 Arnov Sharma
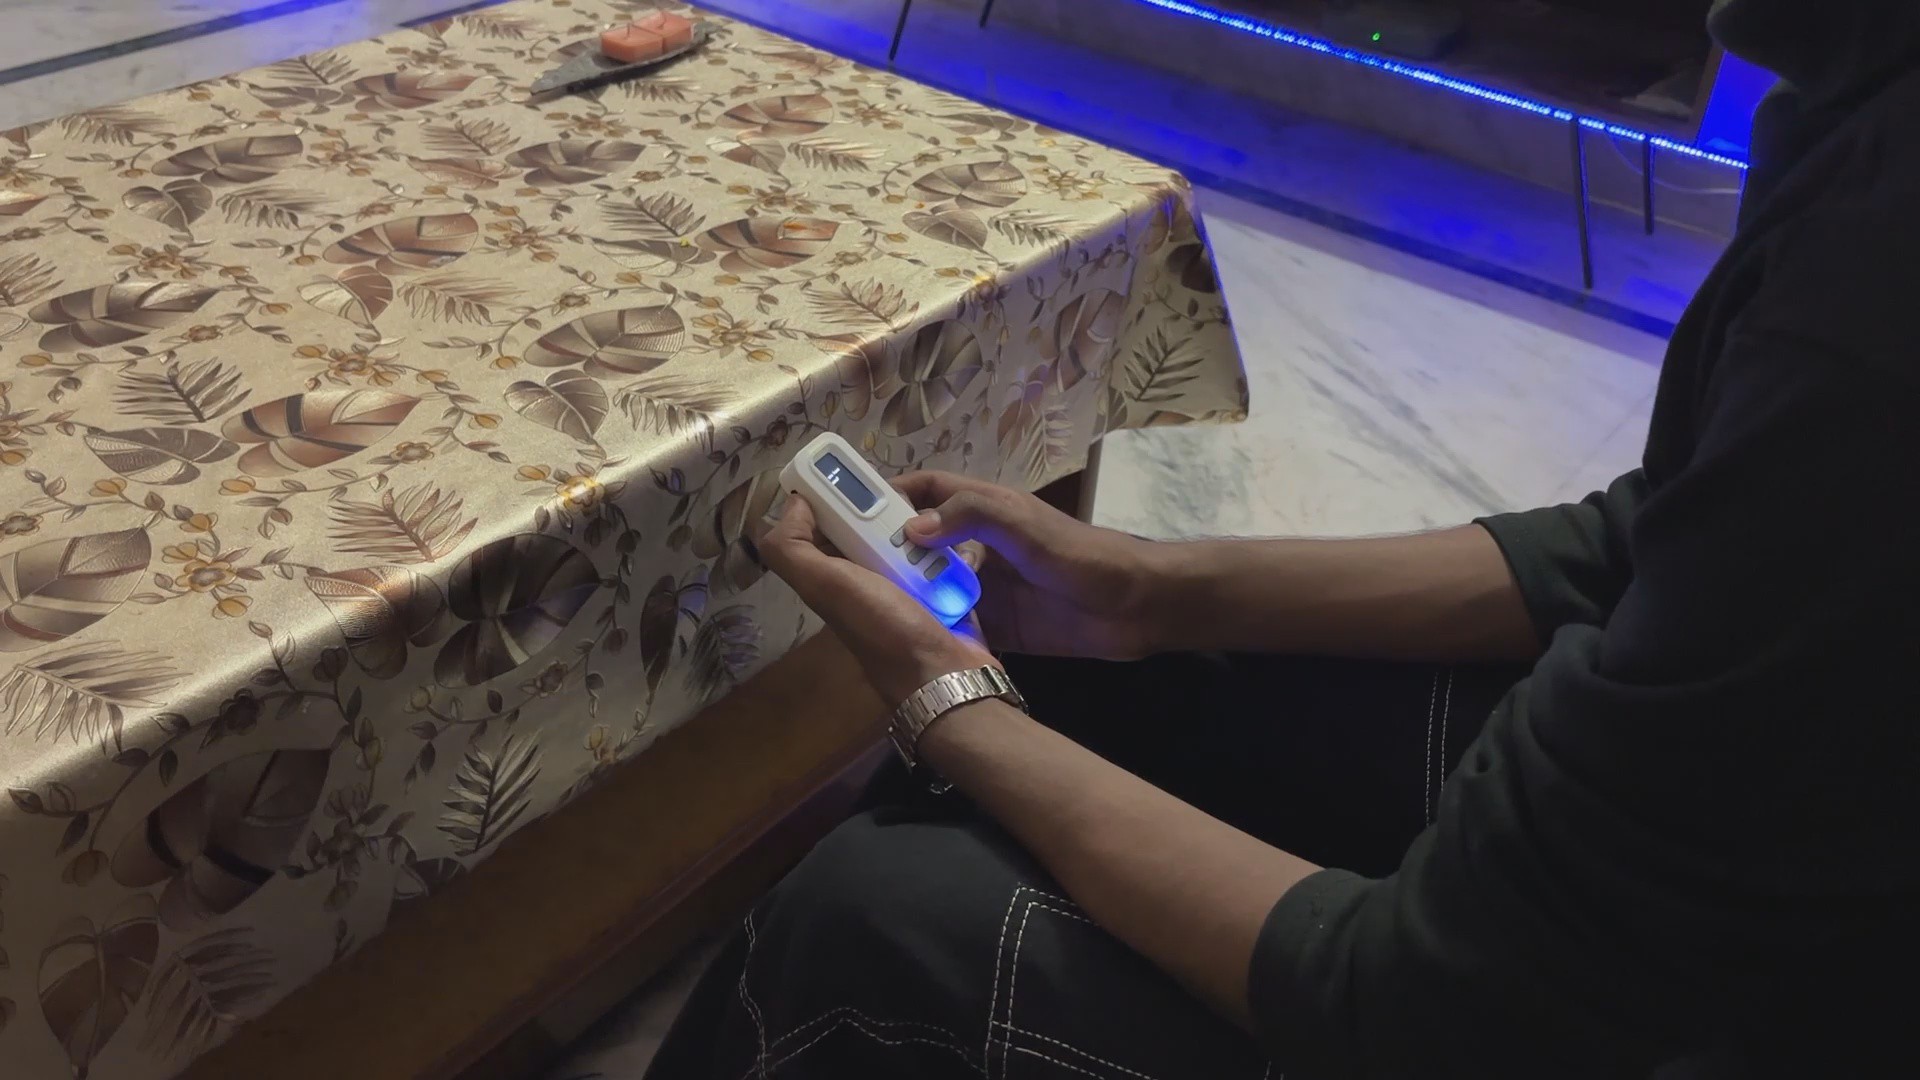
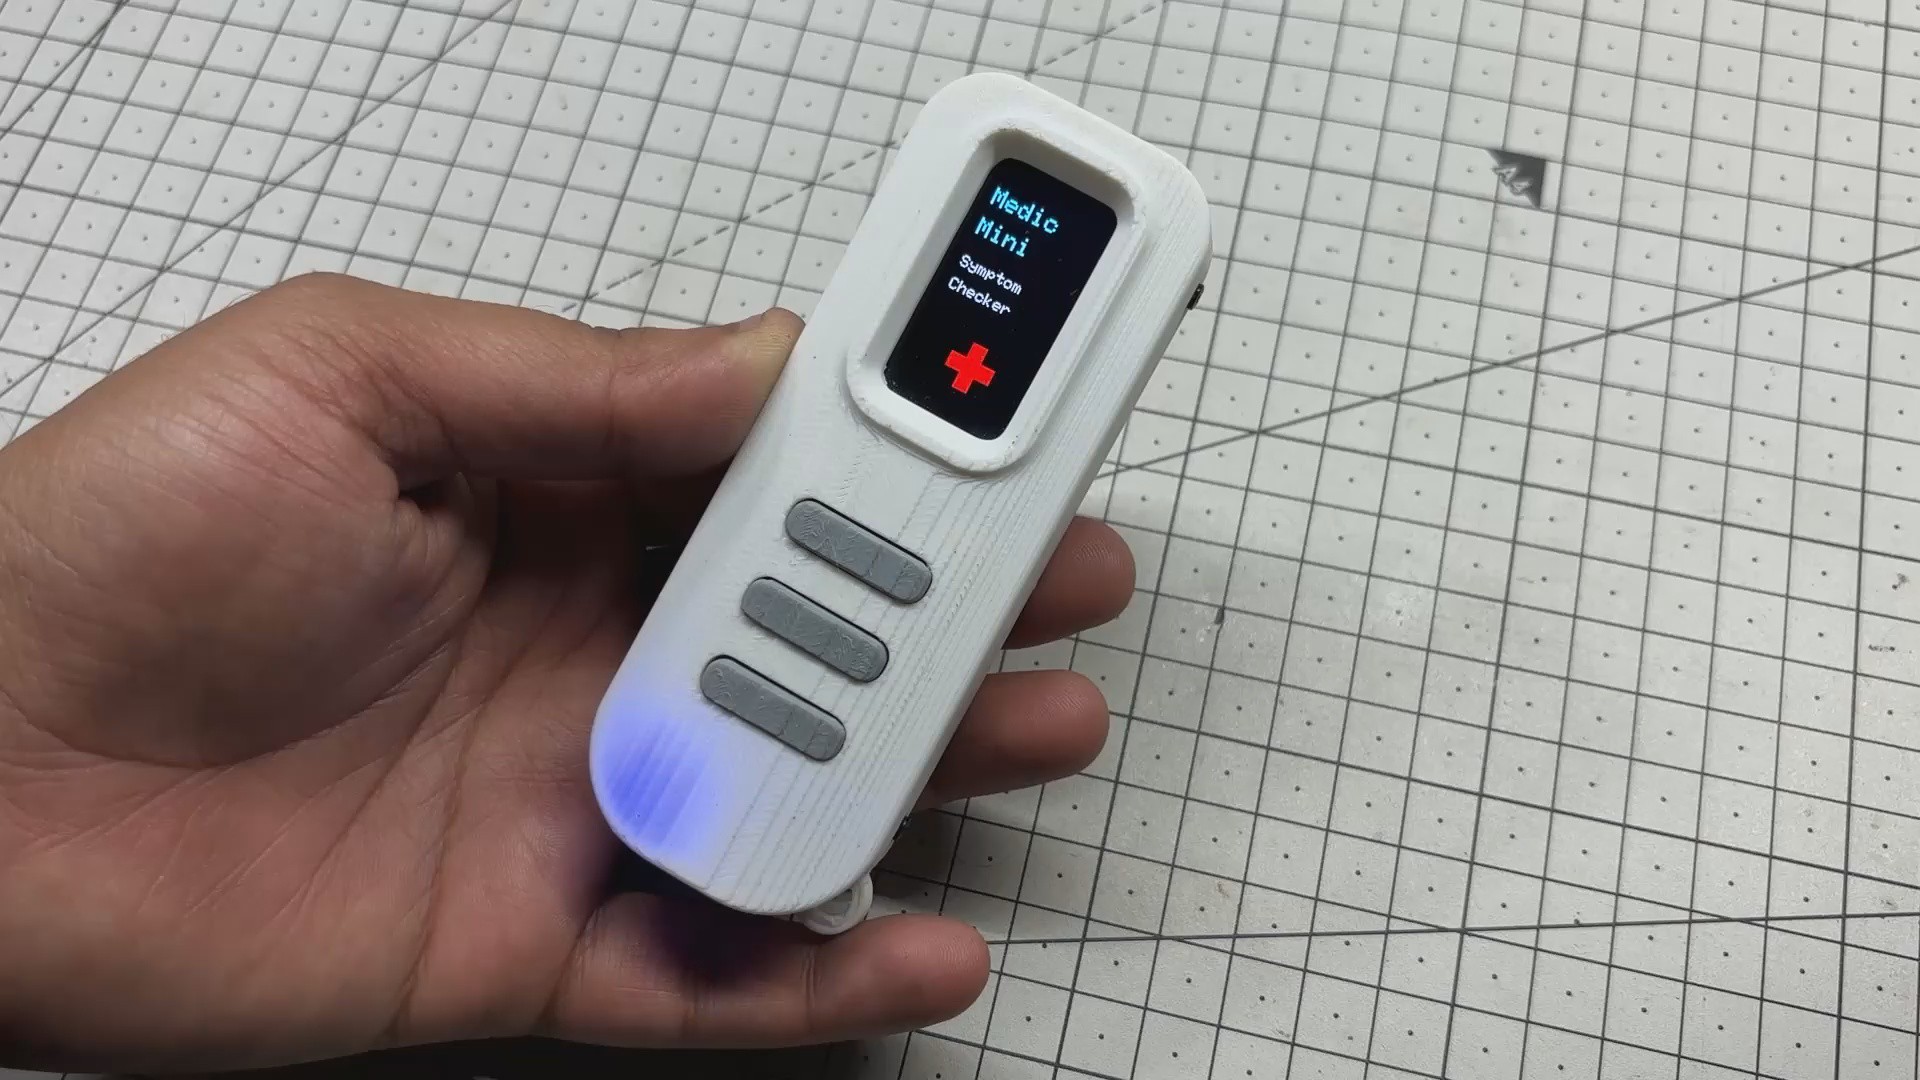
At its core, Medic Mini runs on an ESP32-C6 paired with a 1.47" Waveshare display, housed inside a custom PCB and a 3D-printed enclosure I designed from scratch. The interface is clean and purposeful: users are prompted with one symptom at a time and respond using three tactile buttons—Yes, No, or Not Sure.
I designed Medic Mini to serve as a simple, standalone tool for diagnosing basic medical conditions like fever, viral infections, and fatigue. The current logic is based on common symptoms and straightforward decision rules, but this is just the beginning. I plan to expand its diagnostic database by collecting more symptom data and working with medical professionals to refine the logic.
Based on the pattern of responses, the device offers a basic diagnostic suggestion, making health checks feel as simple as flipping a switch.
This Article covers the whole build process of this project, so let's get started with the build.
Self-Diagnostic Idea

The concept behind Medic Mini was born out of a simple frustration: most health checkers are either too complex, too expensive, or too slow.
I wanted something instant, intuitive, and portable, a device that could walk someone through basic symptoms without needing an app or the internet.
The idea came from observing how people respond to simple yes/no questions when describing how they feel. That’s where the logic started:
• Ask one symptom at a time
• Let the user respond with a button press
• Track the pattern of responses
• Offer a basic result or suggestion
It’s not meant to replace a doctor; it’s meant to give clarity when you’re unsure. Whether it’s for kids, travelers, or just quick reassurance, the goal was to make a health checkup feel like flipping a switch.
The spark really came after watching my own parents. One day, my mom had a headache that seemed minor but by the next day, it turned out to be viral. That made me realize how many symptoms are actually straightforward to track and interpret.
So I thought, why not build a diagnostic device that can guide people through that process?
Right now, the data I’ve collected is limited, but the potential is huge. With input from doctors and medical professionals, we could expand the database, refine the logic, and even integrate sensors to read pulse, temperature, and other vitals.
Medic Mini is just the start; the goal is to make accessible, intelligent health tools that anyone can use.
Basic Setup- ESP32 C6 Devkit Breadboard Edition
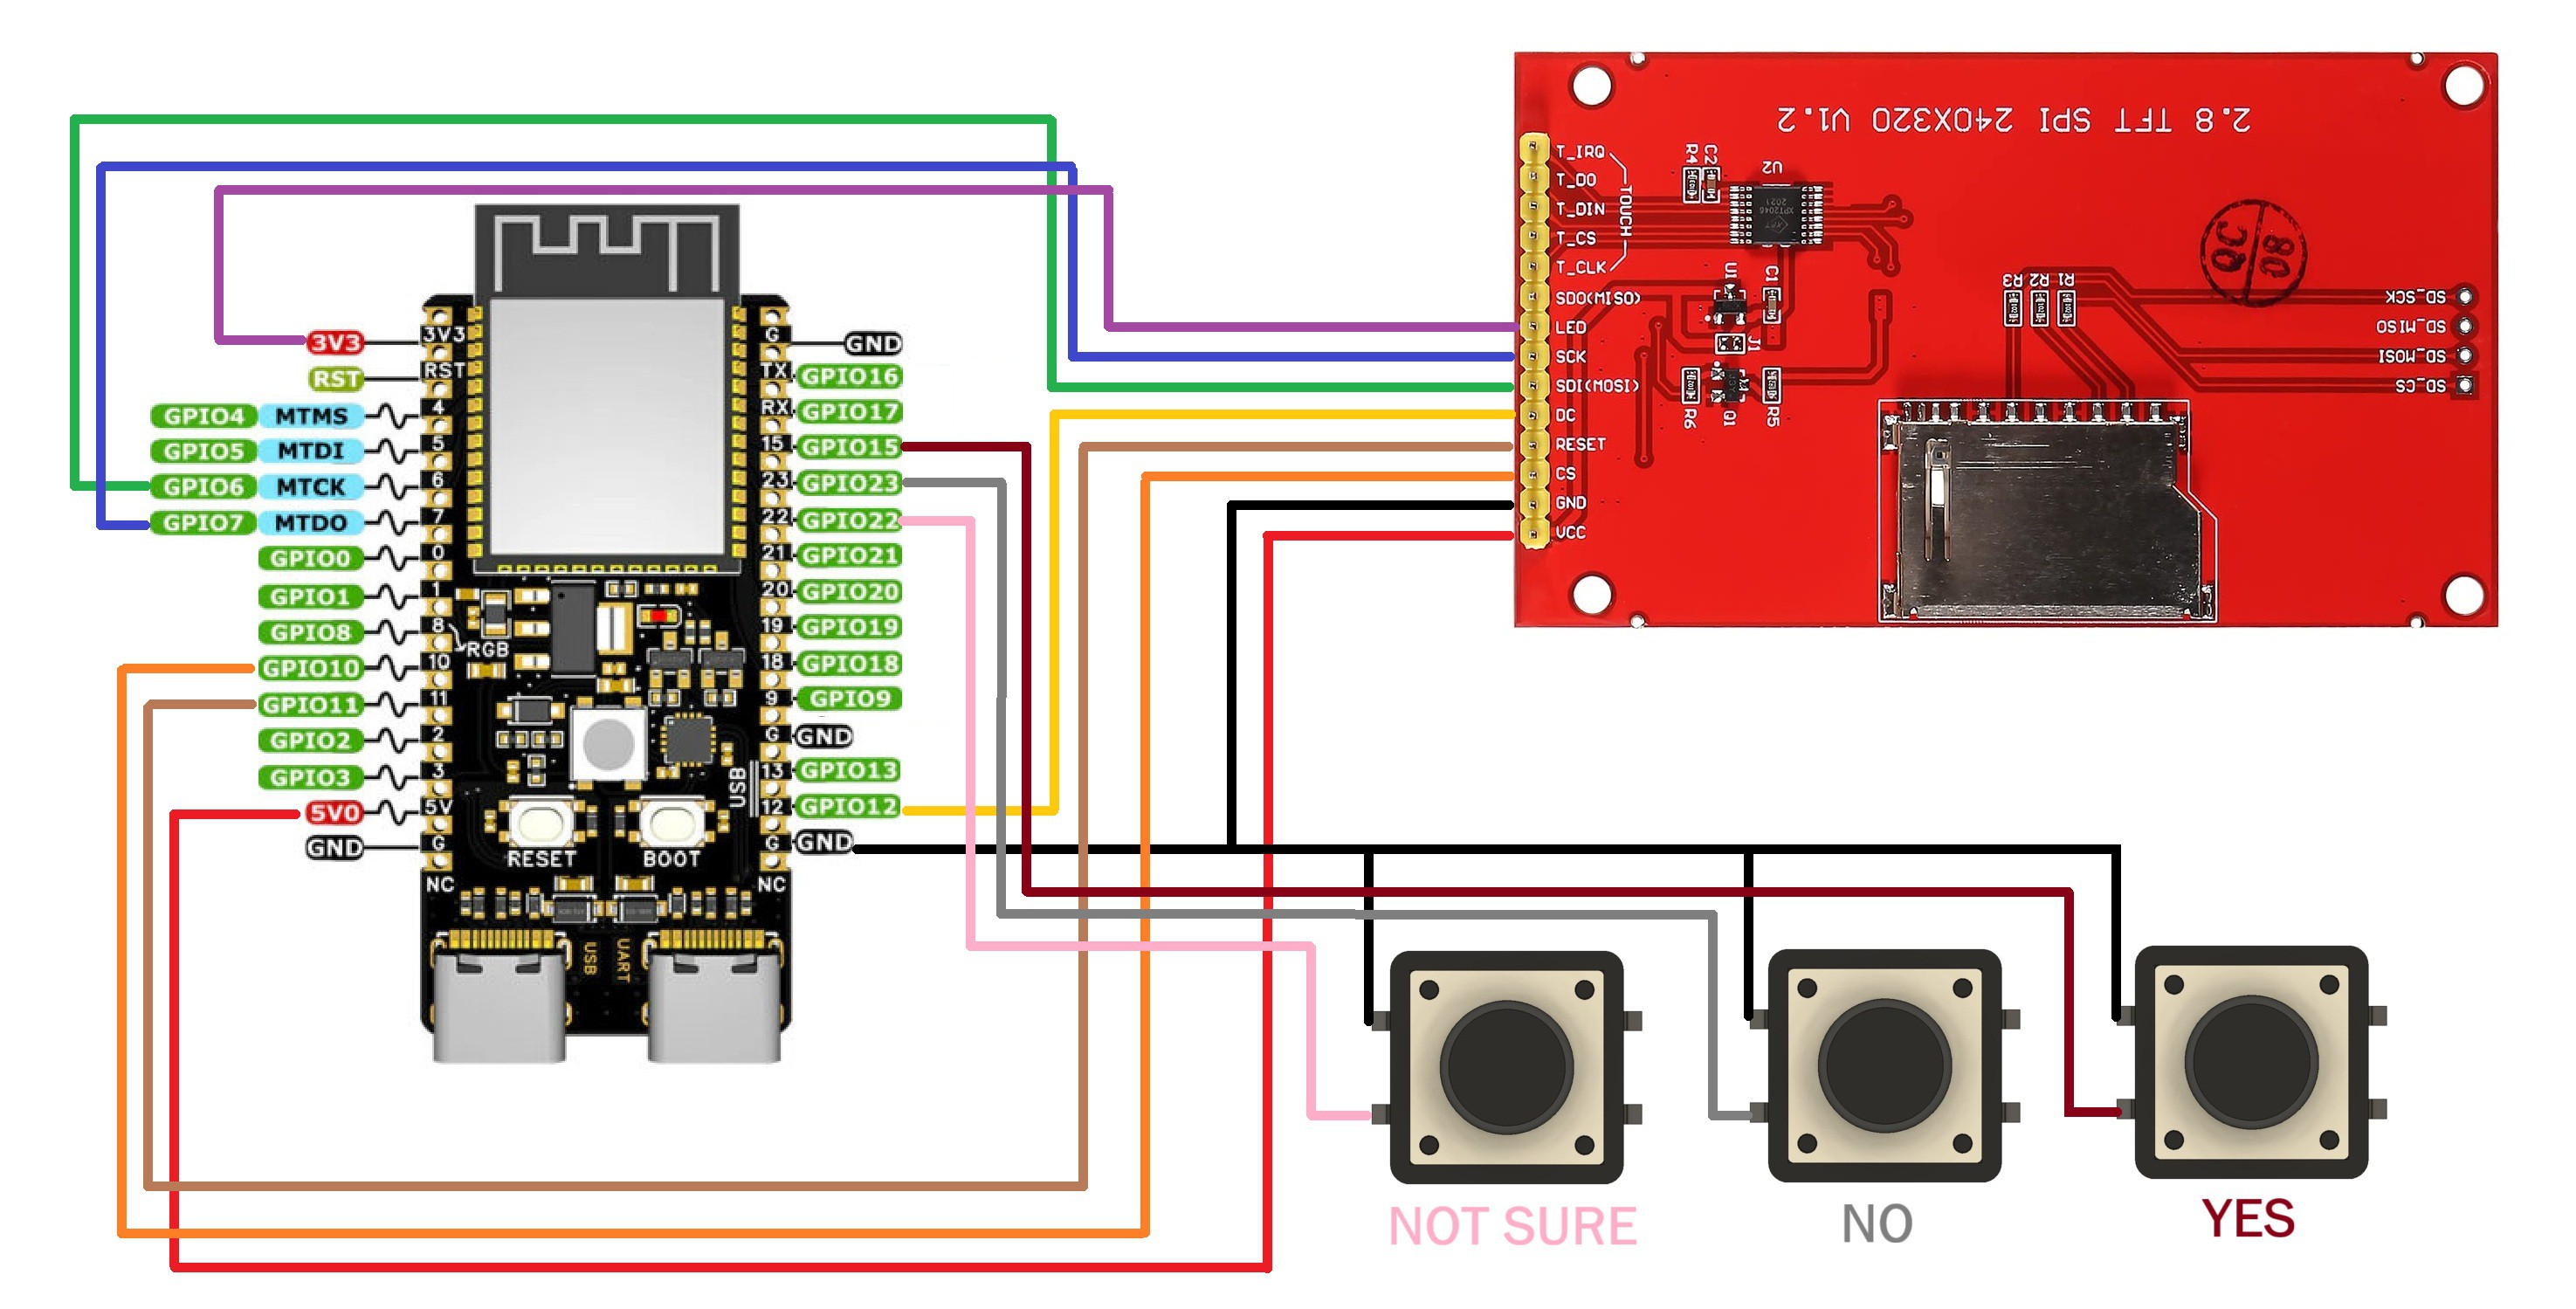
To get started with the electronics, I built a simple breadboard setup using the ESP32-C6 DevKit connected to a 320×240 ILI9341 display.
For user interaction, I added three tactile buttons—Yes, No, and Not Sure—mapped to GPIO pins. This setup served as our base model for testing the core logic and UI flow.
Once everything is working reliably, the plan is to shrink the entire system into a compact, handheld device using a custom PCB and a 3D-printed enclosure.
We started by placing the ESP32-C6 DevKit on a breadboard alongside a 320×240 ILI9341 display and three push buttons for user input.
Using the provided wiring diagram, we connected the display to the ESP32 Devkit in the following order.
- DISPLAY's MOSI to GPIO6
- SCK to GPIO7
- Chip Select to GPIO10
- Reset to GPIO11
- DC to GPIO12
- The LED Pin of Display goes to 3V3 of the DevKit.
- VCC goes to 5V
- GND to GND
This setup gave us a clean, testable base to test the UI and logic before moving on to a custom PCB and enclosure.
CODE for Breadboard Edition
For our Breadboard setup, we use the following code and let's have a quick breakdown of how it works.
#include <Adafruit_GFX.h>
#include <Adafruit_ILI9341.h>
#include <SPI.h>
// Display pins
#define TFT_CS 10
#define TFT_DC 12
#define TFT_RST 11
// Button pins
#define BTN_YES 15
#define BTN_NO 23
#define BTN_UNSURE 22
Adafruit_ILI9341 tft = Adafruit_ILI9341(TFT_CS, TFT_DC, TFT_RST);
// Symptom list
const char* symptoms[] = {
"Headache", "Fever", "Cough", "Fatigue", "Nausea"
};
const int symptomCount = sizeof(symptoms) / sizeof(symptoms[0]);
int responses[symptomCount]; // -1 = not answered, 0 = No, 1 = Yes, 2 = Not Sure
int currentSymptom = -1;
bool symptomDrawn = false;
enum ScreenState {
SCREEN_STARTUP,
SCREEN_SYMPTOM,
SCREEN_RESULT
};
ScreenState currentScreen = SCREEN_STARTUP;
ScreenState lastScreen = SCREEN_STARTUP;
bool lastYes = false;
bool lastNo = false;
bool lastUnsure = false;
unsigned long lastInputTime = 0;
const unsigned long inputLockout = 300;
bool isStablePress(int pin, bool& lastState) {
bool current = digitalRead(pin) == LOW;
bool pressed = current && !lastState;
lastState = current;
return pressed;
}
void drawCenteredText(const char* text, int y, int textSize, uint16_t color) {
tft.setTextSize(textSize);
tft.setTextColor(color);
int16_t x1, y1;
uint16_t w, h;
tft.getTextBounds(text, 0, y, &x1, &y1, &w, &h);
int x = (320 - w) / 2;
tft.setCursor(x, y);
tft.println(text);
}
void drawStartup() {
tft.fillScreen(ILI9341_BLACK);
drawCenteredText("Medic", 40, 3, ILI9341_CYAN);
drawCenteredText("Mini", 80, 3, ILI9341_CYAN);
drawCenteredText("Symptom", 130, 2, ILI9341_WHITE);
drawCenteredText("Checker", 160, 2, ILI9341_WHITE);
// Red medical cross centered at bottom
int crossCenterX = 160;
int crossCenterY = 210;
// Vertical bar
tft.fillRect(crossCenterX - 10, crossCenterY - 30, 20, 60, ILI9341_RED);
// Horizontal bar
tft.fillRect(crossCenterX - 30, crossCenterY - 10, 60, 20, ILI9341_RED);
}
void drawSymptomPrompt(const char* symptom, int response) {
tft.fillScreen(ILI9341_BLACK);
drawCenteredText("Do you have", 80, 2, ILI9341_WHITE);
char buffer[32];
snprintf(buffer, sizeof(buffer), "%s?", symptom);
drawCenteredText(buffer, 110, 2, ILI9341_WHITE);
if (response == 1) {
drawCenteredText("Yes", 180, 3, ILI9341_GREEN);
} else if (response == 0) {
drawCenteredText("No", 180, 3, ILI9341_RED);
} else if (response == 2) {
drawCenteredText("Not Sure", 180, 3, ILI9341_YELLOW);
}
}
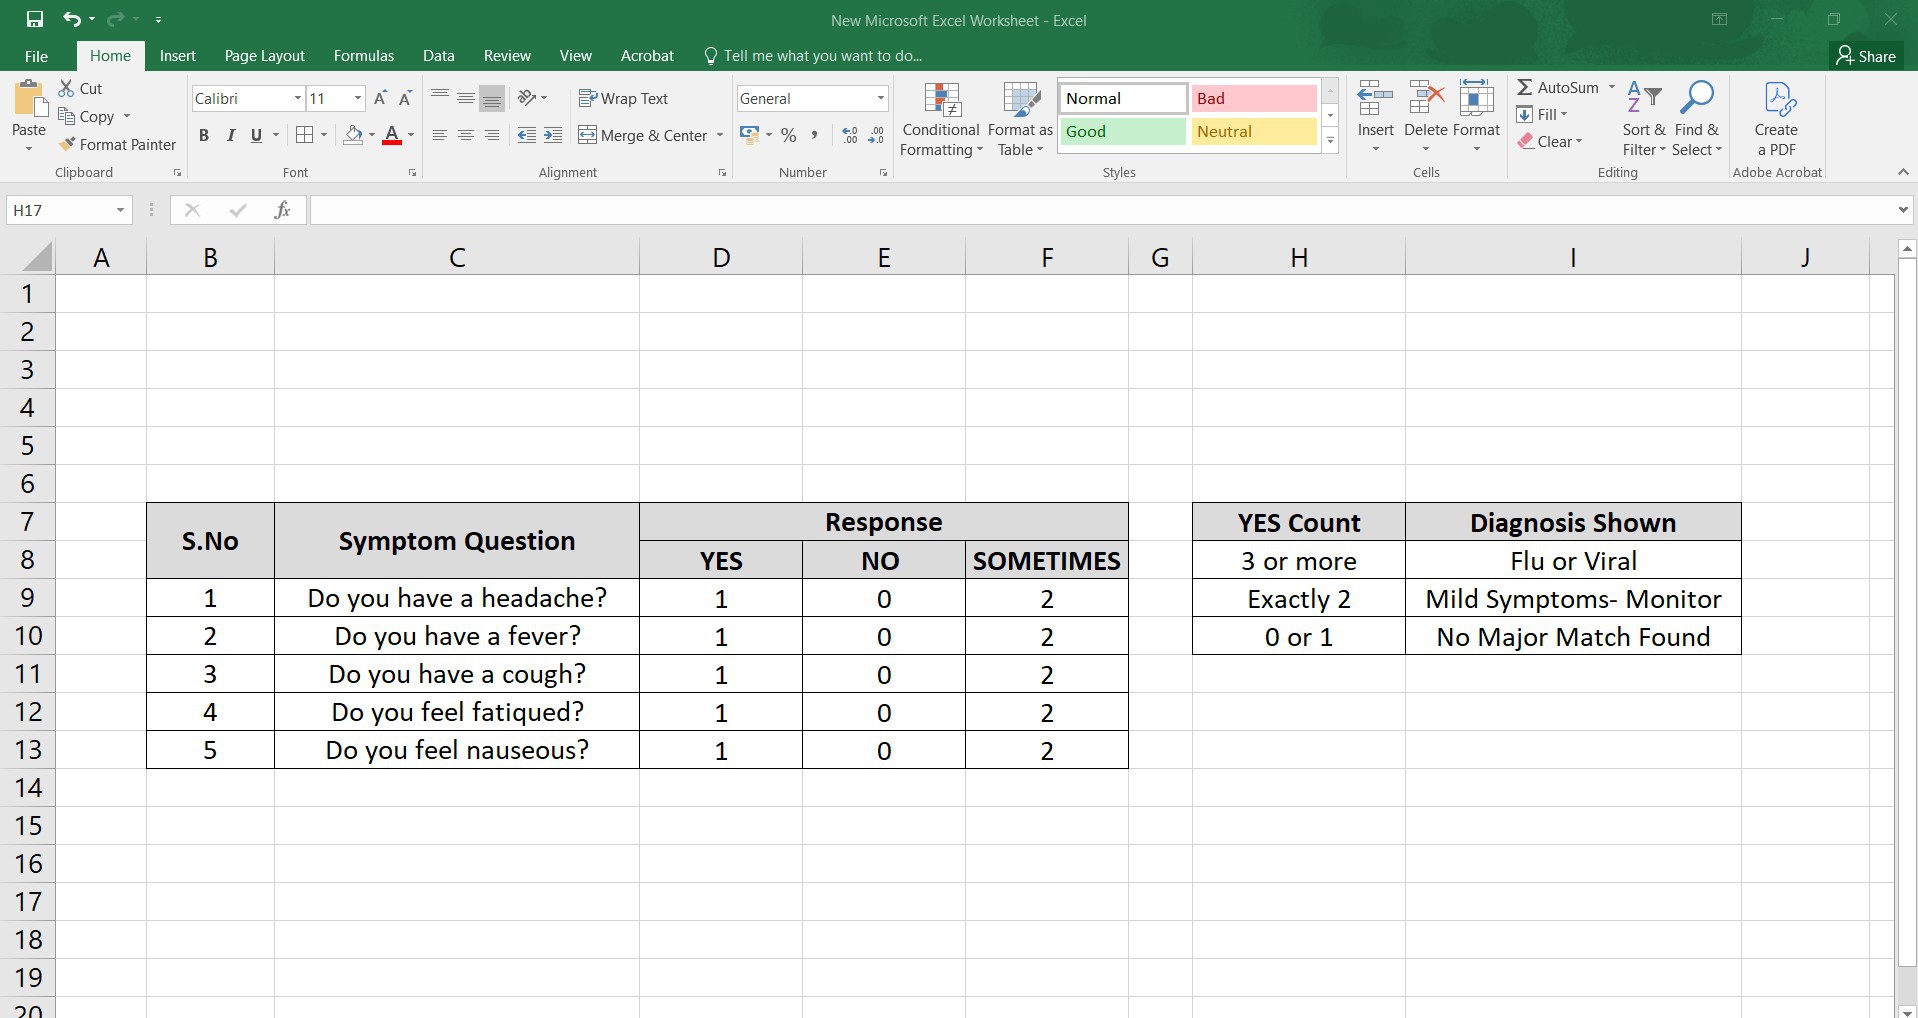
void drawResult() {
tft.fillScreen(ILI9341_BLACK);
drawCenteredText("Processing...", 60, 2, ILI9341_GREEN);
delay(1000);
int yesCount = 0;
for (int i = 0; i < symptomCount; i++) {
if (responses[i] == 1) yesCount++;
}
tft.fillScreen(ILI9341_BLACK);
if (yesCount >= 3) {
drawCenteredText("Possible", 100, 2, ILI9341_WHITE);
drawCenteredText("match:", 170, 2, ILI9341_WHITE);
drawCenteredText("Flu or Viral", 210, 2, ILI9341_YELLOW);
} else if (yesCount == 2) {
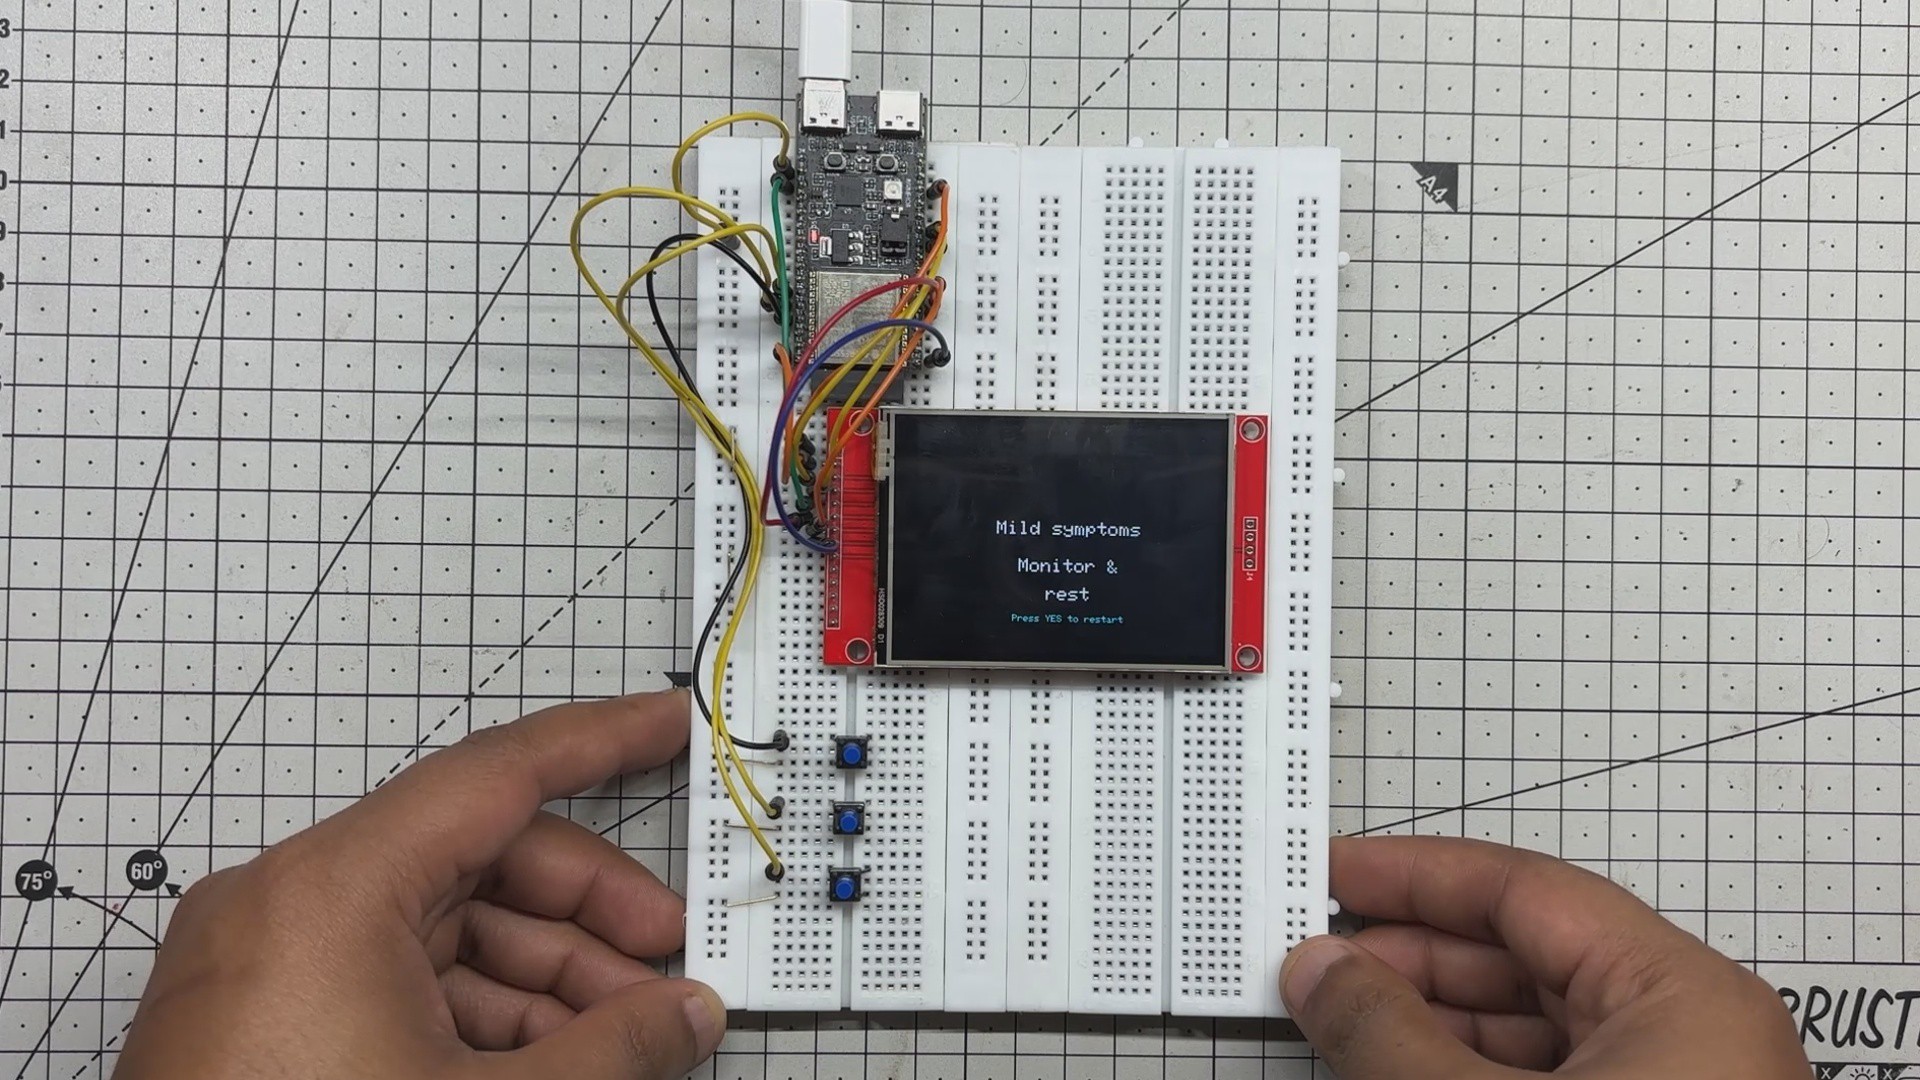
drawCenteredText("Mild symptoms", 100, 2, ILI9341_WHITE);
drawCenteredText("Monitor &", 140, 2, ILI9341_WHITE);
drawCenteredText("rest", 170, 2, ILI9341_WHITE);
} else {
drawCenteredText("No major", 100, 2, ILI9341_WHITE);
drawCenteredText("match found", 140, 2, ILI9341_WHITE);
}
drawCenteredText("Press YES to restart", 200, 1, ILI9341_CYAN);
}
void setup() {
Serial.begin(115200);
SPI.begin(7, -1, 6); // SCK=7, MISO not used, MOSI=6
tft.begin();
tft.setRotation(3); // Landscape
pinMode(BTN_YES, INPUT_PULLUP);
pinMode(BTN_NO, INPUT_PULLUP);
pinMode(BTN_UNSURE, INPUT_PULLUP);
for (int i = 0; i < symptomCount; i++) {
responses[i] = -1;
}
drawStartup();
}
void loop() {
unsigned long now = millis();
if (currentScreen != lastScreen) {
if (currentScreen == SCREEN_STARTUP) {
drawStartup();
} else if (currentScreen == SCREEN_RESULT) {
drawResult();
}
lastScreen = currentScreen;
}
if (currentScreen == SCREEN_SYMPTOM &&
currentSymptom < symptomCount &&
!symptomDrawn) {
drawSymptomPrompt(symptoms[currentSymptom], responses[currentSymptom]);
symptomDrawn = true;
}
if (currentScreen == SCREEN_STARTUP &&
(isStablePress(BTN_YES, lastYes) || isStablePress(BTN_NO, lastNo) || isStablePress(BTN_UNSURE, lastUnsure))) {
currentSymptom = 0;
currentScreen = SCREEN_SYMPTOM;
symptomDrawn = false;
delay(300);
}
if (currentScreen == SCREEN_SYMPTOM && currentSymptom < symptomCount) {
if (now - lastInputTime > inputLockout) {
if (isStablePress(BTN_YES, lastYes)) {
responses[currentSymptom] = 1;
drawSymptomPrompt(symptoms[currentSymptom], 1);
delay(500);
currentSymptom++;
symptomDrawn = false;
lastInputTime = now;
} else if (isStablePress(BTN_NO, lastNo)) {
responses[currentSymptom] = 0;
drawSymptomPrompt(symptoms[currentSymptom], 0);
delay(500);
currentSymptom++;
symptomDrawn = false;
lastInputTime = now;
} else if (isStablePress(BTN_UNSURE, lastUnsure)) {
responses[currentSymptom] = 2;
drawSymptomPrompt(symptoms[currentSymptom], 2);
delay(500);
currentSymptom++;
symptomDrawn = false;
lastInputTime = now;
}
if (currentSymptom >= symptomCount) {
currentScreen = SCREEN_RESULT;
}
}
}
if (currentScreen == SCREEN_RESULT && isStablePress(BTN_YES, lastYes)) {
for (int i = 0; i < symptomCount; i++) {
responses[i] = -1;
}
currentSymptom = 0;
currentScreen = SCREEN_SYMPTOM;
symptomDrawn = false;
delay(300);
}
}
We use the Adafruit ILI9341 library to control our 320×240 TFT display. The SPI pin and input button configuration are defined as follows.
#include <Adafruit_GFX.h>#include <Adafruit_ILI9341.h>#include <SPI.h>#define TFT_CS 10#define TFT_DC 12#define TFT_RST 11#define BTN_YES 15#define BTN_NO 23#define BTN_UNSURE 22
This Section contains Symptom Data, here we added a fixed list of symptoms. response[] stores the user's input and currentSymptom tracks which symptom is currently being asked.
const char* symptoms[] = { "Headache", "Fever", "Cough", "Fatigue", "Nausea" };int responses[symptomCount]; // -1 = not answered, 0 = No, 1 = Yes, 2 = Not Sureint currentSymptom = -1;
We used an enum to control which screen is active, our setup works in three parts basically: STARTUP, which is the welcome screen; SYMPTOM, which prompts the symptom loop; and RESULT that displays the final diagnosis.
enum ScreenState { SCREEN_STARTUP, SCREEN_SYMPTOM, SCREEN_RESULT };ScreenState currentScreen = SCREEN_STARTUP;ScreenState lastScreen = SCREEN_STARTUP;
This function detects button presses and avoids false triggers from bouncing or holding. Also, this tracks the previous state of each button for debounce logic.
bool isStablePress(int pin, bool& lastState)bool lastYes = false;bool lastNo = false;bool lastUnsure = false;
Here's what happens in the Symptom loop: Medic Mini displays a question like “Do you have a headache?”
We press one of the three responses: YES, NO or NOT SURE.
After a short delay, it moves to the next symptom. Once all are answered, the sketch counts how many “YES” responses and shows a basic result.
HANDHELD DEVICE DESIGN
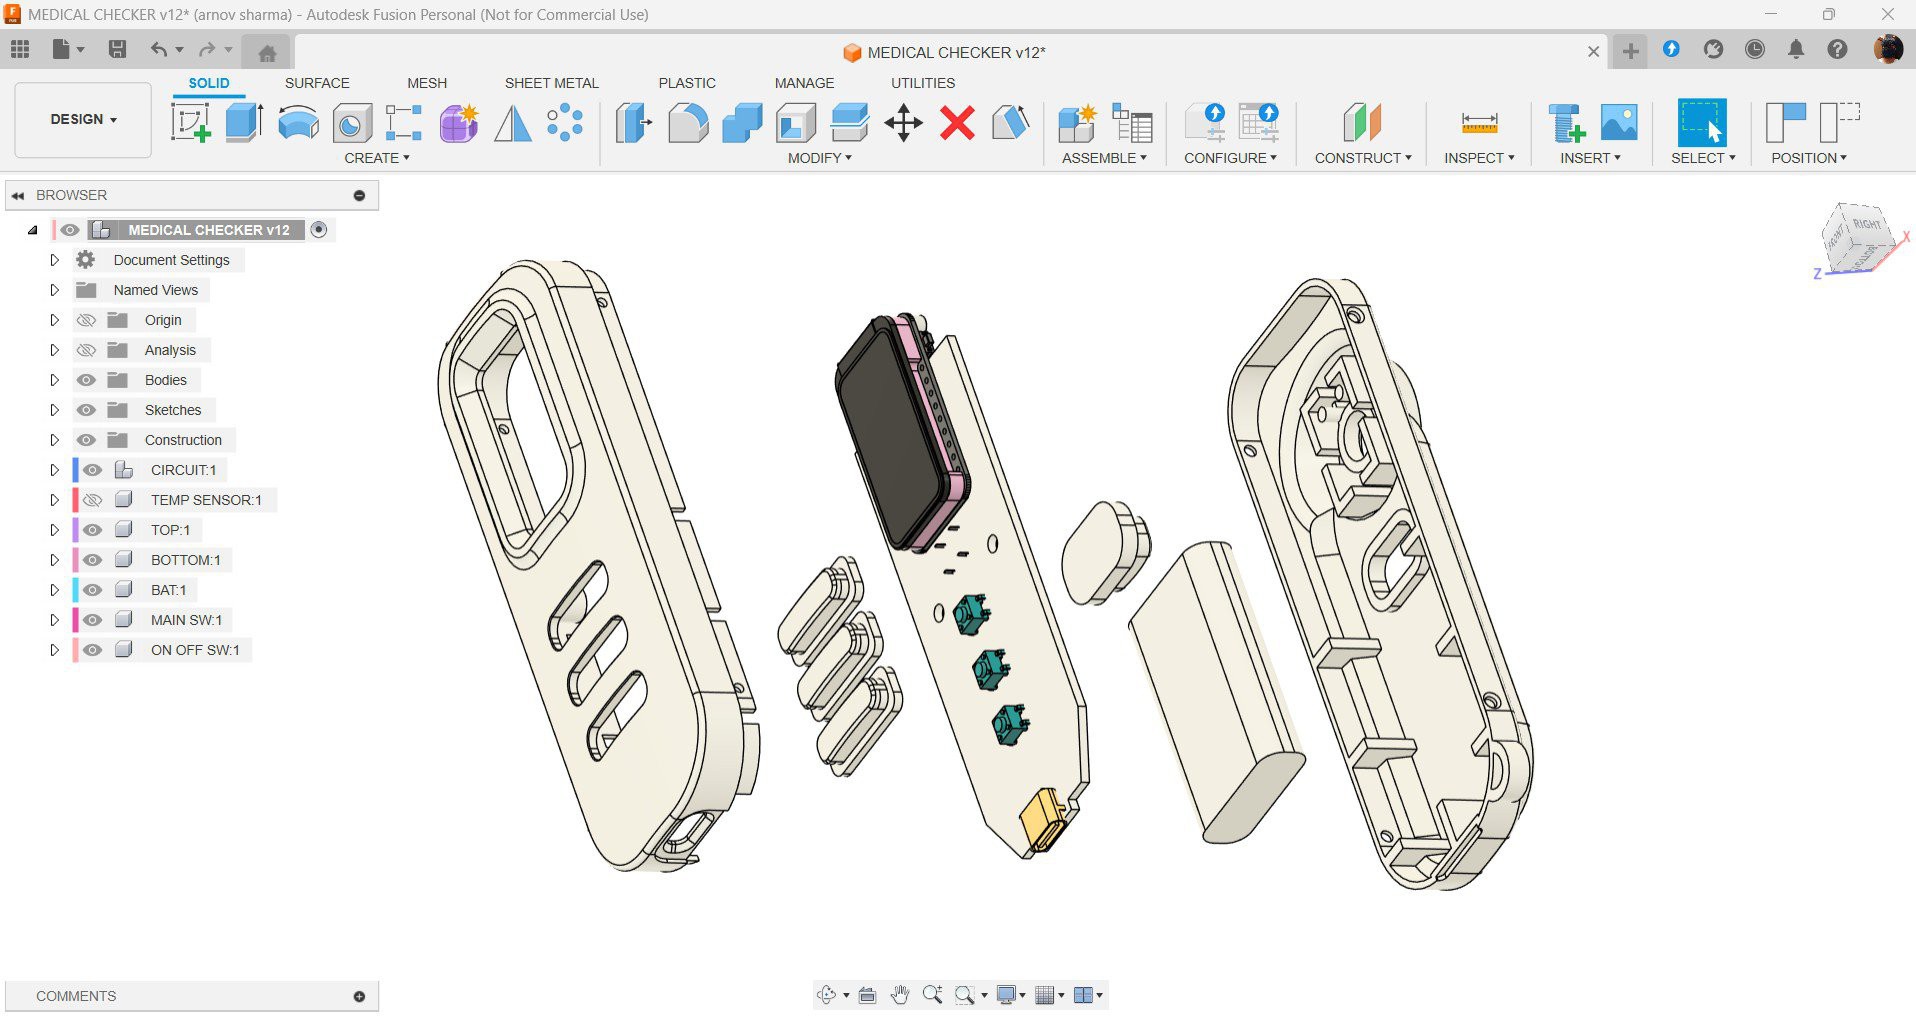
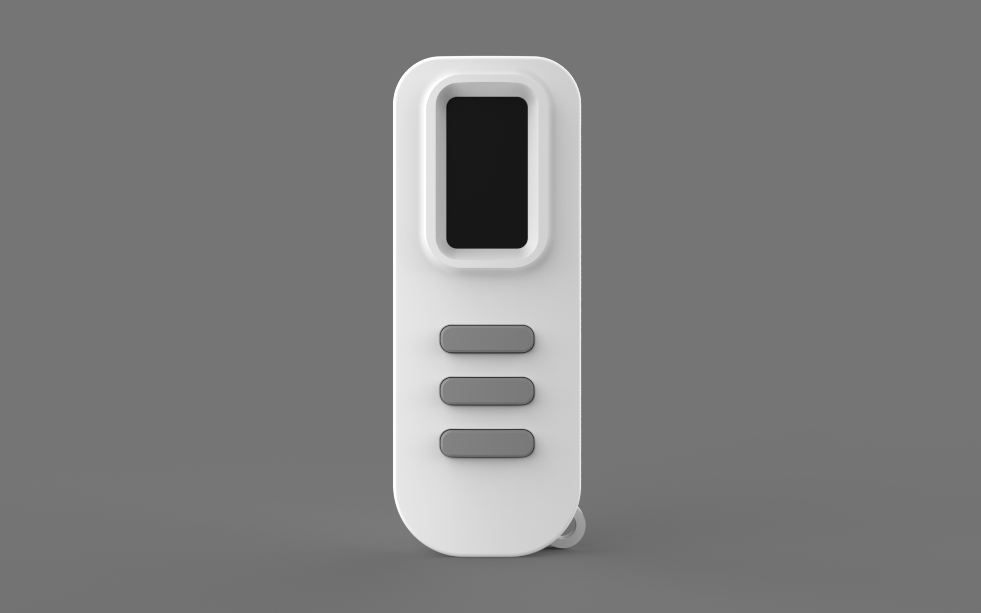
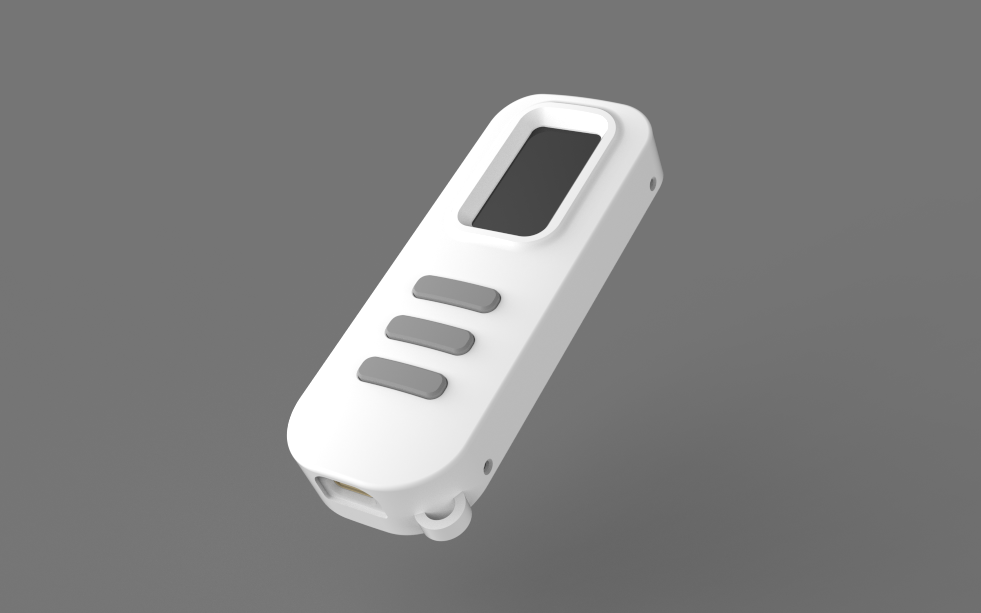
For the design, the goal was to create a handheld device and naturally, the first thing that came to mind was a TV remote.
So I went with a similar form factor: long, slim, and with buttons positioned near the thumb for easy access.
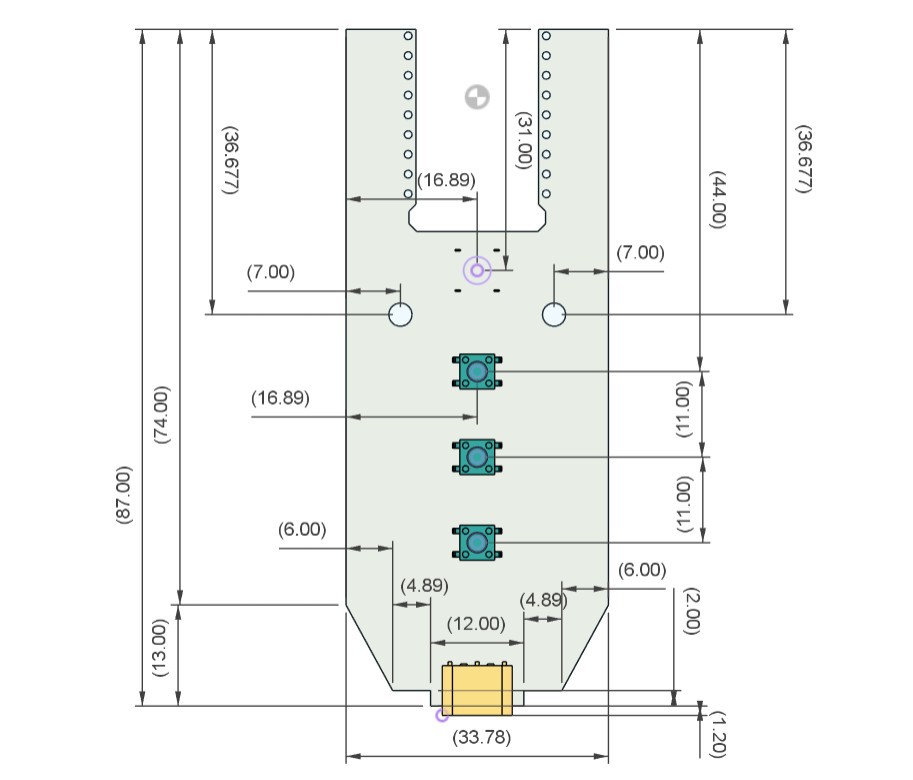
To begin, I imported the ESP32-C6 board model into Fusion 360, along with models for the Type-C port and push buttons. Using these references, I laid out a long PCB: the display sits at the top, the buttons are centered, and the USB Type-C port is placed at the bottom.
The enclosure was designed around this PCB layout. I added three button actuators that align directly above the push buttons; pressing the actuator triggers the switch underneath. The enclosure consists of two interlocking halves, secured together with screws.
We printed both halves using white PLA, while the button actuators were printed in grey PLA to give a clean contrast and tactile feel.
ESP32-C6-LCD-1.47
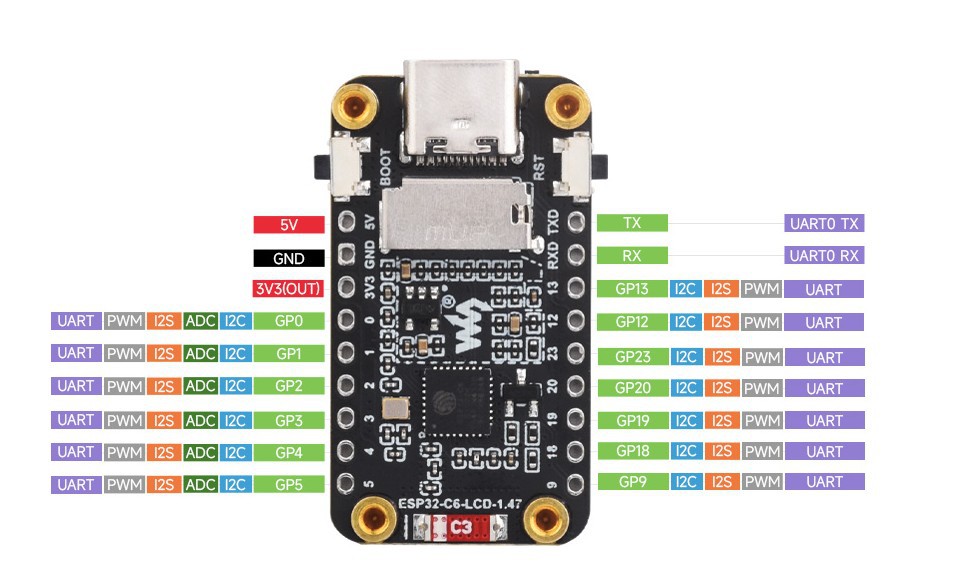
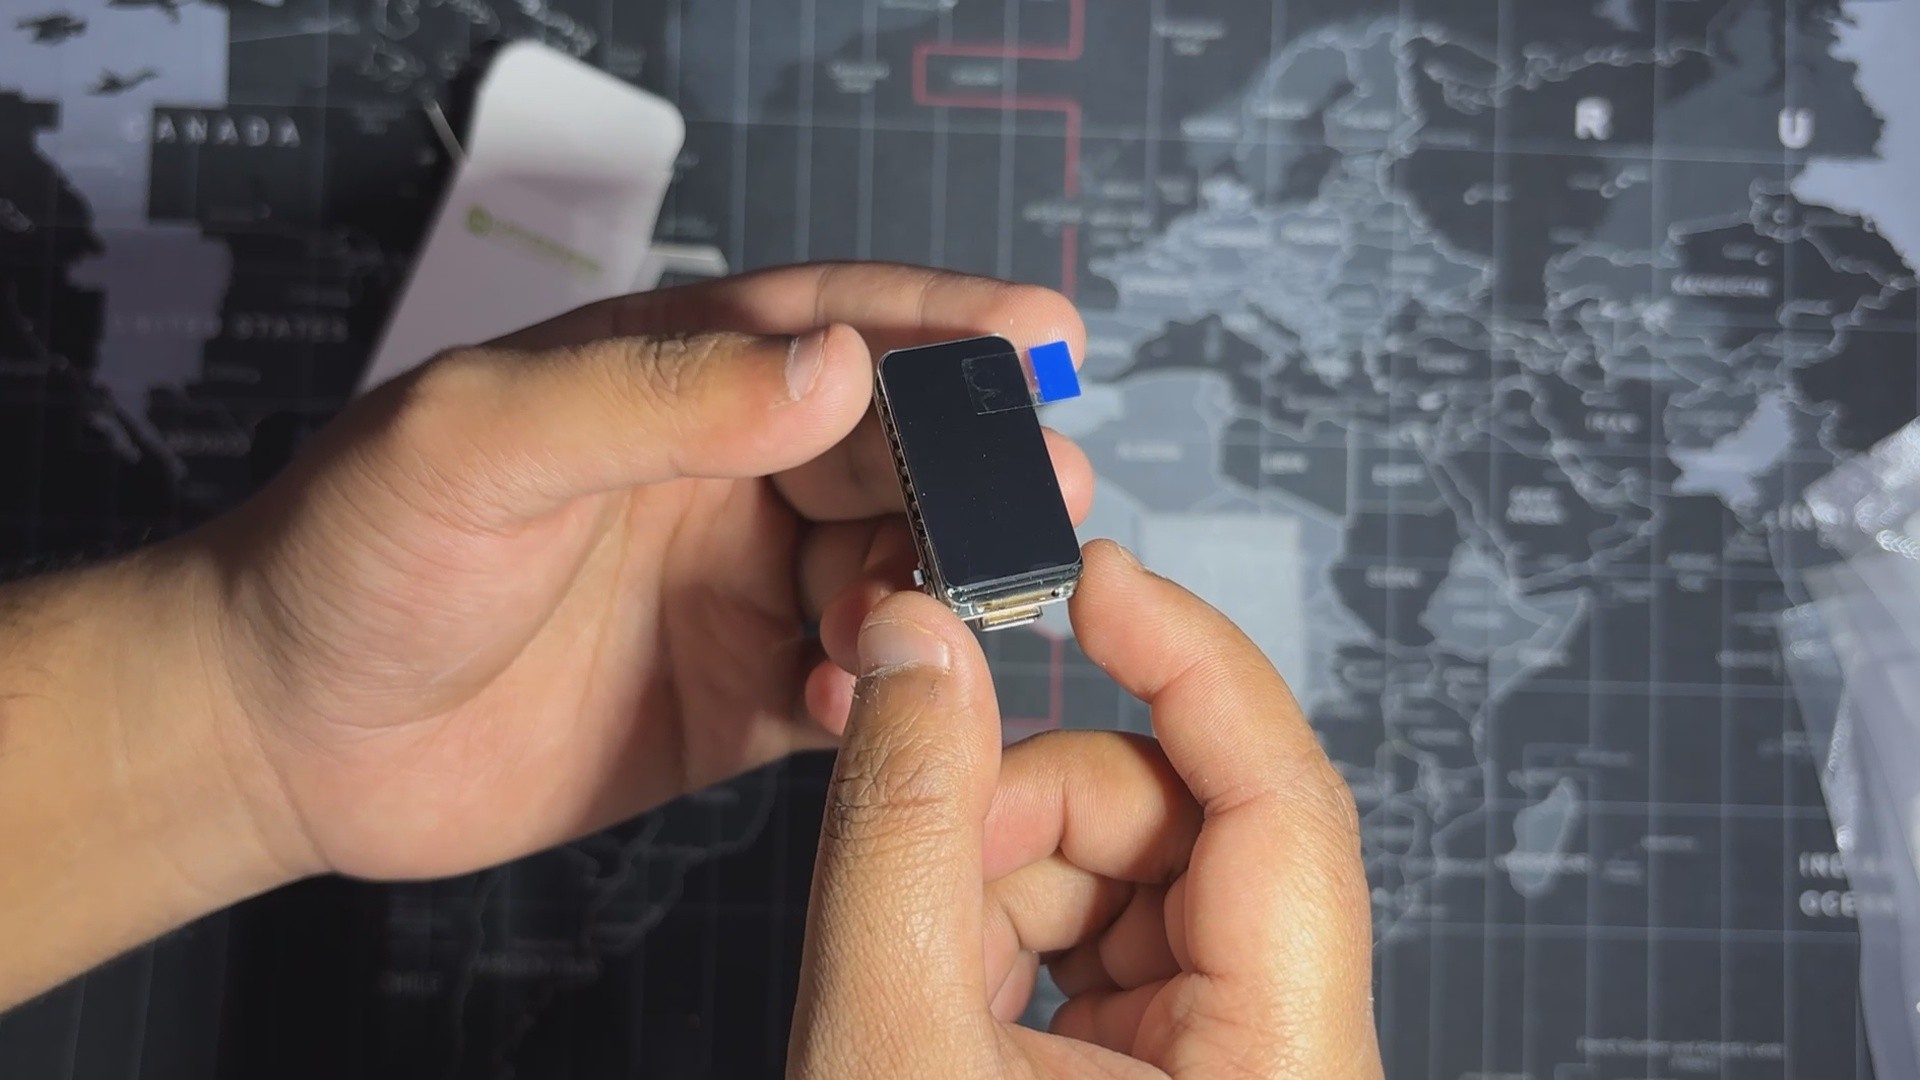
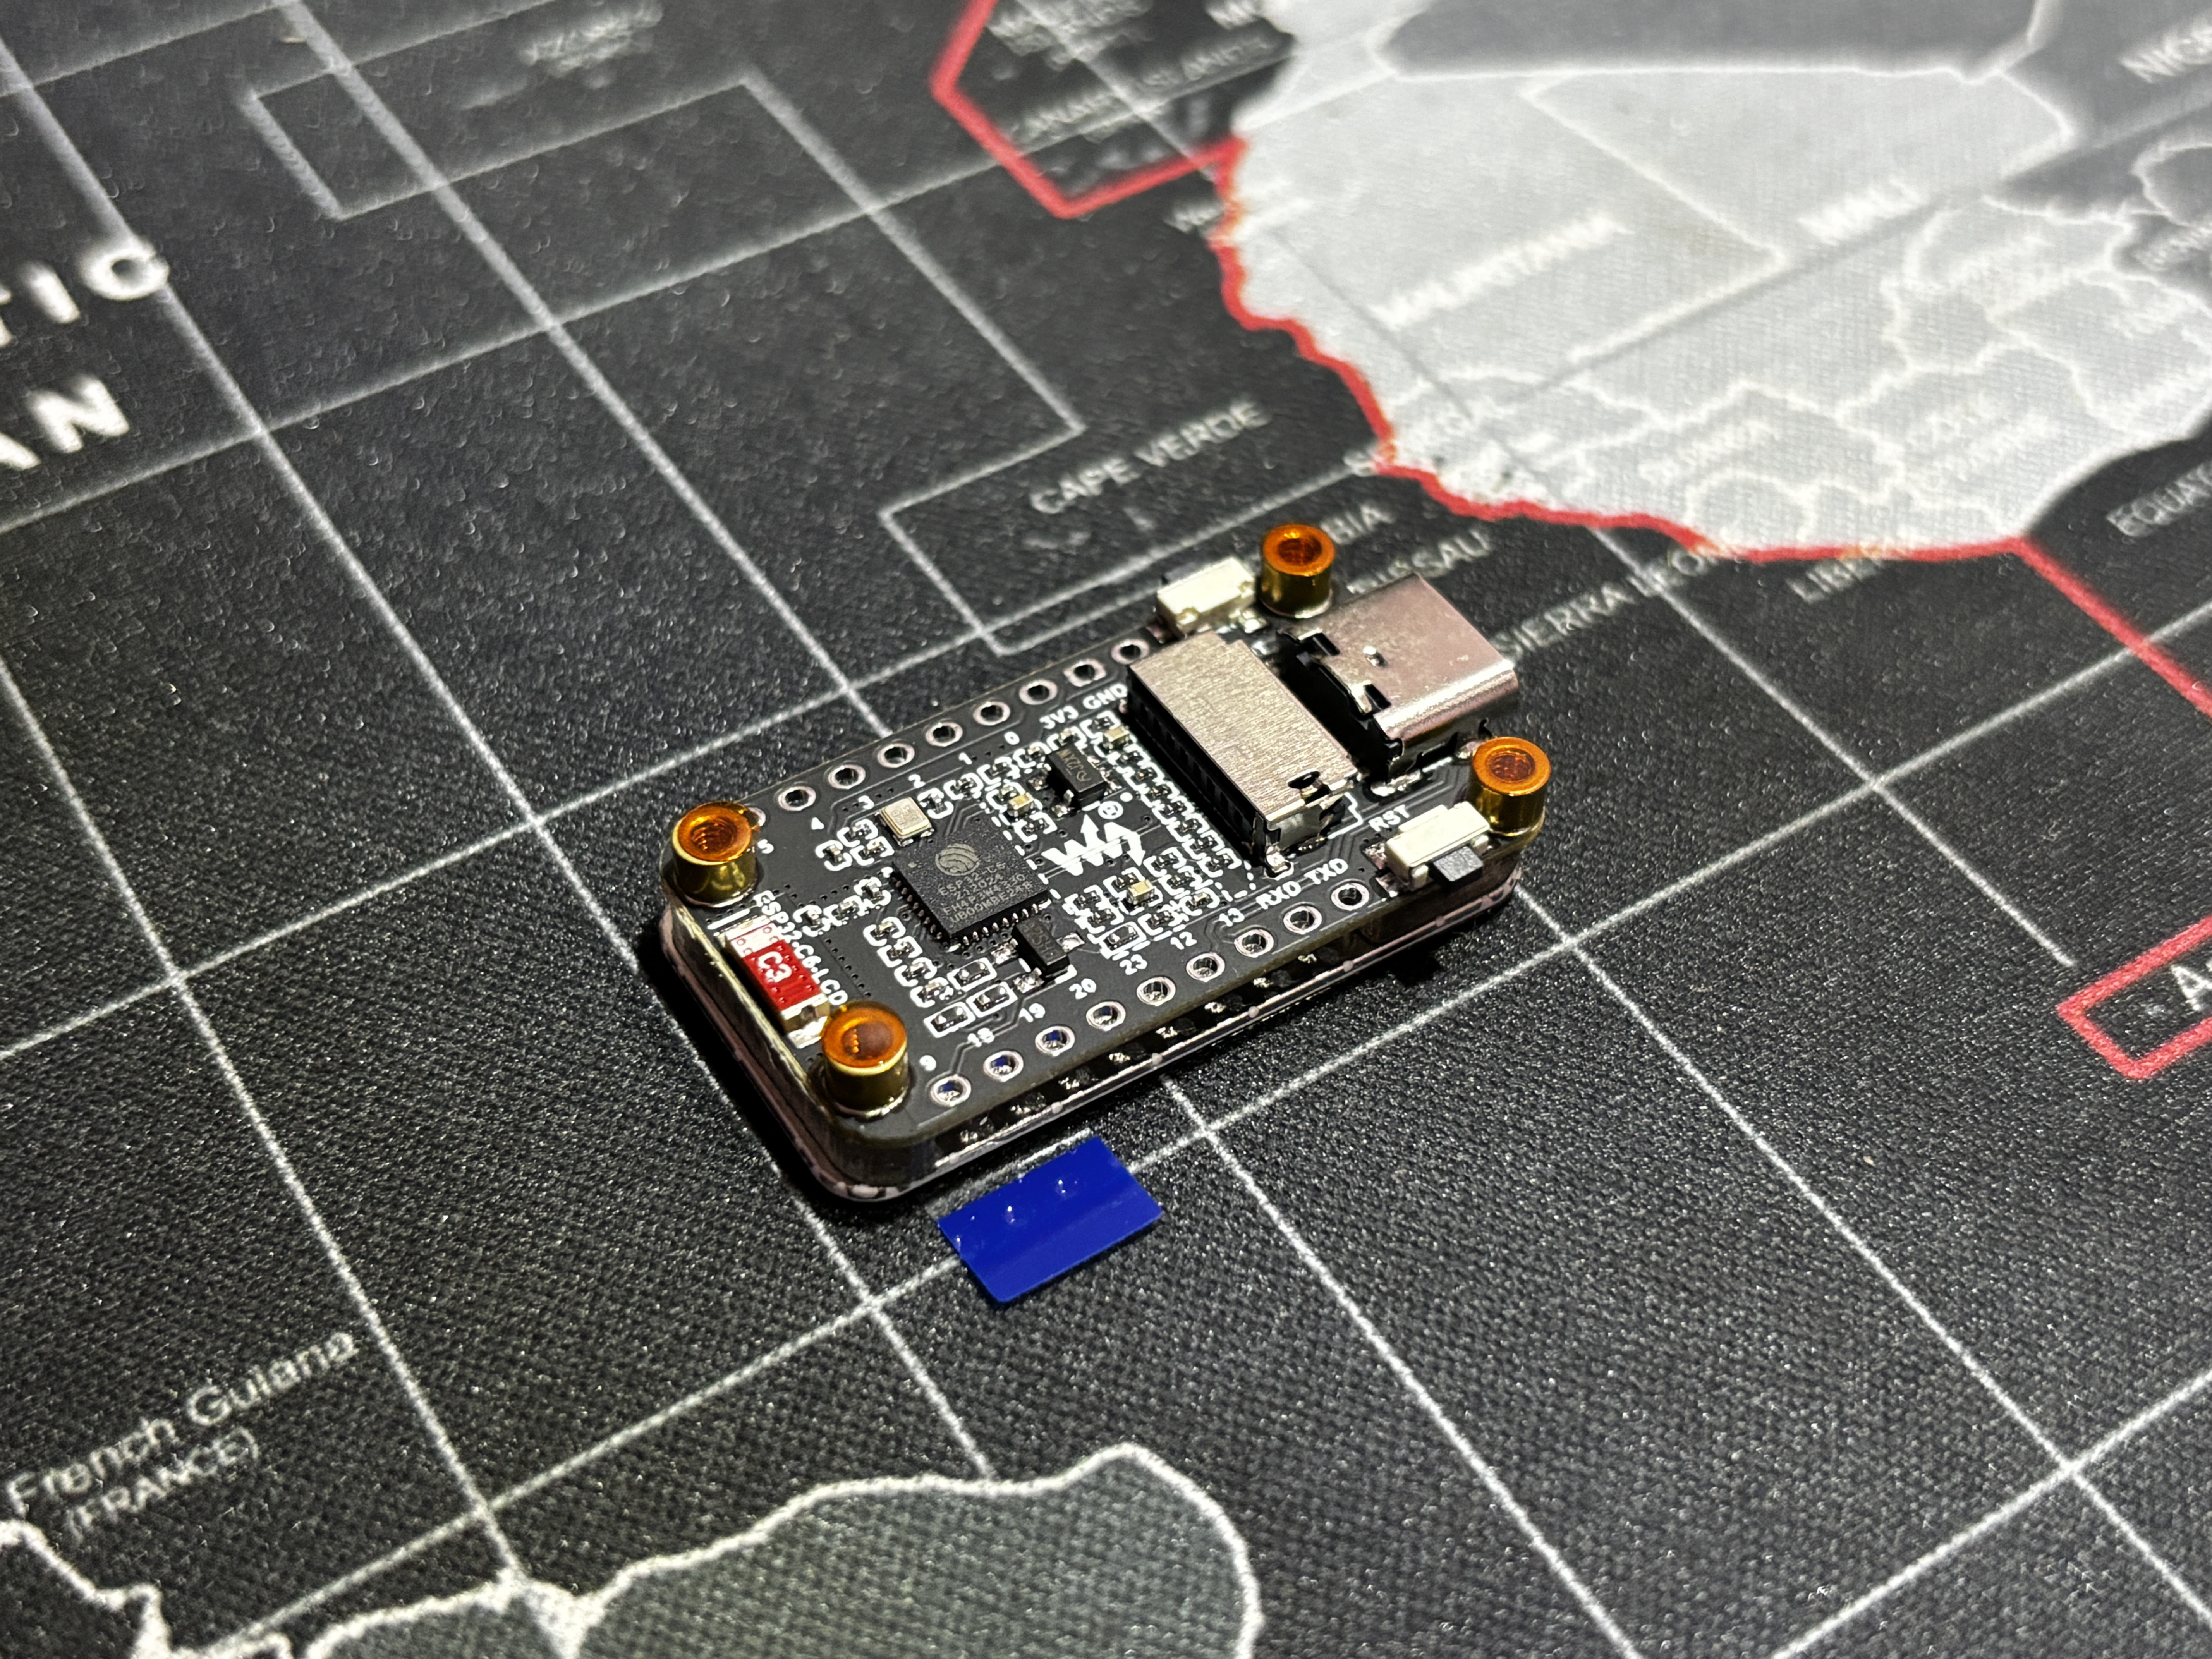
For the handheld version of Medic Mini, I switched to a more integrated solution: the ESP32-C6 LCD 1.47" Display Board by Waveshare.
The name might be long, but the board itself is surprisingly compact and it packs a lot of power into a small footprint.
The board features an ESP32-C6 microcontroller with a 32-bit RISC-V core running at up to 160 MHz, along with Wi-Fi 6 (802.11 b/g/n) and Bluetooth 5 (LE) support. It includes 4MB of Flash, 512KB of SRAM, and 320KB of ROM, and comes equipped with a 1.47" ST7789 LCD display offering a 172×320 resolution and 262K colors. For interaction and expansion, it also provides an onboard RGB LED for visual feedback, a TF card slot, and a GPIO header for connecting additional peripherals.
The built-in ST7789 display is SPI-based and works great with libraries like Adafruit GFX or LVGL. It’s crisp, colorful, and perfect for rendering the Medic Mini UI in a tight space.
This board let me ditch the breadboard and external display entirely; everything is now packed into a single, compact unit that fits inside a custom 3D-printed enclosure.
You can check out more about this display from its wiki page.
https://www.waveshare.com/wiki/ESP32-C6-LCD-1.47
Also, for sourcing this display, we got it from PCBWAY's Giftshop.
PCB DESIGN

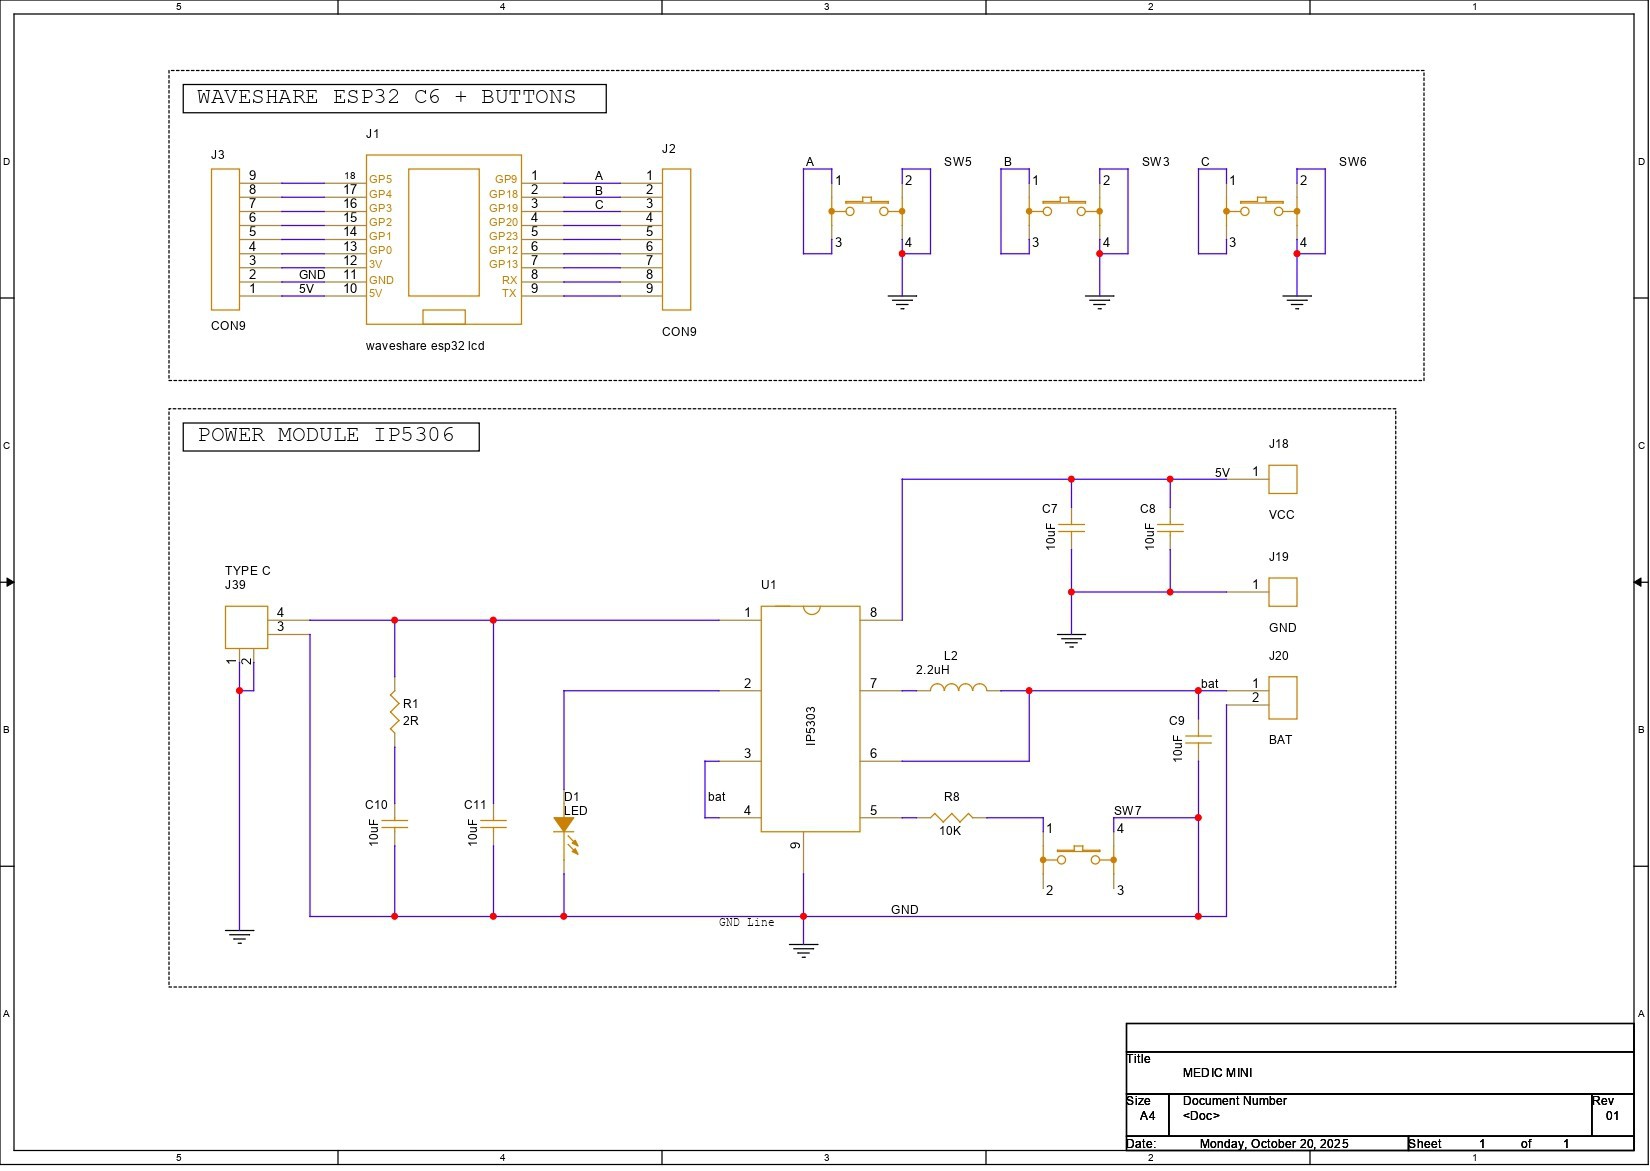

The PCB design for Medic Mini is split into two main sections. First, we built the schematic around the Waveshare ESP32-C6 Dev Board, which connects to three tactile buttons for user input. These buttons are wired to GPIO9, GPIO18, and GPIO19, with each switch also tied to GND. When a button is pressed, the corresponding GPIO pin is pulled low, registering a valid input.
The second section handles power delivery. We use the IP5306 power management IC, which boosts the 3.7V from a lithium-ion cell to a stable 5V at 2A, enough to reliably power the ESP32 board and display. The module also includes a charging status LED; it blinks while charging and stays solid once the battery is full. Built-in features like overcharge protection, low battery cutoff, and full charge cutoff help extend battery life and prevent damage from unsafe voltage levels.
Using the dimensions from the CAD model, we prepared the PCB outline and then placed the buttons in their mounting positions as specified in the design. We did the same for the Waveshare ESP32 board, the Type-C port, and the mounting holes. The rest of the components were placed wherever we found adequate space, and then we connected the tracks and finalized the board.
After completing the PCB design, we exported the Gerber data and shared it with a PCB manufacturer to get samples made.
PCBWAY SERVICE
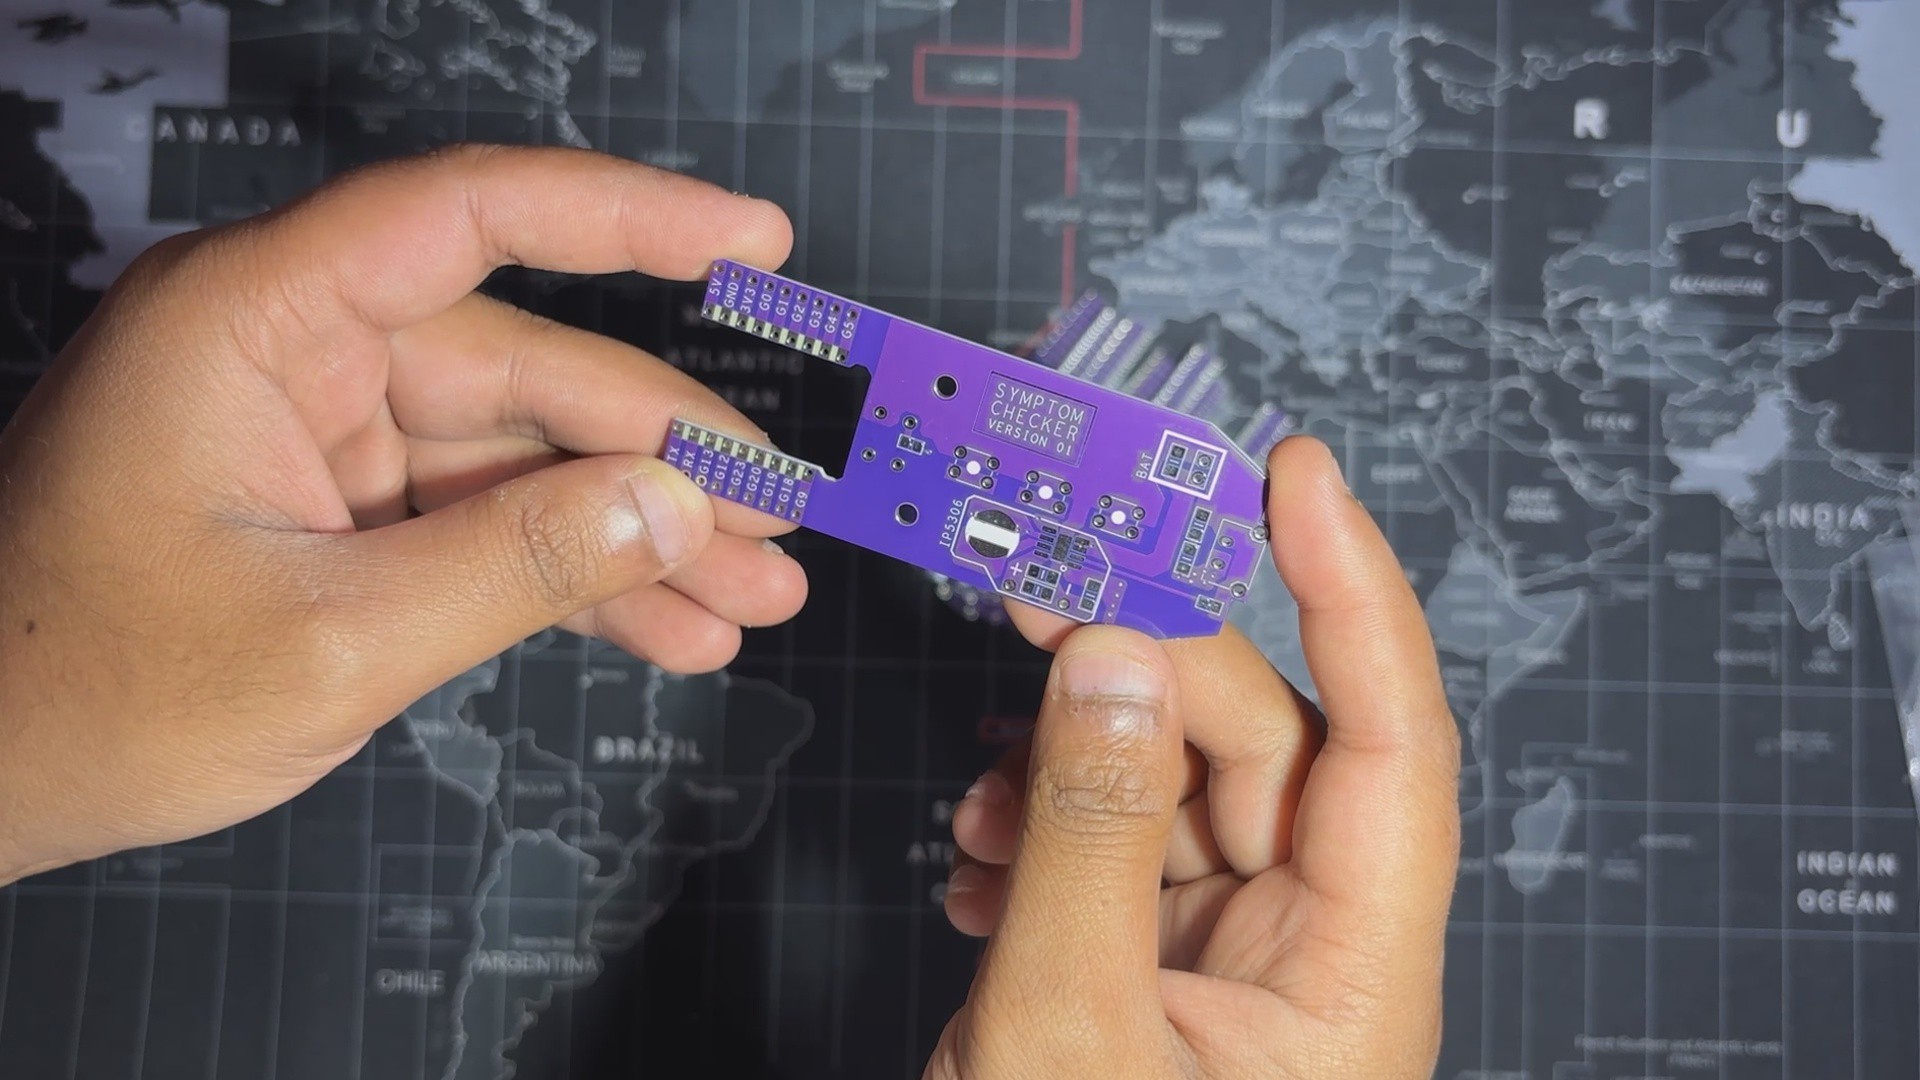
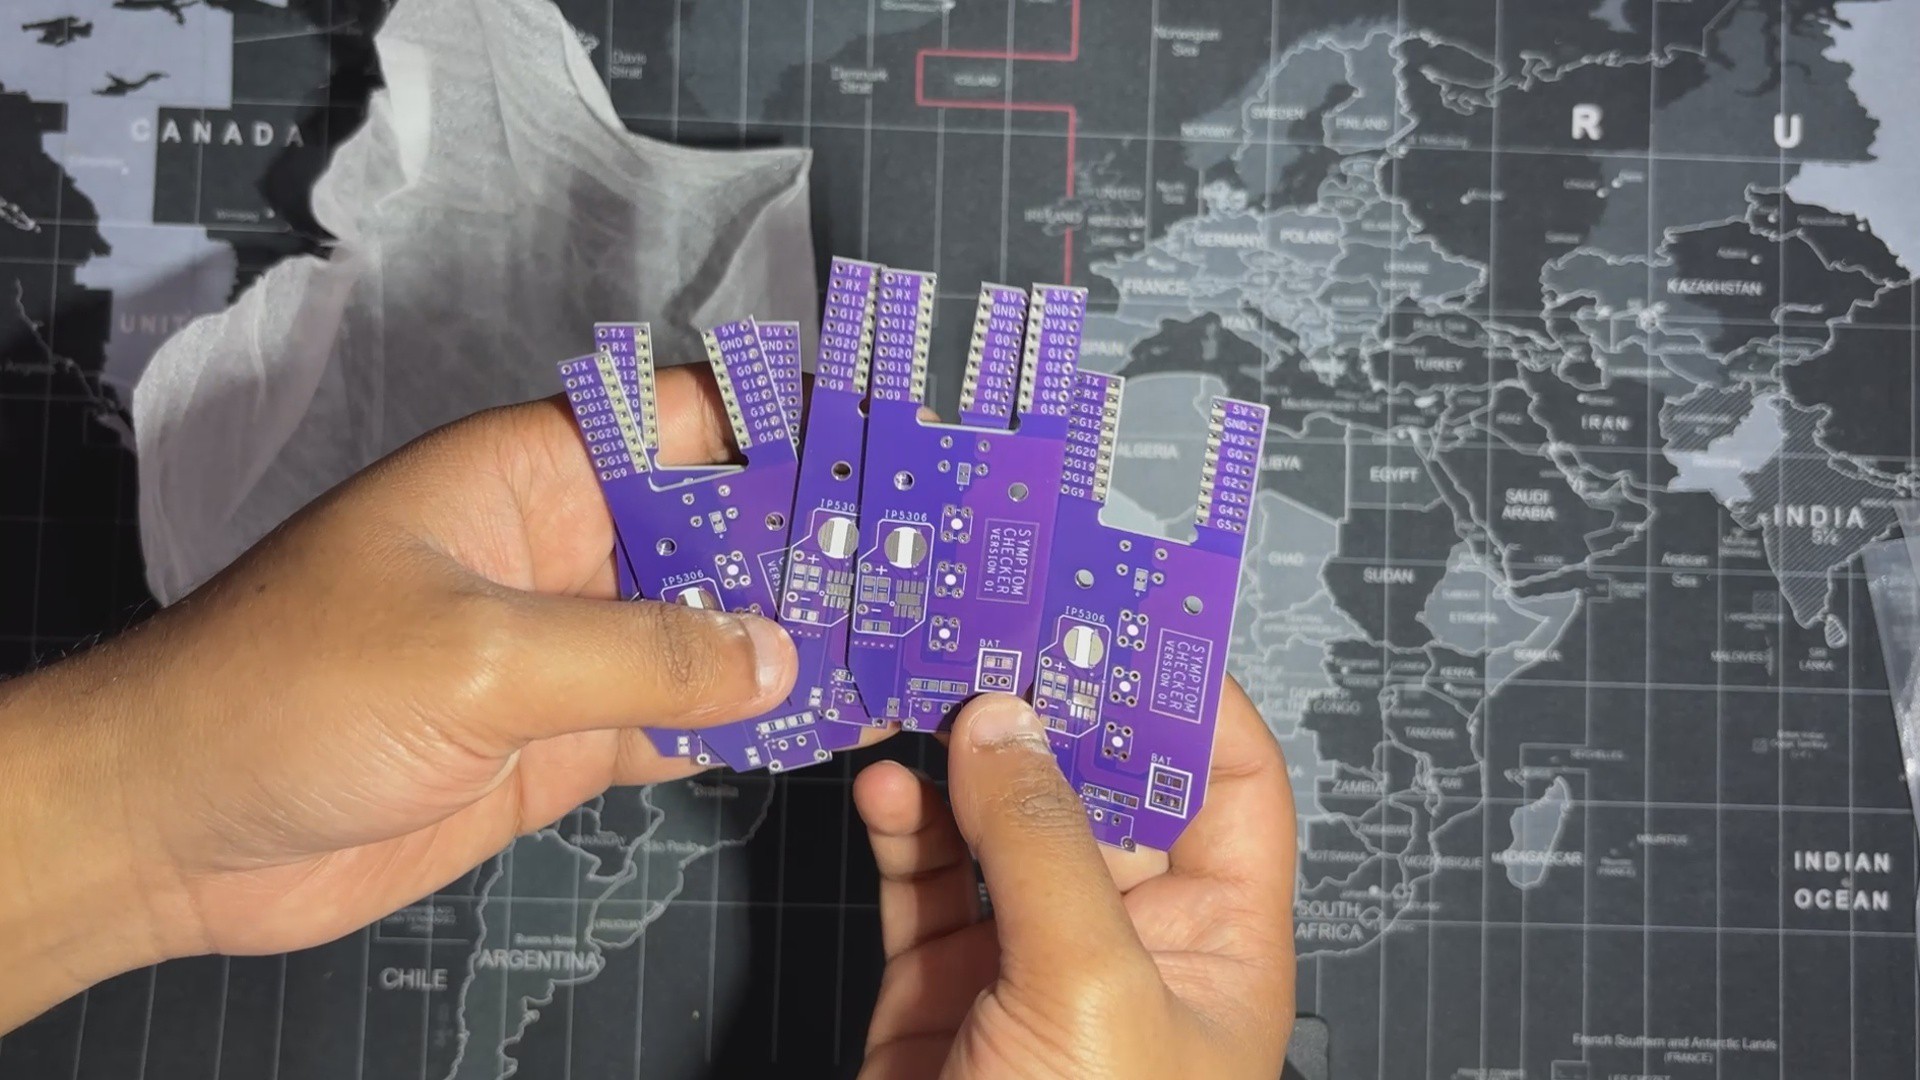
Once the board design was finalized, I opted for a purple solder mask with white silkscreen and uploaded the Gerber files to PCBWay’s quote page for fabrication.
While I typically go with a white or black solder mask for most of my builds, this time I decided to try out PCBWay’s Purple option just for a change. The order was placed smoothly, and the PCBs arrived within a week.
The quality was excellent—clean finish, sharp silkscreen, and everything matched the design perfectly.
Over the past ten years, PCBWay has distinguished themselves by providing outstanding PCB manufacturing and assembly services, becoming a trusted partner for countless engineers and designers worldwide.
Also, PCBWay is organizing the PCBWay 8th Project Design Contest, a global event that invites makers, engineers, and innovators to showcase their most creative builds. With categories in Electronics, Mechanical, and AIoT, it’s a great opportunity to share your work, connect with the community, and compete for exciting prizes.
You guys can check out PCBWAY if you want great PCB service at an affordable rate.