 finallyfunctional
This article goes over what I've been working on since my last video. Design files are available on my github.
Summary -
- A leg exoskeleton-ish mechanism
- A new VR locomotion device based on the concept I discuss here.
- An improved ceiling mounted support rig
- Some progress on sensors and tracking
Leg Mechanism
I'm working on making a leg mechanism, or exoskeleton. The first draft is shown in this video.
Each joint is made of flexible plastic, TPU. When the joints flex, they will store some energy and want to return to their original form, like a spring.
The basic idea is that as the user brings their foot forward, there will be some resistance because the joints will flex, then as they bring their foot back, the joints will help them. The joints store some energy when they bring their foot forward, then release it when they bring their foot back.
I believe the main benefits this mechanism will give are extra stability, smoothing out the user's effort, and reducing the user's effort. I'll talk about these and other benefits below, such as weight negation.
Stability
I believe this mechanism will provide enough stability to make omnidirectional passive VR shoes feel comfortable.
I have held off making omnidirectional passive VR shoes mainly because I think that they would be too unstable. I can see the shoes sliding sideways out from under the user. My current unidirectional (only forward and back motion) passive VR shoes are easy to control because I'm more than strong enough to prevent my foot from sliding too far forward or backward, but it may feel too slippery to also introduce sideways motion.
The leg mechanism is always trying to bring the user's foot back to the starting position. As the user moves their foot further forward, backwards, or sideways, they experience more resistance. This should help keep the user from slipping. I of course don't want too much resistance so there will need to be a balance. Hard stops could also be added to prevent the user from sliding a maximum distance.
After I'm happy with the leg mechanism, I will design an omnidirectional passive VR shoe. I'll briefly talk about that design below.
One small note, the extra stability could allow the shoe to possibly be a bit taller if I want.
Smoothing Out Effort
When walking forward, it takes very little effort to bring the foot forward in the air. Once the user puts their foot down in front of them, they need to use a relatively high amount of effort to bring their foot back. This is illustrated in the simple graph below.
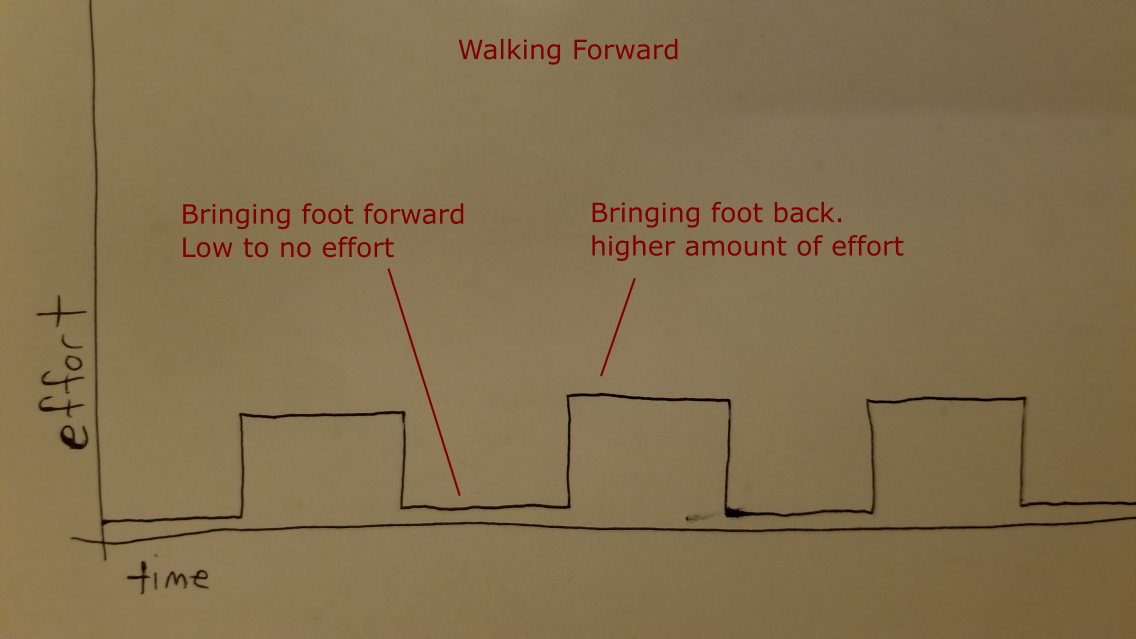
The graph is probably oversimplified a bit, but it explains the idea.
I believe the walking mechanism will help smooth this square graph out. As the user brings their foot forward, instead of it being no effort, there will be a little more effort due to the resistance the mechanism exerts on the user. When the user brings their foot back, there will be a little less effort because the mechanism is helping them. The mechanism should raise the valleys and lower the peaks in the graph, which I think will be more comfortable for the user.
Reducing Effort
If you've ever used an elliptical before, you may have noticed that once you get going, it's easier to keep going because of the momentum you've built up. This leg mechanism might have a similar effect. As you walk or run, the mechanism may act like a spring that is moving your leg back and forth. Instead of losing some energy when your foot goes from moving forward to backward, some of that energy is stored in the mechanism. It may end up in a scenario like the following -
- User brings foot forward, pushing against springs, storing energy in them.
- Springs release the energy and push the user's foot back. As the foot goes behind the user, some of that energy is captured again in the springs.
- Springs release energy again, pushing the foot forward. As the foot goes in front of the user, some of the energy is again captured in the spring.
I think the above scenario will only happen if the springs are strong enough to store enough energy to push the user's foot a whole stride. In reality when the springs release their energy it may all be used up before the user's foot crosses their center line and the springs start storing energy again. I'll need to experiment with springs of different strengths.
I also believe it could negate the weight of the shoe. I've designed the mechanism so that it wants to lift the shoe, as shown below.
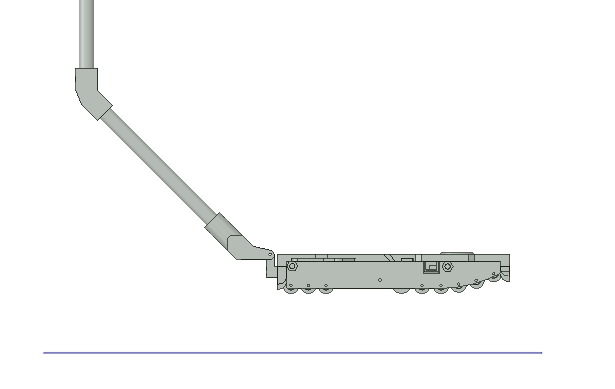
The blue line is the floor, and the mechanism wants to keep the shoe a few inches off the ground. The user keeps the shoe pushed to the ground with their weight, with no extra effort. As the user lifts their foot, the mechanism will help them, effectively negating the weight of the shoe. The shoe I have now is already light (~800 grams), but with this mechanism it could be heavier but not feel heavier to the user.
A Better Design
The design I showed above is a first draft I made quickly just to see if I liked how it felt. The next design will incorporate spiral helical springs in many of the joints. There will be more joints to support strafing and turning more easily. I should be able to more easily adjust the overall resistance. The next design will also support crouching, sitting, and different heights by changing the longest piece of conduit so that it can telescope.
Motorizing
I think in the future the leg mechanism can be motorized with a single motor for each leg. The mechanism already consists in large part of hollow tubes (conduit). Imagine a string going through the tubes top to bottom. At the top, the string is on a pulley, attached to a motor. When the string is pulled taught, the mechanism holds it's starting position.
When the user is taking a step forward, the motor is not powered on and the user will unwind the pulley a bit. When the user starts bringing his foot back, the motor can start winding up. In this way, the user can walk at really any angle, but a single motor can still be used to bring the user's foot back.
Omnidirectional Shoe
I mentioned above I'm most likely going to make an omnidirectional shoe after I make the leg mechanism. I plan on using the omnispheres that I designed for this treadmill. Why those over traditional omniwheels?
- The smallest omniwheels I can get are 2 inches in diameter. The omnispheres can be smaller.
- Omniwheels are a bit noisy. The omnispheres should be much quieter.
- Omniwheels are more expensive, at about $10 each last time I checked. The omnispheres are much cheaper to make.
- Omniwheels don't work well on squishy surfaces, because there isn't much space between the rollers and the frame of the omniwheel itself. I'd like to use the shoes on a rubber mat to reduce noise, so omniwheels won't work. The omnispheres should work on a rubber mat.
The disadvantage the omnispheres have is that they're not truly omnidirectional when used individually, unlike omniwheels. But I will use the omnispheres as a group, which should be truely omnidirectional.
I'm thinking the shoe will consist of 2 or 3 axles that run the length of the foot, with many omnispheres on each axle. Adjacent omnispheres will be rotationally offset just like in the treadmill.
To achieve a curved underside like my current VR shoes have, I'm thinking I'll use omnispheres of different sizes.
Plan B to make an omnidirectional shoe is to design a large, custom, regular omniwheel, that is mounted on the outer side of the user's foot. The omniwheel will be made big enough so that the spacing between the rollers and the frame of the omni wheel is big enough so that I can use it on a quiet rubber surface. The leg mechanism can help support the other side of the shoe, as well as help keep it from tipping forward and back.
Tracking
I believe that an encoder can be placed at each joint of the leg mechanism, along with knowing how long each segment is, to accurately track the speed and position of the user's foot on the ground and in the air.
This Versus a Bowled Surface
A bowled surface, like what the Kat Walk C2 or Virtuix Omni have, can provide some similar effects that this leg mechanism provides. The curved surface of the bowl makes it so the user's foot always wants to come back to the center, providing stability, smoothing out and reducing effort.
While I think a bowled surface is a good option, I have some reasons for going with the leg mechanism.
- It can be motorized later.
- The weight of the shoe can be negated.
- The resistance can be adjusted. While slidemills can have their resistance adjusted with pads on the shoes or oil on the surface, I think the leg mechanism can be more finely tuned.
- The surface of the bowl can't be adjusted to be bigger or smaller, depending on the size of the person. The leg mechanism can.
- While the bowled surface is simpler, the leg mechanism isn't very complicated.
- I think the tracking will be better. The leg mechanism should be able to accurately track your foot in the air. But for just moving in game, the leg mechanism tracking doesn't really have an advantage.
- I just personally don't have a good way to make a smooth bowled surface that will also be quiet.
- It's a stepping stone to a VR exoskeleton.
- In theory, I may be able to experiment with the spring such that the user's feet almost never go closer than shoulder-width apart. This will enable me to create a simpler safety rig since the floor space directly under the user will not collide with the user's feet.
Robotic Arm/Linkage Assembly VR Locomotion Device
A while ago I made a video explaining the concept of a VR locomotion device consisting of two arms, or linkages.
I did some experimenting with larger devices that operate on this concept. I made three versions.
Version 1
This version mainly consists of U channels.
I made some free body diagrams to see how much weight the bearings would need to support, and with the length of the top U channel (8in) the weight should be around 1k pounds. The thrust bearings I bought handled well over this weight (4k), but unfortunately the U channels themselves bend.
Version 2
In the next version I made the linkages discs so that the weight could be more distributed. However the movement of the user's foot was still limited to arcs.
Version 3
The next version is similar to v2, but offers some more freedom of movement. However, the way the device spins around is erratic.
Conclusion
I believe that this linkage assembly device could work with more experimentation, but I'm not going to work on it anymore right now since the leg mechanism is more promising.
Improved Ceiling Mounted Support Rig
I made an improved version of my ceiling mounted support rig. The improvements include -
- Simplified swivel
- Bungee cord doesn't rub against other components
- Utilizes same design the free-standing rig used for coupling the climbing harness to the rest of the rig, which pulls the leg loops up and makes sitting more comfortable
- Uses pipe for the main, middle, long vertical segment instead of conduit to decrease bending and make height adjustments easier
Sensors and Tracking
I've done some work with sensors for tracking.
- I've tried out some cheap IMUs (MPU6050 and MPU9250) which did not work very well. I tried an Adafruit IMU (LSM6DSOX + LIS3MDL, shown in the video), which actually worked quite well but still had some drift.
- I tried out the Polulu magnetic encoder. Once I designed 3D printed parts that hold the encoder aligned with the wheel, it worked very well.
- I experimented with using both Bluetooth Classic and BLE. Bluetooth Classic is much better suited to streaming data, like this type of application needs.
Discussions
Become a Hackaday.io Member
Create an account to leave a comment. Already have an account? Log In.