 WJCarpenter
For a couple of years, I've had a heat pump, and I also have a gas furnace that kicks in when it's too cold for the heat pump to be efficient. That's a common arrangement and is referred to as "aux heat" in the HVAC argot. Because of some recent shenanigans with the heat pump, I've become more interested in when the heat pump is in use versus the aux heat. For unrelated reasons, I'm also interested in when the HVAC fan is running, whether as part of heating or cooling or by itself. My thermostat lets me configure a minimum number of minutes per hour to operate the fan (to even out temperature swings).
I monitor and control my smart home stuff with Home Assistant. It gives me most of what I want with standard capabilities, but it doesn't give me everything. This is a description of how I have set things up. I use it only for monitoring since the thermostat is more convenient for taking actions compare to Home Assistant UI widgets.
Home Assistant understands climate control devices and provides a couple of UI cards to display them.
The top half is a thermostat card, and the bottom half is history-graph card that knows how to deal with a climate device. Both cards show, in different ways, when the heat is on, but without differentiating whether or not it's the heat pump. The thermostat card will indicate "Fan" if the fan is running without heating or cooling being active.
In addition to those standard cards, my smart home dashboard (on a tablet as a touchscreen) includes a series of buttons. One of those buttons shows what's currently going on with my HVAC:
Default (and fan-only):

Cooling (heat pump):

Heating (heat pump):

Heating (furnace):

It's implemented via a custom button-card, a component with about a zillion features. One of those features is to conditionally have the icon spinning, which I do when the fan is running. That includes the default state button when the fan is the only thing running. I indicate what the HVAC is doing via the button color (goldenrod for heat pump heating, gold for furnace heating, blue for cooling, and a default blue shade when none of those things are active). I don't differentiate cooling by heat pump or otherwise since there is no otherwise for cooling in my house.
Here is the YAML configuration of that button:
type: custom:button-card
name: HVAC
color_type: label-card
color: var(--label-badge-blue)
icon: mdi:fan-auto
entity: sensor.hvac_cooked_state
triggers_update: sensor.hvac_cooked_state
styles:
  card:
    - width: 80px
    - height: 72px
state:
  - value: cooling
    color: blue
    spin: true
  - value: heatpump
    color: goldenrod
    spin: true
  - value: heating
    color: gold
    spin: true
  - value: fanonly
    spin: true
  - operator: default
    spin: false
tap_action:
  action: navigate
  navigation_path: /wjc-subpanels/climate-details?wp_enabled=true
double_tap_action:
  action: navigate
  navigation_path: /wjc-subpanels/ventbots?wp_enabled=true
The list of states for sensor.hvac_cooked_state is examined in order, and the first matching value determines the color of the button and whether the fan icon spins.
Where does sensor.hvac_cooked_state come from? I did quite a bit of trial and error before getting things the way i wanted them. Along the way, I defined a series of Home Assistant template helper entities, some as binary sensors and some as sensors that reported text strings. The evolutionary end result isn't necessarily the optimal way to factor things, but I'm happy enough with it. Some of them end up being mere renamings of things that are directly available. But, if there's one thing programmers love more than caffeine, it's layers of abstraction. For organizational convenience, I named them all with the prefix "HVAC" and affiliated them with my smart thermostat device, CarpOBee. For consistency, I gave all of the binary sensor helpers a device class of Power (providing values of "on" or "off").
The affiliation with the device causes them to show up in the generic device page in the Home Assistant UI, which is convenient while working on things:
Here are the YAML template definitions, presenting a logical order rather than the alphabetical order of the above images:
# HVAC raw state
{{states.climate.carpobee_2.attributes.hvac_action}}

# HVAC heatpump power
{{states('sensor.span_panel_heat_pump_power')|int}}

# HVAC is cooling
{{is_state('sensor.hvac_raw_state',  'cooling')}}

# HVAC is fanonly
{{is_state('sensor.hvac_raw_state',  'fan')}}

# HVAC is heating
{{is_state('sensor.hvac_raw_state',  'heating')}}

# HVAC is heatpump
{{
  (is_state('binary_sensor.hvac_is_heating', 'on') or
   is_state('binary_sensor.hvac_is_cooling', 'on'))
   and
  (states('sensor.hvac_heatpump_power')|int > 30)
}}

# HVAC is fanany
{{is_state('binary_sensor.hvac_is_heating', 'on') or
  is_state('binary_sensor.hvac_is_cooling', 'on') or
  is_state('binary_sensor.hvac_is_fanonly', 'on')}}

# HVAC cooked state
{%   if is_state('binary_sensor.hvac_is_cooling',  'on') %}
  cooling
{% elif is_state('binary_sensor.hvac_is_heatpump', 'on') %}
  heatpump
{% elif is_state('binary_sensor.hvac_is_heating',  'on') %}
  heating
{% elif is_state('binary_sensor.hvac_is_fanonly',  'on') %}
  fanonly
{% else %}
  {{states('sensor.hvac_raw_state')}}
{% endif %}
Most of those template strings are straightforward (assuming you are familiar with Home Assistant templating), but a couple of things are worth calling out.
- The first two (in the YAML) abstract away the physical devices, and all of the rest build logical values from those.
- I wanted to distinguish when only the fan was running (fanonly) versus when the fan is running along with other activity (fanany). The climate sensor reports "fan" for the first case, but the second case comes from the semantic knowledge that the fan runs during heating and cooling. (When the dust settled, I didn't use fanany for anything.)
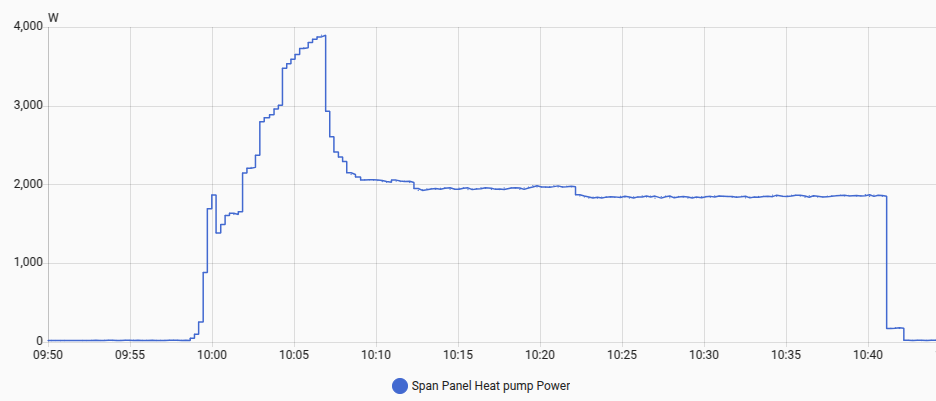
- No part of the climate sensor reports heat pump activity (see more below), but my heat pump is on its own circuit breaker in my Span smart panel. It draws 20-25 watts when idle, so I check for its power draw above 30 watts to know the heat pump is running. The "HVAC is heatpump" sensor reports on for both heating and cooling, but I later disregard, in the "HVAC cooked state" sensor, the cooling possibility for indicating heat pump activity in the button on the dashboard (that is, I check for cooling first before heat pump).
- The definition of "HVAC cooked state" provides a precedence ordering that makes the ordering of state checks in the button configuration redundant.
I don't know all the internals of the heat pump, but FWIW here's what a typical run cycle looks like. There can be a short period at the end of the cycle where the power is below my threshold but the climate sensor is still indicating heating. That occasionally gives a short period (some number of seconds) where my button indicates heating instead of heat pump. It's not worth it to me to fine tune that further. I haven't investigated what the power consumption looks like during a cooling cycle.
With the combination of the standard cards and that custom button, I can see at a glance the complete story of my HVAC. I was hoping to integrate the heat pump and fan status directly into the standard cards, but that turns out to not be possible without modifications to Home Assistant or re-doing those standard cards, so I decided to live with that situation. There is a very handy custom component called Template Climate that lets you create a climate device and supply templated values for most items; effectively, you can inherit and modify an existing climate device. "hvac_action" is one of the entity values you can supply from a template, and my hope was that I could inject my "heatpump" state when applicable. Alas, the underlying climate components in Home Assistant work off a hard-coded list of state names (look for HVACAction here):
class HVACAction(StrEnum):
    """HVAC action for climate devices."""

    COOLING = "cooling"
    DEFROSTING = "defrosting"
    DRYING = "drying"
    FAN = "fan"
    HEATING = "heating"
    IDLE = "idle"
    OFF = "off"
    PREHEATING = "preheating"


CURRENT_HVAC_ACTIONS = [cls.value for cls in HVACAction]
Attempts to use any other values seem to be futile. There are some community-contributed alternative thermostat cards that I might look into, and the climate-aware history-graph card can be replicated using some amount of brute force.
My thermostat is an ecobee3 Lite. It was part of the bundle when my heat pump was installed. For Home Assistant, there are two ways to integrate ecobee thermostats.
- The ecobee integration, naturally, knows the most about ecobee devices. Its climate entity includes an attribute "equipment_running" that lists equipment actually running. It explicitly identifies when a heat pump is active. Unfortunately, it is a cloud-based interface that introduces significant lag in detecting changes or performing commands. In the grand scheme of things, that lag doesn't matter, but it's a bit annoying when you try to drill into precise details that involve timing. The ecobee integration requires getting a developer API key from ecobee. In late 2024, ecobee stopped handing those out to random end users. Luckily, I got mine a couple years ago (it still works), but that avenue is closed for newcomers.
- The other path is to interface to the ecobee as a HomeKit devices. Home Assistant has native HomeKit support, so you don't need any other Apple devices to use it. Pairing is a very simple process. The interface is completely local (no cloud access) and gives essentially no lag on the local network. Unfortunately, it doesn't give any way of explicitly identifying when the heat pump is running.
In the end, I went with the HomeKit integration and used the heat pump power consumption to know when it's active.
UPDATE: I like the overall flavor of Home Assistant's standard history-graph card when use with a climate entity. I decided to see if I could replicate it while also being able to display my additional states. I didn't care about doing an exact match. I just wanted something similar in style.
In the image just below, the top have is the standard card, and the bottom half is my replica. They match reasonably well. My replica has a couple of blue "Fan only" segments. That's because my thermostat lets me set a minimum amount of time per hour that the fan will run (to smooth out temperature swings). I don't know why the standard card seems to show coarser granularity for the current temperature (I didn't pursue it).

The configuration for the standard card is:
type: history-graph
entities:
  - entity: climate.carpobee_2
    name: " "
title: HVAC
min_y_axis: 65
max_y_axis: 81
hours_to_show: 6
My implementation uses custom:apexcharts-card. I don't know much about Apex Charts other than using that card for a couple other things in Home Assistant. It seems to be a pretty powerful open source JavaScript graphing package. I chose this card after a perusal of a few alternatives available in HACS.
Here is my configuration for that card:
type: custom:apexcharts-card
graph_span: 6h
yaxis:
  - decimals: 0
    max: "|+3|"
    min: "|-3|"
all_series_config:
  curve: stepline
  show:
    legend_value: false
header:
  show: true
  title: HVAC
  show_states: false
  colorize_states: true
series:
  - entity: sensor.hvac_heating_tracking_temperature
    name: Furnace
    color: gold
    type: area
    transform: "return parseInt(x) <= -999 ? null : x;"
  - entity: sensor.hvac_heatpump_tracking_temperature
    name: Heat pump
    color: goldenrod
    type: area
    transform: "return parseInt(x) <= -999 ? null : x;"
  - entity: sensor.hvac_cooling_tracking_temperature
    name: Cooling
    color: blue
    type: area
    transform: "return parseInt(x) <= -999 ? null : x;"
  - entity: sensor.hvac_fanonly_tracking_temperature
    name: Fan only
    color: var(--label-badge-blue)
    type: area
    transform: "return parseInt(x) <= -999 ? null : x;"
  - entity: climate.carpobee_2
    attribute: target_temp_high
    color: yellow
    curve: stepline
    name: Target temp high
    stroke_dash: 8
  - entity: sensor.carpobee_current_temperature
    name: Current temperature
    color: cyan
    stroke_width: 5
  - entity: climate.carpobee_2
    attribute: target_temp_low
    name: Target temp low
    color: red
    curve: stepline
    stroke_dash: 8
My general strategy graph the states for heat pump, cooling, etc, with values matching the current temperature when they are active and not graph them at all when they are not active. The custom:apexcharts-card lets you apply an arbitrary transformation to a piece of data to be charted. The transformations are to be written in JavaScript. There are some provided helpers to be able to interact with Home Assistant (via the "hass" object).
For a couple of reasons, I decided to do the heavy lifting in Home Assistant helper entities and just leave some simple stuff in the JavaScript expression.
- I've never been crazy about JavaScript. I'm already dealing with Home Assistant's Jinja templating and related baggage. Keeping those sets of incompatible conventions straight is more than I care to deal with. It's especially annoying to keep track of when something is really a number and when it's a string expressing a number. I can just about keep up with one universe.
- To convert a state like "the heat pump is running" into a number like the current temperature, I need to find the "current temperature" at the time of the recording of the "the heat pump is running" data point. It might be possible to find the history value via the "hass" object (I really don't know), but that seemed like a lot of bother and likely performance drag. By using a helper entity that has its own recorded history, I get the recorded values at the expense of storing additional fake historical data.
For each state that I wanted to graph, I defined a helper template entity. Those are the first 4 entities seen in the YAML configuration above. Here are the template expressions for them:
# sensor.hvac_cooling_tracking_temperature
{% if is_state('sensor.hvac_cooked_state', 'cooling') %}
  {{states('sensor.carpobee_current_temperature')}}
{% else %}
  -999
{% endif %}

# sensor.hvac_fanonly_tracking_temperature
{% if is_state('sensor.hvac_cooked_state', 'fanonly') %}
  {{states('sensor.carpobee_current_temperature')}}
{% else %}
  -999
{% endif %}

# sensor.hvac_heating_tracking_temperature
{% if is_state('sensor.hvac_cooked_state', 'heating') %}
  {{states('sensor.carpobee_current_temperature')}}
{% else %}
  -999
{% endif %}

# sensor.hvac_heatpump_tracking_temperature
{% if is_state('sensor.hvac_cooked_state', 'heatpump') %}
  {{states('sensor.carpobee_current_temperature')}}
{% else %}
  -999
{% endif %}
For the "off" state, the signal value of "-999" is passed, and the card's transform changes that into "null", which is Apex Charts' convention for not plotting a point.
Discussions
Become a Hackaday.io Member
Create an account to leave a comment. Already have an account? Log In.