-
A Comprehensive Guide on How to Backup Data from NAS
09/08/2023 at 08:13 • 0 commentsIn today's data-centric world, Network Attached Storage (NAS) devices have become invaluable for storing and accessing critical information. However, ensuring the safety and availability of your data is equally important. Creating a robust backup strategy for your NAS is the key to safeguarding your valuable files and preventing data loss. In this article, we will walk you through the steps to backup data from your NAS effectively.
![]()
Choose a Backup Solution
Before diving into the backup process, you need to select a suitable backup solution. There are several options available, ranging from built-in NAS backup features to third-party software. One excellent choice is the NAKIVO NAS Backup, known for its versatility and comprehensive features. Regardless of your choice, ensure that your selected solution supports your NAS device's brand and model.
Connect to Your NAS
To start the backup process, you'll need to establish a connection between your chosen backup solution and your NAS device. Most backup software allows you to connect to your NAS via its IP address or hostname. Ensure that you have the necessary credentials (username and password) to access your NAS.
Configure Backup Settings
Once connected, configure the backup settings to suit your requirements:
● Select Backup Source: Choose the specific folders, files, or volumes on your NAS that you want to backup. This flexibility allows you to back up only what is essential.
● Choose Backup Destination: Specify where you want to store your backups. Common choices include external drives, another NAS device, or a cloud storage service.
● Set Backup Schedule: Determine how often you want your NAS data to be backed up. Regular backups, such as daily or weekly, ensure that your data is always up-to-date.
● Select Backup Method: Decide whether you want full backups or incremental backups. Incremental backups only copy the changes made since the last backup, saving storage space and time.
Initiate the Backup
With your settings configured, start the backup process. Depending on the size of your data and your selected backup method, this may take some time. Ensure that you have a stable network connection and sufficient storage space on your chosen backup destination.
Monitor and Verify Backups
Once the backup is complete, it's essential to regularly monitor and verify the integrity of your backups. Some backup solutions offer automated verification features to ensure that your backup copies are error-free and restorable.
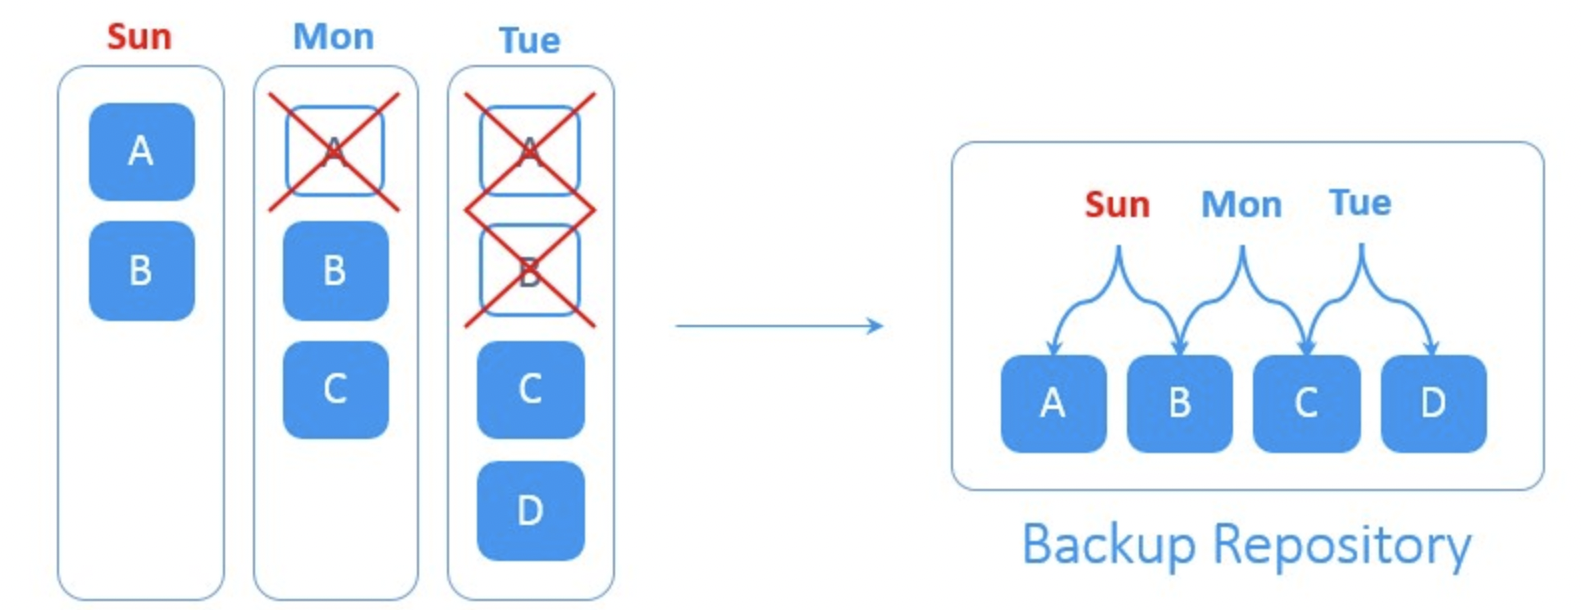
Implement a Backup Rotation Strategy
To ensure that you always have access to historical versions of your data, consider implementing a backup rotation strategy. This involves keeping multiple versions of your backups, including daily, weekly, and monthly backups. Older backups can be archived or transferred to long-term storage.
Plan for Disaster Recovery
In addition to regular backups, have a disaster recovery plan in place. Test your backup restoration process periodically to ensure that you can recover your data in the event of a hardware failure or data loss incident.
Stay Informed and Updated
Stay informed about any updates or patches for your chosen backup solution. Regularly update your backup software and NAS firmware to maintain compatibility and security.
Conclusion
Backing up data from your NAS is a critical step in ensuring the safety and availability of your valuable files. By following these steps and using a reliable backup solution like NAKIVO NAS Backup, you can establish a robust data protection strategy that guards against data loss and provides peace of mind in today's data-driven world. Remember that data backup is an ongoing process, so make it a routine to protect your data effectively, whether you are a small business looking for a cost-effective small...
Read more -
How to Recover Permanently Deleted Emails in Outlook 365
09/09/2022 at 14:08 • 0 commentsWhile collaboration tools are increasing in popularity, businesses still rely on email messaging to exchange information within and beyond their organizations. In today’s world, Outlook is one of the most used email services but it is not impervious to data loss since messages can be accidentally or intentionally removed. Luckily, native tools and third-party solutions allow you to recover deleted emails in Office 365. Read this post to learn how you can restore messages and items even after the retention period expires.
![]()
-
Offsite Tape Storage for Backups: An Overview
09/09/2022 at 13:51 • 0 commentsOnsite backups can be vulnerable to hacker attacks and loss or damage due to storage failure, mistakes and onsite disasters. Offsite backup copies give you the option to recover data when onsite backups are not available. Read this blog post to learn about the benefits of offsite tape storage and get practical tips on how to use this type of storage efficiently.
![]()
-
Interactive ESXi Server Installation from a USB Drive
09/09/2022 at 13:32 • 0 commentsThe first step you should perform to run virtual machines in VMware vSphere is installing a VMware ESXi hypervisor on a physical server. Read how to install ESXi server step by step from a USB flash drive in this blog post. The installation process is not tricky and ESXi installer is user-friendly.
![]()
-
OneDrive Security Recommendations and Best Practices
09/09/2022 at 12:52 • 0 commentsMicrosoft OneDrive is one of the most popular cloud storage platforms since it is reliable, user-friendly and widely available. With features like the personal vault and OneDrive encryption, files are safely stored and accessed remotely. Read the blog to learn more about OneDrive security features and how files are protected from cyber threats and unauthorized modification and deletion.
![]()
-
How to Configure a DRS Cluster in VMware
09/09/2022 at 12:33 • 0 commentsThe Distributed Resource Scheduler (DRS) is a helpful feature that you can enable in VMware cluster configuration. The DRS is used for load balancing in vSphere clusters to ensure that VMs have enough resources to run with enough performance. Read how to configure DRS in VMware vSphere to learn which VMware DRS settings can be useful in your vSphere environment.
![]()
-
How to Delete a Snapshot Using Hyper-V Manager or PowerShell
09/09/2022 at 12:18 • 0 commentsSnapshots, known as checkpoints in Hyper-V, come in handy when you retain to keep the last properly running state of a VM before deploying new software or installing an update. However, you have to be careful while deleting snapshots otherwise, you might lose important data.
![]()
Read this post to learn how the Hyper-V checkpoints work and how to delete them using Hyper-V Manager or PowerShell without losing data.
-
Infrastructure Monitoring Best Practices
09/09/2022 at 11:38 • 0 commentsIssues can occur even in the most reliable environments. IT infrastructure monitoring allows you to be aware of issues in time and react to resolve them quickly. Read how to monitor hardware, software, and networks including methods and features in this IT infrastructure monitoring best practices.
![]()
Learn more: https://www.nakivo.com/blog/all-you-should-know-about-it-infrastructure-monitoring/
-
Hyper-V Failover Cluster Setup: A Step-by-Step Guide
09/09/2022 at 11:24 • 0 commentsBuilding a cluster may not seem an easy task. You need to configure Hyper-V cluster storage, network, and other settings on servers. There are two main approaches: using the command line PowerShell or a GUI.
![]()
Learn how to proceed with cluster configuration for Hyper-V, deploy a cluster and use High Availability for VMs.
-
Disaster Recovery and Backup: Key Differences
09/09/2022 at 11:08 • 0 commentsBackup vs disaster recovery – which should you choose? Both of them are used to protect and recover data. However, there are differences between disaster recovery and backup. Read more to learn details and understand when to use each.
![]()
-
Hyper-V Virtual Switches Overview
09/09/2022 at 10:07 • 0 commentsVirtual switches are essential software programs that enable virtual machines (VMs) to communicate with each other, the host and external networks. This blog lists and explains the three different types of Hyper-V virtual switches: external, internal and private. Read on to learn how to configure each type using the Virtual Switch Manager.
![]()
source: https://www.nakivo.com/blog/hyper-v-networking-virtual-switches/
-
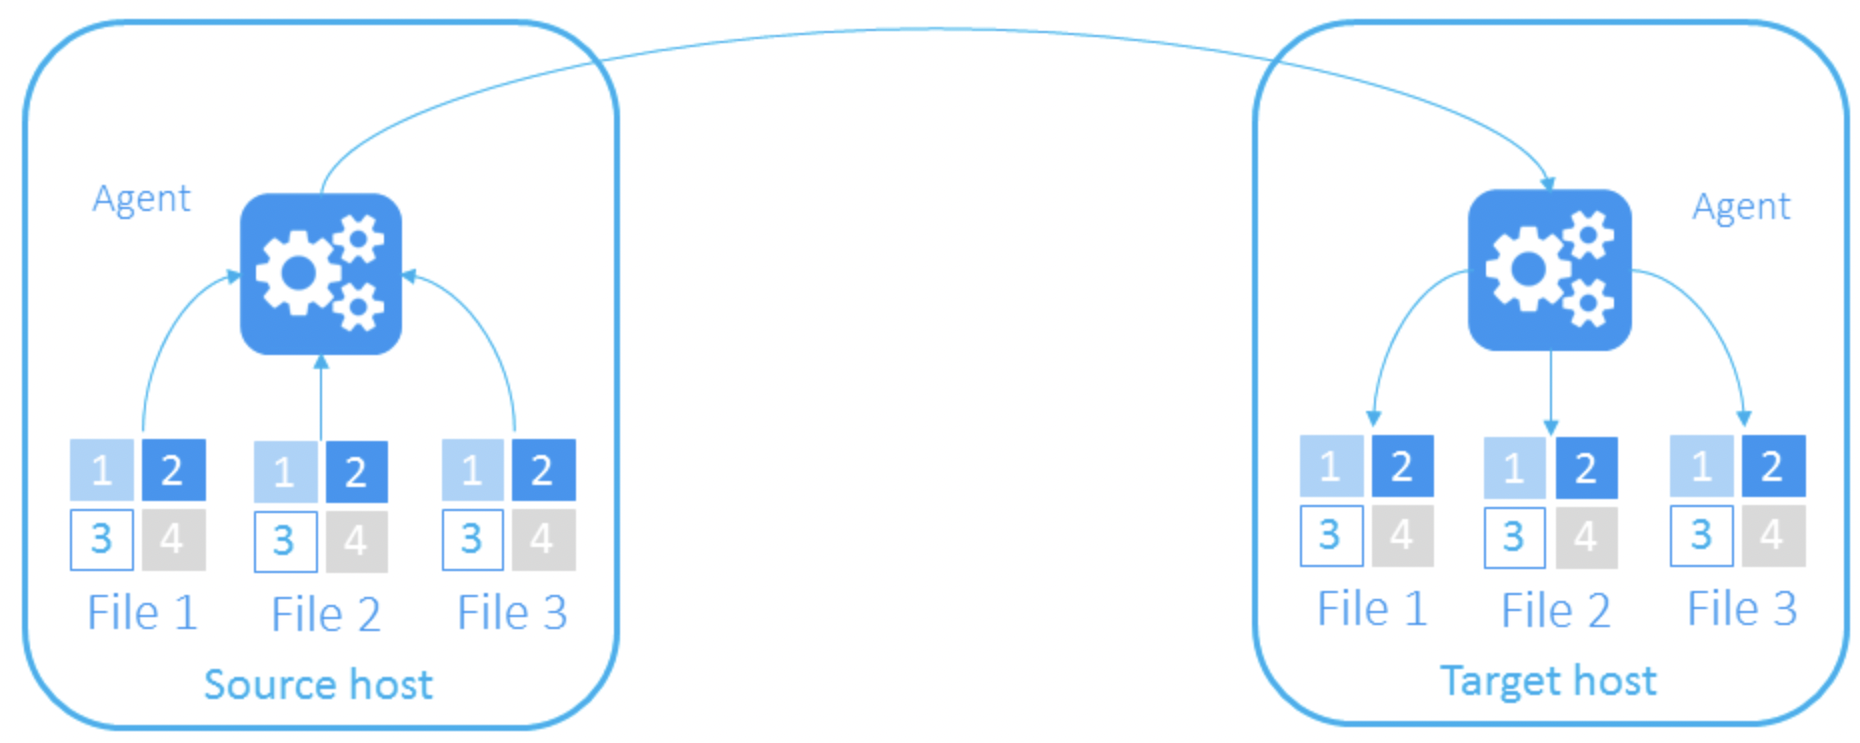
Image-Based vs. File-Based Backup Comparison
09/09/2022 at 09:43 • 0 commentsThere are various types of backups you can use simultaneously to ensure robust data protection within your organization. Image-based and file-based backups are two distinct approaches with similarities and differences. This post details these types and explains how you can use both of them interchangeably when backing up your data.
![]()
Source: https://www.nakivo.com/blog/image-based-vs-file-based-backup/
-
Speed Up VM Backups: Features to Improve Performance
09/09/2022 at 09:21 • 0 commentsBackups can be resource-intensive, especially in large environments with hundreds or thousands of virtual machines. Improving VM backup speeds and performance while minimizing the impact on the production network can be challenging. Modern solutions offer various features that help speed up backups to shrink backup windows and improve resource utilization. Read this post to learn about some of these features.
Learn more: https://www.nakivo.com/blog/increase-vm-backup-speed-maximum/
![]()
-
What are the backup options for VMware?
04/06/2022 at 13:12 • 0 comments1. Backing up VMs as physical machines
In theory, from a user's perspective, a VM functions the same as a physical machine. That's why admins can use the same backup procedures. You can download a backup agent and program backups just like you do with a regular machine.
Pros: It is easy to work with and doesn't require any learning curve.
Cons: It protects the OS and apps but not the virtual machine itself. That's why a direct restoration of the whole virtualized environment is impossible.
2. File-based backup strategy
VMware stores each virtual machine as a virtual machine file (mainly a VMDK file). To protect entire VMs easily, you can backup these files. While OS backups tend to consume significant time and system resources, VMDK file backup is a pretty simple and prompt operation.
Pros: It is an easy solution that doesn't affect the guest OS and its applications. Backup takes ESXi server resources.
Cons: It makes a complete snapshot of a virtual machine without the option of removing certain apps or restoring a specific file. Instead, you can only recover the entire VMDK file, which may contain unnecessary and extensive data. Recovery Time Objective (RTO) is generally higher with file-based backup.
3. Third-party backup and restore solutions
The good thing about third-party solutions is that you get an all-in-one approach. Generally, what's offered is:
Application-aware backup
Backup and recovery of full VMs and ESXi hosts or separate files
Instant restoration
Incremental backups using global deduplication to save storage space
Network acceleration to boost the data backup process.