-
How to Engrave With Cricut Maker (Full Guide)
01/13/2025 at 18:10 • 0 commentsCricut Maker is a crafting machine mainly used for cutting various materials and making craft projects. But did you know we can engrave with it? This blog will help you discover how to engrave with Cricut Maker. The engraving tip allows you to add personalized text, draw decorative flourishes and embellishments, or inscribe your favorite quotes for ornamental pieces on different materials. You can engrave and personalize jewelry, leather metals, etc.
![Learn How to Engrave with Cricut maker Machine]()
Creating engraving projects is easy and fun. They leave a lasting impression, whether you gift or keep your engraved creation. The engraving tip is compatible with Cricut Maker and Maker 3.
How to Engrave With Cricut Machine: 3 Easy Steps
Here is the complete procedure for starting engraving with your crafting machine, such as essential tips on selecting the right materials, adjusting settings, and ensuring safety for a successful project.
Step 1: Creating a Design in the Cricut Application
Before using the machine, you need to create a design in the Cricut Design Space application. After creating a design, you can command your machine to engrave. So, let us see how to make a design with the help of software.
- The first step is to create a template. Open the Cricut Design Space to create a template. You can also use the Shapes section available in the app.
- Afterward, select Create or import an SVG file for your design, then click the green Upload button.
- Once your design and elements are ready, select Layers and then click Attach.
- Next, you must select the Make It button in the Design Space app.
- Your design is visible on the preview screen. You can move it around and ensure it aligns with the material.
- At last, with the design selected from the Line Type menu, select Engrave.
Step 2: Setting up Your Cricut Maker Machine
After preparing your design, the next step involves preparing the crafting machine for engraving. Here are some steps to follow:
- The first step involves switching on the cutting machine.
- Then, connect the machine to your computer using Bluetooth or USB.
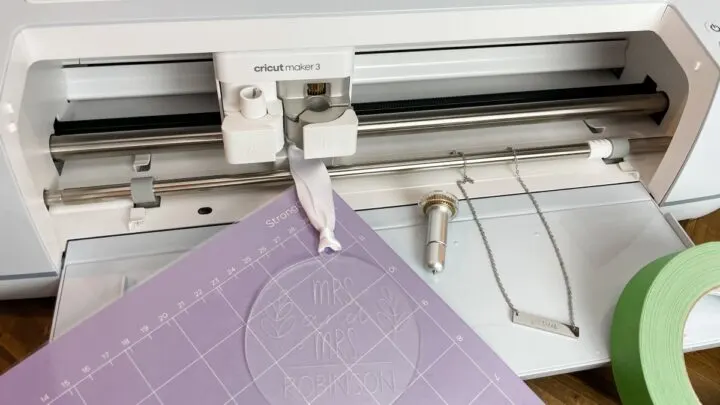
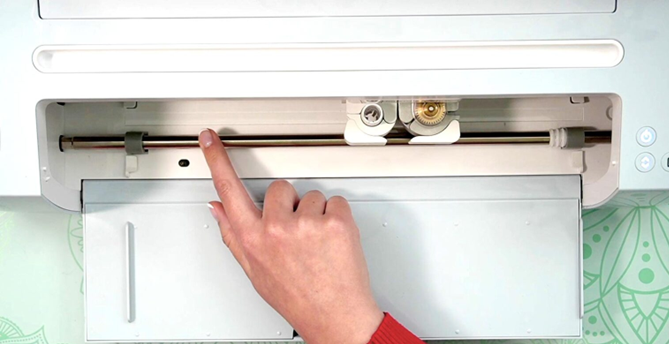
- Now, you need to load the Engraving Tip into Clamp B of your machine.
- Move the four-star roll wheels to the right side of the machine. Most of this is preferred so they do not have to review the material.
![Engraving tips and tricks for beginners]()
Step 3: Start Engraving on the Material
In the last engraving step, you need to load the material into your cutting machine so it can engrave it. It is better to use a StrongGrip mat for engraving. The steps are as follows:
- Materials come with a protective film, which you will need to remove.
- The protective film is not visible easily. So, most people need to remember to remove it.
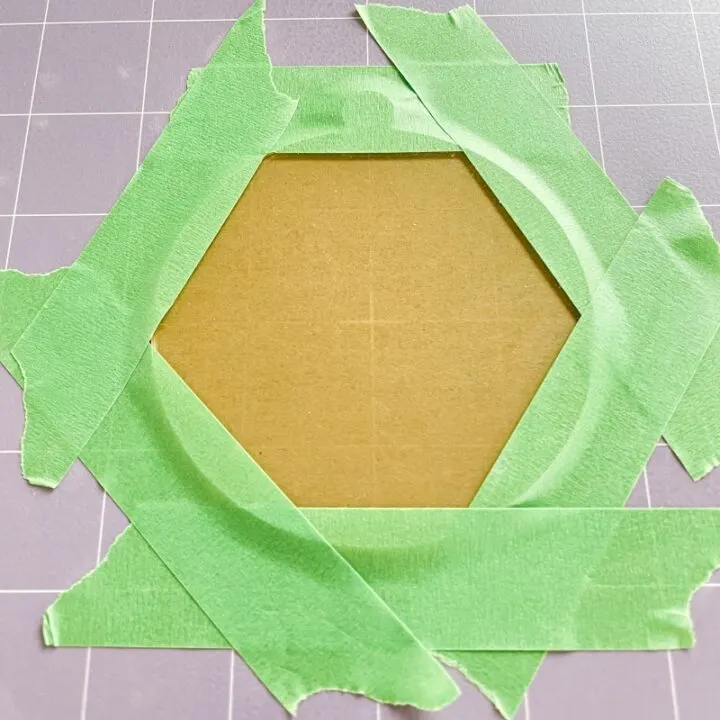
- When you are done with this, place your material on the machine mat. One tip is to use different blank shapes, which you can properly arrange with the help of grid lines.
- After placing your material on the mat, apply masking tape to the edge area beside the part of an area that needs to be engraved.
![how to Engrave Wood with Cricut maker]()
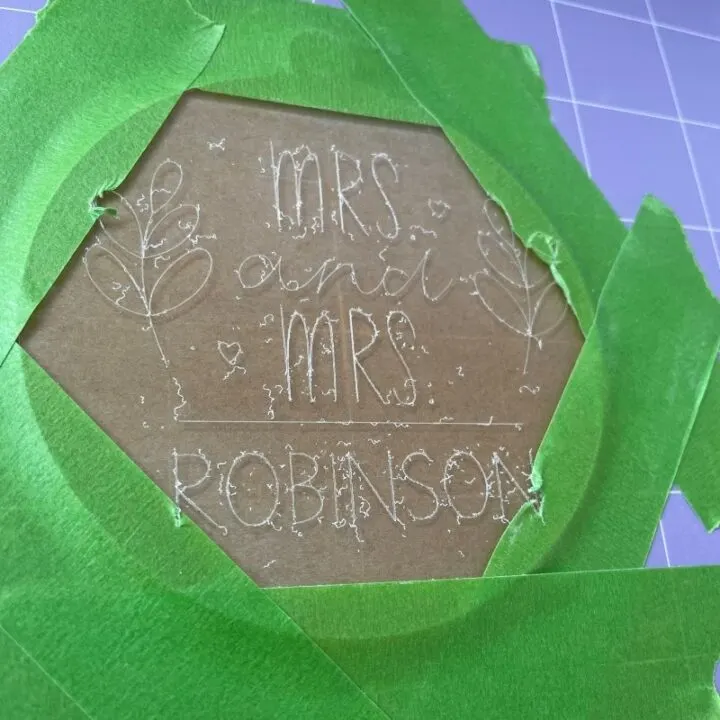
- Further, the material is loaded into the machine for engraving.
- Next, just press the Go button on the machine, and it will automatically start working.
- After engraving, you need to remove the material from the machine.
![How to engrave metal with Cricut maker]()
- Remove the tape and an engraved piece from your mat.
What Materials Can Be Engraved With Cricut Maker?
You can easily learn how to engrave with Cricut Maker by following the simple instructions above. The Cricut Maker can engrave up to 2.4mm thick materials. You can engrave various materials using engraving tips, including acrylic, leather, foil, glitter, cardstock, aluminum, and other metals. The crafting machine is compatible with the Design Space app. If you do not see the material settings for some items to engrave, you can only use different settings...
Read more -
How to Setup Cricut Maker: Getting Started for First Project!
08/17/2024 at 13:00 • 0 commentsIf you wonder how to setup Cricut Maker, you need to follow this tutorial! In this guide, I will teach you the complete Cricut machine setup in 4 simplified steps. Although you can use this post to set up any model, I will use the Cricut Maker machine in this blog.
The Cricut setup can be daunting in the beginning, but you don’t have to worry. I have been crafting using Cricut for many years, and I am capable of teaching you how to do it. However, in this blog, I will only discuss the procedure of setting up Cricut Maker.
Let’s start with the basic steps to download Cricut, connect it to a Windows computer, and finally set up the machine. Let’s delve into it.
Step 1: Check System Requirements
Are you using a Windows PC? Well, you can’t use it without knowing the system requirements. This is a must before you learn how to set up Cricut Maker. Since the setup will be done on the Windows system, let’s see what we need to run the software on it.
Please take note of the following system requirements:
- Operating System: Windows 10 or later (64-bit)
- RAM: Minimum 4 GB
- Disk Space: At least 2 GB free
- CPU: Intel Dual Core or equivalent AMD processor
- Display: Minimum screen resolution of 1024px x 768px
- Connection: A USB port or Bluetooth connection is required.
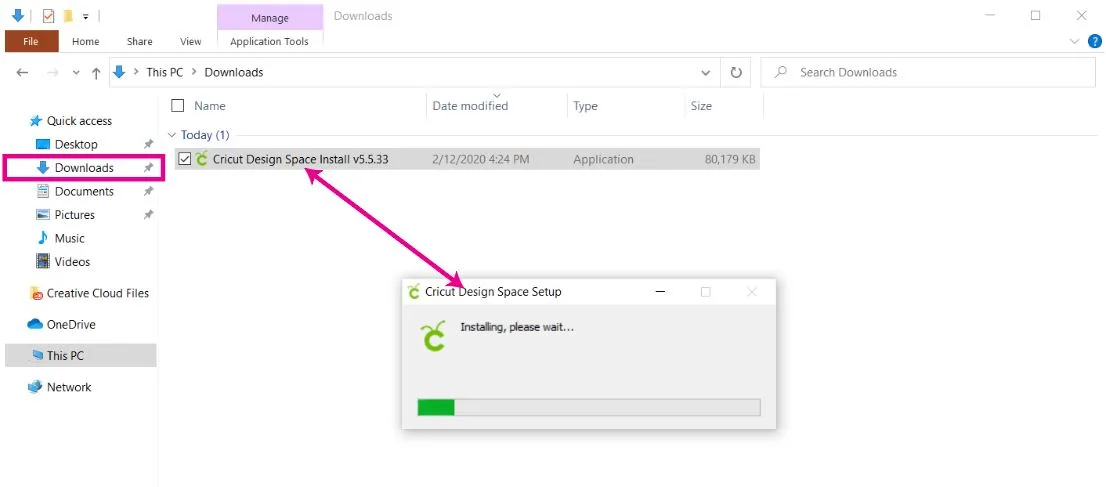
Step 2: Download & Install Cricut Software
In order to learn how to set up Cricut Maker, you have to download Cricut Design Space software on your PC. Since all the setup steps are to be done on the app, you must download it beforehand.
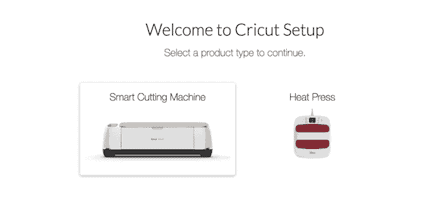
- On your PC, open your browser and enter this URL: cricut.com/setup.
- After that, you will need to choose the product type: Cutting Machine.
![]()
- Then, accept Cricut’s Terms of Use and click on the Download button. Now, your Cricut software will start downloading.
- Once downloaded, you have to go to the Downloads folder and open it.
- Just double-click on the downloaded file and begin the installation.
- Finally, you will have your Cricut software downloaded to your PC.
Step 3: How to Set up Cricut Maker
Finally, I will walk you through the steps to set up a Cricut machine stepwise. Make sure you have downloaded the Cricut software on your PC and checked its compatibility.
- Launch the Design Space app on a Windows PC and click on Product Setup.
- Now, you should create your Cricut account.
- Once done, you have to select a Smart Cutting Machine.
![]()
- Next, click on the Cricut Maker machine.
- After that, you need to follow the screen’s prompts for further setup.
Once you complete the above steps, you will need to connect your Cricut to your PC. I have explained this separately in the next step for your convenience. Please follow the steps carefully.
Step 4: Connect Cricut to PC Using Bluetooth
To complete the Cricut setup, you must connect it to your PC. Then, you will be able to use your machine.
Here’s how to connect Cricut cutting machine to a PC wirelessly:
- Take your power cable out and plug it into your PC and machine.
- After that, press the power button located on the top of the machine.
- Once you have powered on your machine, go to your PC.
- On your Windows desktop, press the Windows logo icon + I keys to enter Settings.
- On the following screen, choose Devices.
- Now, enable Bluetooth and select Add Bluetooth or other device.
- Next, you will see a pop-up asking you to add a device. Choose the Bluetooth option.
- Wait for a while and pair your machine with your PC.
- Once it is found, select it and pair the machine with the PC.
Kudos to you😍! You have learned how to set up Cricut Maker on your Windows computer. From checking system requirements to connecting Cricut to a PC, it might not be as daunting as it seemed to be. Good luck with your first project; now you are all set to create your first project on Cricut.
FAQs
... Read more -
How to Use a Cricut Explore 3: Easy Tutorial for Beginners
08/06/2024 at 13:08 • 0 commentsLearning how to use a Cricut Explore 3 is important in order to complete any project with this machine. The Cricut Explore 3 is a versatile cutting and crafting tool that can cut more than 100 materials, like paper, cardstock, vinyl, iron-on, fabric, leather, wood, and many more. With the help of these materials, you can work on a variety of craft projects. If you do not know how to use this machine, read this blog to learn everything you need to know.
To use this Cricut machine, you need to do certain things. You will have to connect your machine to a computer and download the Cricut Design Space app. This app will help you manage your projects and make the most of your machine. So, let’s start with the tools and supplies you will need for your project.
Tools and Materials for Using Your Cricut Explore 3
Before learning how to use a Cricut Explore 3, you should know about the supplies you will need for your DIY project. What supplies you will need depends on the project you are working on. Here, we are going to talk about using a Cricut machine to cut material to make a beautiful butterfly. You will need the following supplies on your machine:
- Cricut cutting machine: It is important as we are going to use it to cut the material for this project.
- Cricut Design Space: You need a phone or computer to download this app and create or upload a design.
- Power adapter: This is essential as it gets the machine connected to a power source.
- USB cable: It will help you connect the machine to your device. However, you can also use a Bluetooth connection.
- Material: This supply will be used to cut designs on your machine.
- Scraper tool: It will help you to stick the infusible ink to your project.
- Mat: You will need the mat to put the material on it so that you can get a smooth cut.
- Weeding tool: You will need a weeding tool to remove the design from your material.
How to Use a Cricut Explore 3 for Making a Project?
Once you know about all the supplies you will need for your project, you can move towards working on it. So, these are the steps you have to follow:
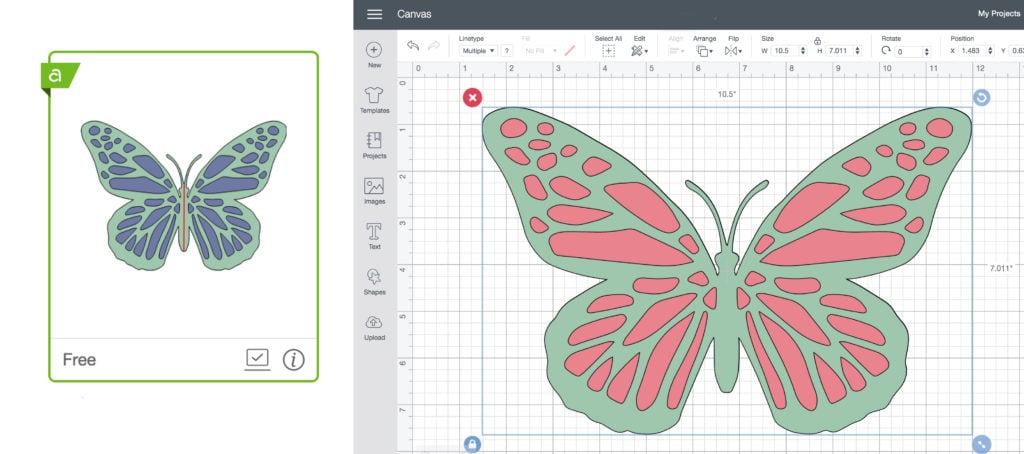
Step 1: Create a Design in Cricut Software
![]()
The first step is to create a design on the Cricut Design Space app. It offers many features that you can use to make your design. The first option you have is you can pick any design from the thousands of options you have. The other option is to create your own design by clicking on the New Project section on Canvas. You have one more option: you can choose any design from your computer and upload it to the software. After that, you can use that image for your project. Once your design is ready, you can move on to the next step.
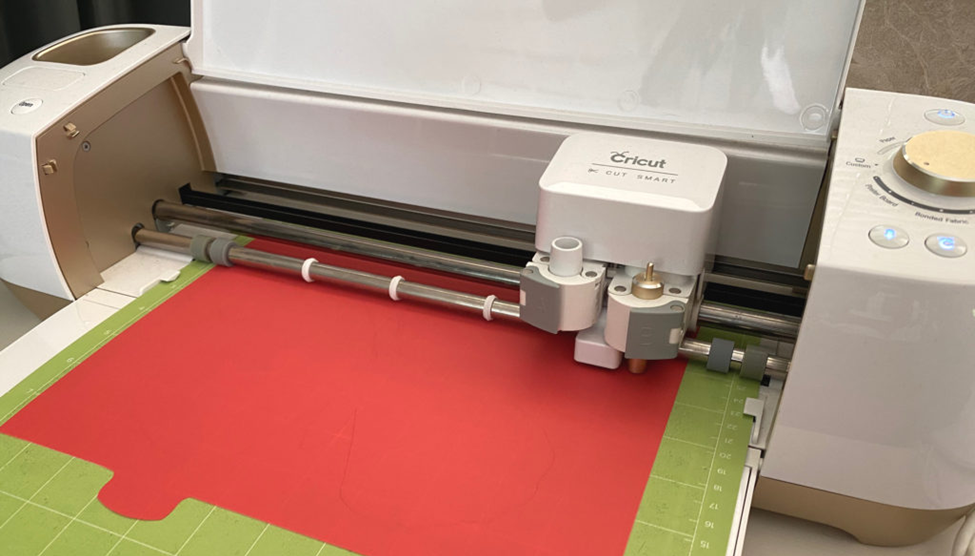
Step 2: Load Your Material
![]()
When you have selected a design, and then load the material on your machine. To do this, you must take the material and put it on the cutting mat. Next, place the mat inside your machine and press the Load button on the machine.
Step 3: Select the Material
When learning how to use a Cricut Explore 3, the next step is to select your material on the Design Space app. Afterward, go to the app and select the material you will use to cut on your machine.
Step 4: Cut Your Design on Your Cricut Machine
Once you have selected the material on the app, you can cut the design. To do so, you will need to click on Make It. The machine will cut the design in the exact shape that you have selected on the Cricut software.
Step 5: Unload Your Material and Reveal Butterflies
![]()
Once the material is cut, you have to unload it and remove it from the Explore machine. Then, you have to weed the design from the material. You can use a weeding tool for that. When the design is out, you have to glue it to the canvas, and your beautiful butterfly is ready to beautify your room.
Conclusion
In short, I am sure you have learned ...
Read more -
How to Download Cricut Design Studio: All Devices Are Covered!
07/17/2024 at 12:52 • 0 commentsAre you wondering how to download Cricut Design Studio on your device? If yes, then you are at the right place. The Cricut Design Space app supports multiple devices, and you can download it on any of them. In this blog, you will learn how to download the Cricut software on all these devices.
Don’t be confused by the term Cricut Design Studio; it’s just another name for Cricut Design Space. So, downloading Cricut Design Studio means you are about to download Design Space. It is supported on phones like Android and iPhone and computers like Windows and Mac. In this write-up, you will see how you can download the app on a desktop and mobile device, and you will be able to download it on your device. So, let’s begin the process!
Minimum System Requirements for Cricut Design Space
Before you learn how to download Cricut Design Studio, you should know the requirements your computer or phone needs. Although different devices have varying requirements, I will list them all to provide a full overview.
- If you are using a Windows computer, it should be running Windows 10 or newer. Similarly, a Mac computer needs to run macOS 11 or later versions.
- For Android phones, they must be Android 10 or higher, and iPhones should be running iOS 15 or later.
- Your computer should have at least 4GB of RAM and 2GB of free disk space.
- To connect the computer to your machine, it should have a Bluetooth option or a USB port.
- The display of the computer or phone should have a minimum resolution of 1024×768 pixels.
- In order to download and upload designs on the app, the device should have a minimum download speed of 2-3 Mbps and an upload speed of 1-2 Mbps.
- Also, the phone or computer should have enough empty memory space to allow for new DIY projects.
- The amount of required space will depend on the size and complexity of the project you are working on.
Make sure your device meets these requirements before downloading the Cricut app to make your DIY projects.
Download Cricut Design Studio for Windows
To download the Cricut Design Space app on your Windows computer, follow these steps:
- The first thing you have to do is open your browser and visit cricut.com/setup.
- Then, agree to the terms and conditions of the software to proceed with the download process.
- Next, click on the Download button, and the app will start downloading.
![Cricut Design Space Studio App]()
- Once the download is complete, open your Downloads folder and click twice on the file.
- You will then see a window asking if you trust the app. Confirm that you do trust it.
- On the following screen, this will start the installation progress.
![Cricut Design Space Application]()
- A new screen pops up, showing the installation has begun.
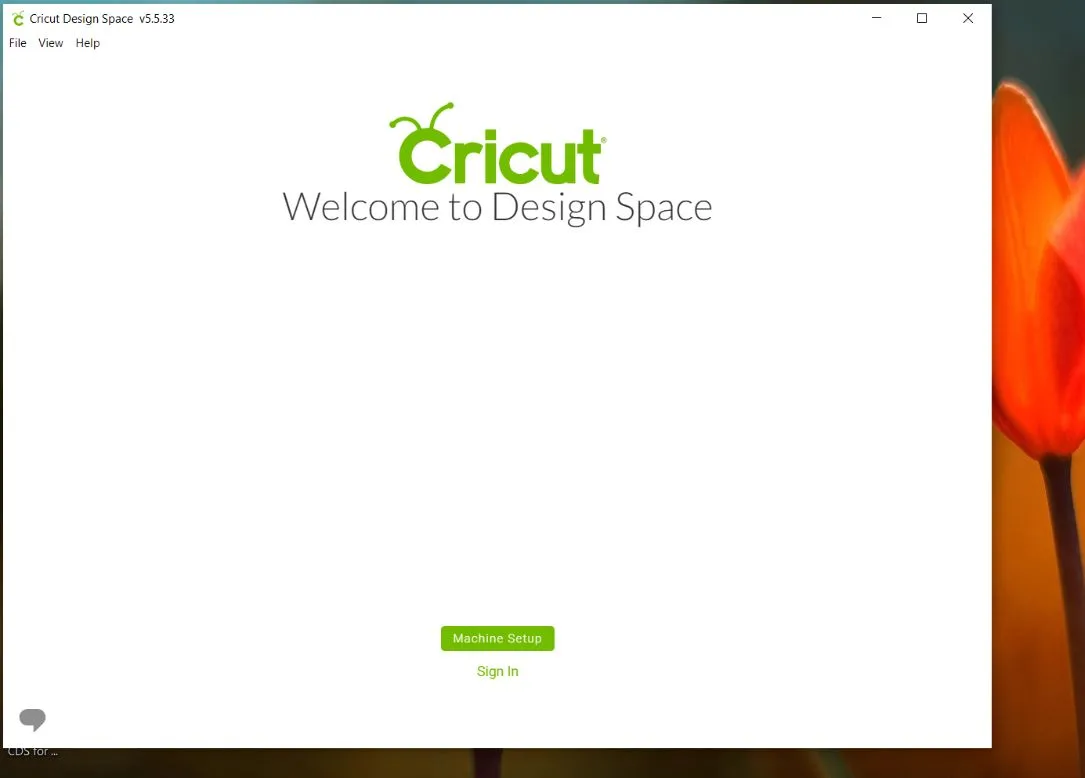
- After the installation is done, open the software and sign in with your Cricut ID.
![]()
- If you don’t have an account, you will need to create one.
- Once you log in, start using the Cricut Design app to create your crafts.
Finally, you can easily download and install the Cricut software on your Windows computer and start your crafting journey today.
Download Cricut Design Studio for Mac
Here is the process to download and install the Cricut Design app on your MacBook:
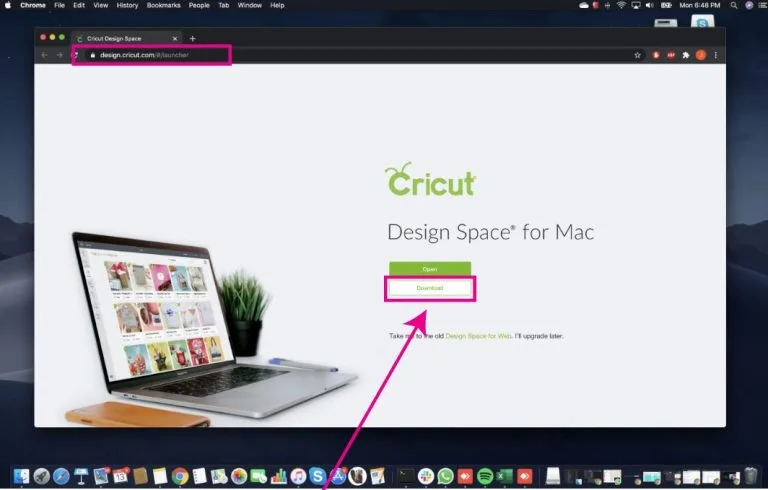
- Just as with a Windows computer, you first have to open your web browser on the MacBook.
- After that, head over to cricut.com/setup and look for the Cricut app.
- Once you find the software, click on the Download button.
![Download Cricut Design Space Application]()
- You can select where a folder you want to save the app file on your computer.
- If you don’t select a folder manually, it will be saved in the Downloads section.
- After tapping on Download, the software will begin to download.
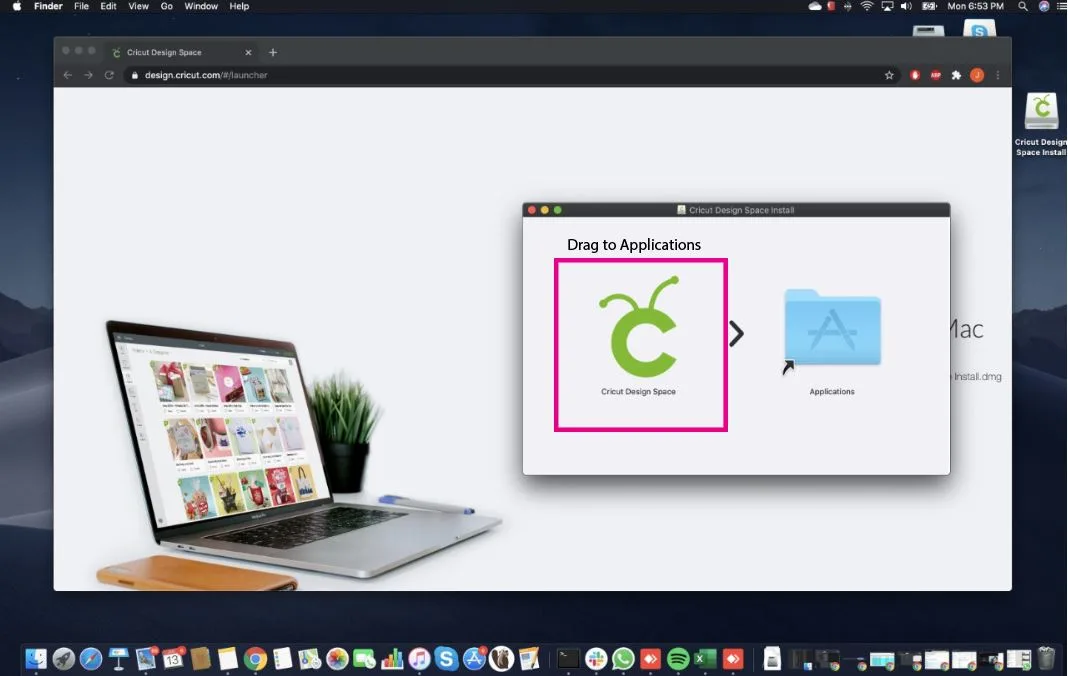
- Once the download is finished, open the folder where you saved the file and open it by clicking twice on it.
- You will see two icons: drag the Cricut icon to the Applications icon.
![Cricut Application]()
- In the Applications folder, double-click...
-
Cricut Design Space Requirements: A Full Guide for Beginners
04/18/2024 at 11:16 • 0 commentsAre you planning on expanding your craft room by purchasing a new Cricut machine? If yes, then you need to learn the Cricut Design Space requirements. Dear reader, in my last blog, I introduced you not only to the Cricut machine but also to its Cricut software. To create your DIY projects, you must have this software on your individual devices. With this Cricut app, you will be able to connect your device to Cricut and help crafters in drawing designs.
To use this Cricut Design app for crafting, you need to check if your device meets the system requirements. If you succeed in achieving this, then you won’t face any trouble during the Cricut software download process. Take a look at this post, as it will provide you with all the details about the requirements & download procedure.
Cricut Design Space Requirements for Mobile Devices
If you intend to download the Cricut Design app, you need to make sure that your mobile device meets the system requirements. You can use this software as an app while drawing designs for your projects. Here are the system requirements that you need to make this app run on your device:
Read moreSystem Requirements Android iOS Android 10 or the current version.Mobile devices or tablets only. Doesn’t run on Chromebooks. Samsung, Motorola, LG, Google series. Broadband Connection To Download: 2-3MbpsUpload: 1-2Mbps Not Available After studying the Cricut Design Space requirements for smartphones, you must understand one thing: whether your device will support this app or not. Go on with this blog and learn about the way via which you can get this Cricut Design app on your Android & iOS devices.
How to Download Cricut Design Space on iOS Devices?
In addition to the blog, you are free to use the Cricut software as an app on your iOS devices. Go through the below steps to learn about the process considering which you can download this app:
- Start the method by looking for the App Store on your device’s Home screen.
- After finding it, open the app by clicking on it.
![]()
- Now, start searching for Cricut Design Space and then click the Get button.
![]()
- Following this, verify the app download by filling in your iTunes password inside the field.
- Nevertheless, you can also double-click your device’s power button for verification.
- Once the download is complete, close the App Store and look for Cricut Design Space on the Home screen.
- After successfully finding the app, open it and select the Machine Setup or Sign In button.
![]()
- Viola! You are most welcome to make new designs or show your creativity on the canvas.
After installing the Cricut Design app on your Android device, you can swiftly download it on your iOS devices as well.
How to Download Cricut Design Space on Android Devices?
If your Android devices have successfully fulfilled the Cricut Design Space requirements, then you can easily get this app on your device. For the successful installation, check out the details given in the next particulars:
- First, unlock your Samsung or Motorola phone by entering your password or using your face ID.
- Second, tick the Play Store to open the app on your mobile device.
![]()
- Now, start looking for Cricut Design Space in the app.
- After getting fortunate in getting the app, tap the Install button.
![]()
- Following this, you will see the Cricut Design app, as well as other installed apps.
![]()
- At this point, simply open the app and then set up your machine or sign in.
![]()
- Conclude this app download method by creating new designs using the library & other benefits.
In conclusion, one thing is pretty sure you must have learned about the Cricut Design Space requirements and its download process on smartphones. Without a doubt, you need to ensure that you have connected the Cricut Design app to all the cutting machines before getting started with the crafting process.
Frequently Asked Questions
Question: What Is Cricut Design Space?
Answer: Cricut Design Space, also called Cricut...
-
Cricut Design Space Login App: Access Crafting Software Easily
04/12/2024 at 12:45 • 0 commentsIt’s been over a year since I started operating Cricut cutting machines to create DIY projects. Initially, I was completely unaware of Cricut models, its software, and how to use them. But my fighting spirit uplifted me to keep going, and I started researching them. It was time-consuming, but I learned about installing the Cricut software, creating a Cricut ID, and the Cricut Design Space login app process.
Cricut Design Space is the company’s registered design software, providing crafters with a wide range of benefits. With this Cricut app, you must get it on your device to make uncountable crafts. Afterward, you should create a Cricut ID and access your account through login credentials. Keep going with the blog, as I covered the continuous info regarding installation, creating an ID, and logging into the account.
Step 1: Download Cricut Design Space on Your Mobile Device
The foremost step before proceeding with the Cricut Design Space login app is to install Cricut software on your mobile devices. You can use this software as an app rather than opening it in a web browser. Exam the section below to install the app on Android or iOS devices.
Android
With the help of the following method, it will become simple for you to install this software on your Android devices:
- Commence the process by switching on your devices and start looking for the Google Play Store.
- You will find the app with other installed apps on the home screen.
- Now, click the Play Store to open the app on your device.
![]()
- Next, look for the Cricut Design app or type its name inside the Search box.
- After getting lucky in finding the app, tap the Install button given inside the blue box.
![]()
- At this point, you will notice that the app will appear next to other installed apps.
After installing this Cricut Design app on an Android device, quickly scan the next section. It will introduce you to the method for installing on various iOS devices.
iOS
Equally important, take the help of the following steps to install this software on your iOS devices:
- First, unlock your iOS device and open the App Store.
- Second, search for Cricut Design Space and then tap the Get option.
- Third, double-click the power button to install the Cricut software.
- Moreover, you can also enter your iTunes password to verify the app installation.
- Now, sit back until the app is installed on your iOS device.
- After the app gets installed, close the App Store tab.
- Now open the app and choose Machine Setup or Sign In.
- Conclude the installation process by creating new projects using this software.
Further adding to the blog, you must have your separate Cricut account; only then will you get permission to use the Cricut app for crafting purposes.
Step 2: Create a Cricut Account ID on Your Device
Before entering the Cricut Design Space login app, you must create a separate Cricut ID. If you fail, you won’t be able to access the software and create DIY crafts. By considering the below steps, it will become a piece of cake for you to make your separate account:
- You can install the Cricut Design app on your mobile device by following the above-said method.
- Afterward, open the installed app, and the Cricut sign-in page will open on your device.
- Now, tap the Cricut a Cricut ID, and you will be on the new web page.
- On this page, start filling in the blank with your First name, last name, personal Email ID, and password.
- Following this, tap the checkboxes and hit the Create Cricut ID option.
- Finally, you are eligible to access the Cricut Design Space login app and use it to create new projects.
After successfully creating your Cricut ID, you can easily log in to your Cricut account without any technical errors. If you intend to do that, take a sneak peek at the coming section of the blog.
Step 3: Cricut Design Space Login App
In conclusion with this blog, get to know about how you can log in to the Cricut app with the help of...
Read more -
Cricut Explore Air 2 Software Download: Easy Installation
04/04/2024 at 11:46 • 0 commentsHey, dear crafters enthusiasts! Hope you are doing really great! In this guide, I am going to put some light onthe Cricut Explore Air 2 software download. If you have been looking for how to download Cricut software, then it can be helpful for you. I remember the day I got my first new iOS device. I needed to set it up on my iPhone, but I wasn’t sure how to do it. Before that, I had to download a Cricut Design Space. It was essential to get the intuitive Cricut software.
If you are ready to follow this guide and download the app, then you should follow it. In this guide, I will be talking about downloading the Cricut app not only on iPhone but also on Mac, Windows, and Android smartphones. Let’s delve into it.
Cricut Explore Air 2 Software Download on a Computer
Want to download your Cricut software on a computer? Mac or Windows? No matter which computer you have been using for years, you can install the app easily on both of these devices. Let’s go through the following steps for both computers.
Windows
- Here, you first need to power on your PC.
- Then, launch an internet browser (Choose any compatible browser, e.g. Google Chrome).
- You will have to navigate to design.cricut.com on the browser’s search tab.
- Next, you will need to click on the checkbox to accept Cricut’s Terms of Use and Privacy Policy.
![]()
- After accepting the T&C, you will need to hit the Download button. As a result, you will see a green Download button.
- Press the Download option, and then it will begin downloading your software.
- When the Cricut file is downloaded, head to the folder in your file explorer where you have downloaded it.
- After that, check your Downloads folder.
- And then, open the file in the Downloads folder to begin the installation.
![]()
- Follow the presented screen prompts to get the software on your PC.
Mac
- The first four steps (mentioned above) are the same as for Windows.
- Once you have downloaded the software file, rush to your Downloads folder.
- Next, you need to go to the .dmg file and double-click it to proceed to the next step.
![]()
- Afterward, you will see a new window with a Cricut icon and a file folder icon.
- Drag the Cricut icon to the blue Applications folder and start the installation.
![]()
By now, you might have seen how to download Cricut software on Windows and Mac computers. Now, it’s time to shift our focus to mobile devices. Let’s dive in.
Cricut Explore Air 2 Software Download on a Mobile
My experience of getting the Cricut app was really good as it is easy to install on your desired devices. It doesn’t matter whether you are an Android user or an iPhone or iPad user; the application installation process is quite similar. Let’s have a look at the steps below:
Android
- On your Android smartphone, you have to open a Google Play Store.
![]()
- On the search bar, type Cricut Design Space and see the suggested results below.
- Click on an app white Cricut written on a white square box.
- Just hit the blue Install tab to get it to your smartphone.
![]()
- After you have installed it, you can add this app to your home screen.
iOS
- You need to launch an App Store app on your iPhone or iPad.
![]()
- Then, you must go to the search bar and type “Cricut Design Space.”
- Now, you will find an app with Cricut written in a white square box.
- Click the Blue Get button to get the application on your iOS device.
![]()
- After you have installed the app, you can open it and start your setup smoothly.
![]()
By now, you might have completely understood the process for the Cricut Explore Air 2 software download. If so, download the software immediately and get started with your Cricut in no time.
FAQs
Question 1: Why is Cricut Design Space essential for using Cricut machines?
Answer: The Cricut machine requires a digital design to cut the intricate design precisely. However, to do this, the software required is nothing but the Cricut app. Having this application installed on...
Read more -
How to Download Cricut Design Space for Desktop: Easy Guide
03/28/2024 at 12:41 • 0 commentsWith Easter just a week away, I know you are all focused on creating baskets, candy, and gifts. But it would be best if you do not forget to design customized greeting cards as they are the most famous and easy-to-make crafts. What if I told you to create your own Cricut Easter cards ideas at home? Yes, you heard right: the Cricut machine will help you make various invitations for the celebration.
If you are hardworking and love creating DIY projects, give the Cricut machine a chance to make greeting cards. With the help of the Cricut cutting machine, you can easily design invitations from any material. One of the best things about Cricut is that it is kid-friendly and will make them keen to learn something new. Keep exploring this blog to learn about the types of Easter cards that can be made using a Cricut machine.
1. Clothespin Animal Card
Do you want to see your kid take crafting to the next level? If yes, you should definitely make a custom-made clothespin Easter card. The clothespin easily gives a modern touch to the Cricut Easter cards ideas. Also, you can swiftly make this custom invitation by forming the design on the Cricut app and giving proper shape to the material.
![]()
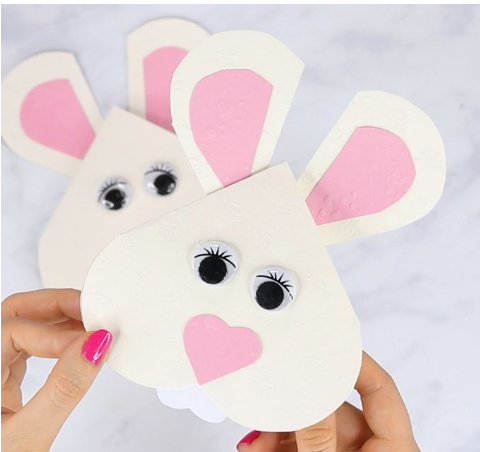
2. Heart-Shaped Bunny Card
Are you looking forward to sharing your feelings with someone special at this festival? Don't worry—design a heart-shaped bunny card. You can easily make this cute-looking bunny by creating the design on Cricut Design Space and letting the machine do the rest of the work. Plus, you can also give this Cricut Easter project to your children or neighbors.
![]()
3. Rocking Easter Egg Card
Equally important, if you want to make one of your Cricut Easter cards ideas look more fantastic and stylish, designing a rocking Easter egg card should be on your list. It was pretty fun making this egg-stra special card. Beyond question, simple cards are everyone's favorite, but won't it be great to have a card that moves from one place to another? You can design the card using the correct Cricut machine, material, and other tools.
![]()
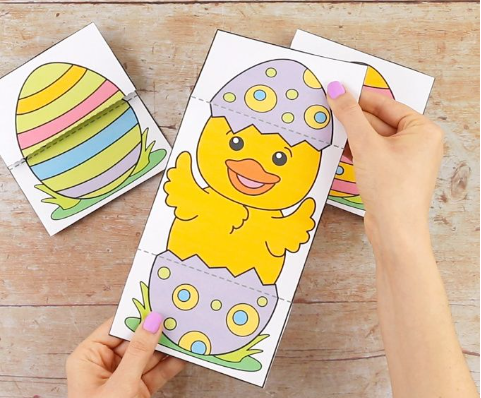
4. Foldable Egg Easter Card
Further adding to the post, keep your kids engaged with this fantastic foldable Easter egg card. You can make single-layer or multiple-layer cards for the festival and give them to the kids. In the beginning, it may seem a little harder to design this card, but as time passes, you will make it within a few minutes. You must use the correct cutting machine and compatible supplies while forming this project.
![]()
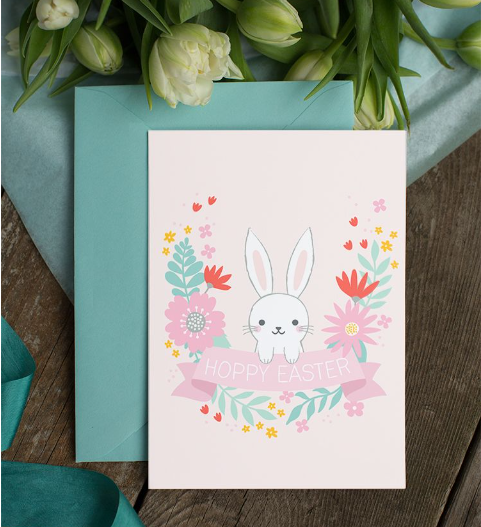
5. Hoppy Easter Card
Subsequently, if you have a hectic schedule and want an instant, good-looking card, the Cricut machine is here for you. To make this card, you must choose a design and load the supplies into the machine. Apart from making it look too glammy, you can add a good wish and give it to the guest.
![]()
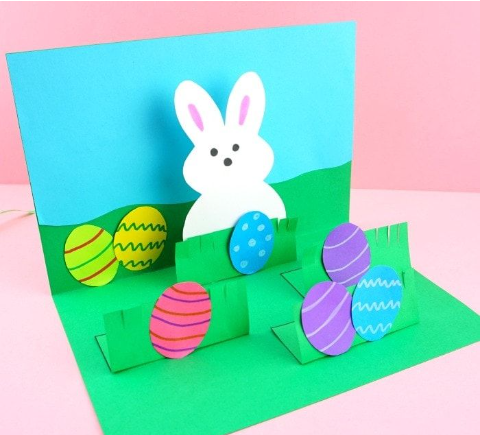
6. Pop-Up Card
Equally important, show off your crafting skills by creating a customized pop-up card. To make this type of project, you must use Design Space and create your design on the canvas. Then, choose the compatible materials and systematically assemble all the pieces to make one of these Cricut Easter cards ideas.
![]()
7. Bunny Picture Card
Did you recently welcome a newborn baby, and will this be their first Easter? Then, you all must be very excited for the primary day. To make their day memorable, you can make a customized card with their cute photograph stick on it. Intending to finish this project, you need to be very particular while choosing the cut-die machine, materials, and other supplies.
![]()
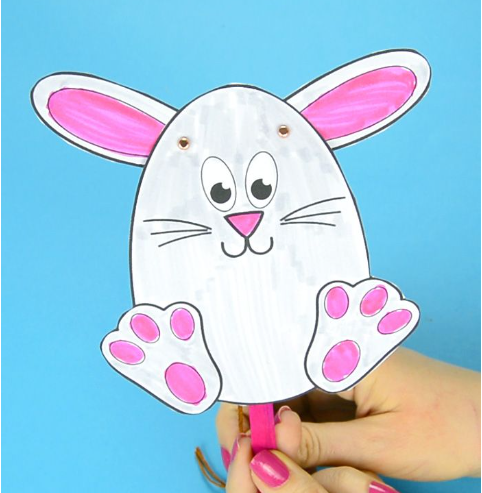
8. Movable Bunny Puppet Card
In addition to the blog, you can take your creative skills to a professional level by designing a DIY movable bunny card. This craft allows you to easily move the puppet from one place to another, which will encourage your baby to participate in the physical activity.
![]()
9. 3D Bunny Card
Make a 3D bunny card with the Cricut machine to give your invitation...
Read more -
How to Download Cricut Design Space for Desktop: Full Guide
03/19/2024 at 13:32 • 0 commentsHey, are you looking for Cricut Design Space for desktop? Don’t worry — you can easily get it on your Windows or Mac. But the question is, how much time will it take to download the app? Well, depending on your internet speed, it will take less than a minute or a maximum of 5 minutes.
The time is not too much, and that’s fine, but what about the system requirements? Can you download the app to your Chromebook, Linux, or any other device? Well, the answer is a big no. However, you can only get the Design Space on Windows and Mac. You can’t get it on other operating systems. Plus, you can download the app on Android/iOS devices without any hassle.
In this blog, I am going to explain the system needs that must be met before downloading the app. Then, you can easily install it on your desktop. Let’s get into it without much delay!
Minimum System Requirements for Using Cricut Software
Do you know why we need to check system requirements? We need to do this because we will need to download Cricut Design Space for desktop. Whether you are installing it on your computer or mobile, you must ensure the basic needs of your devices.
So let’s start with Windows computers first, and then we will move to Mac.
For Windows
- Operating System: Windows 10 or later (64-bit)
- CPU: Intel Dual Core or equivalent to AMD processor
- Display Screen Resolution: Minimum 1024px x 768px
- Internet: Minimum 2 – 3 Mbps Download; Minimum 1 – 2 Mbps Upload
- Connectivity: USB cable or Bluetooth
- RAM: 4GB
- Disk Space: 2GB
- Offline Feature: Available
I started my crafting journey with a Windows computer. Thankfully, my computer met all the requirements. Whatever, I have switched to a Mac now. The experience of using it on Mac is superb😍. Let’s see what we need to download the Cricut software on Mac.
For Mac
- Operating System: Get macOS 11 or later version for the OS.
- CPU: 1.83 GHz
- Display Screen Resolution: Minimum 1024px x 768px
- Internet: Minimum 2 – 3 Mbps Download; Minimum 1 – 2 Mbps Upload
- Connectivity: USB cable or Bluetooth
- RAM: 4GB
- Disk Space: 2GB
- Offline Feature: Available
Download Cricut Design Space for Desktop (Windows)
Below, I have explained the steps to download the Cricut app on a Windows computer. Make sure you have checked the system requirements before downloading it.
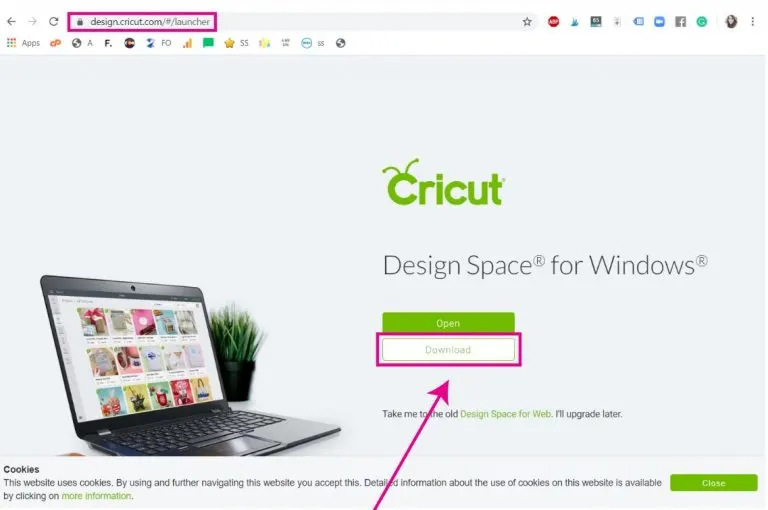
- I first go to the browser on my PC and visit design.cricut.com.
- On Cricut’s official website, I select the checkbox to accept the Cricut Terms of Use and Privacy Policy.
![]()
- Next, I click on the Download button to start downloading the Design Space.
![]()
- Once I completed downloading the app, I double-clicked the file that I had downloaded before in my Downloads folder.
![]()
- Then, I was prompted to select yes or no to approve whether I trusted the application. Here, you should select the option to trust the software.
- After that, your installation will begin.
![]()
- Finally, I have to sign in to your Cricut account. I used my Cricut ID and password.
Download Cricut Design Space for Desktop (Mac)
So, here you go! Below, I have already covered the steps to teach you how to download Cricut Design Space on Mac. Perform the steps to download the Design Space on a Mac.
- Start with switching on your Mac computer.
- Then, find your internet browser and launch it on your Mac computer.
- On this browser, you will have to move to the Search bar and copy & paste the “design.cricut.com.”
- Select acheckbox to accept Cricut’s Terms of Use. It will enable your Download button. Click on it to begin downloading.
- Later, you will proceed to a page where you need to choose a file location to keep your downloaded file.
- Once downloaded, proceed to the file location where you have kept the file.
- From there, you must click on the Save tab to initiate downloading.
- In the last step, the download procedure will begin.
If you follow the above steps carefully, you will easily be able to download...
Read more -
Which Is the Top Rated Cricut Machine of 2024?
03/13/2024 at 18:34 • 0 commentsReady to bring your crafting ideas to life with Cricut? If you have been looking for the top rated Cricut machine that is beloved worldwide for its exceptional crafting capabilities, look no further. Welcome to my ultimate guide, where I will not only introduce you to one or two top machines but also provide detailed coverage of more than five models.
For the past six years, I have dedicated myself to crafting full-time and discovered every Cricut model along the way. With this wealth of experience, I am confident that I can provide you with the right tips based on my journey. Also, I will include expert recommendations for each machine. Let's not delay any longer and dive deep into the Cricut machine lineup, starting from the top down.
1. Cricut Maker 3
Many of you are looking to upgrade from your old Cricut machine, while others are beginners starting their crafting journey. For both groups, the top rated Cricut machine I highly recommend is the Cricut Maker 3. This versatile machine meets the needs of both experienced crafters and newcomers.
The Cricut Maker 3 has cutting-edge technology and many features. It is the fastest cutting machine in the Cricut lineup, capable of cutting over 300 materials ranging from thin paper to thick wood and 2.4mm fabric. While it comes with a price tag of around $399, the investment is well worth it in the long run.
Features:
- Cricut Maker 3 comes with 13 tools
- Works with Smart Materials without any cutting mat
- Twice as fast as the Cricut Maker
- Able to cut 12 feet long without a mat
- Automates cutting pressure and speed
- Works with easy-to-use Cricut Design Space
- Provides 10x cutting force
- Offers Bluetooth & USB connectivity
- Capable of cutting, writing, scoring, foiling, debossing, engraving, Print-Then-Cut, and drawing
2. Cricut Explore 3
![]()
This Explore 3 is a top rated Cricut machine that offers great value and plenty of advanced features. It is a more affordable alternative to the Cricut Maker 3. This updated version of the Explore Air 2 can cut over 100+ materials and works with Smart Materials, allowing cuts up to 12 feet in length without a mat. At just $279, it's a compelling option.
Features:
- Cricut Explore 3 can cut, write, score, draw, and foil.
- It has a Print Then Cut feature.
- Supports both USB and Bluetooth connectivity.
- This machine works with Smart materials.
- An adaptable cutter
- It can be used via Cricut Design Space
- Compatible with 6 different tools
- Able to cut 100+ materials
3. Cricut EasyPress 3
Once you start making projects with the Cricut machine, you'll get to work with HTV and iron on vinyl to create different items like t-shirts, tote bags, coasters, blankets, and more. To use this, you will need a Cricut Heat Press machine. The ideal choice for beginners is the Cricut EasyPress 3, available in two sizes: 12X10 inches and 9 x 9 inches. Prices vary according to size, starting at $149.
Features:
- Built-in Bluetooth connectivity
- Insulated safety base
- Ceramic-coated heat plate
- Auto press function
- Works with the Cricut Heat app
- Compatible with HTV, infusible ink & sublimation
4. Cricut Joy Xtra
![]()
The latest top rated Cricut machine, the Cricut Joy Xtra, was launched on September 7, 2023, and has gained popularity due to its advanced features. It is an upgraded version of the Cricut Joy that offers a larger size for DIY projects, up to 8.5 x 11 inches, and compatibility with Smart Materials up to 4 feet long. Priced at $199, it offers additional features like the Print Then Cut feature, making it perfect for sticker making compared to the $149 Cricut Joy.
Features:
- Wider cutting area of up to 8.5 inches
- Capability to cut, write, foil, and draw on 50+ materials
- Print Then Cut feature is included for precise cutting
- Compatibility with foil transfer tools, pens, and blade
- Lightweight and easy to transport
- Bluetooth wireless technology for seamless connectivity...
-
7 Easy Cricut Maker 3 Wood Projects You Must Try in 2024
03/09/2024 at 13:00 • 0 commentsHey, crafters fam🤗! Are you looking for some exciting Cricut Maker 3 wood projects? Look no further than diving into this blog. Through this blog, you will have many ideas that you can apply to your Cricut Maker 3 projects using only wood.
So far, I have created several Cricut projects that you should definitely try if you want to make something attractive and unique. These crafts are so great that you can sell them if you have an online shop. Also, I have sold many of my DIY projects and am still selling them on my Shopify. I have also noticed that wood projects sell more than others.
So, what are you waiting for? Let’s delve into this blog to discover amazing woodworking projects.
1. Name Puzzle
What could be a better gift for your child than this wooden name puzzle? If you have been looking for Cricut Maker 3 balsa wood projects, then give it a thought. I made this using balsa wood, which is very simple. As you can see, I painted each letter with different colors to give it a custom look. So, keep your children away from plastic toys and give them this wooden toy.
2. Geometric Coasters
I like wooden-made things, so I also use them in my kitchen. But here, I have created these wooden coasters that I use on my dining table to keep glasses and other bottles. And yes, these are also Cricut Maker 3 projects.
So, cut the pieces into different geometrical shapes and use your trusty Cricut Maker 3 to cut them in no time. Trust me, once it is cut and ready to use, it will look so modern!
3. Engraved Earrings
Have you ever tried wooden earrings with intricately engraved designs? They look fantastic. I recommend you try one and either wear it for yourself or gift it to your loved ones or friends. So, I don’t think Maker 3 is only limited to cutting; it performs more than one operation. Get your machine out of the box, start engraving the wood, and create this amazing earring using wood.
4. Wooden Bookmark
![]()
Are you tired of using the same paper bookmarks? Now, it’s time to create a wooden bookmark, and I believe this is one of the best Cricut Maker 3 wood projects. I am a vivid reader, so I want many bookmarks, so I keep creating them. But this time, I tried using wood and saw how perfect it looked! There are only two things you will need: Cricut Maker 3 and a knife blade. Then, your work is done! 😍
5. Desk Organizer
![]()
As a crafter, I can understand the number of tools and materials we have to use. But arranging them in one place is really a tedious task. Now, I don’t bother arranging them in order, as I have created a wood desk organizer. The small boxes are easy to create and simply reduce the pain of finding anything without wasting much time.
6. Pencil and Phone Holder
![]()
This adorable baby elephant pencil or phone holder is unique, isn’t it? It’s one of the fantastic Cricut Maker 3 wood projects that everyone must try. Keep it on your desk and arrange your pencils and other accessories, including your phone, hassle-free.
You can also give it to your children. They can use it on their study table. So, just upload the template and let your Cricut Maker 3 cut the pattern.
7. Wood Letters
![]()
Wood letters made with Cricut are among the most common wood projects. They can be displayed on a table or anywhere else that attracts people’s attention. You can also use a handsaw to create these crafts, but Cricut is the best tool to create a better line.
But you might be wondering what are the other uses of wood letters. Well, wooden letters can be used for stockings, address numbers, and decors for your door. It’s as simple as that!😉
FAQs
Question 1: Where can I get wood for Cricut projects?
Answer: To make Cricut Maker 3 wood projects, you can use many different types of wood. The wood should be flat and even and contain little or no knots. You can get the wood from craft stores and ensure it is free from knots and flat or even. However,...
Read more -
How to Use a Cricut for Shirts: Quick and Easy Guide
03/04/2024 at 12:28 • 0 commentsHey crafters! If you are here to learn how to use a Cricut for shirts, this is the right blog for you. Recently, I finished creating a shirt, so I decided to include it in this blog. It might help crafters understand how to make shirts with Cricut, including Cricut’s use.
I created this shirt for my 8-year-old son, who needed a new T-shirt as a gift. He asked for it and wanted me to make it using my Cricut machine. Also, he is always around whenever I create some crafts on my Cricut. Seeing this, he asked me if I could make a shirt using a Cricut.
When I finally started creating shirts, I noticed that I had run out of many essential supplies. Hence, I needed to buy them. I have already mentioned the essential supplies in this blog for you to consider. Let’s delve into this blog to learn how to use a Cricut machine to create a shirt.
Step 1: Materials and Tools Required
Without essential supplies, you would not know how to use a Cricut for shirts. Therefore, I have mentioned the materials and tools below:
Materials
- Cotton T-shirt
- Iron-on vinyl
Tools
- Cricut machine (You can use Cricut Maker 3 and Cricut Joy LightGrip mat (StandardGrip cutting mat)
- Weeding tool
- Cricut EasyPress
- Cricut EasyPress mat or a folded towel
Tip: You should wash the shirt before applying vinyl on it.
Step 2: Add Your Shirt Design
In this second step, you need to add or upload the shirt design. From Cricut Design Space, you have to find the design that you like.
![]()
Didn’t find anything? Chillax! You can create some designs on Design Space. See, if you want to add some text, then I don’t think adding text will be a big deal for you!
All you need to do is go to the Text option and type whatever you would want to add. Here is the design I created for my son’s shirt.
![]()
Step 3: Cut the Design on Iron-on Vinyl
Here, I am finally going to show you how to use a Cricut for shirts. Grab your machine and set it up if it is not set up. Afterward, you will need to follow the steps below.
1. Load the Iron-on Vinyl on the Cutting Mat
Here, you can use LightGrip (Blue) cutting mat or StandardGrip (green). Make sure you need a mat that has a little bit of stickiness.
2. Place the Vinyl on the Mat
Now, place the vinyl onto the mat using the brayer tool. Ensure it is adhered properly to the mat. But do you know which side of iron-on vinyl should be up? You need to put the shiny side down on your cutting mat.
3. Start Cutting Your Material
Now, you have to hit the Load button so that you can load the mat into the machine. Next, you can send the design file to your Cricut cutting machine.
![]()
To send the file to your machine, follow the steps below:
- First, you have to hit the Make It button.
- After that, you will be on the Prepare Screen. Here, you need to select the Mirror toggle button to turn it on.
- Then, click on the Continue button.
- Further on the Make screen, you have to choose the desired materials that you are going to cut.
- You have to choose Everyday Iron-On from the given Popular Materials list.
![]()
- Now, it’s time to cut the design. Load the Fine-Point blade and the mat.
Afterward, you have to click the flashing Go button to begin cutting. Finally, when cutting is done, you have to weed it using a weeding tool or hand.
Once the design is weeded, you have to place it over the shirt.
Note: If using Cricut Explore Air 2, you need to rotate the wheel to Custom, and then you have to select the drop-down menu.
Step 4: Apply the Vinyl
Now, you need to use Cricut EasyPress to transfer the vinyl onto the shirt. For this, you have to setup your workplace. For this, you need to place the EasyPress mat on a flat surface and then place the shirt on it.
Preheat your shirt and then place the material on the shirt. Again, set the recommended temperature for your shirt and place it over it.
Finally, you did it!
This blog might have helped you learn...
Read more -
How to Make Decals With Cricut: A Step-by-Step Tutorial
02/26/2024 at 11:49 • 0 commentsHey, Cricut fam! I am glad to see you on my blog! I assume you must be here to learn how to make decals with Cricut. Do you know what I created with my Cricut recently? They are custom decals for my laptop. Yes, it looks really incredible on my laptop! I know you probably don’t want to make custom decals for your laptop. But this blog can be helpful even if you want to create a car or wall decal.
![]()
This is because the steps provided by this blog will be the same for all types of decals. So, if you want to make decals for cars, mugs, or walls, follow my instructions carefully till the end of this blog. But wait! Are you also wondering what material you are going to use for creating decals? Chillax! I have already mentioned them in this blog. Now, let’s start!
Essential Supplies and Tools for Creating a Cricut Decal
Do you know why I chose to make a decal for my laptop only? I could have also chosen wall or car decals. But I chose a laptop because it was my birthday gift from my dad. Since then, this laptop has been very close to my heart. Hence, I now want to give it a wonderful look.
To make these laptop decals, we will need some supplies. Afterward, you will learn how to make decals with Cricut. Below is the list of supplies I used for making a decal for my laptop:
- Cricut Explore 3
- Laptop
- Material Trimmer
- Accessories
- Smart Vinyl (in red color)
- Transfer Tape
How to Make Decals With Cricut Cutting Machine?
Now, once you have gathered all the essential supplies for your decals, you need to follow the steps I am providing below to make them.
Step 1: Add a Cricut Laptop Decal
- First, you will need to open your Cricut Design Space app on your computer.
- Then, go to the search and type laptop decal.
- Now, you will need to select from the results that appeared.
- After that, you need to click on the Make It button.
![]()
- You will see a pop-up asking you to select an option like Without Mat or On Mat. Since I am using a Smart Material, I will confirm the Without Mat option.
- Next, the design will be added to your Canvas.
- Afterward, you have to add the name and other elements you like.
![]()
- You will have to change the text color if needed (I kept the text color red so I could cut everything on the same red-colored vinyl).
![]()
- Now, move to the Review Artwork screen to confirm the design you want to use for your material. Once you are satisfied, hit the Continue button.
Step 2: Set Your Material
Okay, in this step, you will choose the materials for your Design Space. I have chosen Smart Vinyl - Removable materials. Once you have selected the materials for your laptop decal, move to the next step.
![]()
Step 3: Cut the Cricut Vinyl Decal
Once you have set up the material, your software will send the information to your Cricut Explore 3 machine. Before cutting, you will need to insert the material into the Cricut machine.
![]()
After that, press the flashing Go button and wait for your machine until it cuts all your designs.
Once done, unload the vinyl. Then, weed the excess vinyl out.
Note: All the steps will be shown to you on your display; just follow them carefully to begin cutting.
Step 4: Use the Transfer Tape to Apply Vinyl to Your Laptop
After weeding out your excess vinyl, you need a transfer tape. Apply the transfer tape on the front side of your design. You can use a scraper to burnish the Transfer Tape onto the design.
Finally, apply your vinyl cut design to your laptop.
![]()
Finally, you have explored how to make decals with Cricut. Now, you should give it a try and make something that stands out! All the best for your effort.
FAQs
Question 1: Do Cricut decals last long?
Answer: Cricut Premium Vinyl Permanent is the best material crafters can use to make decals. With this permanent vinyl, users can transform their decals into beautiful crafts. This material is water- and UV-resistant and can last up to 3 years. Hence, you can make decals with this vinyl and use it...
Read more -
Cricut Design Space Download for Windows 10: A Setup Guide
02/17/2024 at 09:48 • 0 commentsAre you looking for a guide on Cricut Design Space download for Windows 10? If yes, you are at the right place. Through this blog, I will walk you through the steps to download the Cricut app on a Windows computer,connect Cricut to computer, and finally, the machine setup.
You might be wondering why I am discussing the setup process. Let me tell you the Cricut software download process is also a part of the complete machine setup. Hence, you have to follow every step in the sequence. As I have explained in this blog, you will first download the Cricut app, then connect it to the computer via Bluetooth, and finally set up the machine.
Being a crafter for years, the setup process is like a piece of cake for me. Hence, I assure you that you can easily get your Design Space app hassle-free. So, let’s get started!
Steps to Cricut Design Space Download for Windows 10
When I was setting up my Cricut machine on Windows 10, I was a little intimidated. Somehow, I gave it a try to download only on Windows. Then, I was a beginner, but now I am a professional crafter, so I can teach you how to download your Cricut Design Space app on a Windows PC.
Below are the steps to get the Design Space software on a Windows 10 computer:
- To download it, I first open my browser, such as Chrome or Microsoft Edge.
- Then, on the browser search bar, I type design.cricut.com.
- Afterward, I mark the checkbox to accept Cricut’s Terms of Use and Privacy Policy.
- The Download option is enabled by clicking on the checkbox so I can hit the tab to initiate the Cricut software download.
![]()
- Once the download is complete, I pressthe Windows logo + E key on my keyboard to navigate to File Explorer.
- After that, I move to the Downloads tab on File Explorer’s left navigation bar.
![]()
- From this Downloads folder, I get my downloaded Design Space file. I double-click on it to install it on my Windows PC.
- Next, I carefully follow the steps shown on the display to complete the installation.
![]()
Now, you might understand how to do a Cricut Design Space download for Windows 10. Further, let’s learn to connect your Cricut to the Windows 10 PC via Bluetooth.
Steps to Connect Cricut to Windows 10 computer via Bluetooth
After you get the Design Space, you need to move to the next step, which is connecting your Cricut to your computer using Bluetooth. The best thing about wireless connection is that it frees you from those long, clumsy wires. I really don’t like managing those wires. Otherwise, I could have connected my Cricut with a USB cable.
Here are the steps to connect my Cricut to a Windows PC via Bluetooth:
- To connect my computer with Cricut, I need to turn on my Cricut machine.
- Then, I go to the Start tab and select the Settings option.
![]()
- Afterward, I hit on the Devices tab.
![]()
- Here, I ensure to keep my Bluetooth turnedon, then select the option: Add Bluetooth or other device.
![]()
- After that, I select Bluetooth and wait for a while as my computer searches for my Cricut Machine. When it appears in the list, I select it to proceed.
![]()
Steps to Setup the Cricut Machine on Windows 10
Now we have connected our Cricut to Windows 10, let’s set it up. Below, I have explained the steps to set up the machine on Windows/Mac:
- To set up the machine, I powered on my Cricut cutting machine.
- Then, I connected my Cricut to the computer using my Bluetooth, which I have explained above. You also need to connect it using a USB cord.
- After that, I opened my Cricut Design Space and followed the steps on the display to set up my Cricut account.
- Next, I move to the menu and select the Machine Setup option.
- Then, I choose the Cricut machine model I want to set up, and again, I follow the steps displayed on the screen.
FAQs
Question 1: Can I use the Cricut Design Space without installing it?
Answer: Well, using the Cricut Design Space without downloading it on your PC is impossible. You need to do a Cricut Design Space download...
Read more -
Which Cricut EasyPress Is Best for Elevating Your DIY Crafting?
02/15/2024 at 13:33 • 0 commentsIf you are looking to buy a Cricut EasyPress machine, would this blog be beneficial to you? As a Cricut crafter, I have used various Cricut machines over the years. As a result, in this blog, I am going to help you pick the right EasyPress machine to achieve the next level of crafting experience.
![]()
Before selecting a Cricut heat press machine, you must understand its features, properties, and prices. Apart from this, choosing a heat press tool depends on the purpose of use. But don’t worry; I will tell you everything in this blog to help you select the suitable machine for you. So, let’s get started without any further ado!
1. Cricut EasyPress Mini
The Cricut EasyPress Mini tool is a compact and easy-to-use machine. This machine offers the perfect start for the beginner to step into the crafting world. Plus, the machine has a smart tool that makes it easy to handle and get flawless results while making a project. Also, this machine is the most affordable heat press machine the Cricut brand offers.
![]()
In addition, with the help of this machine, users can work on various shoes, stuffed animals, and more. This tool offers high voltage and 3 heat settings, giving long-lasting results while working with iron-on products. To offer the utmost safety to the users, it comes with auto shut-off features and an insulated safety base.
2. Cricut Autopress
Cricut Autopress is a great option available for the crafter who wants to create commercial projects. This machine comes in 15 in x 12 in (38 cm x 30 cm) size and is best for creating bigger projects such as banners, hoodies, curtains, pillowcases, and many others. Plus, this heat press machine comes with various brilliant features, such as a ceramic-coated heat plate, Zero Effort™ operation for easy use, temperatures up to 400 °F (205 °C), auto-off after 13 minutes of inactivity, and many more.
![]()
In addition, the machine has an innovative design to offer the utmost comfort and DIY crafting experience to the users. It also has a control pod that gets the full understanding of the right temperature and timer to get awesome results.
3. Cricut EasyPress 2
The EasyPress 2 machine is the second iteration of the EasyPress series of the brand. This machine is great for crafters who want an advanced heat press machine without spending a massive amount of money. This machine is available in three different sizes and is best to use for projects like banners, blankets, T-shirts, sweatshirts, and more.
![]()
In addition, the machine offers precise temperature control for up to 400℉ (205°C). As a result, the machine gives effortless, fast, and flawless results. Besides that, this machine also includes numerous other features that ensure great iron-on projects and offer the utmost safety to users.
4. Cricut EasyPress 3
EasyPress 3 is the most advanced and latest machine in the EasyPress series. The machine comes with a variety of crafting features that provide a hassle-free crafting experience. There are two models of this machine that include the same features but differ in size. This machine offers flawless results working with various iron-on (HTV), Infusible Ink & sublimation products.
![]()
Also, the EasyPress 3 works with smartphones for easy control. You can download the Cricut Heat app to your machine and connect it using Bluetooth. With the help of this machine, you can easily start a crafting business and make extra bucks by selling products online.
Conclusion
In the above content, you got to know in-depth information about various Cricut heat press machines. These Cricut EasyPress machines are among the most popular versatile crafting tools. The smart features, specs, and innovative designs offer a great deal of comfort and fun. When it comes to their cost, then EasyPress Mini is the cheapest heat press machine of the brand, which costs only $39.99. On the other hand, if you want to get the most advanced...
Read more -
How to Use Cricut Joy: Ultimate Guide for Beginners
01/29/2024 at 16:52 • 0 commentsI have done crafting with all Cricut machines and have had great experiences with Cricut Joy. I first got this portable machine when the Cricut machine launched it. It was easy for me to set up and use it, as I had been using other Cricut machines for a long time. If you are a complete newbie with this machine and are eager to learn how to use Cricut Joy, then it may be overwhelming for you at first.
In this blog post, I will cover everything about this machine, from setup to getting started creating your first project. So, get ready and unbox your machine, follow the instructions in the guide below, and enjoy the features of the Cricut Joy.
How to Setup Cricut Joy on Your Device?
If you are using Cricut Joy for the first time, you will need to set it up before you start a craft with this compact and powerful machine. Therefore, let’s complete the Cricut Joy setup.
Step 1: Download & Install Cricut Design Space
Unbox your Cricut Joy, place it on a clean surface near the power switch, and plug the machine into the power outlet. Then follow these steps:
- First of all, turn on your computer, connect it to the internet, and visit cricut.com/setup.
- Next, agree with Cricut’s Terms and Conditions and click on the Download option to start the software download.
- Once the file is downloaded, locate and install it by following the on-screen instructions.
- If you want to learn how to use Cricut Joy from your mobile, you can install the Design Space app.
Step 2: Login to Your Cricut Account
Once the Cricut app is installed, it will show up on your screen. Now, to access it, we have to log in with Cricut ID and password.
- First and foremost, launch the Cricut app and select Create Cricut ID.
- Next, fill in the requested information, such as your full name, email address, and country code.
![]()
- In the following screen, tick I accept the Cricut terms of use and then click on the Create ID.
- Finally, relaunch the software, and this time, click on Sign In, use the same credentials, and log in.
Step 3: Setup Your Cricut Joy Machine
The Cricut Joy is still being prepared. We need to add it to the Design Space and connect it to Bluetooth.
- First of all, enable the Bluetooth option on your computer by going to the Settings.
- After this, you’ll need to wait a few seconds for the Cricut Joy to appear on the screen, enter the PIN code - 0000, and connect the machine to your computer.
- Open the Cricut app, go to the menu, and click on New Machine Setup.
- Now, we have to select our Cricut machine > Cricut Joy.
- Finally, the setup part of this machine is complete. Let’s do our first project.
How to Use Cricut Joy for Creating a Project?
The project I’m going to tell you about is a plant pot pun; we will be personalizing one of the ceramic plant pots with the Cricut Joy. You will need the supplies mentioned below:
- A Detailed Guide
- Plain Ceramic Plant pots
- Transfer Tape
- Cricut Joy
- A computer with Design Space
- White Smart vinyl
- Weeding Tool
Step 1: Design Your Project
- First, we need to create a design for the project, open Cricut Design Space, and click on New Project.
- Next, use the text function and type something that you want to cut simultaneously from the text edit option and change the font.
- Drag and resize your design to fit on the plant pot and click on “Make It.”
Step 2: Select the Material Settings
In the new step, we will be on a page of the software.
- Since we are using smart vinyl, select the option of mirror off and without.
- Now, select the project copies on the left-hand upper portion of the screen.
- Next, Browse All Materials, access the vast list, and choose White Smart Vinyl.
![]()
- Subsequently, leave the pressure option default.
- The right material setting is more important to learn how to use Cricut Joy.
Step 3: Load the Vinyl and Cut
As I mentioned in the above step, we do not use the Cricut mat, so we use the roll of smart...
Read more

cricut create's pages
The Cricut machine is one of the best-selling powerful machines that has changed the way of crafting.