Close
0%
0%

BuzzWatch

A personal tactile interrupt generator for people with AD[H]D (and maybe others as well).

Similar projects worth following
I (probably) have ADHD. This means, among other things, that I have a terrible sense of time (i.e. don't notice it passing) and tend to deviate easily from whatever I'm supposed to be doing at the moment. This project, a watch-sized device that straps onto one's hand, is supposed to fix that by providing unobtrusive tactile stimuli (via a vibromotor) at adjustable constant or randomized intervals, giving the wearer a reference frame with respect to time while also prompting them to think about their current activity, surroundings and focus of attention & whether they want to continue.

Current state

The board is almost complete, except for some possible refining of the button-debouncing circuit. The software less so, there's still no RNG or satisfactory scaler of the resulting random numbers and the button handler is a work-in-progress. The case also has some problems, although I believe they are more with the 3D printer than with the design of the case.


Design

The device uses as its core an Atmel ATTiny13A microcontroller, with one potentiometer and one button as control inputs. The buzzer is the smallest motor I could find with a bit of solder glued onto the shaft. Everything goes into a 3D printed ABS case with dimensions of 30x30x9mm (excluding the strap tabs).

Power

The device runs off a 1225 lithium coin cell , which has a capacity of about 50 mAh.

To save power the μC spends as much time as possible in power-down mode and the μC's ADC hardware is shut down, with all current through the pot is killed whenever not taking a reading.

The resulting power consumption in about 6 μA at 3V, which means about a year of operation on a single battery. In fact the actual runtime would be almost completely determined by how long and how often the motor is buzzed. I haven't made any measurements of that, but considering that one buzz is around 190 ms and the frequency won't generally be more than a couple buzzes per hour, it's gonna be pretty long.

The schematic

The motor is driven pretty straightforwardly, using a 2N7002 nMOSFET hooked up to one of the pins. The other 2N7002 is used to cut off current through the pot when it's not in use, thus using up two more pins together with the pot. One more pin (PB1, since INT0 is there) is hooked up to the button so that it could wake the thing up when pressed.

The board

I used SMD components to keep the device thickness (and also the amount of holes to drill) to a minimum. The only two through-hole parts are the pot and the battery clip. These two also define the dimensions of the board, it could've been somewhat smaller otherwise. It's a one-sided design, which makes it more convenient for home etching. I used photoresistive film as both etching mask and solder mask and a CuSO₄-based etchant. The μC footprint can accomodate both the -SU and -SSU versions of the 'tiny13. Due to the small size of the board, including a standard ICSP header would be impractical, so contact pads with standard 2.54mm spacing (matching the t13-P pinout so that the jig could later be used in breadboards) are provided instead. Ideally the jig/adapter would use pogo pins, but since I don't have those I used sewing needles instead and soldered it to the board for the duration of the development.

The case

Designed in OpenSCAD (partly as a way to learn it). The board is held in place with a slit on one end and a some standoffs on the other. The lid is held by a bolt that goes through the whole thing and screws into a nut held by the lid.

isp-adapter.sch

schematic of the ICSP jig board

x-geda-schematic - 178.85 kB - 04/18/2016 at 03:43

Download

isp-adapter.brd

EAGLE board file for the ICSP jig board

brd - 55.43 kB - 04/18/2016 at 03:43

Download

ssuonly.sch

Schematic for current iteration of the PCB.

x-geda-schematic - 229.59 kB - 04/18/2016 at 03:41

Download

ssuonly.brd

Current iteration of the PCB. t13-SU footprint removed.

brd - 77.48 kB - 04/18/2016 at 03:41

Download

  • 1 × ATTiny13A-SSU (or -SU) Microprocessors, Microcontrollers, DSPs / ARM, RISC-Based Microcontrollers
  • 1 × R1001N12B1 thumbwheel potentiometer Potentiometers, Trimmers, Variable Resistors / Potentiometers
  • 1 × TD-26EA sideways pushbutton
  • 3 × 100K resistor (0805) , 1 in 1208 package, 2 in 0806
  • 2 × 1μF capacitor (0805)

View all 9 components

  • Not abandoned yet.

    flashcactus04/17/2016 at 16:46 0 comments

    One of the mixed blessings of ADHD is that you tend to do whatever you fancy at the moment, which means lots of exciting projects... Which hang unfinished in limbo while you work on something else. When one of those projects is something that's supposed to help you deal with the whole thing, the situation gets pretty ironic.

    I did somehow manage to return to this one, however, so I'm gonna try and make the most out of it. Which means I'll procrastinate by writing about what I've already done instead of actually doing something new.

    Oh, well.


    Some thoughts on user input.

    Basically, the problem is that you have to have a simple, intuitive way to control the average time between buzzes that's not cumbersome to use. Which means (among other things) not requiring hundreds of button presses (arrrgh, how I hate those clocks which make you do this). So I decided to use a thumbwheel pot. After all, it only uses one pin. (Afterwards I had to consider the ramifications of having a fat resistor between the power rails burning power all the time, and added a transistor to shut it off, which uses up another pin.)

    Now, how does one set the time with a pot? The first obvious choice would be linear scaling: seconds = α*pot_value. But I want a setting range of minutes to days, i.e. scales between 1e2 and 1e5 seconds, with a resolution no less than about ten seconds on the lower end of the scale. The ADC is 10-bit, so it's almost enough. But not enough nonetheless. Additionally, setting anything on the lower end would be a monumental pain, since there's no way you could manually turn the wheel a certain number of (π/1536)-rad steps.

    The next obvious idea is to make it a quadratic or other concave polynomial. Good resolution and smaller steps on the lower end, great range, what else would you want? Well, there's one small thing. No display means no feedback, so you'll have to calculate how much to turn for the time you want. Oops.

    Okay, let's try an exponent. Exponents are great; ballpark mental calculations can be done almost instantly, and if you're that kind of geek that carries a slide rule, it's even more awesome. Except for one thing: machine computation of an exponent is quite intensive. The classic way is to sum a series, which for a chip that has no multiplication command and has to do it the hard way, taking hundreds of instructions for each operation, would equate to spending most of the time awake and eating the battery. Not good.

    At that point I temporarily shelved that issue, deciding that if nothing better came up, I'd just bite the bullet and go for x². Which was a good thing, because working on the other aspects led me to deciding that I need a button for, at the very least, turning the thing on&off. And since I was going to have one anyway...

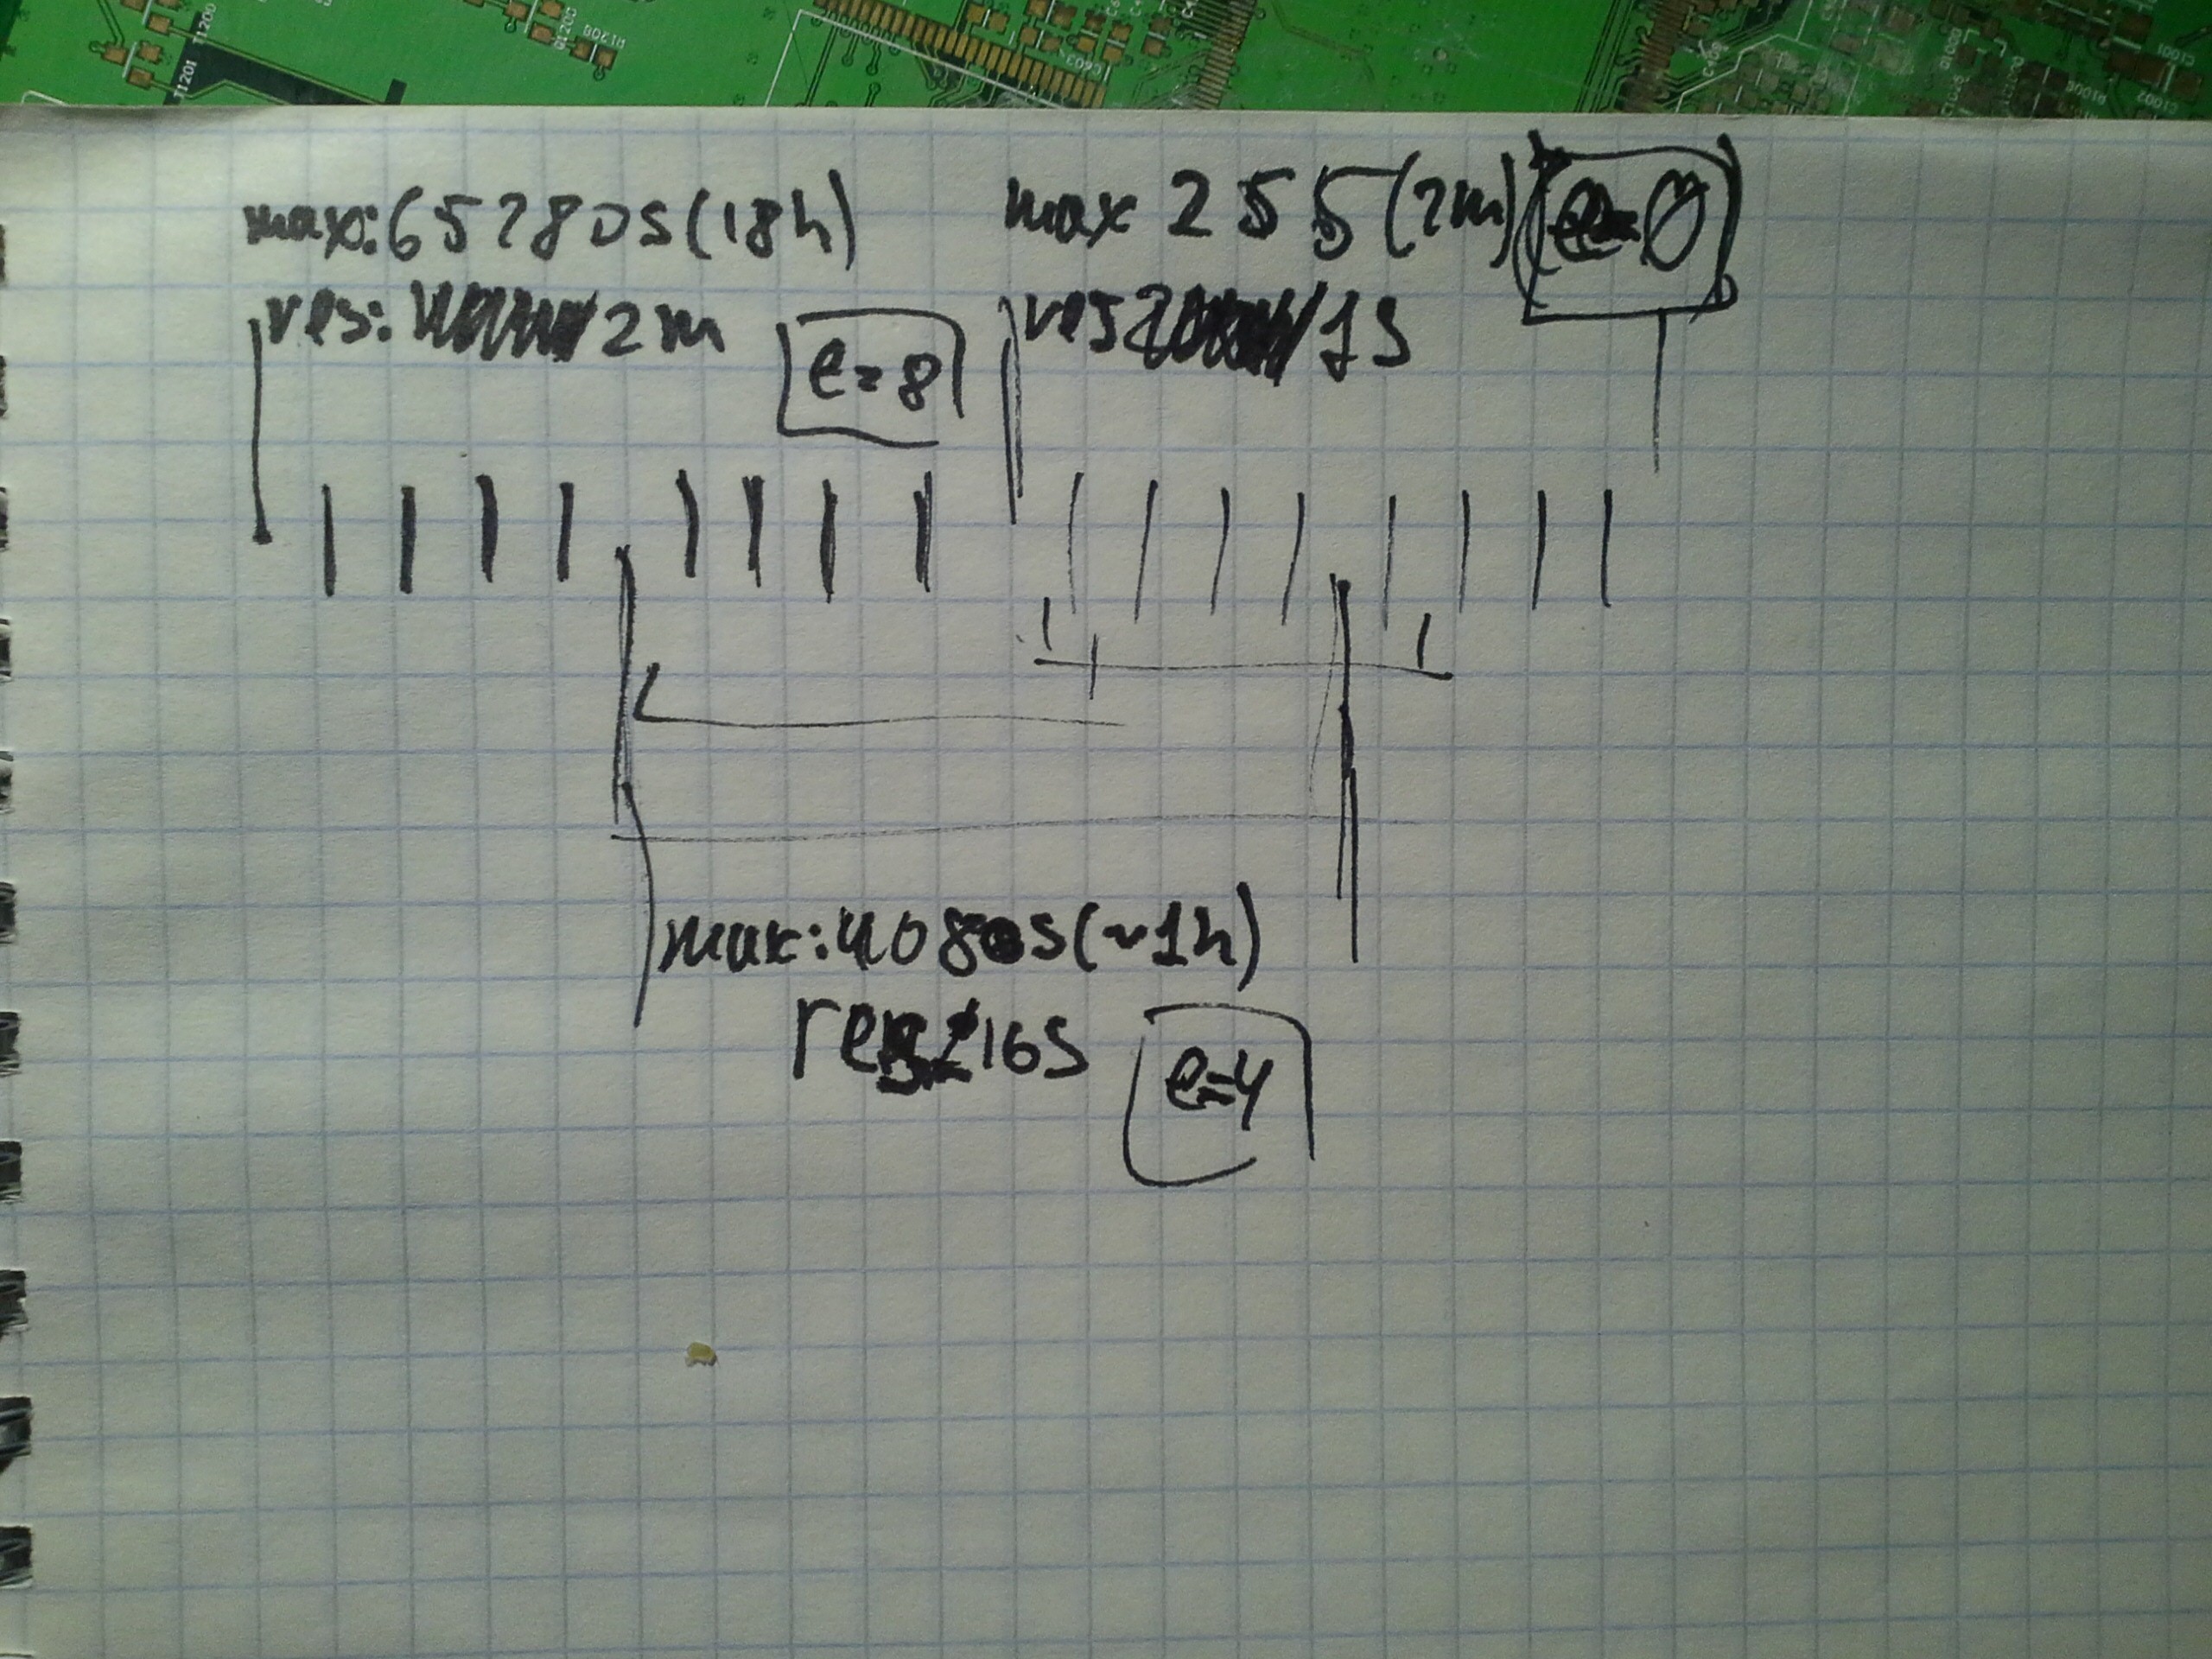
    See, some exponents are really easy to calculate. You just take a one and shift it left by several bits. Although if you just do that, the resolution's gonna be terrible. But if you multiply it by another number... Well, you get a poor man's floating point number, I guess. But the important part is that the mantissa can cover quite a small range. Let's say 32. Now, this is in the realm of hand-setting. You can, in fact, even buzz the number back at the user. The exponents are even better, since you only need only 3 or 4 of them, easily settable by button. And, of course, the settings are pretty easy to calculate mentally. Or with a slide rule, which is so much more awesome.

    Finally, there's no need to actually reduce the resolution artificially. After all, an 8-bit number is essentially the same as its 5 MSBs shifted left by three plus some added accuracy. So here it is:

    Simple, yet powerful. Great range, great resolution, minimal computational complexity on both ends.

    The Button

    this is what I'm going to implement next. I added it when I noticed that I had two unused pins, and one of them happened to be hooked up to INT0, which, conveniently, can wake the MCU from powerdown mode....

    Read more »

View project log

Enjoy this project?

Share

Discussions

Similar Projects

Does this project spark your interest?

Become a member to follow this project and never miss any updates