Close
0%
0%

Yet another automated watering project.

Solar powered budget automated watering system.

Similar projects worth following
Solar powered budget automated watering system.

So I recently bought a cabin on the countryside and I'd like to grow vegetables, potatoes, beetroots and all kinds of edible things there. I will only be there during weekends so I need some kind of watering system. Since I don't have an electronics project to work with right now I thought I'd do it with electronics. I am a cheap bastard so I'd like to do it as cheap as possible, prefferably the electronics part of the build will be less than 400-500 swedish crowns. The water will come from a rain water barrel so there will be no water pressure, only gravity. Ohh, and I want it to be solar powered...

My aim is to make everything from schematics, calculations, software etc. available for anyone to use or improve.

main.c

C Source File - 9.96 kB - 04/06/2017 at 19:31

Download

main.h

h - 1.05 kB - 04/06/2017 at 19:31

Download

  • 1 × pic16f886 Microprocessors, Microcontrollers, DSPs / ARM, RISC-Based Microcontrollers
  • 1 × l293 H-bridge Interface and IO ICs / Peripheral Drivers and Actuators
  • 1 × 12V motorised ball valve
  • 6 × Cheap garden solar lights with a small solar panel and a 2/3AAA 60mAh Ni-mh battery.
  • 2 × LM2936-3.3 Power Management ICs / Linear Voltage Regulators and LDOs

  • Batteries

    Labansson04/09/2017 at 19:18 0 comments

    So, I measured the battery capacity. I figured that since I use all of them in series in my application the most interesting measurement would be to discharge them in series. First I charged them up in parallell to about 1,4V.

    I screwed up the measurement, I discharged the batteries through 421,7 Ohms, but measured voltage over a 384 Ohm resistor, so voltage is a bit off.

    Anyway, the batteries showed a not-so-impressive capacity of about 10mAh. I think its only one battery that is really bad. After the measurement I measured individual cells and all but one had 1,2 - 1,3 Volts. One battery had 1,0 V.

    The graph below shows the discharge. Discharge current is about 20mA (depending on the voltage). When I reached 6V the accumulated capacity was 11,0mAh.

    Still, if my system draws 0,1uA the batteries would last 100h minus the capacity used for opening and closing the valve. I only need 4-6 hours or so since night time in sweden is very short during the summer. I think I will stick them back in and see what happens. If I see resets in the logfile I can always change them later.

  • Schematics and source code

    Labansson04/06/2017 at 19:30 0 comments
  • After-winter update

    Labansson04/04/2017 at 20:17 0 comments

    So I pretty much finished this project up last spring and had it running during the summer. I had some trouble figuring out if the thing was working or not, when I checked it seemed as it was always wet outside (meaning it wouldnt open the watering valve) or I had forgotten the waterlevel since my last visit. It was always something that kept me from figuring out if it was working:-)

    Anyways, here's what I ended up doing to finish the thing: After fiddling with the garden light and trying to figure out how to best connect everything I finally decided to just connect all 6 solars panel in series and connect them straight to all 6 batteries in series through a diode. I figured the solar panel would give such a small current that the batteries should not overcharge (I read somewhere that ni-mh batteries can handle a bit of over-charging if the current is low, they dissipate the extra power as heat in some way, thus protecting itself).

    I also connected the positive of the solar panels through a voltage divider to an analog pin of the pic (so that I could mesure the voltage of the solar panels). Since i didnt want a current to flow at all times I connected the "ground" of the voltage divider to an input pin of the pic. When I measured the voltage of the solar panel I would reconfigure the pin as a low output, then measure the voltage through the voltage divider and when that was done I would configure the pin as an input again. This way the current only flowed when I did the measurement. I took the same approach to the moisture sensor, but this time I had the positive of the voltage divider connected to a gpio pin that was configured as a high output when I measured the moisture.

    I had to fiddle a bit to get the ultra-low-power to work, but after some swearing and testing I managed to put the pic mcu to sleep. I had it wake up once every 20 seconds, increment a timer variable, write a dot to the uart to show that its alive and then go to sleep again. Looking at the code now I realise that I measure the voltage of the solar panels every time the pic wakes up. That might be a bit unnecessary, but a measurement is very fast, so I guess it doesnt matter that much.

    Anyway, in the main loop the PIC checks if it has been more than 15 hours since the last watering. If it has been more than 15 hours and the sun panels read 0V (meaning its dark outside) it measures the moisture level. If the "moisture sensor" is dry it opens the valve for 5 minutes and then goes back to sleep.

    When I measured the current consumption I noticed that the H-bridge had quite a high quiescent current. I solved this by sticking a MOSFET between the GND of the H-bridge chip and the "real" GND, so that I could "turn on" the H-bridge from the PIC mcu only when I was using it to run the motor in the valve.

    When I was all done I measured the current consumption to 4uA in sleep and 400uA in full running (using the LFINTOSC at 32Khz). Thats not much. In fact, it seems too low, shouldnt just the voltage regulator quiescent current be higher than that? But thats what I have written in my notes. Hmm... I think I will have to measure that again, I might have screwed up the measurement somehow. I also measured the motorised ball valve current and when run at 5V it only consumed 50mA (that also seems low, it will be mesured again as well!).

    Anyway, (maybe) I had the thing running all summer. Somehow the summer ended and the autumn came. I planned on bringing it inside all winter long and finally, last weekend, I came around to pick it up. It has been out all winter, maybe thats not so good. My next entry will be about how the thing is doing after the winter, I will do function tests and see what parts (if any) has failed and how I can improve on the design this summer.

    I will also upload the schematic and the source code for the PIC microcontroller. I should have done that in this entry, but I dont have a schematic written down yet and the source code for the PIC looks like shit:-)...

    Read more »

  • Housing

    Labansson05/16/2016 at 20:20 0 comments

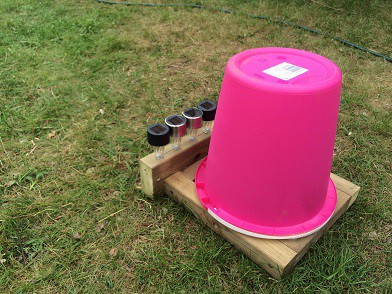
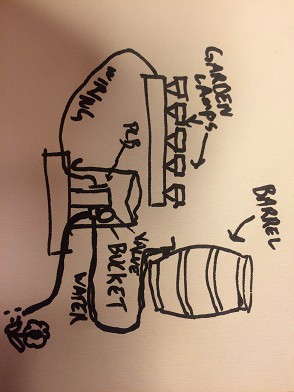
    The housing for the electronics will be an ugly thing. I will go for low cost and the whole thing will be built out of an upside down bucket and a single 45mmx45mm wooden plank that I have lying around. The really ugly sketch below is my first thoughts on the mechanical implementation: There will be the rain water barrel, a garden hose that connects to the ball valve, the solar garden lights fixed to a piece of wood with holes drilled to it and a place to attach the PCB with the electronics. I think the upside-down bucket thing will have the solar lights, the PCB and the ball valve all grouped together somehow.

    I have been thinking about if this approach to weather-proofing the electronics is the way to go. I could have purchased or try to make a watertight container or just sticking it into a glob of resin, but in my experience moisture always find its way into everything. I think the solution with the upside-down bucket will cause the electronics to be in very humid conditions from time to time and there will probably even be condensing moisture. However, if I clean off any flux residues, make the board hang vertical so that moisture will drip off and have proper ventilation I might be able to avoid corrosion and misbehavior of the electronics. The circuitry for the ultra-low-power-wake-up will be sensitive to moisture, so maybe that will need extra protection. I am not at all sure it this is the way to go, but I will try it and see what happens. I wonder if morning dew will be a problem inside an upside-down bucket?

    Anyway, I went ahead and started building the housing yesterday and it worked out kind of OK. The pink bucket adds a beautiful shine to the whole thing!

  • Electronics part 1

    Labansson05/16/2016 at 20:14 0 comments

    The project is coming along nicely. I have decided to add a “water sensor” (two nails with fabric in between) to my project. I decided to do that because I plan to run the watering from a rain water barrel and if it has been raining I won’t water the plants and thus save some water. I will use the output from one solar panel as an analogue input for my microcontroller and use the information to know when dusk has arrived. Later I might add some sampling of the solar panel during the day and a temp sensor and use the information from them to adjust the watering time, but that will be a later project. To figure out how to wire everything up I “reversed engineered” the garden solar light. It was based on a chip marked YX8018, but more on that later. When I tried to figure out the circuit in the garden solar light I realized that just sticking the positive of the solar panel to an analogue pin wasn’t going to work. Damnit!

    I did some testing with the “water sensor” and my multimeter yesterday. When I measured resistance I found that dry fabric showed up as open circuit on the multimeter on the 20k range. When I made it wet using water from my sink it had 6-7KOhms between the nails. A voltage divider with 15kOhms connected to V+ and an analogue pin will surely make me figure out if the water sensor is wet.

    I got my electrically operated ball valve in the mail the other day and it looks good. I tried it at home using just a couple of batteries and it opened and closed fine with just three AAA alkaline cells (total of 4,5V) I found in a drawer. I haven’t decided if I will boost the voltage up to 12V (it is said to operated at 12V) or if I am going to operate it out-of-spec with just the raw solar cell battery voltage. I think I will go for the out-of-spec solution for now and throw in a 12V booster circuit if it doesnt work reliably. It one similar to this:

    I also bought a L293E H-bridge to be able to operate the motor for the valve. I would have preferred a L293D since it has protection diodes (I don’t think 293E has them?) and no sense-inputs (which I don’t plan to use), but the L293E was available over the counter in my local parts shop, so it will have to do. I don’t have any diodes lying around at home, though. I wonder if I will damage something over time if I don’t use any protection. For now I think I will just stick a 1nF-ish capacitor across the power leads for the motor and hope for the best.

    I was thinking about etching a PCB for everything, but I have decided to just use some perf-board. I really hate soldering wires to perf-board, but the build will consist of just a couple of IC’s and some passives, so I think an etched PCB will be a bit overkill.

  • First thoughts

    Labansson05/10/2016 at 12:55 0 comments

    I have been looking at cheap garden solar lights for power. These things are amazing value. For 3 swedish crowns you get a small solar cell, a 2/3AAA 60mAh battery, an led and a housing. A couple of those should be enough to open and close a valve once a day or so.

    For a valve I have discarded all solenoid valves, partly because they use a lot of power and some of them seem to rely on water pressure and water free from particles. And to be honest I dont really understand exactly how they work and what to look for. I have found a motorized ball valve on eBay for approx 120 swedish crowns. I have decided to use this since I understand how it works and there is a big, nice hole for water and particles to go through. The downside is that I will need an H-bridge to open and close the valve and more components mean more money. Did I mention that I am a cheap bastard? :-)

    For the brains of the project I will be using a pic microcontroller since they are cheap, can be in low power modes (drawing less current than I can measure) and I frequently use them in my hobby projects. The particulat controller that will be used for this project will be a pic16f886. The reason for this is that it is relatively cheap and I have experimented with low power modes on that mcu earlier and I'd like to reuse the code I wrote.

View all 6 project logs

Enjoy this project?

Share

Discussions

JanoHak wrote 05/17/2016 at 08:33 point

Solar garden lights are cheap but fair for short time only. After two ears of usage are totally demaged.

Nice idea could be a independent solar wireless surface moisture sensor with the solar light hw :-) Data could be colected near building or water reservoir by some steering device.

My problem is that valve have usually to big consumption. What I see round 7W.

  Are you sure? yes | no

Labansson wrote 05/16/2016 at 20:28 point

I will probably not use any sensors, except for a water sensor I just started experimenting with. I am running everything in this project off the 2/3 AAA 60mAh Ni-Mh cells in my solar garden lights. I will have 6 of them connected in series. My microcontroller will mostly be in a low-power mode drawing only a few microamps or so. I guess you will need a lot of garden solar lights to run a raspberry pi continuosly. I think one of my small solar panels gave about 10mA short circuit current on a cloudy day. Not much...

  Are you sure? yes | no

JanoHak wrote 05/16/2016 at 08:09 point

Which sensors do you plan to use?

I am thinking about Raspberry to use for it but it  needs too much energy for solar power supply.

  Are you sure? yes | no

Similar Projects

Does this project spark your interest?

Become a member to follow this project and never miss any updates