At the time when I started this project, there was no single project I could find, that combined ISP and I2C communication. So I decided to do it myself. Since everything needs to be enboxed and I still want to be able to upgrade firmware from SSH, ISP needs to be possible "without hands".
warning - warning - warning - warning - warning - warning - warning - warning - warning - warning
This can kill your Rasbperry Pi, be especially careful with 5V-linesFor the coffee machine this board will handle PWM and ADC, things an ATMega8 is better capable of than a Raspberry Pi.
Since Gert named his expansion board GertBoard, I decided to name mine RonaldBoard (as a fellow Dutchman? At least Gert's name sounds Dutch...).
All that's needed is: a Raspberry Pi, At*, and wires. For the Pi I chose the ATMega8 rather than ATTiny45 because of having some more cheap I/O.
The design is as follows:
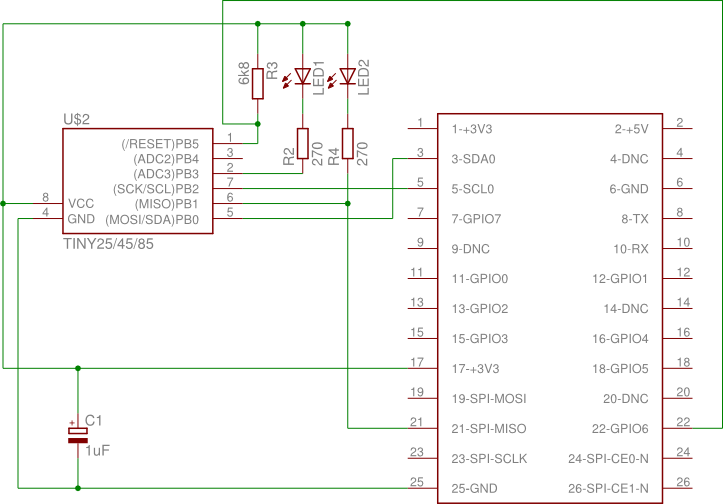
Note! While the pin numbering is okay, the GPIO numbering is wrong! Check [1] for correct info
- The /RESET pin is connected to pin 22 of the GPIO-headerPB0 doubles as SDA (I2C communication) and MOSI (ISP) pin
- PB1 is connected to MOSI, and can be used with care to drive something else when not in programming mode (an LED in this example)
- PB2 doubles as SCL (I2C communication) and SCK (ISP) pin
- PB3 is connected to an LED
Note that because PB1 is used by the Pi when programming the ATTiny, it probably shouldn't be used to e.g. drive a Servo using PWM.
For Pi <=> Atmega8 communication I chose for I2C, because at the time, I couldn't get (non-bit-banging) SPI working. For the Tiny45 the pins are the same; for my ATmega8 this cost me two additional pins...
Set up
If you want to use this in your own project, be sure you have the following:
- Raspberry Pi connected to the RonaldBoard
- The pigpio library installed
- avrdude (patched version)
- Example source (check project files for I2c.tar.gz)
- /etc/avrdude.conf configured with the pgio programmer on the correct pins:
programmer
  id    = "gpio2";
  desc  = "Use sysfs interface to bitbang GPIO lines";
  type  = gpio;
  reset = 25;
  sck = 3;
  mosi = 2;
  miso  = 9;
;
Usage
Before the first run after boot, be sure pigpiod is running and you have the i2c module loaded. I made the following script:
sudo ./modprobes
make
sudo make fuse
sudo make flash
The Makefile makes sure the GPIO's for I2C communication are set to read again, using pigs-commands.
Then test it:
./i2ctestYou should see something like this in your terminal window:
i2cdetect:
     0  1  2  3  4  5  6  7  8  9  a  b  c  d  e  f
00:          -- -- -- -- -- -- -- -- -- -- -- -- --
10: -- -- -- -- -- -- -- -- -- -- -- -- -- -- -- --
20: -- -- -- -- -- -- 26 -- -- -- -- -- -- -- -- --
30: -- -- -- -- -- -- -- -- -- -- -- UU -- -- -- --
40: -- -- -- -- -- -- -- -- -- -- -- -- -- -- -- --
50: -- -- -- -- -- -- -- -- -- -- -- -- -- -- -- --
60: -- -- -- -- -- -- -- -- -- -- -- -- -- -- -- --
70: -- -- -- -- -- -- -- --
test in getting the value of register 0x42:
0x42
testing ADC read:
0xc0
0xd5
0xb7
testing PWM.
Furthermore, the LED should turn off and then shine brighter and brighter.
Used work
Eagle libs for the ATTiny & Pi (both modified afterwards in Inkscape, but very useful for the basic symbol):
- http://bienonline.magix.net/public/undsonst-eagle.html
- http://bioserver.her.hcmr.gr/RaspberryPi.html
Libraries:
- usiTwiSlave by https://github.com/eriksl/usitwislave
- The pigpio library: http://abyz.co.uk/rpi/pigpio/
- Using GPIO for avrdude: http://blog.stevemarple.co.uk/2013/03/how-to-use-gpio-version-of-avrdude-on.html
Discussions
Become a Hackaday.io Member
Create an account to leave a comment. Already have an account? Log In.