The principle of operation is simple. It uses syncronous serial communication to shift 64-bit data to four SCT2024CSSG's, which contain 16-bit shift register, parallel register and current regulated outputs. All you have to do is to insert the 48-line subroutine in your code. To invoke the routine, first preset the FSR0, FSR1 or FSR2 (whichever you wish) register with the starting address of the memory region, and it will be displayed on the LED screen. The whole operation takes 353 instruction cycles (including CALL/RET) to execute.
This is how the subroutine looks for 8-bit PIC 18F family. This example uses FSR1 register as the memory pointer.
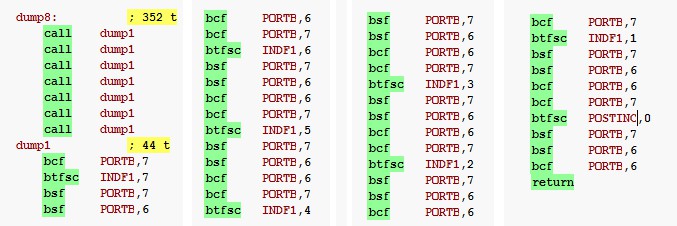
Listing looks more compact if macro is used:

To invoke the subroutine, first define the memory content which has to be displayed:

Please note that some PIC18F MCUs from the same family use other ports than PORTB,6 and PORTB,7 for PGC and PGD. Subroutine needs to be modified in such case.
Dumper uses only SCK (Serial Clock) and SDA (Serial Data) lines, and no Parallel Clock is used. It would be ideal if it used the third port for Parallel Clock, but it is omitted here, as there is no third port at the standard PICKIT3 communication line. This means that all LEDs in the matrix are "blured" during shifting. This is normaly not visible, but if the subroutine call is located in the part of the program which is frequently executed, all LEDs will be falsely ON (or dimmed), so it is recommended to choose the part of the program which is not ececuted too often.
There is a simple RC signal edge detector, which flashes the LED for a few hundreds of milliseconds every time the subroutine is invoked. It can be useful to see if the routine is executed, even if there is no change in the displayed 8-byte memory contents.
The unit is simply connected to the target system instead of PICKIT3. I have to notify that I modified all my PICKITs so that they have male connectors instead of the original female ones. I described that modification at https://hackaday.io/project/6053-slight-modification-on-pickit3
Yet it is not easy to switch the connectors every time you want to debug the code during program development. That's why I built the special cable with PICKIT-DUMPER switch. Now I have to press the button every time I write the program in MCU, but it is much easier then th switch the connector.
In the next step, I shall add the Parallel Clock generator (just a simple monostable) so the registers are properly clocked. I shall also build the better cable with automatic switching (probably with fast analog switches DG444, or so).
 Voja Antonic
 Michael Wessel
 Boxerbomb
 Tim
Tim
 Anders Dinsen