Pierros Papadeas
-
API on SatNOGS Network
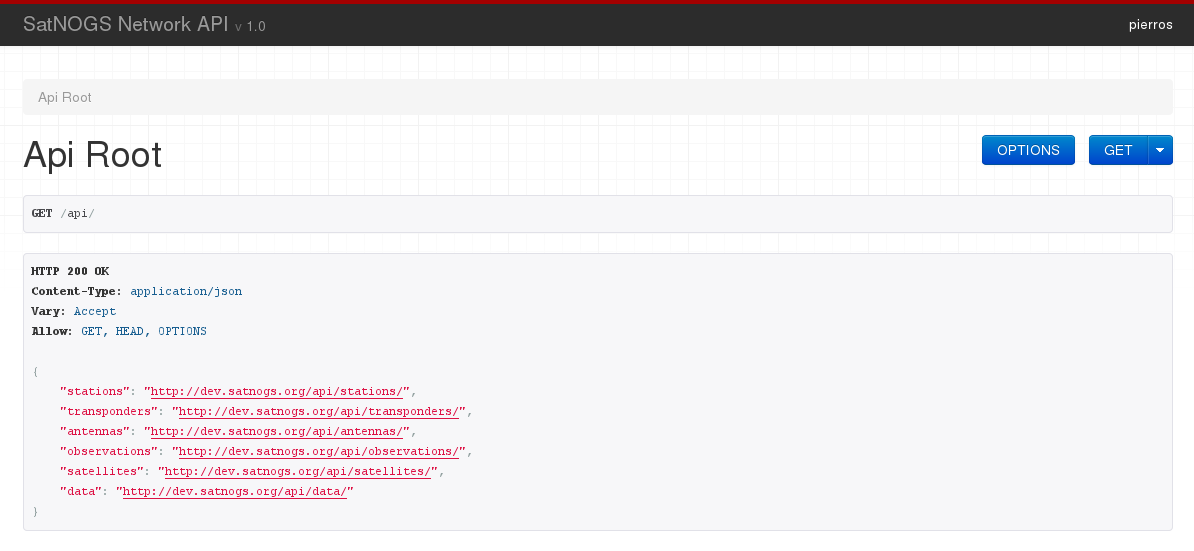
10/25/2014 at 21:22 • 0 commentsThe SatNOGS Network website has had the focus in terms of development from our software team in the past week. While the major functionality (observation calculation and scheduling) is coming along nicely (thanks to libraries like python-ephem) we are also delivering other needed functionality. This time it was a public, well documented, open API.
Based on Django REST Framework, we deployed an API that matches our current DB model and enables other applications or services to query SatNOGS Network for information about Ground Stations, Observations, Data, Transponders or even Satellites.
You can check the code in our repo , or play around with it in our dev instance.
![]()
For now authenticated users of the website are the only ones with POST (write) access, anyone else can view only (GET). We are planning API-key based access so that Stations can submit recorded Data once they are done with their scheduled part of the observation.
-
Extreme conditions considerations - Radome
10/24/2014 at 22:07 • 1 commentIn order to achieve global coverage, a network of Ground Stations would have to have nodes in places that are not entirely friendly environments. Desert hot, ice cold, gusty, monsoon rainy, mountain dry and forest humid could be some descriptions of possible locations SatNOGS would have to survive in.
Apart from the obvious networking considerations (internet connection and power) which are not in the scope of our project (and are dealt with existing solutions), SatNOGS has some physical constrains, especially around wind and water.
The relatively compact design, our current antennas and the targeted IP55 protection marking are indeed a slight advantage on moderate wind and rainy situations, but we had to do more to ensure reliable operations on rainy and windy hilltops and locations.
The way to protect antenna tracking mechanisms (especially dish antennas but not only) has been long known in the industry and in military. The name of it Radome (Radar-Dome). Radomes provide weather protection (ice, heat, rain, wind) especially combined with an environmental control system, and ensure uninterrupted operation for moving tracking mechanisms.
After extensive search on the webz we could not find any DIY and/or Open project for a Radome, so we decided to design, build and document one for SatNOGS.
We started with the desired shape and size. A geodesic dome (3V frequency) provides a good approximation of a sphere (less air drag) while not requiring large amounts of material. For the size, we modeled SatNOGS with a typical antenna setup (Helical and Yagi) and calculated the extremes. We ended up with a sphere of 1.5m radius, 1.2m from the ground.
![]()
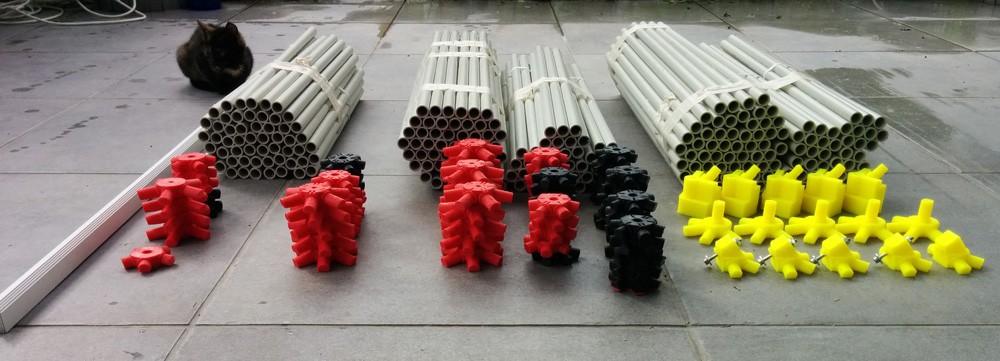
The material selected for construction is PVC tubes for struts (cheap and light-weigth) and ABS connectors (3D printable and durable). The Base is an aluminum (L channel) pentagon that can be bolted on the ground. It is important to emphasize that all materials (except the base pentagon) are non-conductive and dielectric. If Aluminum (or any other metal) was to be used, Quasi-Random patterns would have to mandate the design to avoid interference with the RF signals. For the outer surface many materials were considered, and Shrink Wrap seems to be the most cost-effective, easily applied and durable solution (check here for examples).
Gathering all materials is not hard, especially when you have access to a 3D printer. The overall cost is just below 130 USD.
![]()
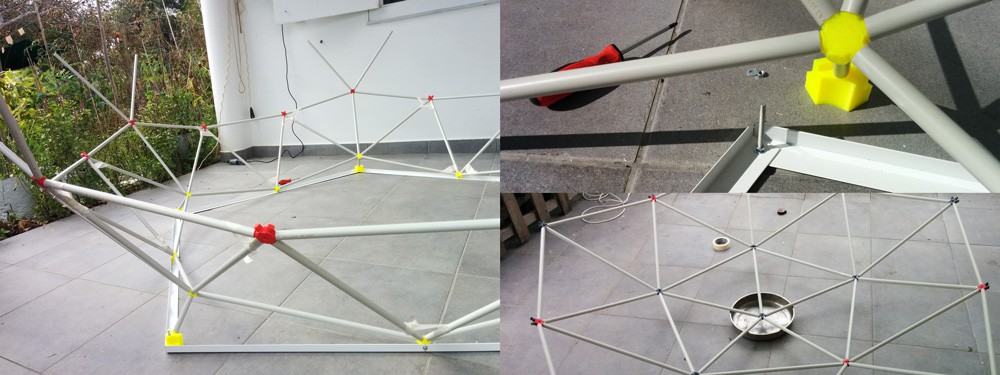
Construction is pretty straightforward. You start with the pentagon and work your way to the middle. Then you start from the top working your way down, until you are left with two hemispheres. Once those are connected in place you lay out the shrink wrap and using a heat gun you apply it in place.
![]()
Depending on the materials you would choose, some bonding might be needed between connectors and struts. (epoxy glue would do just fine). Shrink Wrap would take care of the final rigidity of the structure.
Unfortunately shipping times for shrink wrap as not as fast as we expected so we only finished the skeleton of the radome and we are waiting for the final layer to apply it by next week. (an new log will be posted for this!)
The end result is really impressive taking into account resources used. The structure is really light-weight so 2 people can fit it on SatNOGS by lifting it and lowering it on top of it. Then you would secure the pentagon on the ground and you are ready to go!
![]()
Designs (CAD and STLs) are available in our repo, and once the shrink wrap arrives we will be posting a detailed how-to guide.
-
Portability for SatNOGS ground station
10/22/2014 at 22:44 • 0 commentsMost of the times you would want your ground station to be stable. Secured on a metal beam on top of a building, protected, homed and zeroed where no-one and nothing could disturb it. That is the ideal situation.
For those of us though that like adventures and want to carry a ground station with us on a field trip (DXing, Iridium flare hunts or even mountaineering) having SatNOGS be portable would be a huge advantage.
Luckily (actually... by design) the main gear mechanical assembly is a lightweight box with 3 beams sticking out. Easily carried even as a backpack. Antennas can be detached and especially the yagi ones, disassembled and carried as a long beam. But where would you put your ground station on? That called for a tripod!
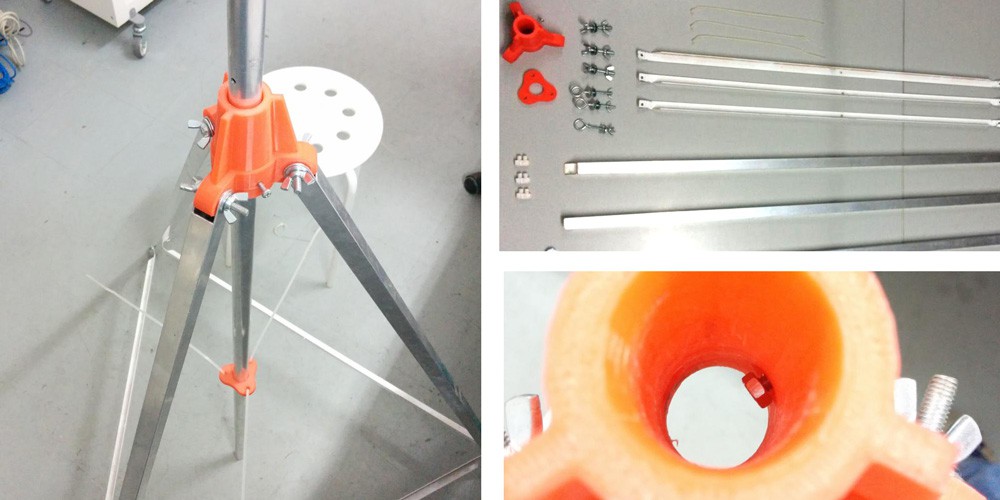
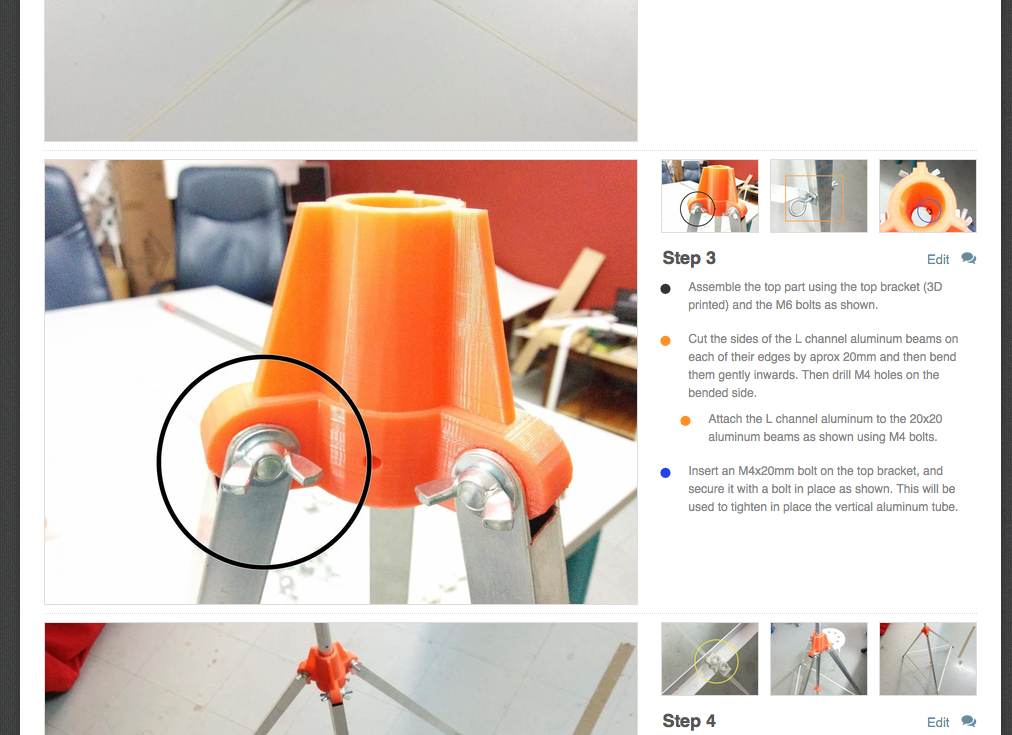
We did have a tripod design (v1) early on (check designs here) but it was not really easily constructed and not easily deployable. So we focused on a new design.
![]()
Version 2 is much more easily constructed, considerably more stable and totally portable as it collapses in a single beam. We tested it dozens of times on the field over the past couple of weeks and it is stable enough to allow reliable operations for a typical SatNOGS setup (UHF and VHF antennas mounted too). The cost of it? Aprox 15 USD :)
Designs and models can be found in our github repo here.
Bill of materials here. And guess what? We love documentation :) So here are some step by step instructions to build it yourself!
![]()
-
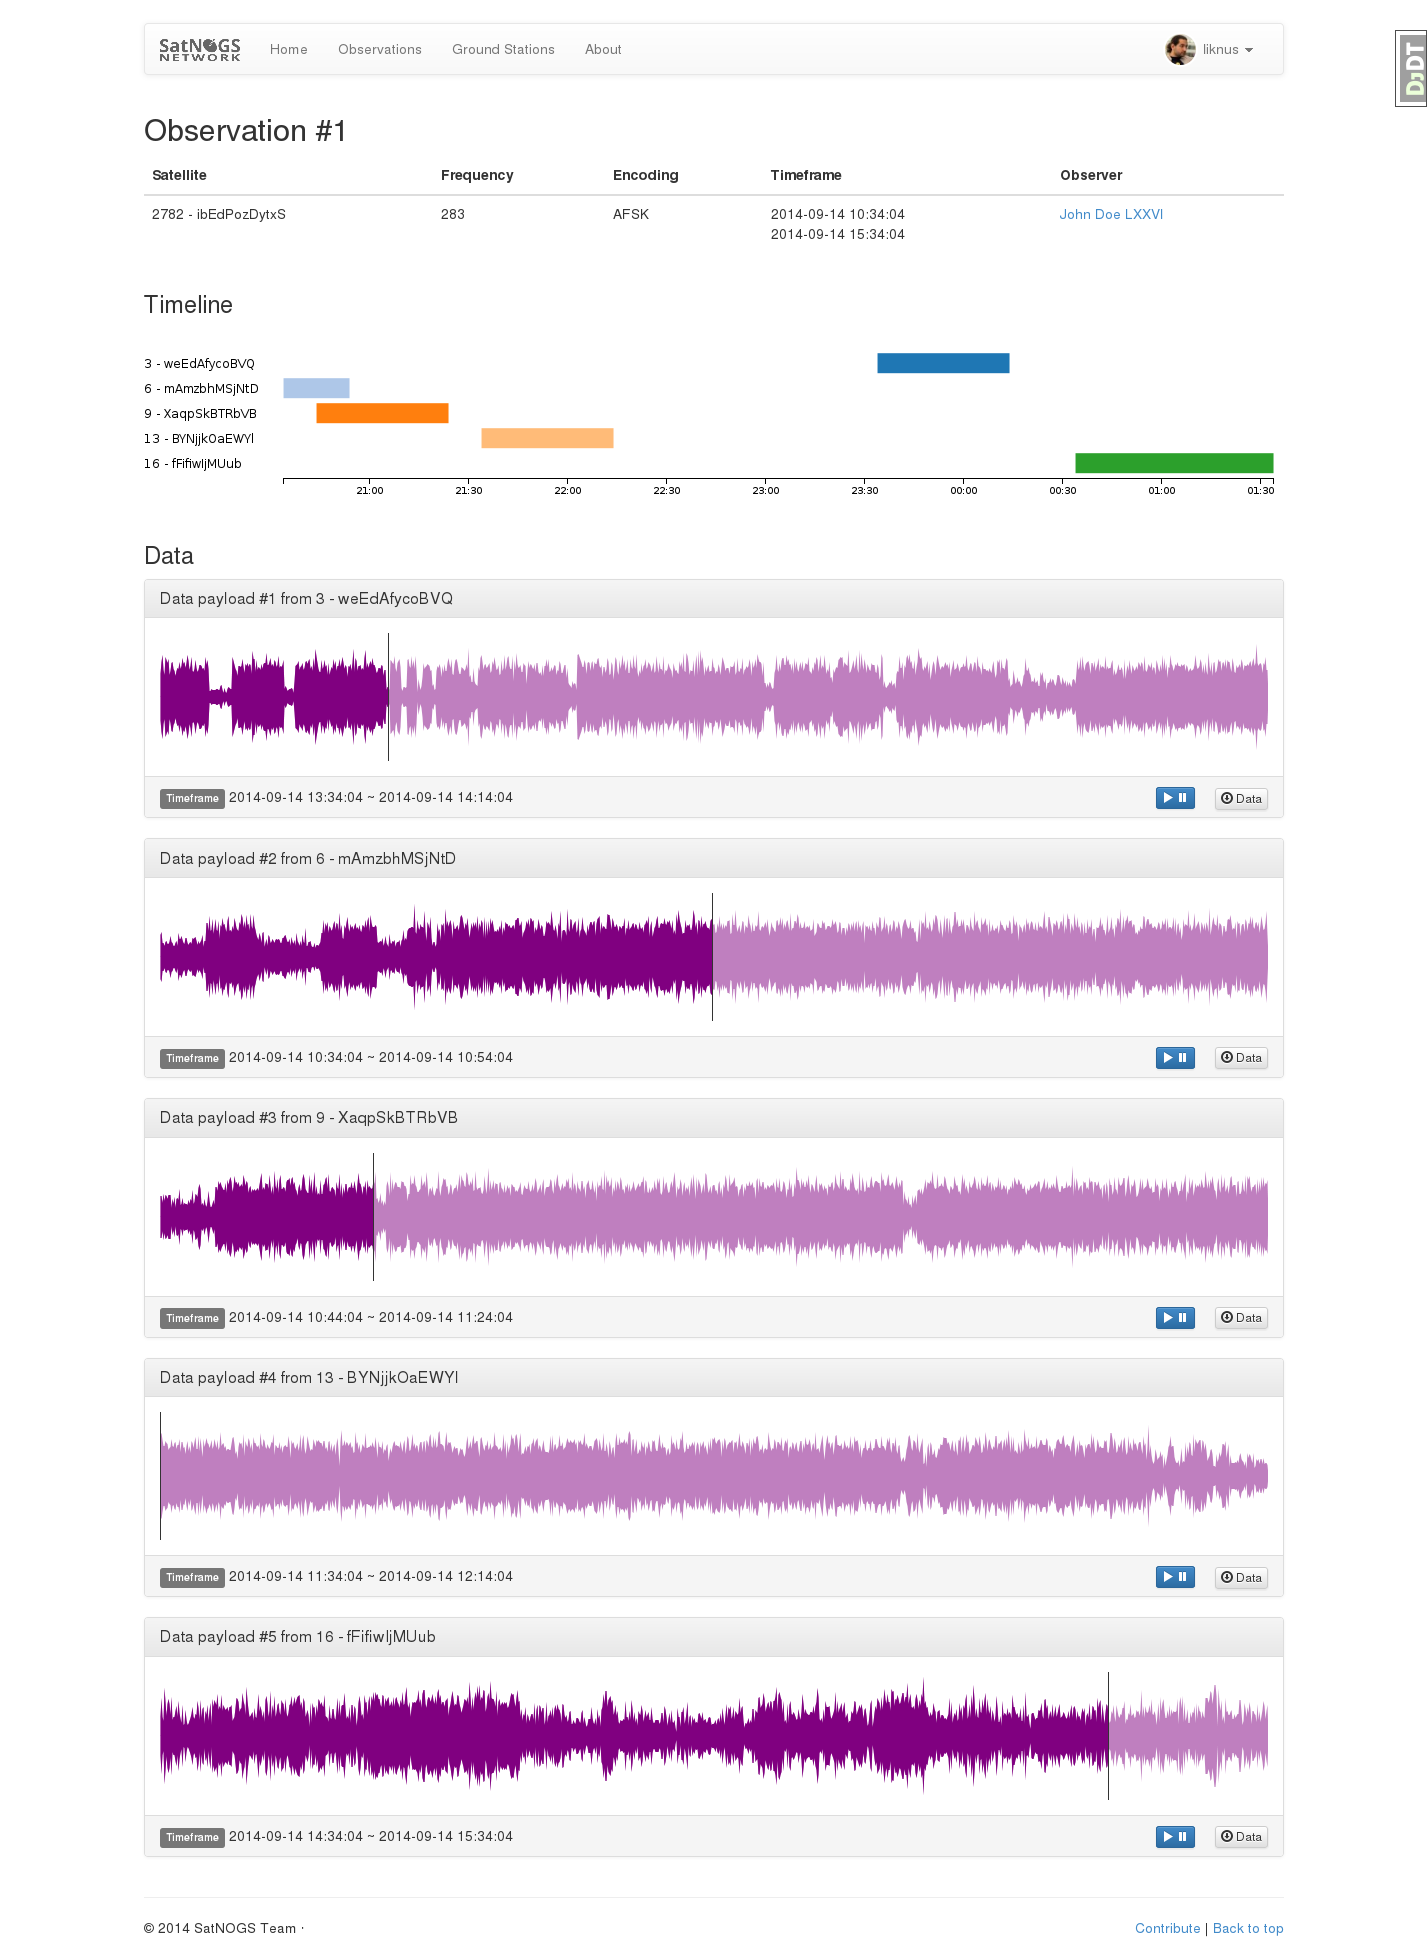
Observation page with data
10/07/2014 at 18:27 • 0 commentsContinuing the development of SatNOGS Network, we focused on enhancing the observation results page. Check out how it looks overall:
![]()
What is new?
Timeline
The new timeline view gives a quick overview on the data that each ground station collected within the observation timeframe. On the left you can see the list of the Ground Stations that participated in the observation and on the right you can check the timeblocks each ground station got data. We used the nice d3-timeline js plugin for it.
![]()
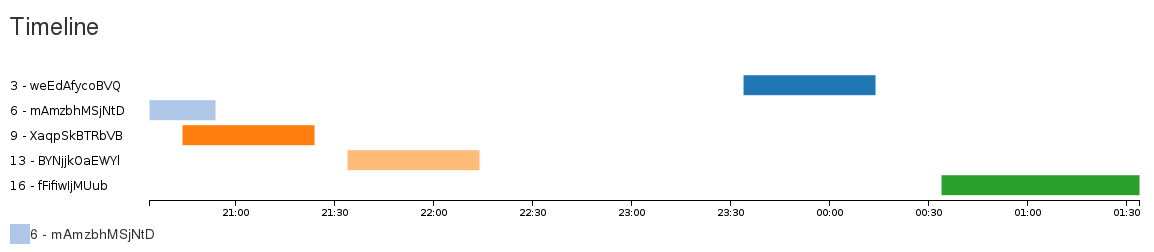
Data View
Each data that is associated with an observation is displayed in a new panel-based section. The data we collect can be either text (decoded messages) or sound (available for further processing). We dealt with the hardest one first. We used Wavesurfer.js to visualize the waveform (HTML5, WebAudio and Canvas FTW!) and added the ability for playback directly in the browser. A download link is also available.
![]()
The code for the implementation of the new views is already pushed in our repos. Soon we will be updating the dev instance with mock data so that you can check out the new functionality yourself.
-
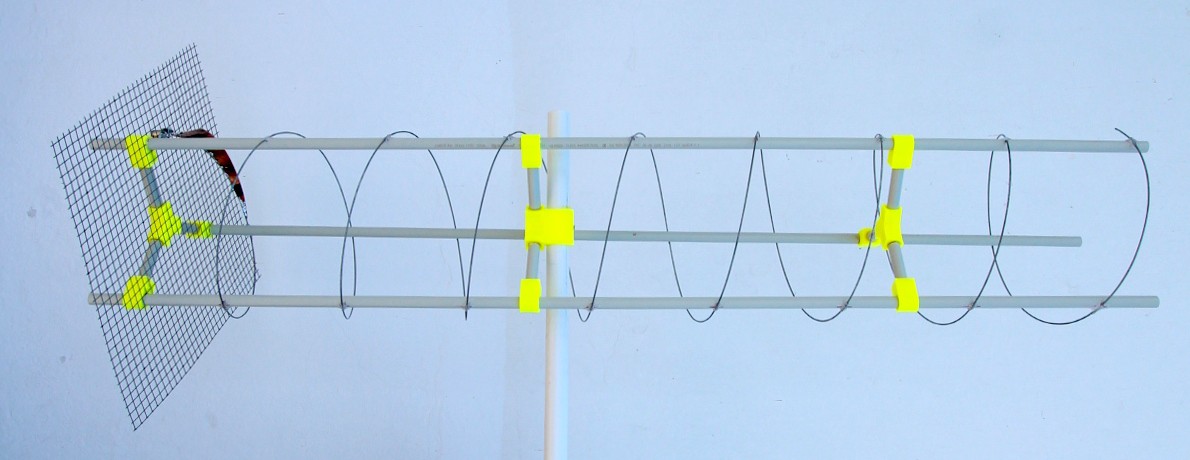
SatNOGS going Helix
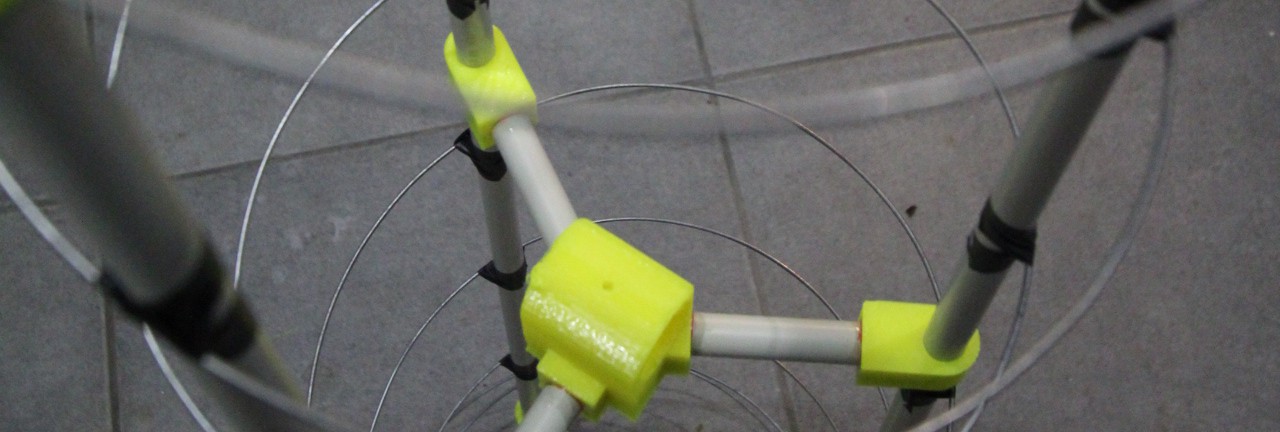
09/28/2014 at 17:49 • 0 commentsAn important part of the instrumentation of our ground station is the Antennas. Early on the SatNOGS team designed and constructed 2 Yagis for UHF and VHF bands. The UHF Yagi design was essentially a cross Yagi design trying to address the circular polarization issue. Based on the experimental operation of the ground station we were sure we can do something better.
Satellites are tumbling and turning, thus if the transmission of the transponder is done in a single dimension polarization you better match this polarity to get the optimum gain. (if not you will loose 30dB) (check here for details). We decided that a Helical antenna would give SatNOGS a better chance for an optimal reception, so we needed to design, document and build one.
![]()
There are a couple of theoretical models for Axial-mode Helical Antennas. Most notable are the Emerson one and the Kraus. We decided to go for Emerson, given our wavelengths, construction constrains and overall size. As we were going for UHF band 437Mhz seemed like a popular frequency for satellite communications and we centered around it. As for the circular polarization we designed a Left-Hand one (as we already had a Right-hand cross-Yagi design).
Dimitris worked on a modular and extensible design that can be used on other bands too. 3D printed parts and off the self items is the classical recipe that we followed. The result is a sturdy and easy to construct antenna. Initial tests are showing improvements compared to our cross-yagi UHF which is a win!
![]()
The design can be found here, bill of materials here and a detailed documentation on how to build here.
![]()
Optimization of the antenna is crucial. We invested considerable amount of time towards that and there is always room for improvement in matching, constructions and details [1]. More NEC calculations will follow and we expect more fixes as we go.
[1] http://users.ece.gatech.edu/~az30/Downloads/HelixAPMagazineSubmission.pdf
-
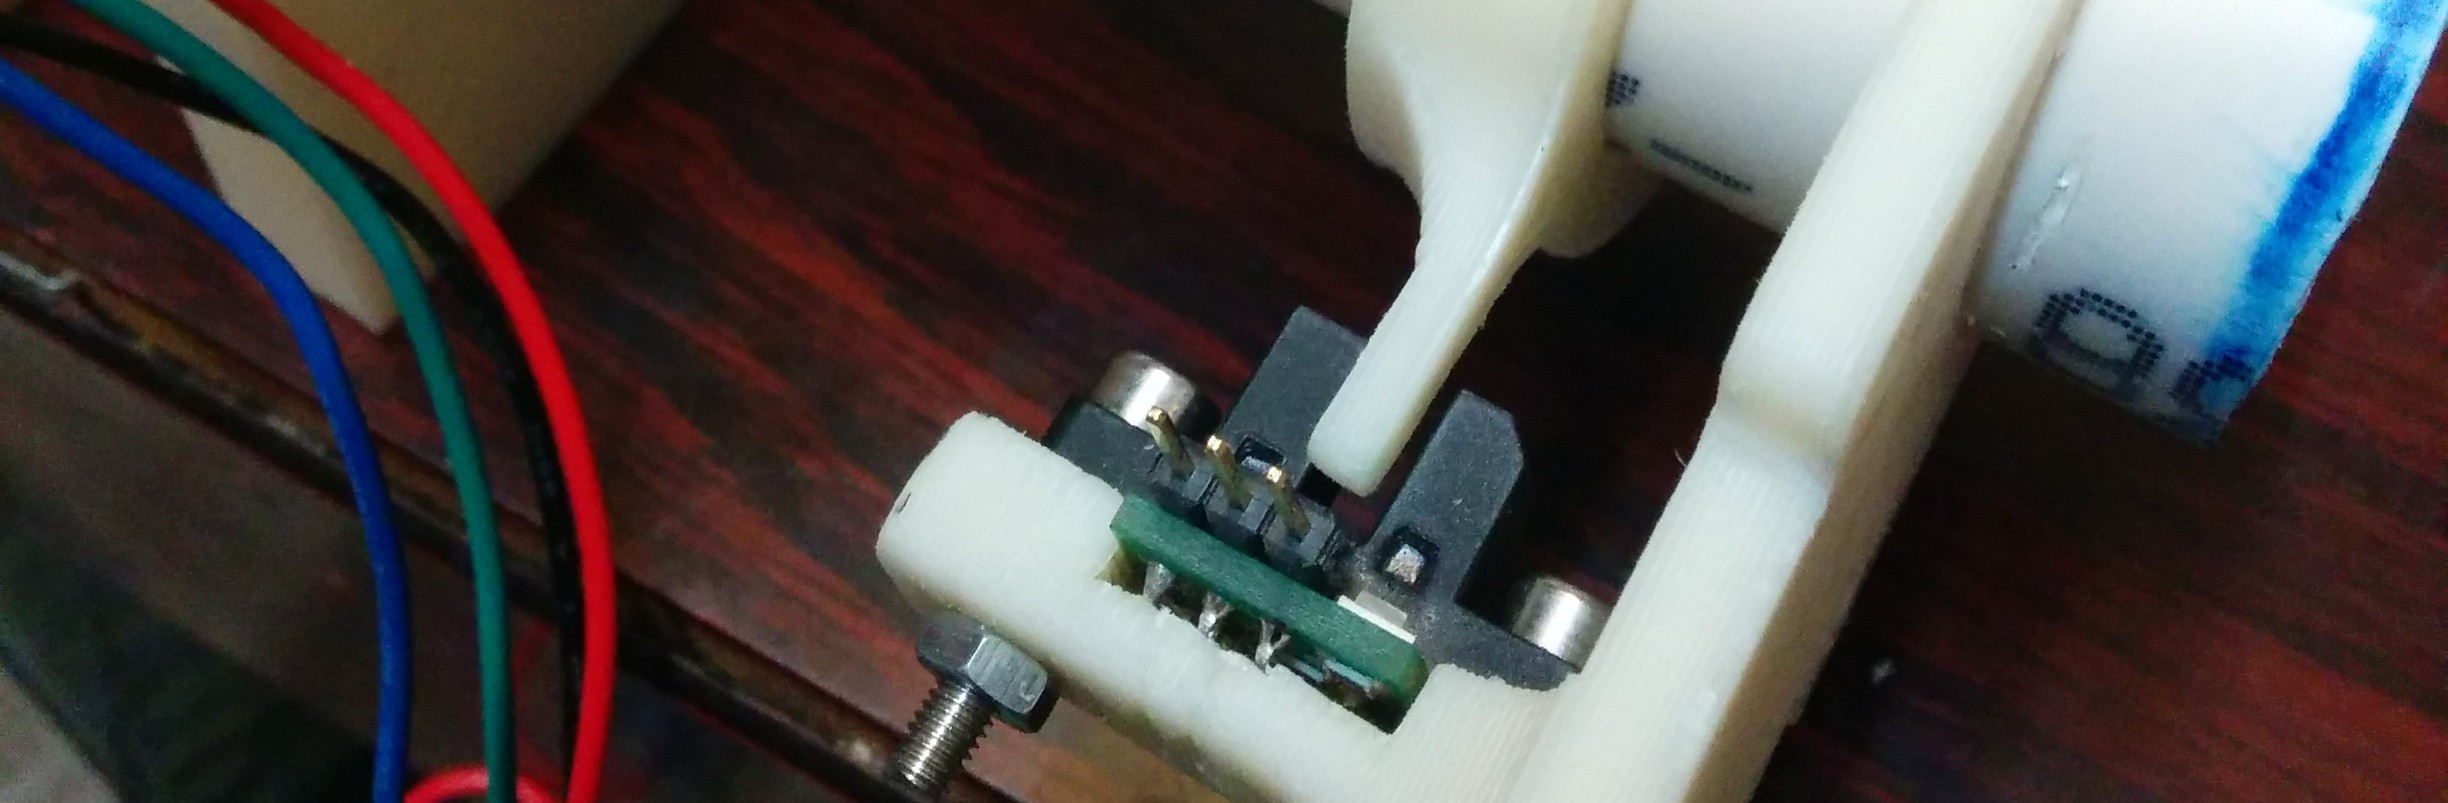
Axis homing tests
09/28/2014 at 16:40 • 0 commentsUsing the first version of satNOGS hardware we figured out that some times due to various reasons (software, mechanical or power malfunctions) the rotator might end up in an unknown position.
At that point, the only way to resolve that situation was to manually reset the rotator to home position (pointing at the north with zero altitude). Therefore, since we wanted the rotator to operate without human supervision, we decided that an automatic homing system was crucial.
At first thought we tried an IMU, which turned out to be too noisy and affected by the rest of the systems so we ended up with a pair of opto-swithes which are manually set at the first run.
![]()
The mounts and activators of the switches are designed in a way that they remain modular and independent of the rest of the tracking hardware so that they can be fitted in previous or future versions.
Our intention is to write two homing functions in the arduino code
The first one, which is already written, is called when the arduino boots for the first time or after power loss. In this function, the rotator scans around the current location until it finds home position. Below you can see a video in action:
The second one runs after every tracking job or on demand through the serial interface and just moves the tracker to the home position. This way, whenever a new traking job begins the user knows that the job starts from zero position.
You can check the code in our repo, and the designs for the hardware too.
It was always our intention to have SatNOGS ground station as unattended as possible in terms of operation. We are now much closer to it!
-
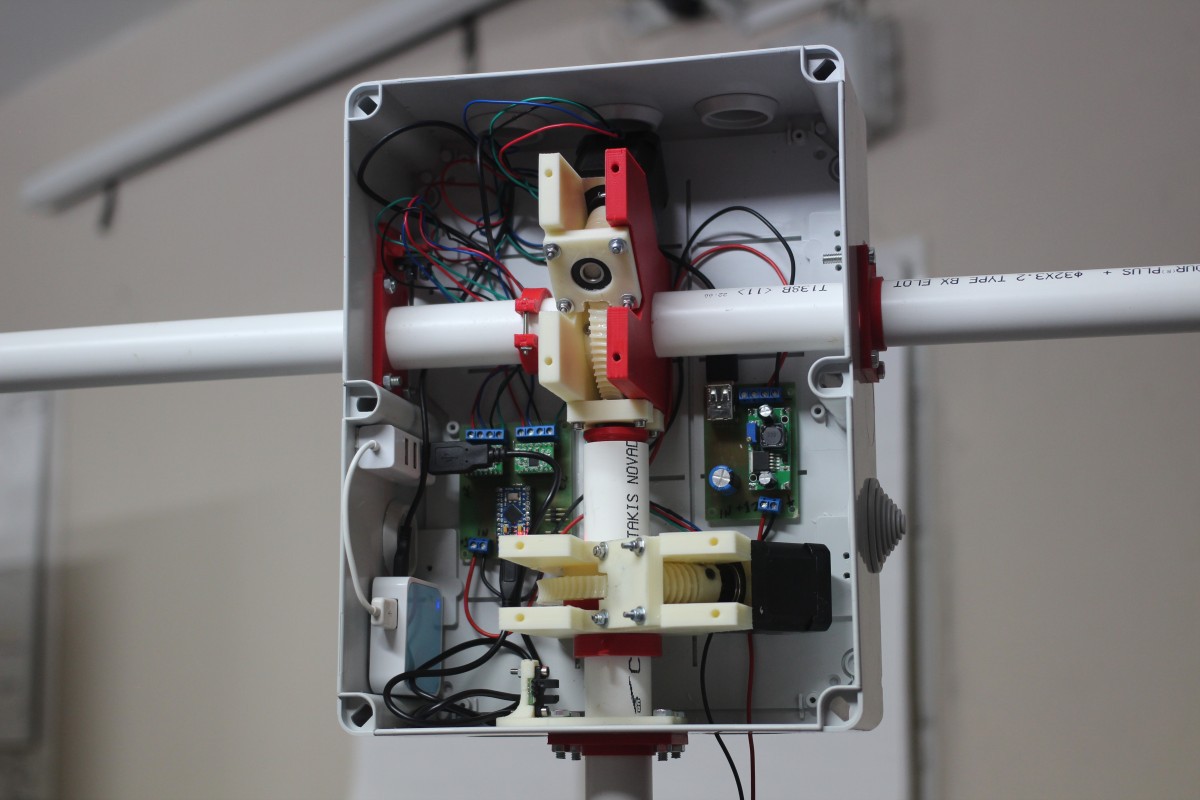
SatNOGS Ground Station v2
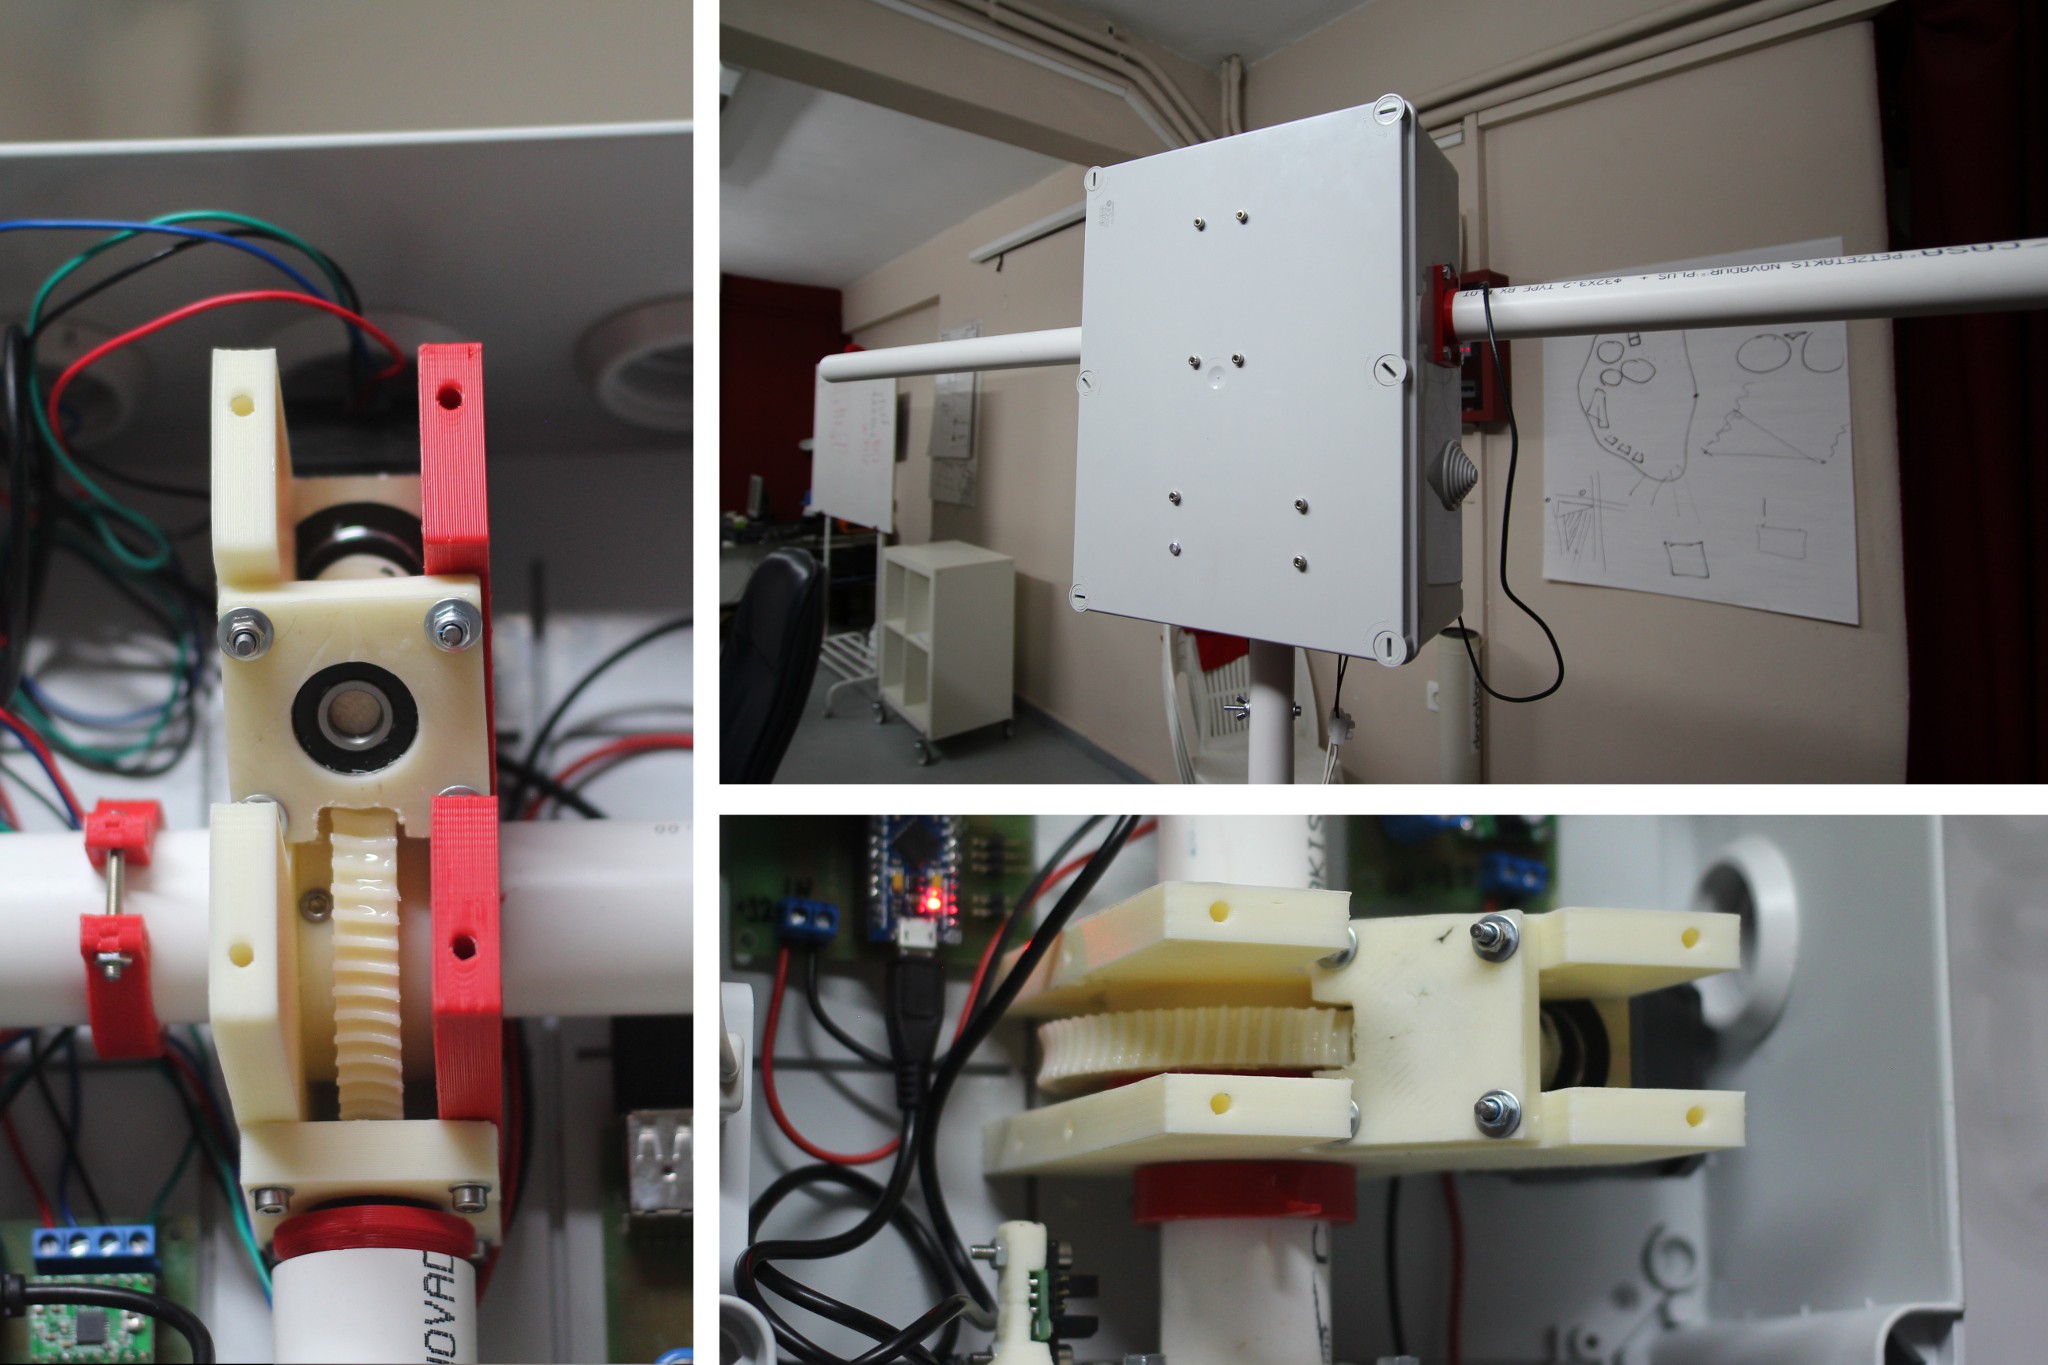
09/24/2014 at 21:48 • 0 comments![]() The time we've all been waiting for, has come. We are proud to release v2 of SatNOGS Ground Station (Tracking Box) with many upgrades and fixes from the previous version. Notably:
The time we've all been waiting for, has come. We are proud to release v2 of SatNOGS Ground Station (Tracking Box) with many upgrades and fixes from the previous version. Notably:- Redesigned Axis Gear Assemblies. They are now smaller, more robust and reliable based around a much more powerful NEMA 17 Stepper Motor. The two assemblies are now structurally connected, making the whole assembly much more rigid. Also we redesigned the Worm Gear for improved printability on 3D printers.
- Integrated electronics. We designed and built a new PCB to house all electronics (Arduino, and Stepper Drivers) along with an additional PCB as a PSU for voltage regulation and neater cable management. (see previous log)
- Reworked stepper driving code, featuring a much cleaner code, acceleration and deceleration in movement, stop functions and early opto-homing support. (see previous log)
![]()
Tripod and On-board computer (TP-Link) stayed the same, with developments on them coming down the road.
A detailed Bill of Materials is available here.
We have also compiled a detailed construction guide, with step by step instructions on how to assemble the Ground Station Tracking box for both Mechanical and Electronics components.
http://satnogs.dozuki.com/c/SatNOGS_Hardware
![]()
All Designs and 3D printable files can be found here and all PCB files for our electronics shields can be found here.
Development does not stop with v2, and we are already working on the homing/zeroing code that will enable the homing parts we included in v2 to function. Moreover based on more testing we are applying to v2 and feedback from the community, we expect minor fixes to be released soon.
We can't wait to see v2 out there, built by others, so get started and/or provide feedback!
-
Acceleration tests in stepper motors
09/24/2014 at 20:41 • 0 commentsStepper motor and axis movement should be accelerated, decelerated and smooth. This is important for a variety of reasons including less strain on the axis and the gears, plus inertia compensation.
Agis with Manthos spend some time looking into some options and finally agreed to implement acceleration resulting to smooth tracking using an Arduino Library and amending it a bit. The results is pure awesomeness for our tracker:
This code and implementation goes straight in our v2 design. Code can be found in our repository.
#smoothie
-
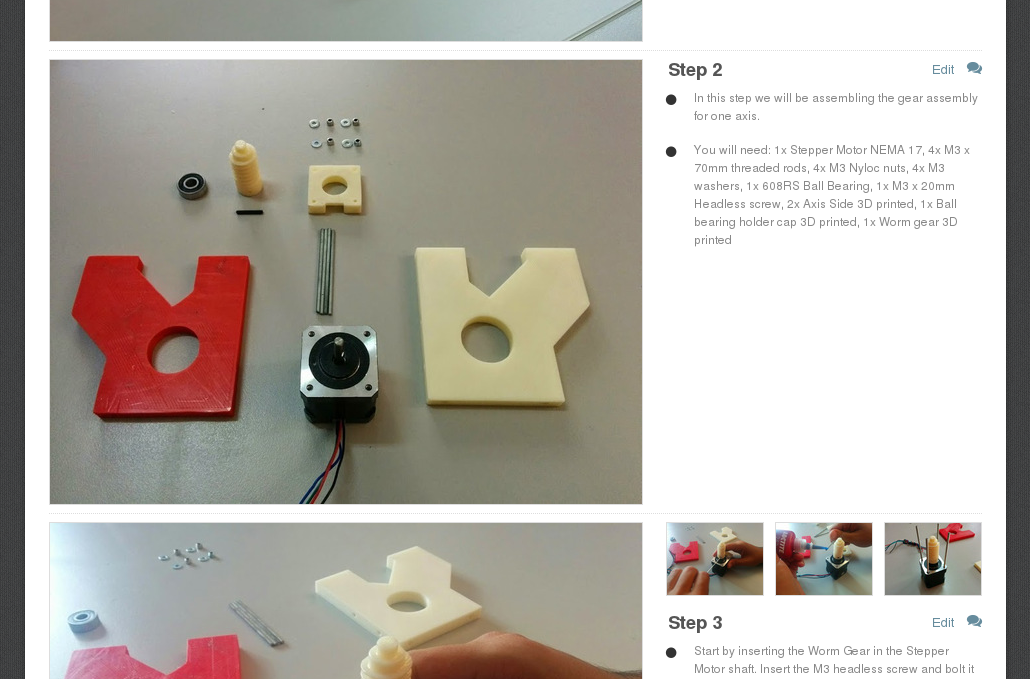
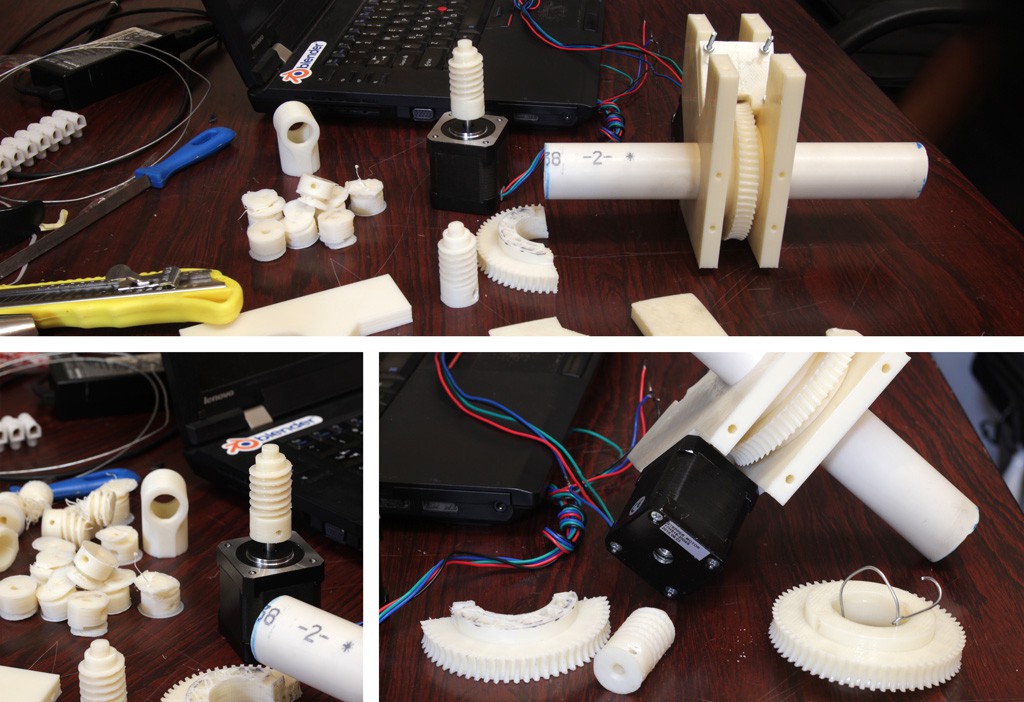
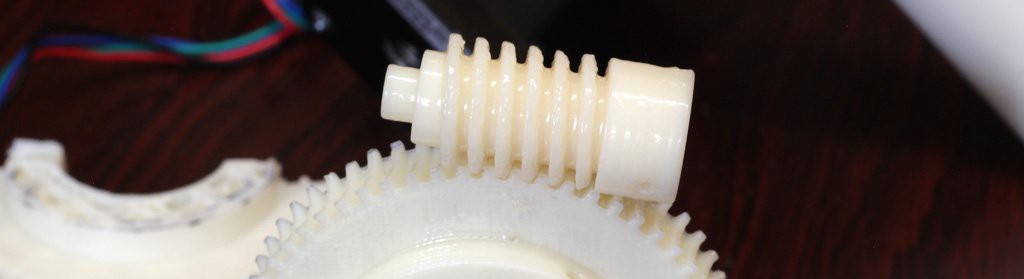
Gears... gears everywhere!
09/22/2014 at 14:36 • 0 commentsWorking towards v2 of the Ground Station Gear Assembly, the SatNOGS hardware team has experimented with various gear designs. All of them where designed and 3D printed from scratch focusing on ease of reproduction and excellent mechanical operation and properties.
![]()
The new gear assembly (which is almost identical for both Azimuth and Altitude) sports a much thinner and compact design, driven by a much more powerful NEMA 17 Stepper motor.
Failing was part of the process. As you can see in the pics above, 3D printing a worm gear can be a monster of its own. After careful calibration and fine-tuning (layer heights, cooling, leveling, infill settings etc) on our 3D printer we were able to consistently reproduce worm and matching gears. We even experimented with acetone abs curing, which (based on the results we are seeing) we believe should be the default for our gears moving forward.
![]()
v2 of Ground Station is around the corner, and we will be posting later this week with full documentation, designs and instructions on how to build. Till then, back to gear-craze!
-
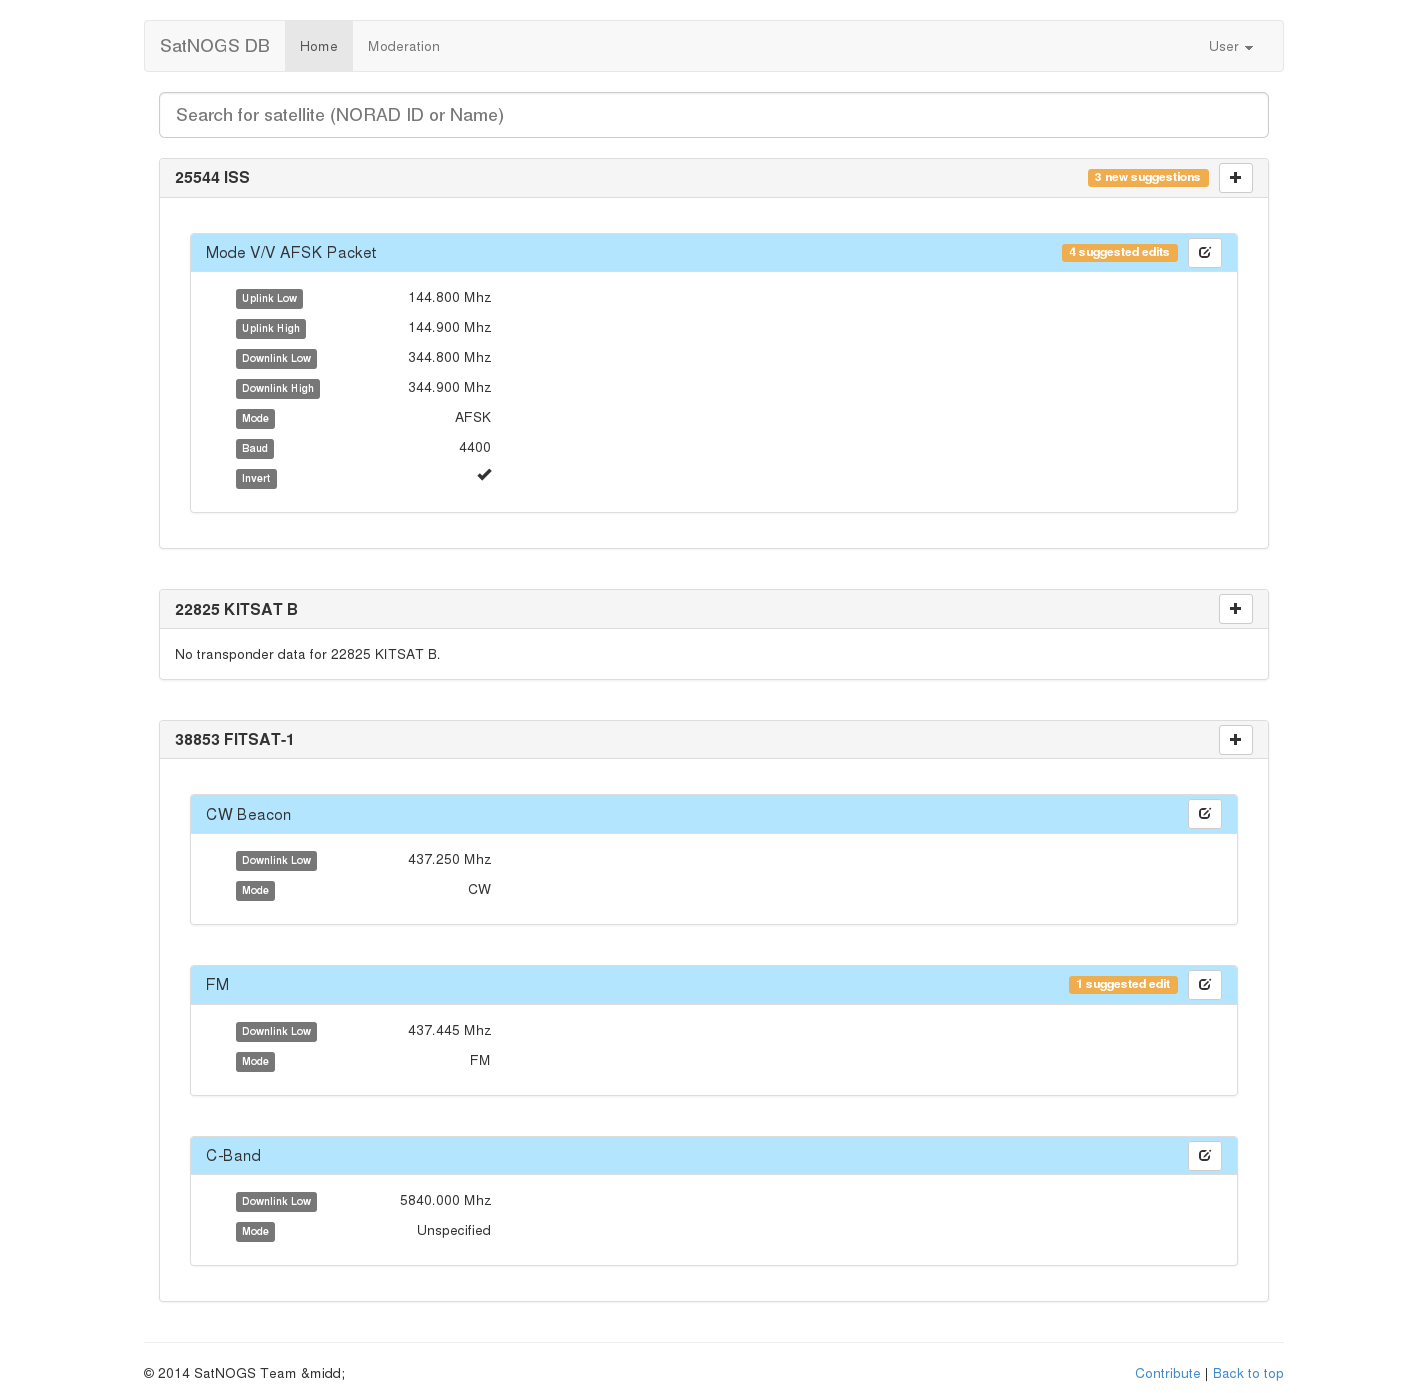
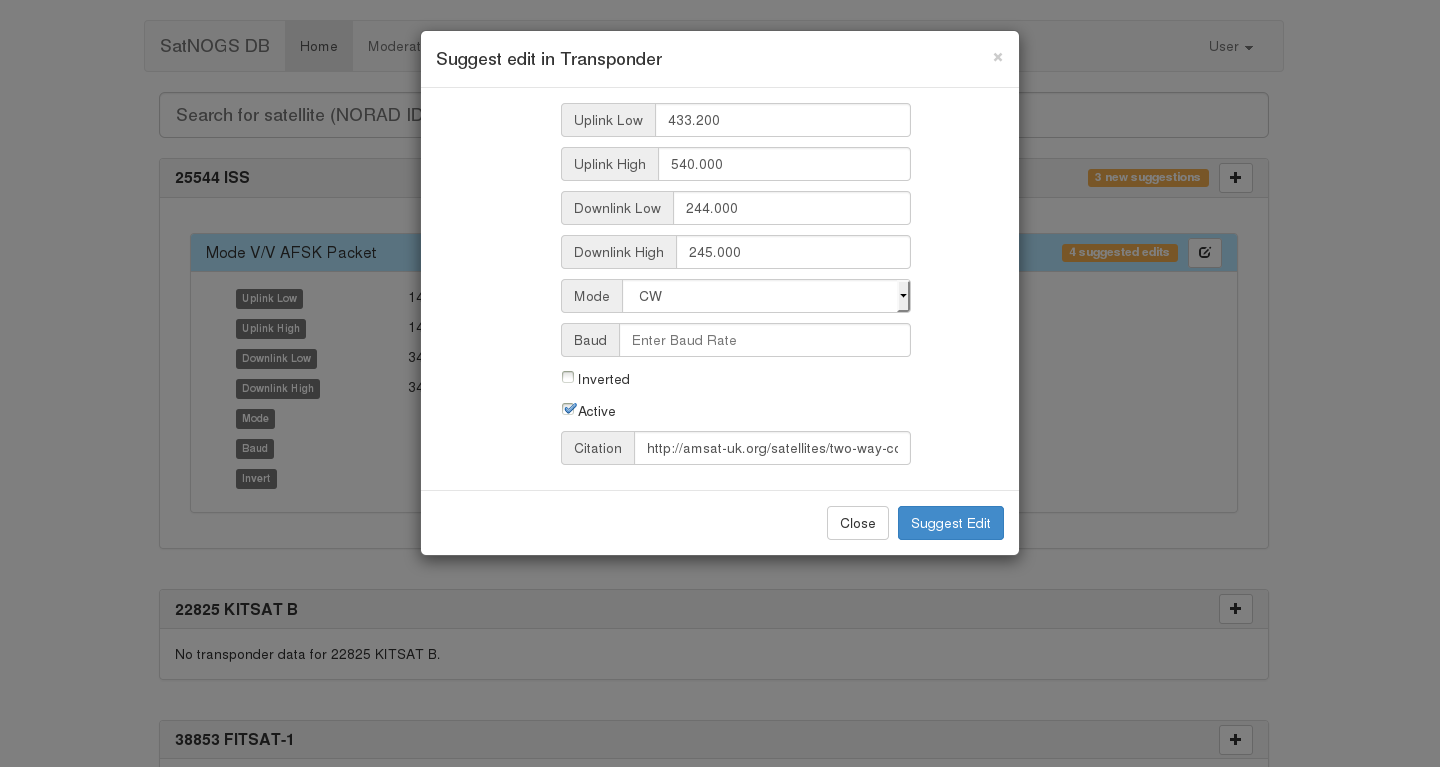
SatNOGS DB - A transponder Database
09/22/2014 at 12:52 • 1 commentDuring our quest for reliable Satellite transponder data we came into a sad realization. There is nowhere out there such a thing as a complete transponder database for operational satellites.
Having this information is crucial for SatNOGS operations on multiple levels. Observation scheduling, observation job details and mainly ground station operations.
It was obvious that we needed to build a DB of all transponders of operational satellites, and in a true community and open data fashion it needed to be open, crowd-sourced and not necessarily SatNOGS specific.
![]()
What we ended up with as a solution is SatNOGS DB . A separate crowd-sourced suggestions app build around transponder data for satellites. The source of truth about transponder data still lives under SatNOGS network (our main observation and scheduling website)(see previous posts) and SatNOGS DB would expose all these data and enable users around the world to provide suggestions about transponders for satellites.
![]()
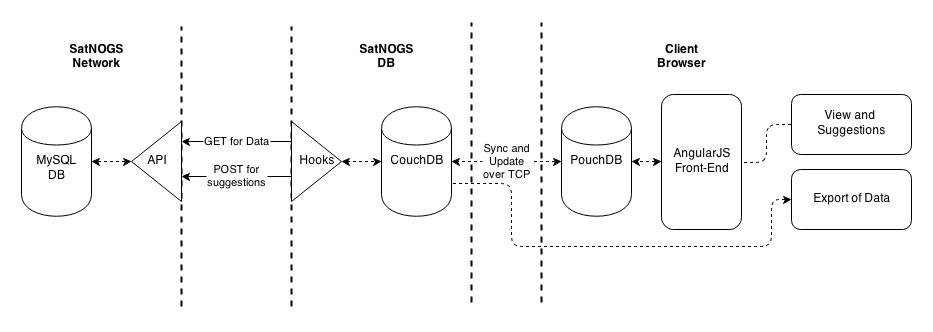
Technically, the stack we are using is really interesting, thanks to our hipster-friendly software expert Nemo. In an effort to make this app as abstract, white-labeled and not SatNOGS specific as possible, no relational specific-schema database is used on the backend. We are using CouchDB [1] as our backend (with the appropriate hooks to SatNOGS Network) and a combination of PouchDB [2] and AngularJS [3] as our client-side front-end. This provides the ultimate flexible and responsive platform for best UX and re-usability. All suggestions are stored in blobs and once they land (moderated and approved) back to SatNOGS Network they become part of our SatNOGS Network database.
![]()
We will be pushing the site live this week (after re-factoring the code) and kickstarting the data with sources we could find around the net. (A post will follow)
Furthermore, by solving our data issue, we are providing the world (and especially ham and amateur satellite communities) with an open, accessible, crowd-sourced database for Satellite Transponder data. (yeah open data!)
SatNOGS - Global Network of Ground Stations
SatNOGS is an open source satellite ground station network, optimized for modularity, built using affordable tools and resources.


 The time we've all been waiting for, has come. We are proud to