 Julian Hofmann
What we're all about

It is our goal to be able to print biological materials and even cells in a high precision manner for an affordable prize to assist scientist like us to hopefully allow for practicable 3D bioprinting for skin grafts and in the future maybe organs. As our team takes part in the iGEM competition and for this tries to modify cells in order to make them printable, we will be the first to test the device will be able to help us make bioprinting work.
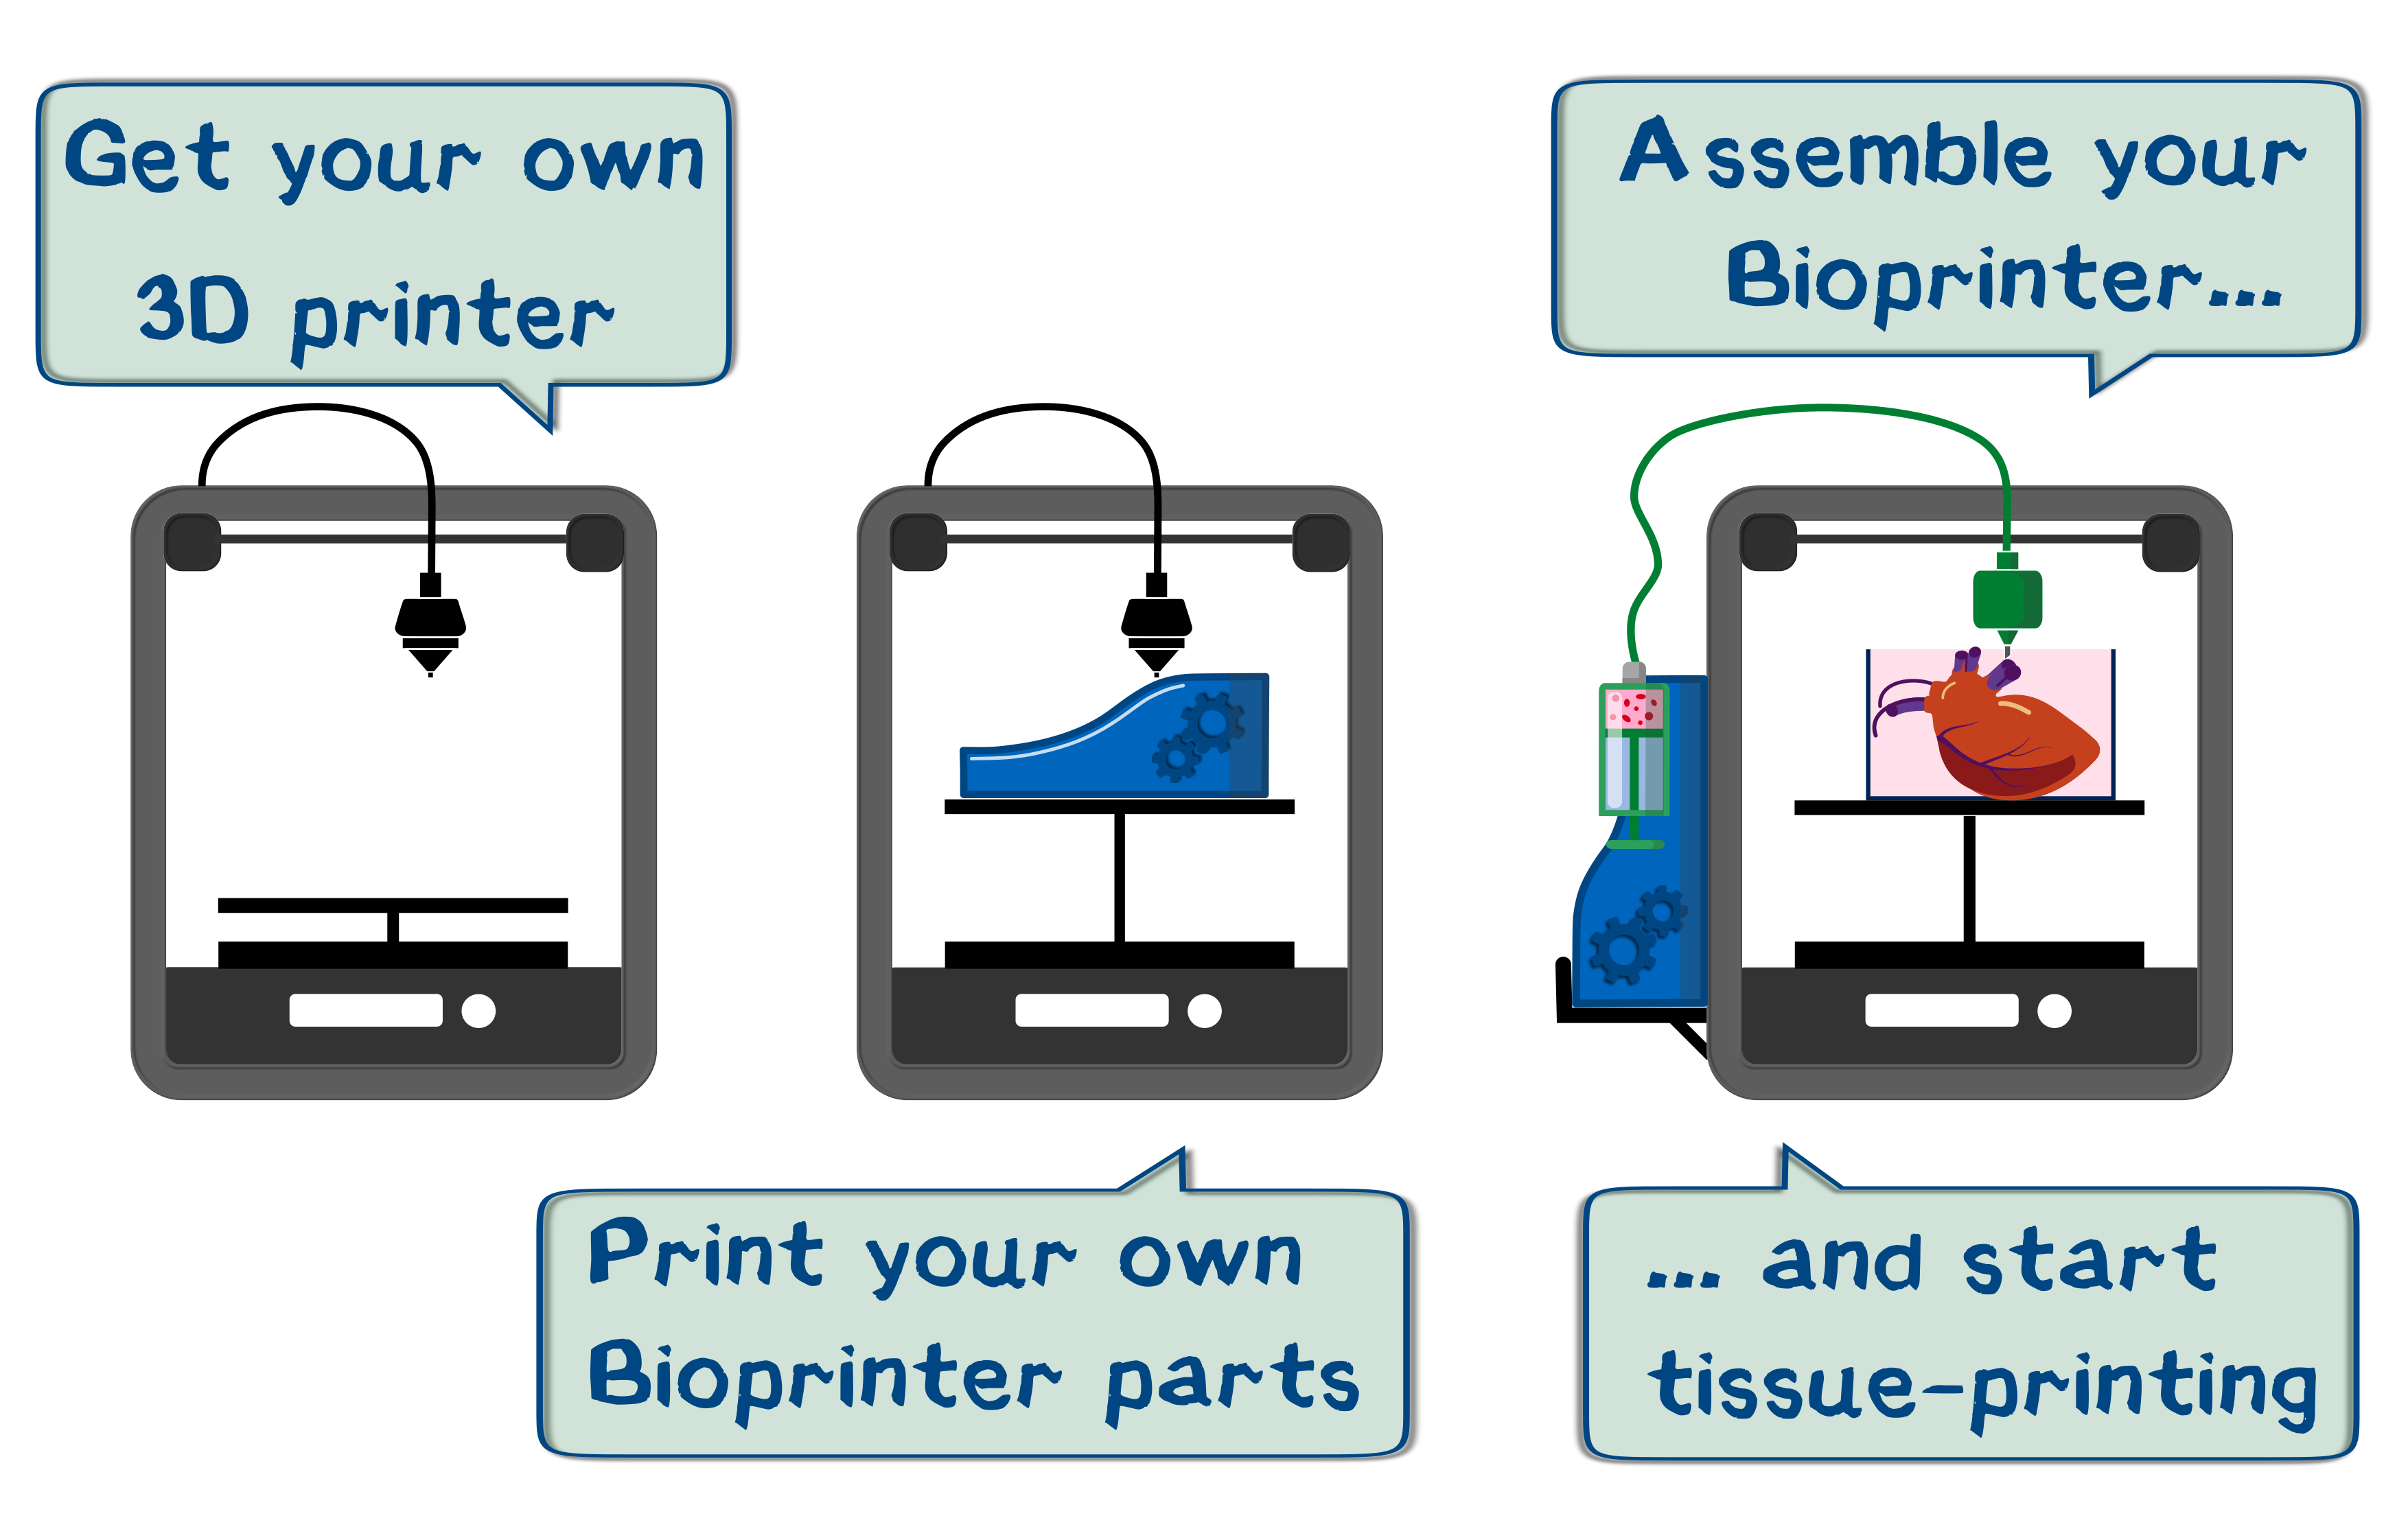
So therefore we developed a system that will allow us to make use of the already proven capabilities of the easily obtainable Ultimaker 2+ print platform.
Instead of having to aquire expensive building blocks the end user, e.g. researchers and doctors, will be able to cheaply print nearly all parts by himself except some simple metal parts and standard wires. Due to the minute effort required for the transformation from FDM printer to bioprinter our system can be utilized and fitted to its user's needs without extensive mechanical knowledge.
Why Bioprinting is an important future technology
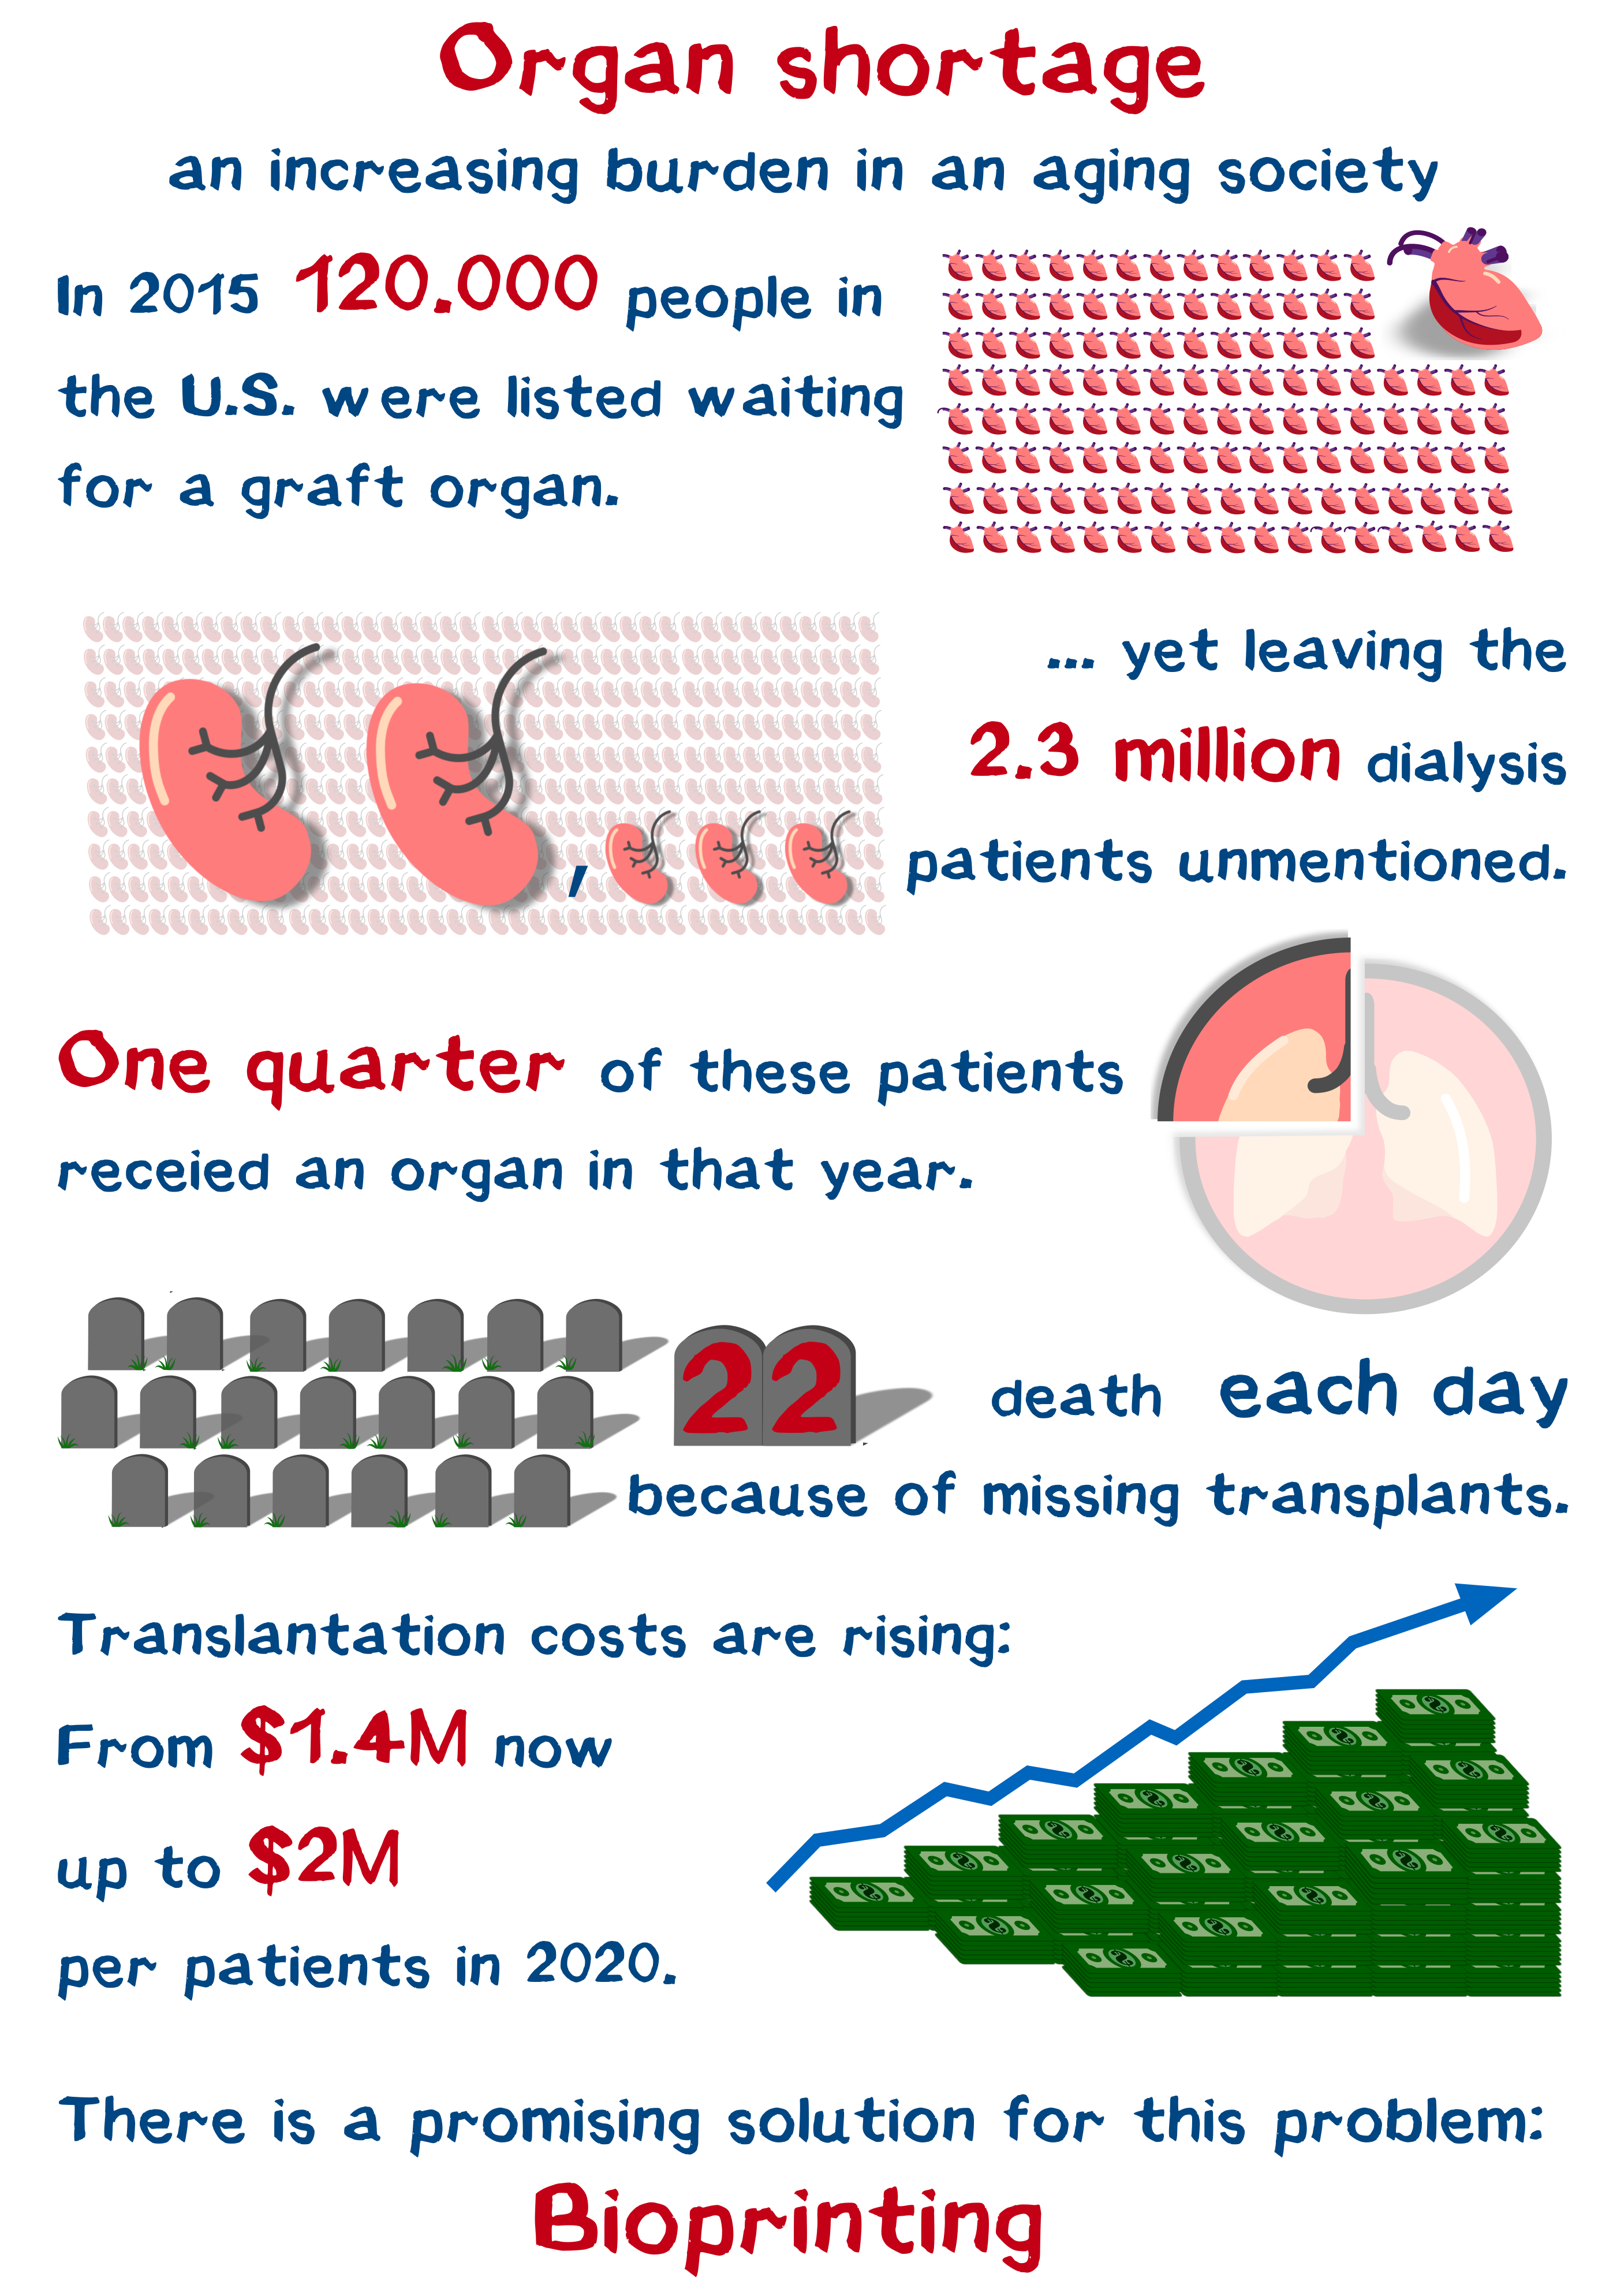 One of the major limitations in medical care is today the shortage of graft transplants.
In 2015 there were 120.000 patients waiting for a graft organ and only 1/4 of these patients received a new organ in this time period.
Due to this shortage in organ supply, there are only in the U.S. 22 dying patients per day.
The supply and transplantation of organs also constitutes a major burden for health insurance funds and these costs per patient are rising, for example from actual $1.4M to $2.0M in 2020 for the transplantation of a liver lobe.
As there number of donor organs is not expected to rise, there must be another solution for the supply of organs for transplantation.
This is the point where Bioprinting comes into play:
This technology is exprected to produce different kinds of replacement organs in this century.
For this reason we are sure that the development of an affordable, open source Bioprinter will advance the research on this field and is thus a valuable contribution to the HACKADAY's category "ASSISTIVE TECHNOLOGY".
How it works
We utilize the already existing second extruder outlet on the device to power and control our self-designed syringe pump.
The pump connects via a capillary to our new print head with adapter for exchangable cannula.
As the machine has to handle liquids it is not only necessary to design a build plate adapter for various cell culture plates, tubes and jars but also to modify the firmware.
Due to the addition of containers we will add an optimized user interface for the slicing software as well as a collision avoidance script, which will correct the machine code for inaccessable areas.
For the purpose of quality control we are planning to add a array of RGB LEDs with a touch based user interface, which will allow for an improved optical control via a webcam and wavelenght-spcific image analysis. This will be especially for cell culture applications as in synthetic biology the use of special fluorescent dyes and protein makers is essential.
The syringe pump
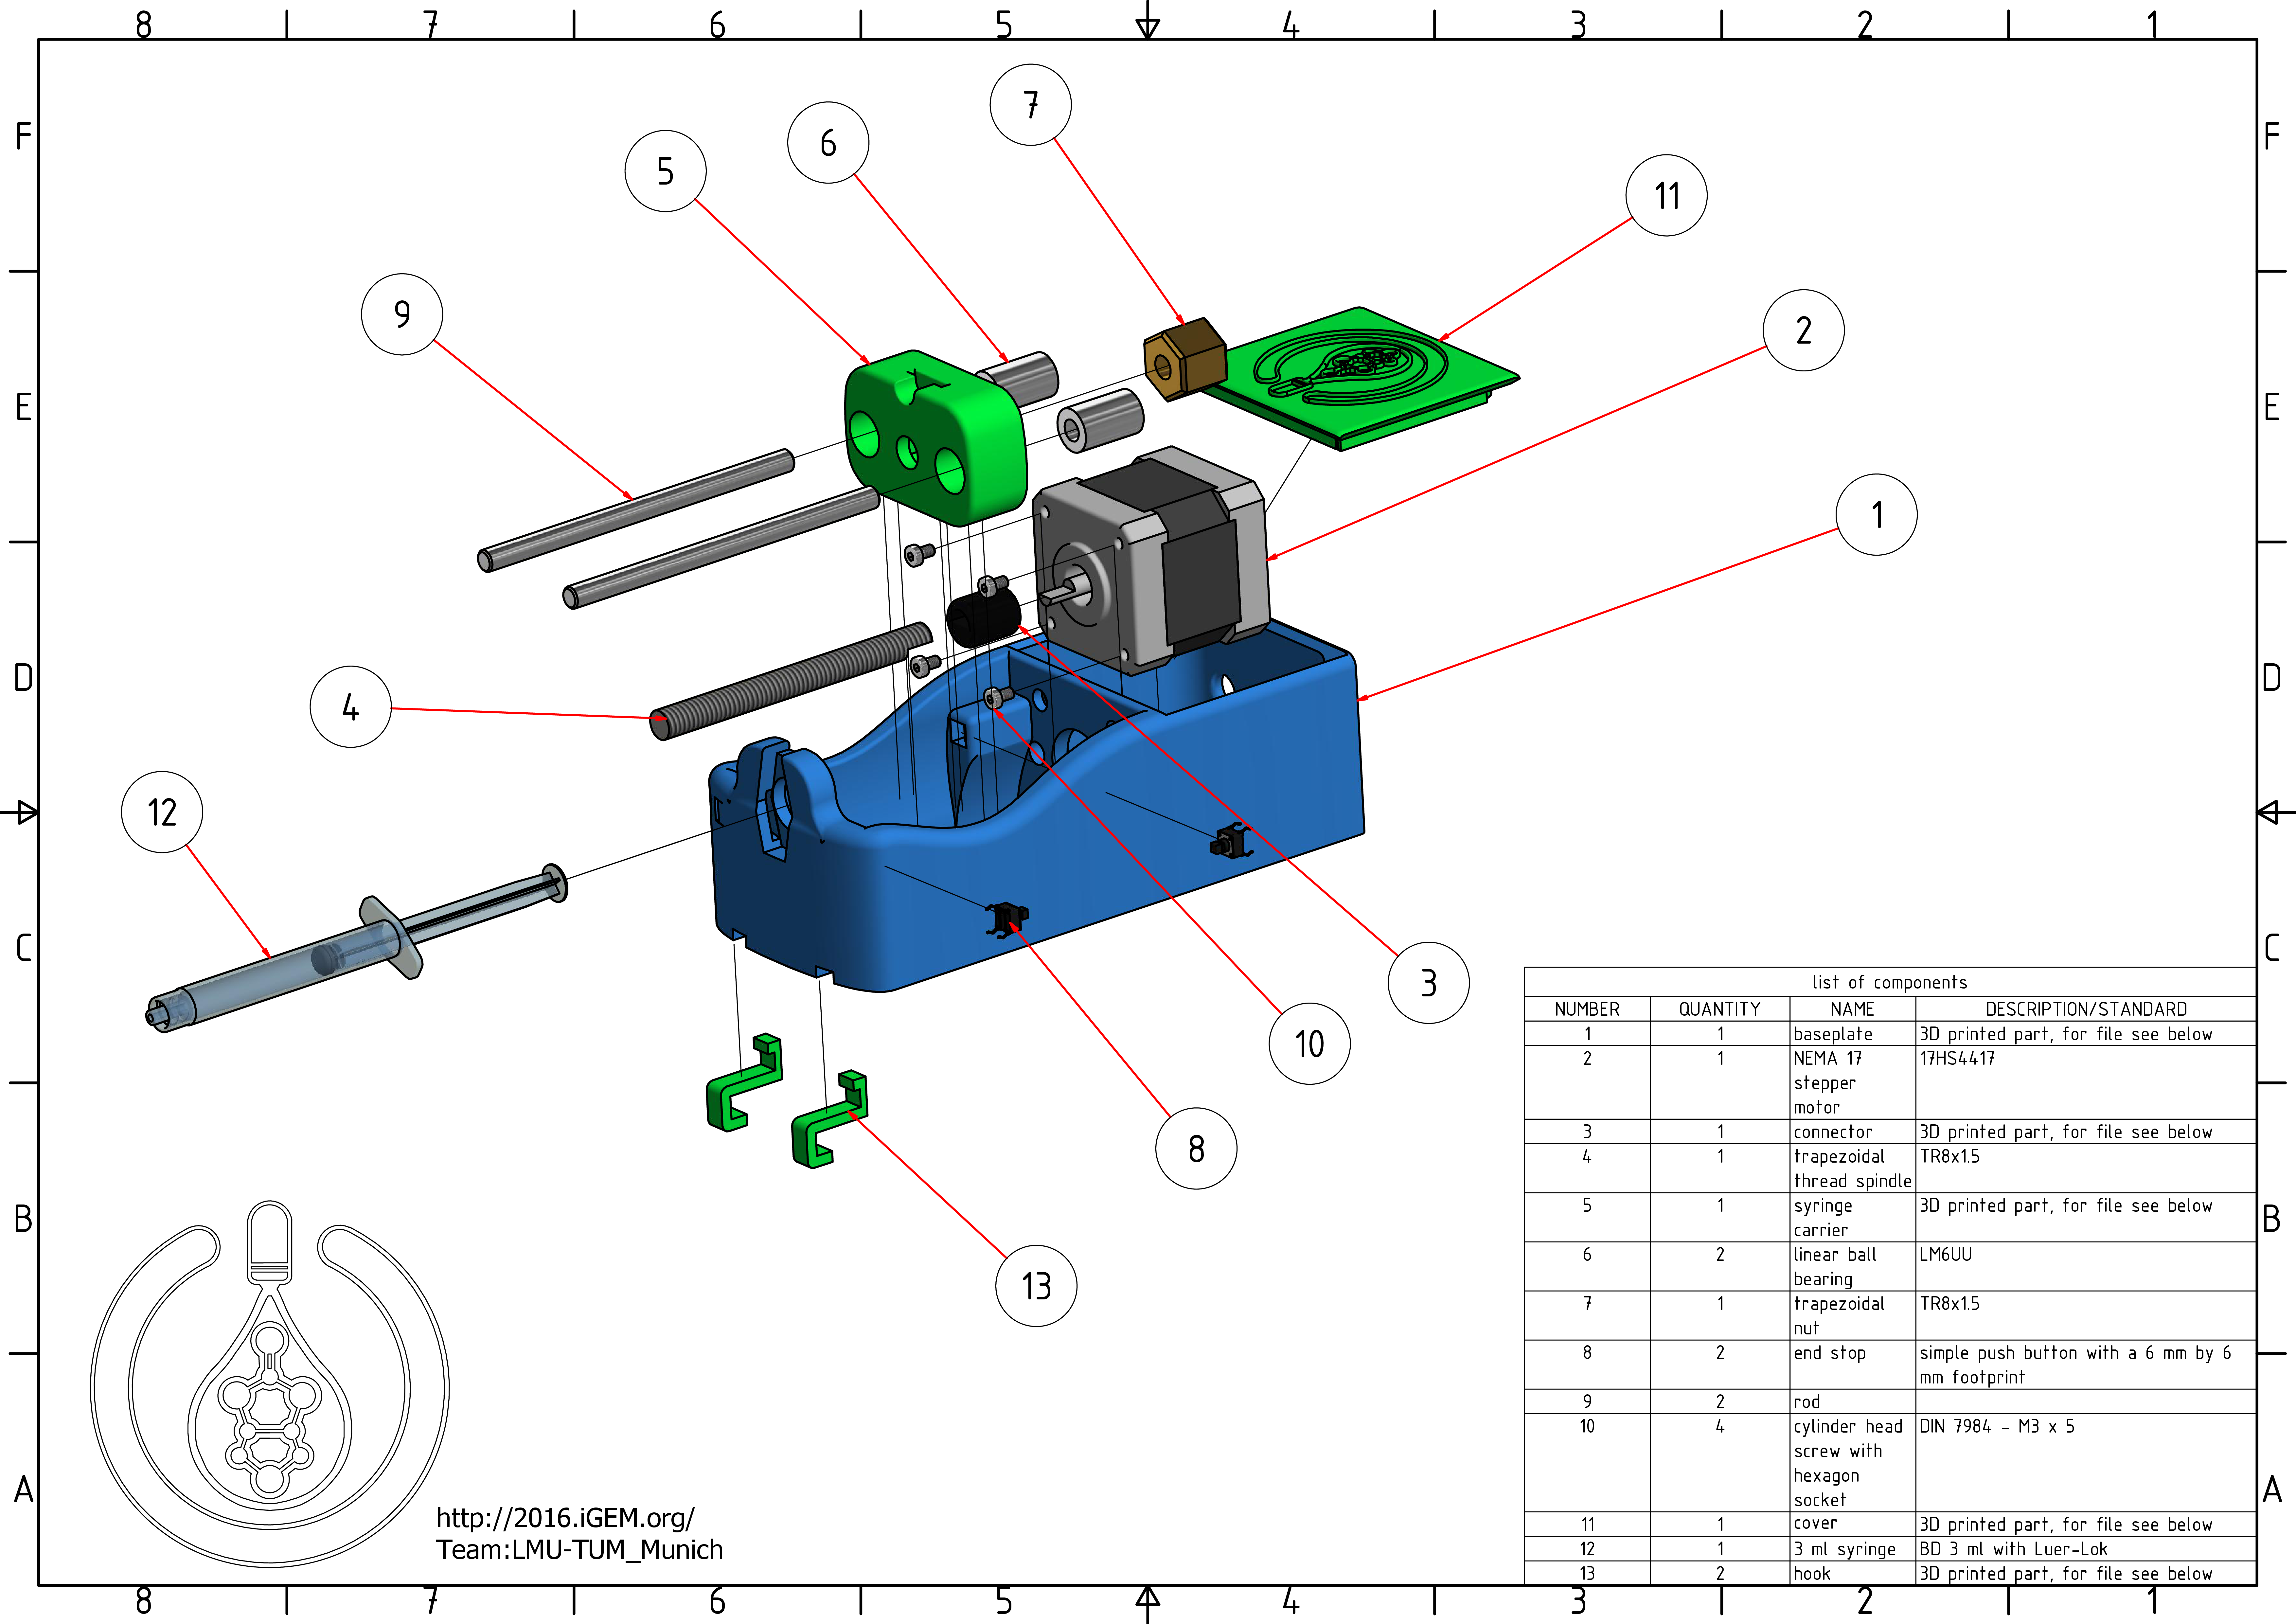
Below, you see an exploded view of our syringe pump that holds a 3 ml syringe. Its purpose is to deliver a constant and precise volume flow according to the information it receives from the printer. A stepper motor rotates a threaded spindle to create a translation that pushes in the syringe’s plunger. The thereby displaced cells are pushed through a capillary to the print head. This was inspired by a simpler 3D printed syringe pump. Subsequently, several improvements were made, which include the following:
- Use of linear ball bearings and smooth rods to make the syringe carrier (5) move more smoothly
- Use of simple end stop switches (8) instead of hall sensors (that did not work in the previous syringe pump. These switches tell the syringe pump to stop the movement when the syringe carrier (5) reached the end and needs to stop.
- A bayonet catch was designed that holds the 3 ml syringe tightly after a simple gyration.
The motor is running in microstep mode to provide a smooth, consistent movement. Since a second extruder is already designated in the Ultimaker 2 plus, the stepper motor is connected to the existent outputs and the engine speed information is transformed using a simple formula.
The device is assembled in the following steps:
You will need a 2.5 mm Allen wrench, some grease and at least a file
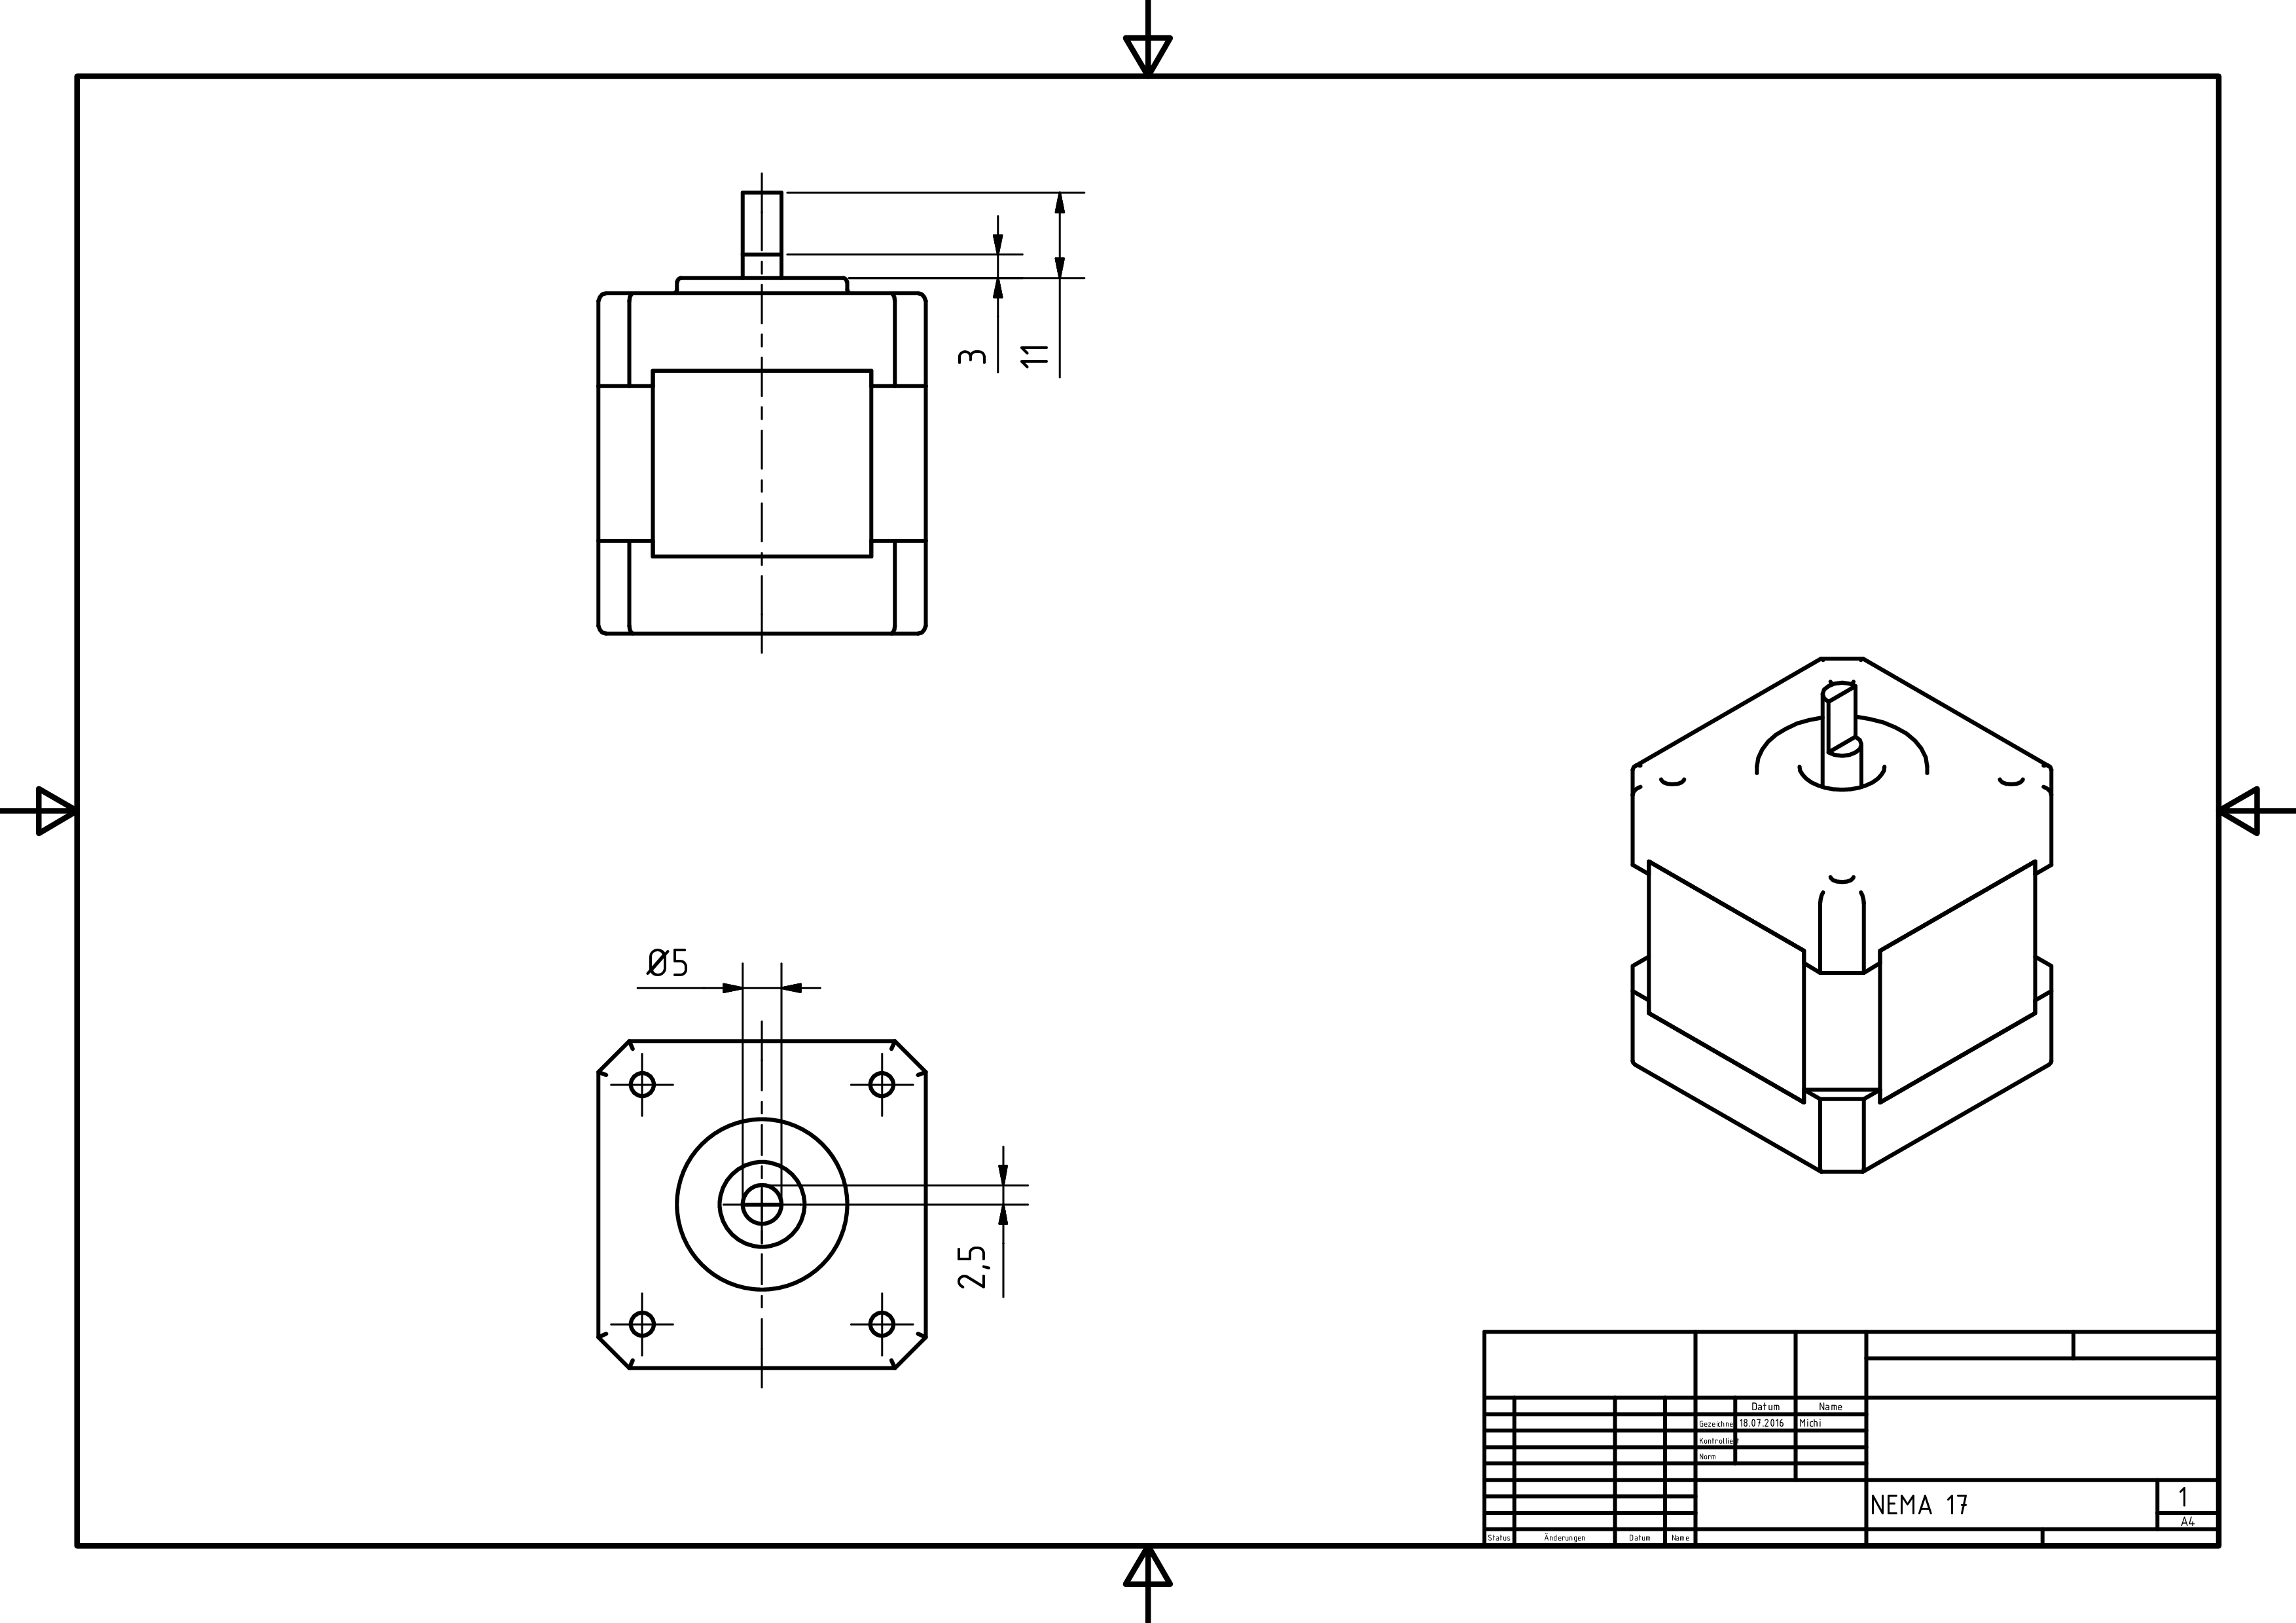
- Prepare the spindle (4) and the stepper motor (2) as shown in the manufacturing drawings by using a file, an angle grinder or a mill.
- Glue the linear bearings (6) and the trapezoidal nut (7) into the syringe carrier (5). Since acetone dissolves the used ABS plastic, you can just thinly dab the area with it and quickly insert the components. After the acetone has evaporated, the parts should be sitting tight.
- Cut off two pins on each end stop (8). They must be on the same side. If you’re not sure which pins to select, measure the electrical resistances between them. The value should change when the button is pushed. Cut off the other two. Solder thin wires to the remaining legs and push them through the cable channels. Make sure that they are not touching each other. Insert the buttons into the provided holes.
- Screw the spindle (4) into the trapezoidal nut (7) until it reaches the middle of the spindle.
- Attach the connector (3) to the spindle (4) with the fitting end.
- Hold the assembled syringe carrier (5) into the baseplate in front of the holes where it’s going to be secured in step 7.
- Insert the two rods (9) into the baseplate (1) through the back holes so that they fit through the linear bearings (6).
- Insert the stepper motor (2) from above into the back of the baseplate (1), insert it’s axle into the connector and secure it with the screws (10).
- Clip in the cover (11).
- Insert the syringe (12) into the bayonet and secure it by turning it. Make sure that the plunger’s end sits in the syringe carrier’s (5) indentation.
- Hang it to the side wall of your printer using the hooks (13)
- Lubricate the spindle a little with grease
![]()
![]()
![]()
![]()

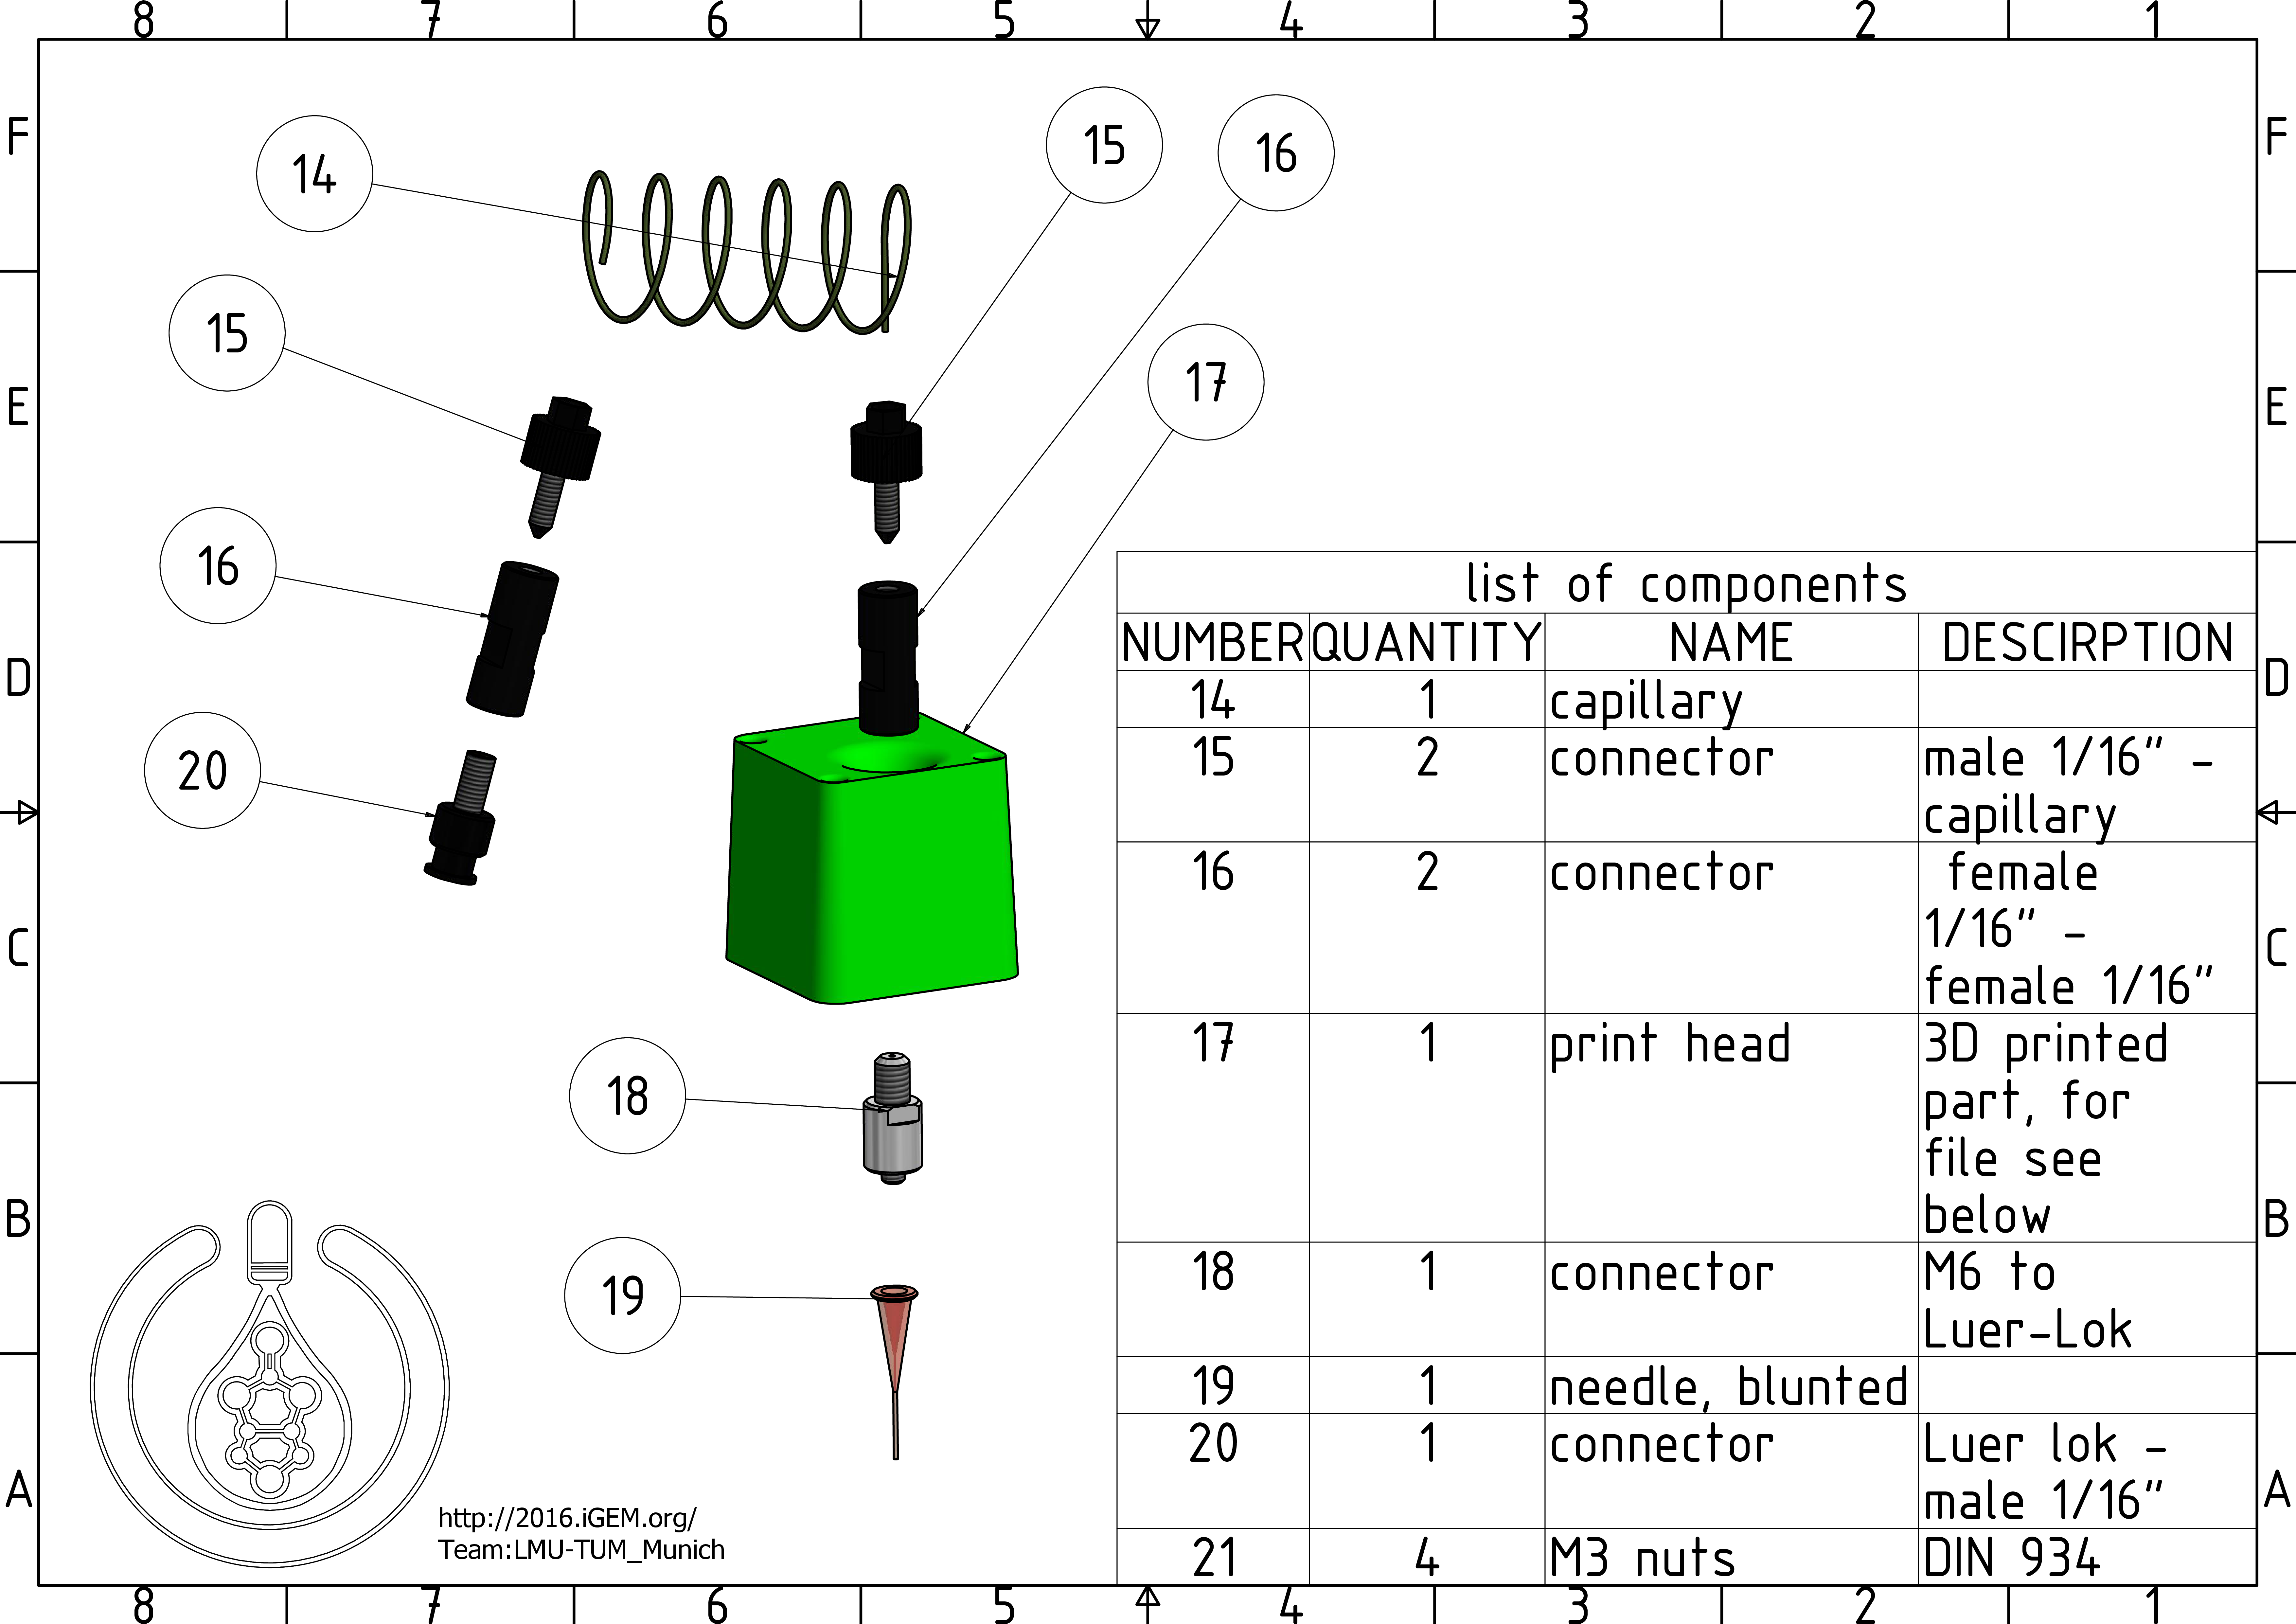
The print head
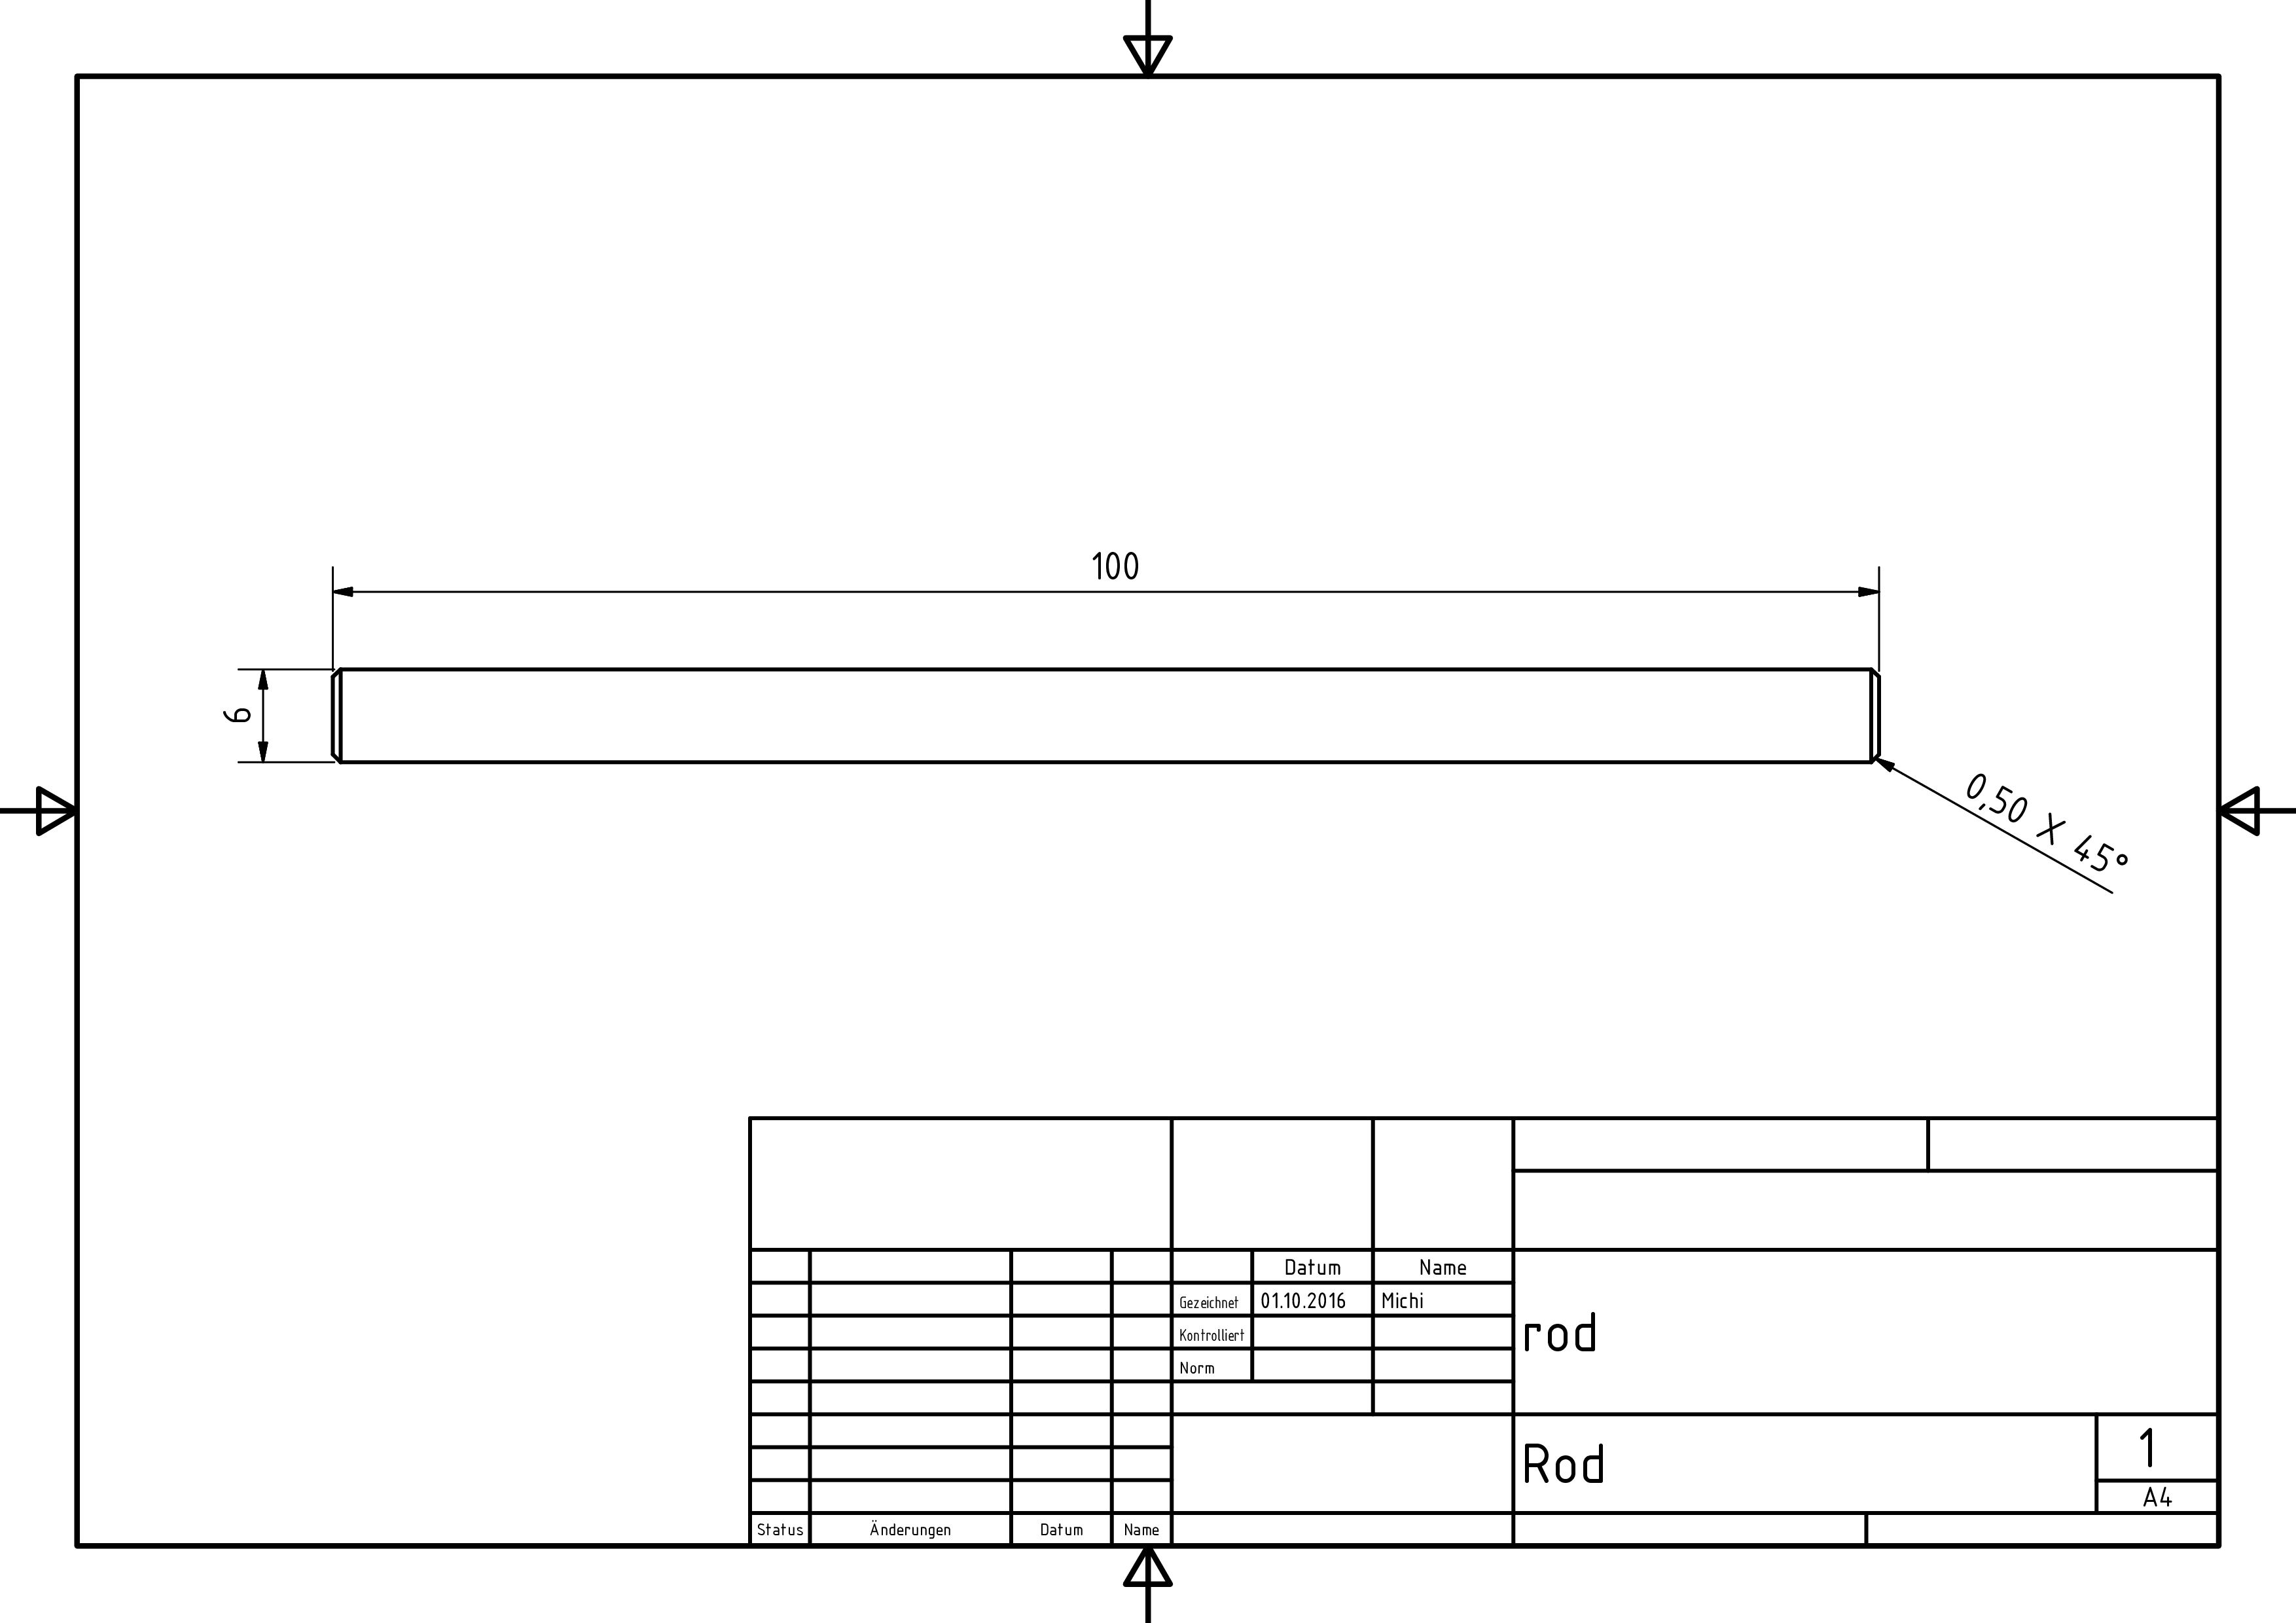
Below, you see the explosion view of the print head. It replaces the original one and holds a dull needle that is placing the cells in the Ibidi slide.
Assembly: Only work when the printer is unplugged!
- Remove the original head by removing the four knurled screws and pull off the lower part. Place it somewhere safe. If you leave it plugged in, be aware that the extruder could start heating as soon as the printer is switched on.
- Assemble the print head as shown above, make sure to install the capillary before fasten the head to the printer, if not, you will not be able to reach it anymore.
- Insert M3 nuts into the provided hexagonal holes.
- Slide the print head onto the screws an fasten them less than finger-tight insert, so that the needle faces the left wall, be sure not to bend the capillary too much or it might break.
- Connect the other end of the capillary to the syringe in the syringe pump.
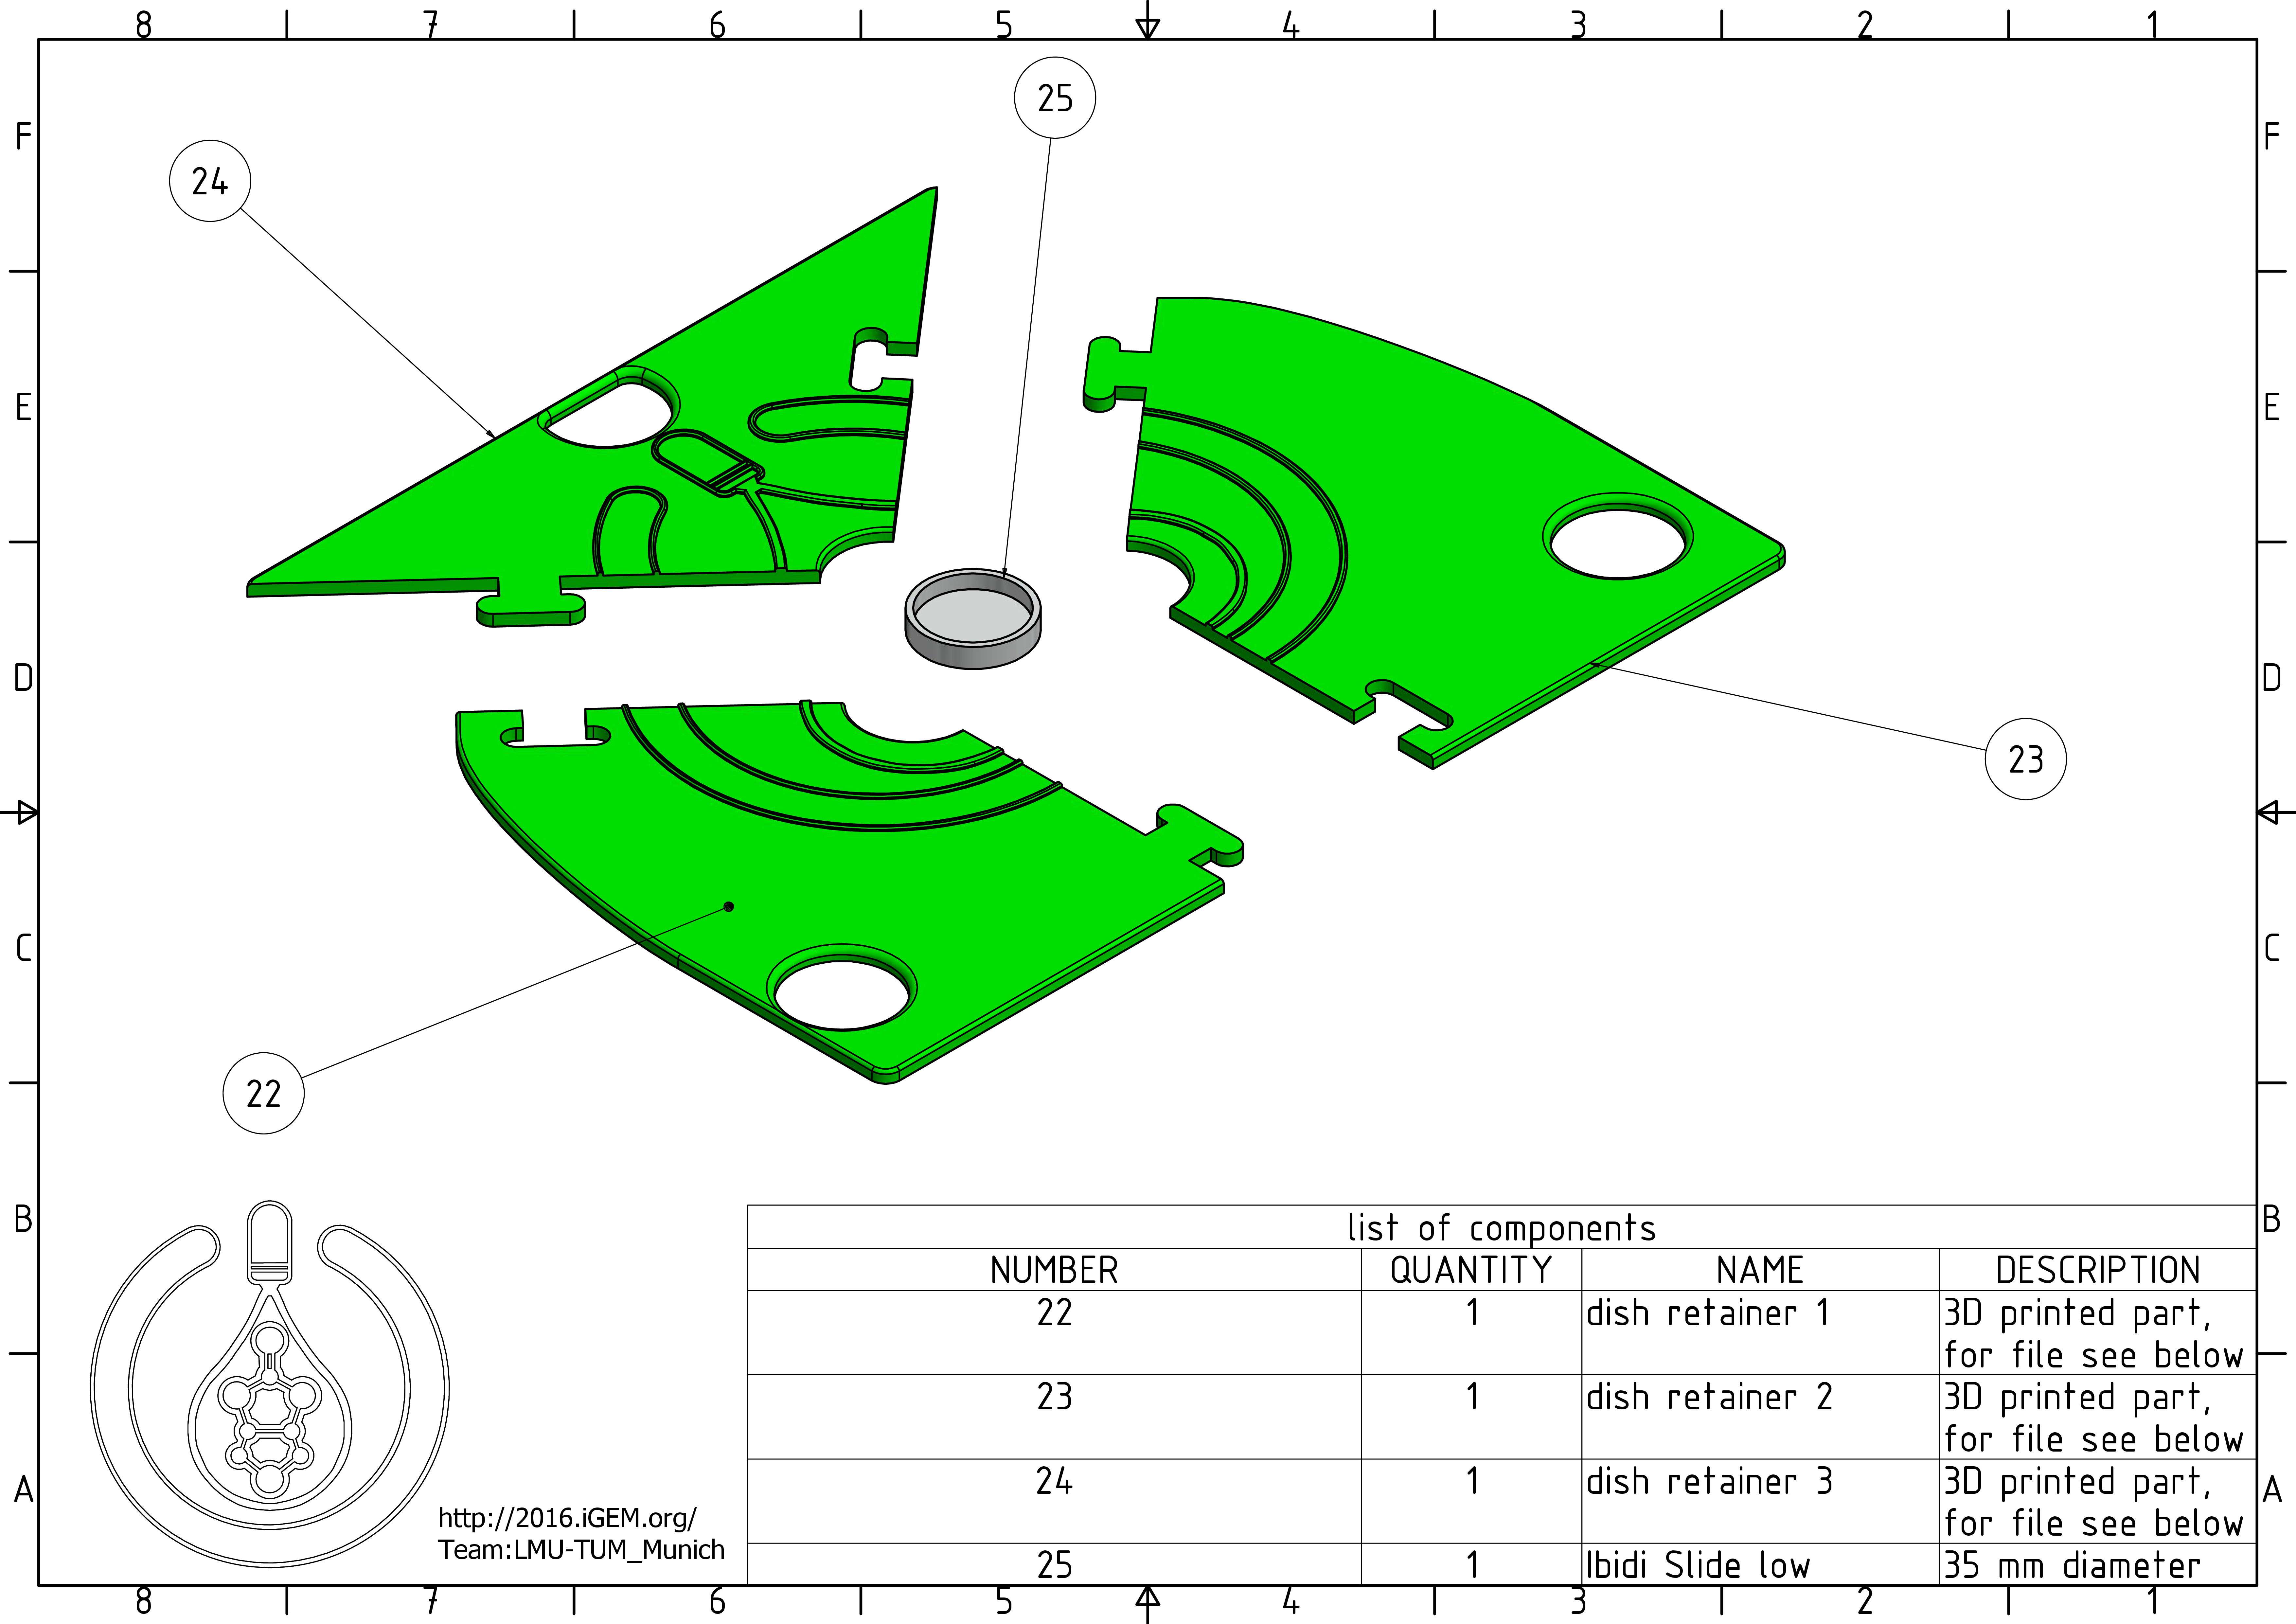
The dish retainer
Assembling it is a child's play - literally. Just assemble the puzzle and replace the glass plate with it. It holds the Ibidi slide in place, which you can place in the middle hole. The other ones are for calibrating the printer's default z value.
Software engineering: Adapting the Ultimaker2+ firmware
Ultimaker's slicing software Cura and the printer's firmware were modified so that there is no possibility to destroy your printer by colliding with the dish, it's holder or any other component. Just place your 3D file in Cura, fill up the syringe and start printing!
Materials used
In the following list all used components, together with the used source and the rough prizes are listed. Prizes incluede all taxes that applied to this kind of article, shipment costs were not considered.
| Number | Component | Quantity | Supplier | Prize | Summ |
|---|---|---|---|---|---|
| 2 | stepper motor (NEMA 17) |
1 |
www.act-motor.com | 6.15 € | 6.15 € |
| 4 | trapezoidal thread spindle (TR8x1.5) | 1 |
www.dold-mechatronik.de | 1.19 € |
1.19 € |
| 6 | linear ball bearing (LM6UU) | 2 | ww.reprapuniverse.com | 1.09 € |
2.18 € |
| 7 |
trapezoidal nut (TR8x1.5) | 1 | www.dold-mechatronik.de | 10.95 € |
10.95 € |
| 8 | end stop switch | 2 | |||
| 9 | smooth rod (6 x 100 cm) | 2 | www.reprapuniverse.com | 1.10 € |
2.20 € |
| 10 | cylinder head screw with hexagon socket | 4 | |||
| 12 | 3 ml syringe with luer lok (#309658) | 1 | www.bd.com | 0.23 € |
0.23 € |
| 17 | ibidi µ-Dish 35 mm, low (#80136) | 1 | www.ibidi.com | 2.00 € |
2.00 € |
| 19 | Union Fingertight (#11-0008-52) | 2 | www.gelifesciences.com | 22.61 € |
45.22 € |
| 20 | |||||
| 21 | connector; M6 - Luer lok | 1 | www.vbm-medical.de | 33.32 € |
33.32 € |
| 22 | |||||
Biological Engineering using Synthetic Biology
