This is my first attempt at using KiCad, and it's meant as a step-by-step tutorial for others new to KiCad.
This is part 1: creating the logical chip design.
Part 2 will be creating the physical component layout.
1.
Create a new project
File > New Project > New Project
Choose a name and save it in an empty directory (if it's not empty, you'll be prompted to choose an empty one).
We're going to build a logical schematic of our tiny chip....
2.
Open the "Schematic Library Editor"

3.
Create a New Component
Click "Create a new component" > (enter a name) > OK

4.
Where'd the component go?
If your new component doesn't show up, zoom in to the dead-center of the layout. It's just hiding in small print.
Also, there are 2 lines of text laid right on top each other. To fix this, hover your mouse over the text for a moment, press "m" (for "move"), and click. You'll see an on-screen menu pop up, asking you which piece of text you'd like to move. Select either, then drag it a little bit away so they're no longer overlapping.
5.
Adding Pins
We don't yet have a body built for our chip, but we're going to add pins.
Select the "Add pins to component" icon. Click on screen where you want each pin to be placed.

Add a name and number to the pin.
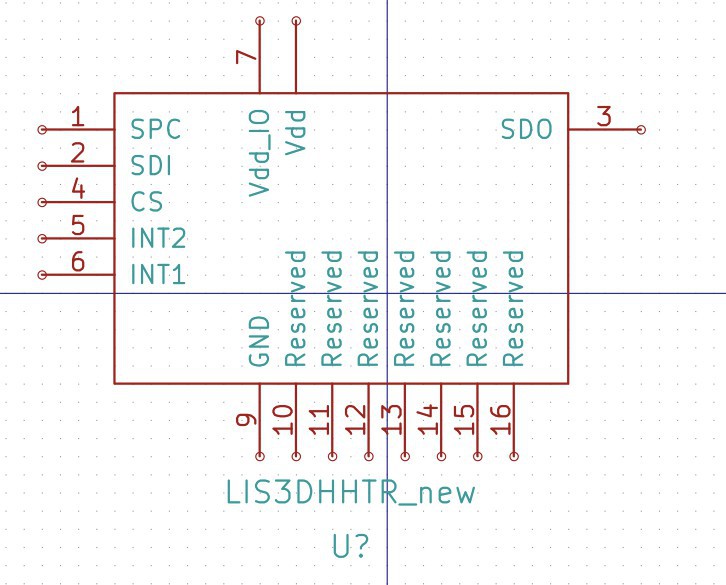
Line up the input pins on the left side. Output pins on the right. Power (Vcc/Vdd/Vdd_IO/...) on the top. Ground/sink on the bottom.
"Orientation Right" is for pins that will be placed on the left side of the chip.
"Orientation Left" is for pins that will be placed on the right.
Repeat for all of your pins.
6.
Draw the Chip Body
With all of the pins lined up nicely, use the "Add graphic rectangle to component body" icon.

Click once to start drawing the rectangle, and once more to end the drawing.
You should now have something like this...

7.
Save Your Component
Click "save current component to new library"

And now you can close the editor window.
 Ryan Logsdon
Discussions
Become a Hackaday.io Member
Create an account to leave a comment. Already have an account? Log In.