Close
0%
0%

RESTful smart power plug

An open communication protocol smart power plug

Similar projects worth following
All smart power plug I found in the market uses proprietary communication protocol. They all connect to Internet passing through my firewall. I don't feel comfortable to let any remote possibilities to hack into my IoT. They don't work for my usage as well where I need to use smoke detector to shutdown power supply for 3D printer.

So I designed and built this RESTful smart power plug by using the bREST framework I wrote.

  • A generic ESP8266 RESTful software library framework bREST is developed.
  • A DIY version smart WIFI power plug is created as a prototype. 
  • A cheaper ready-made Sonoff S20 is modified to run a customized firmware built from bREST.

adafruit-huzzah-esp8266-breakout.pdf

esp8266 specs

Adobe Portable Document Format - 3.32 MB - 06/15/2018 at 12:15

Preview

View all 7 components

  • Sonoff S20 Firmware Update

    Ricky Zhang05/25/2020 at 19:55 0 comments

    After two years, I released an update of the Sonoff S20 firmware. Since 2018, I have owned 5 Sonoff S20 to control my home servers and 3D printers at home.

    The new improvement are the following:

    • Turn on the green LED and turn off the red LED when the switch is open.
    • Turn off the green LED and turn on the red LED when the switch is closed.
    • Enable button switch as a physical switch button.

    You can download my new firmware with an instruction in my bREST example repository. See link here.

    Happy Hacking!

  • Sonoff S20 mod

    Ricky Zhang06/30/2018 at 22:16 0 comments

    Placing orders in Bangood is a good test on your patience. I ordered a box of fuse two weeks earlier than Sonoff S20. Sonoff arrived this week from Thailand. But I still haven't got my fuse.

    Sonoff S20 is a cheap smart power plug. It comes with an ESP8266, a relay and a AC-DC transformer for ESP8266. It costs only $10, which is far cheaper than the cost of my prototype. It seems that it also comes with a mechanical relay since I can hear the click sound when turn on/off. For 15 min use, I can feel warm on the bottom of  Sonoff even it only supply power to a low watts fan.

    In any case, let me explain how to flash bREST to Sonoff in case you want to save money. 

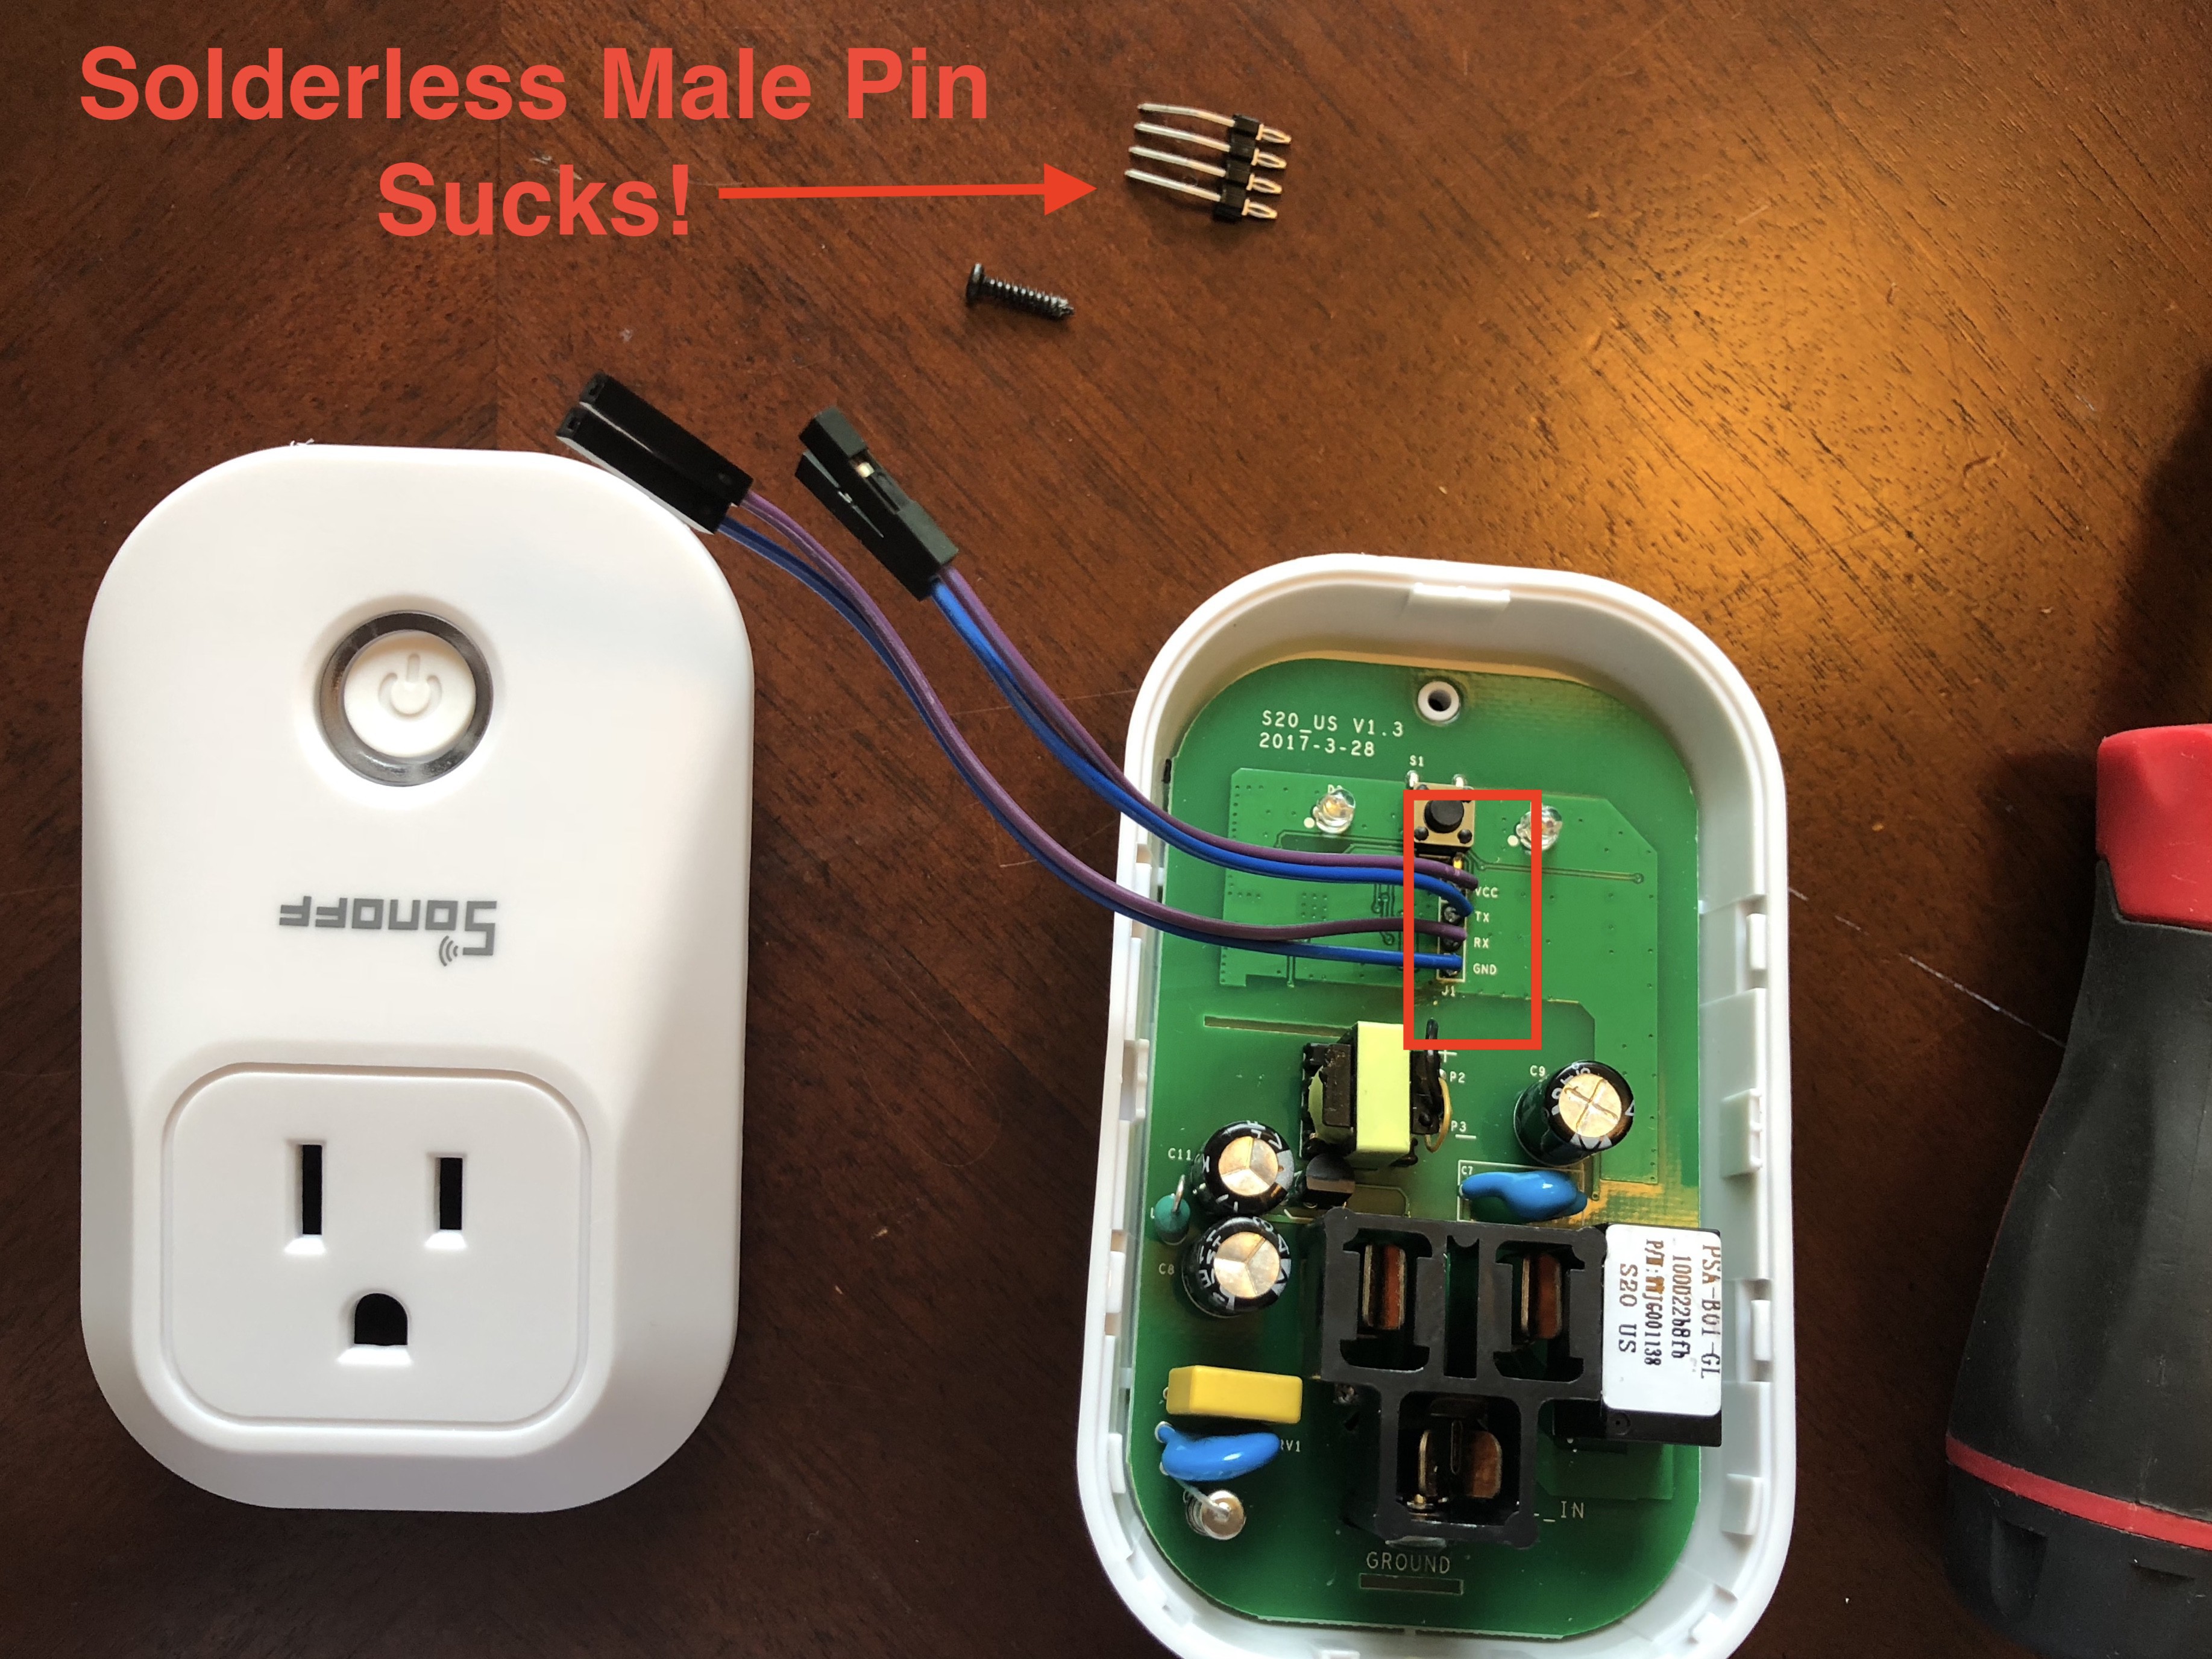
    First, open the hood. You saw 4 holes: VCC, TX, RX and GROUND. These are serial ports for flashing ESP8266.

    I got several packs of solderless male pins from Adafruit. I never got a chance to use it.  I thought this is a good use case here. So I used a hammer and a piece of acrylic board to push them into the board. As you can see, it doesn't work. The pins are bended. I have to cut the two female wires and solder them into the holes.

    After some trial and errors, I figure out the following:

    1.  The enable pin is 12 in Sonoff S20. That pin controls the relay. The relay is Normally Open (NO).

    2. TX holes and RX holes are incorrectly labeled in the PCB. So TX (RX) should connect to TXD (RXD) in USB-to-Serial board. 

    3. Connect VCC to 3.3v and Ground to Ground in USB-to-Serial board.

View all 2 project logs

  • 1
    Build

    Motivation

    I have a 3D printer made in China running days and nights at home without monitor. I doubt if it has a proper fire hazard protection. So I decided to add some intelligence to override its power supply.

    Two features I want: 

    1. Shutdown the power supply when shit happens. The signal may come from external smoke detector sent by Raspberry Pi.

    2. Turn on/off the power supply by Octoprint server running in Raspberry Pi.

    I looked around all smart power plugs in the market. They all use proprietary communication protocol and some even pass through my firewall at home. I hate to leave my door open. Call me a security paranoid. But it is never a good idea to leave any possibilities to let any hackers mess around the appliances at home.

    So I decided to build one from ground up. All parts I used here are also made in China. I admit there is a logical fallacy -- using made in China components to prevent fire hazard of the appliance also made in China.   

    Wiring

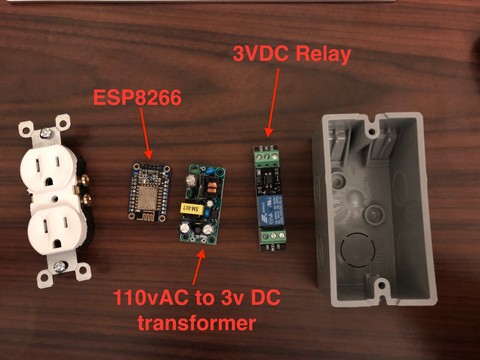
    The wiring is extremely easy. It doesn't worth my efforts to draw it in fritzing. If you don't know how to wire them, you should NOT try it on your own.

    I uploaded ESP8266 specs doc. Go figure it out by yourself.

    Note that I used a mechanical relay, instead of solid state relay. You can hear a click sound when you open/close. Depending on your load ( I probably will make the relay closed for a very long time ), solid state relay may need an additional heat sink to control heat build up. I don't want to add it into this small junction box. So I choose the mechanical one.

    In addition, I'm waiting for the fuse and the fuse holder from China. So I don't show them here. But you should add one in case power surge.

    Software

    There is a popular RESTful framework in Arduino called  aREST. But several things in aREST are foobar ( fuck up beyond recognition ). So I rewrote it from scratch. If you wonder why, read the README in my bREST framework

    All source code is the 2nd sample in my bREST framework. It also includes a simple Python script for you to test.

    Just go to https://github.com/rickyzhang82/bREST


    Alternative Hardware

    The cost of the DIY home depot power plug is above $35. I found a ready-made Sonoff S20 costs less than $12 online. You can check out my project log regarding to the wiring. 

    The new firmware for Sonoff S20:

    • enables physical button switch 
    • enables green LED and red LED to indicate if the power plug is open or closed

View all instructions

Enjoy this project?

Share

Discussions

zerodunwash wrote 01/12/2020 at 20:50 point

The videos are down could you re upload them?

  Are you sure? yes | no

Ricky Zhang wrote 05/25/2020 at 02:44 point

Sorry, I clean up my Youtube video posting. Do you have any specific questions?

  Are you sure? yes | no

paulfleenor wrote 06/27/2018 at 16:56 point

I've been wanting to do this for a while now, do you have any pics of how you arranged the components in the box?

  Are you sure? yes | no

Ricky Zhang wrote 06/28/2018 at 13:50 point

You need to wait until my 3D printer stops. Perhaps I will do this in the weekend. It has no resume function in its firmware.

  Are you sure? yes | no

Ricky Zhang wrote 06/30/2018 at 21:51 point

I posted them in gallery.

  Are you sure? yes | no

Ricky Zhang wrote 05/25/2020 at 20:13 point

If you bought US version Sonoff S20, I released a new firmware update with the physical button switch  enabled. Check out my new project log.

  Are you sure? yes | no

Similar Projects

Does this project spark your interest?

Become a member to follow this project and never miss any updates