Close
0%
0%

DIY USB MIDI controller MPC style

An MPC style MIDI controller featuring a 4x4 FSR matrix and based on Teensy 3.0, fully compatible with the Teensy Audio Adaptor Board

Similar projects worth following
The purpose of this project is to build an MPC style USB MIDI controller using home made Force Sensing Resistors (FSRs) arranged in a 4x4 matrix fashion; the FSRs will be used to sense the pressure applied to the button, a value that can be used for a variety of things (velocity of a note, control change value etc).

I'm a musician and I needed a simple and effective instrument to create drum beats without having to manually write them note by note. I also wanted something fairly small, that could easily sit on my desktop while embracing my guitar and that could be used even at late night without making too much drumming noise. An MPC style MIDI controller perfectly suits my needs.

There are a lot of DIY MIDI controllers of this kind around, but most of them use simple on/off tactile buttons, which is not enough for me. I want to have a fairly reliable velocity control because I will mainly use this with real-life drums simulation. Therefore the only reliable approach is to use Force Sensing Resistors as tactile sensors; the thing is, commercial FSRs are NOT CHEAP! Really, 8 bucks a piece is way too much for me, considering that I want a 4x4 matrix that's more than 120 bucks, which is more than the price of a ready-made MPC style MIDI controller. No deal.

Thankfully, I found out that these FSRs are usually made of a thin film of a material that varies its resistivity when under pressure, called Velostat, and this film is sandwiched between two copper contacts; alternatively, they can be made using a layer of two intricated copper traces and a velostat layer spaced from the first one (just like te PCB button pads found in any game controller).

To connect the FSRs to the microcontroller I use a 16 channels multiplexer to scan through all the FSRs and which puts each FSR as the first resistor of a voltage divider; the FSR decreases its impedance with pressure, therefore I read the voltage drop across a fixed resistor which is high when fully pressed and low when barely pressed.

Finally, I keep track of the current status of each FSR which can be on or off to trigger a MIDI note on/off signal via USB.

Stay in touch for more details ;)

  • 1 × Teensy 3.0 USB development board based on ARM Cortex M4 32 bit microcontroller
  • 1 × FSR PCB Board Force sensing resistors made with copper tape, acetate sheets, and velostat
  • 1 × Motherboard It hosts the Teensy, the 3 daughterboards connectors and another spare analog pin connector
  • 2 × HCF4067 16 channels analog mux/demux One for each daughterboard
  • 2 × 10 K resistors These are put between the OUT of a mux and GND

View all 10 components

  • Increasing the number of concurrent inputs!

    Michele Perla10/08/2014 at 15:39 0 comments

    Hey guys,

    I was helping out a person who saw the project at the Maker Faire and wanted his own adaptation of this controller; he would like to have 88 keys in piano style, but he also wanted standalone audio support; as you may know, my project currently support either Standalone Audio and 48 analog controls, or 144 controls and no audio. Besides RAM usage and polyphony issues that could arise, with the current configuration he won't be able to achieve his goal, I initially thought.

    But then, BANG! I thought that rather than using single pins for each INHIBIT of the 3 HCF4067 that can be plugged on the mobo, I could use those 3 pins as the 3-bits control bus of an 8 channel mux with its common input set to 5 V and its outputs set as INHIBITs of up to 8 HCF4067 which will still share their 4-bits control bus as well as one single analog pin.

    If we could also reach in a reasonable way the pins on the backside of the Teensy, we could use the same architecture to control way more analog inputs!

    Stay tuned for another revision of this project!

    Cheers,

    Mick

  • Revision 2 @ Maker Faire Rome 2014

    Michele Perla10/03/2014 at 22:17 0 comments

    Guys, the project has been finally completed and it is now exposed at Maker Faire Rome 2014!

    I won a contest run by my former university, Sapienza University of Rome, and I'm exhibiting at their stand, along with other great projects!

    There have been a few adds:

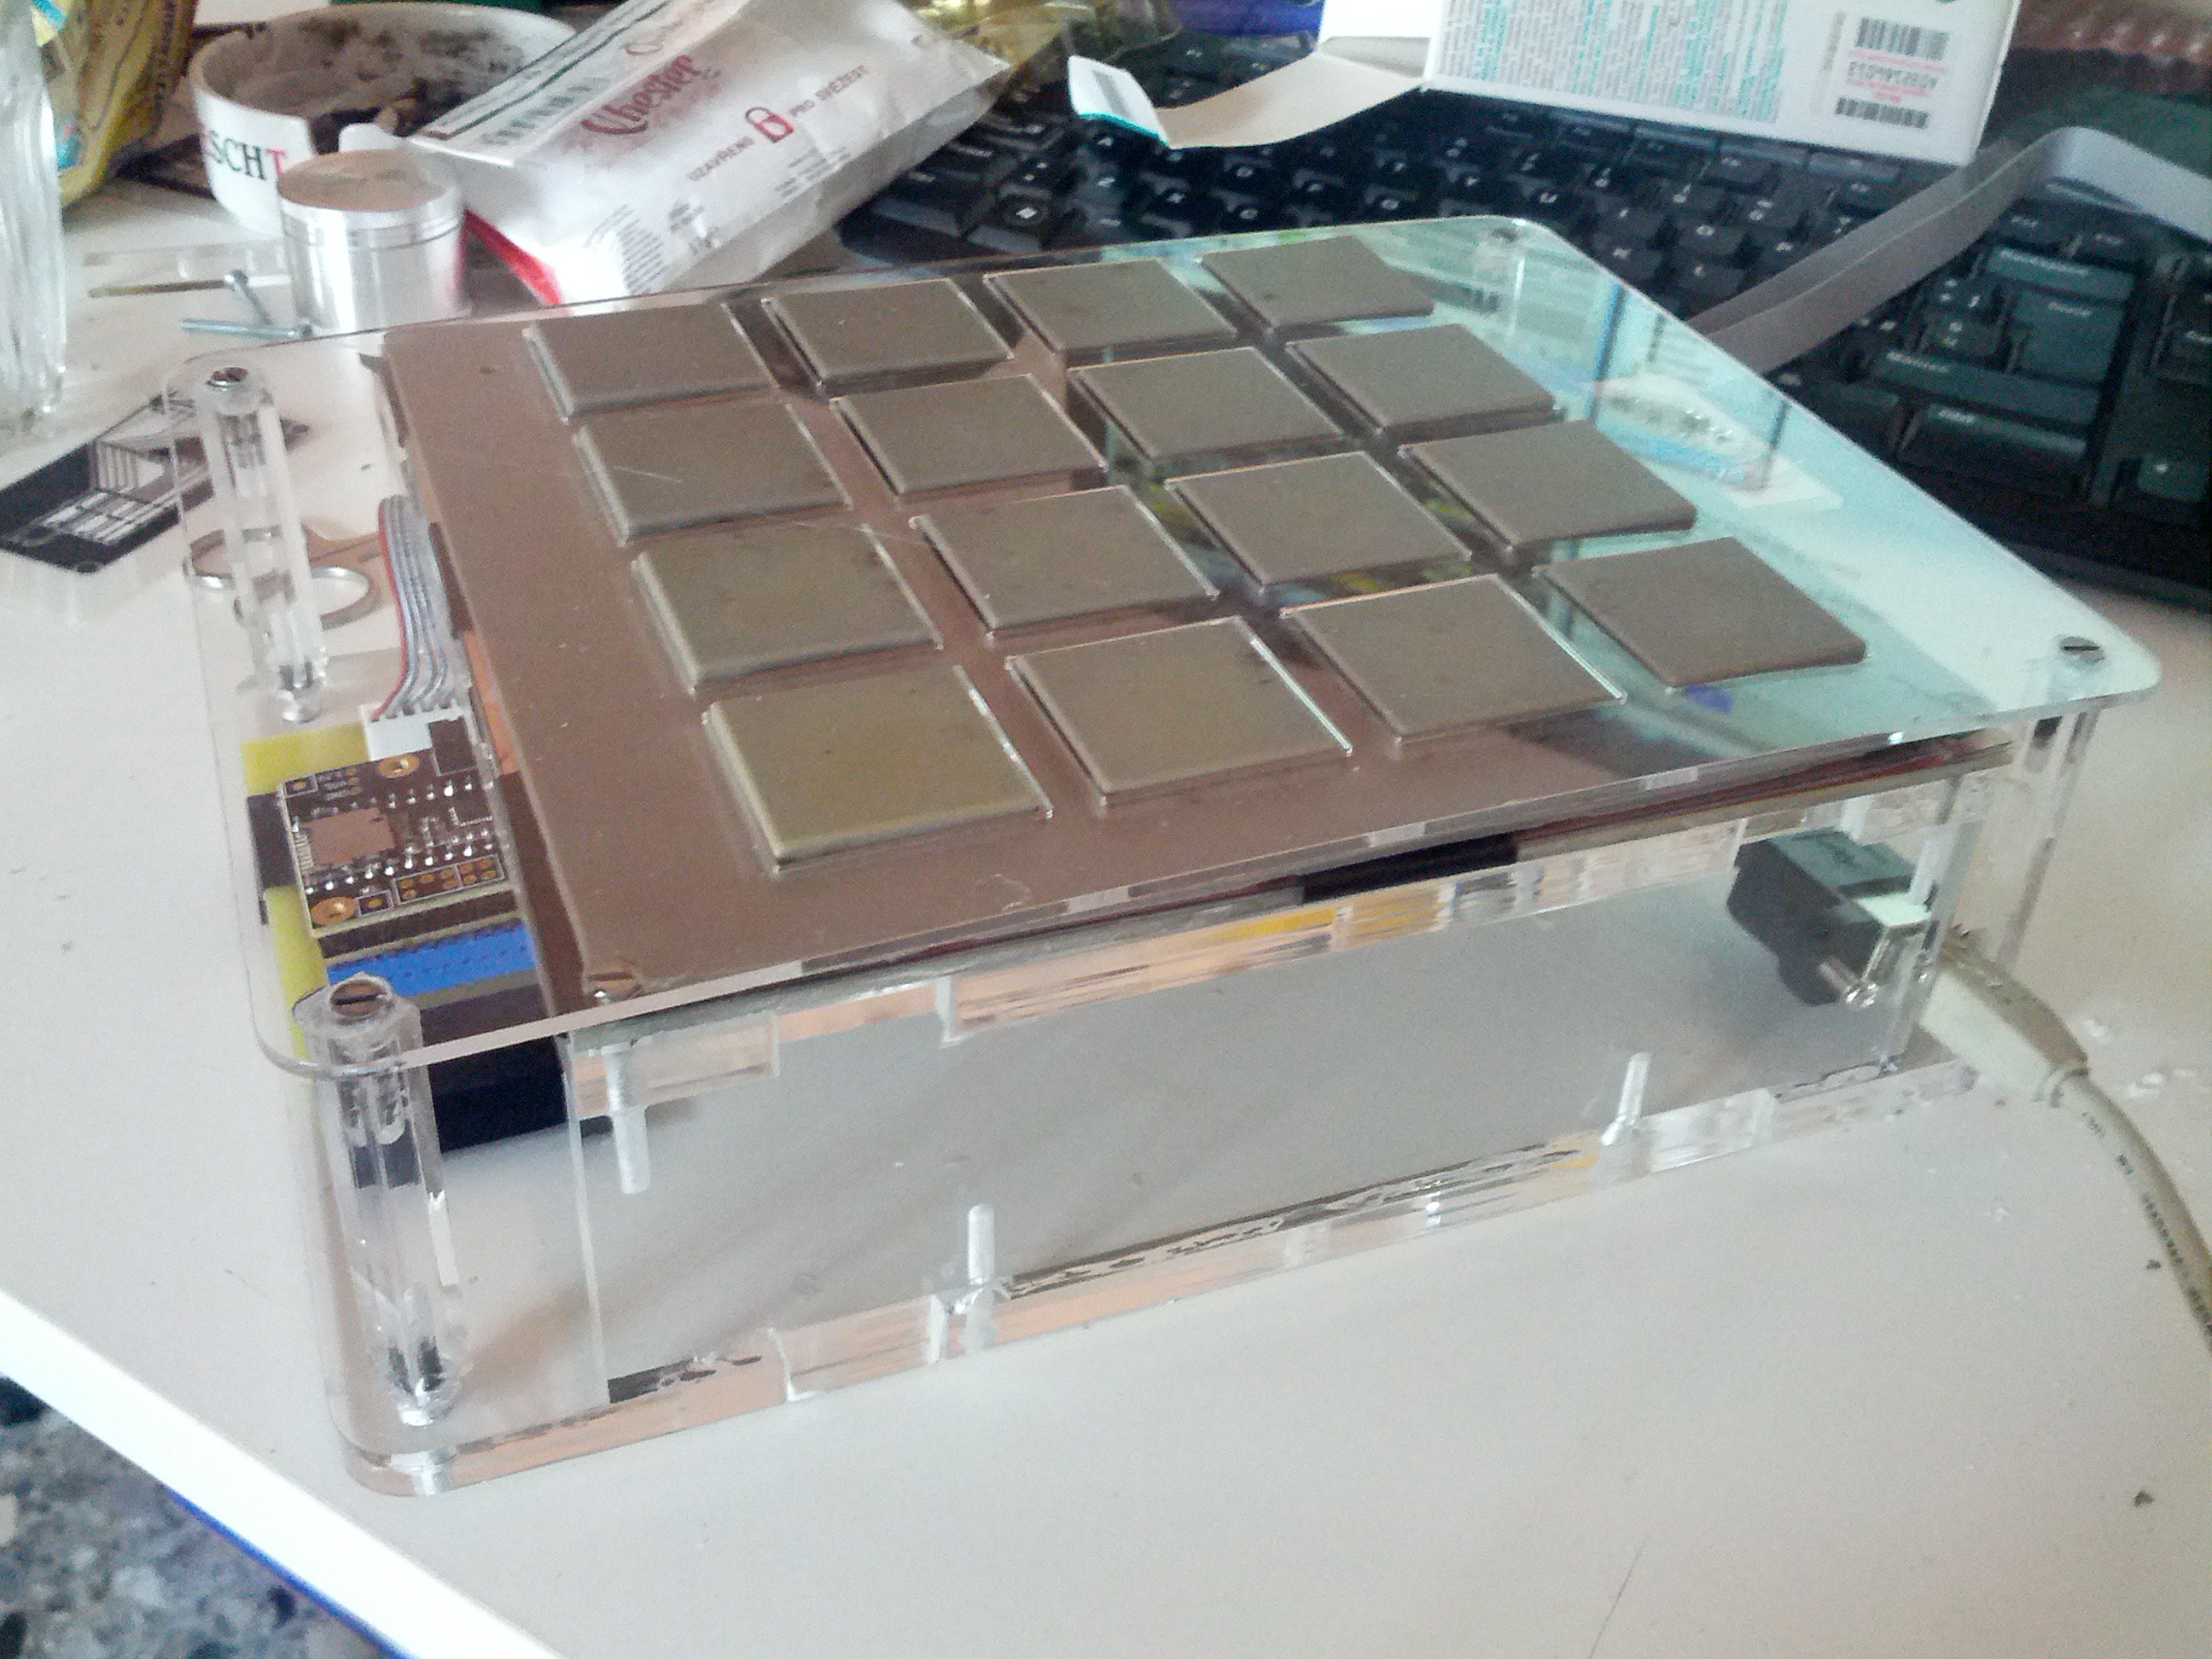
    1) I designed an acrylic enclosure which has been lasercut by an online cutting service here in Italy with very fast shipping (48h) and I managed to build it yesterday in late morning, just before setting up the expo. It is composed of 5 parts; 4 of them compose the base and the plane where the FSR PCB is sitting, all cut in 8 mm thick acrylic, while the top is made of 2 mm acrylic. It is holding up with a mix of screws and glue. I still gotta learn how to properly design enclosures, but it turned out great being my very first attempt to design one! Here's a shot:

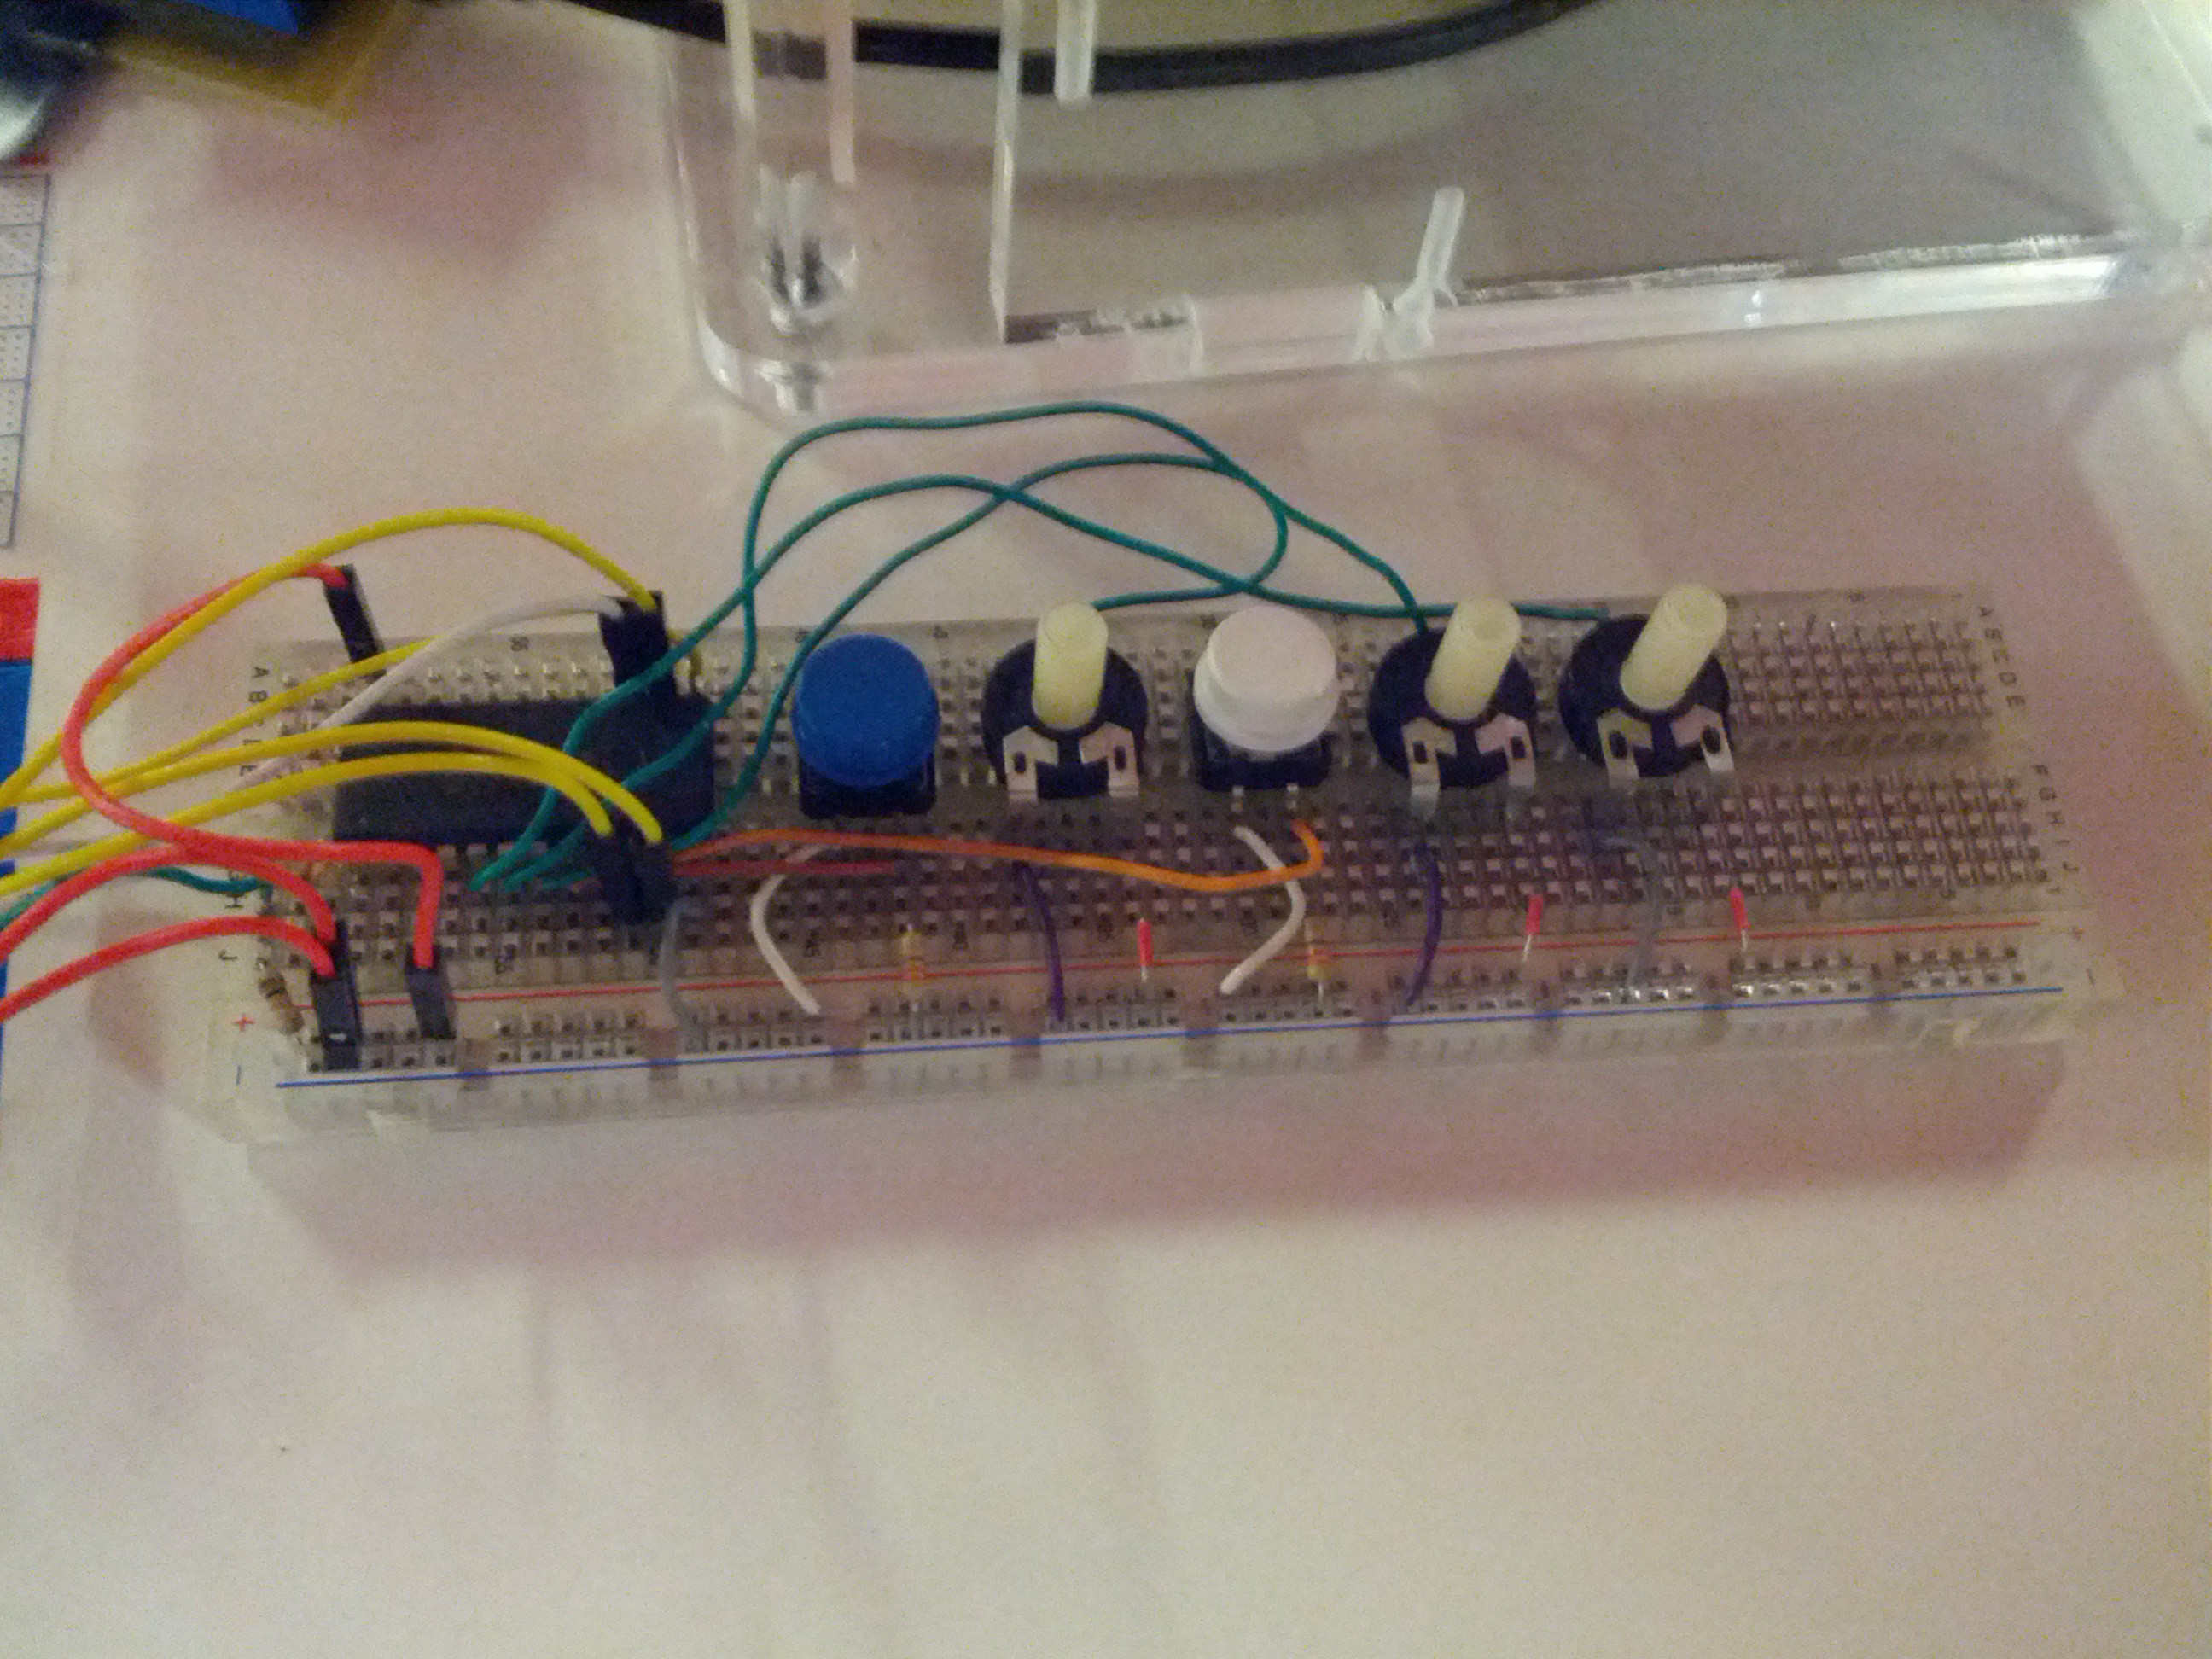
    2) I also put up a breadboard version of an expansion board which holds 2 buttons and 3 potentiometers, which have been programmed to act as follows:

    a) One button (blue) toggles between fixed and dynamic velocity control

    b) One potentiometer selects the fixed velocity value

    c) One button (white) lists through 8 different scales:

    . Chromatic (useful with MPC-like effects in Reason, for example)

    . 7 modal scales (Ionian, Dorian, Phrygian, Lydian, Mixolydian, Aeolian, Locrian)

    d) One potentiometer selects the starting playable note (from C to B)

    e) Finally, one potentiometer selects the octave of the starting note (goes from C2 to C6)

    The source code, both with or without expansion board support, the full schematics for motherboard and FSR daughterboard, the PCB layout file ready to be printed, the enclosure layout to be laser cut on 8 mm and 2 mm sheets, and the whole set of files to be used in KiCad is now available on the Google Drive shared folder of this project, more specifically inside the folder of this project log.

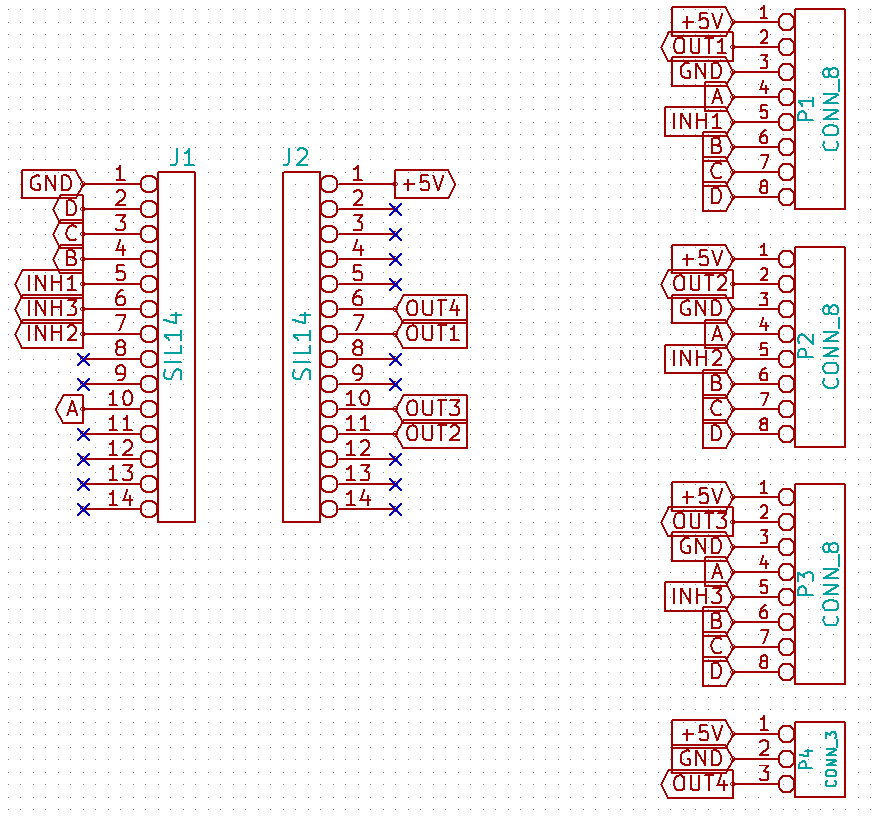
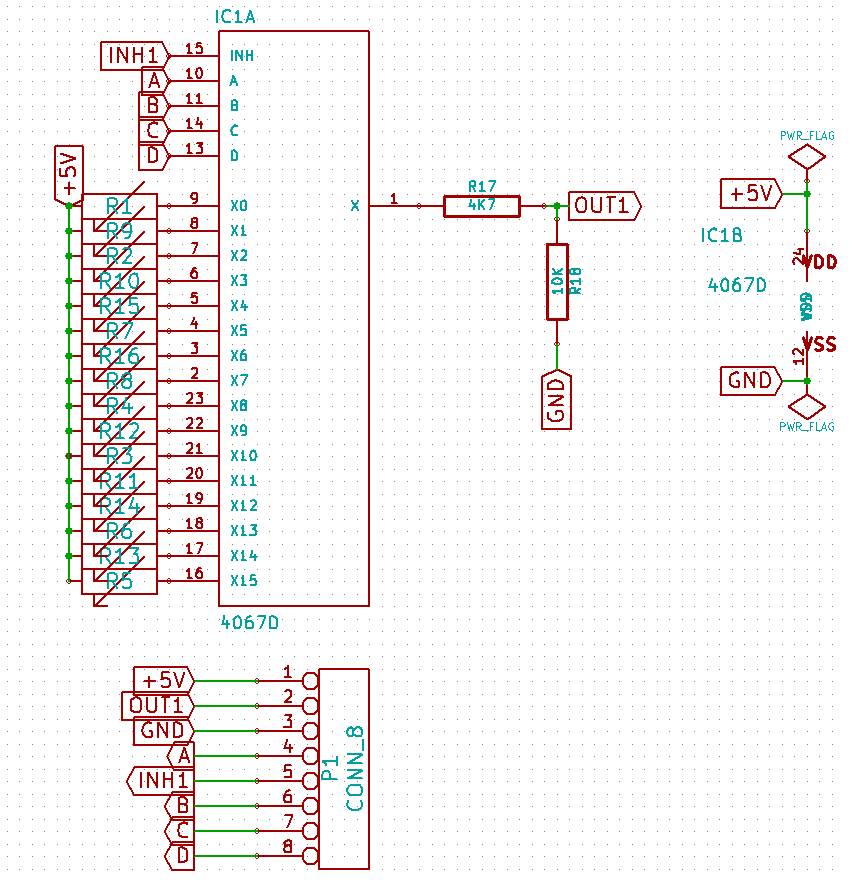
    Here are the pictures of the schematics:

    This is the motherboard:

    And this is the FSR board:

    Bear in mind that the expansion boards looks exactly the same as the FSR Board, except that there are pushbuttons and potentiometers connected to the multiplexer; in particular, one of the pushbuttons pins is put to 5 V, the other goes to the mux in and to ground through 330 Ohms to limit current, while the first and last pin of the pots are connected to 5 V and ground while the wiper is connected to the mux in.

    You can see that the motherboard has a lot of unconnected pins, and the others are connected in a strange way; the thing is that I purposely left some pins unconnected so to not interfere with the pins that should be used by a Teensy + Audio Adaptor board; in fact, I used every remaining pin on a Teensy + Audio Adaptor and it fitted EXACTLY three 16 channel mux connectors which share the same control bus, and there was also another spare analog input left; this sums up to 16x3 + 1 = 49 concurrent analog inputs; the strange ordering of the pins has been arranged to better suit my one layer PCB layout needs; this strangeness can be seen also in the schematic of the FSR board, but if you see its PCB layout you can easily understand why it had to be like that (it's easier to route the shortest path to a pin and later reassign it in software, don't you think?)

    Finally, the best way to sum things up is to show it in a video!

    This kid shows up at the stand and he starts mashing buttons like crazy, he was so cool I had to take a video of him! I will keep adding more videos, hopefully I'll get someone shoot a video while I'm showing all the functionality.

    This is a great achievement for me, I've been a first-timer in doing most of the stuff for this project, from PCB printing to case designing, and it is actually the first really finished and polished project I made; surely being under pressure 'cause Maker Faire was approaching helped me to stay focused, but even if under pressure it has been fun all the way through.

    Thanks to everyone who showed interest and support, now go make your own!

    Cheers,

    Mick

  • Revision 2 is going to Maker Faire!

    Michele Perla09/21/2014 at 21:37 0 comments

    Hey people!

    I got big news: I won a competition with University of Rome Sapienza, which I attended, and now I'm bringing this project to Maker Faire in Rome from October 3rd to 5th!

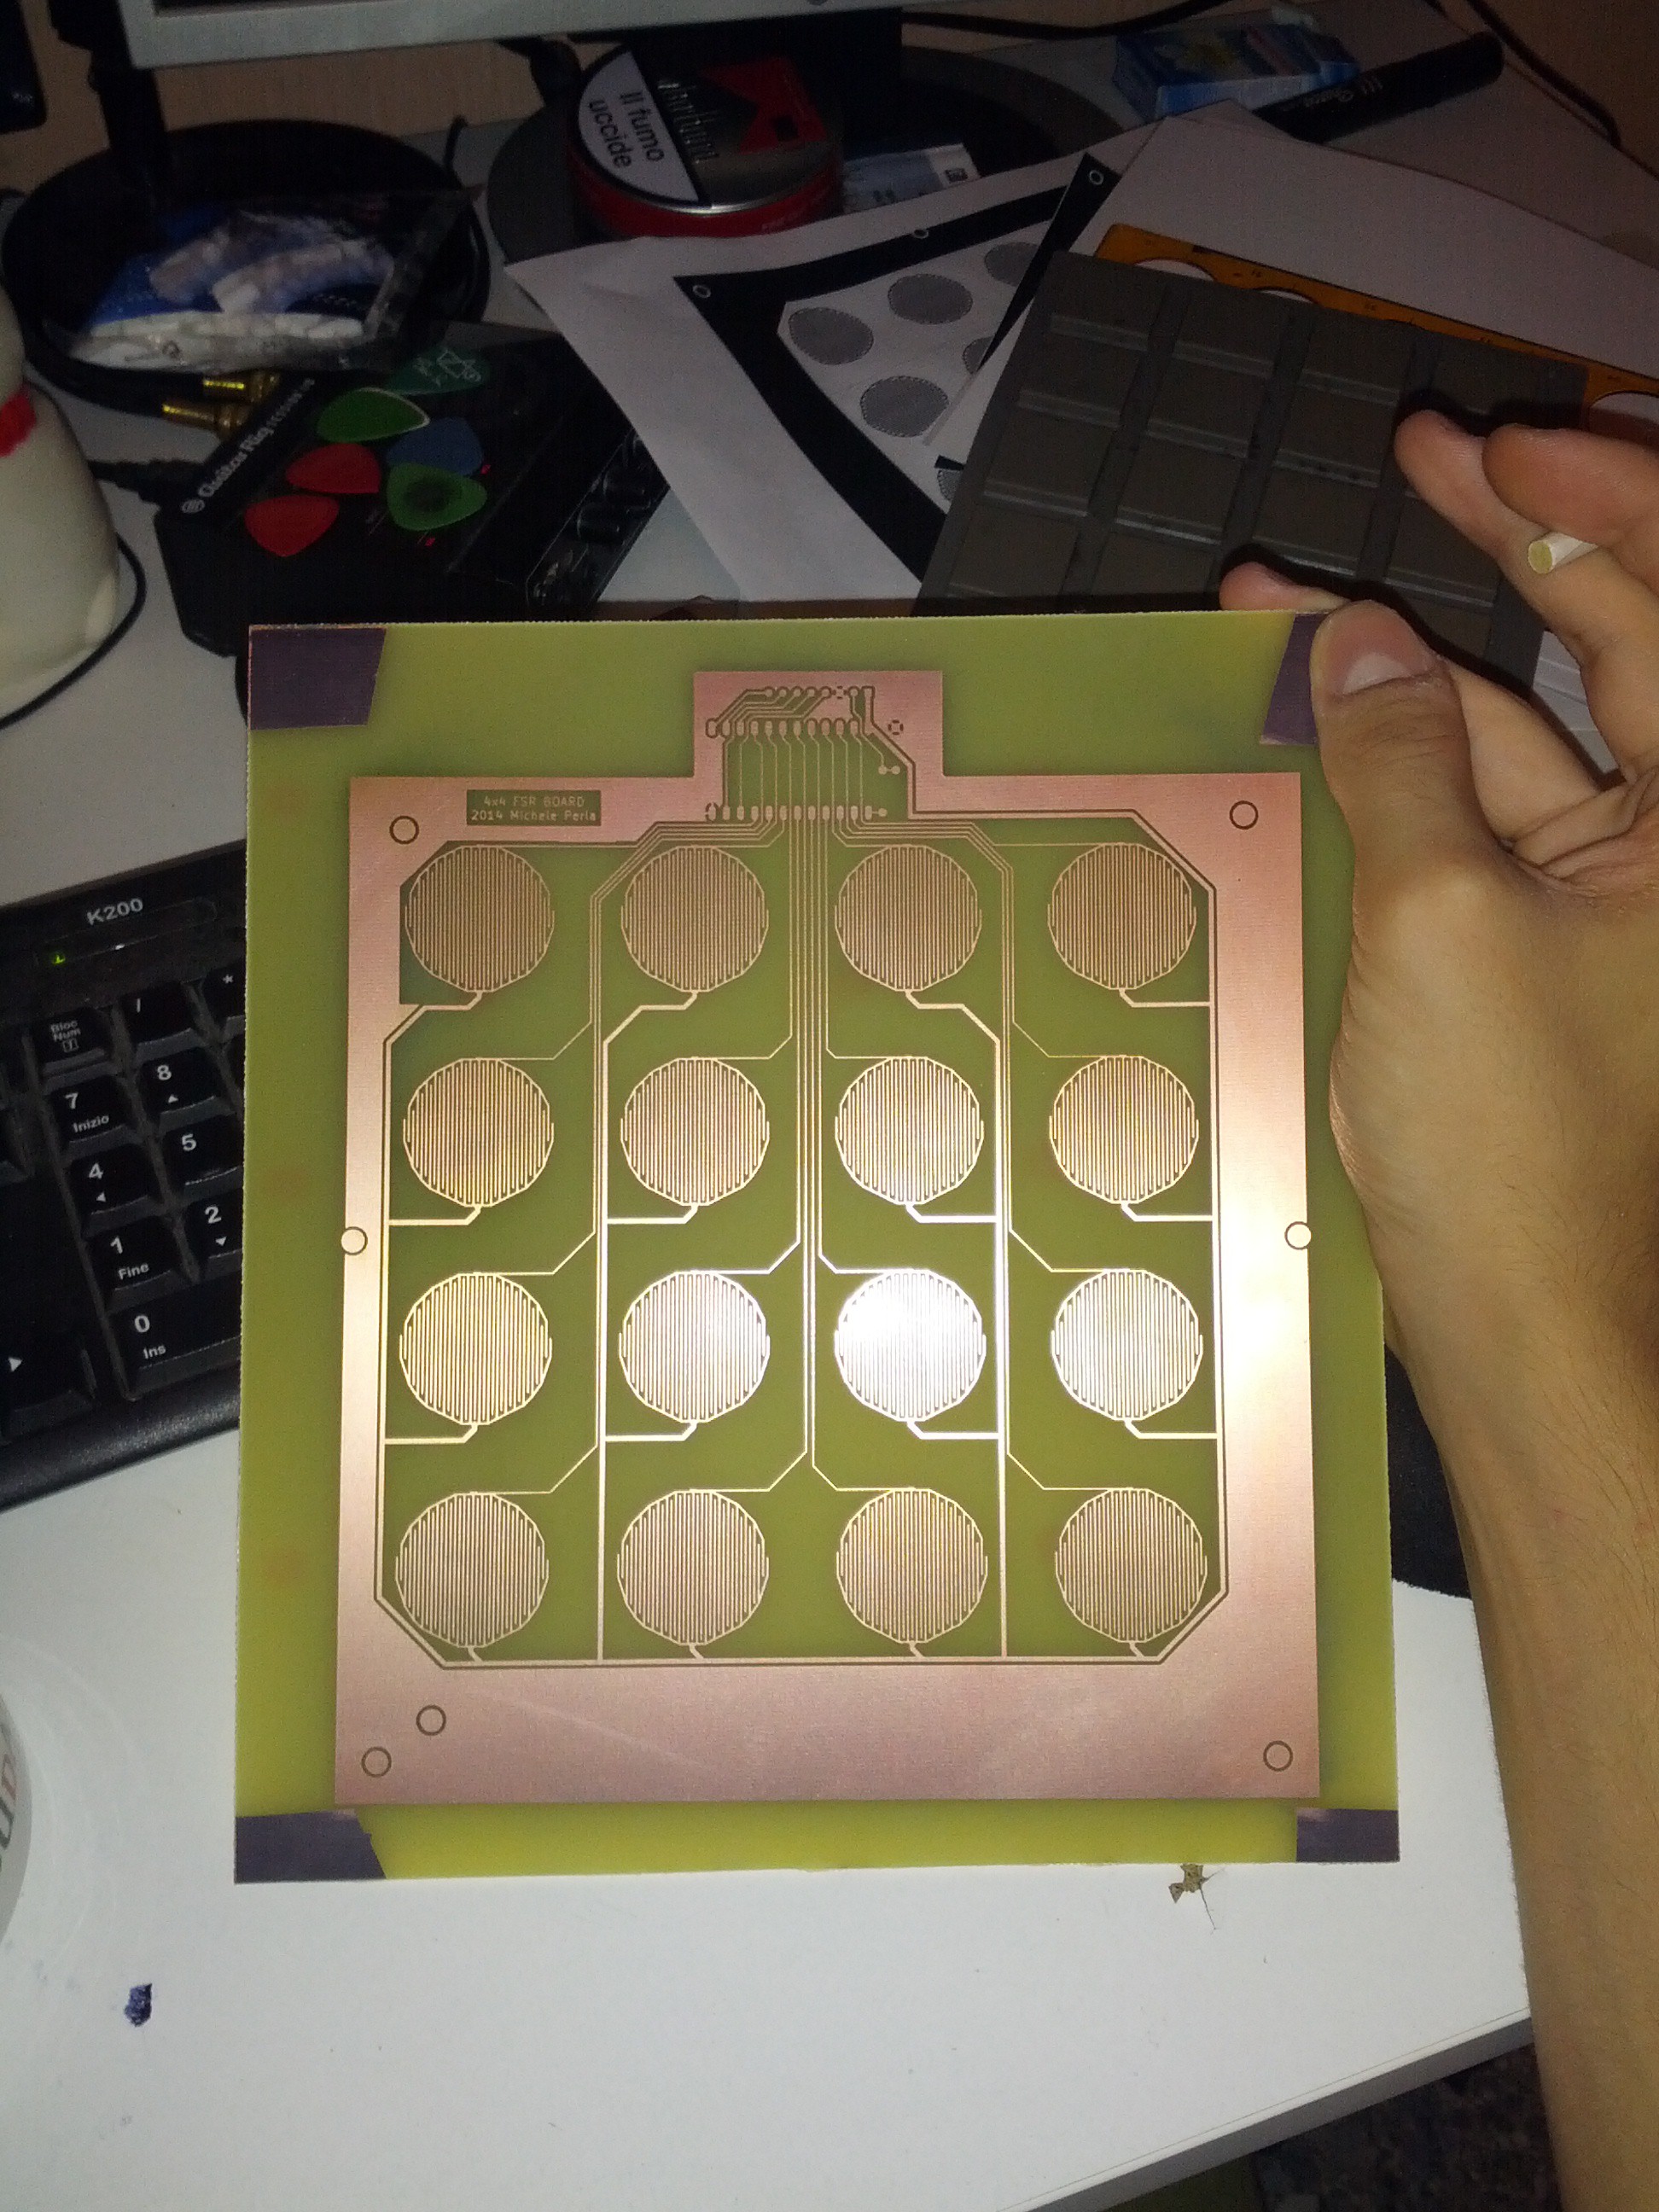
    That's why I'm actively working on Revision 2 of this project! In fact, I just printed the first working PCB of the FSR matrix! See it here below in all of its glory and copperness!

    Unfortunately I'm encountering issues with drilling holes in PCBs, mainly because it's my first time handling a Dremel and secondly because I do not have a drill press (which I will buy in the next days), therefore I managed to make two holes in a test PCB and breaking 2 drill bits, the 1mm and 0.6 mm ones, so I couldn't drill this one and I could not test it :(

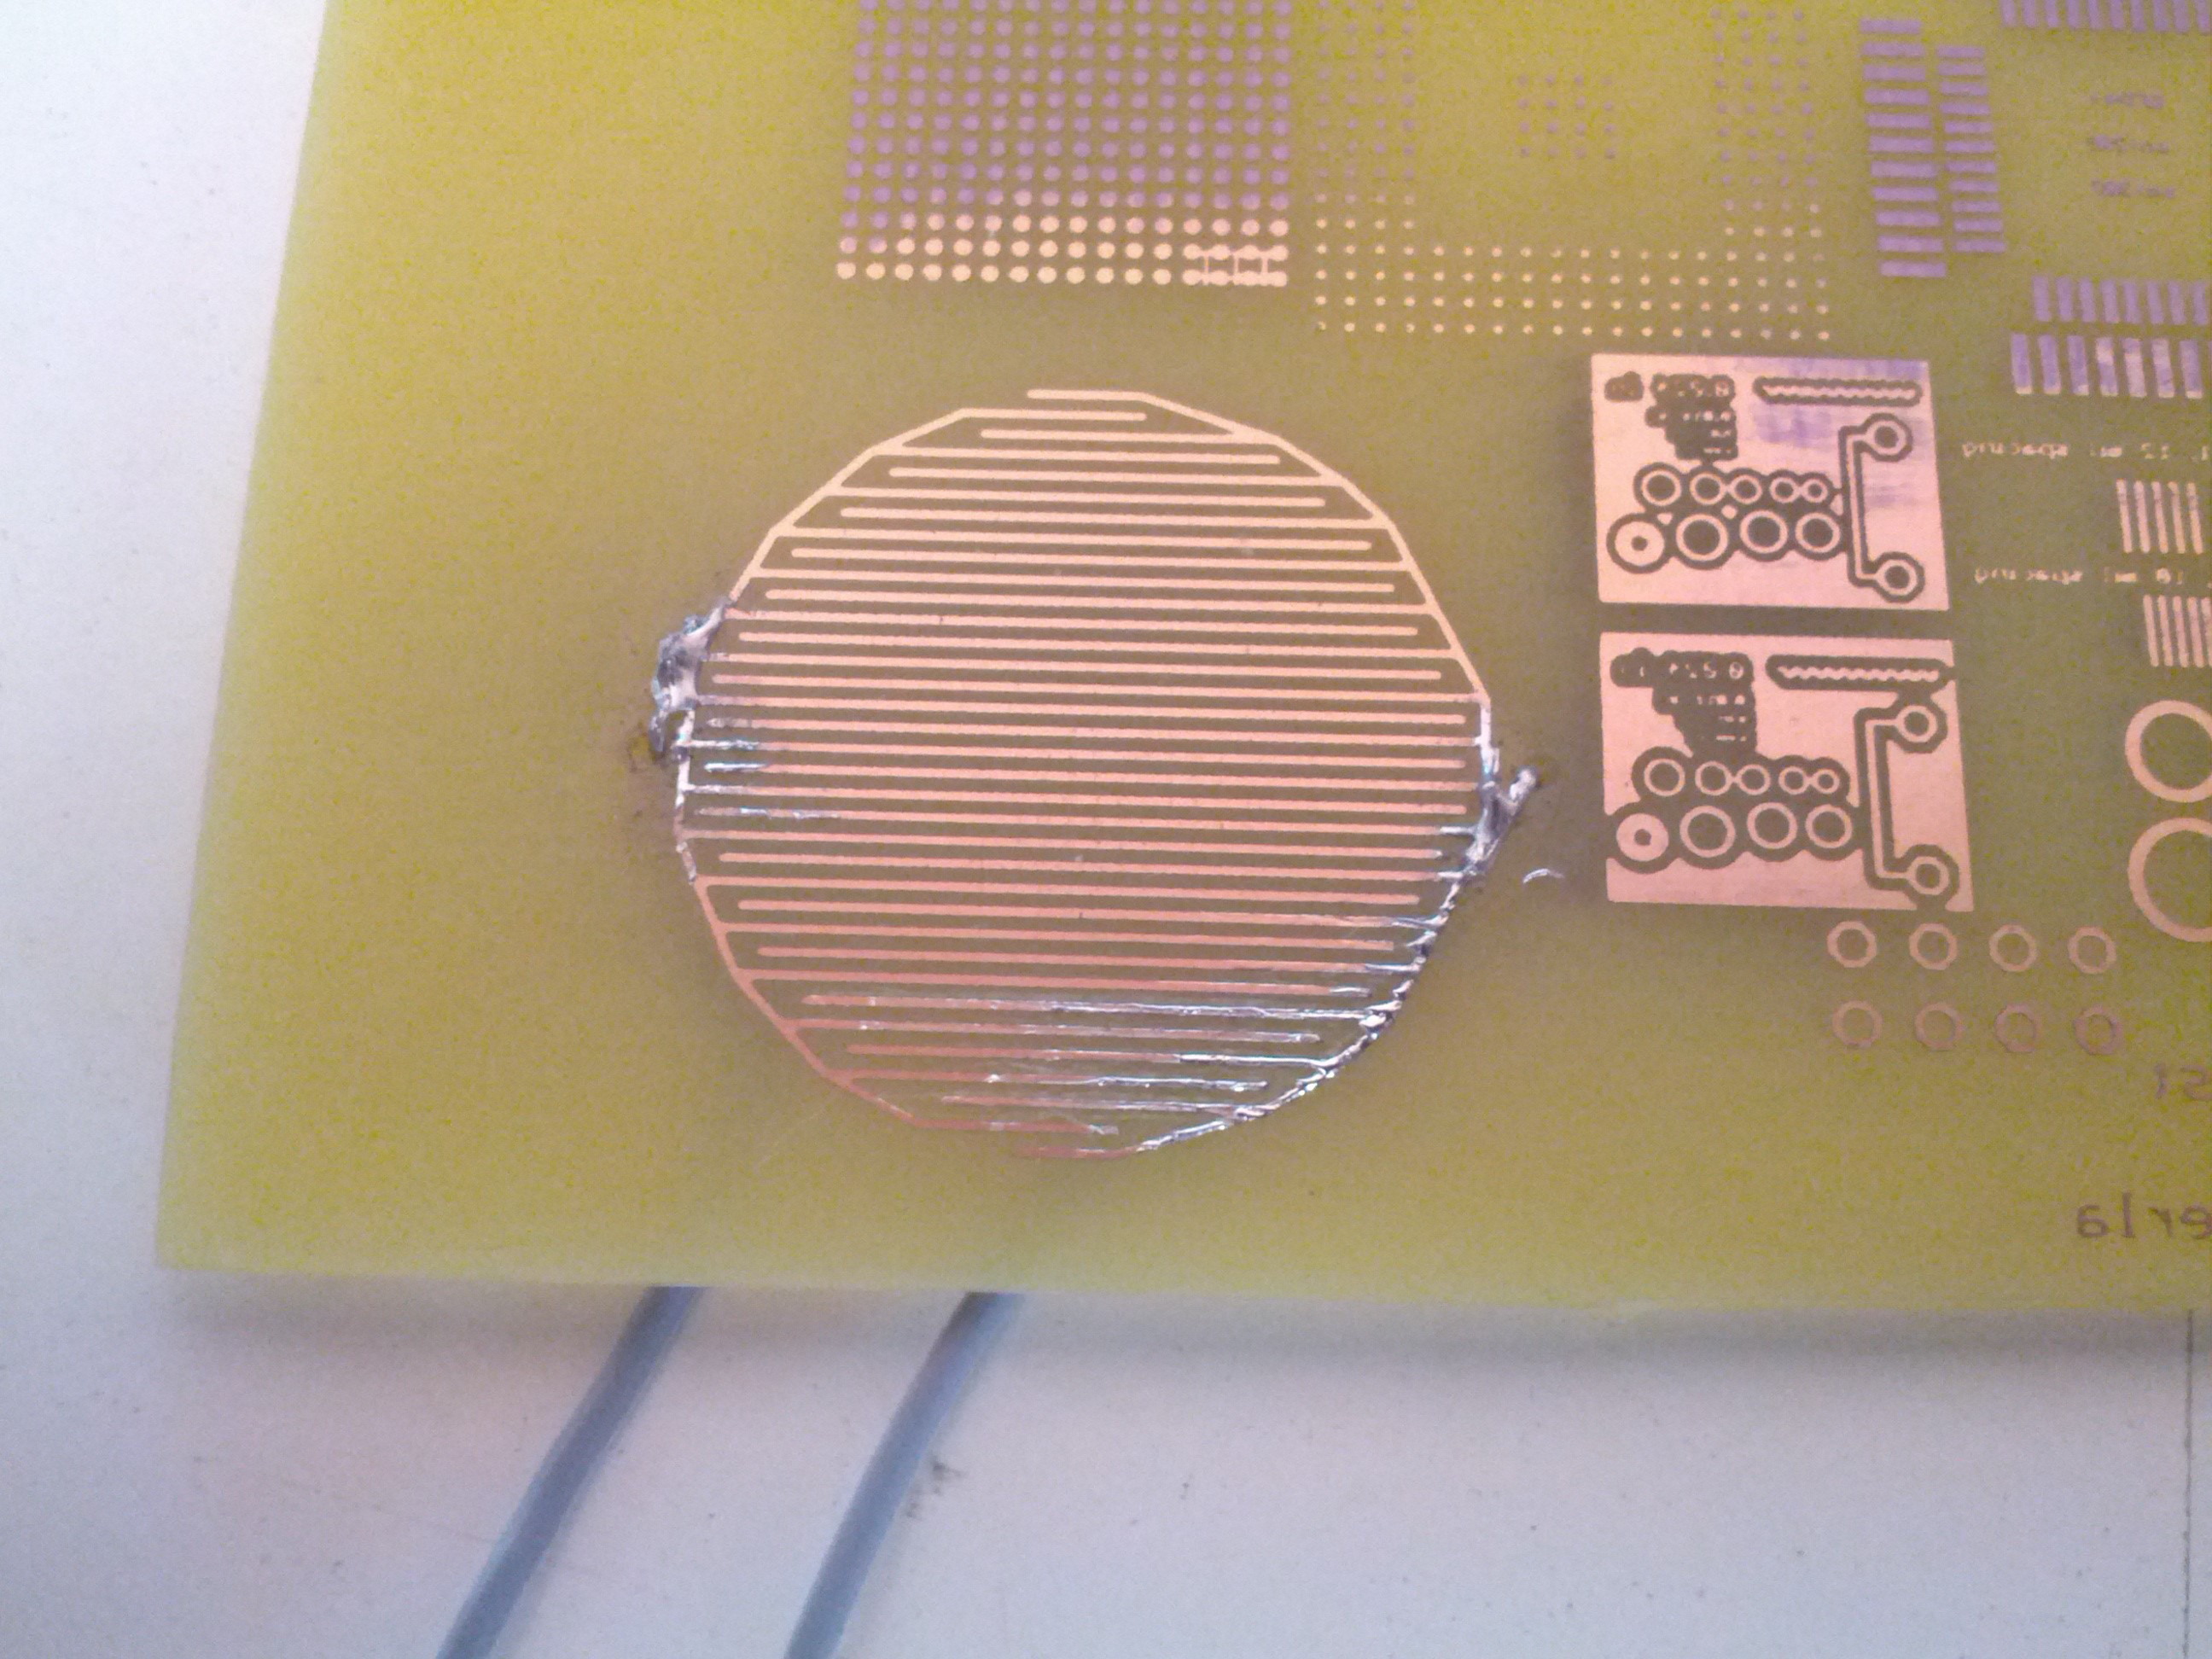
    But I assure you that the pads are fully functional; in fact, the test PCB I drilled was an FSR etching test, I tried that with velostat under a pad and it works perfectly! Here's the test FSR:

    You can see cables coming out under the PCB soldered to each side of the FSR.

    Another issue I encountered while testing that FSR is that there is no way to glue Velostat under the rubber pads; that stuff is unglueable! But I tought of a workaround: I will use an acetate sheet to which I'll glue 16 Velostat circles, and I will cut a windowed acetate sheet (sort of a frame) that will leave some air between the Velostat circles and the FSRs; these two sheets will be put between the pads and the PCB.

    Last thing, I still need to design an enclosure for everything; it will have room for the PCB and a base for it, a Teensy 3.x and Teensy Audio Board (for future upgrades), and a motherboard which will host the Teensy and which will have 3 connectors; one will be connected to the FSR board, the other 2 will be free to use with a similar configuration, that is to host a 16 channel multiplexer; this will leave up to 32 addressable analog inputs! 

    So, stay tuned!

    Cheers,

    Mick

  • The pads have arrived! + more photos

    Michele Perla08/19/2014 at 23:14 1 comment

    Hello there,

    The used Akai MPC 2000 pads arrived this morning, yay!

    I took the opportunity to share with you actual dimensions of the pads, as well as some photos of the inner guts of this prototype; let's start with the description of the electronics photos:

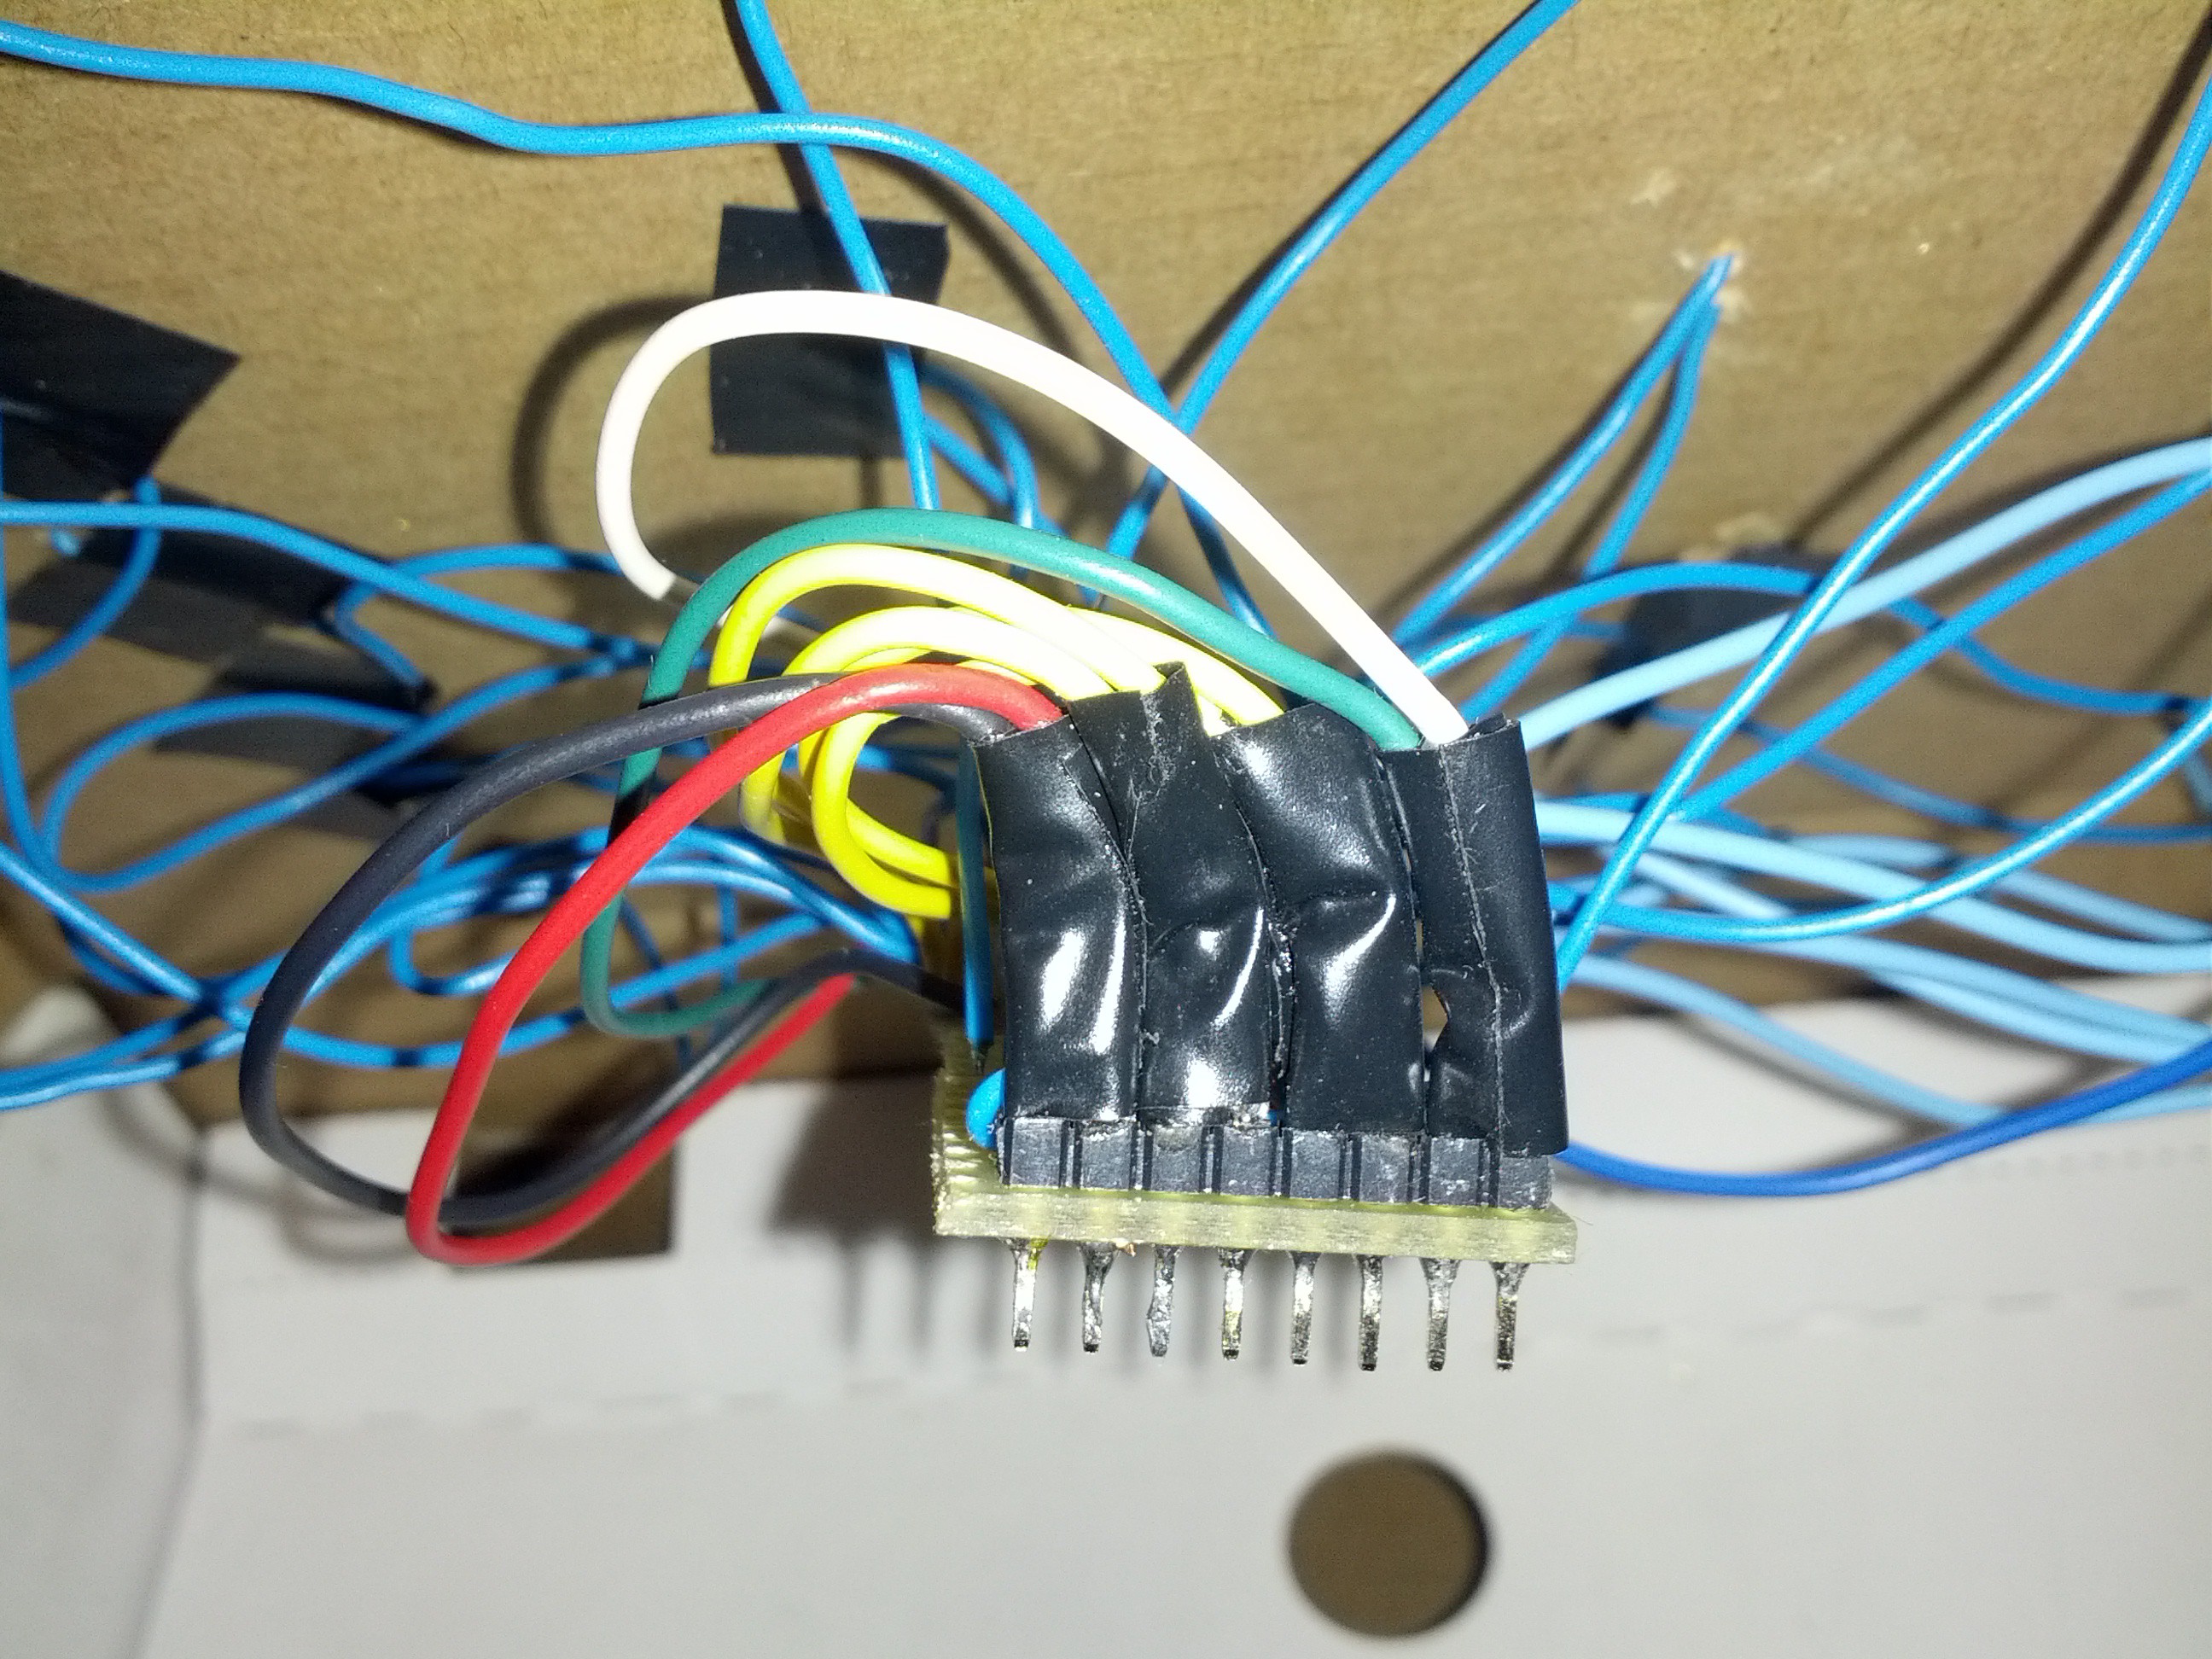
    16 channel mux breakout board pin connector

    This is the mux breakout board connector; beside the blue wires mess, which is composed of the FSRs leads, you can see in order from left to right, and color coded:

    Vss (ground)- Vdd (5 V) - A - B - C - D - Common Out - Inhibit 

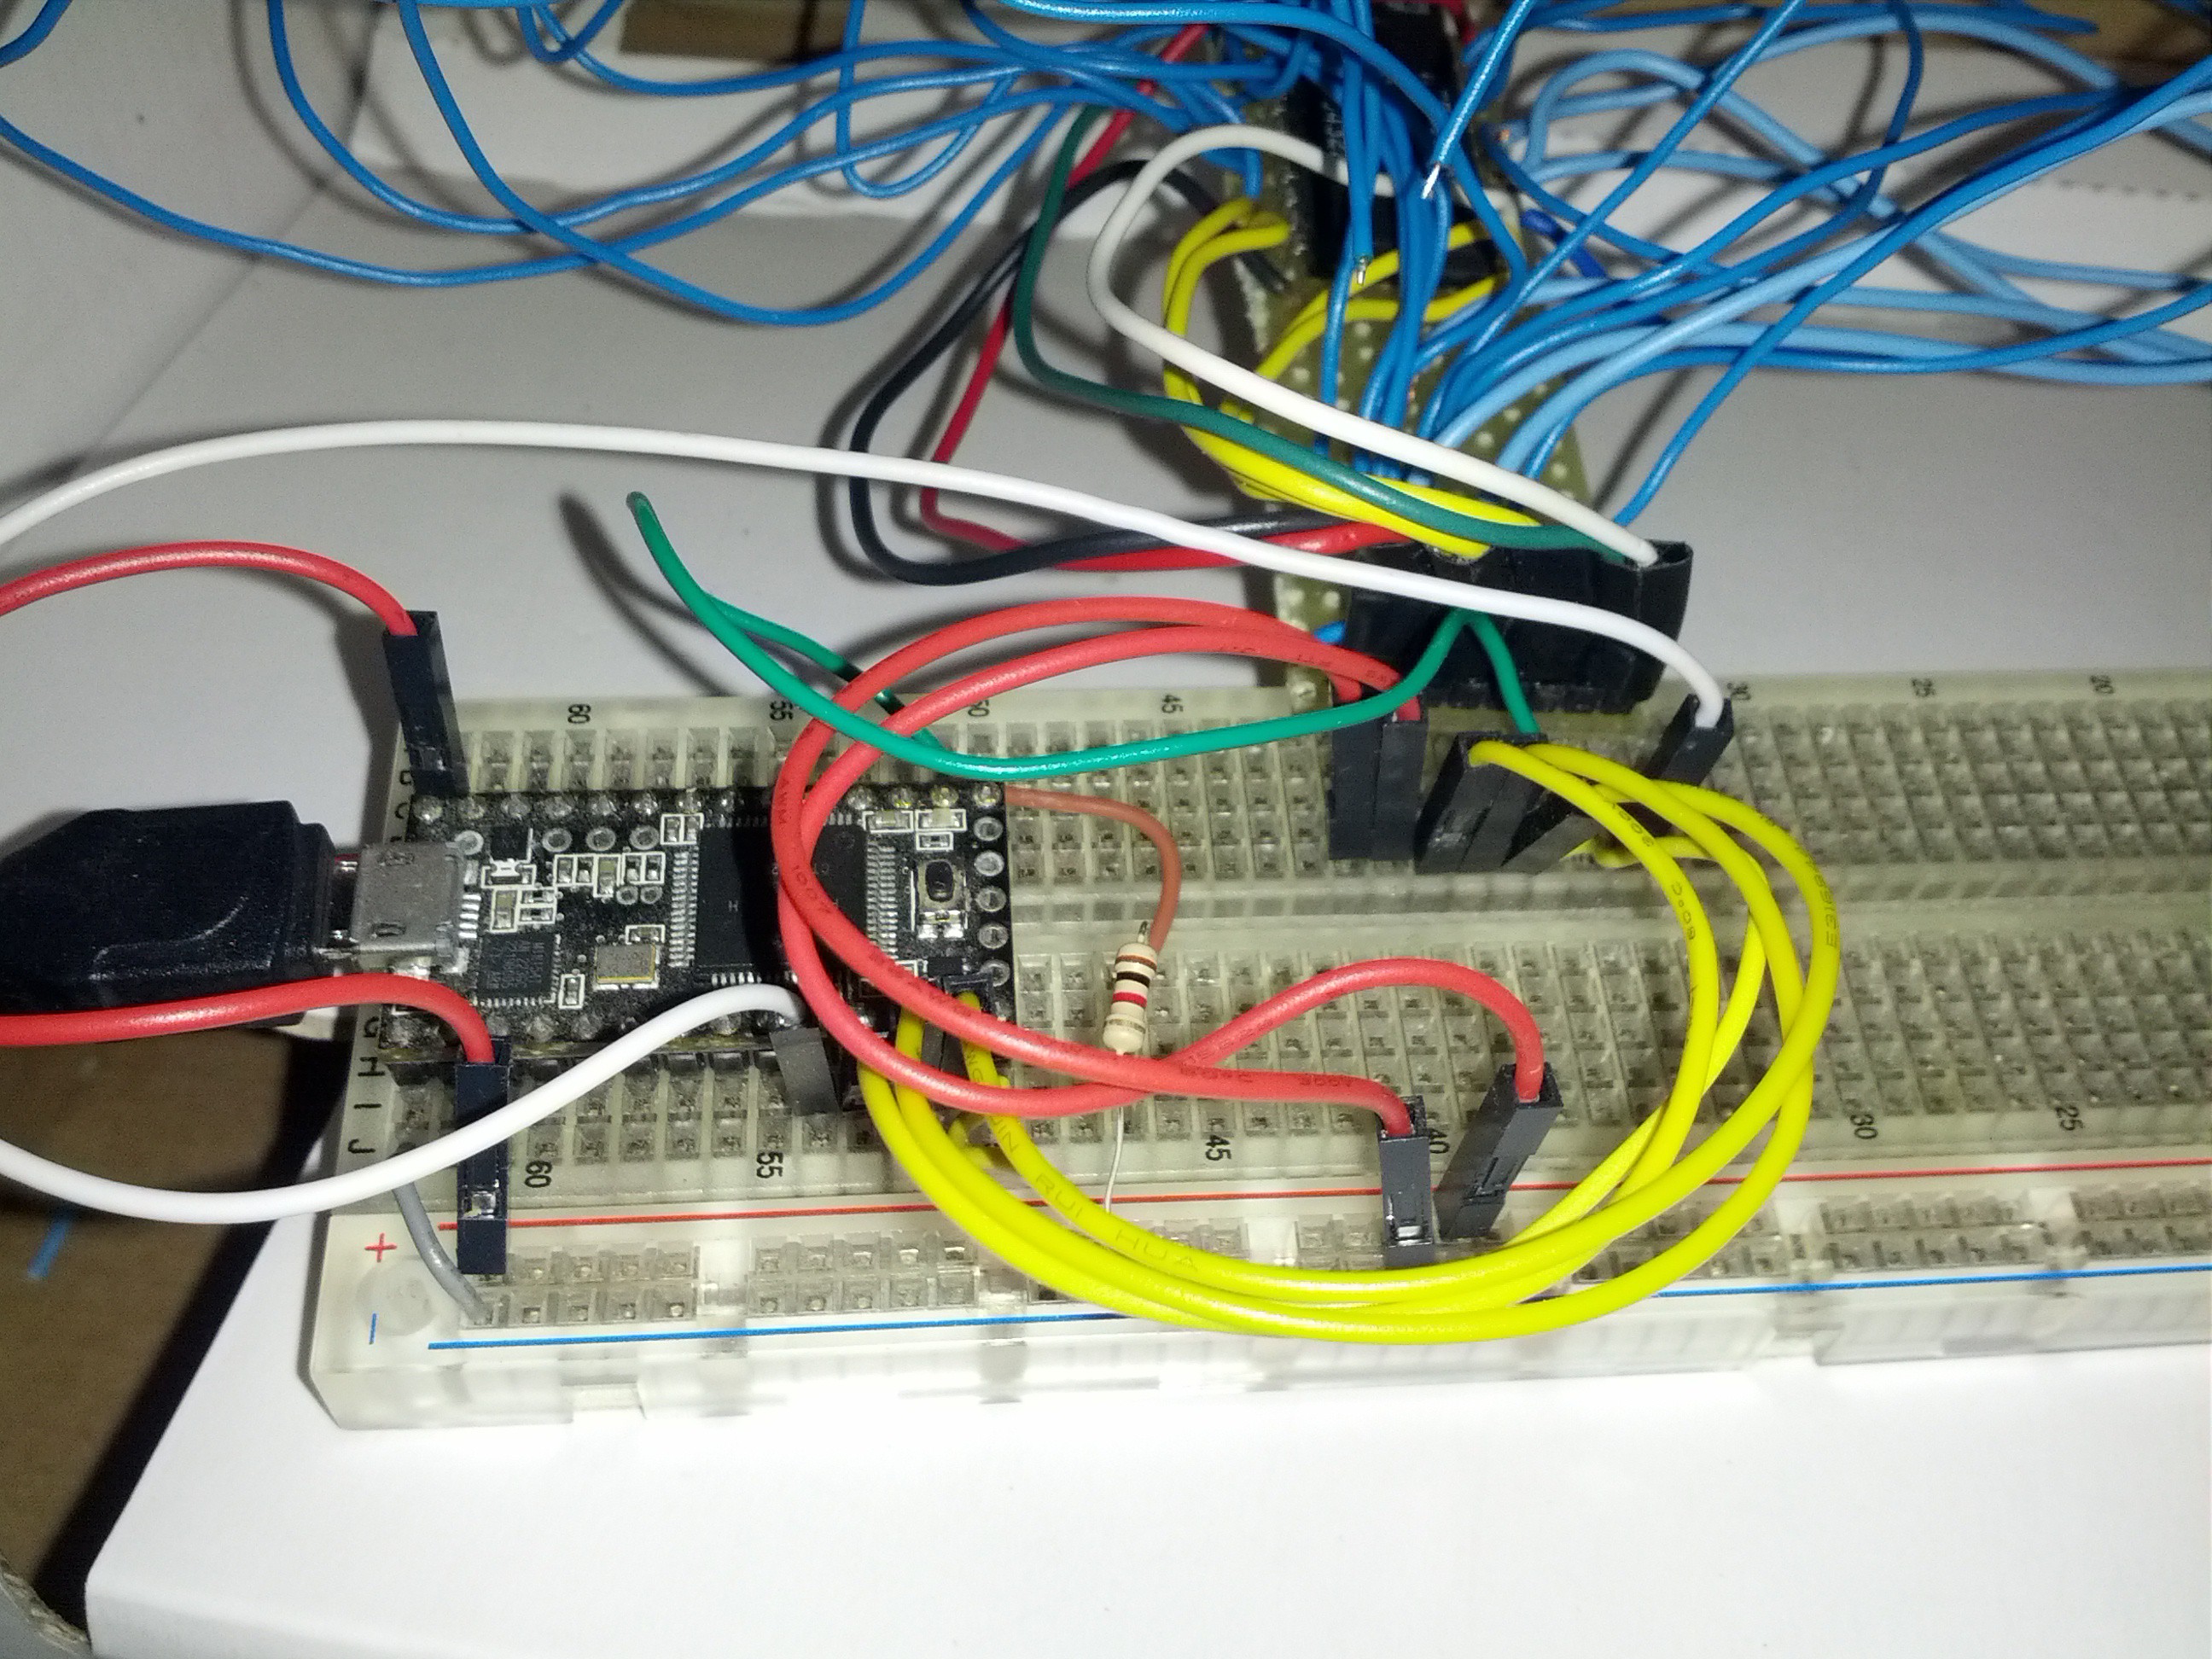
    This board is plugged in a breadboard and connected to the Teensy using some jumpers:

    Inside the prototype 2

    You can see that apart from the red jumper for the ground connection, everything follows the same color coding as on the breakout board:

    RED for Power - YELLOW for A-B-C-D - GREEN for Common Out - WHITE for Inhibit

    A-B-C-D are connected to pins 9-10-11-12, Inhibit to pin 8, Common Out to A0-pin 14 and grounded through a 10 Kohm resistor. You can see that the electronics and the connections are really straightforward.

    Now for the dimensions:

    - Top layer: 

    . Pad width : 1,1875 inches

    . Spacer between pads : 0,1875 inches

    These could be approximated to 1,25 inches and 0.125 inches and will be useful later when designing the final enclosure (e.g. to cut an acrylic sheet with some holes to be put on top of the pads to keep them together with the structure, which will also make the thing look sleek ;D )

    - Bottom layer:

    . Pad width : 1,25 inches

    . Spacer between pads : 0,25 inches

    . "Pressure" circle diameter : 1 inches

    For "pressure" circle I mean the little convex circles under each pad, which will be covered with Velostat;

    The width and the spacer reflects the approximated top pad dimensions; these are necessary to design the PCB pads.

    I made some math, and the first thing that comes out is that I cannot fit 16 pads in a single PCB, at least not in Eagle CAD; the maximum available area in the free version is 100 mm * 80 mm ( 4 inches * 3,2 inches ), therefore I have to either stick with 4 boards with 2x2 pads each ( 3 * 3 inches ), or design these with another tool.

    You can find more pictures in the Google Drive shared project folder link.

    See you next time with the PCB layout of the pads, and who knows what else! 

    Stay tuned,

    Mick

  • Source code available! + quick update

    Michele Perla08/18/2014 at 22:01 0 comments

    Hey guys, 

    Today I had the time to sit down a few minutes on the project and I got the first revision of the code finally available, after more than two months have passed since I did it. 

    Code available here: https://drive.google.com/folderview?id=0B-yo2xApQsSeMm5RcHg0V0JJQmM&usp=sharing

    Soon it will also be available on GitHub

    How to use it:

    -Take your Teensy and program it

    -As soon as the code starts (e.g. you see the Teensy MIDI device connected to the PC) keep the first button pressed down for at least 5 seconds; this is used to initialize the maximum value that the analog pin can read, so to map the analogRead values in the range [0,maximum] instead of [0,1023]

    -Leave the button and enjoy! Notes are mapped from note 36 to note 36+i where i is the index of the pad which goes from 0 to 15. I chose this notes because every digital drum inside Reason (Redrum, Kong) as well as sample players (Dr.Rex) are mapped to default to this range of notes.

    You may want to keep your Serial Monitor opened in another window while using it as it shows some messages in the initialization process as well as during normal use and misuse.

    Anyway, the rubber pads have not arrived yet, they should arrive tomorrow; as soon as I have them I will lay down a PCB according to their dimensions and I will also design a little wooden chassis to keep everything together.

    As always, stay tuned!

    Mick

  • Test video + project update

    Michele Perla08/16/2014 at 07:48 0 comments

    Hello there,

    In this log I'd like to share with you a few more photos of the construction process of the first revision of this MIDI controller as well as a video which shows the very basic functionality of it. In the video you can see me mashing on a few pads with Reason opened on my PC and interpreting MIDI signals into actual samples. Sorry for my lack of my abilities, but playing with one hand and with a phone in the other is no easy task :)

    Here's the link:

    https://drive.google.com/folderview?id=0B-yo2xApQsSeMm5RcHg0V0JJQmM&usp=sharing

    In between the photos you shall find two photos of the new pads I've ordered, which are took from an used Akai MPC and which will be used in the second revision of the controller; this is due to a few issues I have found in the construction:

    - The pads are not reliable; the mouse pad is not a very good pad surface, not very playable, and the copper stripes that compose the sensors are too big and spaced, so if you move the finger on a pad while holding it pressed it gives false triggers

    - The sensor sensitivity is somewhat bad, because cardboard is too light and gives zero support to the sensors; therefore most of the pressure applied on the sensor is consumed in flexing the cardboard rather than transferred to the sensor

    - The electronics are faulty, mainly because I messed up some pad wiring, the mux board does not plug very well on the breadboard which hosts the Teensy and keeps disconnecting when playing, and the cheap oscilloscope probe I'm using adds up to this mess

    So I am thinking of some major mods, which are the following:

    - Printing the pads on PCB(s), to have more dense copper stripes which means increased sensitivity

    - Fixing the pads on a somewhat thick wooden surface, to give it the necessary support so that most of the pressure applied will transfer to the pads

    - Using rubber molded pads to further increase reliability; these pads will be provided with velostat pieces under each pad so to provide ffunctionality as it is now with the mouse pad

    - Using another PCB to host the mux, the Teensy and other complementary stuff, which will of course connect in some fancy way to the separate sensor board(s)

    - Leaving some space for some control goodness like potentiometers which are mandatory in every respectable MIDI controller

    On the software side, right now there is not much happening, MIDI notes are sent for each pad starting from C1 which is note 24 and adding the index of the pad, which are logically organized as a row, so adding up from 0 (upper leftmost corner pad) to 15(lower rightmost corner pad). The thing that I found frustrating is to have to reprogram the pads each time I want to change notes, moreover having to write conditional code if I wanted one specific pad to send a note which is not the standard one; also, I'd like to have more advanced functionality like auto retrigger of a note while holding it; so there are the mods I will implement on the software side:

    - Setting notes on the run using a PC software which will use serial communication, probably written in Java and using javarxtx-lib; this will also be used to set other parameters, such as selecting digital or analog behaviour for each pad.

    - Implementing the above stuff in firmware, of course! That is to say, implementing a serial based communication protocol with a command set, and implementing the various controllable functions

    - Adding an internal metronome

    - Adding retrigger functionality which will rely on the above metronome

     Right now the code is still not available as it is quite bugged because I tried with little success to implement the serial comm with the PC. I will clean it up and pass it on to the masses ;)

    Stay tuned!

    Mick

  • quick update of details

    Michele Perla07/29/2014 at 07:16 0 comments

    Hello!

    First of all, wow I was on a hackaday article, sweet!!

    Secondly I just want to let you all know that I added some quick info in the project details and that I will post some logs in the next days!!

    Thanks to everyone who is following this project and also to everyone who skulled it!!

    Cheers

    Mick

View all 7 project logs

Enjoy this project?

Share

Discussions

CaBachhav wrote 06/08/2019 at 06:39 point

you should commercialize this project. Form a company. Borrow some funds 

  Are you sure? yes | no

Sompob fung wrote 04/13/2017 at 16:15 point

amazing project

  Are you sure? yes | no

bochen wrote 11/01/2015 at 08:45 point

this. is. amazing.

  Are you sure? yes | no

Similar Projects

Does this project spark your interest?

Become a member to follow this project and never miss any updates