 Josh Starnes
Example of IR transmitter using PI, I would use Pi Zero I believe.
http://www.raspberry-pi-geek.com/Archive/2015/10/Raspberry-Pi-IR-remote
Building and Testing an IR LED Circuit
Although you can connect an IR LED directly to GPIO pins on the Raspberry Pi, the LED's output signal will be too weak, and the IR transmitter will have a very limited range. A simple transistor circuit solves the problem by amplifying the current output from a pin and thus increasing the IR LED's signal strength.
To build a transistor-powered IR transmitter, you need two resistors (220ohm and 10K), a transistor (2N2222, BC547, or practically any other transistor will do), and a 940nm IR LED. Additionally, you'll need a breadboard and jump wires to assemble an IR transmitter prototype (Figure 1). Wire the components as shown in Figure 2 to assemble the IR transmitter. The next step is to check to see whether the IR transmitter actually works. To do this, you can use a simple LED Python blinking script (Listing 1) that turns the LED connected to pin 22 on and off.
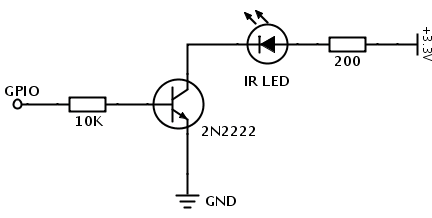 Figure 1: Transistor-powered IR transmitter schematics.
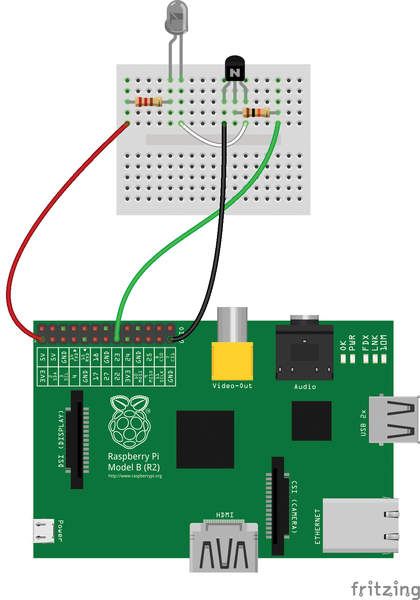 Figure 2: Wiring diagram.
Listing 1
Python Blinking LED Script
01 #!/usr/bin/python
02 import RPi.GPIO as GPIO
03 import time
04 GPIO.setwarnings(False)
05 GPIO.setmode(GPIO.BCM)
06 GPIO.setup(22, GPIO.OUT)
07 while True:
08     GPIO.output(22, True)
09     time.sleep(1)
10     GPIO.output(22, False)
11     time.sleep(1)
Because the IR LED is not a regular light-emitting diode, how do you actually find out whether it blinks or not? You can use a camera with an LCD screen or smartphone camera. Point the camera at the circuit and look at the screen. If the circuit works, you should see the IR LED blinking.
Installing and Configuring the LIRC Package
To control a device with an IR receiver, the IR LED transmitter must send a specific signal sequence, and the LIRC package [1], which emulates the infrared signals of many remote controls, is the perfect tool for the job. LIRC is available in the Raspbian software repositories, so installing it on Raspberry Pi is just a matter of running
sudo apt-get install lirc
Once you've done that, you need to enable and configure the lirc_rpi kernel module. To do so, open modules in the Nano editor
sudo nano /etc/modules
and add the lines below to the file:
lirc_dev
lirc_rpi gpio_out_pin=22
Make sure that the gpio_out_pin parameter points to the pin controlling the IR LED (in this case, it's pin 22). Next, open the file /etc/lirc/hardware.conf in Nano as before with sudo and add the following configuration to the file:
LIRCD_ARGS="--uinput"
LOAD_MODULES=true
DRIVER="default"
DEVICE="/dev/lirc0"
MODULES="lirc_rpi"
LIRCD_CONF=""
LIRCMD_CONF=""
Now, reboot the Raspberry Pi using the
sudo reboot
command to activate the configuration. Finally, you need to specify a profile that emulates a specific remote control. The project's website [2] offers a long list of profiles that emulate practically any remote control in existence, including remote controls for DSLR cameras. So, if you want to use Raspberry Pi to control a Nikon D90 DSLR camera, point the browser to lirc.sourceforge.net/remotes/nikon/ML-L3 and copy the profile. Next, open the /etc/lirc/lircd.conf file in Nano, paste the copied profile into it, save the changes, and restart LIRC with:
sudo /etc/init.d/lirc restart
Turn on the DSLR camera and enable the IR triggering mode. On your Raspberry Pi, issue:
irsend SEND_ONCE Nikon2 shutter
If everything works properly, your camera should fire.
Discussions
Become a Hackaday.io Member
Create an account to leave a comment. Already have an account? Log In.