 Dillon Nichols
-
11Test the Skill on the Alexa Developer Console
Back on the Amazon page, click the Test tab. Let's first test by typing the request, so I write "Alexa, ask MacroFab to blink an LED at 35 hertz". If successful, Alexa should respond with the text from step 10.
Now we have to deal with the fact that Alexa is a computer and not a person. Instead of typing the request, try holding the microphone button and saying your request. You may be surprised to see that Alexa misinterprets your words and cannot respond. What you can do now is copy what Alexa hears into a new Intent and Utterance as explained in Step 4. For me, I wanted to say "Alexa, ask MacroFab to blink an LED at 35 hertz", but she heard "Alexa, ask macro fab to blink and l.e.d. at {rate} hurts" so I changed the Invocation and Intents to match.
Now Alexa should be able to respond to your voice and you can even try talking to a real Alexa device now.
-
12Connect your voice to the physical world
For this step, I'm going to connect a Particle Photon to Losant so I can physically blink an LED. It's possible to use any device that can connect to the web (like an ESP-32), but I'm using a Particle device because Losant makes it so easy.
- Create an account at https://www.particle.io
- Register your device and connect it to WiFi
- In Particle Build, copy the following code and flash it to your device. It sets up a cloud-exposed function that will blink the onboard LED at the frequency that it is set to.
// onboard LED of Photon int led = D7; // how long to delay between blinks int rate = 0; int setBlinkRate(String rateString); void setup() { // set pin to output pinMode(led, OUTPUT); // register the cloud function Particle.function("setBlinkRate", setBlinkRate); } void loop() { // wait until rate is changed to something if (rate != 0) { // set LED high digitalWrite(led, HIGH); // delay delay(rate); // set LED low digitalWrite(led, LOW); // delay delay(rate); } } // this function automagically gets called upon a matching POST request int setBlinkRate(String rateString) { // convert string sent from Losant to integer float temp = rateString.toFloat(); // invert to go from frequency to rate temp = 1/temp; // then multiply to go from seconds to milliseconds for delay() temp = temp*1000; // and divide by 2 to blink at 50% duty cycle rate = temp/2; } - At Losant, go to the Integrations tab and add an Integration
- Choose a name. Select "Particle" as the Integration type. Copy the access token from the Particle Build Settings tab into the Access Token field on Losant. Save.
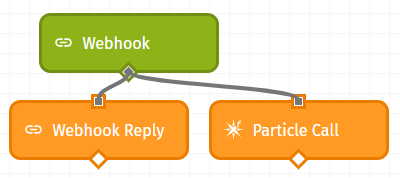
- Back on the Losant Workflow, drag a "Particle Call" node into the workspace and connect the Webhook Node output to this Particle Call input. For the integration, select the Particle device you made in the previous step. If you copied my code, then the Function Name is "setBlinkRate". You'll need to copy the ID of your Particle device from https://console.particle.io/devices and enter it into the "Device Name or ID" field. For the Function Argument, choose "Payload Path". Copy "data.body.request.intent.slots.rate.value" into the "Argument Payload Path". This is the location of the variable sent from Alexa to Losant. The Losant workspace should now look like this:
![]()
That's it! You should now be able to speak to the Alexa and have the LED on the Particle Photon blink at the frequency you stated.
Alexa-powered LED Blinker
Blinking an LED yourself is too hard, so I'll ask Alexa to do it
Discussions
Become a Hackaday.io Member
Create an account to leave a comment. Already have an account? Log In.