 Jeremy
We're rounding the corner to a final product! I've been getting feedback from friends, creating documentation and prepping arduino support.
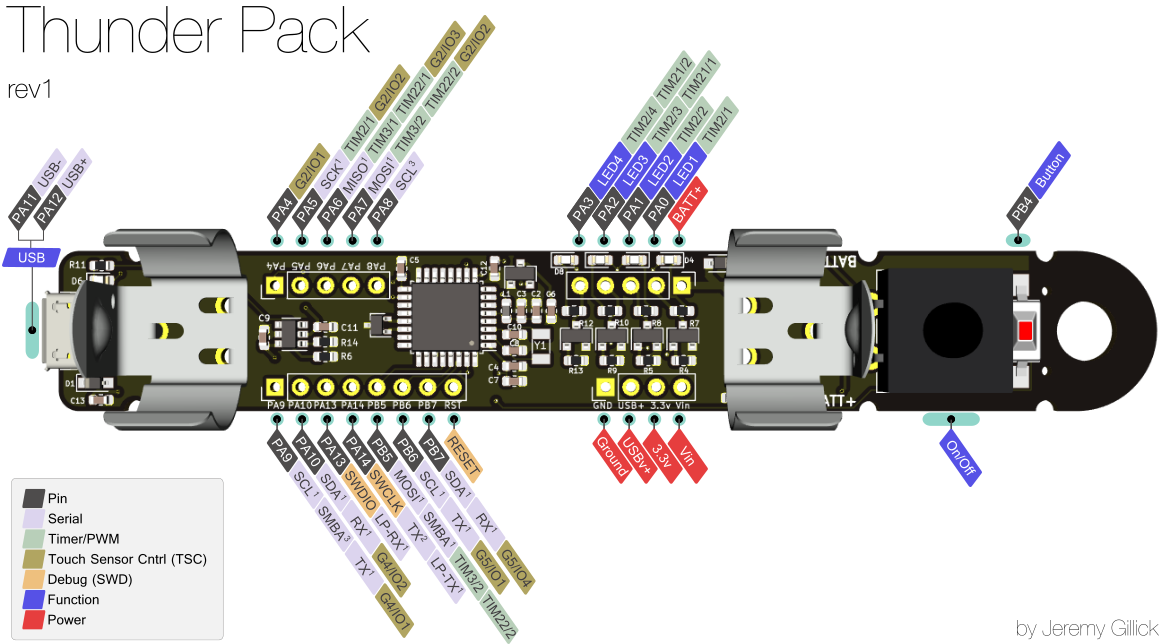
Pin out diagram
The real step to making something real and usable by others is documentation. And in my mind, the first tangible piece of documentation for a custom board is the pinout diagram. From there an intrepid maker can dig up datasheets as necessary to get things running.
I went through a few iterations of this because I wanted it to be easily viewable without scrolling (a vertical oriented board meant vertical scrolling on laptop screens). If the labels look familiar, I borrowed the style from the adafruit pinout diagrams.
There's still room for improvement (I'm not loving the angled labels), so if anyone wants to lend a hand or ideas, please let me know. (also the SVG file is also an inkscape file)
Arduino Support
Another important step to making a board usable by others is platform support; notably Arduino. These days I run a little closer to the metal, but there's a lot of value in giving all makers a very accessible starting point.
The stm32duino project already provides arduino support for STM32 boards; however, I still needed to add Thunder Pack board configs to it. Luckily the stm32duino team (notably [fpistm]) have been very responsive and helpful with my pull requests. Along the way, I even found a bug with one of their binaries and am providing additional pull requests to cut down on the number of outside software dependencies necessary for an end-user to get up and running with any of their boards.
If I'm lucky ThunderPack will be supported by stm32duino 1.8.0! 🤞
Hardware Reviews & Feedback
A couple weeks ago I sent the hardware files to some friends who actually work in hardware design & development. Through that, they pointed out that I was missing some decoupling caps, my USB traces could be optimized for data line impedance, and a few other helpful tricks. This was incredibly helpful and also reassuring about the overall design.
The next step is to build a few more boards and hand them off to more friends for real-world testing.
Discussions
Become a Hackaday.io Member
Create an account to leave a comment. Already have an account? Log In.