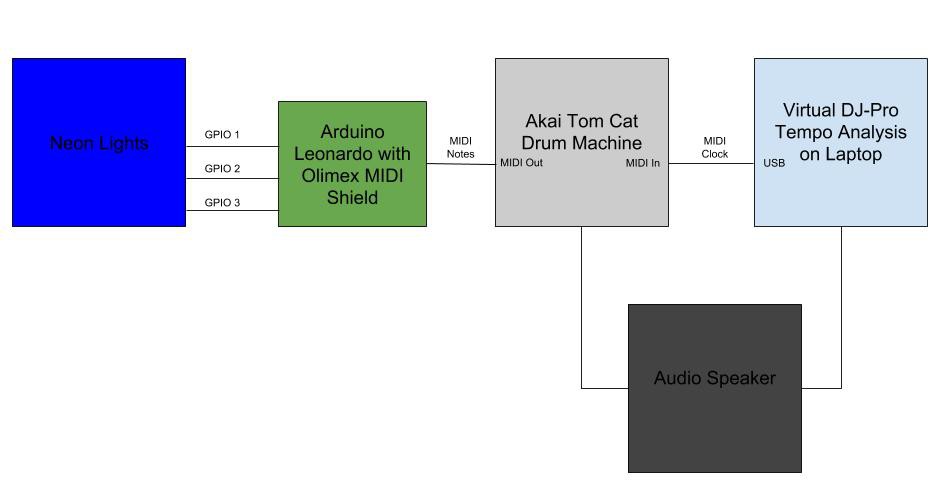
Please see the project logs for the details of the project. I have included a block diagram here as well as two performance videos.
Building a system that encodes and reads music in MIDI format and controls the flashing of a Neon Sign with minimal latency
To make the experience fit your profile, pick a username and tell us what interests you.
We found and based on your interests.
Please see the project logs for the details of the project. I have included a block diagram here as well as two performance videos.
With a custom Neon sign constructed, I was able to enhance the experience of a drum machine performance. Below I have included a video of myself programming a drum machine in which MIDI output is read by an Arduino Leonardo with Olimex MIDI shield to control Neon transformers:
Another application I wanted to pursue was the ability to program the neon sign to stay in sync with an .mp3 audio file that was playing over a speaker. I utilized Virtual DJ Pro's beat analysis software to identify the tempo of a song. With Roland's UM-one USB to MIDI cable, I could output a clocking signal (in reality this is a "step" signal, the distinction is important but not necessary for understanding the flow of information) via MIDI to the input of the drum machine. Listening to the beat of the song, I could silently program in what drum sounds would activate where and the Neon tubes would light up accordingly. The video below illustrates this concepts with one of my favorite songs Blue Monday.
Below is a block diagram of the informational flow of the entire system. The speaker's output can be either connected to the audio of the drum machine OR the audio of the mp3 playing in Virtual DJ pro.
The reaction from the Neon community was overwhelmingly positive. This motivated my Neon partner and I to construct a custom Neon sign to demonstrate music interaction that I had developed. Her vision was a stack of three skulls (just in time for Halloween) with a hint of old-school R/W/B 3D retro-ism. Each tube was connected to its own power supply which could be controlled via GPIO.
The Neon artist that I was working with lived in LA and I am based out of SF (#TechieTrash) . I took a visit down to LA to grab some of her scrap tubes to light up. Conveniently, she was also working on the construction of a custom sign that utilized the switcher and transformers from Tech 22 that I was interested in investigating for my musical interface project. Below I have included a schematic for this interface.
Below is the working video of the flasher working with the custom sign. Note that this is significantly below the 40ms switching design requirements for this projects. I was also able to measure the voltage waveform on the switching controller to verify that it would work with my Arduino's GPIO outputs.
Back at home, I was able to set up an experiment with my Arduino and the Tech 22 power supplies. By imitating the signal coming from the switcher, I could toggle the arduino's GPIO at an increasingly faster rate to observe if 40ms switching was actually possible. Below is a picture of the Tech 22 power supply that I used:
I used the following code to generate the following video:
void setup() {
  pinMode(13, OUTPUT);          // sets the digital pin 13 as output
}

void loop() {
for (int i=100; i >= 0; i--){
      digitalWrite(13, HIGH);
      delay(i);
      digitalWrite(13, LOW);
      delay(i);
   }
In conclusion, I verified that my vision of fast switching Neon was indeed possible. Next I had a little fun using the following code to control the Neon tubes with my Akai Drum Machine MIDI controller.
void setup() {
  Serial.begin(9600);
  Serial1.begin(31250);
  pinMode(13, OUTPUT);          // sets the digital pin 13 as output
  pinMode(12, OUTPUT);          // sets the digital pin 12 as output
  pinMode(11, OUTPUT);          // sets the digital pin 11 as output
}

byte Byte1;
byte Byte2;
byte Byte3;

void loop() {
  // Listening for specific Sounds
  // Kick Drum: 0x99; 0x24; 0x00->0x7F;
  //            153;  36;   0->127;
  //            0x89; 0x24; 0x00->0x7F;
  //            137;  36;   0->127;
  //
  // Snare:     0x99; 0x26; 0x00->0x7F;
  //            153;  38;   0->127;
  //            0x89; 0x26; 0x00->0x7F;
  //            137;  38;   0->127;
  //
  // Clap:      0x99; 0x28; 0x00->0x7F;
  //            153;  40;   0->127;
  //            0x89; 0x28; 0x00->0x7F;
  //            137;  40;   0->127;
  //
  // Open Hat:  0x99; 0x2A; 0x00->0x7F;
  //            153;  42;   0->127;
  //            0x89; 0x2A; 0x00->0x7F;
  //            137;  42;   0->127;
  //
  // Clsd Hat:  0x99; 0x2C; 0x00->0x7F;
  //            153;  44;   0->127;
  //            0x89; 0x2C; 0x00->0x7F;
  //            137;  44;   0->127;

  if (Serial1.available() > 0) {
    Byte1 = Byte2;
    Byte2 = Byte3;
    Byte3 = Serial1.read();

    if (Byte1 == 0x99 && Byte2 == 0x24){
      Serial.print("Kick Drum On  :");
      digitalWrite(13, LOW);        // sets the digital pin 13 off
      Serial.print(Byte1);
      Serial.print(" ");
      Serial.print(Byte2);
      Serial.print(" ");
      Serial.println(Byte3);
    }
    if (Byte1 == 0x89 && Byte2 == 0x24){
      Serial.print("Kick Drum Off :");
      digitalWrite(13, HIGH);       // sets the digital pin 13 on
      Serial.print(Byte1);
      Serial.print(" ");
      Serial.print(Byte2);
      Serial.print(" ");
      Serial.println(Byte3);
    }

    if (Byte1 == 0x99 && Byte2 == 0x26){
      Serial.print("Snare On  :");
      digitalWrite(12, LOW);       // sets the digital pin 13 on
      Serial.print(Byte1);
      Serial.print(" ");
      Serial.print(Byte2);
      Serial.print(" ");
      Serial.println(Byte3);
    }
    if (Byte1 == 0x89 && Byte2 == 0x26){
      Serial.print("Snare Off :");
      digitalWrite(12, HIGH);       // sets the digital pin 13 on
      Serial.print(Byte1);
      Serial.print(" ");
      Serial.print(Byte2);
      Serial.print(" ");
      Serial.println(Byte3);
    }

    if (Byte1 == 0x99 && Byte2 == 0x28){
      Serial.print("Clap On  :");
      Serial.print(Byte1);
      Serial.print(" ");
      Serial.print(Byte2);
      Serial.print(" ");
      Serial.println(Byte3);
    }
    if (Byte1 == 0x89 && Byte2 == 0x28){
      Serial.print("Clap Off :");
      Serial.print(Byte1);
      Serial.print(" ");
      Serial.print(Byte2);
      Serial.print(" ");
      Serial.println(Byte3);
    }
    if (Byte1 == 0x99 && Byte2 == 0x2A){
      Serial.print("Open Hat On  :");
      digitalWrite(11, LOW);
      Serial.print(Byte1);
      Serial.print(" ");
      Serial.print(Byte2);
      Serial.print(" "...
Read more »
I purchased a Olimex MIDI shield in order to be able to read raw MIDI data from the output of the Akai Drum Machine. At this point I wasn't sure what to expect at the output, my goal was just to be able to see something on the serial monitor via the Arduino IDE. I downloaded the Arduino MIDI library and I received an error that required me (through a google search) to purchase a specific Arduino Leonardo for reasons that I have understood later on in my development.
With the arrival of my Arduino Leonardo, my attempt to utilize the Arduino MIDI library was still problematic. I was only able to read input signal from some instruments and not others - specifically the drum sounds that I wanted to listen to. I suspected that the instantiation of the MIDI listening port was only listening to a specific channel and ignoring another. I was not able to figure out how to change this within the source code.
I turned to the internet to learn more about the MIDI protocol. Sparkfun had an incredibly useful article on the history and the state diagrams of MIDI. I was able to understand how MIDI is build on the UART serial interface at a specific baud rate of 31250 and that there are certain 3-byte sequences that specify Note On/Off command, Channel, Note Value, and Volume Level. Forums online helped me realize that for drum sounds are standardized on channel 10 as:
I decided to just use simple serial drivers to read byte values off of the buffer instead of using the MIDI library. Unfortunately the serial monitor's available baud rates and MIDI's baud rate (31250) were not compatible for viewing through the serial monitor. This meant that I could listen to the incoming signals, but the display to the serial monitor would be garbage. This is where the necessity of the Arduino Leonardo came into play: it has two serial ports. One for standard Tx and Rx ("Serial") and one for communicating over the USB ("Serial1"). This allowed me to listen at the MIDI baud rate and display at a rate that the serial monitor supported. I was able to successfully see the incoming commands as the drum machine outputted them with the following Arduino code:
void setup() {
  Serial.begin(9600);
  Serial1.begin(31250);
  byte Byte1;
  byte Byte2;
  byte Byte3;
}

void loop() {
  if (Serial1.available() > 0) {
    Byte1 = Byte2;
    Byte2 = Byte3;
    Byte3 = Serial1.read();

    if (Byte1 == 0x99 && Byte2 == 0x24){
      Serial.print("Kick Drum On  :");
      Serial.print(Byte1);
      Serial.print(" ");
      Serial.print(Byte2);
      Serial.print(" ");
      Serial.println(Byte3);
    }
    if (Byte1 == 0x89 && Byte2 == 0x24){
      Serial.print("Kick Drum Off :");
      Serial.print(Byte1);
      Serial.print(" ");
      Serial.print(Byte2);
      Serial.print(" ");
      Serial.println(Byte3);
    }

    if (Byte1 == 0x99 && Byte2 == 0x26){
      Serial.print("Snare On  :");
      Serial.print(Byte1);
      Serial.print(" ");
      Serial.print(Byte2);
      Serial.print(" ");
      Serial.println(Byte3);
    }
    if (Byte1 == 0x89 && Byte2 == 0x26){
      Serial.print("Snare Off :");
      Serial.print(Byte1);
      Serial.print(" ");
      Serial.print(Byte2);
      Serial.print(" ");
      Serial.println(Byte3);
    }

    if (Byte1 == 0x99 && Byte2 == 0x28){
      Serial.print("Clap On  :");
      Serial.print(Byte1);
      Serial.print(" ");
      Serial.print(Byte2);
      Serial.print(" ");
      Serial.println(Byte3);
    }
    if (Byte1 == 0x89 && Byte2 == 0x28){
      Serial.print("Clap Off :");
      Serial.print(Byte1);
      Serial.print(" ");
      Serial.print(Byte2);
      Serial.print(" ");
      Serial.println(Byte3);
    }
    if (Byte1 == 0x99 && Byte2 == 0x2A){
      Serial.print("Open Hat On  :");
      Serial.print(Byte1);
      Serial.print(" ");
      Serial.print(Byte2);
      Serial.print(" ");
      Serial.println(Byte3);
    }
    if (Byte1 == 0x89 && Byte2 == 0x2A){
      Serial.print("Open Hat Off :");
      Serial.print(Byte1);
      Serial.print(" ");
      Serial.print(Byte2);
      Serial.print(" ");
      Serial.println(Byte3);
    }
    if (Byte1 == 0x99 && Byte2 == 0x2C){
      Serial.print("Closed...
Read more »
There is a huge demand for the ability for Neon to interact with music and sounds. The current infrastructure that supports musical interaction is a microphone that performs a Fast Fourier Transform to determine frequency components - much like an equalizer in your car. This is problematic because in order to detect a 100Hz bass drum, the interface must record the entirety of the sound (10ms) and then process it. The human ear can perceive delays of 10-20ms which means that the delay is already pushing the boundary of human perception. In addition, it is difficult to separate specific instruments such as bass drum, snare, or synthesizer because these instruments span the frequency spectrum. This is why it can be challenging to identify particular instruments visually when observing an equalizer in your car.
As a DAWless Jammer myself, I realized that MIDI instrument signalling is a fast and unique way to trigger individual instruments. My vision is to read the trigger signals from individual drum instruments from a drum machine in order to then trigger a Neon tube on and off in sync with the sound that the listener is hearing.
The first step in accomplishing high-voltage switching is understanding design requirements, the load (Neon gas), and how power is converted.
At 180 BPM (upper limit of music tempos) and 4 hi-hat hits per beat (16th notes) this comes out to a constant on/off switching period of 80ms. This means that any transient or steady state latency issues have to be an order of magnitude lower than these design requirements. Latency could arise from the load or the power conversion.
I used the internet to understand Neon gas and any latency issues here: From this paper it is suggested that only a few tens of attoseconds are required for Neon Gas to glow.
I enrolled in a class at the UC Santa Cruz Extension program to help me understand power supplies: High Efficiency Switch-mode Power Supply, Design Overview is a 10 week class that introduces the fundamental concepts of a real switch-mode power supplies and its functions, operations and interactions. Discussion cover the various topologies as they relate to power supply operation, design, component selection, and rating for a particular application. Using the resources from this class I was able to determine that Neon was based in an LLC Power Converter Topology with an input of 120Vac at 60Hz from the wall and an output of 5kVac at 25kHz. My first idea was to use a straight forward power supply with a GPIO-controlled relay. Unfortunately, physical contact relays can only switch every 2 seconds which is far from the design requirements. Chatting with a gentleman in DigiKey, we realized that only solid state switchers would be able to toggle a voltage of this magnitude so quickly.
I contacted Neon transformer suppliers to understand any existing infrastructure that allowed : Tom at Tech22 helped me realize that I could not only take advantage of the opto-isolator that is inherent in the Neon transformers, but he also had developed a "switcher" which allows a Neon designer to make their lights flash. He claimed that these power supplies could have a turn on time of 30ms - which was perfect for my design requirements. Upon further investigation, I was able to understand that the switching interaction was strategically taking advantage of the opto-isolator in the voltage feedback control loop. The transformer and the switcher are two separate units where the power supply has been modified to allow access to the opto-isolator. The goal moving forward will be to utilize the transformer's switching input by imitating the switcher's output with an Arduino's GPIO.
test test
Create an account to leave a comment. Already have an account? Log In.
Become a member to follow this project and never miss any updates
 C. Prichard
 Noah Thurston
 Lithium ION
 Erik S. Bailey