The choice of a chassis to which everything would be mounted was initially one of the most difficult choices, but looking back my choice of chassis seems incredibly obvious and I'm not sure why I didn't go down this route from the start!
The chassis requirements were:
- Large enough to hold at least 10 footswitches
- Robust enough to withstand being stomped on
- Straight-forward to cut all holes etc in using hand tools/hand power tools at home
Not a particularly complicated list, but finding a chassis which was large enough for at least that many footswitches without them being over-cramped was tricky.
Drilling holes for footswitches and LEDs wasn't an issue, but the chassis was going to either large or non-round holes cut in it for access to the USB port, XLR sockets (a later addition), and screens. The large holes I would be able to do with either a hole-saw or knock-out punch but it was the non-round holes that was causing me issues.
I resigned myself to having to seek some assistance from a local machine shop to cut the non-round holes when a thought occurred - why not just 're-cycle' an existing foot controller?
An existing unit would:
- Be already ergonomically designed - and large enough - for a large number of footswitches
- Generally have pre-cut holes for USB connections and - more importantly - displays
A short search lead me to what I have ended up with - a Line 6 FBV Shortboard MK1
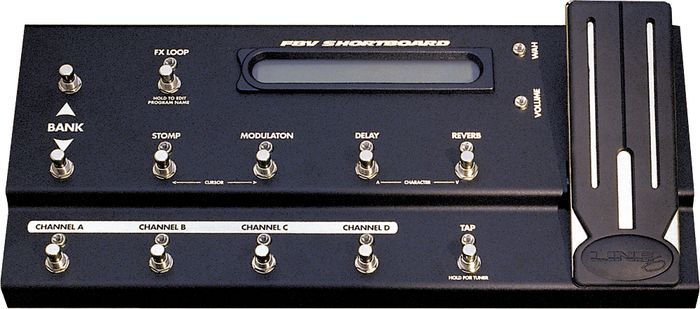
This ticked all the boxes and even had an expression pedal built in!
I managed to find one on eBay for about the same price I was going to pay for a generic sheet metal chassis so snapped it up.
The layout of the footswitches is perfect for what I have in mind for functions and - as a total co-incidence and not planned at all - the 14-segement displays I was planning on using fit perfectly within the display 'window' of the unit so this would not have to be altered at all!
The rear of the unit is the perfect height to accommodate some Neutrik D sized connectors for XLR and USB, and already included a few socket holes I could use for other ports.
All in all, with a few relatively minor modifications I now have an excellent chassis for which to build STJORN upon.
Discussions
Become a Hackaday.io Member
Create an account to leave a comment. Already have an account? Log In.