Materials:
LED strip. I bought mine locally but they are available at Adafruit too.
10K Trimmer Potentiometer with Knob
Mini Speaker 0.5W 8 OHM
Arduino Nano clone
Sweater
The LED strips are a lot of fun in themselves. You can learn more about them here:
https://learn.adafruit.com/adafruit-neopixel-uberguide/the-magic-of-neopixels
Warning - I started this project last year and end up destroying my pixel strip. To make the candles, I cut the strip up into lengths of 6 LEDs so I ended up with 9 candles and a spare. The strips come with a good electrical and mechanical connection. I needed to connect the short segments via wires. I used solid core wire that was stiff. And, I think I burned some of the backing when soldered them on. To make a long story short, the wires broke off when I went to assemble the shirt.
This time my plan was to use conductive thread and stitch the LED strips to the sweater. However, the sweater has is quilted and it was very hard to get the thread sewed neatly with no shorts. The contacts on the LED strips are very close together. After doing the first one and checking the continuity with my multi-meter, I gave up on it and moved to plan C.
Plan C was to use the LED strip connectors that I had bought as a backup. They clip to the end of the LED strip and have a place to clip in the control and power/ground wires. I found these very fiddly to work with but mostly it worked fine.
Step 1 - Prepare the Sweater
I marked the placement and the scale of the candles in chalk on the shirt and we painted the design in sparkly silver paint.

Step 2 - Wire the hardware

Wire the hardware as shown. For testing, I used a breadboard to connect the LED strip to the Nano.
Connect the speaker in series with the potentiometer to Digital Pin 8 and to ground. There is a third pin on the pot that can be left unconnected. The pot acts as a volume control for the speaker.
Connect the LED strip to +5v, ground, and the middle data connection to Digital Pin 6. When programming and testing, I powered the Nano using the USB connection and used the serial interface for debugging messages. When installed on the sweater you can power either via a USB battery or some other power source.
Step 3 Programming
The program runs through 8 days of Hanukkah, turning on the right number of candles, burning them down, and moving on to the next day. Each “day”, it plays the tune once. When it’s finished, it starts all over with day 1.
Keeping track of all the LED pixels for the candles is kind of complicated. I ended up using a number of two dimensional arrays. I’ve commented the code pretty thoroughly- it’s probably easier to understand reading the code. The main array is Candle. It contains 9 entries - one for each candle. The second dimension is the 6 pixels for each candle - 4 for the candle, and 2 for the flame. The value stored keeps track of if it’s off (0), on (1), or flame (3). If it’s on, the color, comes from the CandleColor array.
#include "pitches.h"
#include <Adafruit_NeoPixel.h>
#define PIN 6
Adafruit_NeoPixel strip = Adafruit_NeoPixel(60, PIN, NEO_GRB + NEO_KHZ800);

//global variables
byte Candle[9][6]; //2D 9x6 array of integers holding the on/off state. 0 is off, 1 is the color from CandleColor array, 3 is flame.  First value is the candle number, second value is the LED along the candle, starting from the bottom.
//Candle [0][x] is the Shamesh. There are a total of 9 candles for 8 days.
//Candles are initially 4 pixels long with 2 pixels for the flame.
short CandleState;//current length of the candles. 4 to start, 0 when done.
byte CandleColor[9][6];//a 2D array of bytes. First value is the candle number with the 3  parts of the color (R, G, B)
byte FlameColors[4][3] = {// Four colors, three RGB values.
  {239, 227, 53},
  {245, 200, 49},
  {255, 171, 44},
  {238, 120, 41}
};
byte Palette[8][3] = { // 7 colors
  {128, 0, 0},    //Red
  {128, 0, 128},  //Magenta
  {128, 0, 64},   //Pink
  {0, 0, 128},    //Blue
  {0, 128, 128},  //Cyan
  {0, 128, 0},    //Green
  {128, 128, 0},  //Yellow
  {128, 64, 0}    //Orange
};
#define RED 0
#define MAGENTA 1
#define PINK 2
#define BLUE 3
#define CYAN 4
#define GREEN 5
#define YELLOW 6
#define ORANGE 7

void setup() {
  strip.begin();
  strip.show(); // Initialize all pixels to 'off'
  randomSeed(analogRead(0));
  Serial.begin(9600);
}

void loop() {
  Serial.println("Happy Hannukah");
  for (byte Day = 1; Day < 9; Day++) { //which day of Hannukah is it 1 - 8
    Serial.print("Day ");
    Serial.println(Day);
    CandleState = 4;//initialize all candles to be 4 pixels long
    SetCandleColor(Day);
    for (byte CandleNo = 0; CandleNo < Day + 1; CandleNo++) { //loop through each candle to turn on
      for (byte Pix = 0; Pix < CandleState; Pix++) { //should be 0 to 3, for a total of 4 values
        Candle[CandleNo][Pix] = 1; //1 means it's a part of a candle and on.
      }
    }
    SetupCandles(Day); //Turn on candles but not burning
    Serial.println("Candles On but not lit");
    PlaySong();
    delay(10 * 1000); //30 seconds ****debug***
    //delay (5000);//5 sec
    for (byte CandleNo = 0; CandleNo < Day + 1; CandleNo++) { //loop through and light candles
      //Set top 2 pixesl to flames
      Candle[CandleNo][4] = 2; // 2 is the number for flames
      Candle[CandleNo][5] = 2;
      SetupCandles(Day);
      delay(3 * 1000); //wait 3 sec between lighting each candle***debug***
      //delay(2000);
    }
    Serial.println("Candles lit");
    //candles are now on and lit. flicker and burn them down slowly
    unsigned long LTime = millis();
    const unsigned long BurnTime = 120000;//120,000 milliseconds = 120 seconds***debug***
    //Serial.println(LTime);
    while (CandleState > -1) { //***Main Loop
      Flicker(Day);
      //every 2 minutes burn down a pixel
      unsigned long CTime = millis();
      if (CTime - LTime > BurnTime) {
        Serial.println("burning down");
        Serial.print("CandleState = ");
        Serial.println(CandleState);
        //reset Ltime
        LTime = CTime;
        FlickerDown(Day);
        Serial.println("Flicker Down");
      }
      delay(100);// short delay so the flickering looks ok
    }
    Serial.print("End of day ");
    Serial.println(Day);
    delay(30000);
  }
  Serial.println("End of Hannukah");
  delay(30000);
}


void SetCandleColor(byte Day) {

  byte PrevColor = 99;
  for (byte i = 0; i < Day + 1 ; i++) { //candle number
    //each candle with a random color
    byte ColorNo;
    do {//make sure two same color candles aren't next to each other
      ColorNo = random(8);
      //Serial.println(ColorNo);
    }
    while (ColorNo == PrevColor);
    PrevColor = ColorNo;
    Serial.print("Candle Color ");
    Serial.println(ColorNo);
    for (byte j = 0; j < 3; j++) { //r g b values
      CandleColor[i][j] = Palette[ColorNo][j];
    }
  }
}

void SetupCandles(byte Day) {
  //turns on pixels on LED strip based on Candle, CandleColor, and FlameColor arrays
  for (byte i = 0; i < Day + 1; i++) { //candle number
    for (byte j = 0; j < 6; j++) { //pixels
      //Serial.println(i * 6 + j);
      if (Candle[i][j] == 1) {
        //it's a candle pixel
        strip.setPixelColor(i * 6 + j, CandleColor[i][0], CandleColor[i][1], CandleColor[i][2], CandleColor[i][3]);
      }
      else if (Candle[i][j] == 2) {
        //it's a flame pixel
        byte FC;
        FC = random(4);
        strip.setPixelColor(i * 6 + j, FlameColors[FC][0] / 2, FlameColors[FC][1] / 2, FlameColors[FC][2] / 2);
      }
    }
  }
  strip.show();
}
void Flicker(byte Day) {
  //run through Candle[][] and find the flame and change the intensity and colors
  for (byte i = 0; i < Day + 1; i++) { //candle number
    for (byte j = 0; j < 6; j++) { //pixels
      if (Candle[i][j] == 2) {
        //it's a flame pixel
        byte FC;
        FC = random(4);
        byte Intensity;
        Intensity = random(250) + 1;
        byte r;
        byte g;
        byte b;
        r = FlameColors[FC][0] / Intensity;
        g = FlameColors[FC][1] / Intensity;
        b = FlameColors[FC][2] / Intensity;
        strip.setPixelColor(i * 6 + j, r, g, b);
      }
    }
  }
  strip.show();
}

void FlickerDown(byte Day)
{

  byte r;
  byte g;
  byte b;

  //delay 100 each loop. Run through 100 iterations. Each time turn it down a notch
  byte Intensity = 200;
  for (byte n = 1; n < 100; n++) {
    Intensity = n + 2;
    //Serial.print("Intensity = ");
    //Serial.println(Intensity);
    for (byte i = 0; i < Day + 1; i++) { //candle number
      // CandleState + 1 and CandleState + 2 are flame pixels
      byte FC;
      FC = random(4);
      r = FlameColors[FC][0] / Intensity;
      g = FlameColors[FC][1] / Intensity;
      b = FlameColors[FC][2] / Intensity;
      strip.setPixelColor(i * 6 + CandleState, r, g, b);
      strip.setPixelColor(i * 6 + CandleState + 1, r, g, b);
    }
    strip.show();
    delay(100);
  }
  //now move candles down a pixel. After decrementing CandleState, set CandleState+1 and +2 to Flame. CandleState+3 to off
  if (CandleState > 0) {
    CandleState--;
    for (byte i = 0; i < Day + 1; i++) { //candle number
      Candle[i][CandleState] = 2;
      Candle[i][CandleState + 1] = 2;
      Candle[i][CandleState + 2] = 0;
      strip.setPixelColor(i * 6 + CandleState, r, g, b);
      strip.setPixelColor(i * 6 + CandleState + 2, 0);
    }
  }
  else
  { //flicker out last pixel
    CandleState--;//should be -1 now
    for (byte i = 0; i < Day + 1; i++) { //candle number
      Candle[i][CandleState + 1] = 2;
      Candle[i][CandleState + 2] = 0;
      strip.setPixelColor(i * 6, r, g, b);
      strip.setPixelColor(i * 6 + 1, 0);
      strip.setPixelColor(i * 6  + 2, 0);
    }
    strip.show();
    //flicker last pixel for a while
    for (byte n = 1; n < 100; n++) {
      Intensity = n + 2;
      //Serial.print("Intensity = ");
      //Serial.println(Intensity);
      for (byte i = 0; i < Day + 1; i++) { //candle number
        byte FC;
        FC = random(4);
        r = FlameColors[FC][0] / Intensity;
        g = FlameColors[FC][1] / Intensity;
        b = FlameColors[FC][2] / Intensity;
        strip.setPixelColor(i * 6, r, g, b);
      }
      strip.show();
      delay(100);
    }
    for (byte i = 0; i < Day + 1; i++) { //candle number
      strip.setPixelColor(i * 6, 0);//turn last pixel off completely
    }
    strip.show();
  }
}
void PlaySong() {
  int melody[] = {
    NOTE_F3, NOTE_C3, NOTE_F3, NOTE_AS3, NOTE_A3, NOTE_G3, NOTE_F3,
    NOTE_C4, NOTE_D4, NOTE_G3, NOTE_A3, NOTE_AS3, NOTE_A3, NOTE_G3, NOTE_F3
  };
  // note durations: 4 = quarter note, 8 = eighth note, etc.:
  byte noteDurations[] = {
    4, 4, 4, 4, 4, 4, 2,
    4, 4, 4, 8, 8, 4, 4, 2
  };
  //play twice
  for (int n = 0; n < 2 ; n++) {
    // iterate over the notes of the melody:
    for (int thisNote = 0; thisNote < 16; thisNote++) {

      // to calculate the note duration, take one second
      // divided by the note type.
      //e.g. quarter note = 1000 / 4, eighth note = 1000/8, etc.
      int noteDuration = 1000 / noteDurations[thisNote];
      tone(8, melody[thisNote], noteDuration);

      // to distinguish the notes, set a minimum time between them.
      // the note's duration + 30% seems to work well:
      int pauseBetweenNotes = noteDuration * 1.30;
      delay(pauseBetweenNotes);
      // stop the tone playing:
      noTone(8);
    }
  }
}
Pitches.h - Cut down to the frequencies used
/*************************************************
 * Public Constants
 *************************************************/

#define NOTE_C3  131
#define NOTE_CS3 139
#define NOTE_D3  147
#define NOTE_DS3 156
#define NOTE_E3  165
#define NOTE_F3  175
#define NOTE_FS3 185
#define NOTE_G3  196
#define NOTE_GS3 208
#define NOTE_A3  220
#define NOTE_AS3 233
#define NOTE_B3  247
#define NOTE_C4  262
#define NOTE_CS4 277
#define NOTE_D4  294
Program the nano and bench test to make sure it’s all working before cutting up the LED strip.
Step 4 - Cut Pixel Strip and wire up segments
I made a CAD drawing for myself to figure out where the wires and the conductive thread will go.
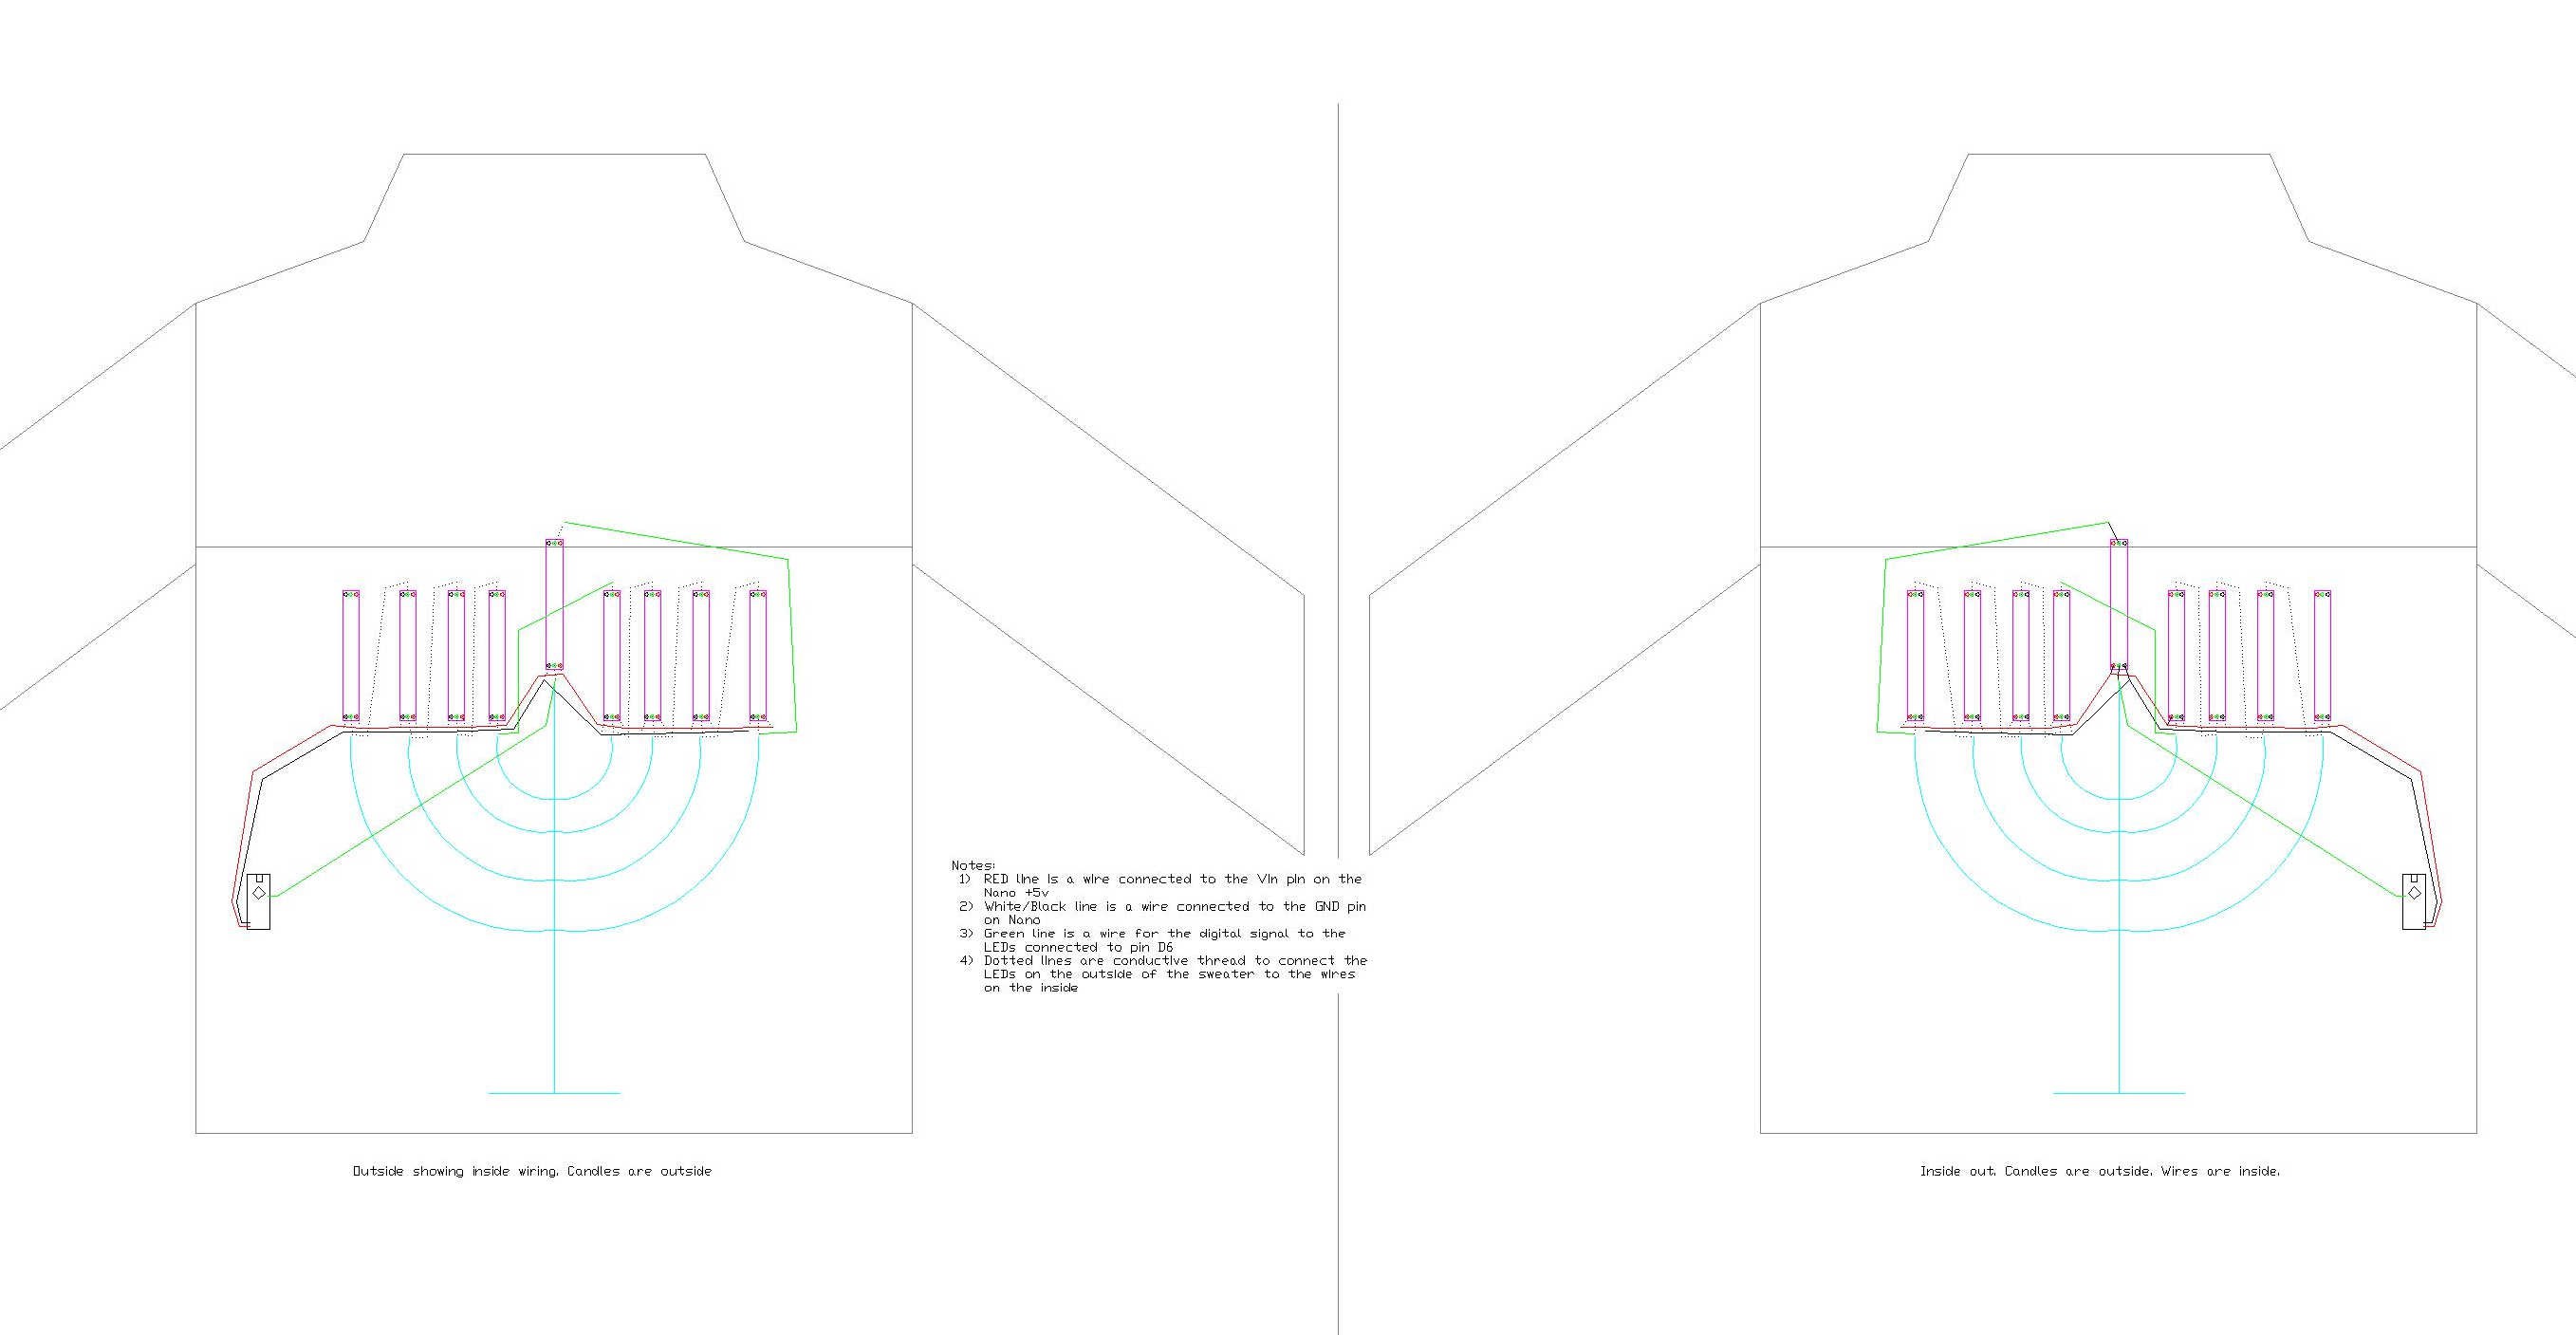
This drawing is no longer exactly what I built. I ended up using wire instead of the conductive thread. If you replace the thread with wire, it is correct though.
It's essentially power and ground rails for each of the LED segments and a wire signal wire connecting the LED strips in order.
After I had it all connected, I tested it.
The center candle - e.g. Shamash, worked perfectly. However, the first candle did not light up. I checked the power and ground wires and they were connected. I checked the signal wire and it was fine. To be 100% sure it was connected properly, I removed the LED clamp connectors and soldered it. No help. I removed the LED connector for the signal wire from the top of the Shamash and soldered that. No help. A couple of times I saw the first candle light up, so I suspect a short somewhere. At this point I'm stumped. <to be continued...>