 Christoph
I want to mount my Rigol DS1054Z scope to the rack. That alone won't be too hard, but there are two complications:
- taking screenshots from the scope is necessary for many projects every now and then. I hate using a USB drive for that.
- The scope has a LAN connector, but then the whole thing would either need to be plugged into different sockets every time I move it, or I'd have to connect it to my laptop. I hate my laptop's LAN connector.
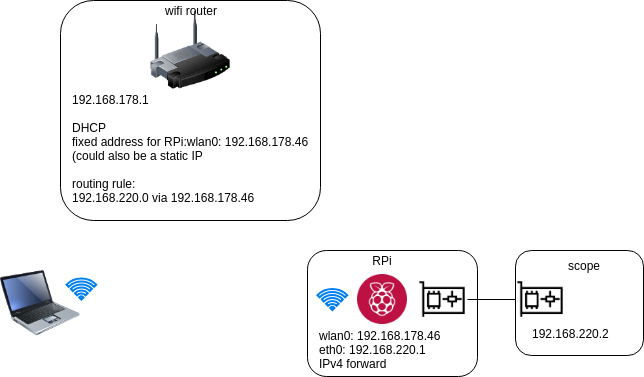
So I decided to add a Raspberry Pi (3B+) to the scope, to give it a wifi interface. That, however, wasn't the easiest thing for me because my networking experience ends at "install pre-configured router, get cat pictures". The devices involved are:
- wifi router with DHCP
- laptop in wifi
- RPi in wifi, plus wired LAN interface)
- scope with wired LAN interface
Primary goal: get screenshots from the scope to my laptop over wifi.
After some discussion about the right approach in the hack chat and on stack exchange (https://unix.stackexchange.com/questions/489232/connect-lan-device-to-wlan-using-a-raspberry-pi), I've finally found a working solution (thanks to @Ted Yapo ).
Network setup
Preparation of the RPi
- a fresh install of raspbian stretch lite 2018-11-13
- In the SD card's boot partition:
- place a file called ssh to enable ssh
- place a wpa_supplicant.conf, it will be copied to /etc/wpa_supplicant during configuration
- edit /etc/dhcpcd.conf to have a static IP for eth0, in a subnet different from the wifi router's. My dhcpcd.conf for eth0:
interface eth0
static ip_address=192.168.220.1/24
static routers=192.168.178.1
- enable IPv4 forwarding:
- uncomment the following line in /etc/sysctl.conf
#net.ipv4.ip_forward=1
- apply change:
sudo sh -c "echo 1 > /proc/sys/net/ipv4/ip_forward"
- uncomment the following line in /etc/sysctl.conf
- reboot
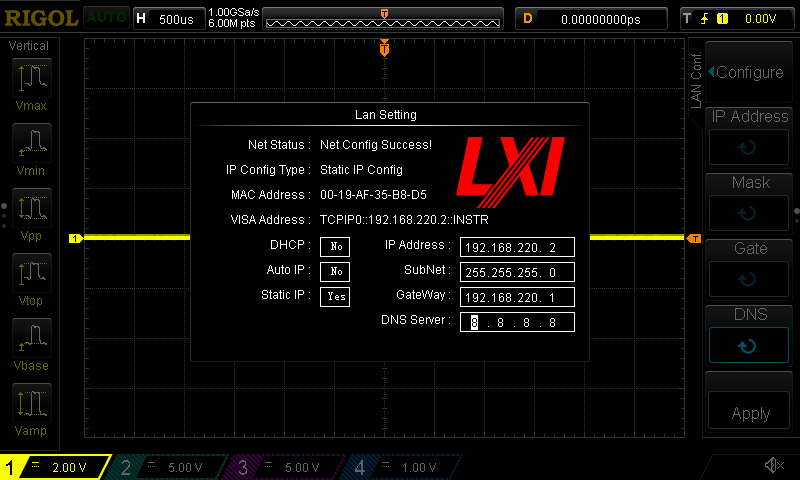
Preparation of the scope
Configure static IP in the new subnet:
Preparation of the router
Add a routing rule to the new subnet via the RPi's wifi interface
Preparation of the laptop:
Nothing network specific, I just installed the ds1054z python package. See https://hackaday.io/project/7691-ds1054z-python-package and https://pypi.org/project/ds1054z/.
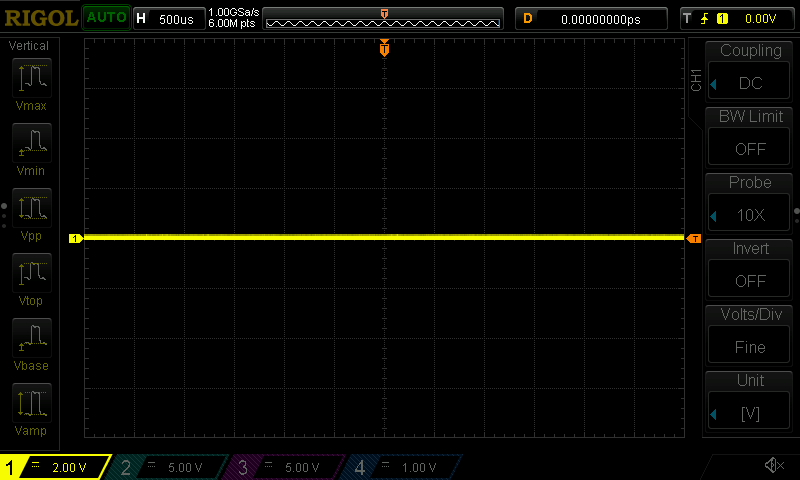
Taking a screenshot
Now iIt's easy: open a terminal on the laptop and execute
ds1054z save-screen --overlay 0.6 192.168.220.2
In my network this takes about 4 seconds. The result is placed in the current working directory and would look like this:
The screenshot with my scope's IP configuration was taken with the same method, so you get menus as well - whatever you see on the real screen.
Why an RPi?
- I had one and didn't have to buy any other hardware for this
- The RPi has SPI, I2C and other interfaces on the expansion header, which might be a good addition to the scope's surroundings during prototyping. It's also quite convenient to use since I can ssh to it with my laptop, which can now also talk to the scope. This opens quite a number of possibilities.
So one more device to add to the rack.
Discussions
Become a Hackaday.io Member
Create an account to leave a comment. Already have an account? Log In.