ziggurat29
-
Improvements - 20190131a
02/07/2019 at 20:24 • 0 commentsSummary
I finally broke down and deployed an init.lua. This autoexec's the software at boot time. I added an emergency bypass mechanism.
Deets
Up until now I have been hesitant to deploy init.lua. This is the 'autoexec' module that causes the program to be loaded on boot. The reason for holding back is fear of 'bricking' the NodeMCU board with broken, but autoexeced, code. It wouldn't really have been bricked, but it would be less-than-convenient to recover.
But the project is pretty stable now, and I thought about adding a simple fail-safe: Have init.lua check if the 'user' button is pressed. If it is pressed, skip running the program and fall back to the Lua shell.
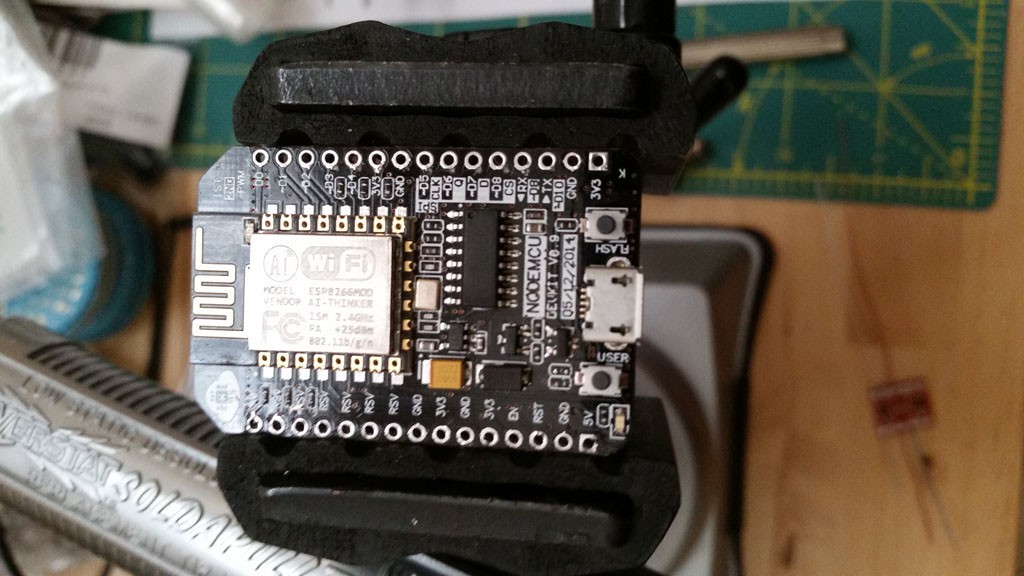
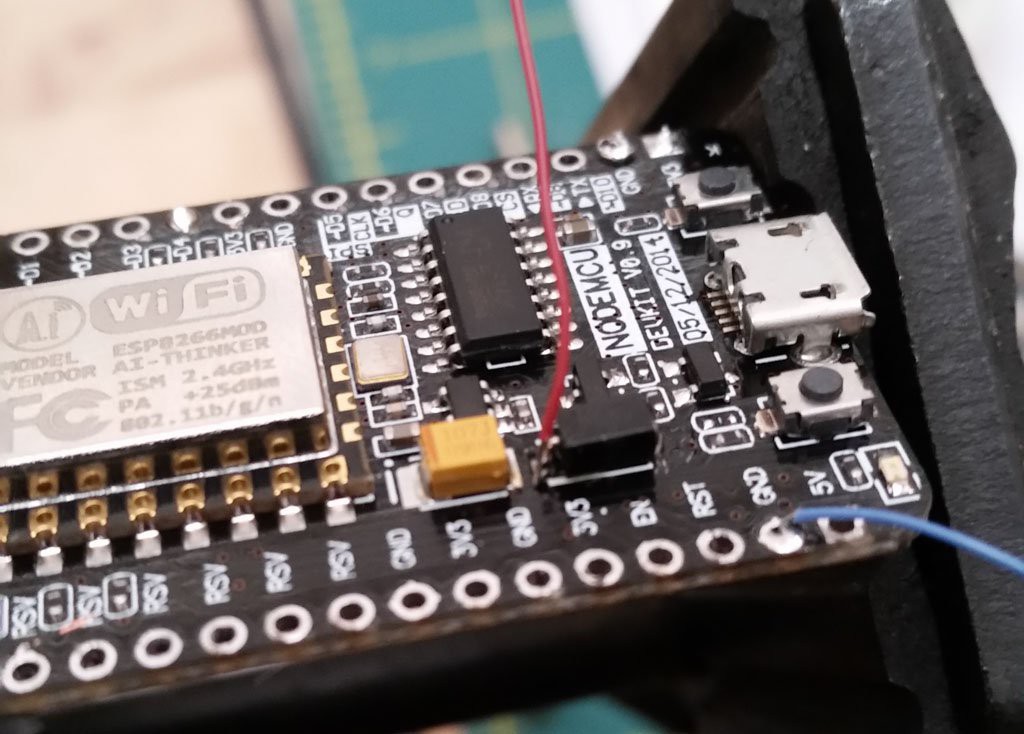
Easy-peasy, or so it seemed. It turns out that the 'user' button is special in a way. Even just looking at it on the schematic, you can see it is kind of funky:
![]()
The GPIO 16 (board numbered as 0) can be used as an input to read the button, or an output to light the lamp. And apparently that's not the end of the story, because it is also used for some other ESP8266 function ('wakeup'?).
When operated in the straightforward mode of setting the pin as an input (with pullup) and reading it, the button did read as high when not pressed, and low when pressed, but then stayed reading as low even when it was released. Maybe that's some interaction with the other ESP8266 function.
Anyway, I worked around that oddity by being super explicit around where I sample the button to restore it to it's prior state. The result is this init.lua:
-- if we hold down the user button during boot, we will skip running our program
gpio.mode(0,gpio.INPUT,gpio.PULLUP) -- you have to go through this sequence
local nUser = gpio.read(0)
-- print ( "nUser = "..nUser )
gpio.write(0,gpio.HIGH)
gpio.mode(0,gpio.OUTPUT) -- the GPIO 16 (index 0) requires special treatment

if ( gpio.LOW == nUser ) then
    print ( "Skipping running because user button down" )
else
    -- call invoke the _init on the LFS; this will wire in the LFS in useful ways
    if ( not pcall(node.flashindex("_init")) ) then
        -- no LFS
        print ( "Horror; no LFS _init" )
    else
        --local ok, msg =
        pcall ( function() return dofile("kosbo.lua") end )
    end
end
So, I flashed that and verified it was working. So now, when I plug in the clock, it will automatically run the program and set the time from the Internet.
Strictly, I can consider the project 'done' now. It boots up, connects to WiFi, synchronizes time via SNTP, resets the clock immediately, and then periodically thereafter at 2 AM daily.
Now it's time for fun oddities. I am thinking about some web service protocol so that a web app can control it in some way.
Next
Some sort of server.
-
Improvements - 20190130a
02/03/2019 at 19:43 • 0 commentsSummary
Improve the 'call sequencer' such that we can schedule calls even if a call sequence is currently in-progress.
Deets
The call sequencer that was produced for the benefit of controlling the Nixie clock has a deficiency: you mustn't schedule a call sequence when a call sequence is already in-progress. This would result in interleaved calls, and also consumes more timer resources.
This currently isn't a problem since the call sequencer is only used for updating the Nixie clock once per day, so there is no likelihood of two sequences coming in at once, however I do want the mechanism to be well-behaved later, when I add a server component to issue arbitrary sequences at arbitrary times.
Presently, the sequencer takes a sequence (a Lua table) and keeps an index into where we are in the sequence, and a periodic timer is used to issue the call and increment the index. When we have finished, we destroy the timer. Through the magic of closures, the timer servicing function captures the index and the call sequence, so nothing needs to be done special there to keep them alive or destroy them when done.
In this new design, we will instead have a separate sequence object, and we will append to it sequences that are requested. If there is not existing sequence object being serviced, we will create a new one and kick start the process. Otherwise, the process is pretty much the same.
function run_sequence ( sequence, period_ms )
    if ( not sequence or 0 == #sequence ) then return end --silly cases

    -- if we have a run sequence in process, merely append these items to it
    if ( _tblRunSequence ) then
        table_append ( _tblRunSequence, sequence )
        return
    end

    -- otherwise, kick off the sequence

    -- do the first one immediately
    local nIdx = 1
    sequence[nIdx]()
    nIdx = nIdx + 1
    -- if that was it, beat it
    if ( nIdx > #sequence ) then return end

    --remaining ones are to be paced out
    _tblRunSequence = table_clone(sequence) -- we make this global
    local pacingTimer = tmr.create()
    pacingTimer:alarm(period_ms, tmr.ALARM_AUTO, function(timer)
        if ( nIdx <= #_tblRunSequence ) then
            _tblRunSequence[nIdx]()
            nIdx = nIdx + 1
        end
        if ( nIdx > #_tblRunSequence ) then
            -- we are completed
            timer:stop()
            timer:unregister()
            _tblRunSequence = nil
        end
    end)
end
In this implementation, we create a global object _runsequence which will contain the stuff being serviced. This object is global, because we need to access it later in subsequent call invocations, and captures won't help us here. If it exists, we append do it and we're done. If it doesn't exist, then we clone our given sequence into it, and kick off the timer. And if the timer finds that it has run out of things to do, it destroys itself, and the global sequence object. So, if there is nothing going on, all memory should be released for garbage collection.
One quirk of Lua is that it intends to be a minimalist runtime system, and you are expected to add code to do things as needed, rather than having an especially rich standard runtime environment. In this case, notably lacking are the ability to make a copy of a Lua table -- assignments are by reference -- and the ability to append a table onto another table. So we have to write that code.
This method creates a table that is a deep-ish copy of a source table:
function table_clone(orig)
    local orig_type = type(orig)
    local copy
    if orig_type == 'table' then
        copy = {}
        for orig_key, orig_value in next, orig, nil do
            copy[table_clone(orig_key)] = table_clone(orig_value)
        end
        setmetatable(copy, table_clone(getmetatable(orig)))
    else -- number, string, boolean, etc
        copy = orig
    end
    return copy
end
And this method appends the values of one table's 'array' section onto another table:
function table_append ( t, o )
    for _, v in ipairs ( o ) do
        table.insert ( t, v )
    end
end
Testing
If you past the following into the Lua shell command prompt:
= _tblRunSequence
run_sequence (
{
function () print ( "Hey!" ) end,
function () print ( "Ho!" ) end,
}
, 5000 )
run_sequence (
{
function () print ( "Hi!" ) end,
function () print ( "Yo!" ) end,
}
, 5000 )
= _tblRunSequence
Then you will get the following output:
> = _tblRunSequence
nil
> run_sequence (
>> {
>> function () print ( "Hey!" ) end,
>> function () print ( "Ho!" ) end,
>> }
>> , 5000 )
Hey!
> run_sequence (
>> {
>> function () print ( "Hi!" ) end,
>> function () print ( "Yo!" ) end,
>> }
>> , 5000 )
> = _tblRunSequence
table: 0x3fff0c90
> Ho!
Hi!
Yo!
= _tblRunSequence
nil
>
This shows that at the start, there was no global _tblRunSequence. We registered a call sequence that simply prints some distinctive text. The first function was executed immediately because there was no sequence in-progress. Then we see that the global _tblRunSequence has been created. The sequence pacing is 5 sec, so we will have some time before it has completed. Then we register a new call sequence. We can sit back an observe that the calls have been made in the expected pacing. When the sequence is complete, we can issue a final '= _tblRunSequence' and see that the global sequencing variable has been deleted.
Tada! Since it's working, it's time to move this stuff to LFS. I did a pass with dummy_strings.lua empty so I could regenerate that list, then I set the list to the current values, and restarted. I did a =node.heap() before running init.lua, and one after, and I got 43704 - 39128 = 4576. So, with the stuff in LFS, the program is nominally using less than 5 K RAM.
Now I should be set up to be able to safely implement some sort of 'server' to issue Nixie calls over the Internet.
Next
Some sort of server?
-
Improvements - 20190129a
02/02/2019 at 03:50 • 0 commentsSummary
Armed with the power of LFS, I begin to make improvements. In this round, I improve resetting the clock to happen once a day, instead of every 17 minutes.
Deets
The NodeMCU will keep it's local rtc in sync by periodically performing an SNTP transaction. When this succeeds (or fails), our code is notified. As it was, we used the 'success' notification to update the date/time on the Nixie clock.
This works, however the updating process causes the display to go through a little flashy sequence because that's how it works. Also, the SNTP module auto-syncs every 1000 sec (16 2/3 min), and this is not changeable by the caller. So, the clock presently will go through the flashy sequence every 16 2/3 min. Lastly, the SNTP sync will almost certainly not happen right at the stroke of 2 AM, when changing from daylight to standard time. I wanted to improve this.
The first thing was to /not/ always set the Nixie upon SNTP sync. But I definitely wanted to do that the first time, because that happens right after power up, and the Nixie is surely wrong then. This was easily done by creating a global variable that is initially 'true', and then immediately setting it to 'false'. Even better, we can leverage the fact that in Lua the absence of a value is logically the same as 'false', so we simply delete the variable, allowing it's RAM to be reclaimed once it has served it's purpose.
local bFirstSNTPrun = true -- so we can tell if we need to kickstart it

local function sntp_syncsuccess ( seconds, microseconds, server, info )

    local sec, usec, rate = rtctime.get()
    local utcTM = rtctime.epoch2cal(sec)
    local localTM = localtime ( utcTM, TZ )
    print ( "sntp succeeded; current local time is:  " ..
            string.format("%04d-%02d-%02d %02d:%02d:%02d",
            localTM.year, localTM.mon, localTM.day,
            localTM.hour, localTM.min, localTM.sec) )

    -- always update the clock on the first SNTP update, because the clock
    -- will be reset on power up and needs this asap.
    if ( bFirstSNTPrun ) then
        periodicClockUpdate(true)
        bFirstSNTPrun = nil -- delete it
    end
end
So, the first time sntp_syncsuccess() is invoked, bFirstSNTPrun will be 'true'. We then update the Nixie clock, and then delete that variable. The next time sntp_syncsuccess() happens, the variable doesn't exist, which is logically 'false' and the update doesn't happen. The method periodicClockUpdate() will update the clock and also manage the timer that will cause subsequent updates to happen on a schedule -- namely 'happen at 2 am'.
The periodicClockUpdate() takes a boolean indicating 'do update the Nixie' or 'don't update the Nixie', and I'll explain that forthwith, but for now obviously it should be 'true' in the one-time invocation coming from sntp_syncsuccess().
The implementation of periodicClockUpdate() will conditionally update the Nixie from the system RTC (and adjusted to local time), and then use a timer to schedule a one-shot event to cause a new invocation of itself at a later time. The 'later time' is a relative time, so it is necessary to compute it as: 'the number of milliseconds to the next 2 AM from now'. This has the added wrinkle that the next 2 AM from now could be sometime later today, or it might be tomorrow.
Lastly, it was discovered that the timer mechanism in NodeMCU has a maximum period of 6870947 milliseconds. I don't know where this value comes from, but it is documented as such. It's hex is 68D7A3, so it isn't a round binary value. Who knows? It's just what we have to deal with. This is way too small for us, because it means a maximum delay of 1:54:30.947. Typically we will want to delay 24 hours. This is where the boolean parameter 'do update the Nixie' comes in. If we compute the desired delay is greater than the maximum, then we saturate the delay to the maximum, and schedule a future invocation with 'do not update the Nixie'. Otherwise if the delay is less than the maximum, we schedule a future invocation with 'do update the Nixie'. Here in its glory:
local function periodicClockUpdate( bUpdate )

    if ( bUpdate ) then
        -- update the clock now
        clock_set_now()
    end

    -- determine time until another sync at the next 2 AM; either today or tomorrow
    local ueNow = rtctime.get()
    local utcTM = rtctime.epoch2cal(ueNow)
    local localTM = localtime ( utcTM, TZ )
    local nSecIntoToday = ( ( localTM.hour * 60 ) + localTM.min ) * 60 + localTM.sec
    local nSecToUpdate = 0
    if ( localTM.hour < 2 ) then
        -- will be later today at 2 am - nSecIntoToday
        nSecToNextUpdate = 7200 - nSecIntoToday
    else
        -- will be tomorrow at (24*60*60 - nSecIntoToday) + 2*60*60
        nSecToNextUpdate = 93600 - nSecIntoToday
    end
    nSecToNextUpdate = nSecToNextUpdate + 2 -- HHH 2 sec past 2 am

    if ( bUpdate ) then
        print ( "now:  "..ueNow..",  next update:  "..nSecToNextUpdate)
    else
        print ( "(interim update check)  now:  " )
    end

    -- OK, the timer has a maximum delay period 6870947 (1:54:30.947), so we
    -- probably won't be able to reach it with one timeout.  If not, we will
    -- have to schedule an alarm earlier, and have that skip the update until
    -- the next try (which also may be too short).
    bUpdateNext = ( nSecToNextUpdate < 6870 )
    if ( not bUpdateNext ) then
        nSecToNextUpdate = 6870
    end

    -- now set up a single-shot timer to call ourselves later
    local updateTimer = tmr.create()
    updateTimer:alarm(nSecToNextUpdate*1000, tmr.ALARM_SINGLE,
            function () periodicClockUpdate(bUpdateNext) end )

end
Once again, we're using a closure to bind the future invocation with its parameter's value to create a function which takes no parameters that will do the desired thing at a later time.
Even if the delay was long enough to reach over 24 hours we'd still want to use a one-shot timer such that we re-compute the delay to the next event instead of using a periodically recurring timer. That way we will keep on schedule rather than compound timing errors over time, causing our update events to likely creep forward day by day. By keeping them on schedule for 2 AM, the daily update will likely happen when folks are asleep, and also concur with the daylight/standard time switch. As a fudge factor I added 2 seconds delay /after/ 2 AM to avoid the risk of isdst() ambiguously computing is/isn't on the day of the change. I'm not sure I actually need to do that, but this makes me feel better, somehow.
I let it run overnight with some debugging print statements, and verified that it was working as expected.
Next
Improve the call sequencer so that we can make additional calls, even if there is a call sequence currently in-progress.
-
♫Mem-ry... Not Enough Is Quite the Bind♫
01/31/2019 at 15:42 • 0 commentsSummary
I set out to do some improvements, but I ran out of RAM. So I had to make an unexpected improvement in the way of the Lua Flash Store ('LFS') on NodeMCU.
Deets
There were several improvements I set out to do, but with each improvement usually comes code, and with code comes RAM. It turns out I was on the hairy edge of being out-of-RAM as it was, and as soon as I started adding any code, my unit no longer worked due to out-of-memory errors.
When Lua code is deployed to the NodeMCU board, it is usually deployed as source. It is stored in a filesystem (SPIFFS), and when loaded, it is compiled on-the-fly to bytecode for the virtual machine. This is the usual arrangement for Lua programs. Since compiling takes negligible time (and also due to the non-portability of bytecode across different Lua versions !) few folks compile in the conventional desktop arena.
But in the embedded arena, the compiler -- fast though it may be -- does take non-negligible memory resources to execute. In my case, the program had gotten just big enough that the compiler would run out of memory before finishing.
The next line-of-defense in this situation would be to break up the program into multiple files, and compile them on-device into pre-compiled images (usually with the '.lc' filename extension, but that is not required). Making multiple shorter files reduces the memory footprint the compiler needs to process a single translation unit. In a way, this strategy is a human-guided version of a divide-and-conquer tactic.
This will carry you a long way, but it does mean doing some surgery to your code, and ultimately it will only carry you so far. And it still uses RAM to load the pre-compiled bits off the filesystem into working memory.
There is also another feature of the NodeMCU environment that can be used: the 'Lua Flash Store' ('LFS'). This is sort-of like a filesystem, but not quite, and it holds pre-compiled Lua objects. These pre-compiled objects have at least two benefits: 1) they are execute-in-place. 2) they can contain read-only strings and read-only tables.
The execute-in-place feature means that you don't have to load the pre-compiled bytecode into RAM to execute it, you can run it directly from where is sits: in flash. Also, putting read-only objects like strings in flash is a big help too. Lua uses looots of strings, and in non-obvious places. Your function names are a string. When you call a function, that is a string lookup. Your member names of structures are strings and involve string lookups. The Lua runtime goes to great pains to 'intern' these strings, and avoid duplications, but when you've only got 40K of RAM, that stuff still adds up.
Using the LFS involves more work than fragmenting the code and precompiling chunks, so naturally I chose the more difficult route. The first exciting difficulty is creating the needed tools!
Cross-Compiler
The standard Lua has always included 'luac', which is a tool that just runs the compiler on your Lua source, and dumps out the byte-code to a file, rather than running it. However, the NodeMCU project uses a modified Lua runtime that allows for objects in read-only memory, and this requires a special build of the 'luac' (called 'luac.cross') that is cognizant of these things. Additionally, luac.cross packages the result into a form that the runtime can directly 'mount' into the execution environment. This form is the 'LFS image'.
For some reason, NodeMCU does not publish built binaries, so if you want to play with LFS you will need to be building from the source. Also, NodeMCU is very much a Linux/gcc-oriented project, so I was left more-or-less out-in-the-cold on my Windows platform. [Edit: I later found out that I was not so out-in-the-cold, but I didn't know that until after I had done the things I will now describe.] So, for my first amazing feat, I would need to see how much hacking on the source I would need to do to get the luac.cross to build for Windows.
I have some experience with Lua in general from desktop projects, so I knew that building Luac /in principle/ conceptually should not be too bad. As a compiler, the dependencies on esoteric stuff like board hardware should be negligible, and as a desktop application, dependencies on the runtime should be easy to satisfy. However as a Linux/gcc application, porting the project to Visual Studio could be a challenge.
The first thing to do was to gather all the relevant source. The NodeMCU is a makefile based system, but fortunately the luac.cross project does not depend on heirarchical makefiles, so it was fairly easy to gather the required files. They were all in 'app/lua' 'app/include', and 'app/uzlib'. The uzlib is used in compressing the final LFS flash image.
I set up a MSVC project with all the relevant source, and started building and fixing reported errors. There were a couple overt bugs that were clearly masked on Linux builds which were easy to fix. The main challenge wound up being translation of compiler-specific directives, such as gcc '__attribute__' into functional equivalents for MSVC '#pragma' and 'declspec'. Some were for data alignment specifications, and others were for controlling the placement of certain objects when linking. Alignment was straightforward, but controlling placement of objects in named sections is a little more tricky. The section placement is important because other code tests for whether an object is read-only based upon its section placement. This affects the compiler output. Fortunately for me, I have a lot of experience with MSVC, so I was able to create the required declspecs without having to study the manual.
A Fool's Errand
Naturally, after having got the project building and feeling somewhat proud of myself for having done so, further study of the process of using LFS revealed that someone made a web service that will do the cross compile for you, so you don't really need the tool at all!
https://blog.ellisons.org.uk/article/nodemcu/a-lua-cross-compile-web-service/
You can just zip up your source, submit it to the web service, and get back the compiled image.
Also, it further appears that the NodeMCU team got a Cygwin build working, so you actually can build a native Windows app that way. Oh, well. One good thing did come of my exercise, however: I found a rather nasty bug. I submitted it to the team as bug #2632 -- we'll see if/when they fix it.
A Bug
The nature of the bug is a use-of-memory-after-having-been-freed bug. I noticed that sometimes my running of the compiler would generate no output. Moreover, when it generates no output, it seems to take a little longer than usual. It's veritably instantaneous in the positive case, but takes a couple seconds in the negative case. And it wasn't deterministic. It was a moody problem. But, since I had the project building in MSVC, it was really easy for me to run it in the debugger.
Turns out the application was crashing, but since I was running a 'release' build, the crash simply terminated the program rather than doing something more 'interesting'. When running the debug build, it was very clear that a chunk of memory that was freed, was continued to be accessed afterwards. So on a good day that memory would not have been re-used for something else yet, and the desired data would still be there for use. On a bad day that data would be corrupt, and who knows what would happen.
In MSVC, if you build a 'debug' build, the memory allocator will fill blocks with a pattern to make it easier to see what state it is in. Freshly malloc'ed data will be filled with 0xCD (presumably 'clear data'), and free'ed data blocks will be filled with 0xDD (presumably 'dead data'). Arena headers have some guard bytes 0xFD (presumably 'forbidden data'). The block filling of 0xDD turned the non-deterministic behaviour into deterministic behaviour.
The code at the crash site was not so obvious as to what was freeing the data, but rummaging through the source at all the malloc/free, and surrounding code revealed a case of 'pointer aliasing', and that when the actual block was freed (through a different pointer), then this other pointer is left dangling.
The solution was simple: just move the free to a few lines later, after the final access to the memory block was finished.
Making LFS
Once I could make images for LFS, it was time to kick the tires. There is a little bit of hand motion involved: you copy the LFS to the SPIFFS, and then tell the board to flash the file into it's special spot. Once it does this, it will reset the board, and henceforth the code and objects in the LFS will be automatically 'mounted' for use. But first you need to have a special spot to put them in.
The fundamental way of doing this is to build the firmware with some configured options. Fortunately, the web-based firmware builder has since been augmented with some options for including a LFS region, so you just need to specify that appropriately when you create your firmware. In my case, I specified a 128 K LFS regions (apparently much more space than I really need, but this is a 4 M flash part, so what else am I going to do with the space?). Apparently it is also considered wise to specify a 1 M offset to the SPIFFS region. This allows you to create new firmwares with reduced likelihood that the new image will damage an existing SPFFS on your device. If you don't specify the offset, then the SPIFFS will immediately follow the flash image, and thus move around build-to-build.
Once I built the firmware with the LFS support, I flashed it. Nothing terribly exciting here except for an additional boot message indicating no LFS was found.
Next, I needed to make a LFS image of my code. As per recommendation, I added a couple stock files '_init.lua' and 'dummy_strings.lua', and I added a third party module 'inspect.lua' and the start of my own code 'kosbo_lfs.lua'. I compiled them into a LFS image with this incantation:
luac-cross.exe -f -m 0x20000 -o lfs.img *.lua
The '-f' option tells the compiler to create the flash image (instead of just a Lua binary chunk), and the -m 0x20000 option tells it to sanity check that it will not overflow my 128 K area. It will be a long time before I'm in danger of that, but I wanted to put all that in a batch file for general use. The '-o' option specifies the output filename, and the rest are the various Lua source to process. The 'stock' source modules of '_init.lua' and 'dummy_strings.lua' need a little explanation.
'_init.lua' and 'dummy_strings.lua'
'_init.lua' is notionally similar to the actual 'init.lua' on the SPIFFS filesystem, but there is no magic in the name. You have to explicitly call it yourself; presumably from an 'init.lua'. What it does is make the LFS easier to use. It creates an LFS table that can reference the stuff in the LFS without having to go through the explicit node.flashindex() API call. Lua supports a notion called 'metatables' which allow you to override operations such as indexing, and this code uses that to create a table 'LFS' (which takes some RAM) and override the index operation (which does /not/ take RAM) to find things in the flash store.
This is handy, but the big benefit (in my opinion) is the manipulation of the 'searchers' and replacement of 'loadfile' and 'dofile' to first check in SPIFFS, and then check in LFS. This means you can transparently use objects in the LFS and not really have to care about the special node.flashindex() mechanism. Additionally, your SPIFFS hosted source overrides the LFS source, so it is handy for development. Develop more rapidly in SPIFFS, and then incrementally move debugged source to LFS.
'dummy_strings.lua' is kind of cool in that the module does nothing (I guess hence 'dummy'). but it declares a boatload of strings. In normal Lua, this would simply allocate a lot of strings, then they would be immediate candidates for garbage collection -- not really exciting. However, since these strings are in the LFS, they are read-only strings that are /never/ garbage collected. And because Lua 'interns' strings, then any time your source specifies a string that matches, it will actually just create a reference to these ROM-based strings, rather that allocate RAM to store them. Their mere presence in this file is sufficient to make this happen, so it's a kind of free magic.
You do have to figure out what strings to put there, but there is a handy code snippet in the comments that, when run, will dump all the strings that are currently stored in RAM, and handily formatted such that you can cut/paste the output into this file. Handy!
Burning LFS
OK, getting back to the LFS image. To use it you simply copy it onto SPIFFS, and then utter these magic words:
node.flashreload('lfs.img')(obviously specifying whatever filename in your case). This will cause the image to be validated, burned to LFS, and then the system reboots, and the message about 'no LFS found' will /not/ be emitted, because it was found! Once burned to the LFS region, the image file serves no further purpose, so you can delete it if you want, but I usually just leave it there because there is so much space on the SPIFFS as it is.
This flash operation is a manual one, and you only need to do it once for a new image.
Using LFS
Once your stuff is in LFS, you can access it directly via the node.flashindex() mechanism, but it is much nicer to use the features of '_init.lua', so typically your first action on bootup is to do:
pcall(node.flashindex("_init"))Which will wire in all that stuff we talked about before. Then you just make function calls as per usual. As such, my development process is to develop in the RAM intensive 'kosbo.lua' as before, but as functions become mature, I move them over to 'kosbo_lfs.lua' and burn them into LFS. Currently, this was all the timezone code and the clock control code. My kosbo.lua contains newly developed code.
I also kept my config file in SPIFFS, because I want that to be read/write, and it doesn't take RAM since it's contents are discarded after having been processed, and it's processed to completion right after boot, before more significant code is run.
Now that detour is completed, it's time to get back to the code improvements.
Next
Getting back to various improvements.
-
Let's Do the Time Zone Again (it's just a [5 hour] jump to the left)
01/29/2019 at 21:52 • 0 commentsSummary
I added timezone support, so the clock can display the local time.
Deets
NodeMCU doesn't have any timezone support -- what is there is all UTC. So I'll have to write that myself. Plus, I will have to deal with summer time/standard time issues.
Configuration
For starters, I need to specify in the configuration what timezone we are operating in. Rather than making somthing up, I decided to use a semi-standard form of stating this information that is one of the POSIX forms for the TZ file. Details can be found here:
http://www.gnu.org/software/libc/manual/html_node/TZ-Variable.html
This will provide the names of the timezone (unneeded), the offsets from UTC, and the rules for when to switch back and forth. I am using what is called 'format 2' in that document. Actually, I am simplifying a little bit by not supporting some of the optional bits.
To begin with, I add another section in kosbo.cfg file; e.g.:
-- the timezone
timezone
{
    TZ = "EST+5EDT,M3.2.0,M11.1.0"
}
This will necessitate another config handler function timezone():
-- config function; set the timezone
function timezone ( tuple )
    print('in timezone...')
    if ( tuple.TZ ) then
        TZ = parseTimezone ( tuple.TZ )
    end
end
The timezone is just a string, and that needs to be parsed into useful parts. This is not too hard in Lua, because we have something akin to regular expressions (called 'patterns'), with capture groups. As can be seen, I broke that out into a utility function parseTimezone() which returns a struct of the parsed elements:
function parseTimezone ( tz )
    if ( not tz ) then return nil end

    --XXX add optional start end hour? 0-24
    local pattern = "^(%a%a%a)([%+%-]?%d+)(%a%a%a),M(%d+)%.(%d+)%.(%d+),M(%d+)%.(%d+)%.(%d+)$"
    local f, l, c1, c2, c3, c4, c5, c6, c7, c8, c9 = tz:find ( pattern )

    if ( f ) then
        --XXX sanity checking
        return {
            stdName = c1,
            stdOffset = tonumber(c2),
            dayName = c3,
            startM = tonumber(c4),
            startW = tonumber(c5),
            startD = tonumber(c6),
            startH = 2,
            endM = tonumber(c7),
            endW = tonumber(c8),
            endD = tonumber(c9),
            endH = 2,
        }
    else
        return nil
    end
end
Lua patterns do not allow for optional capture groups, so this is why I chose to omit some of the optional parts. Those can be accommodated, but it will require more code, so it didn't seem worth it at the moment. The missing optional components allow the summer time offset be something other that one hour ahead of standard time, and also changing the hour when the summer time/standard time switch is made, which is by default 2 am.
The timezone information is simply stored in a global 'TZ'.
Adding and Subtracting Time
Adjusting for the offset is less straightforward than you might like, because you have to consider potentially changing the date, month, and year. Additionally, you have to consider leap years.
First, we'll need a function to to determine the number of days in a month, which will be needed if we have to increment our time to the next day (and thus might have to increment the month, and possibly year), or decrement our time to the previous day (and thus might have to decrement the month, and possibly year).
-- days in the month for a given year
function daysinmonth ( month, year )
    if ( 2 == month ) then
        if ( 0 == year % 100 ) then
            if ( 0 == year % 400 ) then
                return 29
            else
                return 28
            end
        elseif ( 0 == year % 4 ) then
            return 29
        else
            return 28
        end
    elseif ( 4 == month ) then
        return 30
    elseif ( 6 == month ) then
        return 30
    elseif ( 9 == month ) then
        return 30
    elseif ( 11 == month ) then
        return 30
    else
        return 31
    end
end
"Thirty days hath September..." and all that stuff. Now we are ready to convert UTC time to local time (well, almost).
-- convert UTC tm to an equivalent local time given the timezone
function localtime ( tm, tz )
    local tmLocal = tm
    local offset = tz.stdOffset --offset is defined as hours to ADD to LOCAL time
    if ( isdst ( tm, tz ) ) then --if it's DST
        offset = offset - 1
    end

    --XXX generalize this offset function so we can also use in in isdst
        tmLocal.hour = tmLocal.hour - offset
    if ( tmLocal.hour < 0 ) then
        tmLocal.day = tmLocal.day - 1
        if ( tmLocal.day < 1 ) then
            tmLocal.month = tmLocal.month - 1
            if ( tmLocal.month < 1 ) then
                tmLocal.year = tmLocal.year - 1
                tmLocal.month = 12
            end
            tmLocal.day = daysinmonth ( tmLocal.month, tmLocal.year )
        end
        tmLocal.hour = tmLocal.hour + 24
    elseif ( tmLocal.hour > 23 ) then
        tmLocal.hour = tmLocal.hour - 24
        tmLocal.day = tmLocal.day + 1
        if ( tmLocal.day > daysinmonth ( tmLocal.month, tmLocal.year ) ) then
            tmLocal.day = 1
            tmLocal.month = tmLocal.month + 1
            if ( tmLocal.month > 12 ) then
                tmLocal.month = 1
                tmLocal.year = tmLocal.year + 1
            end
        end
    end

    return tmLocal
end
A bit more messy than one might like! Additionally, we need to consider whether we are in standard time or daylight time. This is another can of worms.
Summer Time / Standard Time
The rules for when to change between standard time and summer time are locally-defined. This is handled by way of the configuration file. However, they are also expressed in terms of a day of the week (typically Sunday), and a week number within a month. Obviously the specific date moves around year-to-year, so we need to be able to calculate that. First, we're going to need a way to determine what is the day of the week that a given month starts on. Here is a function using well-known formula for determining the day-of-the-week given a date:
-- day-of-week for year (4 digit), month (1-12), day (1-31)
function dow ( year, month, day )
    local M = ( month + 9 ) % 12 + 1
    local C = math.floor ( year / 100 )
    local Y = year % 100
    if ( month < 3 ) then Y = Y - 1 end
    local weekday = ( day + math.floor ( 2.6 * M - 0.2 ) -
            2 * C + Y + math.floor ( Y / 4 ) + math.floor ( C / 4 ) ) % 7
    -- 0 = sun, 1, = mon, 2 = tue, 3 = wed, 4 = thu, 5 = fri, 6 = sat
    return weekday
end
Then we can determine what is the date of the nth week containing a certain day for a certain month and year:
-- the date of the nth (week, 1-5) day of week (day, 0-6) for a given month and year
function nthdow ( year, month, week, day )
    local firstdow = dow ( year, month, 1 )
    local date = ( day - firstdow + 1 ) + ( week - 1 ) * 7
    if ( day < firstdow ) then
        date = date + 7
    end
    return date
end
(I had to cook that one up myself, and it took a bit longer than I would have liked!)
Now we should be able to compute the dates on which the switches occur. For convenience, I decided to put these dates in the TZ structure. I made a helper function that, given a year, will compute and update those dates in the TZ structure, then they can be used with ease for other computations.
-- Adorn the TZ structure with the dates when DST starts and ends for a given
-- year.  Compute this only if needed.
function prepDSTdates ( tz, year )
    if ( not tz ) then return end
    if ( not tz.dstYear or tz.dstYear ~= year ) then
        tz.dstYear = year
        tz.dstStartDate = nthdow ( tz.dstYear, tz.startM, tz.startW, tz.startD )
        tz.dstEndDate = nthdow ( tz.dstYear, tz.endM, tz.endW, tz.endD )
    end
end
Finally, we can determine if a given time (UTC) is in the local standard time or daylight time:
--given a UTC tm, and tz, determine if tm is in the DST of tz
function isdst ( tm, tz )
    local adjustedTZ = tz
    prepDSTdates ( adjustedTZ, tm.year )
    --this adjustment needs to also tweak the dates
    adjustedTZ.startH = adjustedTZ.startH + adjustedTZ.stdOffset
    adjustedTZ.endH = adjustedTZ.endH + adjustedTZ.stdOffset
    if (
        ( ( tm.mon > adjustedTZ.startM )
            or
            ( ( tm.mon == adjustedTZ.startM )
                and
                ( ( tm.day > adjustedTZ.dstStartDate )
                    or
                    ( ( tm.day == adjustedTZ.dstStartDate )
                        and
                        ( tm.hour >= adjustedTZ.startH )
                    )
                )
            )
        )
        and
        ( ( tm.mon < adjustedTZ.endM )
            or
            ( ( tm.mon == adjustedTZ.endM )
                and
                ( ( tm.day < adjustedTZ.dstEndDate )
                    or
                    ( ( tm.day == adjustedTZ.dstEndDate )
                        and
                        ( tm.hour < adjustedTZ.endH )
                    )
                )
            )
        )
    )
    then
        return true
    else
        return false
    end
end
I need to do some exhaustive testing on this, especially for boundary conditions, but a spot check seemed to be good, so I'll motor on for now. I found it interesting while implementing this code is that the spots in the year when one changes zones results in a 'hole' of forbidden times (when you 'spring forward'), and duplicated times (when you 'fall back'). Don't use local time for logging if care about them being unambiguous during the hour of the switchover!
OK, now I have the tools in place to make the clock show local time. I alter the clock_set_now() function to translate the UTC 'now' to a local 'now':
function clock_set_now()
    --get current date and time
    local sec, usec, rate = rtctime.get()
    local tm = rtctime.epoch2cal(sec)
    prepDSTdates ( TZ, tm.year )
    local localTM = localtime ( tm, TZ )
    --update the clock
    sequence = { function () clock_send_time(localTM) end,
            clock_show_time, clock_update,
            function () clock_send_date(localTM) end,
            clock_show_date, clock_update,
            clock_show_time }
    run_sequence ( sequence, 250 )
end
So, just adding the prepDSTdates() (to ensure the specific dates for the current year are set up correctly, and the localtime() function to translate the UTC time to the local time and set from that -- the rest is the same.
The clock could now be considered complete from a utilitarian standpoint. I'm going to do a few improvements, though. I don't really want to re-set the clock every 16 2/3 minutes, and I need to improve my run_sequence() function to be safe to call from multiple points in the code. Then I want to add some 'server' of sorts, so I can change the display remotely.
Next
Improvements.
-
Controlling the Clock Programmatically
01/29/2019 at 00:56 • 0 commentsSummary
Clock control functions have been added, and SNTP synchronization is effected.
Deets
Back before my first attempt failed, I had managed to control the clock a little from the serial port. First we needed to configure it for the correct bit rate. This was added at the start of the section of the immediately executed code:
uart.setup(1, 9600, 8, uart.PARITY_NONE, uart.STOPBITS_1)
According to the Nixie clock's documentation, the following commands exist:
- digits or spaces show on numeric display
- 't' show time
- 'd' show date
- 'u' update time or date
- 'a' show alarm; cycle through alarms
- 'i' increment the numeric display
These commands have no termination (e.g. CR/LF, etc). Experimenting, I found that the clock seems to depend on there being some sort of delay to infer that a command has been sent. For instance, sending a partial display's worth:
uart.write(1, "5 4 3")
uart.write(1, " 2 1 ")
will result in "5 4 3 2 1 " being shown, but if there is a delay between those two writes, then the " 2 1 " will overwrite the prior "5 4 3". How much delay? Unknown.
Also, more annoyingly, you need to pace out the digits before doing updates. For instance, to update the time, you are meant to load the display with the desired time, switch to time display via 't', and then apply the change with 'u'. However you cannot send the digits followed by 'tu'. It will ignore those commands. You need to pace them out, with a little delay before the 't' and another delay before the 'u'. How much delay? Unknown; it's not documented as being needed at all.
As mentioned before, delays via a spin-wait are verboten in NodeMCU, so I will need to use timers in some way. That's a pity. (and a PITA; You can come to my PITA pity party!)
The documentation seems to suggest that you should send a full displays worth of digits at one time, though that doesn't seem to be completely true. You can send a partial display so long as it starts on the left.
Also, the 'a' command seems to do nothing on my clock. Fortunately, I am not going to use the alarm feature.
Documentation says that other characters are ignored, but you know I had to try. I found some buried treasure in undocumented commands:
- 'b' switches to numeric display, and blanks it. So, effectively 'display off'
- 'r' resets numeric display to all zeros
- 'g' toggles some sort of auto increment, and increments once each 8 sec. I guess this is for testing.
Making Clock Functions
I made clock functions in Lua. Most are trivial, e.g.:
function clock_show_time()
    --switch to time display mode
    uart.write(1, "t")
end
and did the same sort of thing for:
function clock_show_date()
function clock_update()
function clock_blank()
function clock_zero()I also created a clock_send_time() and clock_send_date() function. The clock documentation did not specify how to send the digits to cause 'u' to update the date or time correctly, but by experimentation, I found that you are expected to place the digits into the expected spots where the clock or date normally have them, and then 'u' will work. So I created those function by using Lua's string formatting capabilities (roughly similar to a printf()):
function clock_send_time ( tm )
    --format string for updating time
    local strTimeSet = string.format("  %02d %02d %02d",
            tm.hour, tm.min, tm.sec)
    --send strTimeSet
    uart.write(1, strTimeSet)
end

function clock_send_date ( dt )
    --format string for updating time
    local strDateSet = string.format("    %02d%02d%02d",
            dt.year%100, dt.mon, dt.day)
    --send strDateSet
    uart.write(1, strDateSet)
end
OK, so I should explain why I used a struct (er, 'table') as a parameter, instead of the three values h, m, s (or y, m, d). The reason is that this makes other things easier. In particular, the way to get the time and date from the NodeMCU is like this:
local tm = rtctime.epoch2cal(rtctime.get())
and this returns a struct that has the hour, min, sec, year, mon, day in it. So by making clock_send_time() and clock_send_date() expect that sort of struct as a parameter, it slightly simplifies the code that is ultimately going to be calling those methods, anyway.
All this works by way of testing with the interactive console, but I still have a problem with the programmatic control, because I need the delays between the various calls.
I started making some code that was a little like what was done in the connect_and_run() method, but it looked klunky, and required a bunch of cut-and-paste for the various command sequences. Later, I got a different idea: a generic call sequencer. Then I could reuse that command pacing logic for arbitrary call sequences.
Call Sequencer
The gist of the call sequencer is that you pass it an 'array' (in the Lua sense) of arbitrary functions, and those functions will get invoked sequentially, with a specified delay between each invocation.
function run_sequence ( sequence, period_us )
    if ( not sequence or 0 == #sequence ) then return end --silly cases
    --do the first one immediately
    local nIdx = 1
    sequence[nIdx]()
    nIdx = nIdx + 1
    --if that was it, beat it
    if ( nIdx > #sequence ) then return end
    --remaining ones are to be paced out
    local pacingTimer = tmr.create()
    pacingTimer:alarm(period_us, tmr.ALARM_AUTO, function(timer)
        if ( nIdx <= #sequence ) then
            sequence[nIdx]()
            nIdx = nIdx + 1
        end
        if ( nIdx > #sequence ) then
            -- we are completed
            timer:stop()
            timer:unregister()
        end
    end )
end
So, it will call the first function immediately, then if there are more, it will register a timer which will invoke the remaining functions. Because Lua can create closures via it's upvalue mechanism, any parameters to the function are packaged along with it.
This allows me to create the setting functions like this:
function clock_set_time ( tm )
sequence = { function () clock_send_time(tm) end,
        clock_show_time, clock_update }
run_sequence ( sequence, 250 )
end

function clock_set_date ( dt )
sequence = { function () clock_send_date(dt) end,
        clock_show_date, clock_update, clock_show_time }
run_sequence ( sequence, 250 )
end
The first member of those sequences are examples of creating a closure. The other functions do not take parameters, so a closure was not needed for them.
There is a wart in this design, though, in that the run_sequence() should not be called again until any prior sequences have completed. I did not address this at this time, but instead punted with a clock_set_now() function that combines getting the current date/time, and setting the time, and the date, and switching back to time display:
function clock_set_now()
    --get current date and time
    local sec, usec, rate = rtctime.get()
    local tm = rtctime.epoch2cal(sec)
    --update the clock
    sequence = { function () clock_send_time(tm) end,
            clock_show_time, clock_update,
            function () clock_send_date(tm) end,
            clock_show_date, clock_update,
            clock_show_time }
    run_sequence ( sequence, 250 )
end
I dreaded trying to figure out any contention solving mechanisms -- possibly using coroutines (Lua doesn't have preemptive threads or locks), but it occurred to me that I should simply have the run_sequence() mechanism post to a single, shared, queue, and subsequent calls to run_sequence() will simply append items to that queue, kickstarting it if needed, and not kickstarting if not needed. Because NodeMCU is a single-threaded environment, it will not be necessary to lock access to the queue. Any timer events are pended until our code has yielded to the system, anyway.
But for now, I am leaving it like this, since I want to move on.
For the last step, I simply added the call to clock_set_now() at the end of the exiting sntp_syncsuccess() method. So the program flow is now:
- process configuration
- connect to WiFi
- start an SNTP sync operation
- when SNTP syncs successfully, call clock_set_now()
- handle the timer event that will sequence out calls to set the clock up
The SNTP sync is set to automatically resync, which is hard-coded in the library to be every 1000 sec, so about 16 2/3 min. As presently written, I setup the clock every time this happens, however I will probably change that to do so less often -- maybe once per day. The reason is that the clock updating has visible effects which might be distracting to the onlooker. It's not critical, though, so I'll save that optimisation for later.
I uploaded the code to the board, and beheld with wonder the clock synchronising itself via the Internet! Ha! So this project wasn't quite as silly is I originally thought it would be.
I still need to make a 'server' so that I can fiddle with the clock via the network (probably just displaying digits, but maybe implementing stopwatches or something else more interesting). But for now, a more pressing matter is apparent: timezone. The clock is showing UTC time, not local. The NodeMCU libraries have nothing for dealing with timezones, so I'm on my own there.
Next
Coding in timezone support.
-
Khoding 50ftw4rz
01/27/2019 at 18:06 • 0 commentsSummary
It is time to write the code to control the Nixie clock, and provide a service to do some things.
Deets
Now that the hardware is apparently stable, I can start to work on the software side. The software in this case is written in Lua, and run in an event-driven execution environment.
A Little About Lua
I won't explain Lua too much except to say that it scripted, compiled to byte-code for execution, and has very few fundamental data types (notably number, string, boolean, nil, function, and 'table'). The sole structured data type is the 'table', which is an associative array. The special case of integer keys is used to realize conventional arrays, but they are meant to be 1-relative. To me, Lua feels a little bit like Javascript.
When Lua code is executed, it is immediately translated into a 'byte code' form that can be executed by a virtual machine. I say 'can be', because some statements such as 'function' are only compiled, and create an object named as declared in the source code that contains it's byte code representation. Statements at file level are executed immediately.
Lua scripts can be in files, but they can also be in strings. A section of Lua code (file or string) is called a 'chunk'.
A quirk of Lua is that named objects are global by default, unless declared 'local', or in the special cases of parameter names, etc.
A Little About the NodeMCU Execution Environment
The execution environment in NodeMCU is a little different than what is more commonly found in Lua environments in that it is intended to be used to define a mainly asynchronous system. This is similar to NodeJS which was the inspiration, hence the name. In this asynchronous environment, you try to do as little as possible in sequential steps of execution (that is a synchronous model), and rather break up your activity into a bunch of handlers that will be invoked when relevant events come in. As such, your program when run really just defines and registers a bunch of handlers, then immediately returns control back to the system.
This style of authoring can be a little disorienting if you are mostly used to the step-by-step style (i.e. 'synchronous') of coding, but you you will get used to it. The existing modules are pretty rich, so your code in Lua often is rather small. But it's definitely not a sequential step of execution from the top of your source file to the bottom.
My first attempt at an application will by structured like this:
![]()
(No Visio for me, tee-hee.)
There will be three files:
- init.lua
This is a specially named file that is automatically executed after the NodeMCU board has gotten the Lua environment up, just prior to running the interactive shell.
You could put your entire program in here, but I'm not going to for reasons I'll explain later. - kosbo.lua
This will be the program itself. It will load configuration, declare all the event handlers, utility functions, and have a little immediate code that causes all that to wire together. This is a fast process, immediately exiting and returning to the system (which will then run the interactive Lua shell on the USB serial port). - kosbo.cfg
This will contain configuration settings. Things like my wireless router's SSID and passphrase.
And that's it! 'init.lua' and 'kosbo.cfg' are simple, so I'll explain them first.
init.lua
As mentioned, init.lua is a specially named file that works a little like autoexec.bat of olden days. You can put your whole program here, but I actually like to put my program in a second file that is invoked from this one. I find this handy for development. If I have a bug in my program, I would prefer the board boot to the shell and not run my program. Then I can manually run my program and see any sort of debugging output on the terminal. If I had autoexec'ed my program, all that output would be lost by the time I connected the terminal to the serial port.
My init.lua is a one-liner:
pcall ( function() return dofile("kosbo.lua") end )'pcall' is a 'protected call' and is roughly equivalent to a 'try' in other languages. It will catch any errors raised and return, instead of giving them to the runtime, which will simply abend. It returns at least two values (yes, Lua functions can return multiple values), a boolean indicating the function ran, and a textual message (or nil if no message) that may have been part of where the code error()'ed. It may return additional values, which are the return values of the function called.
Here, we define an anonymous function inline which runs dofile() on 'kosbo.lua'. So, if I have init.lua on the board, it will run my program on boot, and if I don't have it, it will drop to the shell. At the shell, I can manually execute that same one line, and run the program and see any important output to help me debug.
kosbo.cfg
The configuration file is just slightly more interesting. Here is a skeleton version:
wifi_sta
{
    ssid = "myrouterssid",
    key = "myrouterwpapassphrase",
}
To a human that is intelligible: a 'section' of stuff named 'wifi_sta' ('sta' for 'station' mode -- arbitrary name), followed by some stuff in curly braces that are name-value pairs separated by the'=' symbol, and they themselves can have several separated by the ',' symbol.
Fact of the matter is that this is actually Lua code. So to 'parse' your configuration file, you merely need to 'execute' it. That idea will totally freak out security-conscious folks, but it was considered cool in the 90's and in fact that is what JSON was all about as well. In this case, the 'code' interpretation is 'call a function named 'wifi_sta' and pass it a parameter which is a table which has two entries with the key of 'ssid' and 'key'. Then party on that.'
So to process configuration, one needs to implement a (global) function named 'wifi_sta' (in this example), and then merely call dofile() on the configuration file. Your wifi_sta() function will take one parameter: a Lua table, and it will contain all the key-value pairs listed. It will be invoked when you 'execute' the config file. Tada! No special config file parser.
Here's a minimal example:
-- config function; set the wifi station
-- this creates a named function to be executed later, but this has to be
-- global, because it has to be reachable when executing a different file
function wifi_sta ( tuple )
    print('in wifi_sta()...')
    print('the SSID is:  ' .. tuple.ssid )
    print('the key is:  ' .. tuple.key )
    -- do other interesting things
end

-- 'read' configuration file by executing it.
-- this creates a named function that we know will be references by code
-- in this file only, and so it can be 'local'.  It will go away when this
-- file's execution ends
local function configure ( confname )
    print('reading configuration...')
    local ok, msg = pcall ( function() return dofile(confname) end )
    if ( ok ) then
        print('configuration loaded!')
        return true
    else
        print("configuration not loaded from file '"..confname..
                "' message = "'..msg.."'")
        return false
    end
end

-- the following is at file level and is executed immediately
if ( configure("kosbo.cfg") ) then
    -- ... do more things
else
    print("failed to process configuration; ending...")
end
The above file is named 'kosbo.lua', and it what will eventually be auto-exec'ed via 'init.lua' as mentioned earlier. But for now it's handy to manually execute it so that I can see the debug output.
There's aspects of the Lua execution environment that is useful to understand. When the file is executed, what is happening is that it is being compiled into byte-code, and either executed immediately, or stored for later. The first two sections define a function object for later use, under the names 'wifi_sta', and 'configure'. Nothing gets executed there at this time. The last section is at file level, and so it gets executed immediately. When the end of the file is reached, control is passed to whatever invoked it. This might be the Lua shell when we do it manually, or back to init.lua if via that mechanism.
When that happens, the byte code that was generated for the third section is (eventually) reclaimed by the garbage collector, and anything declared as 'local' is as well, if there were no other references to it. This is the case with the second function, configure(), since it was declared as 'local'. However, the first function wifi_sta() was not declared as local (i.e., it is global), so it sticks around and takes up memory.
There is a reason that wifi_sta() is global. The reason is that the configuration file 'kosbo.cfg' needs to be able to reach the wifi_sta() function. Since it is in a different file, it would not otherwise be visible to the kosbo.cfg unless it was global.
The downside is that wifi_sta() is only needed for a moment, when configuring, after that is just a waste of RAM. That's easily remedied, though, simply by setting the function name (which is really a variable name containing a function object) to 'nil'. Then it will effectively be deleted, and it's memory available for garbage collection. A good place to put those is right after the dofile() call. E.g.:
local function configure ( confname )
    print('reading configuration...')
    local ok, msg = pcall ( function() return dofile(confname) end )
    -- now we can delete the global config functions from memory
    wifi_sta = nil
    if ( ok ) then
        print('configuration loaded!')
        return true
    else
        print("configuration not loaded from file '"..confname..
                "' message = "'..msg.."'")
        return false
    end
end
Connecting to the Network
For the next amazing feat, we will connect to the WiFi. This involved doing something useful in the wifi_sta() configuration function, and then writing some Node-style code that registers callbacks that are invoked when connection has been successfully made. First, fleshing out the wifi_sta() function:
-- config function; set the wifi station
--(this has to be global; we delete it when we're done with it)
function wifi_sta ( tuple )
    print('in wifi_sta...')
    -- set the ssid and password if different from what is already in flash
    -- oh, and set auto connect
    local ssid, password, bssid_set, bssid = wifi.sta.getconfig()
    -- retained in flash, so avoid writing unnecessarily
    if ( tuple.ssid ~= ssid or tuple.key ~= password ) then
        print('setting wifi parameters to ssid='..tuple.ssid..',
                key='..tuple.key)
        wifi.sta.config ( { ssid = tuple.ssid, pwd = tuple.key, auto = true,
                save = true } )
    end

    -- static IP setup, if desired
    if ( tuple.ip and tuple.netmask and tuple.gateway ) then
        wifi.sta.setip( { ip = tuple.ip, netmask = tuple.netmask,
                gateway = tuple.gateway } )
    end
end
This is fairly straightforward: take the configuration parameters and stuff them into the wifi library. We do a little optimization in that we avoid setting them redundantly, because these are stored in flash, and we want to avoid wearing it out needlessly.
The next part is a function that will make repeated attempts to connect, and invoke notification functions on success or failure. Failure means that the maximum number of attempts has been reached without successful connection.
It is forbidden in NodeMCU to take 'too much' time processing without yielding control back to the 'system', so things like spin-waiting in a delay loop are straight out. But I don't want to hammer the wifi checking for connectivity, so I use a timer. The timer will have a registered callback function that will be invoked by the system periodically, and this will function similar to what I would otherwise do in a for loop, with a sleep-like function.
local function connect_and_run()
    -- try to connect to the access point; check 10 times, 3 sec between check
    if ( (wifi.getmode() == wifi.STATION) or (wifi.getmode() == wifi.STATIONAP) )
            then
        -- we use a timer instead of a loop so that we yield to the system
        -- while we're waiting for a delay to pass between attempts.
        local joinCounter = 0
        local joinMaxAttempts = 10
        local joinTimer = tmr.create()
        joinTimer:alarm ( 3000, tmr.ALARM_AUTO, function(t)
            local ip = wifi.sta.getip()
            if ( ip == nil and joinCounter < joinMaxAttempts ) then
                print('Connecting to WiFi Access Point ...')
                joinCounter = joinCounter + 1
            else
                -- relinquish this timer now
                t:stop()
                t:unregister()
                -- we either succeeded or failed...
                if ( joinCounter == joinMaxAttempts ) then
                    -- sorrow
                    print('Failed to connect to WiFi Access Point.')
                    connect_failed()
                else
                    -- joy
                    print('Connected!')
                    connected()
                end
            end
        end )
    end
end
Of note here if you're not familiar with Lua's syntax is the use of the colon ':' operator. This is syntactic sugar to make Lua look more like an object-oriented language. It simply passes a hidden parameter is the first argument. So the following are equivalent:
-- semantic sugar to look OO
t:stop()
-- functional equivalent without sugar
t.stop(t)
It's useful to note that this function connect_and_run() exits immediately. It is the anonymous function that is registered during joinTimer:alarm() that is run later (and repeatedly, as we have set it up).
It's also useful to note that the variables joinCounter, and joinMaxAttempts are accessible within the body of that function, even though they ostensibly have gone out-of-scope when connect_and_run() exited, which was long before the anonymous function was called for the first time. That is because Lua binds those variables to the function as what it calls 'upvalues'. You don't have to do anything special to make this happen, it's just good to be aware that it is available.
The 'loop' created will try 10 times, waiting 3 seconds between each attempt, before giving up. If during this time it was successful, the connected() function is invoked, and if the maximum attempts are reached, the connect_failed() function is invoked.
To kick this process off, the file-level immediate code is modified to invoke the connect_and_run() method:
print("processing configuration...")
--setup the environment as per config
if ( configure("kosbo.cfg") ) then
    -- the mode is retained in flash, so avoid writing it unnecessarily
    if ( wifi.STATION ~= wifi.getmode() ) then
        print('setting station mode...')
        wifi.setmode(wifi.STATION)
    end

    -- explicitly request connection to happen if we aren't already connected
    if ( wifi.STA_GOTIP ~= wifi.sta.status() ) then
        print('trying to connect...')
        wifi.sta.connect()
    end

    print("connecting to access point...")
    connect_and_run()
else
    print("failed to process configuration; ending...")
end
The connect_failed() function will reboot the system, restarting the process:
local function connect_failed()
    -- we simply reboot to start it all up again
    node.restart()
end
The connect() function is invoked on successful connection. I print out a little status info, and then start a SNTP synchronization process. This will register even MORE callback functions:
local function connected()
    -- emit some info
    print("Wireless mode: " .. wifi.getmode())
    print("MAC: " .. wifi.sta.getmac())
    print("IP: "..wifi.sta.getip())
    print("Hostname: "..wifi.sta.gethostname())

    -- now that we have network, sync RTC
    sntp.sync(nil, sntp_syncsuccess, sntp_error, true)

    -- XXX other things

end
And the the callbacks for handling the SNTP activities:
local function sntp_syncsuccess ( seconds, microseconds, server, info )

    local sec, usec, rate = rtctime.get()
    local tm = rtctime.epoch2cal(sec)
    print ( "sntp succeeded; current time is:  " ..
    string.format("%04d-%02d-%02d %02d:%02d:%02d",
            tm.year, tm.mon, tm.day, tm.hour, tm.min, tm.sec) )

    -- XXX more things

end

local function sntp_error ( code, text )
    -- code:
    -- 1: DNS lookup failed (the second parameter is the failing DNS name)
    -- 2: Memory allocation failure
    -- 3: UDP send failed
    -- 4: Timeout, no NTP response received
    print ( "sntp failed!  code:  " .. code );

    -- XXX do we need to retry?  or will it retry automatically?

end
So, all this was tested out. I couldn't stimulate an SNTP error, so I'm not sure if the library will keep retrying, though I think it will. As written above, the SNTP sync() will repeatedly synchronize every 1000 seconds. There is not a provision to change this interval. The internal implementation of sync() will set the rtc of the ESP8266. Ultimately, we'll use that to set the Nixie clock time and date.
Next
Controlling the Nixie clock.
- init.lua
-
One More Time, With Feeling
01/27/2019 at 00:20 • 0 commentsSummary
I pull the project apart and put it back together. This time it seems to be stable.
Deets
I licked my wounds and got over the fact that I would have to pull apart the project to try again with a new board. Will it blow up this board, too?
I pulled the project apart, and desoldered the headers of a new board. But before I started with the new board, I still couldn't help myself thinking about what was it that went wrong with the prior board. I don't want to repeat the failure.
My old board was now cleaned up and naked, so I plugged it in one more time. It was still non-responsive, but I believed that to be due to a bad flash, and should be recoverable. The tools I was weren't able to reflash it, but I knew that the ESP8266 itself required some magic holding of gpio lines during reset to invoke the bootloader. At length, I was able to enter the bootloader by diddling these lines and the nRST. Then the flashing tool I was using was able to write an image successfully.
After flashing, I connected to it, and got the expected prompt, so that's an improvement. But not trusting the board, I let it sit for a while. We'll see if I get the random garbage that I experienced before.
After about an hour of sitting, I did not see the garbage. Hmm. Well, maybe because the radio is off, it hasn't heated up the chip enough. I wrote^H^H^H^H^H cut-and-pasted a little code to set up the required WiFi parameters, and set it to auto-connect, and wrote them out. These are in non-volatile memory, so it should happen irrespective of reboots. I let it sit a few hours longer, demonstrably on the network by it's being able to be ping'ed, and still it seemed stable. Hmm....
Well, I don't know what went wrong before, but I am not heartened by the prospect that the board cannot be used in this combination without more 'stuff', and am skeptical of that notion, anyway. So I did a bad thing, and decided to hook the old board back up to the clock. /Not/ use the fresh, new board. I.e., asking for further trouble.
Before I hooked back up the old board, I did some cogitation on the previous problems. I didn't seem to do hard damage to the board, but it still could be flaky. It could simply be that the firmware itself is fundamentally flaky, and that all the hardware fixin' in the world will not be enough. This does happen (I had a recent 2 mo battle with Google on a similar line), but I doubted it in this case because the NodeMCU project has been released for quite a while, and it's codebase seems to have have simmered down to a 'maintenance and feature' phase rather than a less mature 'architecture and infrastructure' phase. Still, there could be a recent bug introduced, and my firmware was built off the tip.
I did occur to me that perhaps there could have been coupling of extraneous signal into... something! The way I had mounted the board before, I put the level shifter underneath the NodeMCU, and some extraneous wire wrapped around the side, underneath the PCB antenna. That is radiating out power and the wire could make for a great receiving antenna. Maybe. Also, where I mounted the board is close to the high-voltage line, which is pumped at 300 KHz by the switching regulator. So, maybe.
It did also occur to me that the bypass caps on the power supply might be inadequate to take power of questionable cleanliness.
At any rate, I went ahead and rewired everything, but changed the layout. I moved the board towards the end, away from where the high-voltage goes the the Nixie board. I also pulled the level shifter out from under the NodeMCU board, and stuck it separately on the clock board. I also added a .1 uF bypass cap to the power tap point I was using. While I was at it, I also put a piece of foam tape over the high-voltage pins. I was bored with shocking myself. I somewhat enjoyed the shocks, but I was afraid an unexpected one might cause me to fling the assembly and break it.
![]()
I went through a similar step-by-step re-connection of the boards, and connected with the computer. I let it sit for a few hours to see if it started spewing garbage again. It didn't. So I guess I fixed something. In retrospect I regret not being more scientific about it, because I'd really like to know what change fixed it. Oh, well.
So, now the unit seems to be working, and ready for some software!
Next
Coding the application
-
Eternal Darkness
01/26/2019 at 20:45 • 0 commentsSummary
about 6:00 pm, Monday, January 21, 2019
Something has gone wrong, and my NodeMCU board may be bricked. I have spares, but I will fail to get the project done in one day, as I had hoped.
Deets
While fiddling with the commands and starting to plan the Lua code for the server, something started going wrong. Initially serial data was not being responded to, and then the terminal connection locked up. I rebooted the board and reconnected, but very shortly afterwards random garbage data was being sent to the terminal.
So now I have to figure that out. Could it be:
- the 9 V is just way too much for the input of the NodeMCU regulator, and it failed somehow? It's rated for a max input of 20 V, but I wonder with the current needed for the radio that maybe it is overloading? It doesn't feel hot to the touch, though.
- the board has become flaky somehow. Maybe I zapped it somehow while playing with it or assembling or doing my electrical tests.
- something else...
I tried reflashing, and then the flash operation failed midway, so it seems I have also bricked the board. I have two more boards, but I have exhausted the time today for this project, so I failed to get it done in one day as I had set out to do. *sigh* Thems the breaks. So further work will have to wait until the weekend.
Next
Cry a little. Then start over.
-
Oh, What Tangled Wires We Weave
01/25/2019 at 23:09 • 0 commentsSummary
about 4:00 pm, Monday, January 21, 2019
Soldering stuff together. Out of fear of destruction, this was done in steps, testing along the way.
Deets
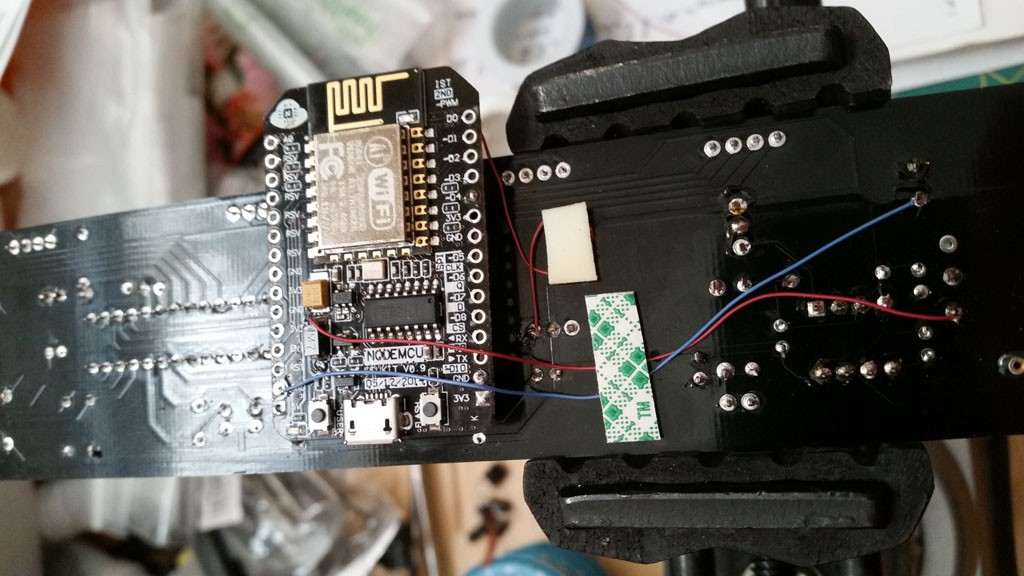
First, the NodeMCU board has pin headers soldered on (or at least mine do). These aren't handy for me, so I desoldered them.
![]()
As mentioned before, it is necessary to tap off a component on the NodeMCU Dev board for power (in), since the desired point is not brought out to the headers. Fortunately, there is a big fat diode that is somewhat easy-ish to solder a lead to. Not super easy, though! It is a power diode, and is thermally conductive. On my first attempt, the heat from the iron on one lead conducted quickly to the other and the diode went flying off the board. Ugh, now I have to do some SMT soldering to put it back in place, and solder the originally intended wire. Oh, well; this is what happens. Be quick, and flux helps in being quick. I find a 'flux pen' useful to paint on a little flux in magic marker fashion useful in a pinch without making too much mess.
Also, be fully aware that the large capacitor next to the diode is NOT directly connected to that diode as you might guess from the layout. Do NOT bridge those two.
The ground lead was straightforward.
![]()
Not exactly pretty, but after having flung the diode off before, I am a little iron shy. The joint is not as cold as it looks. I wouldn't ship it so someone else, though.
OK, having gotten the pieces prepared, it was time to assemble it, somehow. Since there were no plans beforehand, I am winging it by using ye olde double-sided foam tape to stick the parts onto the back of the clock's PCB.
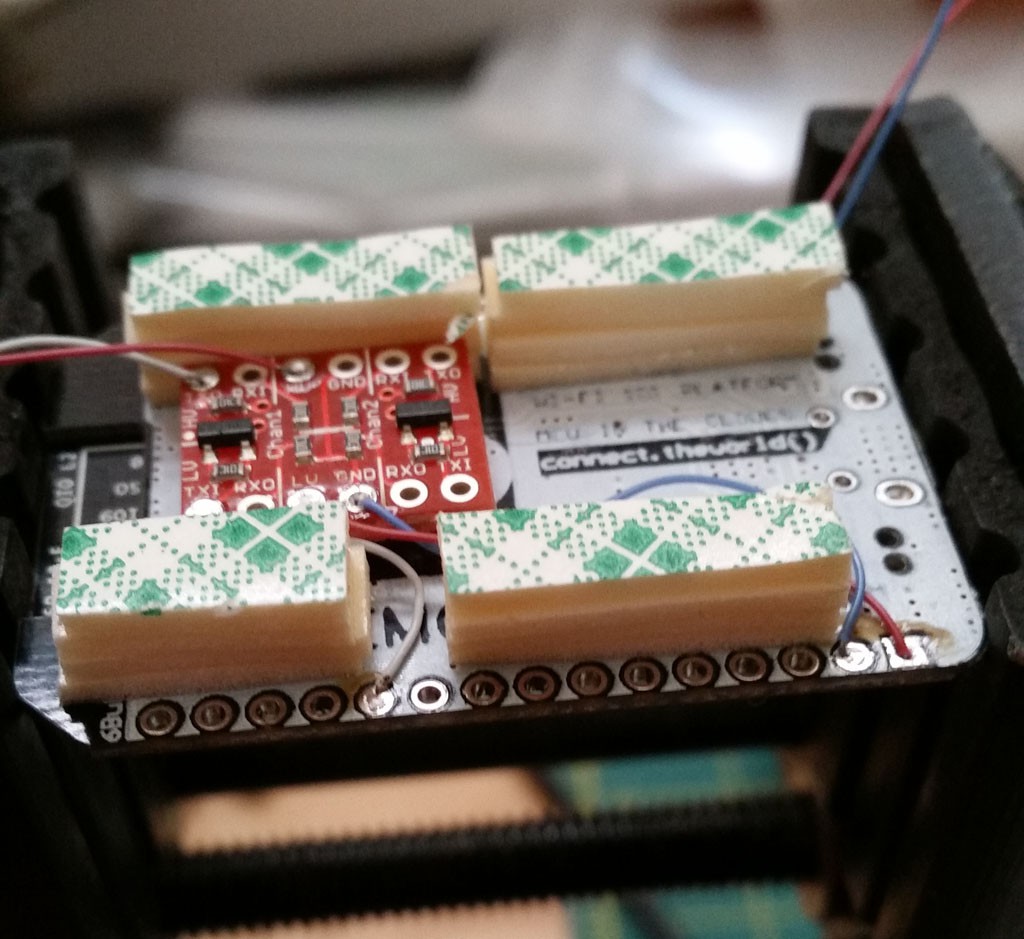
I decided to stick the shifter onto the back of the NodeMCU Dev board:
![]()
and this gave me an idea: to build a 'standoff' from multiple layers of foam tape:
![]()
This should allow me to have some clearance away from the clock PCB, which has all sorts of electrical points that I don't want to touch the module. I found a place to put the module and stuck it on:
![]()
You can see the clearance from the top:
![]()
With the things mounted in place, it was time to connect the wires and test. I am really paranoid about making a mistake and blowing up something. The Nixie board has 175 V on it (and boy, do I know what that feels like!), so one false connection or accidental shorting would be all it takes. Additionally, I will be connecting this to my desktop system via USB, and I most definitely do not want to destroy that. So I do this in steps.
First, some sanity checks before proceeding with intended connections:
- I connect the NodeMCU board to a USB charger. No power to the Nixie, and no computer connection. OK, no 'magic smoke', and some blue lights on the board blink in a familiar way. I cycle power, and I still get the familiar blinking lights.
- I connect NodeMCU board to USB to computer. The board boots and I can connect and execute some simple Lua commands on it 'Hello, World!' style.
- I disconnect computer, and just power on Nixie. The clock runs as expected.
- I disconnect the clock power, and reverify the NodeMCU board on the computer. Still working, yay!
- I disconnect computer, reconnect USB charger and Nixie power. Nothing is burning yet.
So that gives me confidence that there aren't any accidental connections between the boards. Now for the first stage of coupling them together:
- I connect the clock's ground and 5 V to the level shifter's 'high voltage' side.
- I connect the level shifter's data to the clock's serial input.
Since I now have electrical connection between the boards, I do a mini 'smoke test' with the Nixie power and USB charger power. This time there is random data shown on the clock -- no familiar clock display! Yikes! After that moment of fright passes, I remember that the way the clock handles the serial data is that as soon as it receives data, it immediately shifts into the 'display data' mode. So it's possible that garbage data from the NodeMCU at boot-up triggered this. Since you can manually change the display mode via a button, I give it a click and get back to the clock as expected. Whew.
At this point almost all the connections are made except the final power input to the board from the Nixie supply. I decided to save that connection for last since the NodeMCU board can be powered from the USB, and since I'm going to need the computer USB connection for a while.
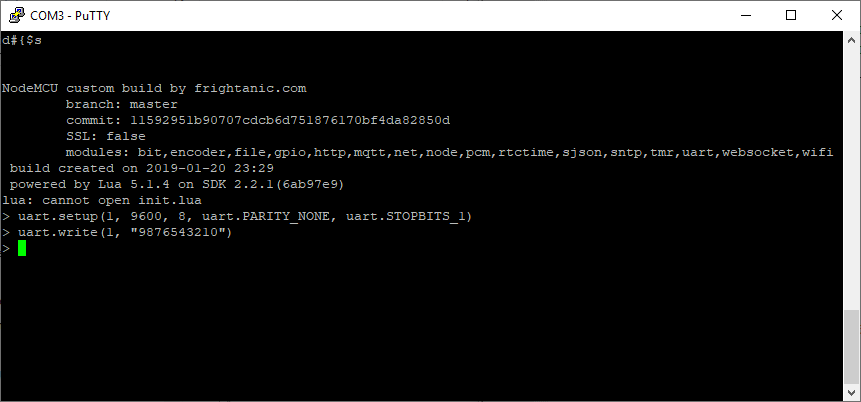
I do connect and boot the board, and can connect with a serial terminal. OK, for a little fun, I will try sending some data. The uart must be configured for 9600N81. Then the documentation states that you must send a complete display's worth of data. There is no mention of any command termination, like CR/LF, so I guess it just knows by counting?
On the terminal:
![]()
And on the clock:
![]()
Something demonstrable happened; hooray! And sending a different pattern:
![]()
After this I tried out some of the other commands. The 't' will switch to time diplay mode, and 'd' will switch to date. There isn't one to switch back to the arbitrary numeric display, so you would have to re-send that data to trigger the switch, overwriting what is there. I couldn't get 'a' to do anything -- it's supposed to show and cycle through the alarms -- but I don't care that much about alarms, anyway.
Finally, I soldered the last wire coupling the Nixie power supply to the power tap point on the NodeMCU board. It occurred to me that I don't want the USB power to try to power the Nixie clock (i.e., which USB is plugged in, but not the clock power supply), so I added a diode to prevent that.
I took a little breath, and tried various power combinations without plugging into the computer, and then finally took the leap and connected to the computer and nothing popped. *exhale*.
Next
Writing the code for a server application.
The Internet of Nixie Clocks
Wherein the tubes of Nix do bridge betwix the worlds of form and ether. I see no reason one should bridge, but that won't stop me, either.