Hi everyone! This is a brief(ish) summary of our smart buoy project. We’ll break down the technical build into separate posts, to explain: electronics, 3d print, and dashboard.
Step 1: What does it do?
The sensors on board the smart buoy enable it to measure: wave height, wave period, wave power, water temperature, air temperature, air pressure, voltage, current usage and GPS location. In an ideal world, it would also have measured wave direction - based on the measurements it was able to take, we were quite close to making it work. However, it turned out to be pretty complicated and it’s actually a massive problem in the actual research community. If there’s anyone out there who can help us out and suggest an effective way to get wave direction measurements, please let us know - we’d love to understand how we could get it to work!
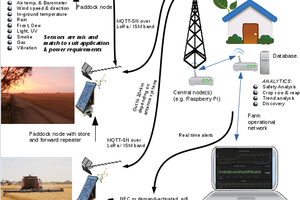
All the data the buoy collects is sent via radio to a base station, which is a Raspberry Pi. We made a dashboard to display them using Vue JS.
Step 2: Build - Buoy Casing
This buoy was probably the most difficult thing we’ve printed so far. There were just so many things to take into consideration as it was going to be in the sea, exposed to the elements and a lot of sun. We will talk more about that in another episode in the Smart Buoy series. In brief: we printed a near hollow sphere in two halves. The top half has slots for the solar panels and a hole for a radio aerial to go through. The bottom half has a hole for a temperature sensor to go through and a handle for a rope to be tied to.
After printing the buoy using PETG filament, we sanded it, spray painted it with some filler primer, and then put on a couple of layers of epoxy.
Once the prep of the shell was complete, we put all the electronics inside and then sealed the water temperature sensor, radio aerial and solar panels using a glue gun. Finally, we sealed the two halves with StixAll glue/adhesive (super aeroplane glue).
And then we hoped it was waterproof…
Step 3: Build - Buoy Electronics
The buoy has lots of sensors on board and we go into detail about these in the relevant tutorial. As this is a summary, we’ll try to keep this informative, but brief!
The Buoy is powered by an 18650 battery, which is charged by four, 5V solar panels. Only the real time clock is constantly powered, however. The buoy uses the real time clock’s output pin to control a transistor allowing power to enter the rest of the system. When the system is turned on, it starts by getting measurements from the sensors - including a voltage value from the power monitor module. The value given by the power monitor module determines how long the system sleeps for before taking the next set of readings. An alarm is set for this time, then the system turns itself off!
The system itself is a lot of sensors and a radio module connected to an Arduino. The GY-86 module, RealTimeClock (RTC), Power Monitor module, and I2C multiplexer all communicate with the Arduino using I2C. We needed the I2C multiplexer is required because the GY-86 and the RTC module we used both have the same address. The multiplexer module allows you to communicate with no extra hassle, although it might be a bit overkill.
The radio module communicates via SPI. Originally, we had an SD card module as well, but it caused so many headaches because of the size of the SD library that we decided to scrap it.
Take a look at the code. It’s likely that you have some questions - probably lingering doubts as well - and we’d be happy to hear them. The in-depth tutorials include code explanations, so hopefully they will make it a bit clearer!
We tried to logically separate the code files and use a main file to include them - a method which worked perfectly.
Step 4: Build - Base Station Electronics
The base station is made using a Raspberry Pi Zero with a radio module attached. We got the casing from https://www.thingiverse.com/thing:1595429. You’re fab, thanks so much!
Once you have the code running on the...
Read more » t3chflicks

 Michael C
 Nikola
 sparks.ron
 pastcompute
I'm liking how it's all built out of modular components (and are all common off-the-shelf parts), which could open up the possibility for future upgrades. Do you know how long one of these could last out on the water?