 BTom
BTomSetup of the RPI:
Create SD card with Raspbian lite image, and in the terminal run the following. In the previous robot we used the mjpeg-streamer This time we are using the ustreamer
sudo apt-get update
sudo apt-get upgrade
sudo apt-get install git
git clone --depth=1 https://github.com/pikvm/ustreamer
or you can use the same version we installed on the robot: https://github.com/Essort/ustreamer
cd ustreamer/
sudo apt install libevent-dev libjpeg8-dev libbsd-dev libraspberrypi-d
make WITH_OMX=1
checking the cameras
v4l2-ctl --list-devices
v4l2-ctl -d /dev/video0 --list-formats-ext
v4l2-ctl -d /dev/video2 --list-formats-ext
If you can't see the compatible formats, check lsusb, and dmesg for troubleshooting. In our setup, one webcam got two /dev/video, so this is why we use video0, and video2. You should check your result of the v4l2-ctl --list-devices to set up your scripts according to that.
You can start the stream with this example commands
You have to modify the following command with the previous command results, if your camera doesn't support the format, and resolution. You have to change the --host to the device IP
./ustreamer --device=/dev/video0 --format=MJPEG --host=192.168.0.16 -p 8080 -r 1280x720
./ustreamer --device=/dev/video2 --format=MJPEG --host=192.168.0.16 -p 8081 -r 1280x720
setup the cameras to auto start when raspberry booted
sudo apt-get install screen
We made 2 start scripts: "startLeftCamScreen" and one for the other camera: "startRightCamScreen"
# startLeftCamScreen
cd ~/ustreamer && ./ustreamer --device=/dev/video0 --format=MJPEG --host=192.168.0.16 -p 8080 -r 1280x720 --allow-origin *
# startRightCamScreen
cd ~/ustreamer && ./ustreamer --device=/dev/video1 --format=MJPEG --host=192.168.0.16 -p 8081 -r 1280x720 --allow-origin *
Set them to executable
chmod +x ~/startLeftCamScreen
chmod +x ~/startRightCamScreen
Edit the root startup script fil
sudo nano /etc/rc.local
And the following line before `exit 0:
# Run a command as `pi` from the home folder
# in a screen named `pistartup`
su - pi -c "screen -dm -S leftCam ~/startLeftCamScreen"
su - pi -c "screen -dm -S rightCam ~/startRightCamScreen"
After this if your reboot the RPi, the stream will automatically start.
There are som helpful commands:``
#check for running screens
screen -list

#ressume screen
screen -r
At VR (PC) side, you have to make a simple html for embed mjpeg stream because currently webBrowser in the UnrealEngine widget can't open the stream directly. With the simple HTML you can configure the position screen size etc. with the html for the VR display.
<!DOCTYPE html>
<html>
<head>
    <meta charset="UTF-8">

    <meta name="mobile-web-app-capable" content="yes">
    <meta name="apple-mobile-web-app-capable" content="yes">

    <title>Right</title>
</head>

<body style='background-color:black; width:1280px; height:720px;overflow: hidden;'>
<div  style='display:flex; width:1280px; height:720px;'>
    <div style='position:relative; left:0px;'>
        <img style='width:1280px; height:720px;' src="http://192.168.0.16:8081/stream" />
    </div>
</div>
</body>

</html>
In the unreal engine we use the same trick what we used in the previous version, with a little update in the "stereo camera" material.
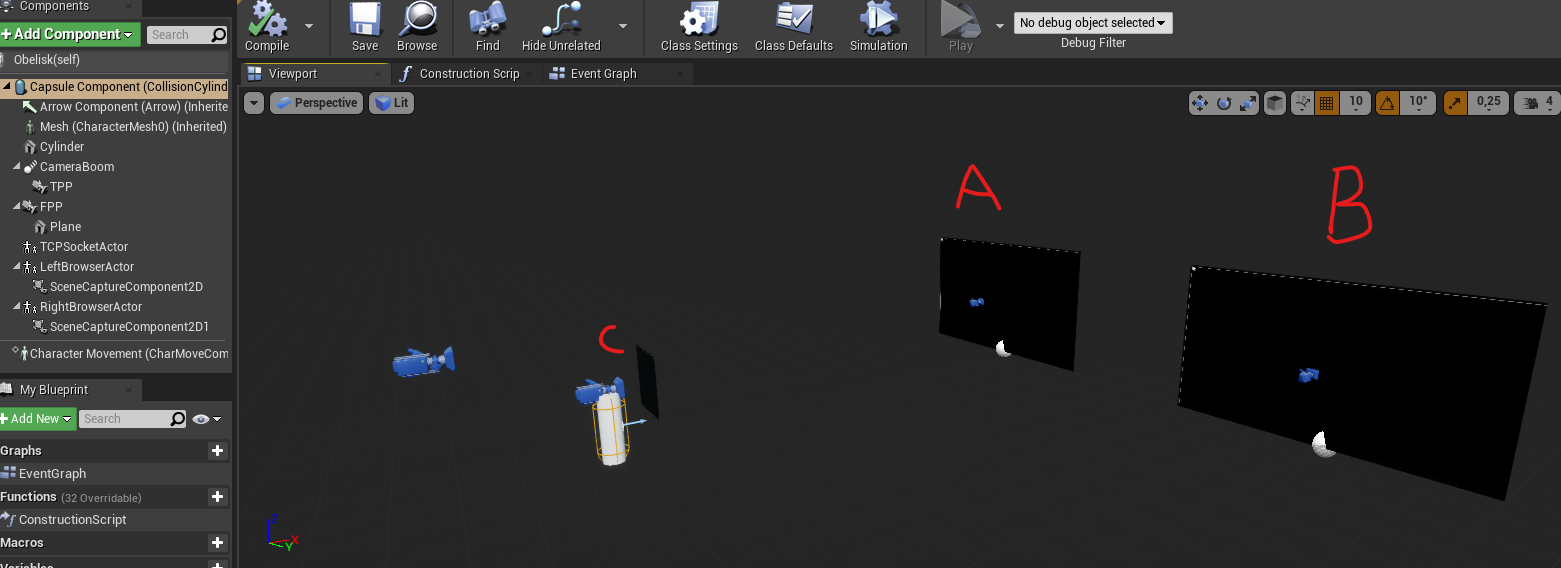
The concept is the same we are using SceneCaptureComponents and a widget with browser. The A showing the left camera stream in the widget web browser, and B is the right.
C is the first person perspective camera. Front of it is a simple plane with the camera material.
This is the "stereo camera" material:
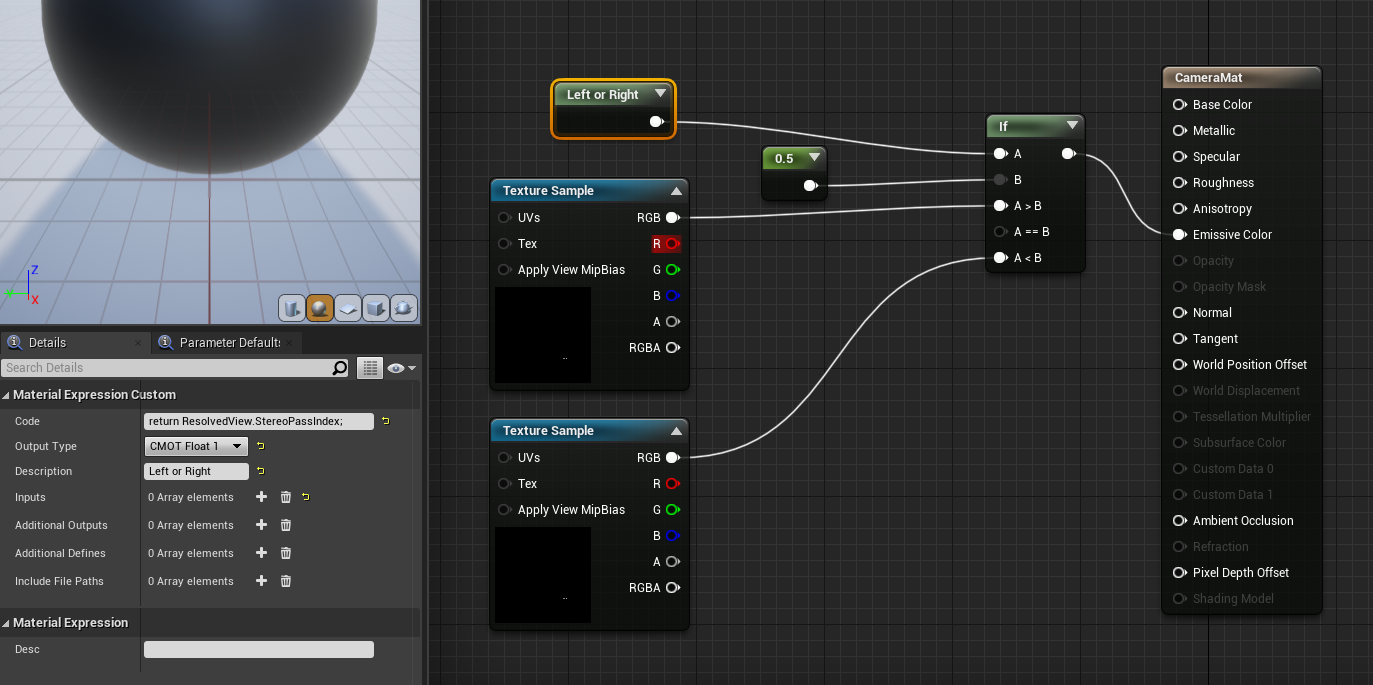
There is a "custom" node on the picture with this code:
return ResolvedView.StereoPassIndex;
//We tried to setup this with media stream, but we can't make the NDI stream output from the webcam at the robot side.
Other thing we will try out is the WebRTC instead of the HTTP MJPEG stream.
Discussions
Become a Hackaday.io Member
Create an account to leave a comment. Already have an account? Log In.