 schwarzrmsu
The LCD when powered looks so cool, lets make it say something now!

This has definitely been the hardest part yet, and will most likely be a work in progress as the SW matures. Later versions are going to take a number of inputs and map them onto the display to show information related to the electronic load performance. For now I simply want to create a function that will print a string onto the LCD. I started by generating functions to initialize the LCD functionality:
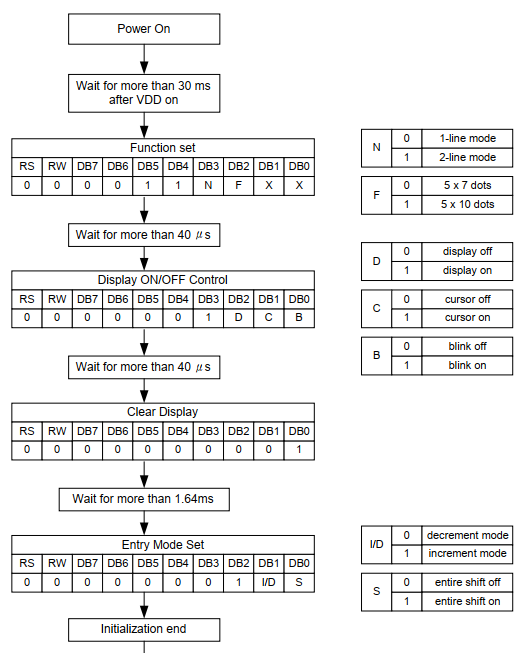
void LCD_functionSet(void)
{
    HAL_GPIO_WritePin(GPIOA, GPIO_PIN_15, GPIO_PIN_RESET);    //RS
    HAL_GPIO_WritePin(GPIOC, GPIO_PIN_10, GPIO_PIN_RESET);    //RW

    HAL_GPIO_WritePin(GPIOB, GPIO_PIN_8, GPIO_PIN_RESET);    //DB7
    HAL_GPIO_WritePin(GPIOB, GPIO_PIN_7, GPIO_PIN_RESET);    //DB6
    HAL_GPIO_WritePin(GPIOB, GPIO_PIN_6, GPIO_PIN_SET);        //DB5
    HAL_GPIO_WritePin(GPIOB, GPIO_PIN_5, GPIO_PIN_SET);        //DB4

    HAL_GPIO_WritePin(GPIOB, GPIO_PIN_4, GPIO_PIN_SET);        //DB3
    HAL_GPIO_WritePin(GPIOB, GPIO_PIN_3, GPIO_PIN_RESET);    //DB2
    HAL_GPIO_WritePin(GPIOD, GPIO_PIN_2, GPIO_PIN_RESET);    //DB1
    HAL_GPIO_WritePin(GPIOC, GPIO_PIN_12, GPIO_PIN_RESET);    //DB0

    HAL_GPIO_WritePin(GPIOC, GPIO_PIN_11, GPIO_PIN_SET);    //E
    delay_us(1);
    HAL_GPIO_WritePin(GPIOC, GPIO_PIN_11, GPIO_PIN_RESET);    //E
    delay_us(40);
    return;
}

void LCD_displayOnOffControl(void)
{
    HAL_GPIO_WritePin(GPIOA, GPIO_PIN_15, GPIO_PIN_RESET);    //RS
    HAL_GPIO_WritePin(GPIOC, GPIO_PIN_10, GPIO_PIN_RESET);    //RW

    HAL_GPIO_WritePin(GPIOB, GPIO_PIN_8, GPIO_PIN_RESET);    //DB7
    HAL_GPIO_WritePin(GPIOB, GPIO_PIN_7, GPIO_PIN_RESET);    //DB6
    HAL_GPIO_WritePin(GPIOB, GPIO_PIN_6, GPIO_PIN_RESET);    //DB5
    HAL_GPIO_WritePin(GPIOB, GPIO_PIN_5, GPIO_PIN_RESET);    //DB4

    HAL_GPIO_WritePin(GPIOB, GPIO_PIN_4, GPIO_PIN_SET);        //DB3
    HAL_GPIO_WritePin(GPIOB, GPIO_PIN_3, GPIO_PIN_SET);        //DB2
    HAL_GPIO_WritePin(GPIOD, GPIO_PIN_2, GPIO_PIN_RESET);    //DB1
    HAL_GPIO_WritePin(GPIOC, GPIO_PIN_12, GPIO_PIN_RESET);    //DB0

    HAL_GPIO_WritePin(GPIOC, GPIO_PIN_11, GPIO_PIN_SET);    //E
    delay_us(1);
    HAL_GPIO_WritePin(GPIOC, GPIO_PIN_11, GPIO_PIN_RESET);    //E
    delay_us(40);
    return;
}

void LCD_clearDisplay(void)
{
    HAL_GPIO_WritePin(GPIOA, GPIO_PIN_15, GPIO_PIN_RESET);    //RS
    HAL_GPIO_WritePin(GPIOC, GPIO_PIN_10, GPIO_PIN_RESET);    //RW

    HAL_GPIO_WritePin(GPIOB, GPIO_PIN_8, GPIO_PIN_RESET);    //DB7
    HAL_GPIO_WritePin(GPIOB, GPIO_PIN_7, GPIO_PIN_RESET);    //DB6
    HAL_GPIO_WritePin(GPIOB, GPIO_PIN_6, GPIO_PIN_RESET);    //DB5
    HAL_GPIO_WritePin(GPIOB, GPIO_PIN_5, GPIO_PIN_RESET);    //DB4

    HAL_GPIO_WritePin(GPIOB, GPIO_PIN_4, GPIO_PIN_RESET);    //DB3
    HAL_GPIO_WritePin(GPIOB, GPIO_PIN_3, GPIO_PIN_RESET);    //DB2
    HAL_GPIO_WritePin(GPIOD, GPIO_PIN_2, GPIO_PIN_RESET);    //DB1
    HAL_GPIO_WritePin(GPIOC, GPIO_PIN_12, GPIO_PIN_SET);    //DB0

    HAL_GPIO_WritePin(GPIOC, GPIO_PIN_11, GPIO_PIN_SET);    //E
    delay_us(1);
    HAL_GPIO_WritePin(GPIOC, GPIO_PIN_11, GPIO_PIN_RESET);    //E
    delay_ms(2);
    return;
}

void LCD_entryModeSet(void)
{
    HAL_GPIO_WritePin(GPIOA, GPIO_PIN_15, GPIO_PIN_RESET);    //RS
    HAL_GPIO_WritePin(GPIOC, GPIO_PIN_10, GPIO_PIN_RESET);    //RW

    HAL_GPIO_WritePin(GPIOB, GPIO_PIN_8, GPIO_PIN_RESET);    //DB7
    HAL_GPIO_WritePin(GPIOB, GPIO_PIN_7, GPIO_PIN_RESET);    //DB6
    HAL_GPIO_WritePin(GPIOB, GPIO_PIN_6, GPIO_PIN_RESET);    //DB5
    HAL_GPIO_WritePin(GPIOB, GPIO_PIN_5, GPIO_PIN_RESET);    //DB4

    HAL_GPIO_WritePin(GPIOB, GPIO_PIN_4, GPIO_PIN_RESET);    //DB3
    HAL_GPIO_WritePin(GPIOB, GPIO_PIN_3, GPIO_PIN_SET);        //DB2
    HAL_GPIO_WritePin(GPIOD, GPIO_PIN_2, GPIO_PIN_SET);        //DB1
    HAL_GPIO_WritePin(GPIOC, GPIO_PIN_12, GPIO_PIN_RESET);    //DB0

    HAL_GPIO_WritePin(GPIOC, GPIO_PIN_11, GPIO_PIN_SET);    //E
    delay_us(1);
    HAL_GPIO_WritePin(GPIOC, GPIO_PIN_11, GPIO_PIN_RESET);    //E
    delay_us(40);
    return;
}
Now that I have initialized the LCD, I can send commands for the different characters and it will print the characters onto:
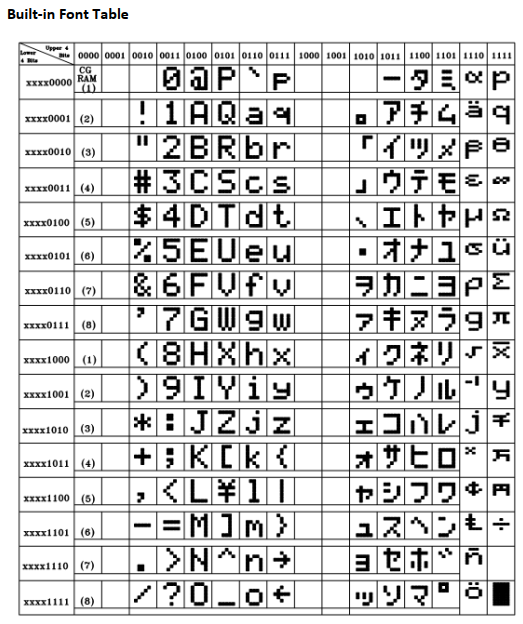
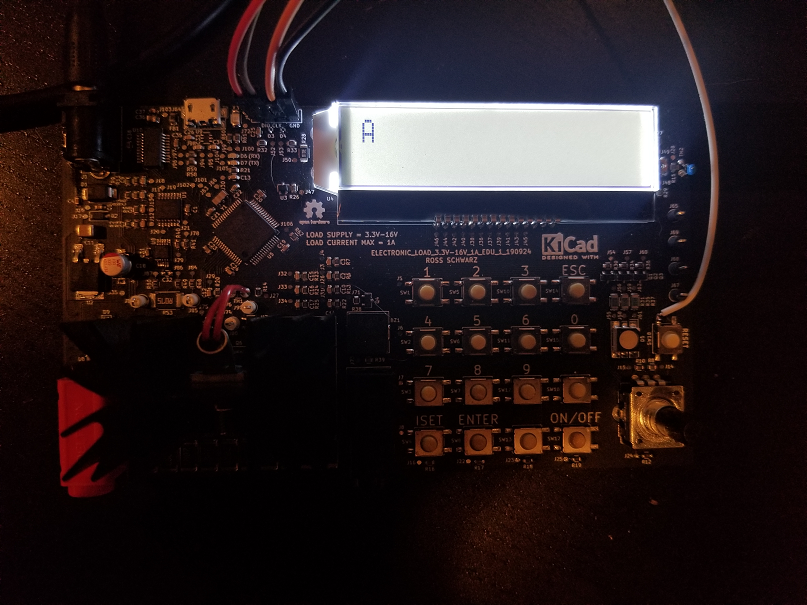
I started with a function to print the letter A:
void LCD_print_A(void)
{
    HAL_GPIO_WritePin(GPIOA, GPIO_PIN_15, GPIO_PIN_SET);    //RS
    HAL_GPIO_WritePin(GPIOC, GPIO_PIN_10, GPIO_PIN_RESET);    //RW

    HAL_GPIO_WritePin(GPIOB, GPIO_PIN_8, GPIO_PIN_RESET);    //DB7
    HAL_GPIO_WritePin(GPIOB, GPIO_PIN_7, GPIO_PIN_SET);        //DB6
    HAL_GPIO_WritePin(GPIOB, GPIO_PIN_6, GPIO_PIN_RESET);    //DB5
    HAL_GPIO_WritePin(GPIOB, GPIO_PIN_5, GPIO_PIN_RESET);    //DB4

    HAL_GPIO_WritePin(GPIOB, GPIO_PIN_4, GPIO_PIN_RESET);    //DB3
    HAL_GPIO_WritePin(GPIOB, GPIO_PIN_3, GPIO_PIN_RESET);    //DB2
    HAL_GPIO_WritePin(GPIOD, GPIO_PIN_2, GPIO_PIN_RESET);    //DB1
    HAL_GPIO_WritePin(GPIOC, GPIO_PIN_12, GPIO_PIN_SET);    //DB0

    HAL_GPIO_WritePin(GPIOC, GPIO_PIN_11, GPIO_PIN_SET);    //E
    delay_us(1);
    HAL_GPIO_WritePin(GPIOC, GPIO_PIN_11, GPIO_PIN_RESET);    //E
    delay_us(40);
    return;
}
I ran a simple combo of these functions in main to test the functionality:
LCD_print_A();
delay_ms(1000);
LCD_clearDisplay();
I made similar functions for the other letters of the alphabet, along with space and key punctuation. The next part is deconstructing a string and printing each letter individually. Below is the function I created to accomplish this:
void LCD_printString(char string[])
{
    char stringInitial[21] = "";
    char stringCopied[21] = "";
    char* stringPointer;
    uint16_t i = 0;

    strcpy(stringInitial, string);

    uint16_t stringLength = strlen(stringInitial);

    //UART_printlnString(&huart2, stringInitial);

    while(i < stringLength)
    {
        stringPointer = &stringInitial[i];
        memcpy(stringCopied, stringPointer, 1);

        if(strcmp(stringCopied," ") == 0)
        {
            LCD_print_SPACE();
        }
        else if(strcmp(stringCopied,".") == 0)
        {
            LCD_print_PERIOD();
        }
        else if(strcmp(stringCopied,"/") == 0)
        {
            LCD_print_FWDSLASH();
        }
        else if(strcmp(stringCopied,"0") == 0)
        {
            LCD_print_0();
        }
        else if(strcmp(stringCopied,"1") == 0)
        {
            LCD_print_1();
        }
        else if(strcmp(stringCopied,"2") == 0)
        {
            LCD_print_2();
        }
        else if(strcmp(stringCopied,"3") == 0)
        {
            LCD_print_3();
        }
        else if(strcmp(stringCopied,"4") == 0)
        {
            LCD_print_4();
        }
        else if(strcmp(stringCopied,"5") == 0)
        {
            LCD_print_5();
        }
        else if(strcmp(stringCopied,"6") == 0)
        {
            LCD_print_6();
        }
        else if(strcmp(stringCopied,"7") == 0)
        {
            LCD_print_7();
        }
        else if(strcmp(stringCopied,"8") == 0)
        {
            LCD_print_8();
        }
        else if(strcmp(stringCopied,"9") == 0)
        {
            LCD_print_9();
        }
        else if(strcmp(stringCopied,"A") == 0)
        {
            LCD_print_A();
        }
        else if(strcmp(stringCopied,"B") == 0)
        {
            LCD_print_B();
        }
        else if(strcmp(stringCopied,"C") == 0)
        {
            LCD_print_C();
        }
        else if(strcmp(stringCopied,"D") == 0)
        {
            LCD_print_D();
        }
        else if(strcmp(stringCopied,"E") == 0)
        {
            LCD_print_E();
        }
        else if(strcmp(stringCopied,"F") == 0)
        {
            LCD_print_F();
        }
        else if(strcmp(stringCopied,"G") == 0)
        {
            LCD_print_G();
        }
        else if(strcmp(stringCopied,"H") == 0)
        {
            LCD_print_H();
        }
        else if(strcmp(stringCopied,"I") == 0)
        {
            LCD_print_I();
        }
        else if(strcmp(stringCopied,"J") == 0)
        {
            LCD_print_J();
        }
        else if(strcmp(stringCopied,"K") == 0)
        {
            LCD_print_K();
        }
        else if(strcmp(stringCopied,"L") == 0)
        {
            LCD_print_L();
        }
        else if(strcmp(stringCopied,"M") == 0)
        {
            LCD_print_M();
        }
        else if(strcmp(stringCopied,"N") == 0)
        {
            LCD_print_N();
        }
        else if(strcmp(stringCopied,"O") == 0)
        {
            LCD_print_O();
        }
        else if(strcmp(stringCopied,"P") == 0)
        {
            LCD_print_P();
        }
        else if(strcmp(stringCopied,"Q") == 0)
        {
            LCD_print_Q();
        }
        else if(strcmp(stringCopied,"R") == 0)
        {
            LCD_print_R();
        }
        else if(strcmp(stringCopied,"S") == 0)
        {
            LCD_print_S();
        }
        else if(strcmp(stringCopied,"T") == 0)
        {
            LCD_print_T();
        }
        else if(strcmp(stringCopied,"U") == 0)
        {
            LCD_print_U();
        }
        else if(strcmp(stringCopied,"V") == 0)
        {
            LCD_print_V();
        }
        else if(strcmp(stringCopied,"W") == 0)
        {
            LCD_print_W();
        }
        else if(strcmp(stringCopied,"X") == 0)
        {
            LCD_print_X();
        }
        else if(strcmp(stringCopied,"Y") == 0)
        {
            LCD_print_Y();
        }
        else if(strcmp(stringCopied,"Z") == 0)
        {
            LCD_print_Z();
        }

        //UART_printlnString(&huart2, stringCopied);
        i = i + 1;
    }
    return;
}
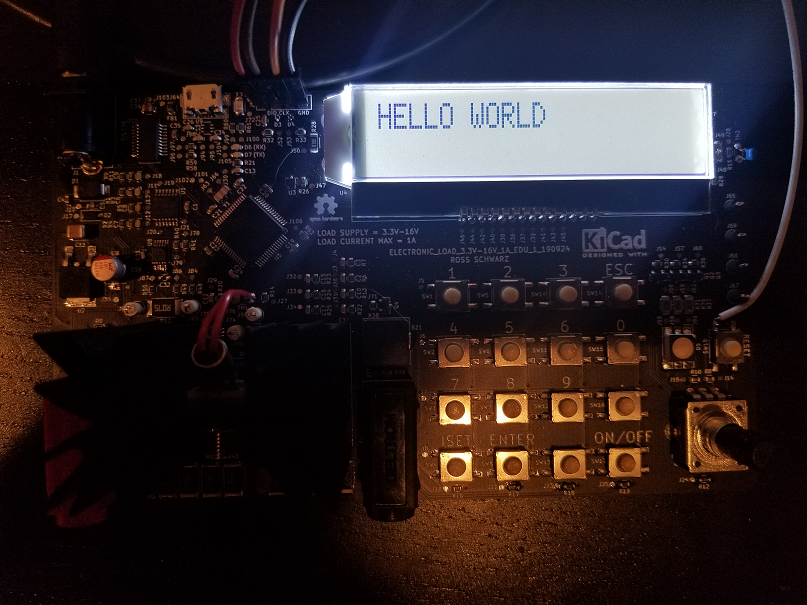
This function takes a string, and looks at each character one by one. If the character matches a known character in the "if statement", then it prints that character onto the display. The while loop goes through each character until it has gone through the entire string length.
Running the following function with "HELLO WORLD" gets the following result:
LCD_printString("HELLO WORLD");
delay_ms(1000);
LCD_clearDisplay();
Discussions
Become a Hackaday.io Member
Create an account to leave a comment. Already have an account? Log In.