 Ben Jacobs
Subsystem Description
This subsystem contains contributions from team members Chad, Katarina, Ryan and Ben J.
The Raspberry Pi 3B+, for all it's excellent features, does not have a built in audio input. To remedy this and get the analog guitar audio into the RPi for processing, as well as to provide a HiFi audio output, an audio codec device was used. An audio codec is a device that interfaces digitally with a processor to provide analog audio capabilities. The main components that go into a codec are an ADC, a DAC, and some sort of filtering. The codec that was used in this project in specific was the Wolfson 8731, which is available on a dev-board for convenience.
The Wolfson 8731 operates on the i2C interface (for low speed, general purpose communications, eg. setting volume) and the SPI/I2S interface (for audio data transfer). Using open source drivers, the WM8731 appears to the Raspberry Pi's Linux operating system as a normal sound card in the ALSA sound manager tool (alsamixer).
The audio codec dev-board may be sourced at the following website for a cost of $19 (as of April 2020): https://www.mikroe.com/audio-codec-proto-board
Subsystem Bill of Materials
- Raspberry Pi 3B+ (Amazon): $35
- WM8731 Proto Dev-Board (Mikroe): $19
- Female-Femal Jumper Wires (Adafruit): $3.95
- Medium breadboard
First Step - Loading an OS on the Raspberry Pi
This project assumes you are using the PatchBoxOS on your Raspberry Pi. PatchBox is an OS that supports Real-Time audio, and is rather lightweight, compared to Raspbian or other common OSes for the Pi. If you use another debian-based OS, be prepared to possibly encounter audio latency issues.
A download link and install instructions for PatchBox may be found on their website: https://blokas.io/patchbox-os/
Subsystem Hardware Connections
With the OS installed on the Raspberry Pi, you may begin making hardware connections for the Audio Codec Subsystem. Below is a block diagram of the codec subsystem. Notice the connections to the RPi over I2C and SPI interfaces.
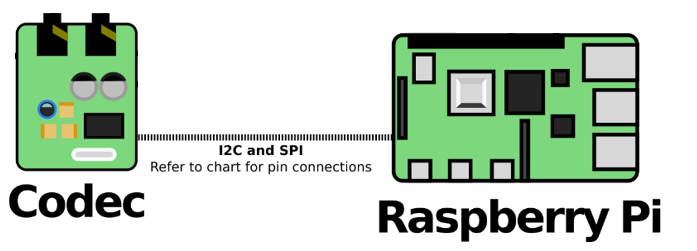
Below is a table showing the connections between the Raspberry Pi and the WM8731 Codec board. For the puprose of this site, this information was taken directly from the following webpage: https://www.fredrikolofsson.com/f0blog/?q=node/656
proto               raspberry
-----                -----
sck                  rpi 12
miso                 rpi 38
mosi                 rpi 40
adcl+dacl            rpi 35  //both proto pins go to the same rpi pin
sda                  rpi 3
scl                  rpi 5
3.3v                 rpi 1
gnd                  rpi 6
It is important to note that for the time being, the codec may be powered by the 3.3V pin on the Raspberry Pi, but in the final prototype, the codec and the Raspberry Pi are being powered by the Power Supply Subsystem (details provided in that section).
Subsystem Software Configurations
Before the WM8731 codec will be recognized by the Linux operating system on the Raspberry Pi, some software configuration was necessary. Although the same page used for the hardware connections reference (the blog of Fredrik Olofsson) contains software setup instructions, it was found that issues with audio dropouts and general instability were remedied by following the Github page for the TerminalTedium project, which also uses the WM8731 in conjunction with a Raspberry Pi: https://github.com/mxmxmx/terminal_tedium/wiki/setting-up-linux
The difference between these two sites is in which kernel module is being loaded to handle communication with the codec. The TerminalTedium page recommends loading the rpi-proto module, which was found to work best, as it appears to be a module built into Linux which was made specifically to be compatible with the WM8731.
Kernel modules are loaded at boot on the Raspberry Pi by modifying the config.txt file, located in the /boot/ directory. The following code snippet shows the modification necessary to this file in order to load the necessary module.
# Enable i2c
dtparam=i2c_arm=on
dtparam=i2s=on
dtparam=spi=on

# Disable default audio interface
dtparam=audio=off

# Enable audio (loads snd_bcm2835)
dtoverlay=i2s-mmap
dtoverlay=rpi-proto
Upon a reboot of the Raspberry Pi, the new audio interface should be visible by running the command alsamixer at a terminal window. The device should be listed as "rpi-proto".
Configuring PureData
As a preamble to this section, a helpful resource for learning about PureData in general may be found here: http://write.flossmanuals.net/pure-data/introduction2/. It is recommended that you familiarize yourself with the PureData interface before proceeding. PureData is similar to MAX/MSP in that it's a visual DSP programming language.
The operating system on the Raspberry Pi, PatchBoxOS, comes pre-loaded with a recent version of the PureData DSP engine. Minimal configuration is necessary to set it up to be used with the WM8731 codec, which is now visible to the Linux kernel as an audio device.
After loading PureData, enter the audio settings menu. More information on reaching this menu, and what it should look like, may be found here: http://write.flossmanuals.net/pure-data/configuring/
The following settings are recommended. This may be done manually, or the code below may be pasted into a .pdconfiguration file and loaded into PureData.
audioapi: 1
noaudioin: False
audioindev1: 0 2
audioindevname1: snd_rpi_proto (hardware)
noaudioout: False
audiooutdev1: 0 2
audiooutdevname1: snd_rpi_proto (hardware)
audiobuf: 15
rate: 48000
callback: 0
blocksize: 64
midiapi: 1
nomidiin: False
midiindev1: 0
midiindevname1: ALSA MIDI device #1
nomidiout: False
midioutdev1: 0
midioutdevname1: ALSA MIDI device #1
path1: /home/patch/Documents/Pd/externals
path2: /root/Pd/externals
npath: 2
standardpath: 1
verbose: 0
nloadlib: 0
defeatrt: 0
flags: -alsamidi -rt
zoom: 1
loading: no
Subsystem Testing
Once PureData is configured, open the built-in 'Test Audio and MIDI' patch. This may be found under the Audio menu. Below is a screenshot of this test interface.
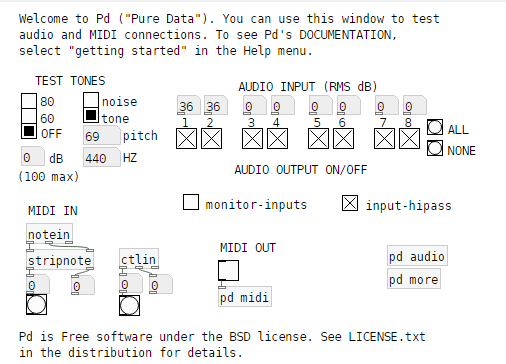
Attach a set of headphones and a signal source to the line-in input of the codec. Start by playing a test tone by clicking the '60' setting under 'TEST TONES'. You should hear a 440Hz tone in the headphones. Turn off the test tone, and check the 'monitor-inputs' box to pass the line-input through to the headphones. If either or both of these tests do not work, you may need to restart PureData.
Discussions
Become a Hackaday.io Member
Create an account to leave a comment. Already have an account? Log In.