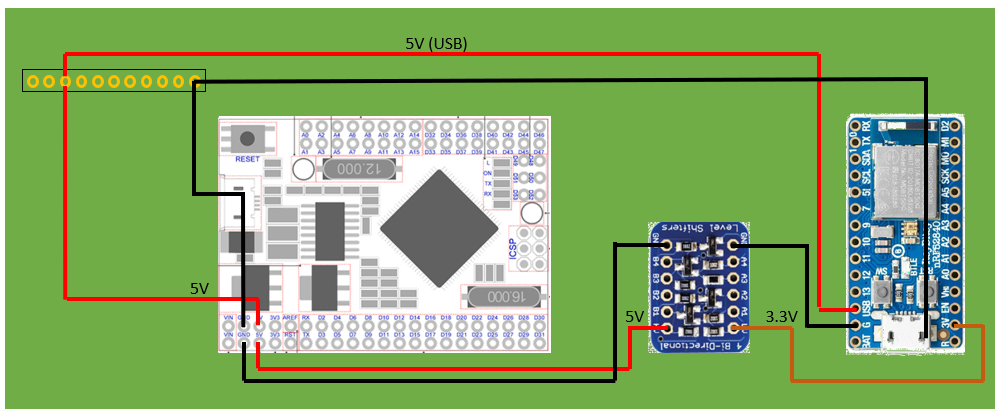
As mentioned earlier, the Adafruit board runs on 3.3V IO voltage, so a level converter is needed, and a bi-directional level shifter can easily be made with two mosfets and two resistors. However the Adafruit Bi-directional logic level converter board is the fast track to get this up and connected without any breadboarding. The Atmega2560 PRO is connected to the “Hv” side, and the Adafruit itsybitsy to the “Lv” side. Picture below shows where I placed the level converter and how it is hooked up to the mega2560 board.
Here is the connection diagram for the I2C wiring and level converter.
Make sure the wires are long enough for the itsybitsy board to be mounted through the MIDI OUT hole in the encapsulation. And it should be mounted with its top-side up in the finished unit, i.e. bottom side up when seen from the bottom/wiring side.
The USB pin of the itsybitsy is 5V out from the USB connection and can be used to power the entire 5V domain of the unit so everything can be powered from a single USB connection to the itsybitsy board.
Connect a wire to the “USB” pin of the itsybitsy, and one to the big ground pad at the USB connector, and then connect these to GND and 5V on the main PCB.
 Although the "USB" pin (5V) on the itsybitsy is said to be an output only, I checked the schematics and it can also be used as an input to power the Itsybitsy board. this means whenever the ATmega2560 Arduino needs to be programmed, it should be OK to just leave that board connected to USB, and the Itsybitsy will then be powered from the Atmega2560 Arduino 5V output through its "USB" pin.
To test that everything is correctly connected I programmed the itsybitsy board with the same I2C slave code as in previous log posting and checked that the data was correctly output on the serial monitor. And then I also tested by combining the Adafruit BLE Midi example with the I2C slave code, and voila, the KORE could now BOTH play the arpeggios from the BLE midi example file AND output to the serial port monitor the value of the pots and buttons.
Discussions
Become a Hackaday.io Member
Create an account to leave a comment. Already have an account? Log In.