 PMercier
I had a lot of problems and familial events. I abandoned this project. Too much to manage, too much problems to solve. I had to cut a drop whatever was not absolutely essential.
.... time passed and i was able to get my head out of the water. Getting back at my bench I saw the two scopes who were waiting looking at me with their lonely buttons. I abandoned a project i had with them. Still had plenty problems to solve, but why not looking at it just to be sure i made the good choice.
I won't go in details as it can be pretty boring, but i was more the type that do everything by himself. All the recent events in my life got me to reflect a lot on myself. So i tried something I had never done until now : Getting some help !
So i looked for people that had extensions cards and who were kind enough to share a scan or a photo of their cards.
Two days later, success ! Someone accepted to help me. He had access at his job to the extensions cards i needed.
He sent me a lot of photos of the cards he had. Front, back, top and down. I can't thank him enough for that. He got me fired up again about this project.
As i had to take a temporary leave from my job, all of the problems linked to it disappeared (nearly 75% of them). I had some brain time to spare for my own projects.
First step was to look for software who reversed or helped to reverse a PCB. Or at least some techniques. I learnt that some company are specialized in this field, that some windows program helped in this, some searcher published papers about reversing a PCB with computer vision. I don't have money, I don't have/want Windows, i didn't want to start learning another domain for the moment.
So it was a fallback to what i already knew and had : Gimp and a good old Wacom tablet.
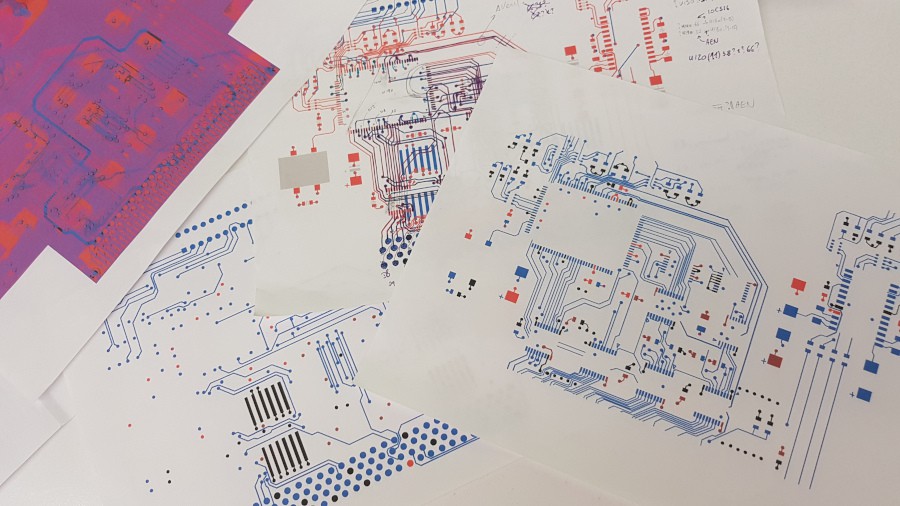
What i learned for my first PCB reversing 4 layers board with trials, errors and looking for what other people do :
- Get the best and more detailed photo you have for each side of the board.
- The best photos are with homogeneous lighting
- Play with the colors/contrasts/highlights/gamma/filters to get the best view of the copper tracks
- Learn how to use the cage deformation tool
- Create a layer with a specific color for
- the top traces (light red)
- the bottom traces (light blue)
- the components (light grey)
- For every vias, look for the thermal relief, it a good hint to know to what layer it's connected
- Use a hard pen, not a brush to draw over the tracks. For the width, 5 to 9 pixels was enough for me.
- Try to leave some space between the tracks you've drawn, ti's easier to read after
- If you spot the a VCC rail, a GND rail or any power rail, mark it with a specific color
- Even if you don't need a full reversal, it's useful to correctly all the tracks
- Real paper and real color pens are still the best tools :)
Okay, i had most of the TDS3GM board tracks. And I though, good job, i'll find how it work by tomorrow for sure.
Silly me. It's where the real hard work start !
I knew how to use EasyEDA, but it left me with a sensation of playing with a baby toy. So it was time to look for something more robust. A long time ago I played with EaglePCB, but the licensing and limitations where pretty frustrating. I wanted to really get into electronic hobbies, so knowing i can get stopped because i used something like that ... naaaahhh. So after some googling, youtubing, reading, benching and accounting i choose KiCAD to draw the board schematic.
I'll keep this part short as the "history" of this project is near it's end. Not because i don't want to share any useful technics or information, but because i don't remember all i did. That a shame because it's in theses part that i spent a lot of time understanding what was going one on this simple design and learned a lot too in the process !!!!
Here what i can share for sure is :
- reverse engineering a 4 layer PCB just with photo is a lot of recursive analysis
- Even with missing or interrupted tracks you can guess where they are going to using datasheets and trying to understand how the board was designed
- Sometime if you can't find where a track is going, take a guess and way to see if it match with the other guesses/tracks
- Having your cleaned tracks printed on paper allow you to easily take notes, so don't reject paper, love them :)
- It felt easier to follow a track with a pen on a paper
Discussions
Become a Hackaday.io Member
Create an account to leave a comment. Already have an account? Log In.