Close
0%
0%

Miscellaneous Mechanica - Lockable Rotary Joint

A rotary joint design for a long articulated arm for the workshop.

Public Chat
Similar projects worth following
I want to make an arm that can be mounted on the wall of my workshop that can hold a light or camera (or both). I want the arm to be easily movable and very sturdy when locked. I also don't want to be limited to by a number of fixed positions like some of the currently available offerings.

The joints that are necessary for the larger project are developed and detailed here.

The mechanical joints necessary for this project must fulfil several requirements of the umbrella project.

Namely:

  • Rotate in 1, 2 or 3 axes
    • Only move in those axes, no wobble
  • Lockable
    • Free-moving to fully locked in 1 small motion
    • Using only 1 hand
  • Range of mounting options
    • Multiple threaded holes 
    • OR counter-bored holes to allow mounting without access to the back of a panel/wall
  • Friction
    • Metal to plastic contact for the sliding elements to prevent binding or galling.
  • Cheap
    • Less than £20 in materials and accessories
    • Time spent is less relevant at this stage

With this list of requirements in mind, I will be designing and making a series of joints and eventually assembling a long arm for the shed.

  • Its a clutch!

    Greg Duckworth08/25/2020 at 18:03 0 comments

    Why didn't you tell me that this was basically a clutch?! Well, at least I found some amazing bits of information on clutch design, right the way back to some extremely early clutches in the 1900's. 

    Where is the project currently at?

    After many hour of research and reading more than a few papers and presentations on clutch design and friction in rotary systems, I have got several more designs to test.  The thing we are trying to design is fundamentally just a clutch, only its coupling two stationary systems, not two rotating systems.

    I have now got a prototype for a tapered friction interface design which I will be testing in short order.  In the last Project Log I detailed the limits of torque that a human could reasonably apply, which is now a parameter in the design process.  The calculations that correspond to the single face contact, tapered face contact and multi-plate face contact have been done and a very predictable result has been found: 

    Humans are not strong enough to exert the necessary torque on a 40 mm diameter hand wheel to enable a small (< 60 mm dia.) simple clutch design to hold 180 Nm of torque, even if the clutch has a tapered face.

    So, like most of the initial prototypes I make, the new tapered design of clutch is not sufficient to meet the requirements and I should have done some calculations before I wasted all that time.  

    But where is the fun in that?

    Where are we going?

    • The current designs need to be tested to confirm that the expected performance of the locking mechanism is even remotely close to the predicted performance.
    • The tapered clutch design, along with the corresponding design principles and choices, needs to be documented.  
    • Some revisions were made to the design (Now up to version 9 of the joint design overall) so those revisions should be documented to help people avoid those mistakes in the future.
    • Multi-plate clutch designs need to be documented, built and tested.

    History and Background

    Cone Clutch

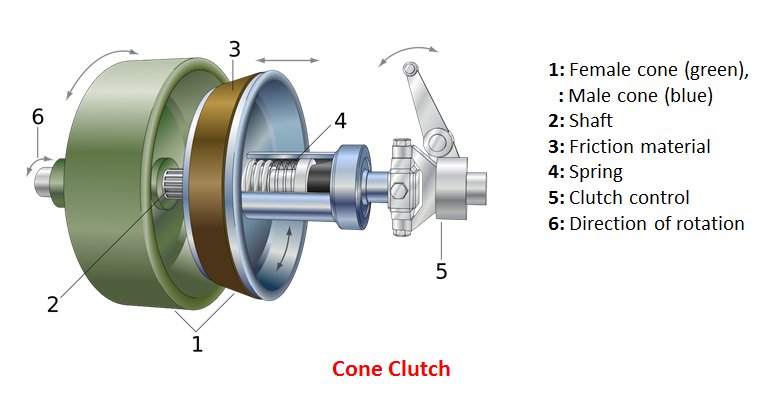
    A small alteration to the flat plate clutch will increase the torque capacity for a given size of clutch, without needing to resort to a complex multi-plate clutch design.  The mating faces of the clutch may be tapered, thereby increasing the contact area without increasing the overall diameter of the clutch.  Care must be taken to keep the taper angle well above the self-locking angle of the material as this would make the clutch difficult to disengage.  

    The image shows a typical cone clutch.  Image taken from here: Cone Clutch

    The conical contact surface makes a considerable difference to the holding torque.  For a clutch with a friction surface OD of 50 mm and ID of 45 mm, an applied force of 2.5 kN, and a friction coefficient of 1, the holding torque of a flat plate clutch is 118 Nm.  For a similar conical clutch, with a taper angle of 15 degrees (30 degree included angle), the holding torque goes up to 229 Nm.  

    There are some limitations and negatives though.  The angle of the mating components must be closely matched such that the clutch will perform well without requiring 'bedding in'.  The torque is also limited by only having a single friction surface and the taper makes the action of the clutch either very strongly engaged or disengaged.  The ability to set the clutch to a lower torque may be useful in this project.

    Plate Clutch

    Plate clutches have not changed much (conceptually) in 100+ years, although the materials, manufacturing processes and design have seen many improvements or paradigm shifts in that time.  The use of multiple clutch plates to increase the number of friction surfaces is nothing new.  By stacking the plates such that half of the plates are connected to the drive-side and half to the driven-side, in an alternating fashion, the number of friction surfaces is increased.  The number of friction surfaces in...

    Read more »

  • More Design Priciples

    Greg Duckworth07/02/2020 at 12:43 0 comments

    So I have done some engineering analysis and some prototyping work and I now have the next version of the rotary joint that I would like to manufacture and test.  First; How I got to this point.

    Holding Moment Calculations

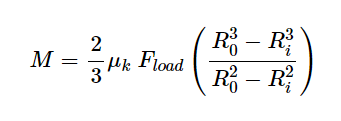
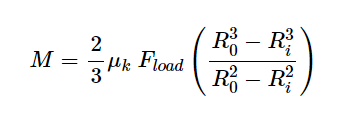
    So I have previously documented a set of calculations that can be done to derive the holding torque for face-to-face contact of two discs.  The resulting formula is:

    Where M is the holding moment, µ is the coefficient of friction, F is the applied force, Ro is the Outside Diameter and Ri is the Inside Diameter.

    This results in some interesting conclusions:

    µ vs Ro

    The holding moment is directly proportional to the coefficient of friction.  This means that achieving the highest coefficient of friction allows the lowest clamping force to hold a given moment.  The moment is also proportional to the outer radius of the disc.  The subtlety here is that the overall size of the joint is given by the diameter not the radius and so it is very beneficial to increase the coefficient of friction against increasing the radius of the disc.

    To illustrate this, for a given force (8 kN), a required holding moment (180 Nm) and a coefficient of friction of 1, the disc must have an Ro of 25 mm and an Ri of 20 mm.  If the coefficient of friction is reduced to 0.6 then the disc needs an Ro of 40mm and an Ri of 35mm.  This changes a 50 mm diameter disc to an 80 mm diameter disc, greatly increasing the mass and making manufacture more difficult.  (The difference between Ro and Ri was maintained at 5 mm in both instances to simplify comparison)

    Ri and Ro

    The equation for the holding moment of a circular contact is directly proportional to the radius, given that there is no inner diameter.  The holding moment for a disc is more complicated and the relationship between the holding moment and Ro and Ri is not immediately intuitive.

    For a given force, the holding moment increases as Ro increases. This is intuitive.

    For a given force, the holding moment decreases as Ri DECREASES.  This was not intuitive to me at first.

    For example:

    So for MORE surface are you get less force???  

    Okay, so I can now think of this in terms of a certain pressure as a certain radius.  The case with the larger ID (left) has a higher pressure and all of that higher pressure is spread over a larger radius.  The case with the smaller ID (right) has a lower pressure and that pressure applies over a smaller radius than the case on the left.

    If anyone knows of a better explanation, I would love to hear it.  Please message me or comment here, I would love to understand this better.

    Anyway, the conclusion of this exercise was a table:

    µRo (mm)Ri (mm)Desired M (Nm)Required Force (kN)
    1.025151808.8
    1.02520180
    8.0
    0.8252018010
    0.6252018013.2
    0.4252018019.9

    (A.N. If anyone wants a deeper explanation of how I got to these figures, message me and I will post a very nerdy update with equations and everything)

    Hand wheel and bolt selection

    The required clamping force is applied using a hand wheel or hand lever.  There is a limit to the torque that can be applied by humans and I would like this joint to lock and unlock easily.  The bolt must also hold without damaging the threads.  It would be preferable if the hand wheel or lever would fit within the silhouette of the joint.  Another locking method is the cam-lever.  This does not necessarily need to fit within the silhouette of the joint as it does not lock via rotation.

    Bolt torque is calculated as follows:

    Where T is the torque, D is the diameter of the bolt, F is the force applied, and K is the coefficient of friction.  The units are typically in metres and Newtons, however, I find that using mm and kN is more intuitive and does not require a correctional factor.  K is typically 0.2 for dry steel on steel and may be as low as 0.12 for very well lubricated bolts.  I am using K = 0.16 for my calculations....

    Read more »

  • Prototype #1 - What I Learned

    Greg Duckworth07/01/2020 at 00:17 0 comments

    So I went and made the first prototype rotary joint.  It works surprisingly well being my first attempt and I think it will certainly stand up to testing.  It is very satisfying to hold and Locks very rigid when held in the hand.

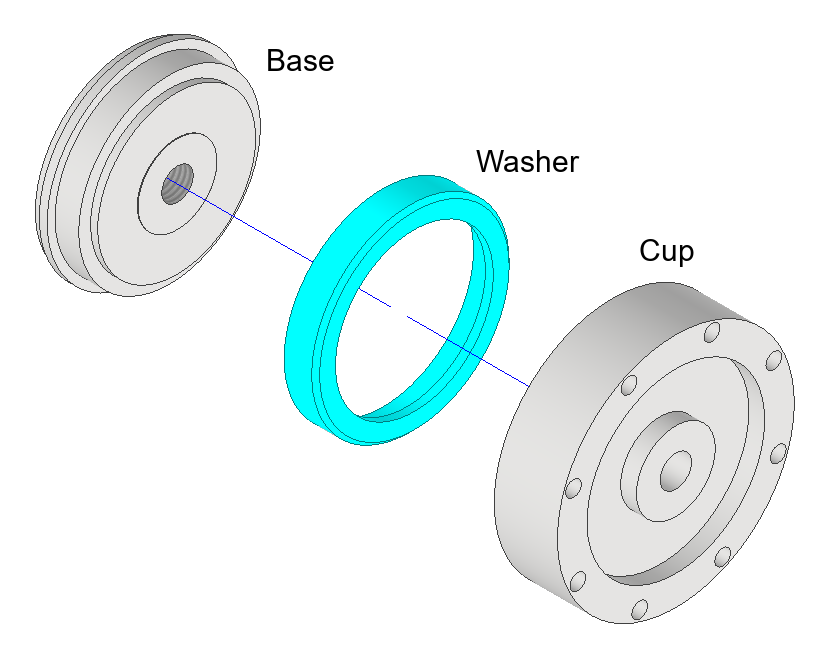
    The order of operations in terms of component manufacture could definitely be improved.  In the first prototype there are 3 major components: The base, the washer and the cup.

    There are several mating surfaces that have tight tolerances to consider.  The washer must have its ID bored and be the correct length before the base is made, as the washer has its OD finished when glued to the base.  This may or may not be necessary as the nylon washer will readily deform to the shape of the base, although it is definitely useful in allowing fine tuning of the washer.

    The ID of the cup must be turned after the base and washer have been finished to ensure the correct fit can be achieved.

    What will I change?

    First, the washer should not extend to cover the end face of the base and should not be used as both a high friction material in the locked mode and a low friction material in the freely rotating mode.  This will also simplify the production of the washer, with only the facing, boring and parting operations being necessary before gluing the washer to the base.  Fewer critical measurements to make, fewer features to cut, simpler cleanup after glue up.  Good.

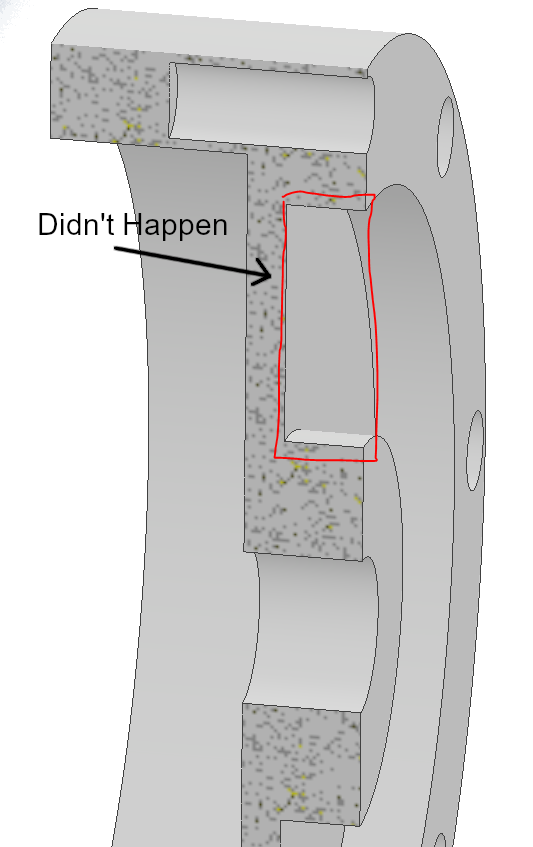
    Second.  I did not manage to machine the recess in the cup as shown in the picture above.  I am technically capable of this machining operation, although it is not trivial, but I did not consider it necessary for testing and I could always add it later if necessary.

    This recess was designed to allow the centre section to flex and make contact with the base, thereby allowing metal to metal contact and therefore good locking.  This approach may have worked, at least, the aluminium could be deformed 0.05 mm when tightened with a hex key.  However, this is very much missing an important engineering subtlety that will be shown in an upcoming project log.  The recess may be added in future iterations for weight-saving purposes but the cup will not be allowed to contact the base near the centre of the screw in future iterations.

    I also made the OD of the cup larger as the available stock allowed it and it felt right in the hand.  I liked the larger overall size and I shall likely stick with this choice of OD, although I may design a smaller version in the future.

    The base component was basically machined to drawing and will not likely change much in upcoming designs, although the mating face will change slightly.

  • Some Design Principles

    Greg Duckworth06/25/2020 at 15:12 0 comments

    The previously given specification for the joint can be though of as a set of tests which the joint design will be evaluated against.  We can make any joint design we like, but if it wobbles then it fails to meet a fundamental requirement.  To help to pass the specification tests, we can use some fairly basic design principles to guide our decision making.

    So lets start by evaluating the forces and torques on the joint.

    I would like the arm to have a reach of 3 meters at full extension and I would the payload to be 2 kg.  This is quite a significant extension for such a mass but hopefully we can get somewhere close.  The self-weight of the arm is also important: I am going to assume that this is equivalent to another 2 kg at full extension (4 kg total mass, evenly distributed along the arm).  

    The maximum static torque is experienced by the joint furthest from the load i.e. the joint attached to the wall (Labelled A below)

    The torque at A will be 4 kg x 9.81 m/s^2 x 3 m = 117 Nm.  We will use the value 120 Nm for ease.  This is the value that the joint must be able to comfortably hold.  If the joint is able to hold only 120 Nm then it would begin to slip so a factor of safety should be used.  In this case a factor of safety of 1.5 feels about right so the joint must be able to hold 180 Nm maximum.

    From this site:

    Disc Friction

    We can calculate the holding moment between two discs as follows:

    Where M is the moment, µ is the coefficient of friction between the surfaces, F is the force pushing one surface onto the other, Ri is the ID of the disc and Ro is the OD of the disc.

    It is difficult to find details of the coefficient of friction for aluminium and Nylon.  Tables show the coefficient of friction between Nylon and steel as 0.4 so we will use this value. Ri is 18 mm (0.018 m) and Ro is 25 mm (0.025 m). Friction ref

    F is somewhat variable.  High force mechanisms are typically difficult to actuate so lower is better.  We will find the required force to give a moment of 180 Nm.

    This gives a relation of M = 0.008675 * F, (M in Nm and F in N)

    The required force to hold 180 Nm is 21 kN.

    The bolt that is used to apply the holding force is an M8 which according to Bolt Ref has a minimum ultimate tensile of 29.2 kN (for grade 8.8).

    Using a bolt torque to force calculator (Bolt Torque ref) a required torque of 20.2 Nm is calculated.

    Discussion

    These calculations reveal a lot of the dependency between clamping strategy and the required performance of the underlying components.  We could take them further.  We could calculate the force that can be exerted by a cam mechanism as they are cheap and easy to come by.  We could also investigate the pull-out force that the tapped aluminium could sustain, although I don't think either of these will be hugely useful in my situation.

    Instead, I made the first prototype joint and I am going to test it.  At the same time I am going to redesign the joint to use a different face contact and use Aluminium-on-Aluminium for the friction surfaces, instead of Nylon-on-Aluminium.  I am also doing something I should have done before making the prototype: I am going to run these calculations for several designs to understand the sensitivities involved.

View all 4 project logs

Enjoy this project?

Share

Discussions

Similar Projects

Does this project spark your interest?

Become a member to follow this project and never miss any updates