Kalimov
The Mask Reborn Box is a box that renews protective masks and respirators. The box is designed to be low-maintenance and user-friendly.

The box is open source. If you feedback (positive or negative) or would like to share this project, we would love to hear from you.
The team:
- Kalimov Lok
- Jason Leong
- Torrey Nommesen
- John Lee
- Daniel Feng
- Halima Ouatab
Thanks to Dr. Chen Jian Feng, the Academician of Chinese Engineering Academic, and his team members. We based our process on their report of how to safely reuse disposable masks. This is the same progress used by the National Center for Biotechnology Information.

Another useful source of information that helped us to validate our process is the Stanford white paper Can N95 respirators be reused after disinfection? And for how many times? by Lei Liao, Wang Xiao, Mervin Zhao, Xuanze Yu.
Tools, Software, and Parts list
Hardware components | |||||||
| × | 1 | |||||
| × | 2 | |||||
| × | 1 | |||||
| × | 1 | |||||
| × | 1 | |||||
| × | 1 | |||||
|
| × | 1 | ||||
| × | 6 | |||||
| × | 7 | |||||
| × | 6 | |||||
| × | 6 | |||||
| × | 6 | |||||
| × | 6 | |||||
|
| × | 1 | ||||
|
| × | 1 | ||||
| × | 1 | |||||
| × | 2 | |||||
| × | 6 | |||||
| × | 2 | |||||
| × | 1 | |||||
| × | 6 | |||||
| × | 1 | |||||
| × | 1 | |||||
| × | 5 | |||||
| × | 6 | |||||
| × | 6 | |||||
| × | 8 | |||||
| × | 2 | |||||
| × | 1 | |||||
| × | 1 | |||||
| × | 1 | |||||
| × | 1 | |||||
| × | 1 | |||||
| × | 1 | |||||
| × | 1 | |||||
| × | 1 | |||||
| × | 1 | |||||
| × | 1 | |||||
| × | 1 | |||||
| × | 1 | |||||
|
| × | 1 | ||||
| × | 20 | |||||
| × | 2 | |||||
| × | 1 | |||||
| × | 6 | |||||
| × | 4 | |||||
| × | 1 | |||||
|
| × | 1 | ||||
| × | 1 | |||||
| × | 2 | |||||
| × | 5 | |||||
| × | 3 | |||||
| × | 1 | |||||
| × | 1 | |||||
| × | 30 | |||||
Software apps and online services | |||||||
| |||||||
| |||||||
Hand tools and fabrication machines | |||||||
|
| ||||||
|
| ||||||
|
| ||||||
| |||||||
|
| ||||||
|
Story
We are going to restore used masks quality totally.
When will the next pandemic take place?
How will we react?
Why there is there such a huge mask shortage?
The CDC told people not to horde surgical masks and N95 respirators so that health workers would have enough. However, the need was so large that everyone, not just health workers, did not have enough masks, even though manufacturers were producing them day and night. This boosted the price of masks sky-high. Without proper masks, it's has become a challenge to flatten the curve of infections before any vaccine can be created
We are forced to balance lives and the economy. The shortage of proper protection makes quarantine necessary, but the sooner the world reopens to business the better.
Compared with reuseable and washable masks, disposal masks are still cheap and easily distributed. But what if we could have both? What if we didn't have to ration the remaining masks and we could have all the masks we needed? What if we lived in a world where people don't have to horde masks anymore?
Our team, the Mask Aid Project, is excited to announce that we found a solution that can restore used N95 respirators so they are useable again.
Factors that affect the protection of masks
- Filtration pore size - Because of the size of the microscopic holes in masks, air flows but water droplets and particles of dust are blocked. But the can only protect for a few hours before they are blocked and are no longer breathable.
- Material - N95 masks are made using what's called electret melt-blown nonwoven. When melt-blown is made, it needs to be charged. But if you clean these masks with alcohol or disinfectant, it ruins the fiber. Clean water doesn't damage melt-blown but it does draw out the remaining electrostatic charge.
- Static charge - Tiny particles of the scale known as PM2.5 or PM0.3 can fit through the pores in the fabric. To stop these particles, an electrostatic charge is applied to the non-woven melt-blown layer of medical masks. The static charge attracts tiny particles like smog, bacteria, and viruses so they attach to the fiber while still allowing airflow. This is the difference between medical masks and normal cloth masks. However, water vapor that comes from normal air humidity, our breath, and our sweet can draw away the charge. That's one of the reasons why experts tell us to change our masks every 4 hours.
What is our process?
- We wash used masks or N95 respirators gently without detergent. This removes dirt, sweat, and the remaining charge on them.
- We dry masks with 56~70ºC air for 30 minutes. This is base on science articles that show that COVID-19 is eliminated above 56ºC.
- We also apply UVC light either at the same time or after the drying process.
- We recharge the masks with a high-voltage electric field. This is the main purpose of our machine. We want to scale down an industrial electret machine to a desktop size so that every family or community center can recharge their masks.
Why can't mask factories just make more masks?
Why can't we just wait for new batches of maks to come from the factories? Well, let me tell you a true story that happened in China. The government warned people not to buy those any new masks before February 14th. The reason is that although each mask takes only half a second to be sewed and then 4 or 5 hours to be sterilized, it takes up to 2 weeks for the sterilizing vapors to dissipate and be safe to use. This is because they use ethylene oxide vapor which needs time for the toxic gas to dissipate before being sold.
It is hard for factories to change their process quickly as they are designed for mass-production. They don't use hot water washing as it draws out the charge. They don't use hot air or UVC treatment as it takes space and new equipment to do. They use ethylene oxide vapor because it doesn't affect the charge but it eliminates bacteria contaminates during production. It's more efficient and lowers the cost to produce masks.
In this crisis, 15 days of waiting for us feels like 15 years. Since you don't need the scale of a factory, we can scale down the huge machines that they would use. Since we can re-apply the static charge, we don't need to worry about losing the charge while we are sanitizing. And we don't need to horde masks because they can be renewed again and again.
Before building, let's see some facts

It was an old mask. I used a static meter to check it. It's nearly useless.

A new mask should have static like this.

And it's amazing that recharged mask could have much stronger static charge than a new one! In my opinion, it was due to the process of mask manufacturing. Two weeks delay before shipping out, and to the final users, this can weaken the static charge on masks.
How we built it
Part 1: Enclosurehow to build a Mask Reborn Box. Our produce is open-source. There is a great backstory behind the box and if you are curious, please check out our site atE maskaidproject.com. We are currently running a crowdfunding campaign to get our product out there as soon as possible.
Part 1: Enclosure design

Layer division
I built the prototype with PP hollow boards as they are light and waterproof. However, due to the hot air that may soften the boards inside, I made the three floors in the middle with PC hollow boards. You don't have to worry about the enclosure outside as the boards can be cooled by outside air.
Below I show you the size you are going to prepare.
First, we need PP hollow boards. They are 5mm thick.

Yellow and black parts are plastic angles and triangles


This is the control & display panel. The size of the holes depends on the OLED and buttons. (The final one has five round holes instead of the 4 pictures above as my teammate strongly suggested a reset button)

This plate holds the position of plastic net, which contains masks inside.
This is PC hollow board:

PC hollow board
It's strong and it is rated to survive 100ºC heat. In reality, it can actually exceed the 100º C specification. It is thicker than the PP hollow board we used and is about 12mm thick. We need 3 45 x 45cm pieces.


This is the drawer planned to be the washing tank.


I used 3D printed plastic angle bars instead of ones I found later on the internet while we were participating in the MIT Hackathon Challenge "Africa Takes on COVID-19". Using real plastic angles will be cheaper but it takes time to get.

Then I placed PC hive boards on each layer's floor. These boards were stronger than PP hollow boards and can withstand hot air without having to worry about structural integrity. However, it’s more expensive so I only used 3 pieces, each 45 x 45cm and 12mm thick. The PP boards shown earlier work fine for the outside of the box because they can keep their strength since they are exposed to cooler air outside the box.
Part 2: How does the static recharge work?
The main principle of our box is that it renews masks because of electrostatic recharging. I basically built a scaled-down electret machine. This is the origin of the Mask Aid Project idea. As melt-blown fibers were scarce in the first stage of the outbreak, some people started thinking about how to reuse disposal masks. We experimented with many ways to recharge static on old disposal masks. There re too many to mention here, so I will focus on the final result. (Check out our story on the Mask Aid Project website if you are curious.)

Diagram of how some Electrostat machines work
This is how the middle layer material of masks is made in a factory: the voltage of the machine reaches about 120 kilovolts. Through a process called dielectric breakdown, the fiber in the middle of the capacitor like structure becomes charged. It is not technically a complete breakdown though because there can't be any sparks or the machine could burn the fiber. As an aside, a key part of the process is the use of an "electro-corona, " so we privately joke that we are fighting “Corona vs Corona”.
Since we are talking about high-voltage, some may worry about its safety. First, you are not going to touch it. Second, we can’t have expensive, powerful, gigantic machines sitting in our living room. Third, Joule’s Law is amazing! We boost 5V to 400KV so the current is too low to be fatal. Tasers are much more dangerous.

Electro-corona is a happy medium between complete dialectic breakdown and an open circuit. Using Ohm’s Law and some data I found online, I selected a high-voltage resistor of about 5 or 6 million ohms. This can controls the current while preventing sparks.

5-6M Ohm resistor

Static meter
The red and green wires are the positive and negative inputs. You need a static meter to find out the output charge.
When it’s on, its body becomes hot as it creates a near short circuit. The module was not designed to work this way. It was designed to work for only a few seconds at a time. We needed it to work continuously so we hacked it.

1-ohm ceramic resistor
We put a 1-ohm ceramic resistor between the power and the positive input.

Our modification to the circuit
Part 3: Building discharge poles
At the beginning of the outbreak, I was exploring options for the materials I could use in my prototypes. The parts could not be restricted or too expensive. One frustration came with the discharging brushes available on the market. They were effective, but they made with carbon fiber so they were expensive. Also, due to the heightened need for mask making machines, their price was about 50 times normal.
So I had to change my perspective. People working in the IC chip industry are very concerned about static as it could spoil the product. They use many ways to protect from a static charge. The material they use as a conductor is not as good as metal, but it draws out static charge continuously. We found the material to be much more affordable if you know how to hack them. You can find this material in the B.O.M. list of this instructable.


I made two discharge boards (one is black because I ran out of my white duct tape). Finally, I buried wire beneath them as connection.
Part 4: Building the hot air fan module
Why not use a hairdryer instead? In the beginning, experts did suggest that we should use hairdryers to sanitize masks. However, they also noticed people shouldn't use them for too long as it could damage the dryers. Also, a lot of people are not patient enough to hold a hairdryer for half an hour. Also, temperature control on hairdryers is not that accurate. Once it overheats, the air could melt disposal masks.
So we built this:

Custom designed air-heating unit
Heating such a big layer would take too much power. We chose a PTC heater like the kind you find in AC units. We combine it with a DC brush-less fan, which was quite powerful at 12V 0.6A.


We had two ways of controlling the temperature: One by soldering a thermostat switch on the PTC, another by using a DHT11 sensor to tell the MCU when to shut the heating unit down.
Part 5: UVC treatment
UVC radiation kills bacteria and viruses. Many people know about this technology. The problem is that few people know the difference between UVA, UVB, and UVC. Some think that they are the same. That’s why there were fake UVC lights on the market when the outbreak began. In our project, we only trust UVC, unlike the kind of light that nail polishing machines use.
Here again, I faced some hard choices. We knew there were three ways to make UVC, the most common being hot cathode (HCFL), rarer is cold cathode (CCFL), and then there is UVC LED. For the environment and for shipping, it originally seemed that UVC LED was the best choice. But - we finally chose CCFL for many reasons. Like I have said before, we didn’t want parts that restricted or overpriced. A lot of research went into how we settled on CCFL.

CCFL driver board

CCFL tube
I installed two tubes in the box, one on the floor of the middle layer, and another on the ceiling. I stuck some wire clips to hold the tubes.
The cold cathode UVC tubes and driver board were low cost but still powerful. They run at 12V and consume 10 watts total power. A scientific paper said that 15 minutes UVC exposure to surfaces can kill almost all bacteria. We decided it was good to pair it with hot air.
P.S. The origin wire on the tubes were too short, so we need to cut and solder longer wires to extend them.
Part 6: Washing function
You may ask, why wash the mask if it would clear all remain static charge?
Washing is optional. First, we don’t worry about the loss of static charge because we can recharge later. The main purpose of washing surgical masks or N95 respirators isn't to eliminating bacteria, it’s to remove the dust blocking the airflow. The static charge does not only sticks to viruses, but also tiny dust particulars. Hot air treatment can kill bacteria but it cannot remove the dust. Human sweat and fats also block the air, similar to how acne forms on faces. After reading the material properties of melt-blown, water was the best affordable choice. It can dissolve mineral salts and soluble stains and wash away insoluble particulars when the static charge is gone. More than just soaking though, you need water to flow. So I used a small submergeable pump and a short piece of plastic hose. I put a piece of adhesive double-sided tape on the pump to affix it to the wall of the water tank. I also extended the wires to be about 50cm longer.

Submergeable pump

If you want a better wash, I suggest putting a heater inside. This helps kill bacteria and dissolve stains. It would be a great help in cold countries. Remember to add a sensor or a thermostat switch to control the water temperature.
Part 7: Other accessories

Plastic net to hold masks
You need two pieces of plastic net, listed in the material list, to hold the masks in place while they are being washed and blown. N95 respirators can be squashed to fit the net and without damaging them. You need some zip ties tied at one side to make a hinge so it can act as a net.

UVC exposure is harmful to humans so we need a door to block it. I came up with a simple solution. I cut a piece of PP hollow board that was 45 x 14cm. I drilled 4 holes, 4mm diameters each at 4 corners, and put 4 plastic rivets through them. The board can then be placed in between the gaps of the PC hollow board. Finally, I stick some velcro on two sides of the box and on the door to cover it. It looked rough but it worked. You can upgrade it with a hinge or reed switch with magnets to make it more secure like a microwave door.

I placed an OLED and 5 press buttons (four functions and one emergency reset) to the panel board. All buttons were soldered with XH2.54 2P wires. The OLED needed an XH2.54 4P doubles headed wire to connect.
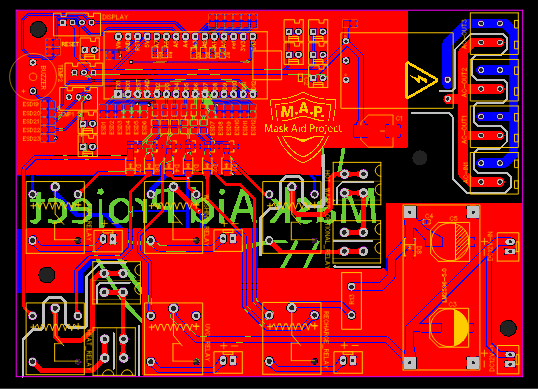
Part 8: Control boards

This prototype needed a lot of small upgrade to work better, so I left some plug-ins on the board. They were: door switch, a temperature sensor for the water tank, and two more analog inputs. Since there is a great possibility of errors caused by electrostatic charge - which also generates lots of ion in the air - there are a bunch of ESD protective parts on the board.

I used LCEDA to draw the board and had them made in several days.

From this picture, you can see a few differences to the 3D rendering. There was no model library for AC-DC 5V and LM2596, so the modules were stacked.

This is the AC-DC 110/220V to 12V switching power supply. There are three kinds of power in this device, AC power, DC 12V, and DC 5V. For stability reasons, I put another AC-DC 5V module specially for MCU, sensors, and relay controls. They were electrically isolated from the other actuators.


The high-voltage panel should be placed away from the other boards. When it is on, you will hear a mosquito-like buzzing sound. That's the electro-corona discharging.

Every function connected to the board
I’ve uploaded details of schematics and codes.
Part 9: Test run
Let's take a look how to use the Box.
I bought a PM2.5 meter, which was used by someone's home decoration before.
I've tested several times. The raw videos are below.
This shows old mask has weak ability of blocking aerosols.
This is even worse than old mask. Yes, sanitizing and sterilizing can make masks clean, but without recharging, it's nearly nothing between your nose and aerosols.
With static recharged, this thin masks recover its ability. It can block tiny particulars or aerosols.
Part 10: Something want to tell
As pandemic still rages the world, we want to share and provide the kit to help people. We have launched a crowdfunding and want to figure out how many people need this.
https://www.indiegogo.com/projects/mask-reborn-box-new-life-for-old-masks/
In the campaign, there is another type of Mask Reborn Box. Here I show you Jason's work, Semi-PMRB PM0.3 test video.

Custom parts and enclosures
The 3D sketch model of Mask Reborn Box. Open it with 123D Design.
Schematics
The schematic picture