Neural Networks, Briefly
For those who don't know, neural networks are a machine learning model with a structure loosely based on the human brain, whose aim is to approximate a function which maps a set of inputs, to a set of outputs. They can be used to solve all kinds of problems, without being explicitly programmed with rules to follow. In a simple feed-forward neural network, data is fed into the network. This data then passes through multiple layers, where it is multiplied by many weights. Once it reaches the final layer, a result is produced. To help visualize this, it is often easier to look at an example:
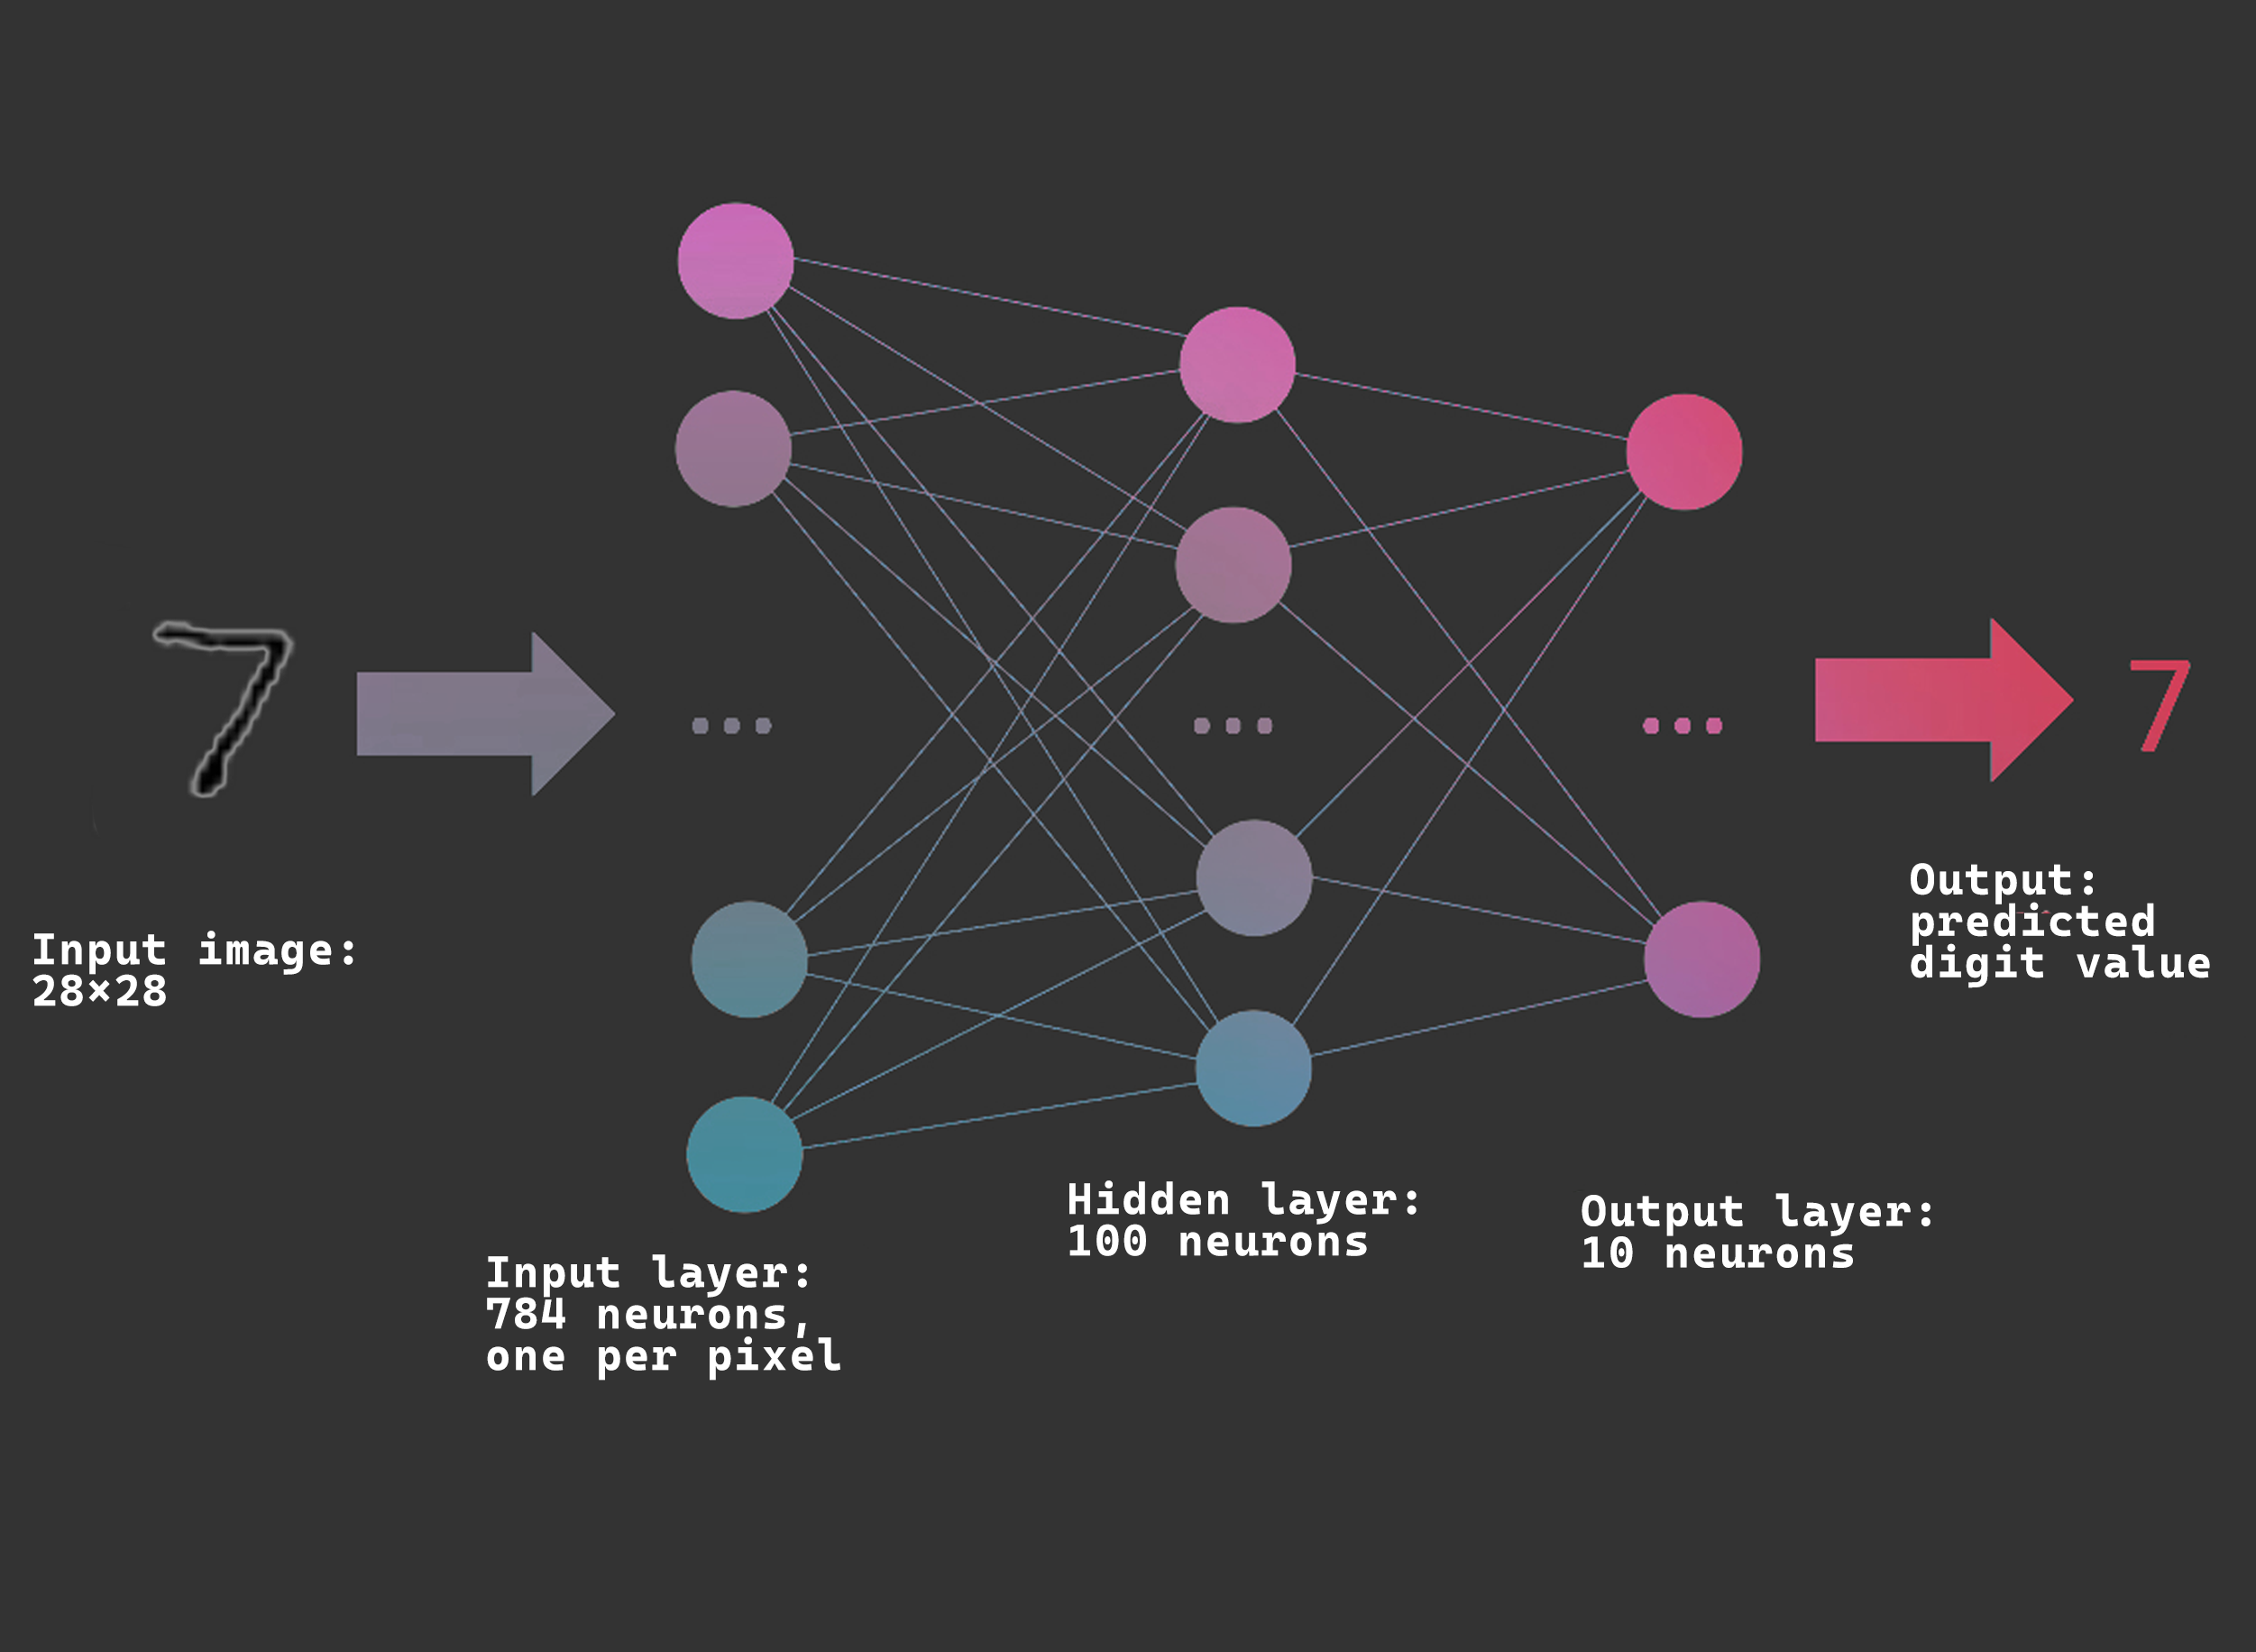
An easy way to think about how the output is produced to imagine the image of a seven being converted into a 28x28 matrix. Every element in the matrix corresponds to a pixel in the original image, and its value depends on the brightness of the pixel (a 0 would be a completely black pixel, 255 would be a white pixel). Once this matrix is created, it is fed into the input layer, where it is multiplied by a matrix of weights which alter the data (a set of weights for each node). This happens with every layer in the network until we reach the final layer. The output is a value which tells us that the input was a seven.
However, we cant just create a neural network and expect it to work immediately: it has to be trained first. This is typically done using massive labelled datasets. For the example above, a good dataset to use would be MNIST, which contains thousands of images of handwritten digits.
First, we generate our network. The weights for each layer are initialized randomly, meaning that the output of the network will most likely be incorrect at first. Then, an image is fed into the input layer, and once a forward pass is completed an output is produced. This is evaluated, and an error value is calculated (this tells us how far off our output was from the correct value). The error value is then used in a process called backpropagation to carefully adjust the weights in the network. This corrects the output of the network for future predictions. As this happens repeatedly, the network becomes better at recognizing handwritten digits, and the error value decreases. The process of training machine learning models (optimization) is very resource expensive and can take many hours, if not days, even on powerful hardware.
The math behind backpropagation gets very complex, and can easily overwhelm someone just getting into machine learning (like me). But we don't always have to go through the complexity of backpropagation to train our models. If we look at nature, we can see that natural selection has worked wonders for many organisms, and we can apply the basic concept behind this process into our machine learning algorithms. This is called neuroevolution, and offers many advantages over using backpropagation, most importantly its robustness, and how efficiently models can be trained.
Neuroevolution
In neuroevolution, instead of optimizing by looking at a single neural network, we create a population of networks, each with different weights. We allow the networks to make predictions and we evaluate the fitness of each network (how good they are at predicting). We can then take the weights from the best performing networks, and create a new generation of networks based on the parent weights. This is similar to natural selection since we are allowing the "genes" of the fittest networks to become more prevalent in future generations.
My Project
My main goal for this project is to simulate natural selection, by creating a digital environment for sprites (organisms) to interact with. The whole project is written in python, and the machine learning is mostly done with the help of tensorflow and numpy.
BUILDING THE ENVIRONMENT
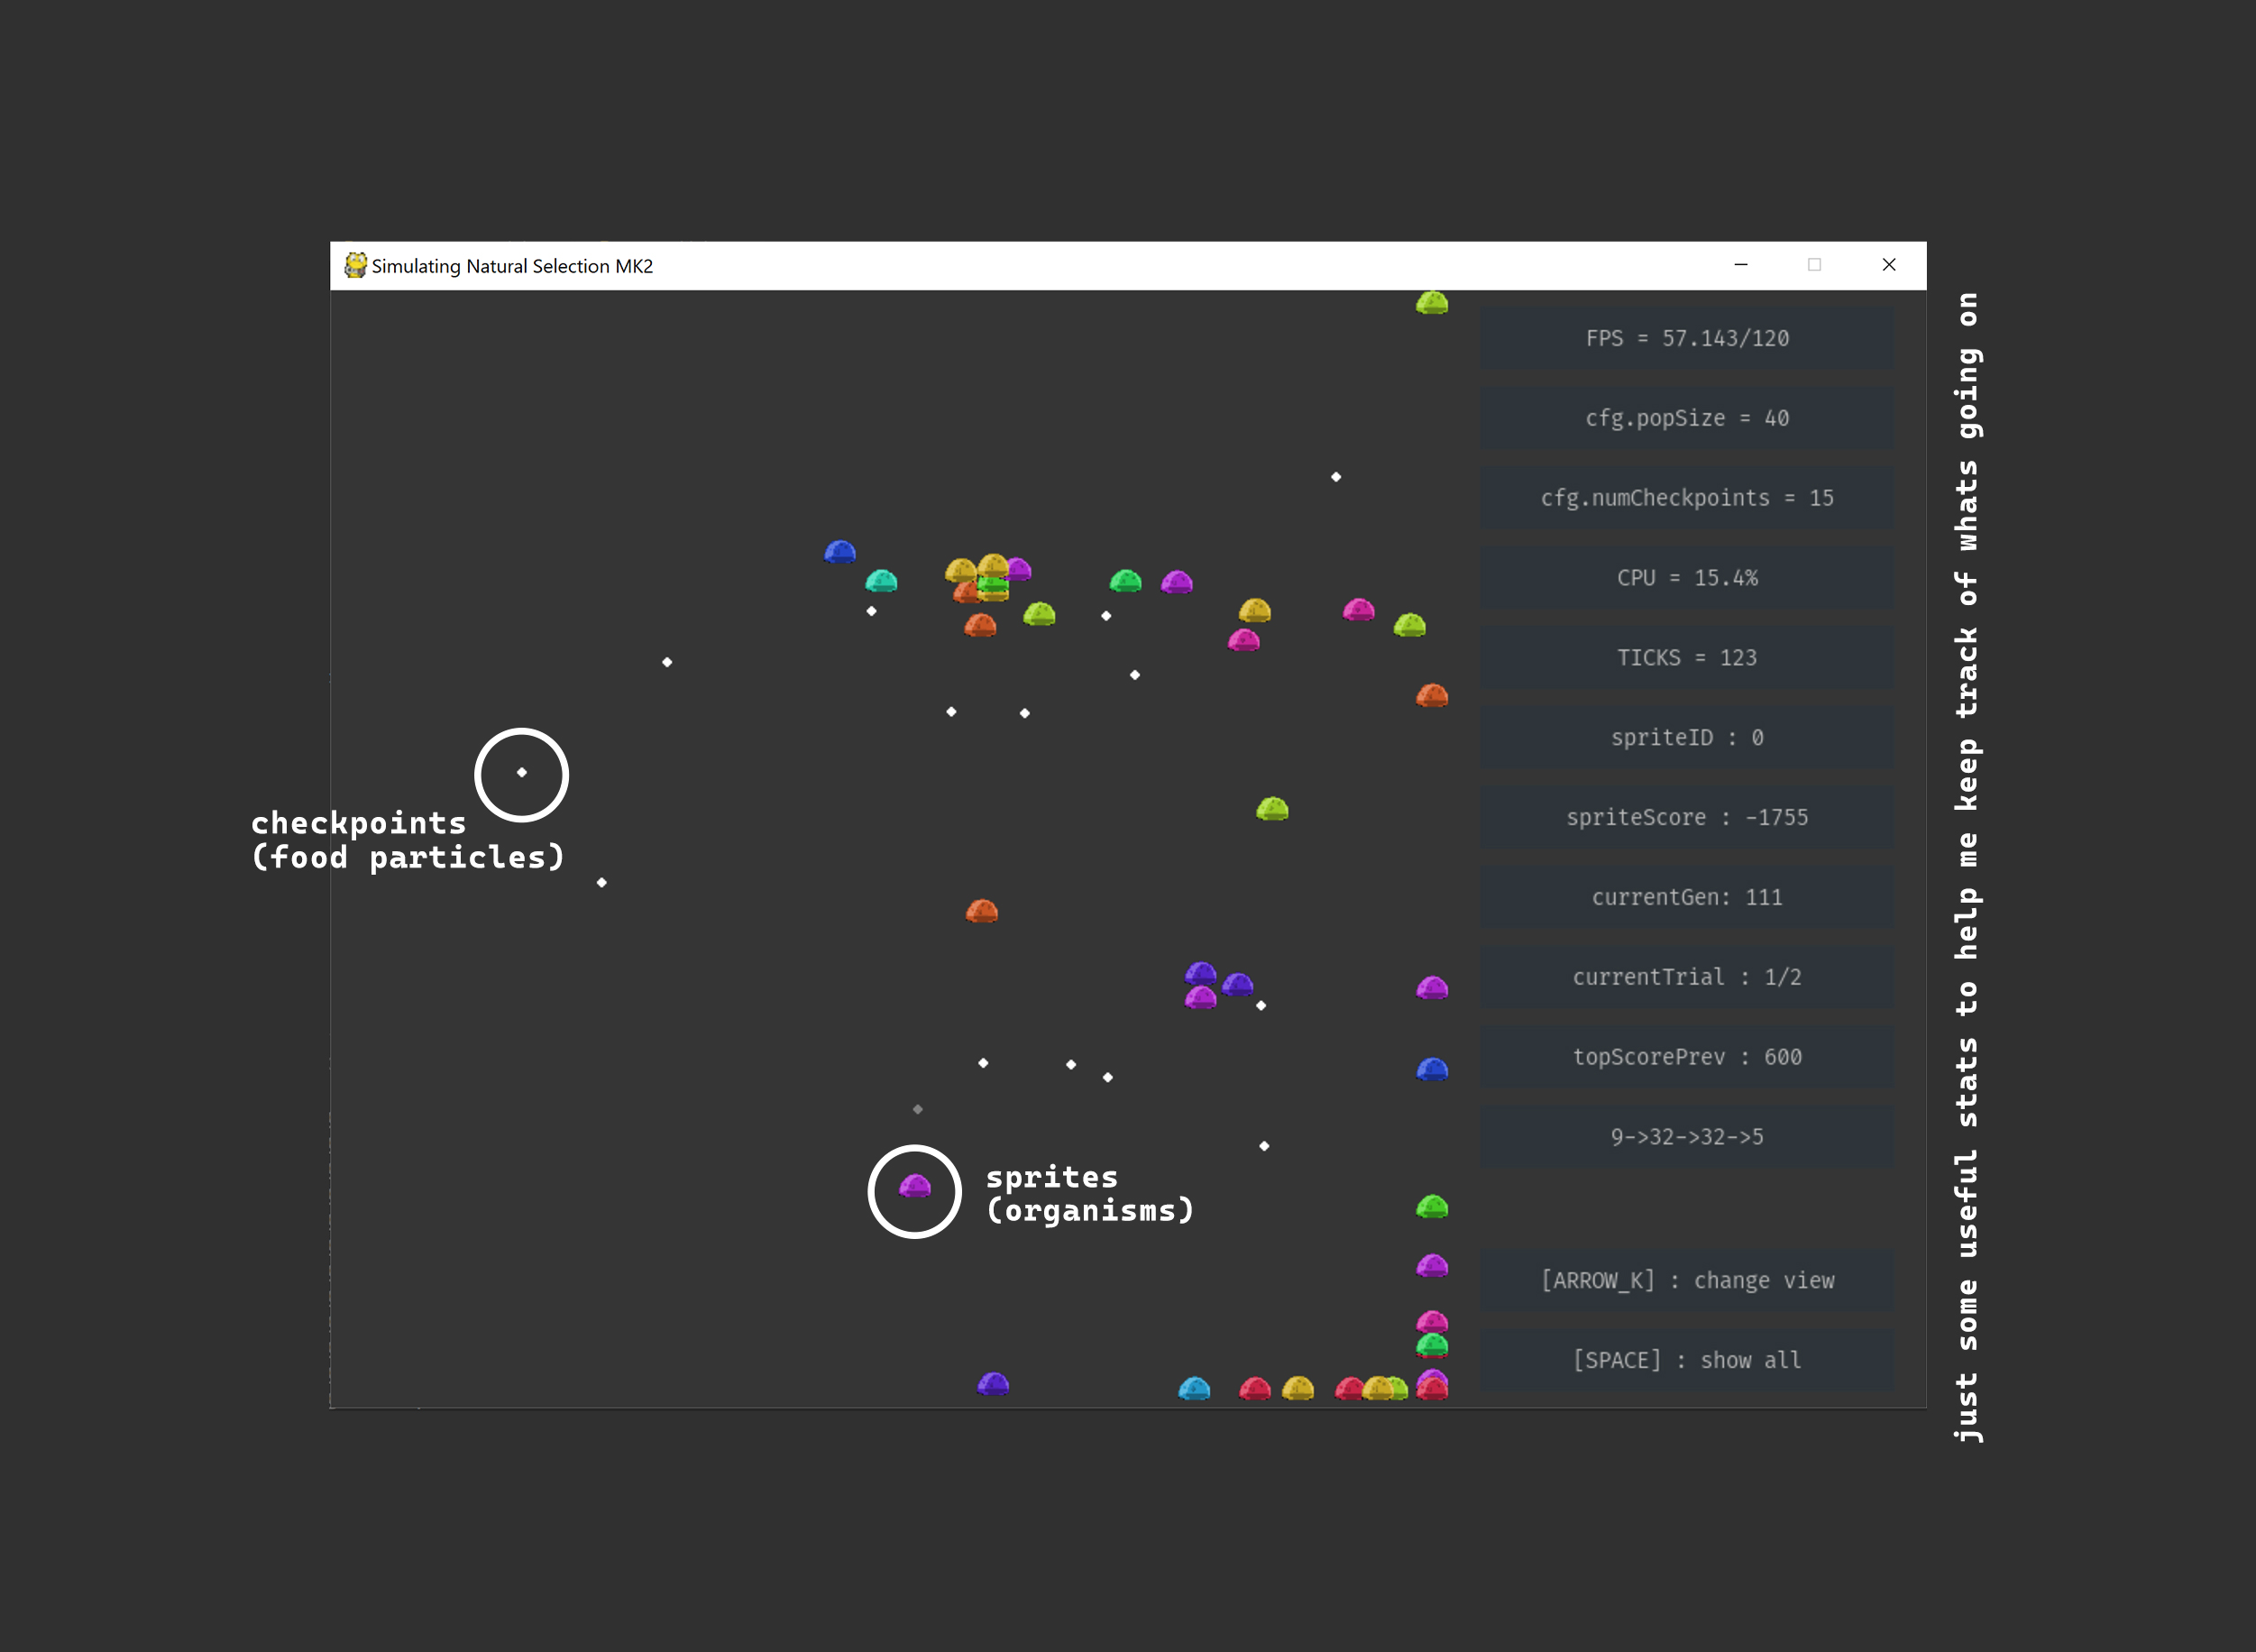
To create the environment and its physics, I used pygame. Sprites are allowed to move around the environment, and can collect checkpoints (food particles). The sprites cannot collide with each other, and food collected by one sprite is still available to all other sprites.
The location of the checkpoints is random, and is different for each generation. The sprites also spawn from a random location (but this location is the same for all of them).
Each generation consists of a set amount of trials. For example, if we have five trials, sprites will spawn in five different locations and allowed to move from there, before a new generation is created. This makes sure that the spawn location of the sprites does not affect their score, so some generations don't have an unfair advantage.
Each trial runs for a certain amount of ticks (game updates).
SCORING THE SPRITES
Since my main objective was to get the sprites to aim for checkpoints to collect them, I had to score them according to how well they collected checkpoints, instead of just basing it on how many checkpoints were collected. In other words, I had to reward the kind of behavior that I wanted to achieve.
Sprites increase their score by approaching checkpoints, and get a bigger score boost by collecting them (checkpoints can only be collected once). When a sprite moves one step (from one tick to the next), it is penalized (as if it is using up energy). Sprites are also penalized for staying still. This scoring system should (in theory) favor more efficient sprites.
INPUT DATA
The input data for the network is essentially what each sprite can detect. Defining this was tricky, and I tried many different combinations of inputs to see which gave me the best results. These are the ones I tried:
- cpDistance: the distance to the nearest checkpoint
- deltaBearing: the angle between the direction the sprite is moving in and the bearing of the nearest checkpoint.
- cpDeltaX/cpDeltaY: the distance of the nearest checkpoint in X and Y.
- spriteSpeed: the absolute speed of the sprite.
- spriteDirection: the angle the sprite is moving in.
- spriteVelocity: values for X and Y velocity of the sprite.
- wallDist: distance to the nearest wall
Of course, all of these were normalized before they were fed into the network (to make them all values between 0 and 1).
The combination I ended up going with was cpDistance, deltaBearing, spriteSpeed, sprite Direction and wallDist.
NETWORK STRUCTURE
The following two functions generate the network, and feed data forward through it, respectively. I found that the network structure that worked best was a four layer network. The number of nodes in each layer was defined in a configuration file (input_nodes, hidden_nodes, hidden_nodes_2 and output_nodes).
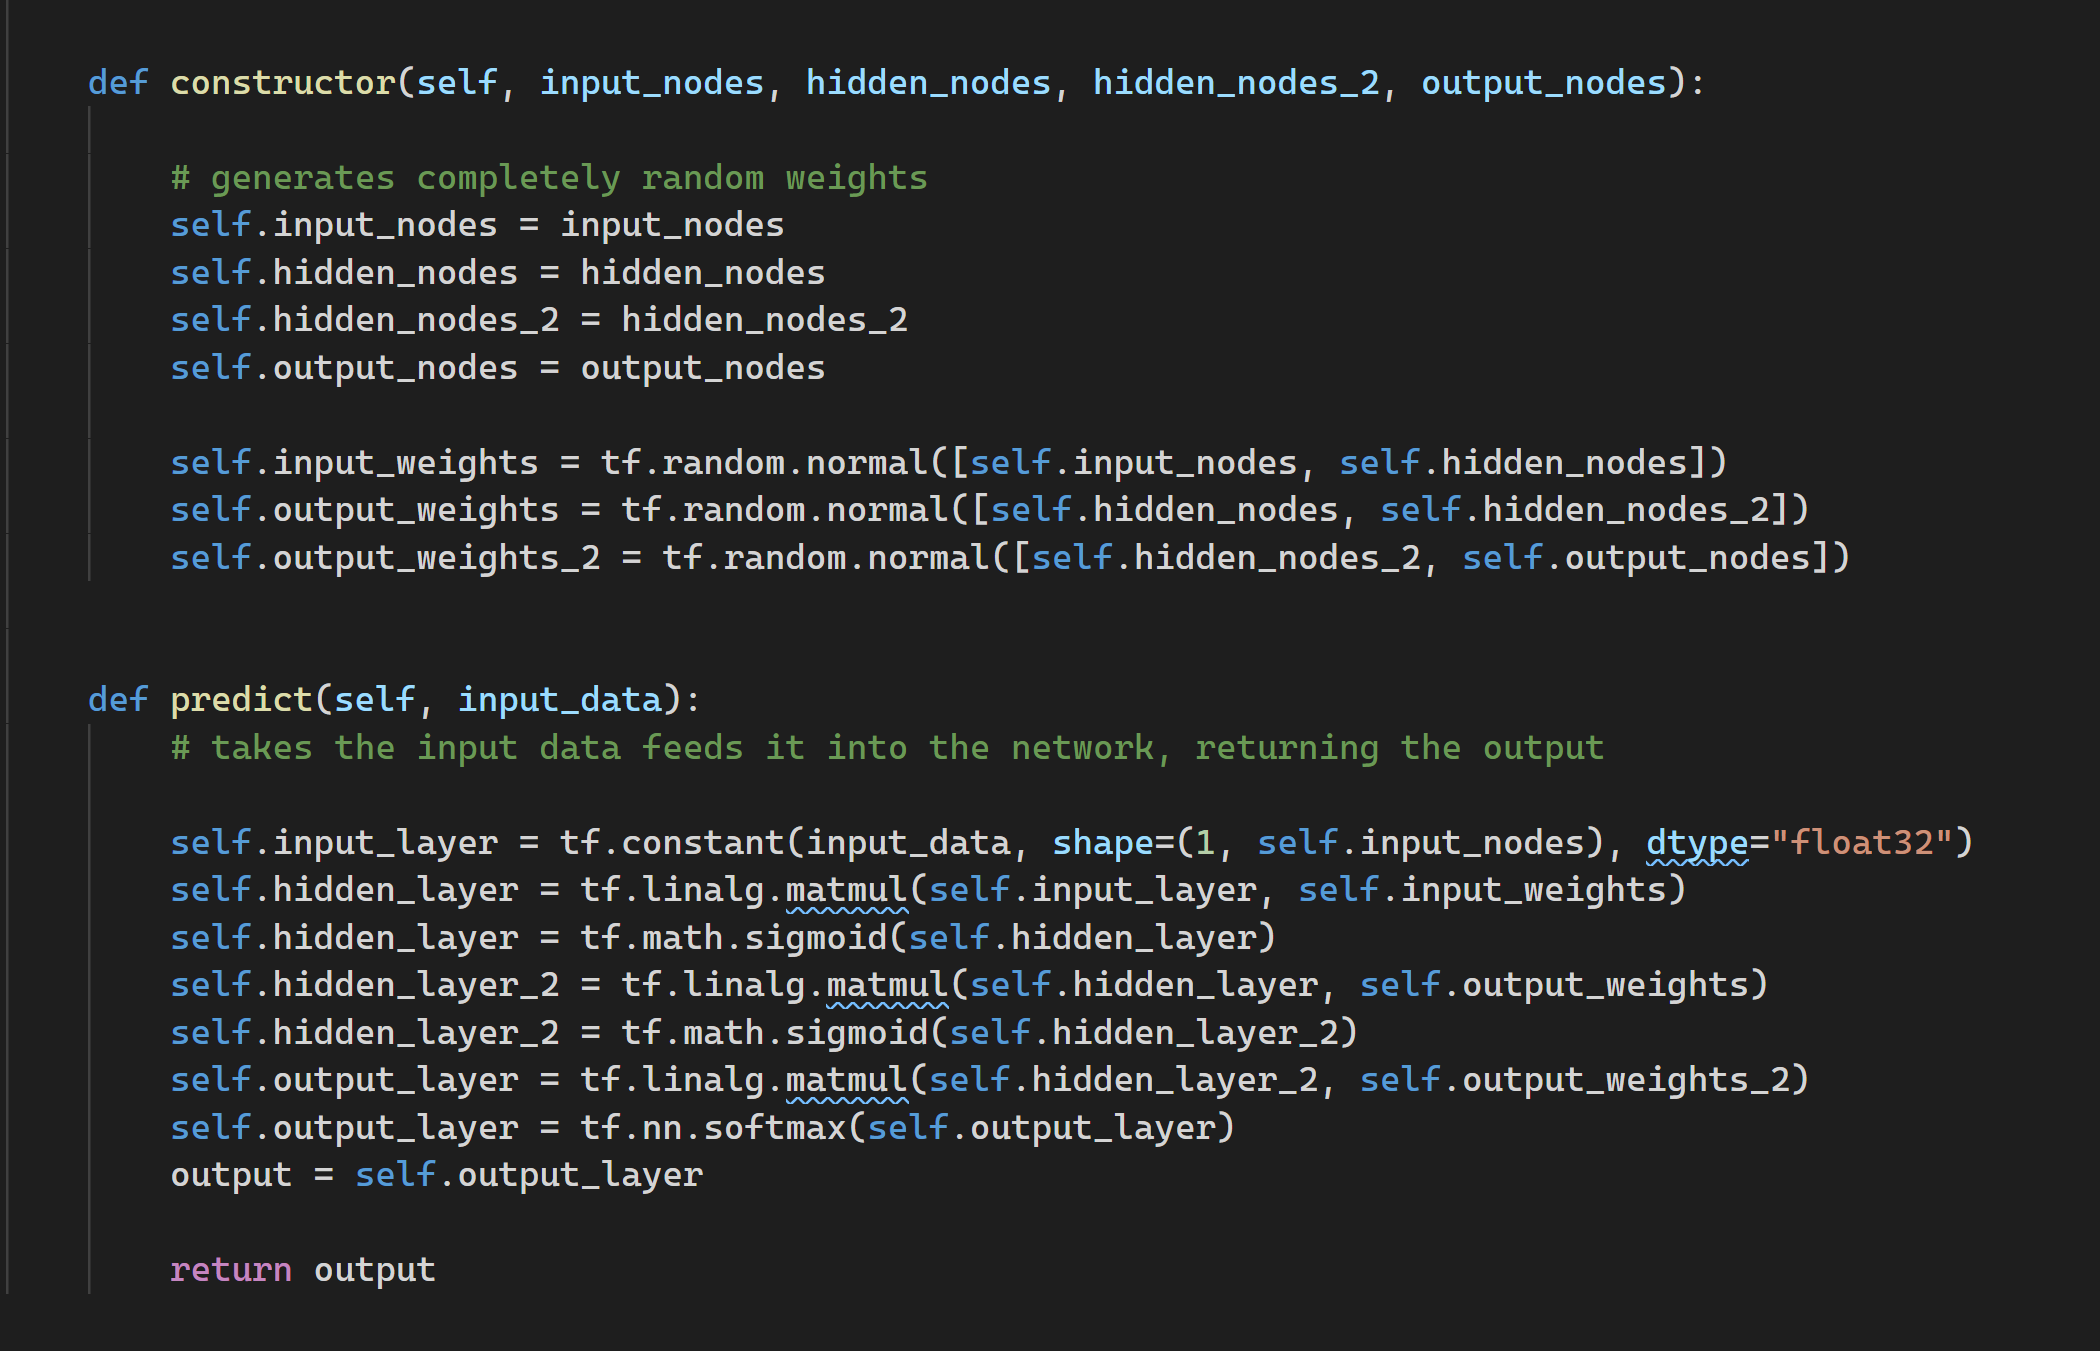 The constructor() function generates a network with completely random weights (values obtained from a normal distribution), and stores them. This happens for every single sprite.
The predict() function produces a prediction based on input_data. The prediction defines in which direction the sprite will move (this can be up, down, left, right, or not at all). I used sigmoid activation for the layers within the network, and a softmax activation for the output layer.
The output (when output_nodes=5) is a list of five values between 0 and 1. The element with the largest value is obtained, and the depending on its index, the sprite moves in a certain direciton.
These two functions are responsible for creating the sprite's "brains", and for taking in sensory input, and determining what action the sprite should take.
CROSSOVER AND MUTATION
At the end of a generation, the sprites with the highest score are selected and a new generation is created, based off of the parents. I tried two different methods for creating the child generation:
Method 1: Without Crossover

Here, the child weights are produced based on a single parent. First, a set of mutator weights are produced (tensors with values sampled from a normal distribution with a mean of 0, and a stddev of 0.2). Then, the mutator weights are added to the parent weights, to produce a set of child weights. Essentially, we are taking the parent weights, and changing them slightly by adding variation.
This method only requires one parent, which means that if one sprite does really well in one generation by chance, it will get the most representation, which isn't fair. To fix this, I allowed the child population to be formed up of children from different parent sprites. For example, by selecting the top three sprites from one generation, I can divide up the next generation so that a third of the sprites use the weights from parent one, another third from parent two, and so on.
Method 2: With Crossover

Here, parentWeights are passed into the function. This is a list containing the weights of two parent sprites. The function iterates through every single value in the parent's weights. Every value has a 50% chance of coming form parent one, and a 50% chance of coming from parent two. This produces the child set of weights. In other words, we are taking the two parent's "genes", and combining them to create an offspring. After we combine them, we add variation.
I found that the second option worked best since it combined features from the best sprites. However, using the second option also means that there would be less variation, since all the children from the next generation would be based on the same two parents.
TUNING SOME PARAMETERS
The main script for this function imports a set of variables stored in a separate configuration file. This was done to make it easier for me to change some parameters between runs, and see what worked best. Here's an example of some of those parameters.
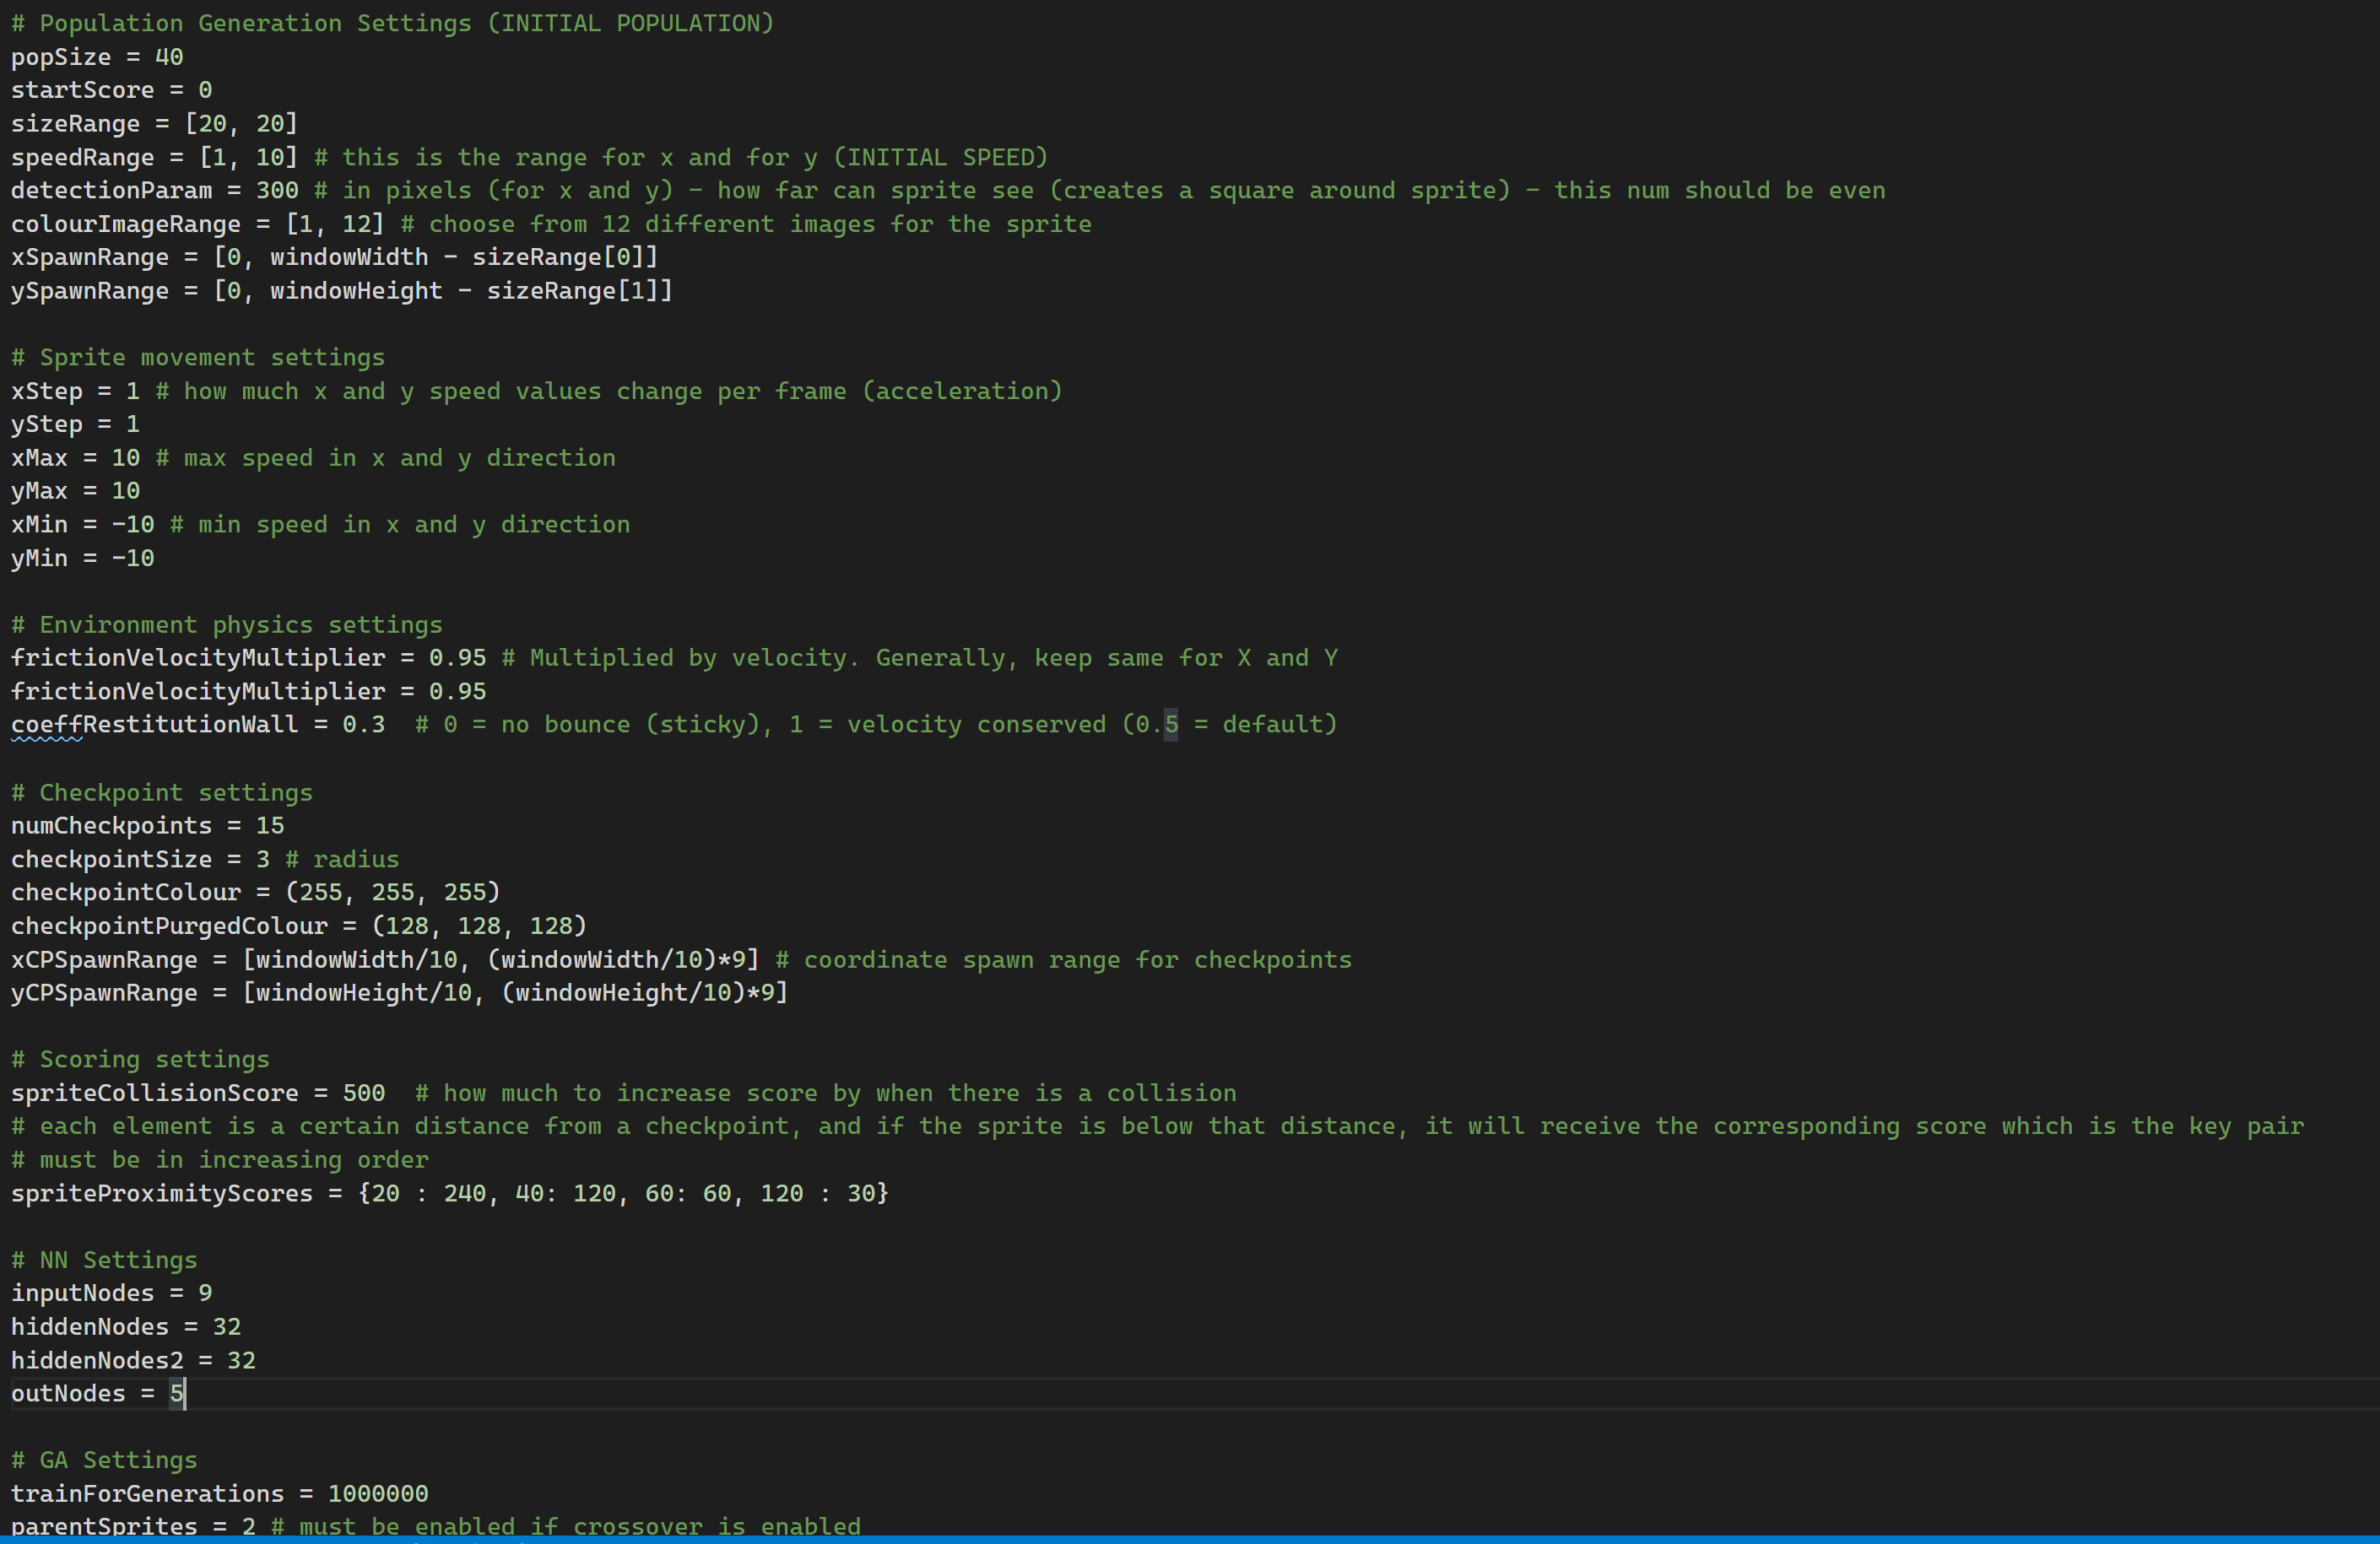
The most important parameters I changed around were:
- Population size: A larger population means that there will be a larger amount of variation per generation.
- Number of checkpoints: Changing this also changes the final score of sprites, since if there are more checkpoints to collect and enough time to collect them, the sprite score can be higher.
- Network structure: this can affect the learning rate of the network. For this project, I ended up going for 8 nodes in the first layer, then 32, then 16, then 5 nodes for the output. I found that these values created good results, and I found them purely by trial and error.
- Training time per trial: this determines how long the sprites can move around for before the environment is reset.
- Some other settings for crossover and mutation, for example, controlling the amount of variation in the child generation.
RESULTS
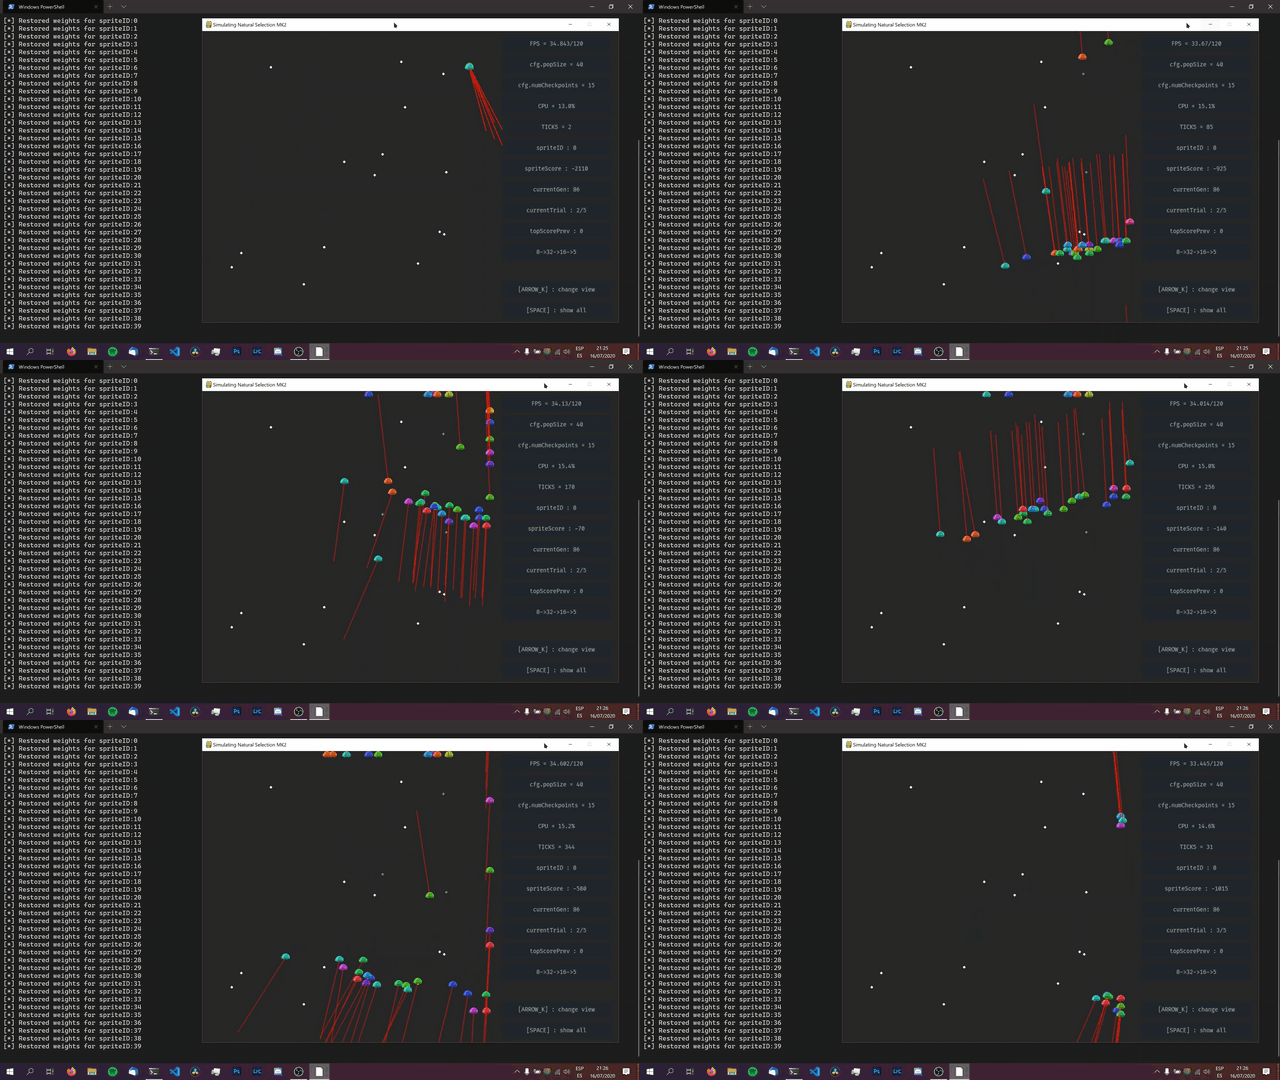
The first few generations would always be more or less the same, with most of the sprites not moving and all, and some just getting stuck on the walls. However, after trying many combinations of different parameters, different network structures, and even writing some more code for the environment (like penalizing sprites for staying still, and for movement), I could not avoid getting the behavior shown in the image above. This has led me to the following conclusion: Either this is the best way for sprites to collect checkpoints (in this specific environment with the rules I programmed), or, my code just isn't working.
Note: I'm still working on improving this project, so I will not be uploading the source code yet. (I've also got to clean it up a bit first). However, if anyone is still interested in seeing it I can send it to you.
:)
 Gonçalo Nespral