deʃhipu
-
Done
08/28/2020 at 17:32 • 0 commentsThey switches and keycaps arrived while I was on vacation, but now I'm back and I assembled it all.
![]()
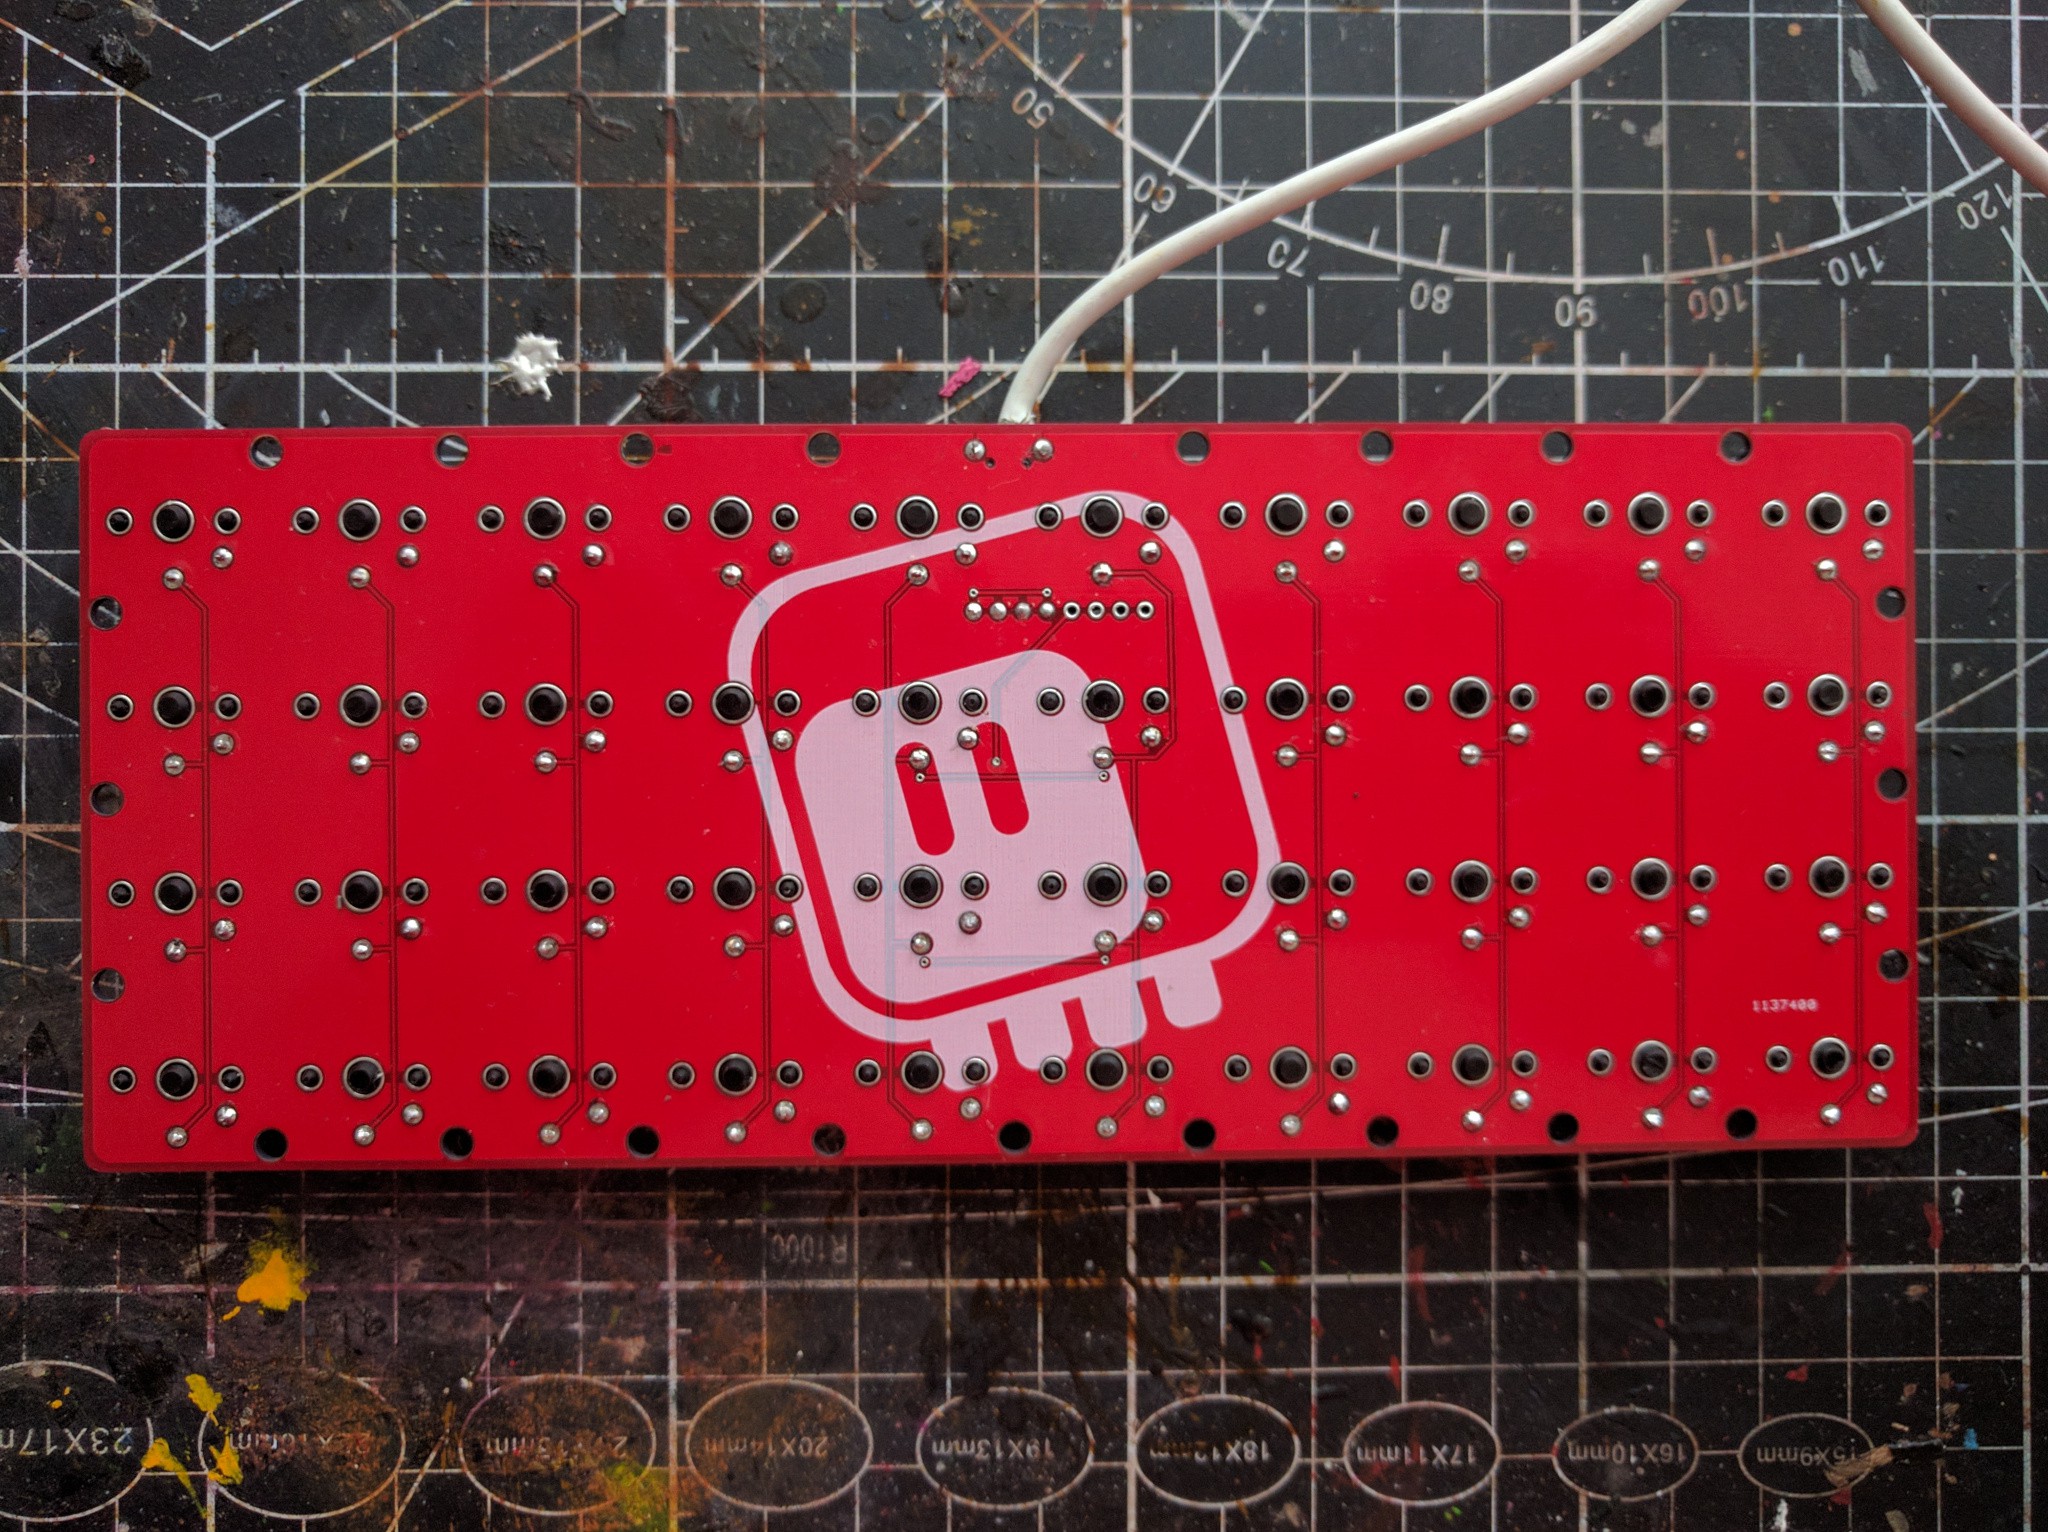
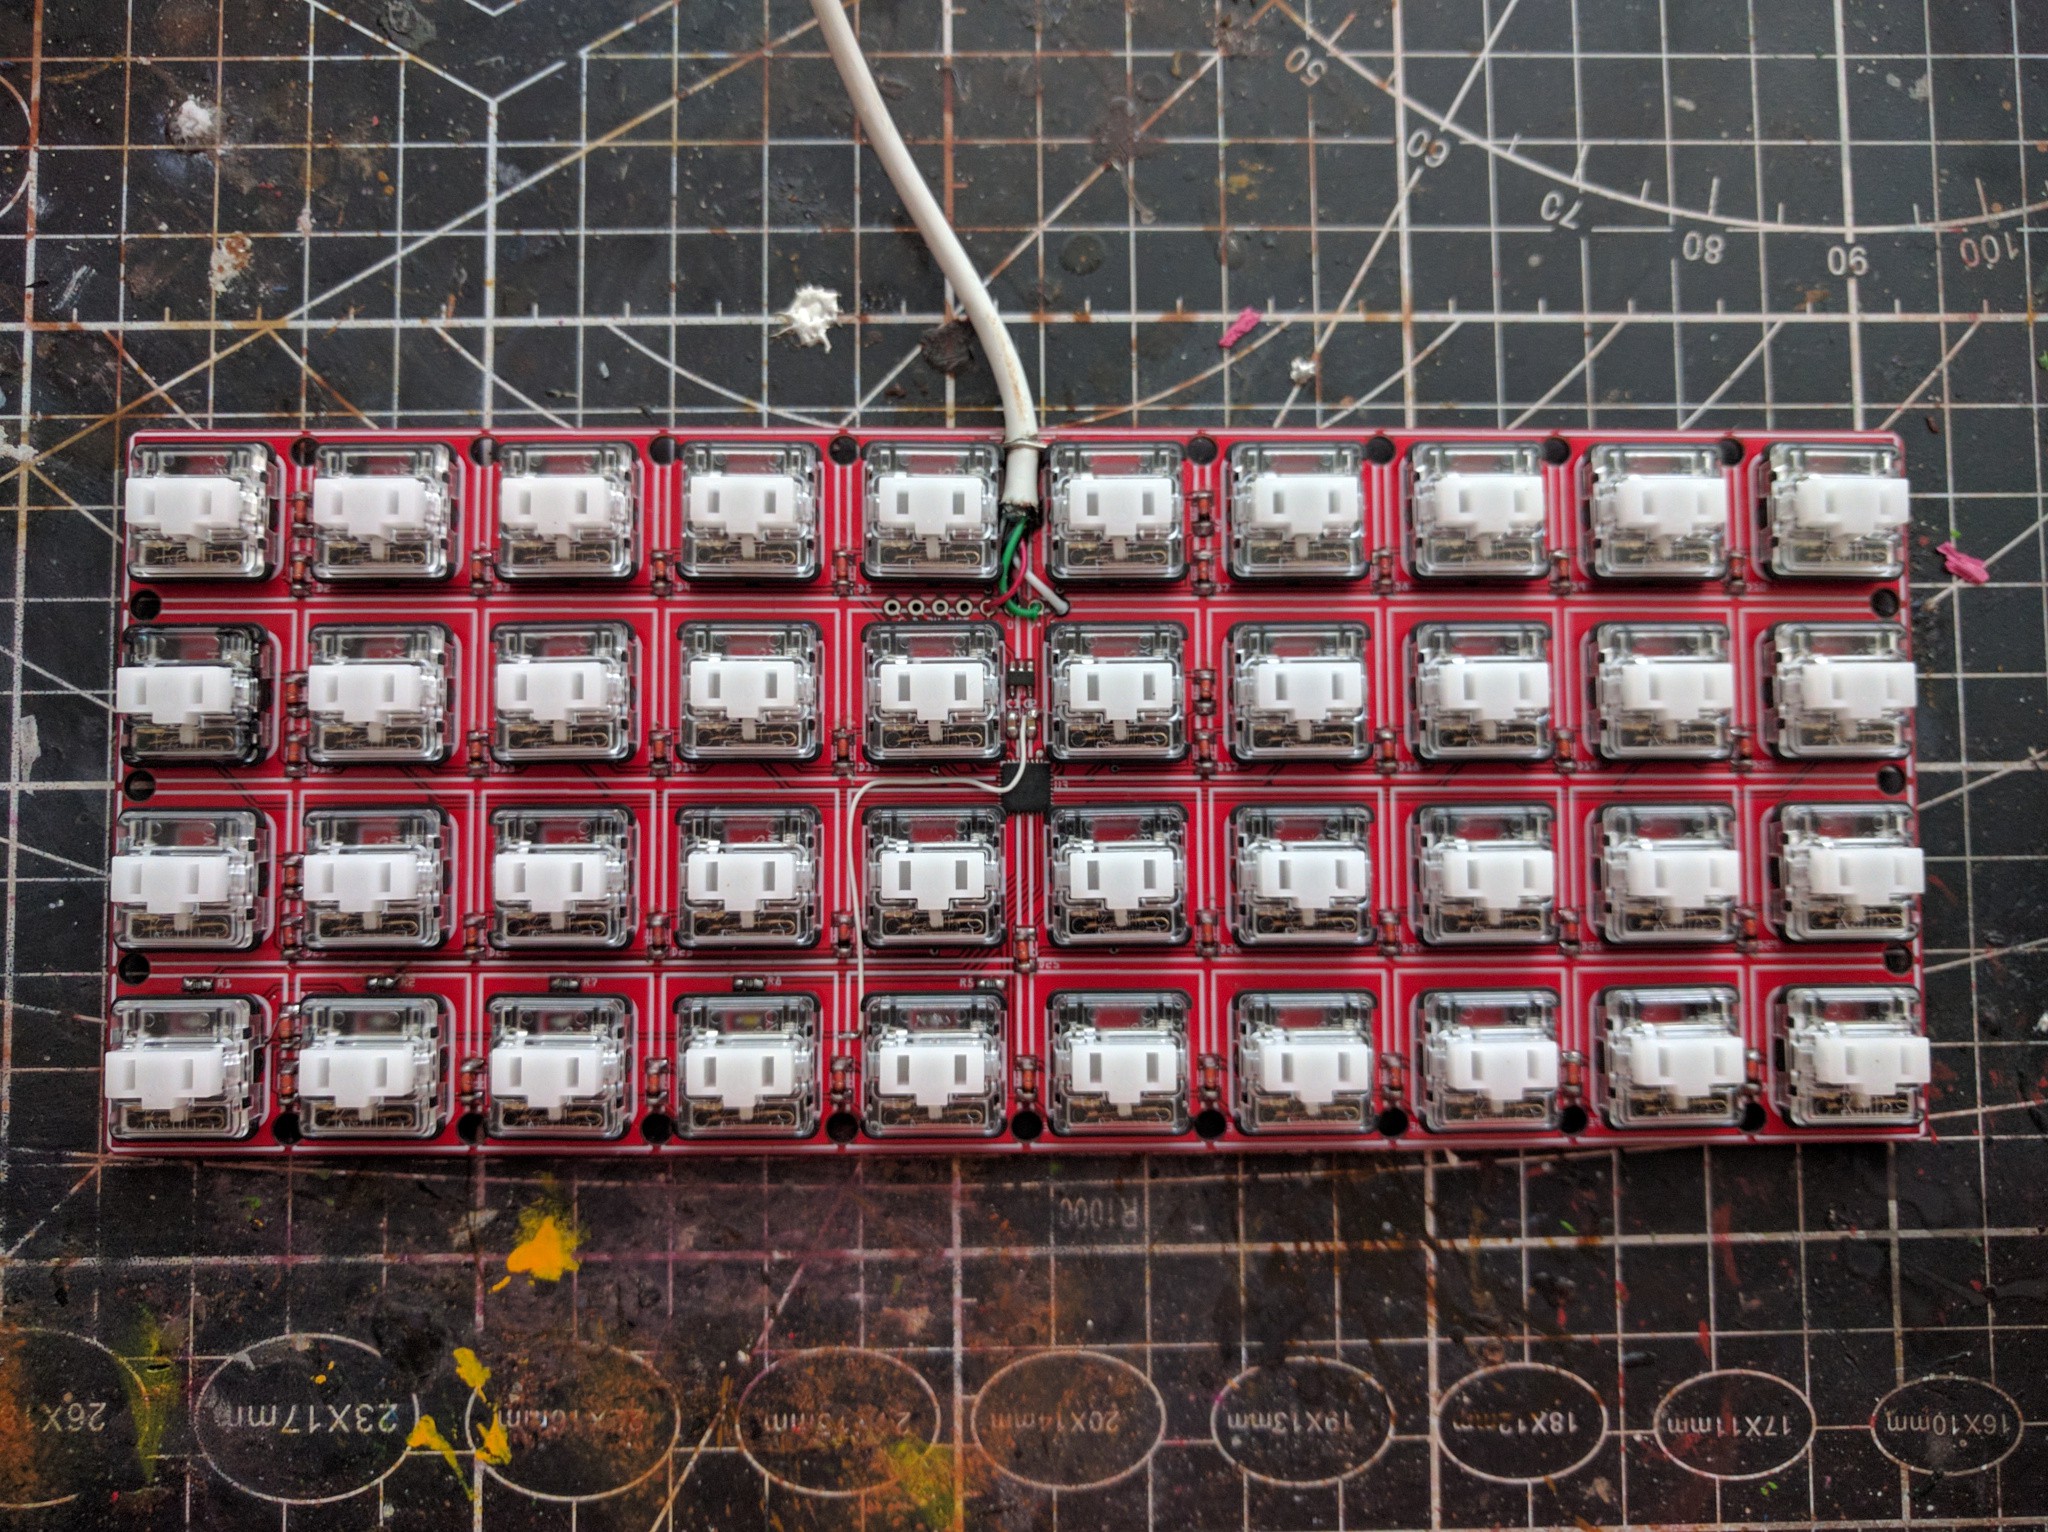
All switches nicely soldered, and straight:
![]()
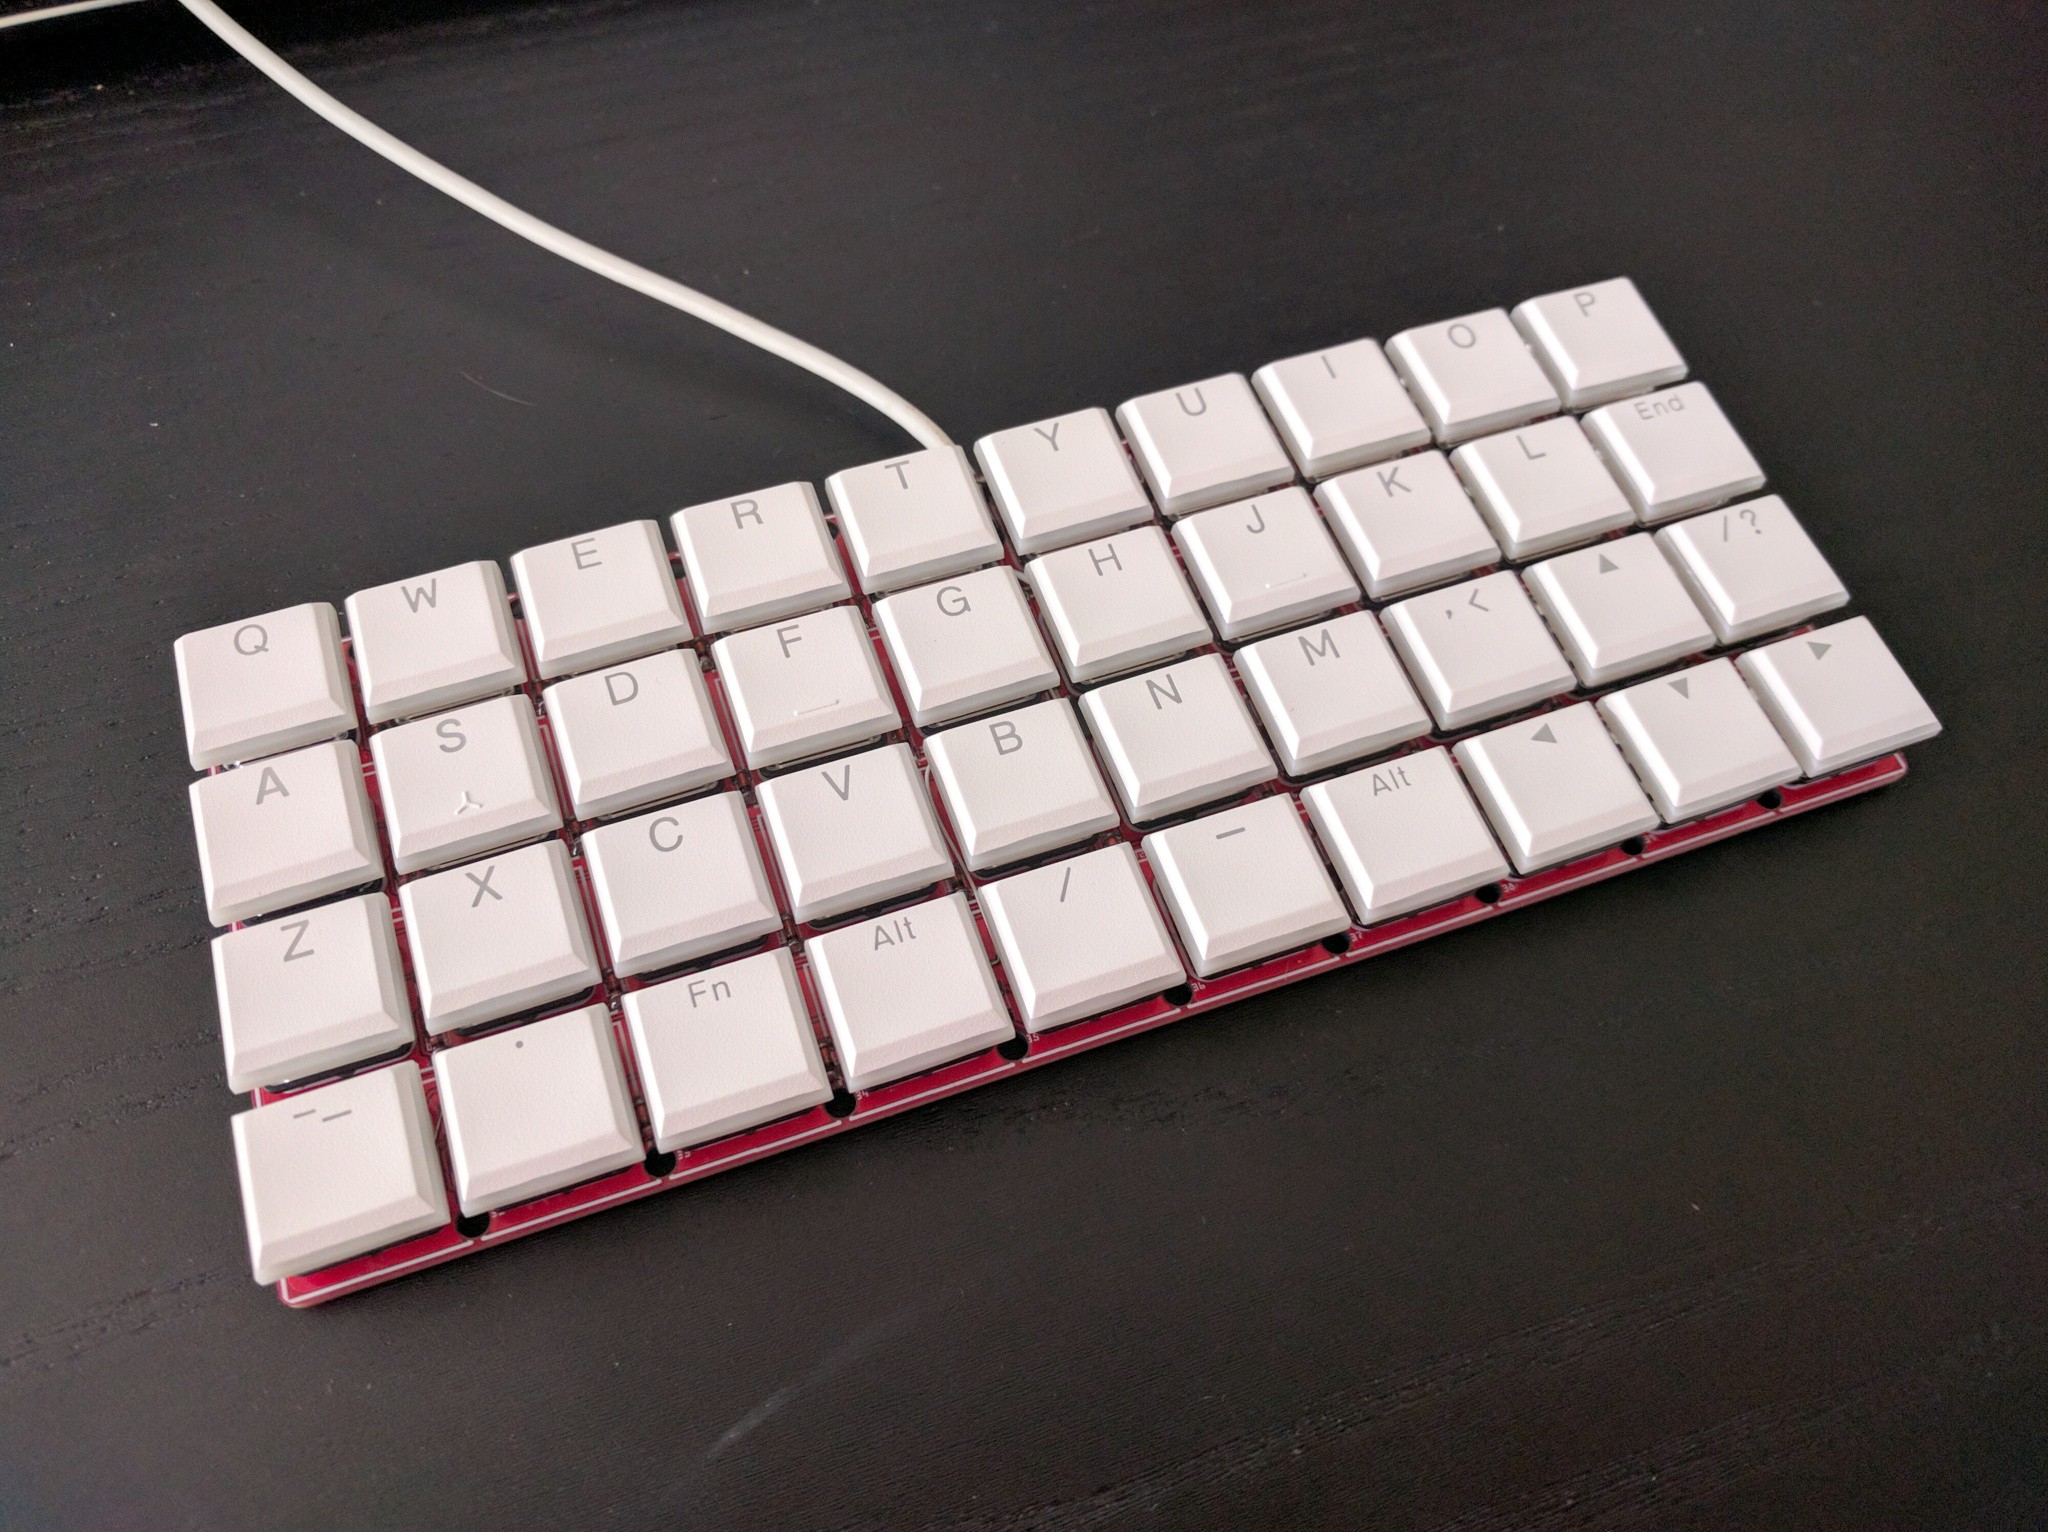
Then I just inserted all the keycaps. Of course I had to be a little creative about the bottom row and the enter key, since those keys mostly didn't come in 1u versions.
![]()
You would think that after adding the switches the code that I previously wrote would just work. Well, that would surely be something, but no — there were some inevitable minor bugs. Then, after fixing them I tried it for a bit, and decided to rearrange the keys a little bit to expose the more commonly used symbols better.
![]()
I'm still having a couple of problems. The Shift key is too low, and the backspace takes some getting used to. I also discovered why hold/tap is usually done with a timeout and not like I did it — I can't use the modifier keys with mouse clicks as it is now. I will add a long timeout for that.
-
Code
08/15/2020 at 12:39 • 0 commentsI know it's not pretty, but it works. Mostly. For now.
---------- more ----------import board import digitalio import usb_hid import time COLS = (board.A6, board.A1, board.A4, board.A3, board.D6, board.SCL, board.SDA, board.D12, board.D10, board.D13) ROWS = (board.MOSI, board.AREF, board.D11, board.D5) LEDS = (board.A2, board.A5, board.TX, board.RX, board.D9) class Keyboard: def __init__(self, matrix, cols=COLS, rows=ROWS): self.matrix = matrix self.cols = [digitalio.DigitalInOut(pin) for pin in cols] self.rows = [digitalio.DigitalInOut(pin) for pin in rows] for col in self.cols: col.switch_to_output(value=0) for row in self.rows: row.switch_to_input(pull=digitalio.Pull.DOWN) for self.device in usb_hid.devices: if self.device.usage == 0x06 and self.device.usage_page == 0x01: break else: raise RuntimeError("no HID keyboard device") self.debounce = bytearray(len(cols)) self.last_state = bytearray(len(cols)) self.current_layer = 0 self.pressed_keys = set() self.last_held = 0 self.release_next = 0 def scan(self): if self.release_next: try: self.pressed_keys.remove(self.release_next) except KeyError: pass self.release_next = 0 for x, col in enumerate(self.cols): col.value = 1 debounce_bits = 0 for y, row in enumerate(self.rows): state = row.value debounce_bits |= state << y if state != bool(self.debounce[x] & (1 << y)): continue last_state = bool(self.last_state[x] & (1 << y)) if state: self.last_state[x] |= 1 << y else: self.last_state[x] &= ~(1 << y) if state == last_state: continue if state: self.press(x, y) else: self.release(x, y) col.value = 0 self.debounce[x] = debounce_bits def press(self, x, y): code = self.matrix[self.current_layer][y][x] if code == 0x0800: self.current_layer = 1 return if self.last_held: if code & 0xff00 == 0x0800: self.current_layer = 1 else: self.pressed_keys.add(self.last_held & 0xff00) self.last_held = 0 if code & 0xff00 and (code & 0xff) != 0: self.last_held = code return self.pressed_keys.add(code) def release(self, x, y): code = self.matrix[self.current_layer][y][x] if self.last_held == code: self.pressed_keys.add(code & 0xff) self.release_next = code & 0xff try: self.pressed_keys.remove(code & 0xff00) except KeyError: pass if code & 0xff00 == 0x0800: self.current_layer = 0 self.last_held = 0 return if code == 0x0800: self.current_layer = 0 return for layer in 0, 1: for mask in 0xffff, 0xff00, 0x00ff: try: self.pressed_keys.remove(self.matrix[layer][y][x] & mask) except KeyError: pass def send_report(self, pressed_keys): report = bytearray(8) report_mod_keys = memoryview(report)[0:1] report_no_mod_keys = memoryview(report)[2:] keys = 0 for code in pressed_keys: if code == 0: continue elif code == 0x0800: continue elif code & 0xff00 and code & 0xff == 0: modifier = (code >> 8) - 1 report_mod_keys[0] |= 1 << modifier elif keys < 6: report_no_mod_keys[keys] = code keys += 1 self.device.send_report(report) def run(self): last_pressed_keys = set() while True: self.scan() if self.pressed_keys != last_pressed_keys: self.send_report(self.pressed_keys) last_pressed_keys = set(self.pressed_keys) print(last_pressed_keys, self.last_held, self.release_next) time.sleep(0.01)And then there is the key definition:
import keyboard from micropython import const _A = const(4) _B = const(5) _C = const(6) _D = const(7) _E = const(8) _F = const(9) _G = const(10) _H = const(11) _I = const(12) _J = const(13) _K = const(14) _L = const(15) _M = const(16) _N = const(17) _O = const(18) _P = const(19) _Q = const(20) _R = const(21) _S = const(22) _T = const(23) _U = const(24) _V = const(25) _W = const(26) _X = const(27) _Y = const(28) _Z = const(29) _1 = const(30) _2 = const(31) _3 = const(32) _4 = const(33) _5 = const(34) _6 = const(35) _7 = const(36) _8 = const(37) _9 = const(38) _0 = const(39) _ENT = const(40) # Enter _ESC = const(41) # Esc _BS = const(42) # Backspace _TAB = const(43) # Tab _SPC = const(44) # Space _MN = const(45) # Minus -/_ _EQ = const(46) # Equal =/+ _LB = const(47) # Left bracket [/{ _RB = const(48) # Right bracket ]/} _BSL = const(49) # Backslash \/| _SC = const(51) # Semicolon ;/: _QT = const(52) # Quote '/" _GR = const(53) # Grave `/~ _CM = const(54) # Comma ,/< _DT = const(55) # Dot ./> _SL = const(56) # Slash //? _CAPS = const(57) # Caps lock _F1 = const(58) _F2 = const(59) _F3 = const(60) _F4 = const(61) _F5 = const(62) _F6 = const(63) _F7 = const(64) _F8 = const(65) _F9 = const(66) _F10 = const(67) _F11 = const(68) _F12 = const(69) _PS = const(70) # Print screen _SCL = const(71) # Scroll lock _PA = const(72) # Pause _INS = const(73) # Insert _HOME = const(74) # Home _PGUP = const(75) # Page up _DEL = const(76) # Delete _END = const(77) # End _PGDN = const(78) # Page down _AR = const(79) # Arrow right _AL = const(80) # Arrow left _AD = const(81) # Arrow down _AU = const(82) # Arrow up _LCT = const(0x0100) # Left control _LSH = const(0x0200) # Left shift _LAL = const(0x0300) # Left alternate _LSP = const(0x0400) # Left super _RCT = const(0x0500) # Right control _RSH = const(0x0600) # Right shift _RAL = const(0x0700) # Right alternate _FN = const(0x0800) # Function MATRIX = ( (_Q, _W, _E, _R, _T, _Y, _U, _I, _O, _P), (_A, _S, _D, _F, _G, _H, _J, _K, _L, _ENT), (_Z, _X, _C, _V, _B, _N, _M, _CM, _AU, _SL), (_LSH | _CAPS, _LCT | _ESC, _LAL | _INS, _FN | _TAB, _BS, _SPC, _RAL | _DEL, _AL, _AD, _AR), ), ( (_1, _2, _3, _4, _5, _6, _7, _8, _9, _0), (_B, _F2, _F3, _F4, _F5, _MN, _EQ, _GR, _QT, _SC), (_F6, _F7, _F8, _F9, _F10, _LB, _RB, _DT, _PGUP, _BSL), (_CAPS, _ESC, _INS, _TAB, _F11, _F12, _DEL, _HOME, _PGDN, _END), ) keyboard.Keyboard(MATRIX).run() -
Design Files and Schematic
08/12/2020 at 16:01 • 0 commentsI have now fixed the two problems I found with the PCB, and uploaded the Gerbers and the Fritzing files. The keyboard uses the same bootloader and CircuitPython firmware as the #Fluff M0 — that's the convenience of having a board that breaks out all the pins.
I'm still working on the Python code for the mod keys, of course — I will post it separately when it's ready.
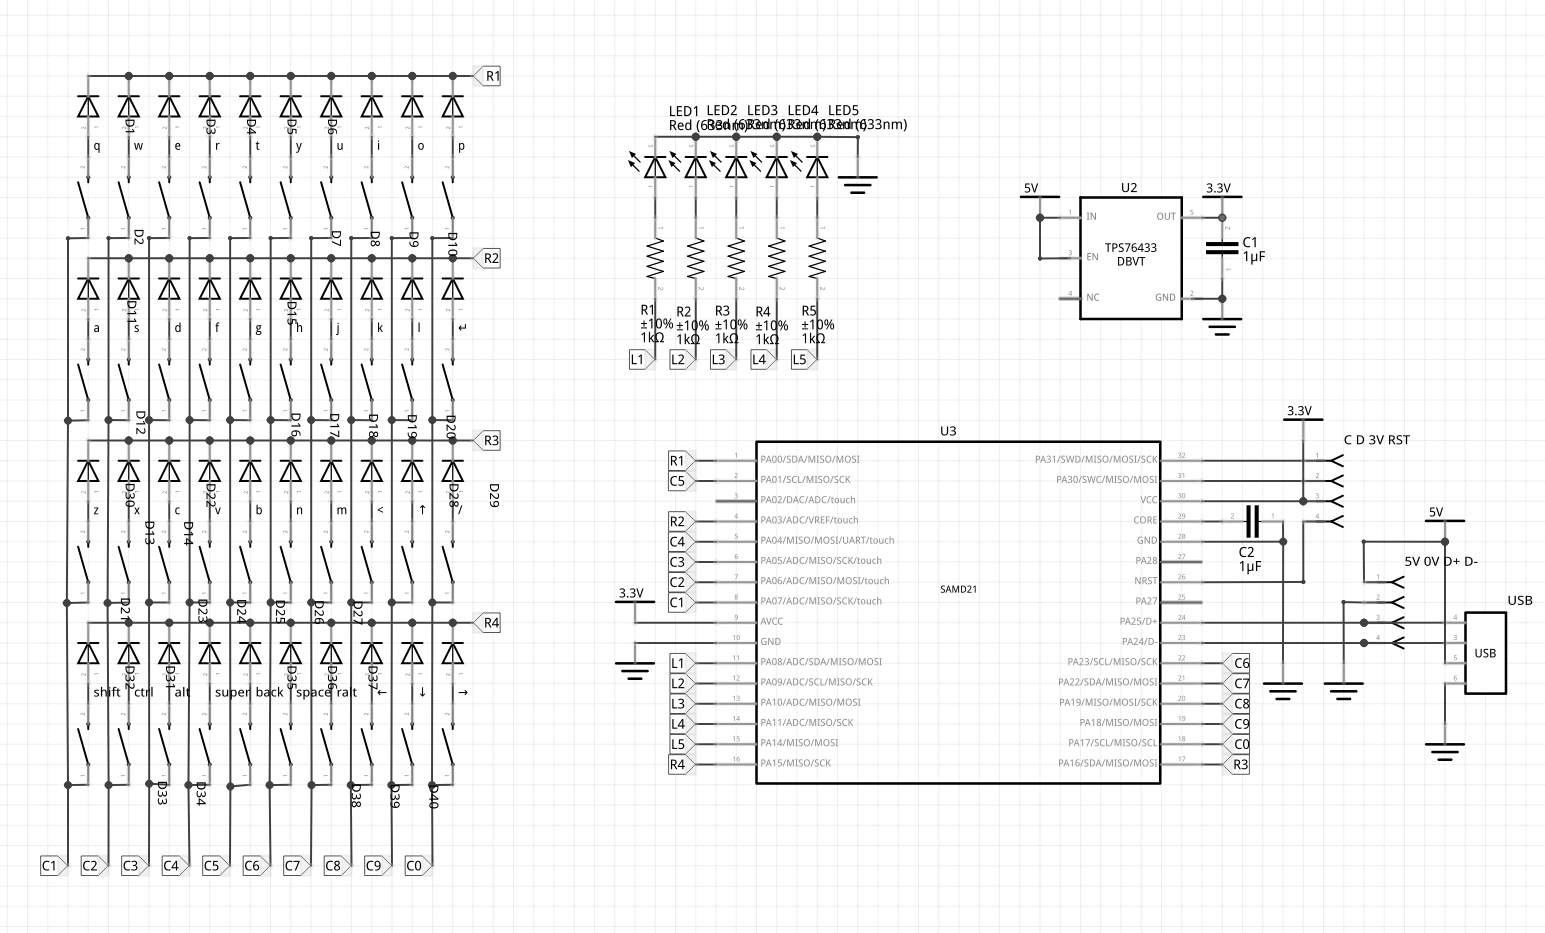
Here's the schematic of the keyboard:
![]()
-
The PCB and Bodges
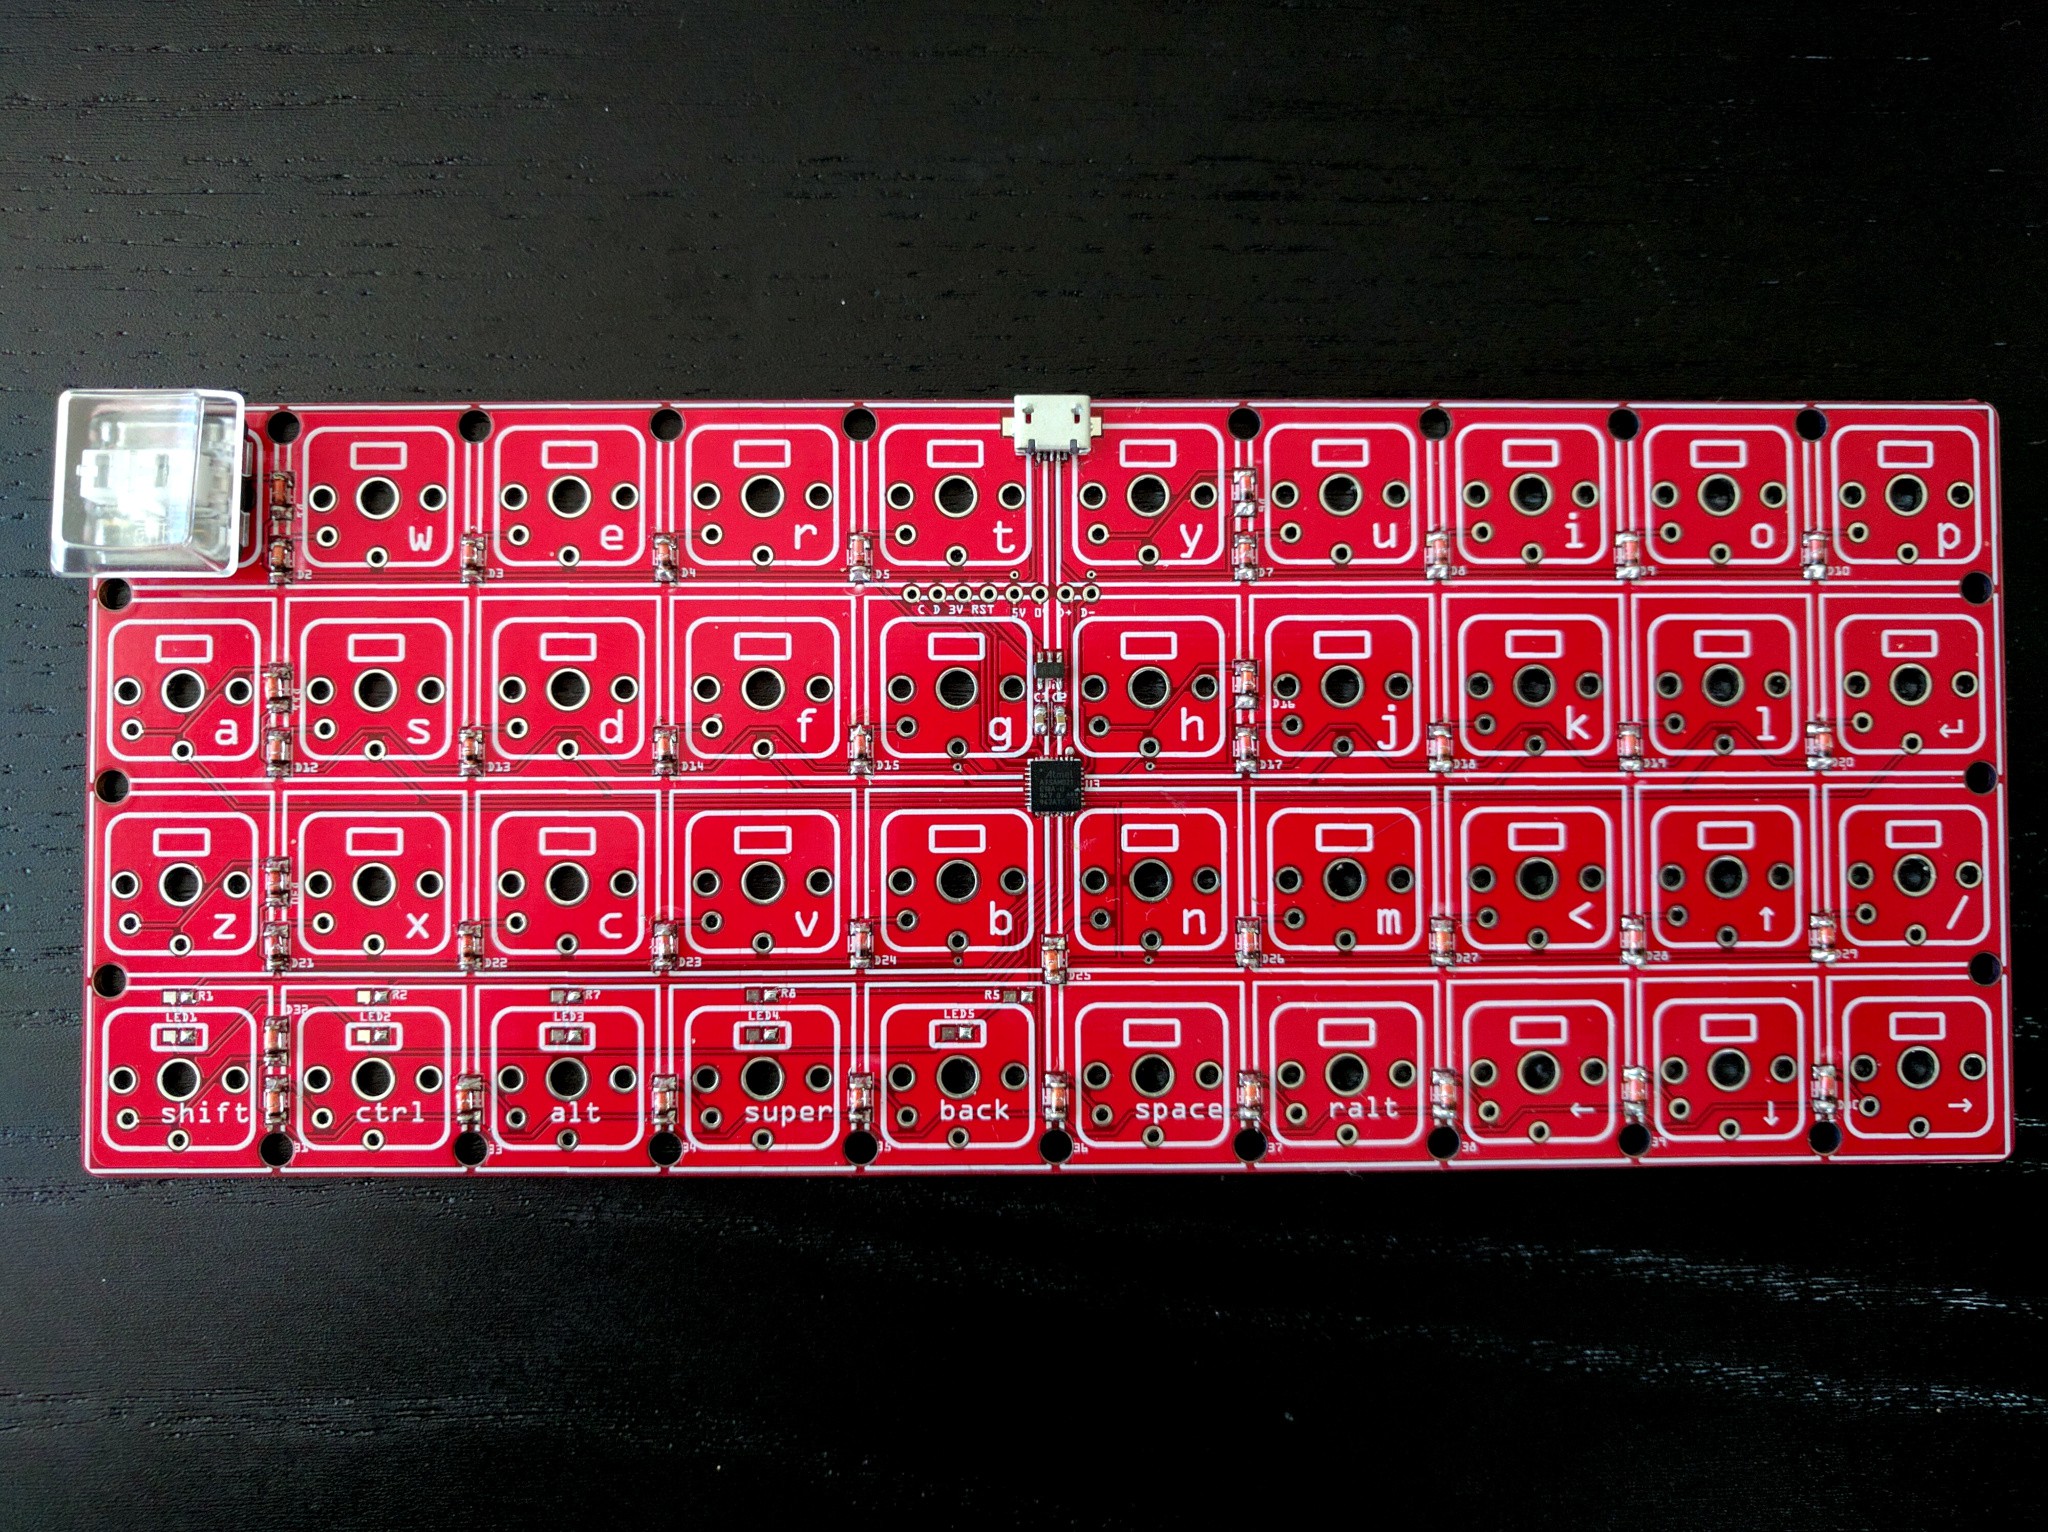
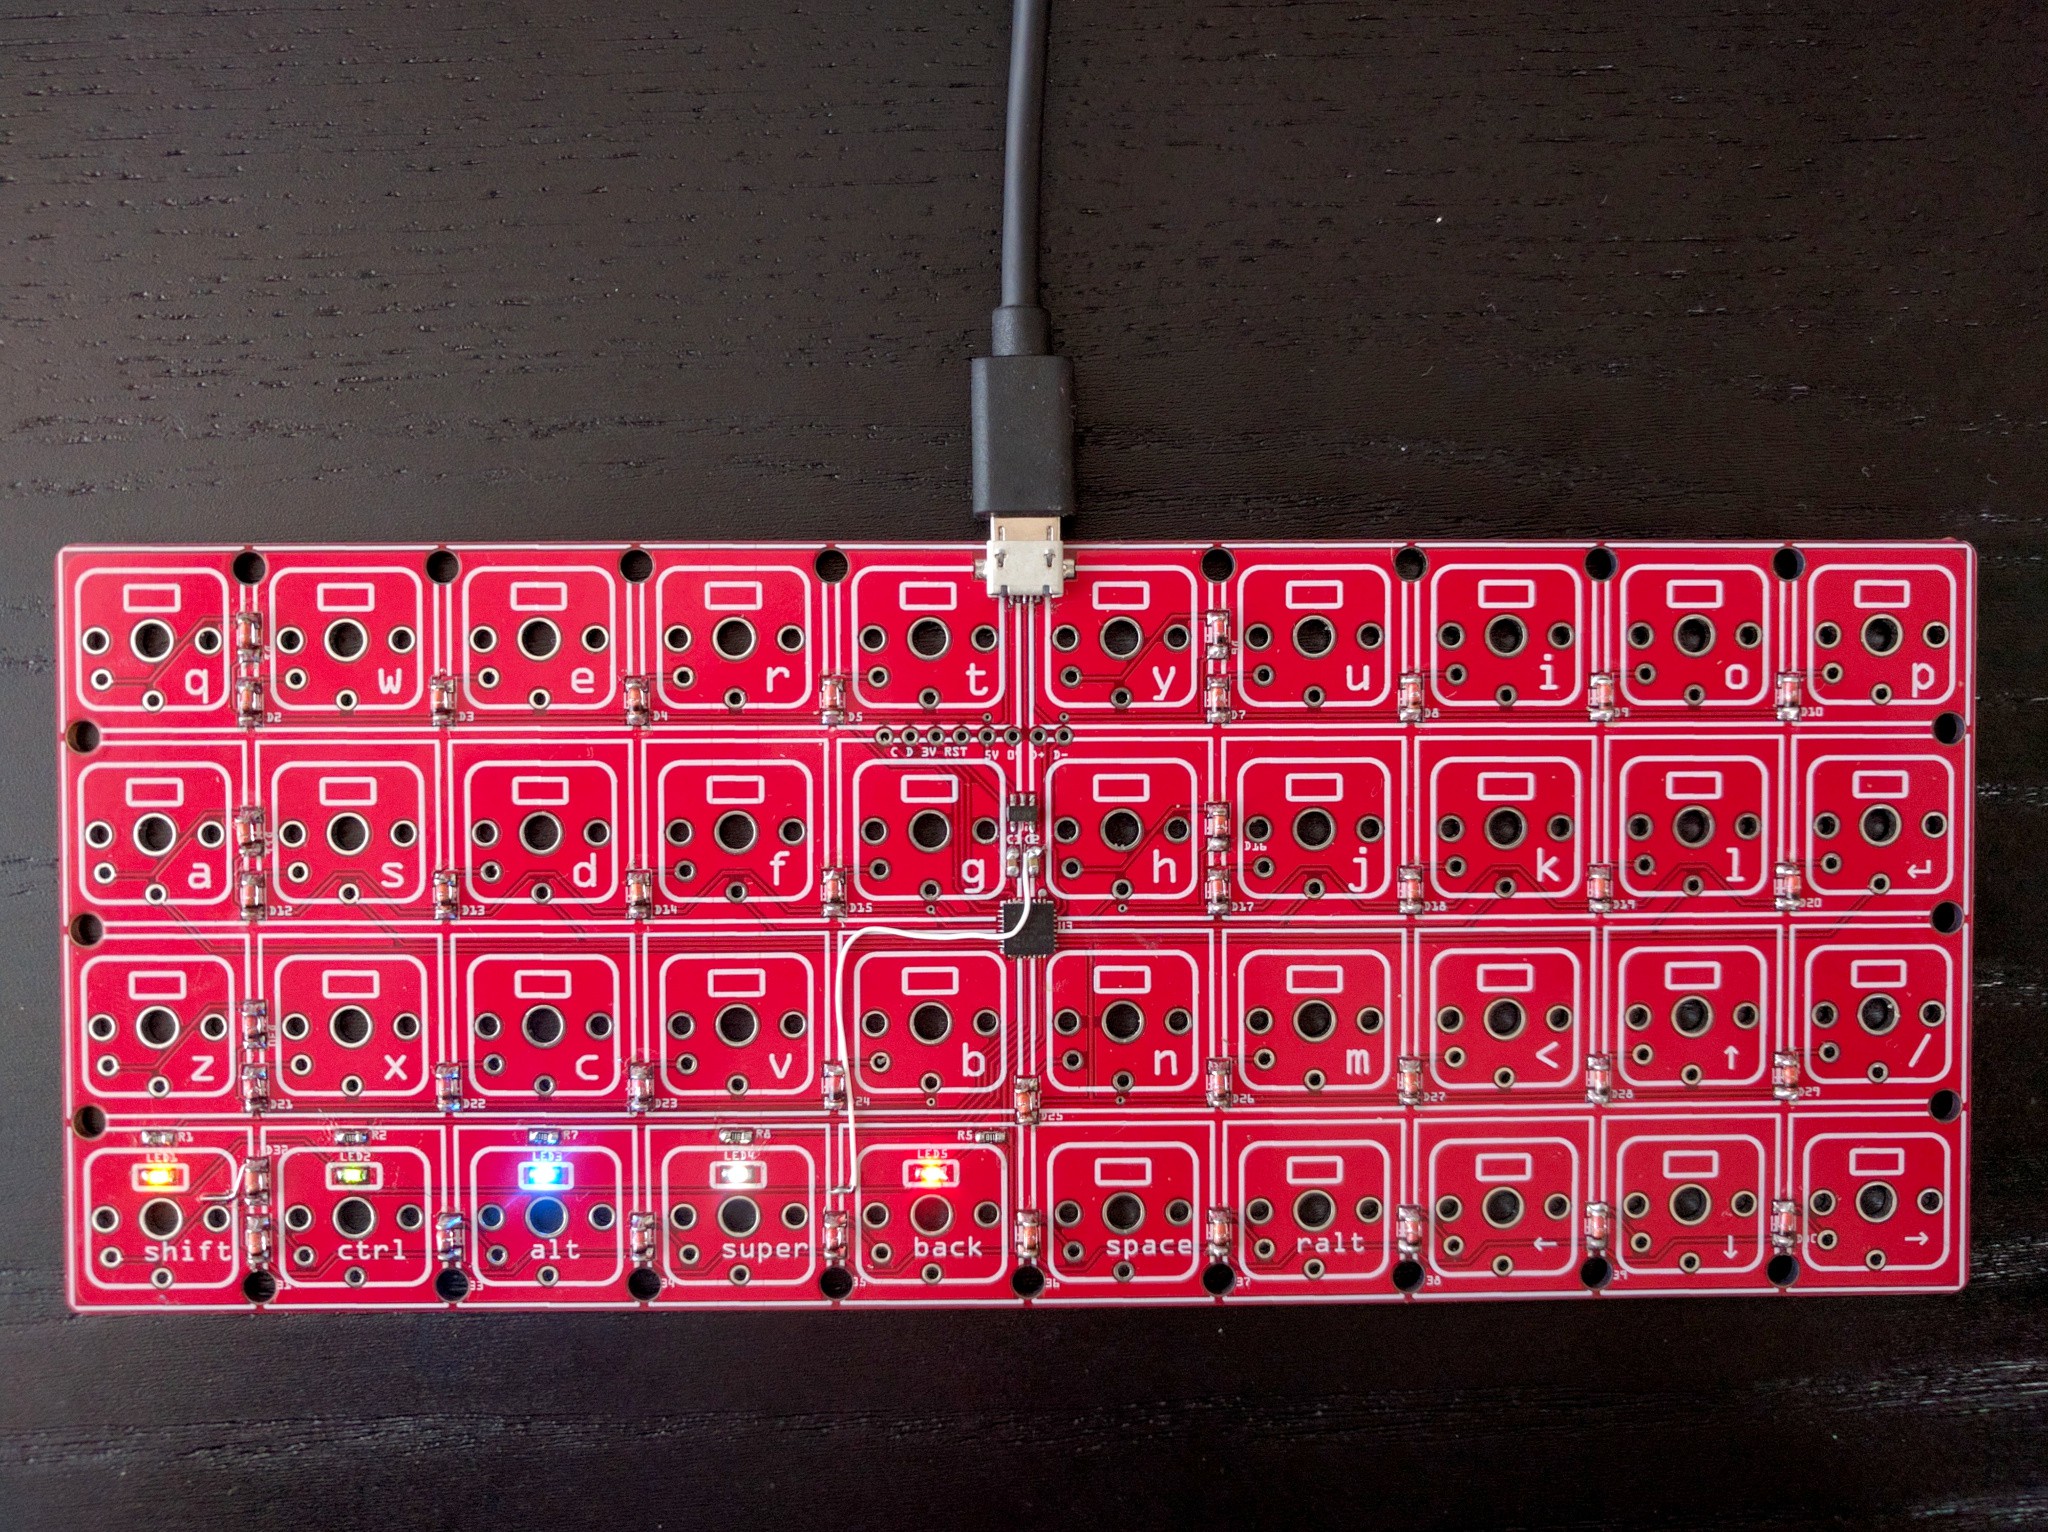
08/12/2020 at 15:56 • 0 commentsI have now assembled and programmed the PCB:
![]()
There are only two problems with it: the diode next to the "shift" key is shorted (because I moved it and forgot to move the trace), and the cathodes of LEDs are not connected to GND (because I forgot). Nothing a few bodges couldn't fix, though:
![]()
I have the basic firmware copied from the #Flounder Keyboard, and it works. Now I only need to implement the mod key magic, as described in the previous log, and it should be ready to be used. Oh, and of course I'm still waiting for the switches, but I'm confident they will fit because I have one left over from previous projects.
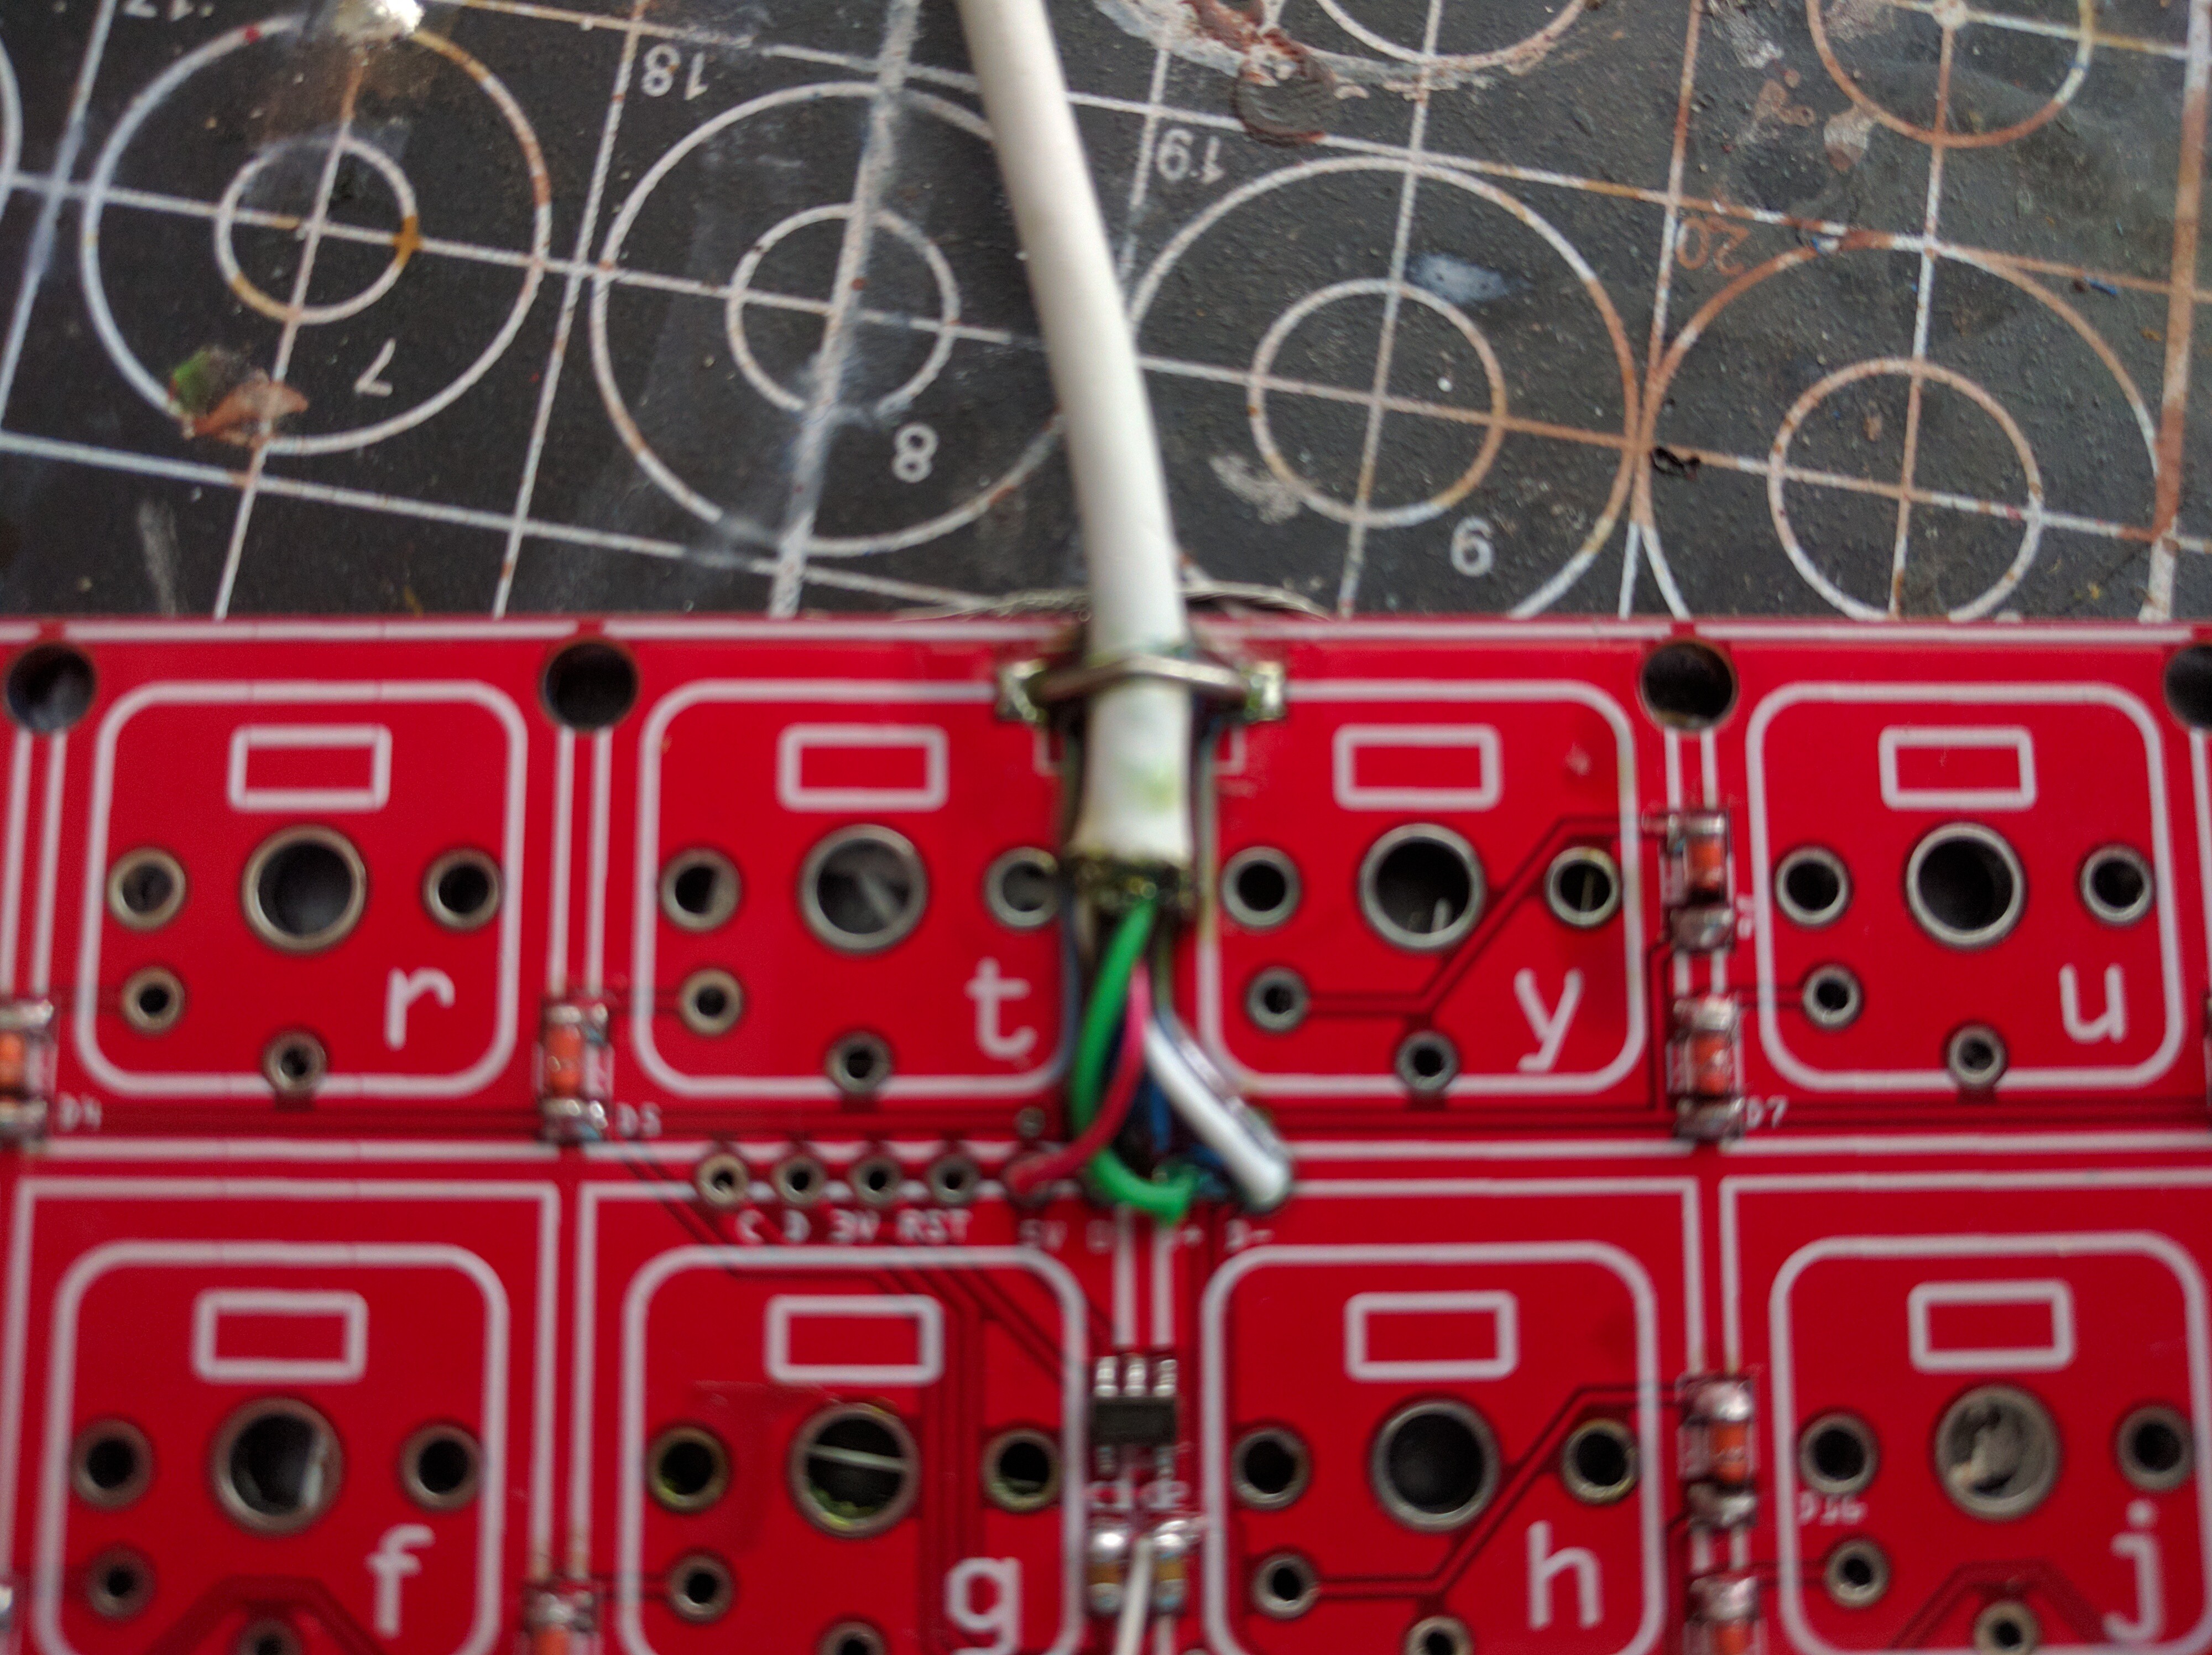
Finally, I decided to not try to carve up the switches to make the USB socket fit, and instead opted for a fixed cable.
![]()
-
Soon
08/11/2020 at 12:58 • 0 comments![]()
The PCBs are on their way, and hopefully will arrive by the end of this week. I can already test and assemble them, before the switches and keycaps arrive — then I will publish the designs. I can also start on programming them.
-
Double-function Modifier Keys
08/08/2020 at 00:41 • 0 commentsThe feasibility of this keyboard hinges on the ability to use the modifier keys both as modifier keys and as regular keys. How is this going to work? The basic idea seems very simple: if you use it with another key, it's a modifier, otherwise it's a regular key. But how exactly can we tell? There are a lot of details here.
I got the whole idea from the QMK keyboard firmware, where this is called Mod-Tap. However, it doesn't work exactly how I wanted — the difference is in the time you keep the key pressed. If you press it and release it quickly (tap), it acts as a regular key, but if you hold it down longer, it acts as a modifier. This mostly works, except that sometimes I press a key too slow (especially when it's a space, pressed with my thumb), and then there is no visible effect (modifier keys don't usually do much on their own) and it seems like the switch is mechanically failing, which was very frustrating, at least until you realize what is happening (I replaced the switch before I did).
So I want to do something a little bit smarter:
- When you first press a mod key, the fact is recorded, but no keycode is sent immediately. They keyboard waits to see what happens next.
- If you press any other key (regular or mod key), the recorded mod key is considered to be a modifier, and the internal status is updated accordingly.
- As soon as that mod key is released, the status is updated again to remove the modifier.
- You can chain modifiers like that indefinitely — only the last pressed mod key needs to be remembered and delayed, as it's the only one that can have two functions.
- As soon as you press any regular, single-function key, the last mod key pressed is considered to be a modifier, and the keycode is sent immediately.
- If you release a mod key without pressing any other new keys, it is considered to be a regular key and its keycode is sent.
This is, in my opinion, a little bit better, because no timings are involved, so you can do it as fast or as slow as you like. There is still the downside that you can't hold down the key to make it repeat — though I could probably do that with a timeout, or something like a double-tap. You also can't send the modifier key alone, so forget about using the ctrl key for shooting. It should still be easy to program, and the only extra memory needed is the variable holding the last pressed key, plus the modifier key status, which now has to be separate from the actual key status.
-
It's That Time of the Year Again
07/31/2020 at 22:44 • 0 commentsEvery year near the end of summer I get a sudden urge to get a new computer keyboard. This year it came earlier. It used to be that I would scour the Internet for the available keyboards in my price range, or visit brick-and-mortar computer shops to try the keyboards in person. But some three or four years ago I started making my own keyboards, and so now instead of lamenting the lack of good keyboards on the market, I can lament the price of the mechanical keyboard switches.
One secret to avoid breaking the bank is to build small keyboards — ones that have as few keys as possible. This is probably why the mechanical keyboard community is full of those chocolate-bar-shaped little designs. So, if I must make one again, let's make it minimalist. I also decided to avoid any large keys — as stabilizers for them are a huge problem, keep the standard 0.75" key spacing, and generally make everything as simple as possible.
I started with the venerable Plack layout, and tried to make it even smaller. I removed the two extra columns from both sides of the keyboard, and moved the keys to the bottom row, making them share the physical key with the modifiers. The reasoning is that you very rarely use a modifier key on its own, so I can make those keys work as modifiers when pressed together with other keys, but generate normal key presses when pressed and released on their own. There are some timing issues involved, but I think I will be able to make that work.
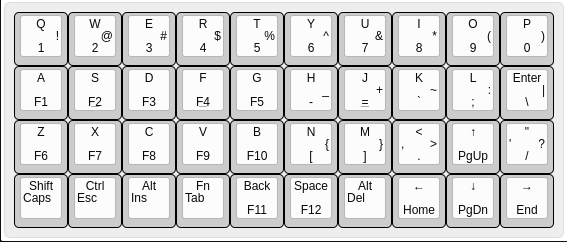
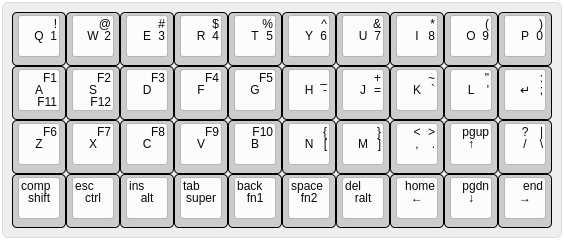
Another change I made was to move the arrow keys into their traditional inverted-T shape. Finally I added the right alt (because I need it for the Polish keyboard layout) and CapsLock (which is mapped to Compose), and that's the result:
![]()
Next I had to decide what switches to use. Initially I was tempted to finally test the Kailh laptop X switches, but after looking at the price (nearly $2 a piece), I decided that's a little bit too much, and defaulted to the Kailh Chocolate White switches, together with a set of key caps for them. Having those on order, I proceeded to design the PCB.
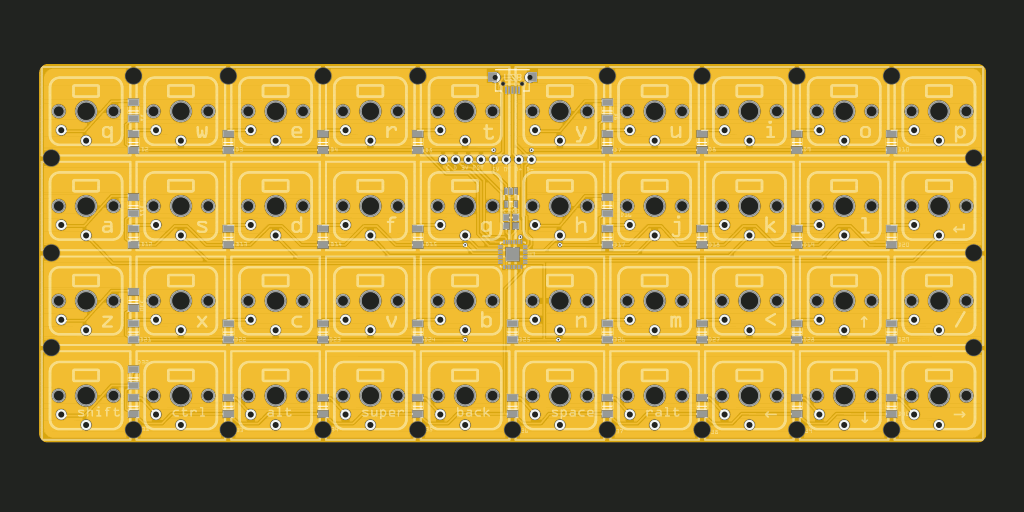
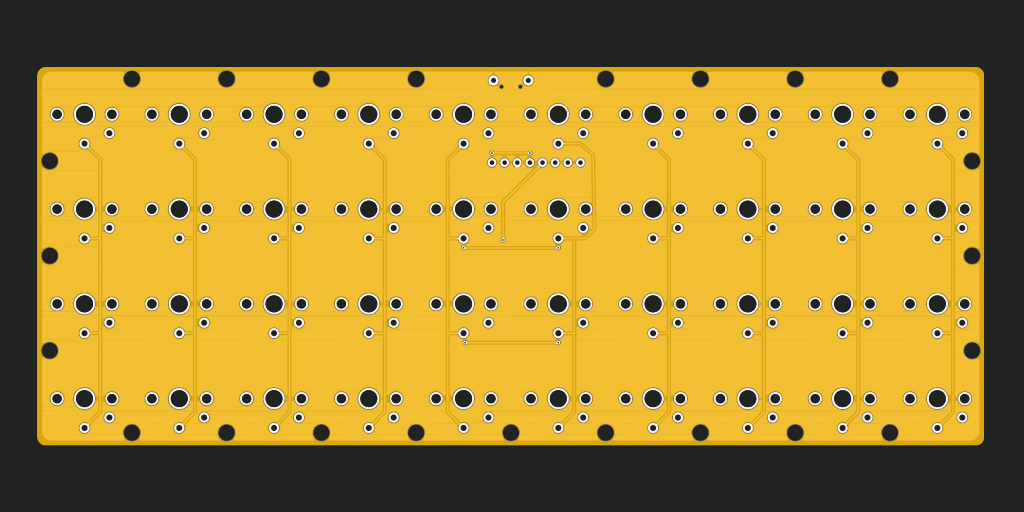
I already had the footprint made for Fritzing, so it was just a question of arranging and connecting all the pieces:
![]()
![]()
If you look closely, you will notice that the USB port overlaps with two of the switches. The plan is to see if I can modify the switches to make room for the port, and if not, then instead solder a USB cable directly to the headers below, skipping the port completely. I didn't want any part of the PCB to stick out of the outline of the keys.
I still have five GPIO pins available for easy routing (and two in harder to access places, plus two programming pins I could possible re-use), so I'm considering adding LEDs under the modifier keys.