-
New Feature: ISO Adjustment
11/30/2020 at 04:07 • 0 commentsFter getting overwhelmed with the user interface(I underestimated that task), I decided to go for an easy win to keeo me going. Changing the ISO settings seemed simple enough. Unlike most things that seem simple enough, this task actually was. I got all the ISO settings I think I need working, and ready to use. The code is crude right now, with everything under if statements in a while loop, but I could take this camera out and use it right now if needed. That's the entire point, so I call that a win. I'll eventually go back and clean up all this code and make functions. For now, I'll just enjoy my nea feature.
Here are the if statements I added:
        if keyboard.is_pressed("0"):
            camera.iso = 0

        if keyboard.is_pressed("1"):
            camera.iso = 100

        if keyboard.is_pressed("2"):
            camera.iso = 200

        if keyboard.is_pressed("3"):
            camera.iso = 300

        if keyboard.is_pressed("4"):
            camera.iso = 400

        if keyboard.is_pressed("5"):
            camera.iso = 500

        if keyboard.is_pressed("6"):
            camera.iso = 600

        if keyboard.is_pressed("7"):
            camera.iso = 700

        if keyboard.is_pressed("8"):
            camera.iso = 800
Some of those settings don't seem to do much, but I'll test again later and remove any that are dead weight. I have to see if the keyboard driver I'm using supports key combinations. Otherwise, I'll be limited to a standard keyboard character set. I suspect I could even use Python code to look for key combinations and trigger extra events. I don't really feel too bad about using up almost all of the number keys in my code.
I found that I get far better low light results using an SIO of 800, set manually, than I do using the auto mode. I'm glad I added this feature and discovered that, as low light performance seemed horrible. Just goes to show how disappointing the most basic implementation of this camera would be. I imagine there are plenty of people out there who want to make use of the HQ Camera Module, and just don't have the technical skills and programming abilities to do so. Hopefully my work here will help someone someday. I coudn't find anything similar to what I'm doing, so I have to do this all myself. I'm ok with that. I get to learn this at a much deeper level than I might have otherwise.
Next up: White balance
-
Adding Status Feedback
11/30/2020 at 03:13 • 0 commentsI finally got ahold of some AAA batteries for my bluetooth keyboard, so I can start coding on the Pi instead of on my laptop. I really do need a way to modify the code remotely, but that's a whole new rabbit hole.
Now I'm onto feedback. The program does work, though at a very basic level. It's nearly impossible to tell the state of the system, as there are no recording lights, symbols, or even sounds. I figure the easiest thing to investigate first is just putting screen overlays that DO NOT embed into the video. Back to the documentation for a bit of research, then I'll try out some code and post the results...
After screwing around with the example in the docs for way too long, I've decided to do something else instead. I find it very frustrating how little information there is on this. The default code sets the camera resolution to 1280x720, and I need it at 1920x1080. I'm not familiar with numpy at all, so I'll have to learn all of that too. Too many knowledge gaps, too tired to try.
I did figure out that the example in the docs doesn't work on Python3. You have to replace
np.getbuffer(a)with
a.tobytes()since the first bit of code existed in Python2, and I'm working with Python3. Moving onto the next part, still to be determined.
-
General Thoughts
11/30/2020 at 01:56 • 0 commentsWhen the Raspberry Pi Foundation released the first camera module, I didn't really care. Same with the second one. They just didn't really fit any of my camera needs. Resolution and quality was just too low for me to actually do anything with. When the HQ module released, I checked out the specs and knew I had to get one. Wasn't sure what I'd do with it, but needed it. That's how it usually goes. I guess it's the curiosity and excitement for all the new possibilities that makes me crave the new toys and tools.
When I was a child, I was obsessed with animals, animal documentaries, and any kind of educational programming I had access to. I remember my thrift store tv, with a dead speaker, in black and white. I had to tune every channel manually. Still loved the stupid thing. I remember watching a penguin documentary on the tv in my Dad's van on the way to the big city. Those programs, and the technology surrounding me shaped me. My dad used to give me his old cell phones back in the 90s. I used to charge them up and just play with and collect them. These days, I find myself wanting to create, rather than consume things. I particularly want to create my own documentaries and educational things. I miss watching Mutual of Omaha's Wild Kingdom. I miss the not so great image quality. It seems this camera project is a good way for me to bring everything I enjoy together. I get to tinker with all kinds of technology and make a tool I'll cherish forever. It's good enough quality for me to make fun videos, and has a whole bunch of 90s flare to it. The 90s were my favorite days, as that's before my life was destroyed and everything became painfully serious. This camera is a way for me to experience something I could never have dreamed of as a kid, now on my own terms. To own a video camera back in the 90s, was something completely out of my reach. I'm very happy to have one now. I went on a 5,200 mile road trip to the west coast recently, and got to swim with the sealions. I got to live out a childhood dream by filming wild animals in their natural habitat. It was unreal. I felt at home out there. If I were being paid for that experience, I'd have been truly content. My camera for that experience, and my first ever video camera, is a GoPro Hero7 Silver. The lady and I sold our bikes and bike rack on that trip to lighten the load, and it helped partially fund that camera purchase. I mounted it to a snorkel mask I'd been holding onto for almost a year(it actually has a GoPro mount on it), and got into the water to see under the ocean for the first time. This camera would have never survived such a harsh environment, and I'll never try to make it waterproof, but that's what multiple cameras are for. This camera is just a tool I'm building to make my documentary process as easy and fun as possible. I could go on endlessly, but I'll end it here. I hope someone reads and enjoys this particular log. I've shared this incredibly important success with friends and family, and no one seemed to care. I hope we friendly fellow hackers will appreciate my work on this odd project.
-
Software: Setting Up The Preview Screen
11/29/2020 at 18:37 • 0 commentsI started with my best guess at the easiest way to implement this, and it failed nicely. The goal is to get a preview up as soon as the program starts, and try to keep it running the entire time. I added all the stopping and starting as I know the different camera modes have different resolutions. Actually, this isn't the easiest way to do it, but it was the first thing that occured to me. The following code is really wonky and does not work.
import keyboard
from time import sleep
from picamera import PiCamera

camera = PiCamera()
camera.exposure_mode = 'auto'
camera.awb_mode = 'auto'

while True:
    camera.start_preview()
    try:
        if keyboard.is_pressed('r'):
            sleep(2)
            camera.stop_preview()
            camera.resolution = (1920, 1080)
            camera.start_preview()
            camera.start_recording('/home/pi/Documents/test_files/button.h264', splitter_port=2)

        if keyboard.is_pressed('s'):
            camera.stop_recording(splitter_port=2)
            #camera.stop_preview()


        if keyboard.is_pressed('p'):
            sleep(2)
            camera.stop_preview()
            camera.resolution = (2592, 1944)
            camera.start_preview()
            camera.capture('/home/pi/Documents/test_files/testpic.png')
            #camera.stop_preview()

        if keyboard.is_pressed('x'):
            break
        sleep(.01)
    except:
        pass
That failed in a very interestng fashion. The preview did indeed come up, and stay up, but it would flash every few seconds, and I couldn't interrupt the program to stop it. I ended up having to spam the "x" button and reboot the Pi. It at least did capture a video and an image without interfering with the preview. I now need to stop the screen from flashing, and find a way to interrupt this program.
Let's try this out. I took out the sleep(2) and the camera.start_preview() from the while loop. I added the camera.start_preview() to the top, after the camera is initialized. The 2 second sleep I had in there seems to be about the same amount of time as the flashing. After pasting that in, I realized that I NEVER stop the preview, and that's probably why it's still up on the screen. Better add that into the end when "x" is pressed.
import keyboard
from time import sleep
from picamera import PiCamera

camera = PiCamera()
camera.exposure_mode = 'auto'
camera.awb_mode = 'auto'
camera.start_preview()

while True:

    try:

        if keyboard.is_pressed('r'):
            sleep(2)
            camera.resolution = (1920, 1080)
            camera.start_recording('/home/pi/Documents/test_files/button.h264', splitter_port=2)

        if keyboard.is_pressed('s'):
            camera.stop_recording(splitter_port=2)

        if keyboard.is_pressed('p'):
            sleep(2)
            camera.resolution = (2592, 1944)
            camera.capture('/home/pi/Documents/test_files/testpic.png')

        if keyboard.is_pressed('x'):
            camera.stop_preview()
            break
        sleep(.01)
    except:
        pass
That worked out far better this time. The preview window came up, and never went away. It did change dimensions every time it changes functions, but it's far better and more usable. There was a live preview image on screen at all times. The image and video captures were also good.
import keyboard
from time import sleep
from picamera import PiCamera

camera = PiCamera()
camera.exposure_mode = 'auto'
camera.awb_mode = 'auto'
camera.start_preview()

while True:
    try:
        if keyboard.is_pressed('r'):
            camera.start_preview()
            sleep(2)
            camera.resolution = (1920, 1080)
            camera.start_recording('/home/pi/Documents/test_files/button.h264', splitter_port=2)

        if keyboard.is_pressed('s'):
            camera.stop_recording(splitter_port=2)

        if keyboard.is_pressed('p'):
            camera.start_preview()
            sleep(2)
            camera.resolution = (2592, 1944)
            camera.capture('/home/pi/Documents/test_files/testpic.png')

        if keyboard.is_pressed('x'):
            camera.stop_preview()
            break
        sleep(.01)
    except:
        pass
When hitting "r" to start recording, the preview goes away for a moment, and comes back. It then does this again. I suspect this is due to the following:
if keyboard.is_pressed('r'):
camera.start_preview()
Hitting "s" to stop recodring does not interfere with the preview window. I need to add some way of knowing if it's recording or not. Perhaps an overlay or something.
Trying the following to stop the interruption from taking a picture, as well as the interruption from starting a recording:
import keyboard
from time import sleep
from picamera import PiCamera

camera = PiCamera()
camera.exposure_mode = 'auto'
camera.awb_mode = 'auto'
camera.start_preview()

while True:
    try:
        if keyboard.is_pressed('r'):
            sleep(2)
            camera.resolution = (1920, 1080)
            camera.start_recording('/home/pi/Documents/test_files/button.h264', splitter_port=2)

        if keyboard.is_pressed('s'):
            camera.stop_recording(splitter_port=2)

        if keyboard.is_pressed('p'):
            sleep(2)
            camera.resolution = (2592, 1944)
            camera.capture('/home/pi/Documents/test_files/testpic.png')
            camera.resolution = (1920, 1080)
            camera.start_preview()

        if keyboard.is_pressed('x'):
            camera.stop_preview()
            break
        sleep(.01)
    except:
        pass
The changes to the picture section actually helped quite a bit. Usually, the preview would resize, it would take a picture, then leave the preview window at the new dimensions. I set it to change the resolution back to 1080p, as this camera will primarily be used to record 1080p video, with the occasional image capture. The preview still flickers when starting a video recording, but I am nearly done with this particular task. The following code might help a bit. I changed the order of a few things. Explaining every single change is tedious, and I'm not in a professional environment, so I won't be doing that all the time.
import keyboard
from time import sleep
from picamera import PiCamera

camera = PiCamera()
camera.resolution = (1920, 1080)
camera.exposure_mode = 'auto'
camera.awb_mode = 'auto'
camera.start_preview()

while True:
    try:
        if keyboard.is_pressed('r'):
            camera.resolution = (1920, 1080)
            sleep(2)
            camera.start_recording('/home/pi/Documents/test_files/button.h264', splitter_port=2)

        if keyboard.is_pressed('s'):
            camera.stop_recording(splitter_port=2)

        if keyboard.is_pressed('p'):
            sleep(2)
            camera.resolution = (2592, 1944)
            camera.capture('/home/pi/Documents/test_files/testpic.png')
            camera.resolution = (1920, 1080)
            camera.start_preview()

        if keyboard.is_pressed('x'):
            camera.stop_preview()
            break
        sleep(.01)
    except:
        pass
I've gotten this running better than ever, and the preview portion seems to have hit a good stopping point. The screen still flashes when I start recording, but that's the worst of it. I'd still like to shorten the preview that pops up when a picture is taken, but that can wait until later. Doing some research, ate a turkey leg, and getting ready to take care of a few other things around the house.
I ended up making more changes to the code, but forgot what I was doing and reverted them to a known working version to be safe.
-
Starting Software Development Back Up
11/29/2020 at 16:59 • 0 commentsThe first version of the code I posted is very crude and often errors out. It keeps saying there is no video recording when you go to stop the video. It only does this sometimes, not consistently. As I type this, I suspect that the "if" statement that interrupts the "while" loop is actually stopping the video stream before it runs the stop command, causing it to error out. I'll go test it out. Here's the original code:
------------------------------------------------------------------------------------------------------------------------------------------------------
#Install modules with python3: python3.7 -m pip install
import keyboard
from time import sleep
from picamera import PiCamera

camera = PiCamera()
camera.exposure_mode = 'auto'
camera.awb_mode = 'auto'

while True:
    if keyboard.is_pressed('r'):
        sleep(2)
        camera.resolution = (1920, 1080)
        camera.start_preview()
        camera.start_recording('/home/pi/Documents/test_files/button.h264', splitter_port=2)

    if keyboard.is_pressed('s'):
        camera.stop_recording(splitter_port=2)
        camera.stop_preview()


    if keyboard.is_pressed('p'):
        sleep(2)
        camera.resolution = (2592, 1944)
        camera.start_preview()
        camera.capture('/home/pi/Documents/test_files/testpic.png')
        camera.stop_preview()

    if keyboard.is_pressed('x'):
        break
    sleep(.01)
I started up the software(to make sure I didn't break it after viewing it), and it worked as usual. I commented out the following line and tested again:
camera.stop_recording(splitter_port=2)
That helped disprove my theory that the interrupt was causing problems. When I hit the "s" button to stop recording, the program didn't error out, but instead the preview went away, as it should have. I tried to start recording again, with the "r" button, but got an error stating that it was already recording. This tells me that the "s" function didn't stop the recording, which would indicate it crashed it.I think I need to take a look at how the "sleep()" function interacts with the camera feed...
Another test, with original code, shows that the error still occurs most of the time. I wonder if splitter port 2 is being closed prematurely or something.
I'll eliminate the while loop and if statements and see if it gives any errors:
from time import sleep

from picamera import PiCamera

camera = PiCamera()
camera.start_preview()
sleep(2)
camera.start_recording('/home/pi/Documents/test_files/testvid.h264')
sleep(5)
camera.stop_recording()
camera.stop_preview()
That code worked fine, as expected. Now I'll try forcing splitter 2:
from time import sleep

from picamera import PiCamera

camera = PiCamera()
camera.start_preview()
sleep(2)
camera.start_recording('/home/pi/Documents/test_files/testvid.h264', splitter_port=2)
sleep(5)
camera.stop_recording(splitter_port=2)
camera.stop_preview()
That also worked just fine. I really need to learn more about programming and Python... I'm pretty sure I searched this error message before, but I'll try it again. A search turned up nothing of use to me, so I guess I just have to figure it out myself. I guess I could add "try" to the while loop, and ignore exceptions. Not the proper way of doing things, but it has worked for me in the past. This exception is killing off the entire program, which is not a good thing when trying to run a camera. I can see this being a problem when you go to stop a recording, it crashes the program, and you have to fumble with it to capture some footage. I'd be pretty mad if I missed a shot due to that.
I figured it out. The following code works to ignore the error, as well as print out when it occurs, without interrupting the program:
#Install modules with python3: python3.7 -m pip install
import keyboard
from time import sleep
from picamera import PiCamera

camera = PiCamera()
camera.exposure_mode = 'auto'
camera.awb_mode = 'auto'

while True:
    if keyboard.is_pressed('r'):
        sleep(2)
        camera.resolution = (1920, 1080)
        camera.start_preview()
        camera.start_recording('/home/pi/Documents/test_files/button.h264', splitter_port=2)

    if keyboard.is_pressed('s'):
        try:
            camera.stop_recording(splitter_port=2)
            camera.stop_preview()
        except:
            print("Error")
            pass


    if keyboard.is_pressed('p'):
        sleep(2)
        camera.resolution = (2592, 1944)
        camera.start_preview()
        camera.capture('/home/pi/Documents/test_files/testpic.png')
        camera.stop_preview()

    if keyboard.is_pressed('x'):
        break
    sleep(.01)
I modified the "s" portion, which stops the video recording, so that it would ignore the errors and move on:
    if keyboard.is_pressed('s'):
        try:
            camera.stop_recording(splitter_port=2)
            camera.stop_preview()
        except:
            print("Error")
            pass
The ACTUAL problem here is that the wireless keyboard/mouse/media remote thing is sending multiple keypresses after a while. I feel it took me way longer to figure this out than it should have. I'm quite happy though, as this means I can move on, and reminds me that I am capable of completing this project.
Seeing as the entire main loop needs to be running for the camera to operate, I think I'll put the entire code into a "try" situation, so that the damn thing can't crash on me:
#Install modules with python3: python3.7 -m pip install
import keyboard
from time import sleep
from picamera import PiCamera

camera = PiCamera()
camera.exposure_mode = 'auto'
camera.awb_mode = 'auto'

while True:
	try:
		if keyboard.is_pressed('r'):
			sleep(2)
			camera.resolution = (1920, 1080)
			camera.start_preview()
			camera.start_recording('/home/pi/Documents/test_files/button.h264', splitter_port=2)

		if keyboard.is_pressed('s'):
			camera.stop_recording(splitter_port=2)
			camera.stop_preview()


		if keyboard.is_pressed('p'):
			sleep(2)
			camera.resolution = (2592, 1944)
			camera.start_preview()
			camera.capture('/home/pi/Documents/test_files/testpic.png')
			camera.stop_preview()

		if keyboard.is_pressed('x'):
			break
		sleep(.01)
	except:
		pass
That actually worked great, first time. That didn't normally happen to me when first learning to code. All that time writing my video codec rename program, and tinkering with Arduinos has paid off. I at least now have a simple program that can record a video, take pictures, and exit without crashing. I even pressed the various command buttons a ton of times while various things were running, and couldn't interrupt it. That's perfect, as you never know what buttons you might accidentally hit.
That's all for this section. Next up, I'll be adding some more features, maybe like starting the preview window as soon as the program opens, and keeping one open the entire time. Once that's working, I can display the output on whatever screen I choose as my viewfinder.
-
Initial Update: Touchscreen and Such
11/29/2020 at 03:17 • 0 commentsToday I spent quite a few hours working on this. I want to watch tv and relax, so I'll probably keep this brief.
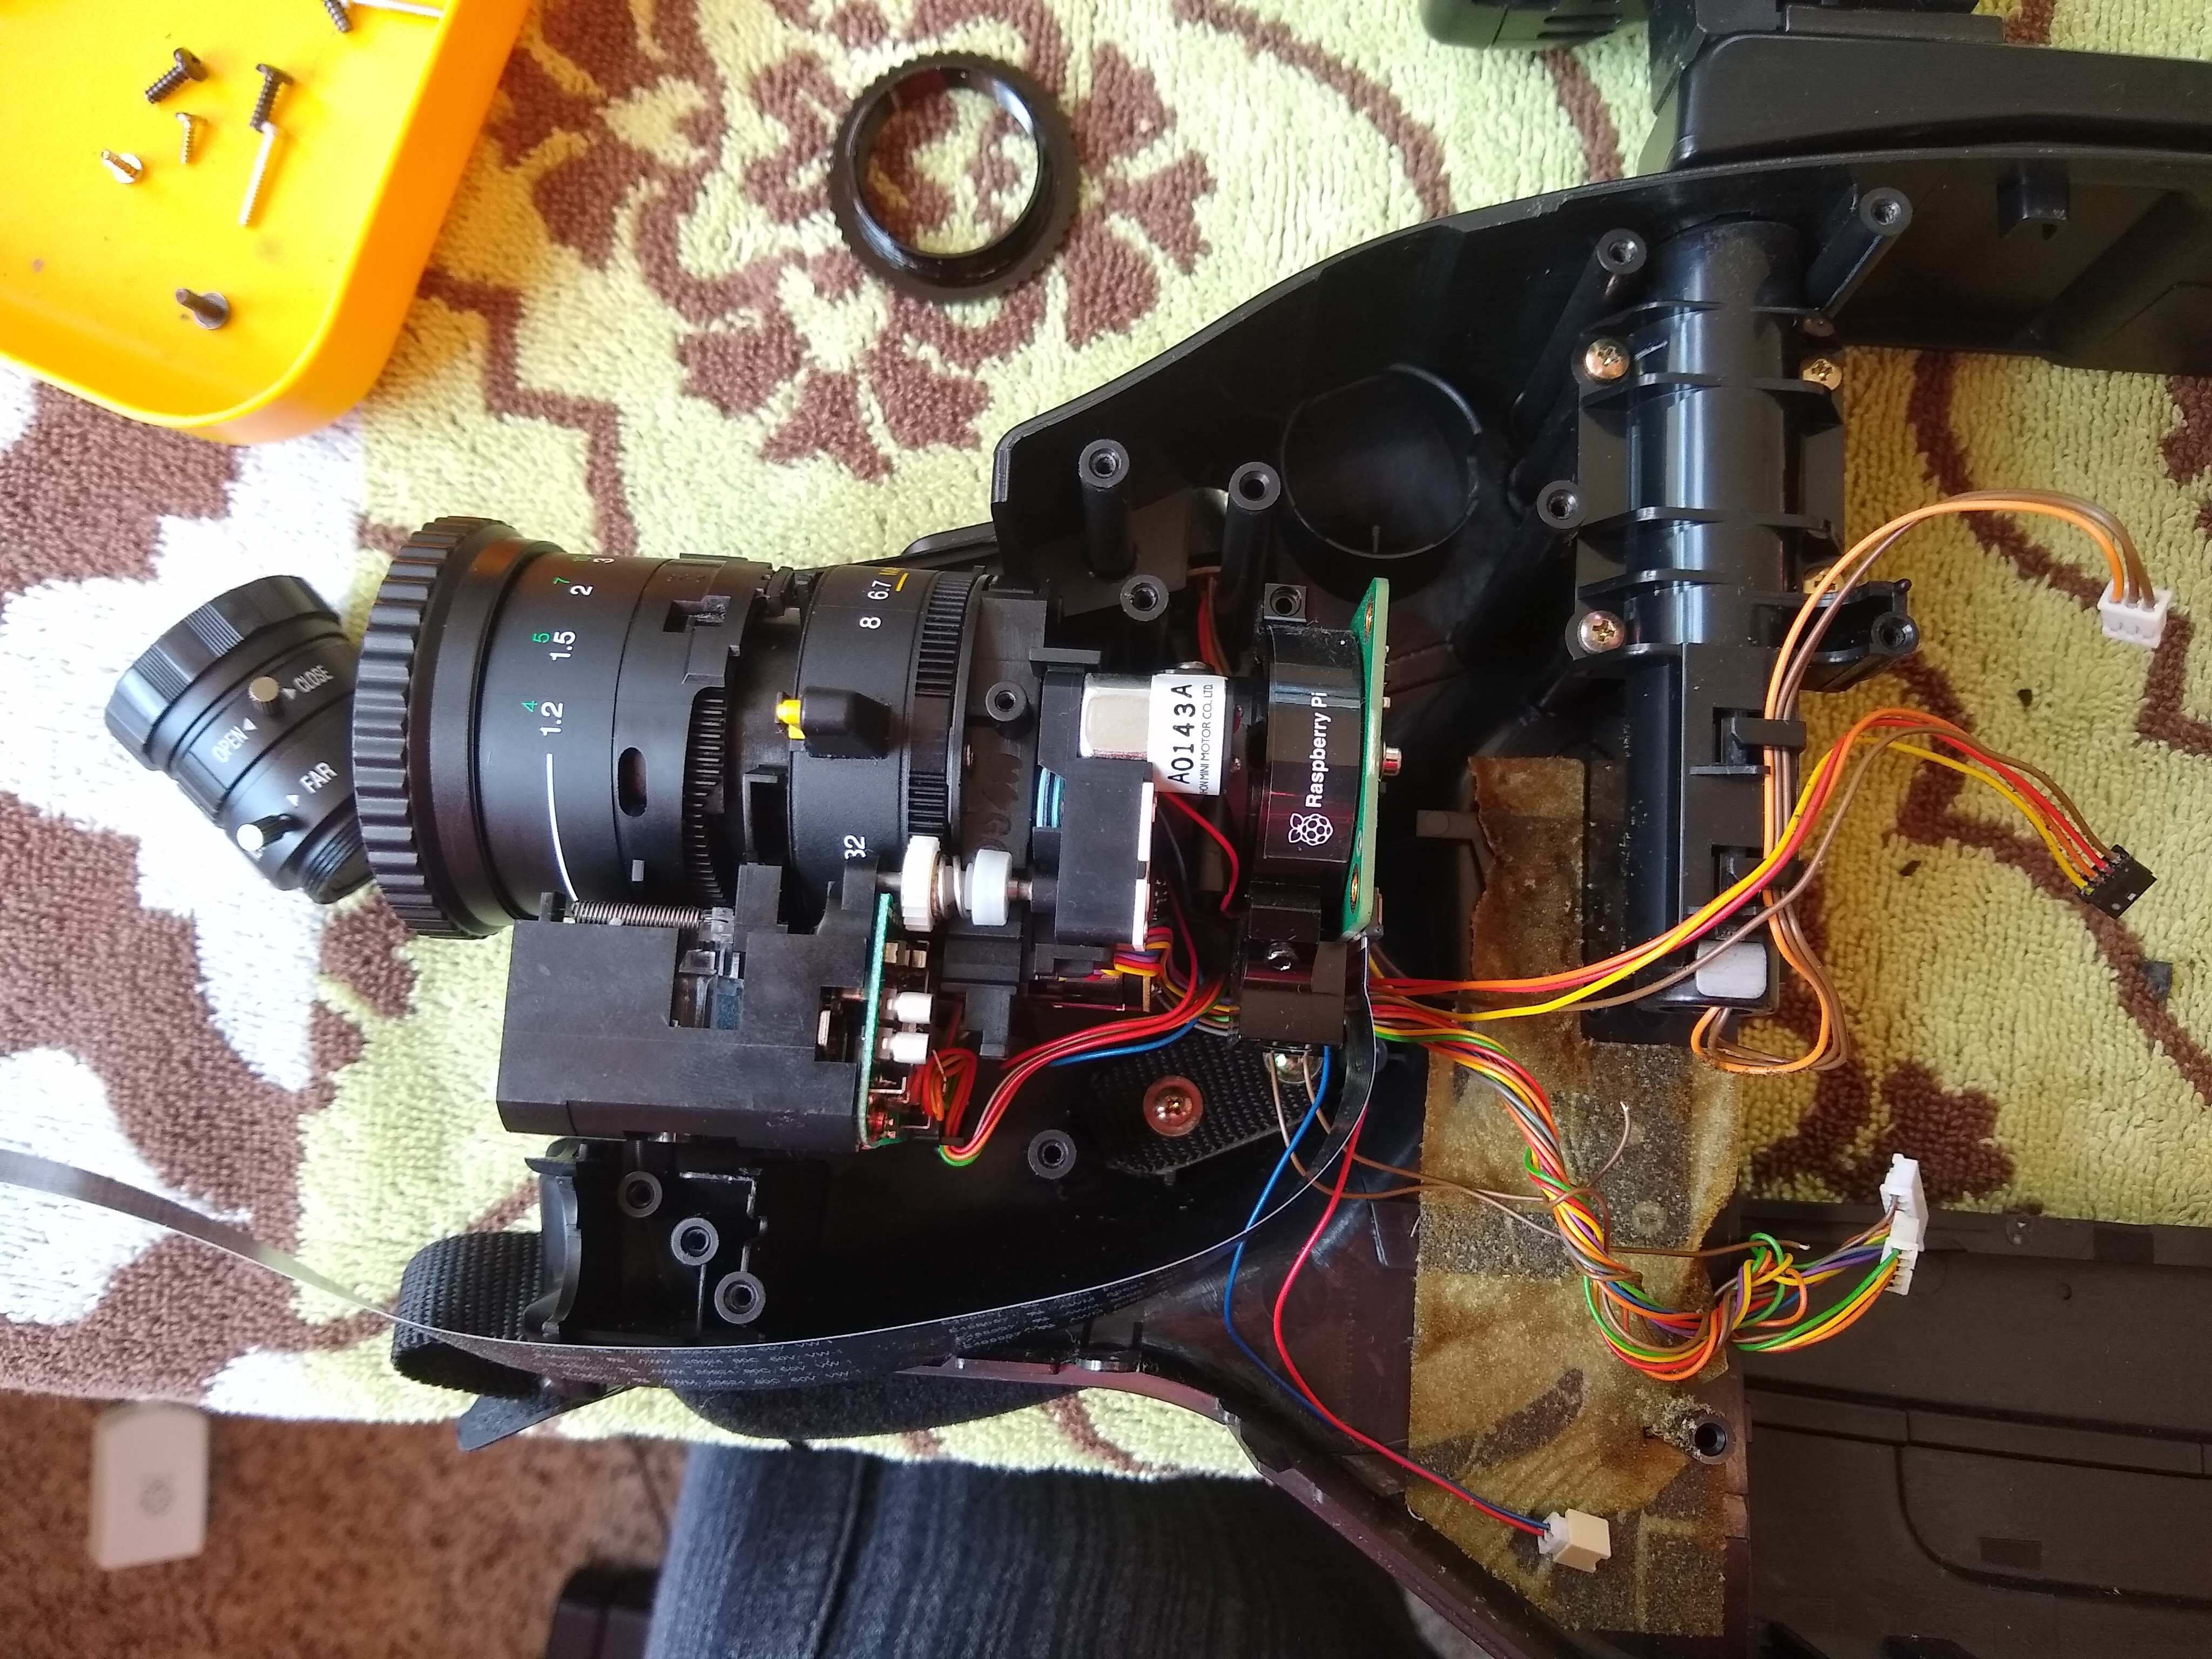
I got the sensor mounted to the lens and even got it adjusted. I shaved down the plastic on the lens assembly, put a piece of tape on for a friction fit, then just jammed the sensor module onto it. Held up pretty darn well, but is temporary. I can even adjust the main threaded ring thing to focus it. Macro mode works fairly well, zoom is pretty good. Close up and low light performance aren't great, but will do.
I installed the touchscreen inside the camera case, with unusually good results. I captured some video of this thing in action, as well as some test shots from the camera itself.
I still need an audio interface and microphone, then I can record video with audio. Add in a small LCD as a viewfinder, a speaker, and a battery pack and I'll have a useable stand alone camcorder. I've never owned a camcorder, and I find it interesting that I built one isntead of buying one. I'm really happy with the progress today.
I didn't mention it much, but I did right a very simple program to start and stop recording, and take a picture.
More to come in the future, including a video I made.
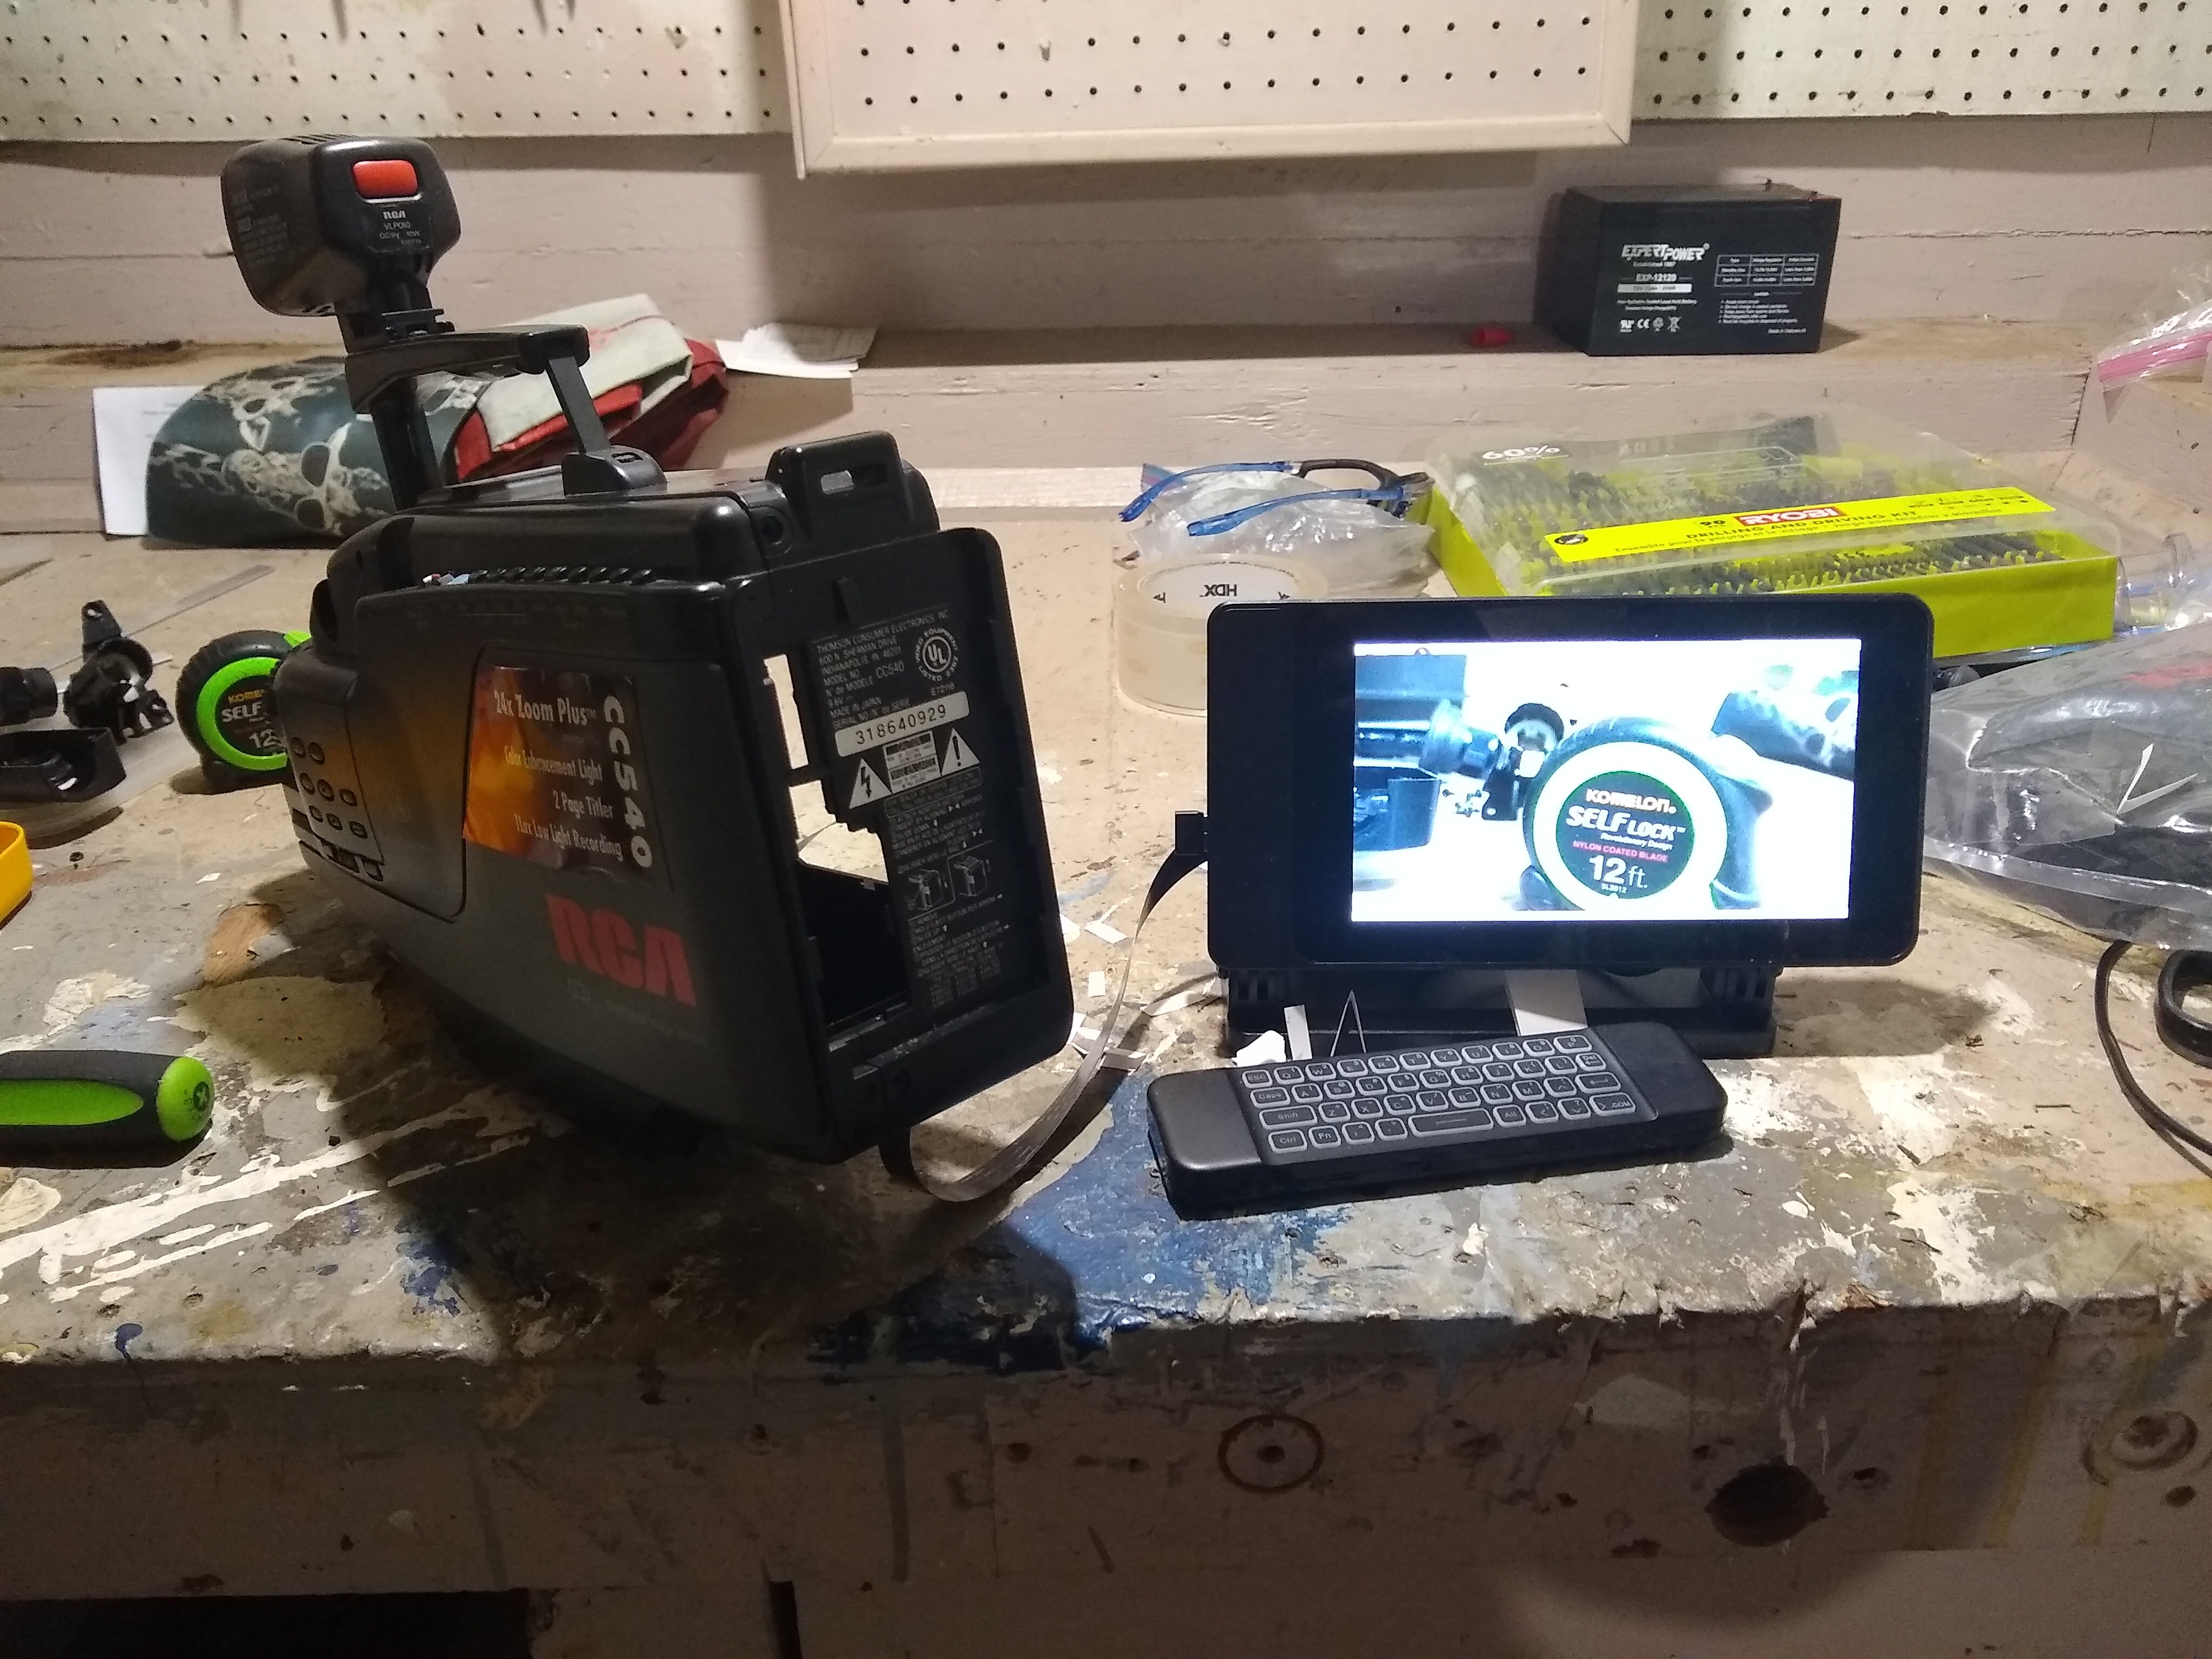
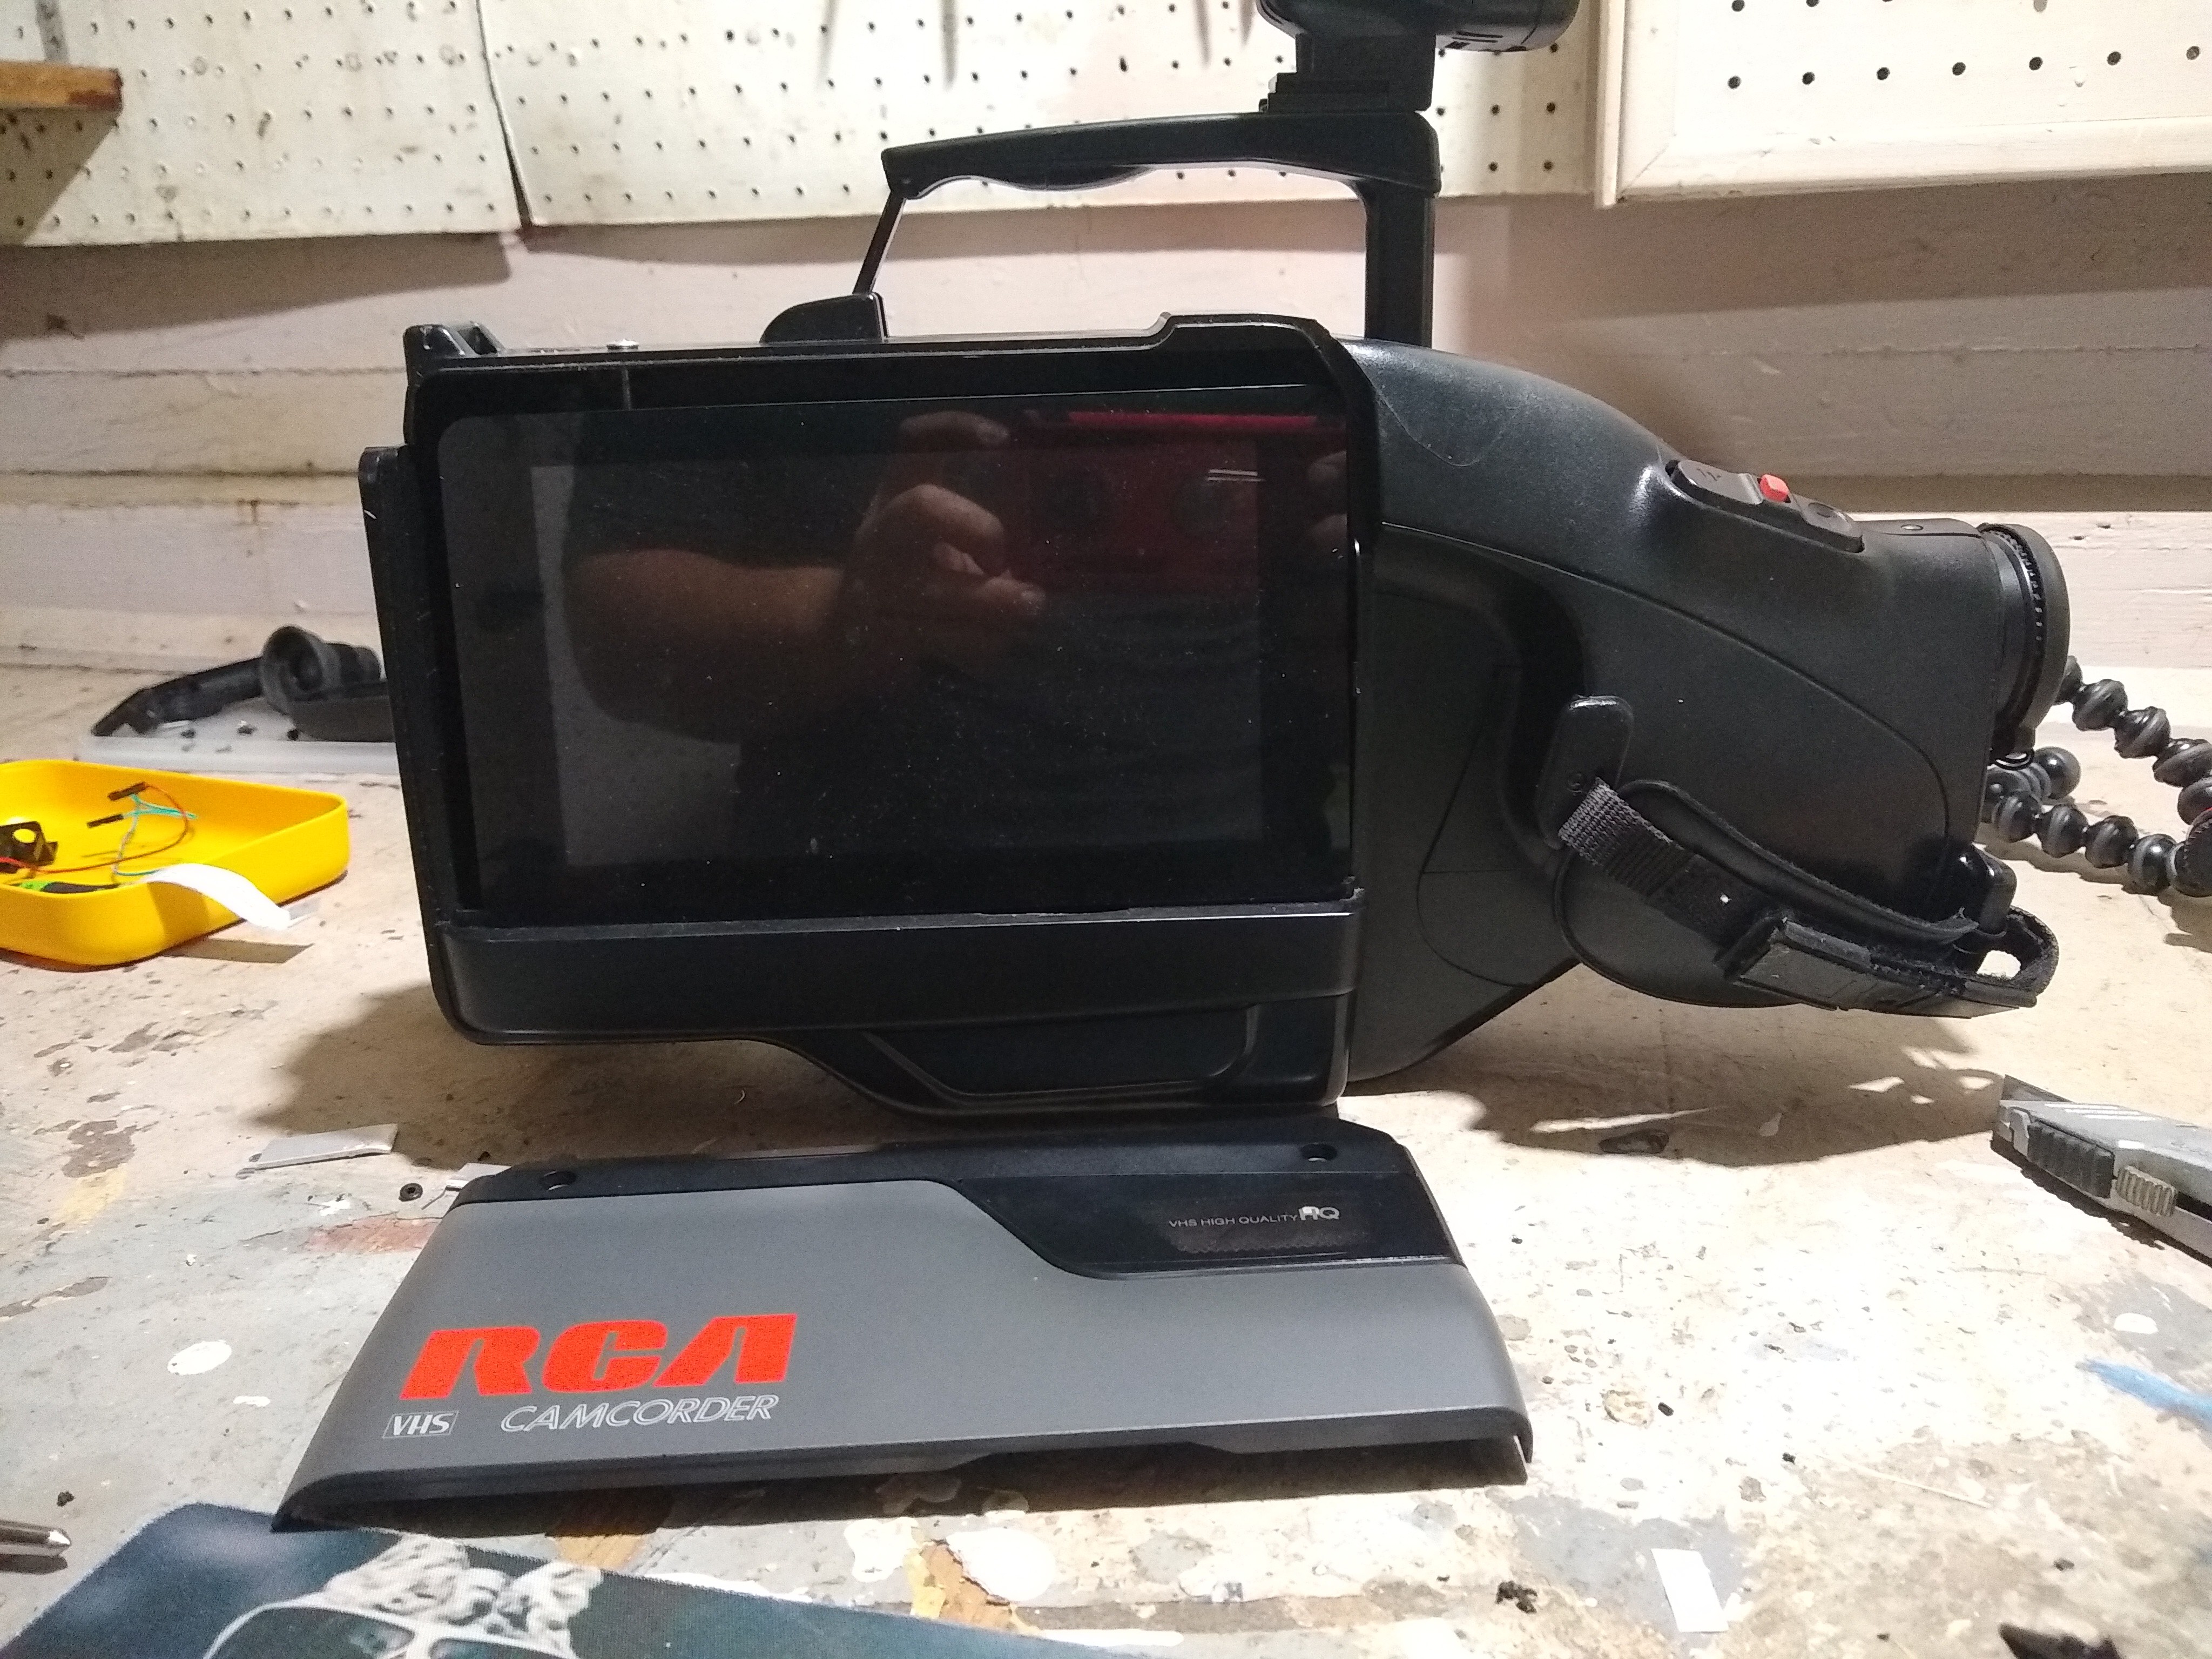
The first picture is the test setup before I installed the touchscreen and Pi into the camera. It was quite tedious to work with.
![]()
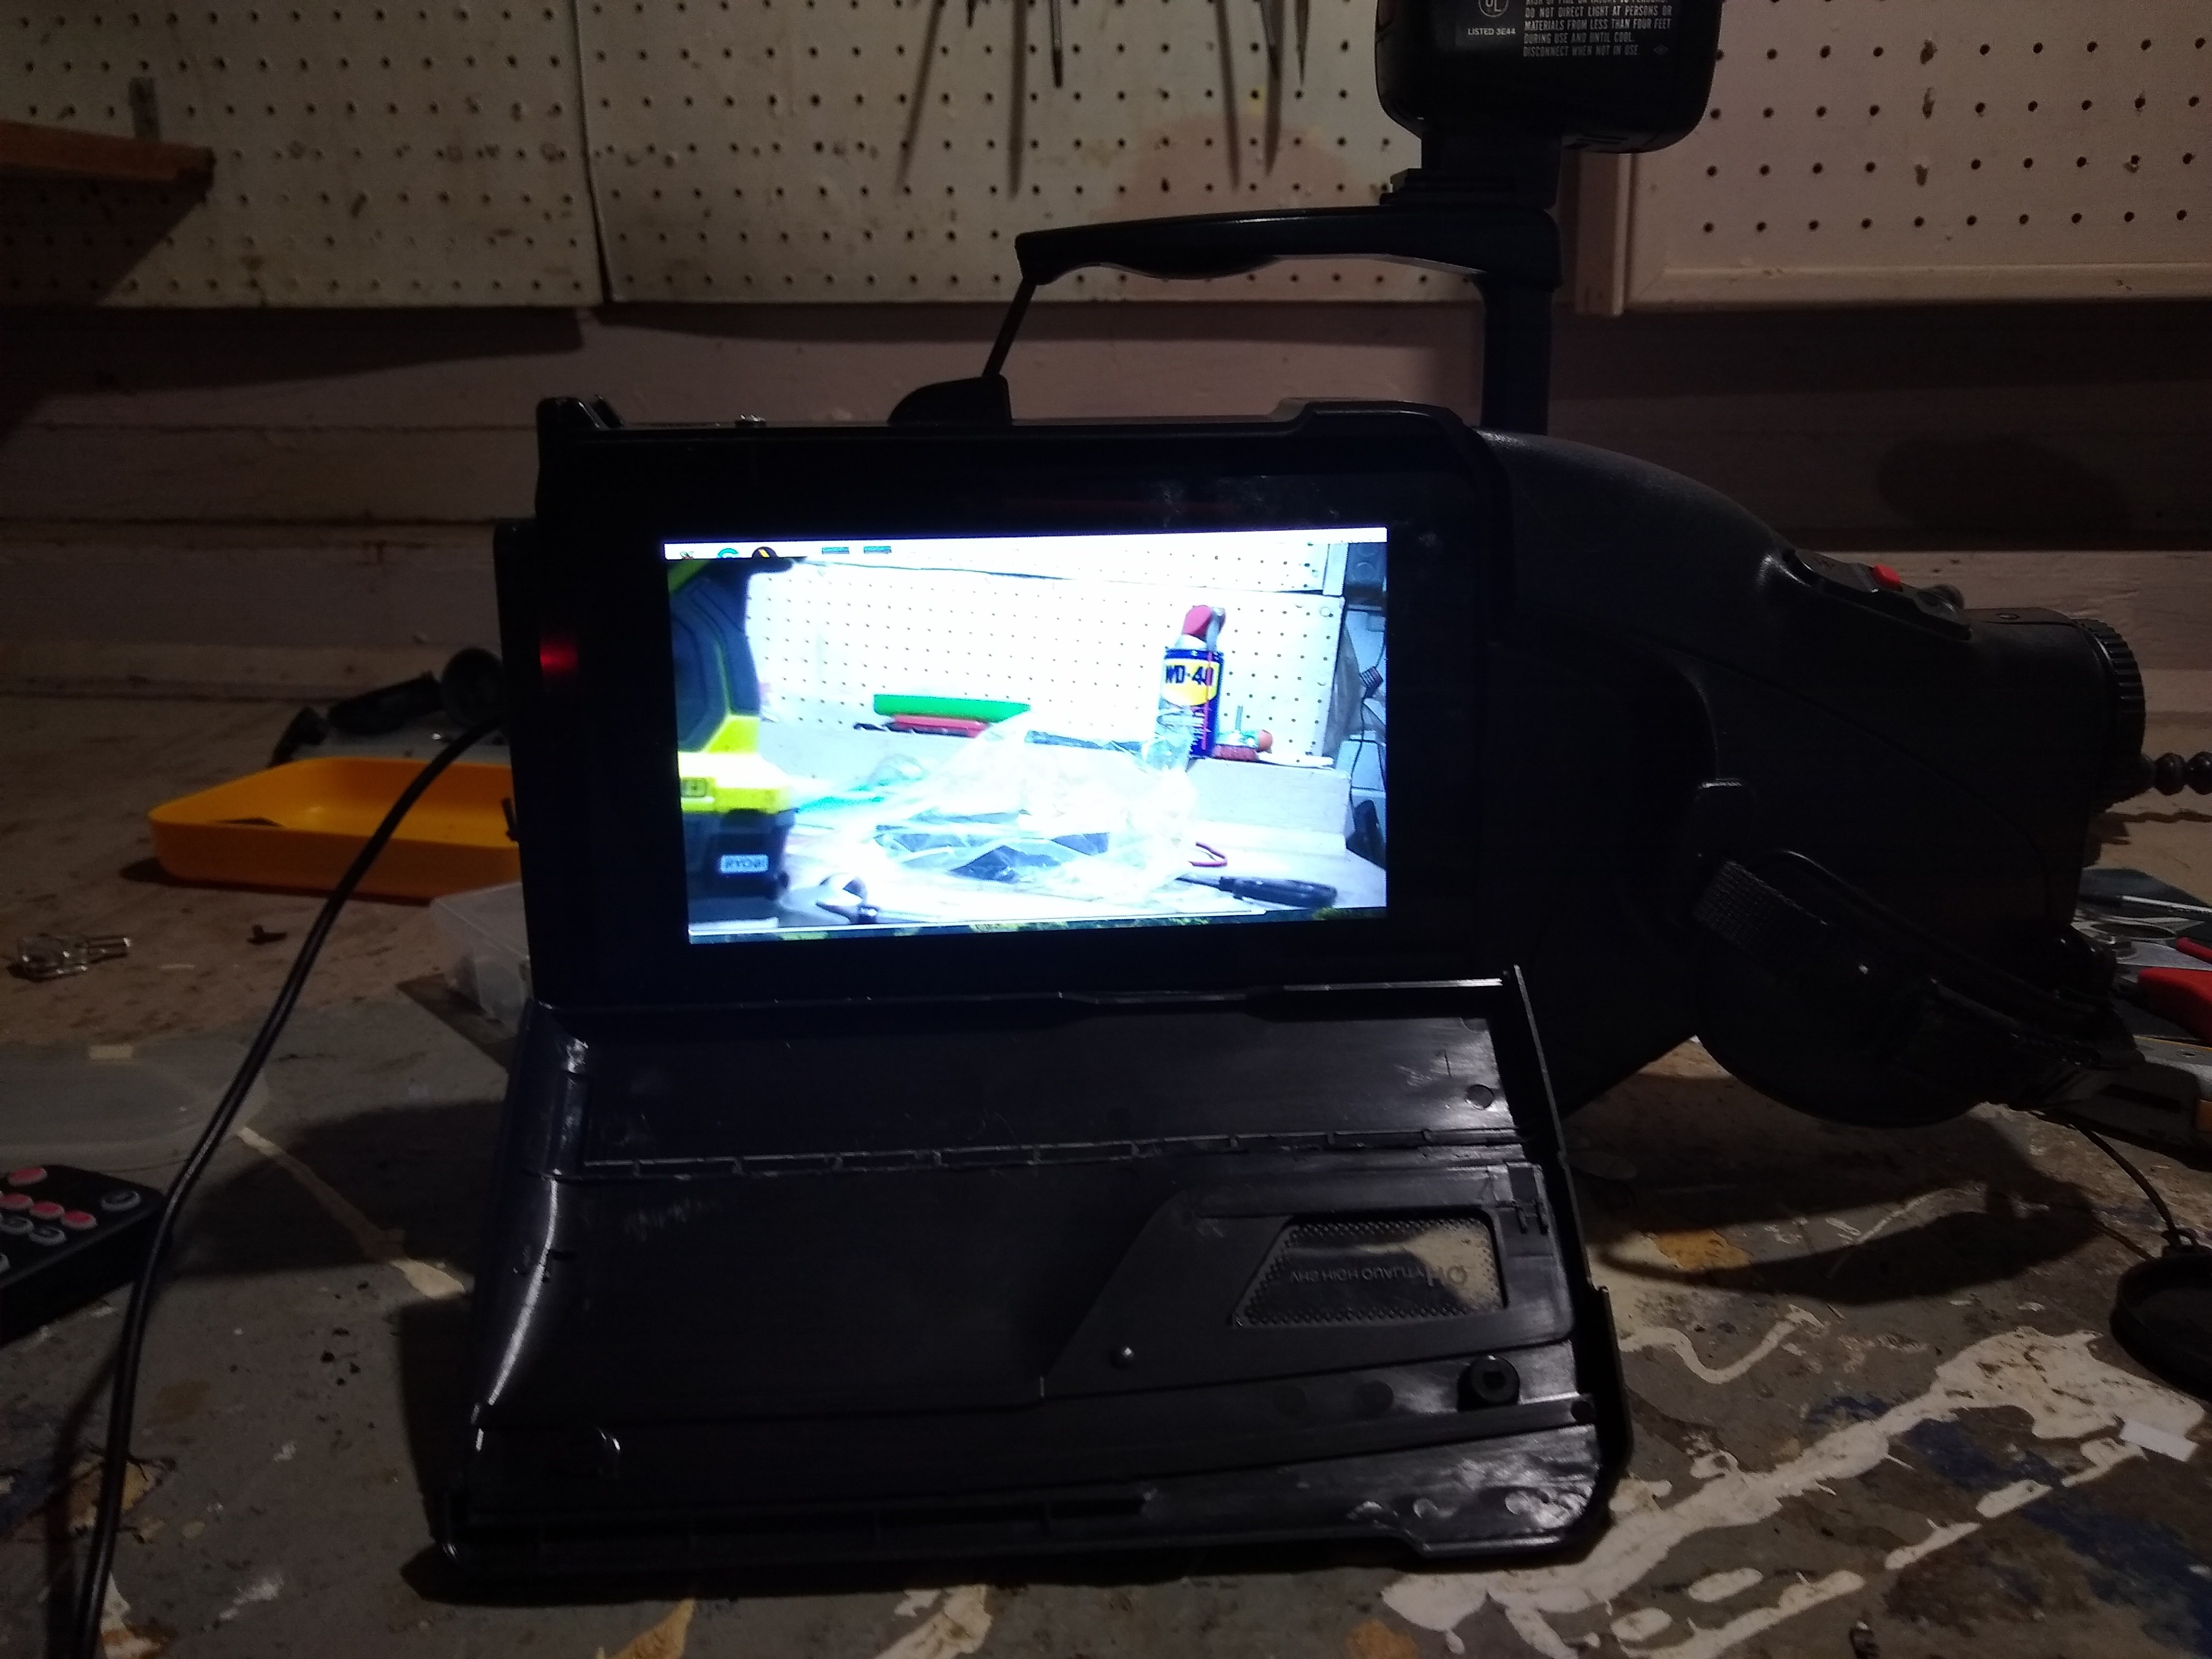
This one is after I bolted the screen and such into place. Went far better than I thought. I'll get pictures of the inside next time I have it apart.
![]()
The assembled camera displaying its first images as a semi-complete camera. It's only tethered by USB power these days.
![]()
-
Verified Lens and Sensor Will Work Together
11/29/2020 at 03:01 • 0 commentsAnother update on my camera project: just verified the new camera sensor will fit nicely into the case, and should be fairly easy to mount. Once I design the mounts for it, I can start mounting buttons and the computer hardware. After that, it's just a matter of adding a small screen, battery packs, microphone, memory cards, and programming it. So far, so good. I really needed a victory lately. Can't wait to start filming animals with my custom camera. It even looks like a little TV camera.
![]()
-
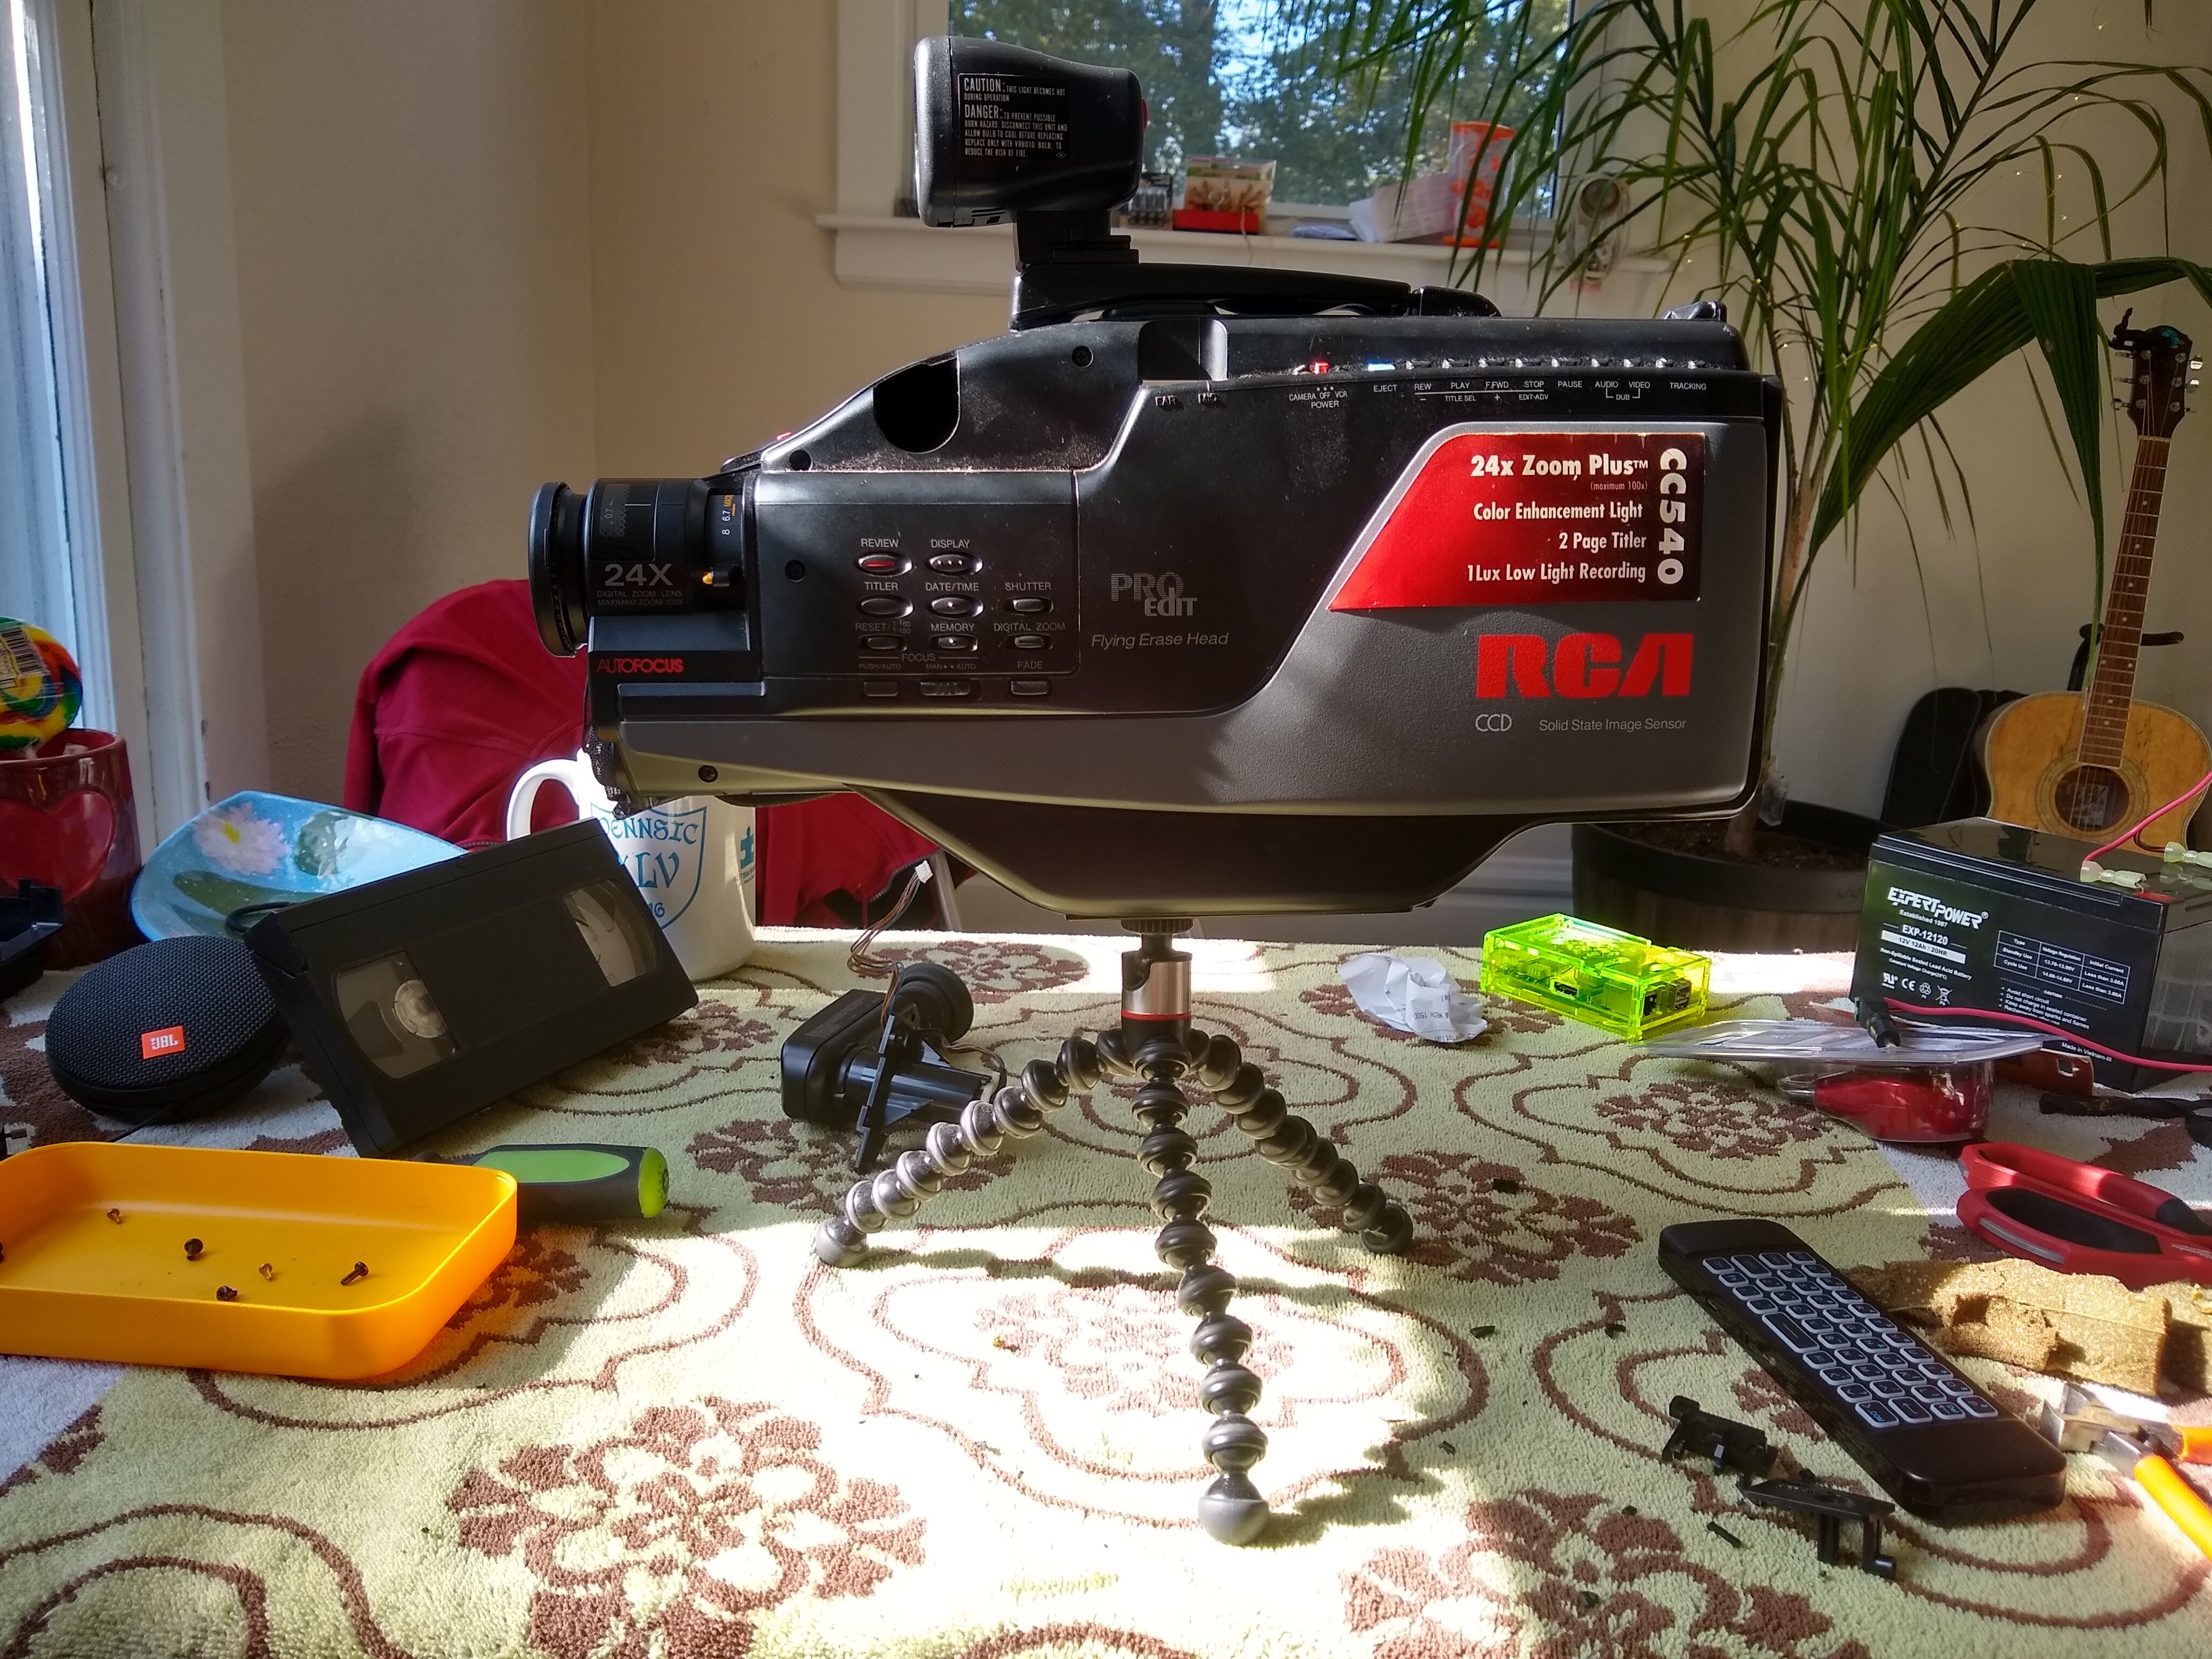
October 31st: First Major Update
11/28/2020 at 23:10 • 0 comments![]()
Picked up a camcorder from 1993 at Goodwill last night for $7.50. It uses VHS tapes, but I'm gutting it to install a custom digital camera and computer. I just got the lens working with the new Sony camera sensor, and recording video without sound using software I wrote for it. Once the lens is mounted to the sensor, I can install the computer(Raspberry Pi 4) and lens into the body and press a button to record. There's still a ton of work to do though. This is a big project I've been ever so slowly working on for a while. I've always loved documentary films, and I enjoy making videos. Wanted something slightly retro, with a shoulder mount form factor. All the nice professional used cameras I found for this were at least $100. This thing is big, comfy, cheap, and easy to work with. A bit of fun in the morning.
Update 11/1/2020:
Yesterday I determined the CRT viewfinder is fried, so I'll be going with an LCD touchscreen of some sort. Am working on a way to mount the lens to the camera sensor. I realized that the Raspberry Pi foundation will probably introduce a 4k camera sensor at some point, so I could possibly update this old VHS camera to 4k. I've got good quality test videos out of this already, and the 24x optical zoom is really neat. More updates to come. I don't know of anyone else designing an entire camera system like this. The goal is to have it be an all in one filming and editing station as well. There's plenty of room inside for a secondary computer that can edit the videos as soon as they're filmed. I love modern technology.
Raspberry Camcorder and Video Editing Station
Creating an all in one portable video production set up.