-
1Get the required software as stated in the manual (Getting Started with Pico - page 34 onwards)
As usual, from the manual (page 34 onwards!):
https://datasheets.raspberrypi.org/pico/getting_started_with_pico.pdf
-
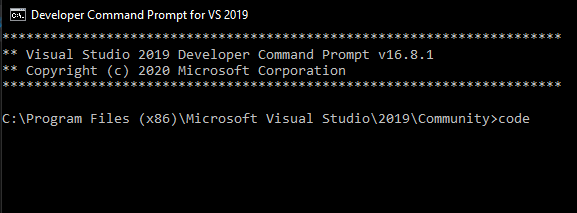
2Then, install VS Code, and run it!
Install VS Code and the Build Tools for VS2019.
Then, launch VS Code from the Visual Studio 2019 Developer Command Prompt.
Launching it from elsewhere wouldn't work at all during the build stages!
-
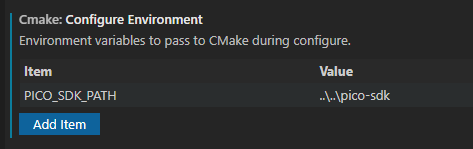
3Set Path!
After launching VS Code there, set the path so that the build tools can locate the SDK:
setx PICO_SDK_PATH "..\..\pico-sdk" -
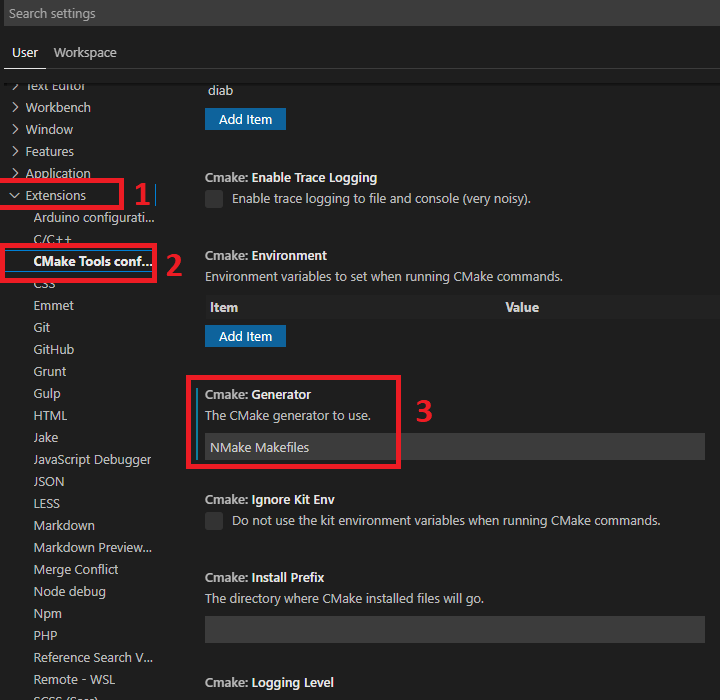
4Install CMake Tools extension in VS Code!
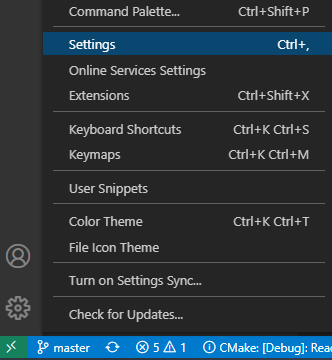
Install this extension, and then go to the Settings in the VS Code:
Click on the "Gear" button on the bottom left of the screen:
Then click on the "Settings":
Over there in the "Settings", click on Extensions->CMake Tools configuration and then scroll down until you see "Cmake: Generator". Fill it in with "NMake Makefiles":
Also, you need to set the path for the SDK inside the config as well:
-
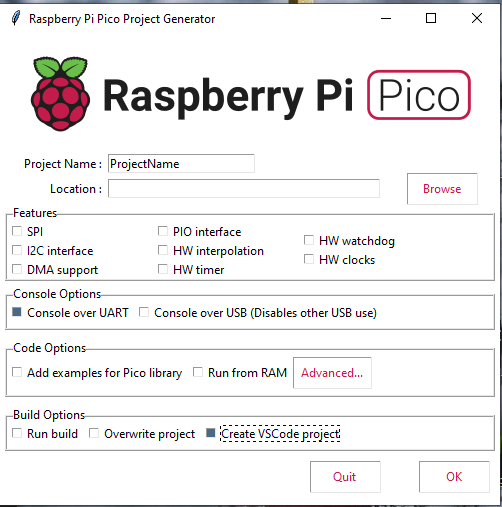
5Test compile a simple blink project!
To start off with a simple code, we get the project generator through this git:
git clone https://github.com/raspberrypi/pico-project-generator.gitWe may need to modify a bit on that script - it expects the SDK to be entirely inside the project folder. It's easier to have just one SDK for all the other Pico projects.
def CheckSDKPath(gui):
    sdkPath = os.getenv('PICO_SDK_PATH')

    if sdkPath == None:
        m = 'Unabled to locate the Pico SDK, PICO_SDK_PATH is not set'
        if (gui):
            RunWarning(m)
        else:
            print(m)
    elif not os.path.isdir(sdkPath):
        m = 'Unabled to locate the Pico SDK, PICO_SDK_PATH does not point to a directory'
        if (gui):
            RunWarning(m)
        else:
            print(m)
        sdkPath = None
    sdkPath = "X:/pico-sdk/" # return this sdkPath instead!
    return sdkPath
Then run the script:
python pico_project.py --gui
When you are inside the generator, fill in the "Project Name", "Location" and checkbox the "Create VSCode Project":
Click on OK, and it'll generate the thing for you.
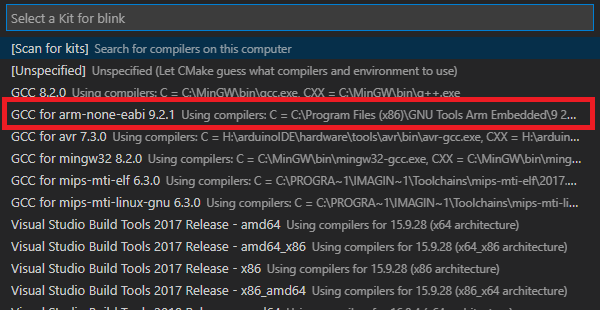
Still inside VS Code, "Open Folder" this folder that you created from the generator.
When you open, it prompts you for what kind of compiler you need for this project. Select "GCC for arm-none-eabi".
In the main C file type in this:
#include <stdio.h> #include "pico/stdlib.h" int main() { stdio_init_all(); const uint LED_PIN = 25; gpio_init(LED_PIN); gpio_set_dir(LED_PIN, GPIO_OUT); printf("Hello World Pico!\n"); while(1) { gpio_put(LED_PIN,1); sleep_ms(250); gpio_put(LED_PIN,0); sleep_ms(250); } return 0; } -
6Compile! (by hitting F7)
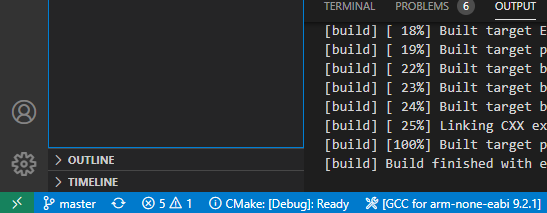
Once all the project files are configured, just compile by hitting the F7 button. It'll take a few minutes depending on the size of the project.
If it is successful you will see "Build finished with exit code 0". On this one the project name there is "Hello" so yours will be different.
build] TinyUSB available at E:/pico-sdk/lib/tinyusb/src/portable/raspberrypi/rp2040; adding USB support.
[build] Compiling TinyUSB with CFG_TUSB_DEBUG=1
[build] -- Could NOT find Doxygen (missing: DOXYGEN_EXECUTABLE)
[build] ELF2UF2 will need to be built
[build] -- Configuring done
[build] -- Generating done
[build] -- Build files have been written to: E:/pico-projects-2021/hello/build
[build] [  1%] Performing build step for 'ELF2UF2Build'
[build]
[build] Microsoft (R) Program Maintenance Utility Version 14.28.29333.0
[build] Copyright (C) Microsoft Corporation.  All rights reserved.
[build]
[build] [100%] Built target elf2uf2
[build] [  2%] No install step for 'ELF2UF2Build'
[build] [  3%] Completed 'ELF2UF2Build'
[build] [ 10%] Built target ELF2UF2Build
[build] [ 13%] Built target bs2_default
[build] [ 14%] Built target bs2_default_bin
[build] [ 15%] Built target bs2_default_padded_checksummed_asm
[build] [100%] Built target hello
[build] Build finished with exit code 0
-
7[OpenOCD] Deploying the Raspberry Pi's version
Caution: From this OpenOCD tutorial onwards, this one is extremely tricky and some steps are bound to fail easily! Proceed with caution!
Once you done compiling, it'll give you the ELF file for you to do debug on the Pico. Rather than you just yank out the Pico and reconnecting it (with pressing BootSel) to reprogram it multiple times, you just load it through OpenOCD and the three debugging pins on the Pico.
From the manual Getting Started with Pico, clone this:
git clone https://github.com/raspberrypi/openocd.git --recursive --branch rp2040 --depth=1Then install Cygwin according to this tutorial :https://mindchasers.com/dev/openocd-darsena-windows.
When you are done installing Cygwin, go to the OpenOCD directory and do this:
./bootstrap
and then after doing all the stuff needs doing, issue this:
./configure --enable-ftdi
Some more time later, after finishing the configuration, make, and then make install:
make -j4
make install
-
8[OpenOCD] Linux Subsystem - get the GDB-multiarch!
Unfortunately, plain GDB doesn't run on ARM devices like Pico. It needs the GDB multiarch.
Sadly, I couldn't grab GDB-multiarch from Cygwin, so I had to resort to using the Linux Subsystem on Windows 10.
sudo apt install gdb-multiarch -
9[OpenOCD] Take out the FT2232H board, connect it and switch drivers!
1.) Plug in the FT2232H board.
2.) Get Zadig. Switch the drivers to WinUSB (Options->List All Devices) :
[ If you couldn't see the Dual RS232-HS but the one with "Interface 0" and "Interface 1", pick the one with Interface 0 and switch it ]
-
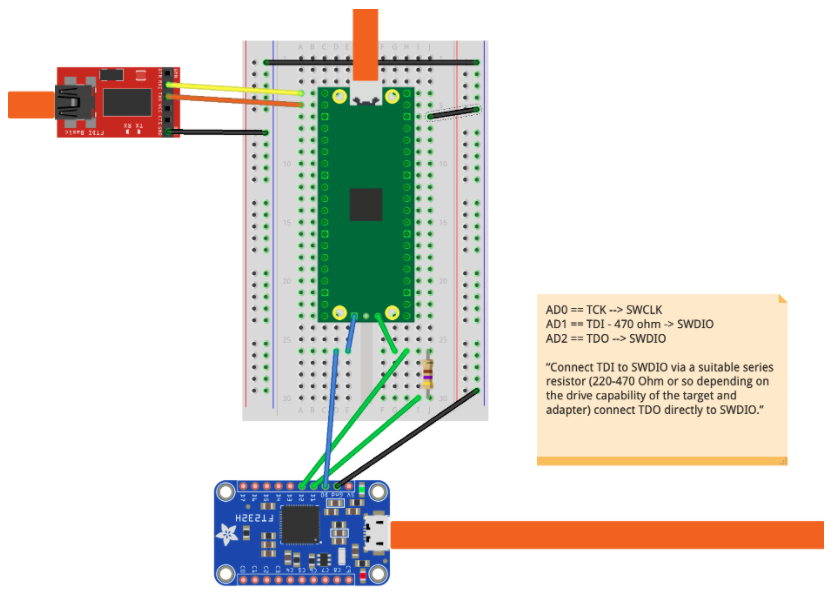
10[OpenOCD] Connect the board to Pico!
As the title said, connect the Pico to the FT2232 board. The blue board is the Adafruit version - but the AD0, AD1 and AD2 are the same. Make sure you ground the pin on the center (the three pins on the bottom of the Pico) too.
Source: https://github.com/raspberrypi/openocd/issues/11
RP2040 : Quick setup guide for Win10 and FT2232H
This is a small guide to deploy Raspberry Pi Pico SDK and FT2232H for Windows 10 systems.
Discussions
Become a Hackaday.io Member
Create an account to leave a comment. Already have an account? Log In.
FYI, the connection in “[OpenOCD] Connect the board to Pico!” is correct. I have tested it. However, the side note is wrong. According to the "ft232h-module-swd.cfg" in OpenOCD config file, D1 is TDO, ad D2 is TDI on Adafruit FT232H Breakout Board.
Are you sure? yes | no