Close
0%
0%

Polargraph type hot wire foam cutter

Two polargraph type drawing robots with a hot wire instead of a pen to cut 3D shapes out of foam

Similar projects worth following
I put two drawing robots together face-to-face. Instead of pens, the pulleys are attached to plates with a hole in the center. A resistive heater wire passes through the holes freely. Electric cables are attached to the heater wire, and the weight of the cables keeps the wire taught. The two sides move independently, so 3D shapes can be cut out of sheets of foam. The slope of each section is maintained to make a smooth object.

I saw a couple of these drawing robots at the Portland Maker Faire. There are a few commercial ones available: Makelangelo, Polargraph, QuickDraw Bot. The basic version consists of two stepper motors mounted to the corners of board. Pulleys hang down from the motors and meet in the middle to hold a pen. The motors move the pen making a drawing. For years, I have wanted to build some very large 3D objects. I had seen this video about making a car body (the Bailey Blade) using foam: https://youtu.be/xdsFLRmEtpI, and I realized I could cut the cross sections of a 3D model similar to the Bailey Blade video using two of these drawing robots. I put two drawing robots together face-to-face. Instead of pens, the pulleys are attached to plates with a hole in the center. A resistive heater wire passes through the holes freely. Electric cables are attached to the heater wire, and the weight of the cables keeps the wire taught. The two sides move independently, so 3D shapes can be cut out of sheets of foam. The slope of each section is maintained to make a smooth object. Below are some videos of the foam cutter in action. The first was constructed from 2″x 2″ x 4′ wood beams.  Later, I increased that to 8′ long wooden beams, so it could hold the standard 8′ x 4′ foam sheets (although, the cutting width was still only 6′ wide). I made my own program to control the movement of the stepper motors using an Arduino and Easy Drivers. I was able to cut a star, but what was supposed to be straight lines ended up being curved and the round off error came to cause large inaccuracies in cuts since stepper motors can only move at increments as low as 1/32 of a step (200 steps per full revolution). I also hadn’t added the capability to cut two different shapes on each side from a software standpoint. Instead of continuing to try to make the software myself, I contacted Matt Havlovick from QuickDrawBot.com. I saw his booth at the maker faire in Portland the summer before, so I invited him over to check out the foam cutter. Within an hour, we had the eagle shown in the picture above. After a couple of weeks, he had his software “sketchy” edited so that two different profiles could be cut at the same time. I was then able to cut complex 3D shapes like the turbine shown in the picture above.

  • Synchronization of coordinates

    Adam06/01/2021 at 20:30 0 comments

    My previous turbine 3D model was quite large. Let’s only take the first four layers of the GCODE to help understand the coordinate synchronization algorithm.

    Here is an algorithm to find the line going from a point on layer one to a point on layer 4 that minimizes the distance from the line to the surface of the model. It does this by finding the minimum mean square distance between between the line and coordinates on layer 2 and layer 3.

    Here are the first four layers in our GCODE. The red points are examples of coordinates that should be synchronized.

    The synchronization program will:

      1. Read in the GCODE file.
      2. Remove everything except the coordinates.
      3. Separate each layer into its own list. P1 and P2 are the top and bottom perimeters. The interior perimeters will be called iP1 through iPN from top to bottom
      4. Starting with the first location in the gcode for both P1[1] and P2[1] (in this example, let’s suppose we only have one part), find the distance of each point on iP1 to the line.
      5. Store the closest point to the line as C-iPN (closest interior perimeter point).
      6. Repeat step 4 and step 5 for every iPN (interior layers: iP1, iP2,…,iPN), storing the closest point on each iP to the line created in step 4.
      7. Calculate the sum of the distances of C-iP’s to the line. Store this number as the objective function.
      8. Remain on the same point on P1 or P1[1], but now draw a line to the next coordinate on P2 or P2[2].  (OBJ[1,1]= the objective function for P1[1] to P2[1], OBJ[1,2]=P1[1] to P2[2])
      9. Repeat step 4 through 8 for every coordinate in P2[1 through n].
      10. Find the lowest OBJ[1,j]; that is the P2[j] coordinate that should be synchronized with P1[1].
      11. For every point on P1[1 through N], repeat step 4-10.

    You can download the GCODE file for the turbine blade at this link: 3DHotwire/Turbine_blade-all_GCODE.txt.gcode

    Here is the synchronization code written in Python. I’m not a professional programmer, so excuse the mess. It works!!   …kinda… and it is very slow since it is checking every line created by the combination of coordinates from P1[1-N] to P2[1-N], and finding the distance from every coordinate to the every line on every interior layer. To speed things up, I only used one out of every 20 interior layers.

    import re
    from tkinter import Tk
    from tkinter.filedialog import askopenfilename
    import time
    
    Tk().withdraw() filename = askopenfilename()#prompt user to select the gcode file
    
    
    i=1
    coords= []
    coordinates = []
    with open(filename) as gcode:
        for line in gcode:        line = line.strip()        coord = re.findall(r'[XY].?\d+.\d+', line)        if coord:            a = coord[0]            b = coord[1]            aa = float(a[1:])            bb = float(b[1:])            c = [aa,bb,i]            coords.append(c)                    elif "layer_num" in line:            coordinates.append(coords)            coords = []            i=i+1
    
    ####calculate the shortest distance between a point and line(defined by two points)
    import numpy as np
    P1 = coordinates[1] #first layer is not coordinates[0] as that is blank
    P2 = coordinates[len(coordinates)-1]#last layer
    j = 0 #top profile coordinate iterator
    k = 0 #bottom profile iterator
    l = 2 #interior layer iterator. Starts at 2 because first layer is empty [], and the first layer is P1
    m = 0 #interior coordinate iterator
    min_dist = 99999999.9 #some large distance for each point in a layer
    sum_min_dist = 0
    lowest_dist = 9999999.9#some large distance for total of layer's minimum distance
    
    start = time.time()
    
    def distance(p, q, rs):    x = p-q    return np.linalg.norm(        np.outer(np.dot(rs-q, x)/np.dot(x, x), x)+q-rs,        axis=1)
    
    for sets in P1:    for points in P2:        while l < len(coordinates)-1: #don't count the first layer as it is blank [] and don't use P1, start at coordinates[2] to last coordinate -1            while m < len(coordinates[l]):                p = np.array(P1[j]) #coord of top profile                q = np.array(P2[k]) #coord of bottom profile                rs = np.array(coordinates[l][m])#interior layer at the m-th point                d = distance(p, q, rs)
     if min_dist > d: #first time around min_dist should be large number, so this will be true min_dist = d #distance to the closest coordinate...
    Read more »

  • Cutting a 3D turbine... the less-automated way

    Adam06/01/2021 at 20:18 0 comments

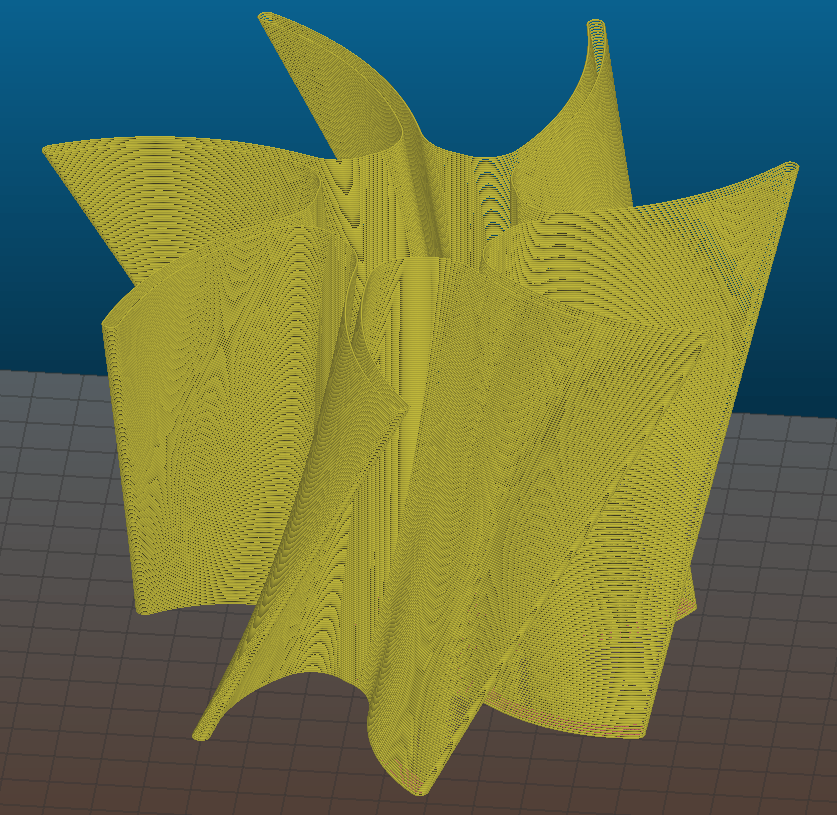
    The turbine blade is a great example of the foam cutter’s ability to cut at angles. Here is a 3D model of a turbine blade. Notice that the profile on the front is slightly larger than the back’s profile and the blades twist at a 45 degree angle from front to back. I export the turbine as a .STL file and import it into a 3D printing slicer software to break it up into layers and get the coordinates for my foam cutter. In this example, I am using Slic3r to obtain the GCODE using spiral vase mode since I only need the perimeters. Here is a picture of the resultant GCODE.

    One side of the foam cutter will travel along the coordinates on the top layer and the other side will travel along the coordinates of the bottom layer. All layers in between will be discarded. I can import the GCODE into a spreadsheet program like excel, and remove the unneeded parts.

    Here is what the meat of the GCODE looks like. I only need the X and Y coordinates I remove the “X” and “Y” and convert the formatting of the columns to number instead of text. In Slic3r, I added output “layer_num” after every layer. Since I only need the first and last layer, I added a layer counter in the column farthest to the right to help me choose the first and last layer.

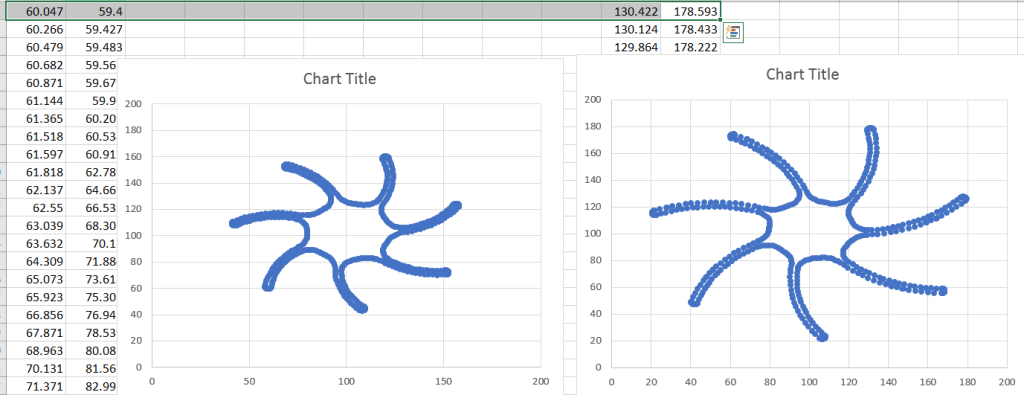
    Here is a plot of the first layer using the X and Y coordinates.

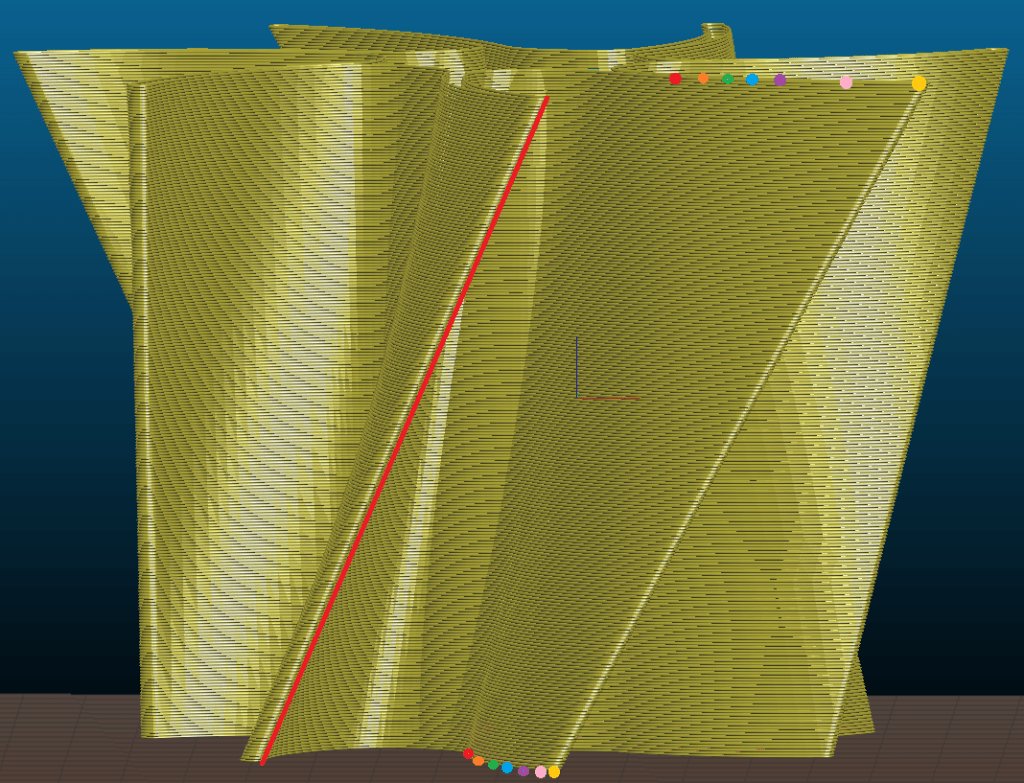
    There are 546 sets of coordinates in the first layer and 518 sets of coordinates in the last layer. The location that each drawing starts at is highlighted. Notice that both sides start at very different locations. Since both sides need to cut in a synchronized fashion, I need to find a similar location on one drawing and shift all of the coordinates so they are drawn at the same time (see the next figure for more explanation of what I mean by synchronization). Also note the number coordinates was different, so either some of the 546 coordinates need to be deleted or some of the 518 sets of coordinates need to be duplicated. Making the coordinates in one drawing synchronized with the other drawing means that when the foam cutter on one side is at a certain coordinate, the other side of the foam cutter is also at a specific coordinate so the wire will follow the contour of the turbine. You can imagine, if the wire was the red line below, the wire would need to be at synchronized coordinates to maintain the shape of the turbine as it cuts. The red, orange, green, purple, pink, and yellow dots show some approximate synchronization points that I eyeballed. This manual process is very time intensive since I have to move rows using copy/paste commands until there are the same number of coordinates on both sides and all are synchronized.

    Once I have the coordinates synchronized, I add “draw” in front of each set of coordinates and paste it into the sketchy software.

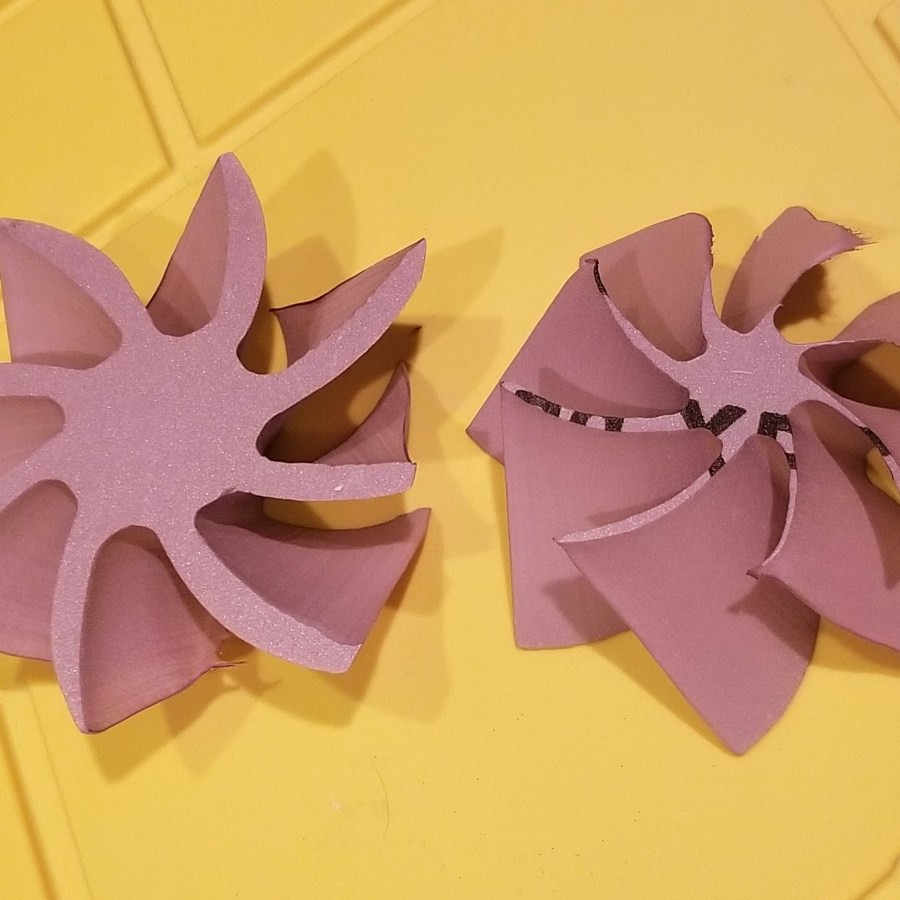
    And here is the result!

View all 2 project logs

Enjoy this project?

Share

Discussions

Similar Projects

Does this project spark your interest?

Become a member to follow this project and never miss any updates