 RossGK Tangibles
I hope I'm using this Hackaday Log feature right. The thing offers 'Add a project log' rather than the more obvious "Add a log entry," so I'm not totally sure if I'm creating many one-entry logs, or multiple log entries in a single log. Just an illustration of the importance of 'User Experience' (aka UX) people on your development team!
But I digress, as I try to load a few progress entries here to share what I'm doing on the GPOD project.
If someone should happen to acquire a GPOD (or build one themselves on their own) they'll probably want a stand for their SPLED illumination above their plants or seedlings.
I built a (probably too complex) wooden one in the depths of winter for my prototype, and got the plants going with that.
SImplest Possible Option
I began by trying to think of the simplest structure that someone really new to building things could handle. As usual, the simplest structure is often no structure at all.
So what I'd recommend where you can do it, is to just attach your SPLED arrays under a shelf to illuminate plants or seedlings on the shelf below. An adjustable shelf is optimal, allowing you to move the shelf as they grow. You can probably run the control wire behind the shelf or even just bite the bullet and drill a hole in your shelf if you want to be very neat.
The SPLED arrays and strings etc are usually very light. I like the n x n arrays, or the rings, and they are only a few grams, so it's easy to attach them with double-sided tape, and not damage your shelf at all.
A Hack Stand for Hackers
The next simplest option I came up with is an inverted plastic yoghurt container. By cutting away a side and punching a few holes, you can put a single ring of SPLEDs into the base and create a cozy little growlight for one pot. Here's a view of the result with a pot of freshly sprouted arugula.
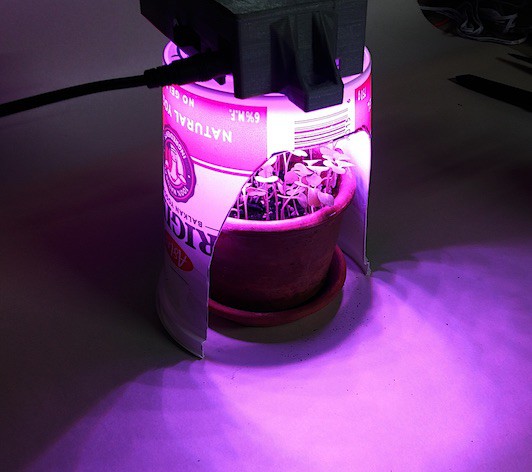
It was a very simple build and surprisingly satisfying to have a little cocoon of a plant house set up on my bench.
Next, I thought I'd create something more substantial, yet still simple. The criteria was that it should require minimal tools, and wooden bits that might be scrap or easily purchased for those with a bit more skill.
Just working on capturing the details of that, and will share shortly.
Discussions
Become a Hackaday.io Member
Create an account to leave a comment. Already have an account? Log In.