ben.phenoptix
-
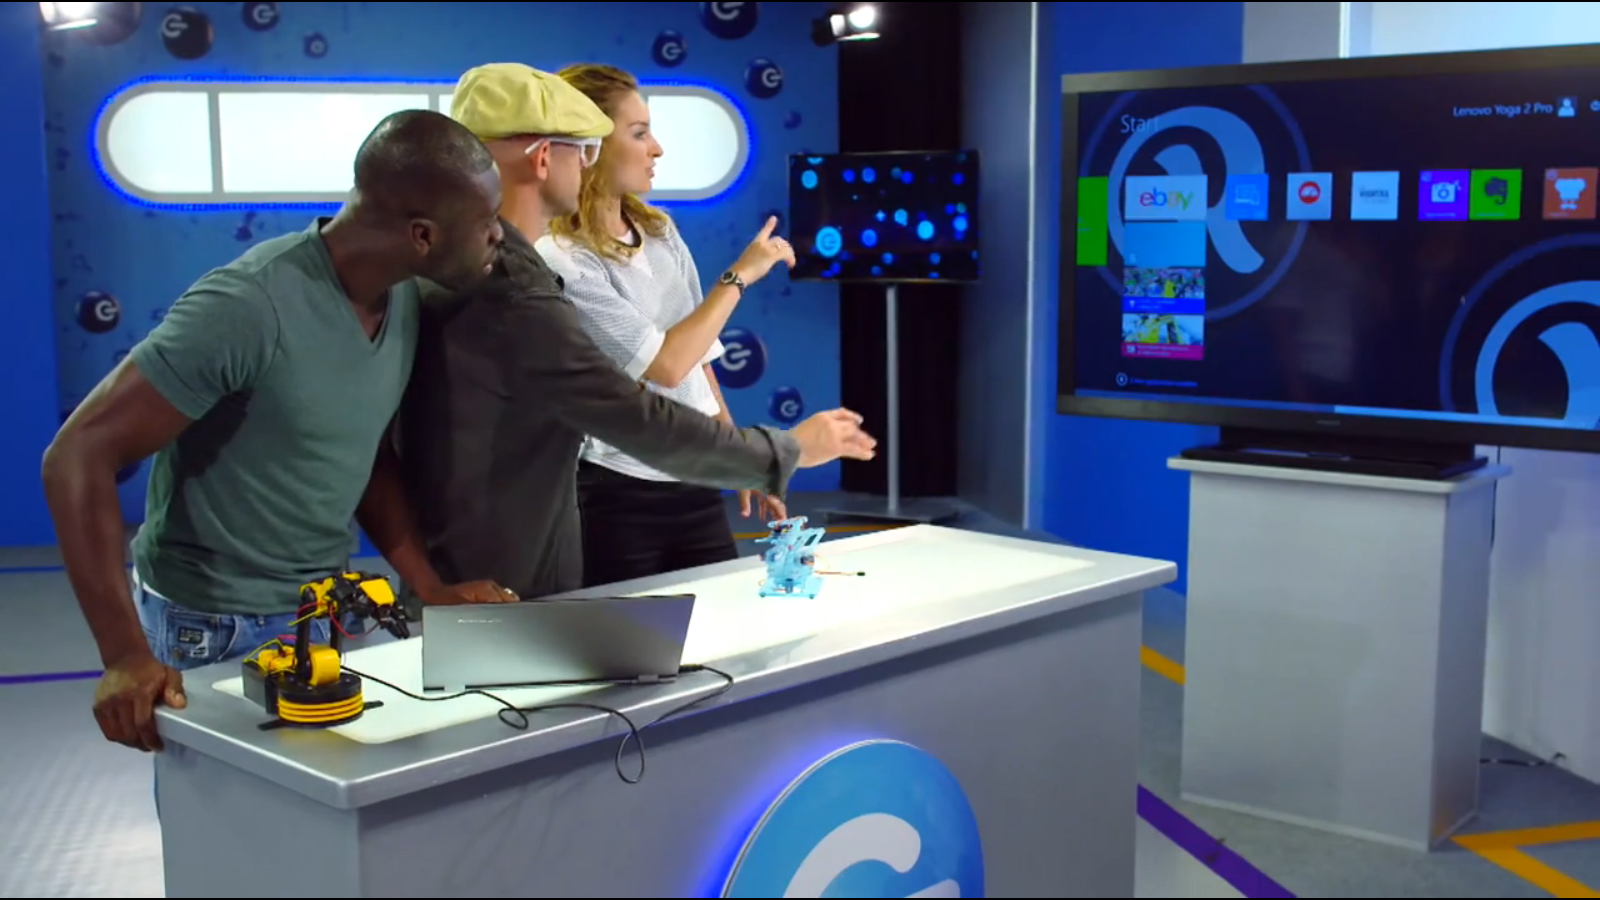
As seen on TV! #meArm on the Gadget Show (UK)
10/13/2014 at 20:13 • 0 comments![]()
Quite shocking that it's been three months since the last project update on here! So much has been going on with the #meArm project and the business that created it (well it was me (Ben) but for phenoptix, which was also me).
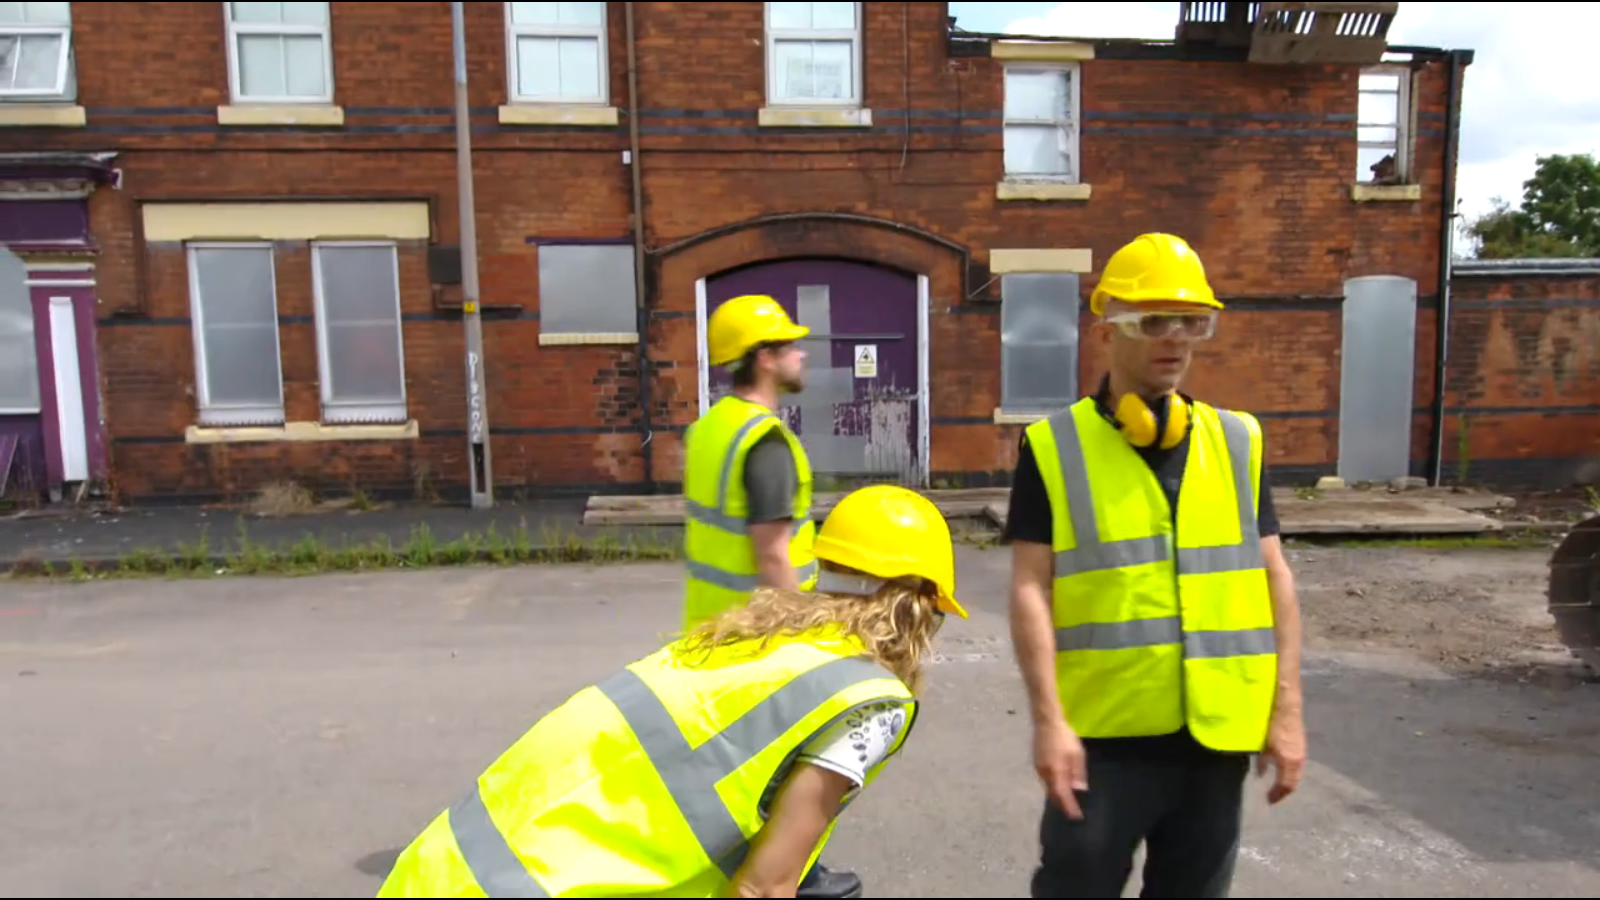
The super secret project that the #meArm maxi was built for was for a TV show in the UK where they wanted to knock down a building using a digger controlled via a robot arm. Unfortunately I had very little hands on time with the machine we used and just sent the maxi down for testing. A couple of issues meant the maxi was under powered and ultimately left out of contention. I did manage to accompany Shay who's company Running in the halls (RITH) did all of the software work for the piece during filming and help cobble together the Mechano solution. This meant the #meArm was part of the story and did at least get used as a prop during filming! I did even get a one second cameo myself! I'm the blurry guy with the beard in the background
![]()
-
Supersized #meArm for a super secret project
07/23/2014 at 11:15 • 0 commentsHad a really strange phone call and did the thing I'm trying to do less of, I said "yes". Frankly it would have been silly to say no. The result is that I've just spent two days dusk till dawn hacking together a #meArm Grande. It only moves back and fowards as the axial rotation wasn't needed. It was packaged up yesterday and sent off for testing. The results of which I eagerly await!
Should it pass I'll be getting some feedback and building two more polished versions on a similarly tight deadline.
![]()
Fingers crossed!
Files of course are up. Open is everything for the #meArm project. http://www.thingiverse.com/thing:404062
-
#meArm arrives in Poland! Via 3D printer
07/17/2014 at 19:41 • 0 commentsAnother exciting first for the #meArm. Tonight the first working 3D printed version has been spotted in some rather fetching colours in Poland. The print took about half a day and isn't the first I've seen. One was printed in the USA and another in Spain, but this is the first where they've sourced the servos and fixings.
It's really exciting to have another #meArm in the world and they really seem to love it judging from the way they're stroking it at the end of the video!
You can check out their work below:
-
In print for the first time!
07/14/2014 at 16:40 • 0 commentsWow so this has just hit the news stands
![]() in the UK! Interview about the meArm project! As developed on Hackaday.io!!
in the UK! Interview about the meArm project! As developed on Hackaday.io!! -
Now available with JavaScript! On the Espruino
07/11/2014 at 10:21 • 0 commentsMEARM ROBOTIC ARM
Gordon at Espruino has just uploaded a video of the #meArm with an Espruino controller board, using an IR remote! Really impressed!
-
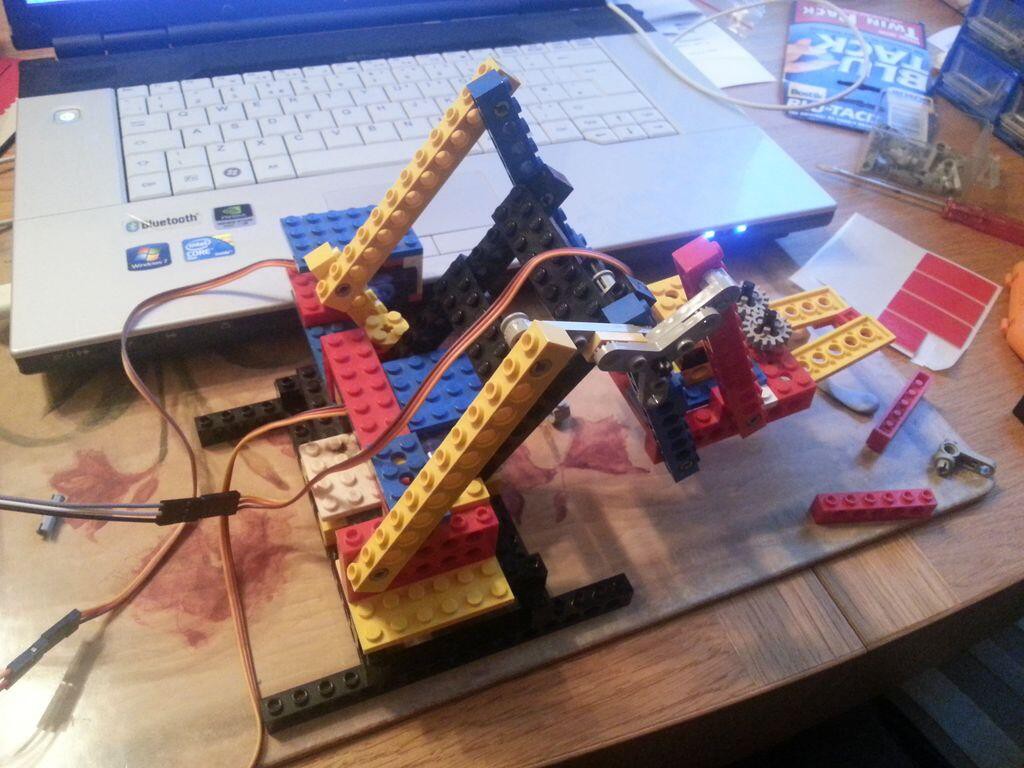
Lego #meArm from Simon Monk - Raspberry Pi Genius himself!
07/01/2014 at 08:47 • 0 commentsFantastic tweet popped up on my timeline last night from Simon Monk, the author of many a great tome on Arduino and Raspberry Pi, it seems that Simon has made a #meArm from Lego!
![]()
The extra weight of the lego seems to be a little problematic for the servos, but I'm seriously impressed with the effort that's gone into this.
-
#meArm - Update! Now available in Peru!
06/25/2014 at 14:03 • 0 comments![]()
Famed for Machu Picchu, lamas and roasted rodents on sticks Peru isn't the first place you think of for open hardware. However through a quick vanity search on twitter we've discovered a rather excellent Peruvian website selling our super #meArm under the open hardware licence.
![]()
Kool Mechatronics are cutting and etching what looks to be the v0.3 of the MeArm and selling it on the OpenHardware.pe website. It's really fantastic to see the project spreading around the world like this. I'd like to thank the website and Kool Mechatronics for supplying all of the license information and links to our site so people can get involved with the #meArm project.
So if you're in South American and you're looking for a robot arm please check out their site!
-
Fuller write up of the MeArm at the Science Museum
06/24/2014 at 15:52 • 0 commentsAt the beginning of this month I had a great opportunity to run a workshop at the stupendous Science Museum in London. Admittedly this was my first time to the museum that I can remember. School always favoured the Natural History Museum next door, because dinosaurs. I could write another blog on my my love of the Natural History Museum, it was a really special pleasure to walk past it on my way to work for five days.
![]()
It's a beautiful building that still gives me chills thinking about its contents and my childhood geeky wonderment.
The Science Museum was going to have to be pretty special to compete and oh my gosh it really is special. As I was there to work I wasn't able to enjoy the exhibits quite as much as I would have liked but it was something quite special to walk past items like Stevenson's Rocket, a Rolls Royce Merlin Engine and a full sized Lockheed Electra airliner as I meandered my way to the Make. Hack. Do event.
![]()
Make. Hack. Do was set out to allow people to create electronic instruments from vegetables, build and program robots and get hands-on with 3D printing in a free festival. Where participants could design, hack and program in a series of workshops and meet the artists and inventors using electronics and 3D printing in innovative ways. It opened with a "Lates" event where grown ups with beer came along to find out what we were up to. It was a great way to start the festival as it was possible to test my plans of how to run the workshops, with an understanding, relaxed yet enthusiastic crowd.
![]()
The next four days were advertised as suitable for ages 10 and above, in reality as long as a child was able to be attentive and hold a screwdriver they got to build robots! One lad came over and told me he was only five but he was "very good" and proceeded to build his claw faster and better than a group of 12 year olds that built along with him! Other workshops and activities included exploring creative uses of electronics and 3D printing, creating colourful 3D printed sculptures, helping stitch a tapestry made of electronic thread and sculpting circuits with special electronic playdough. It's possible we'll be copying the squishy circuits workshop locally in August.
![]()
It was quite incredible to be among some fantastic artists and inventors from across the UK at Make.Hack.Do demonstrating how electronics and 3D printing can be used for art and music. Musical objects hacked together by Royal College of Art students were on show and along with some intricate 3D printed art byTobias Klein. LiveCodeLab showed how anyone can create live music using computer coding andOtoto turned furniture, toys and even vegetables into musical instruments using electronics.
![]()
One of the many highlights of the festival was meeting this young man and his father who were visiting from Switzerland. In the last week he'd downloaded the files of our #meArm robot arm and cut his own from balsa wood using a CNC milling machine. He had me sign a flier! It was fantastic meeting someone who had built their own arm, one of the many reasons we support open hardware. I think he wrote this in the guest book too. Really made my day!
![]()
![]()
The festival was supported by Airbus Group, Renishaw, the Engineering and Physical Sciences Research Council (EPSRC) and the University of Nottingham. Two of whom supported my PhD, so extra thanks to EPSRC and the University of Nottingham. There are thanks for all of the organisers and volunteers. It was really well run and I was even able to take a break for lunch, that's really special in an event like this!
![]()
![]()
Overall it was an amazing five days and a spectacular event in a world class venue. It was great to be a part of it.
-
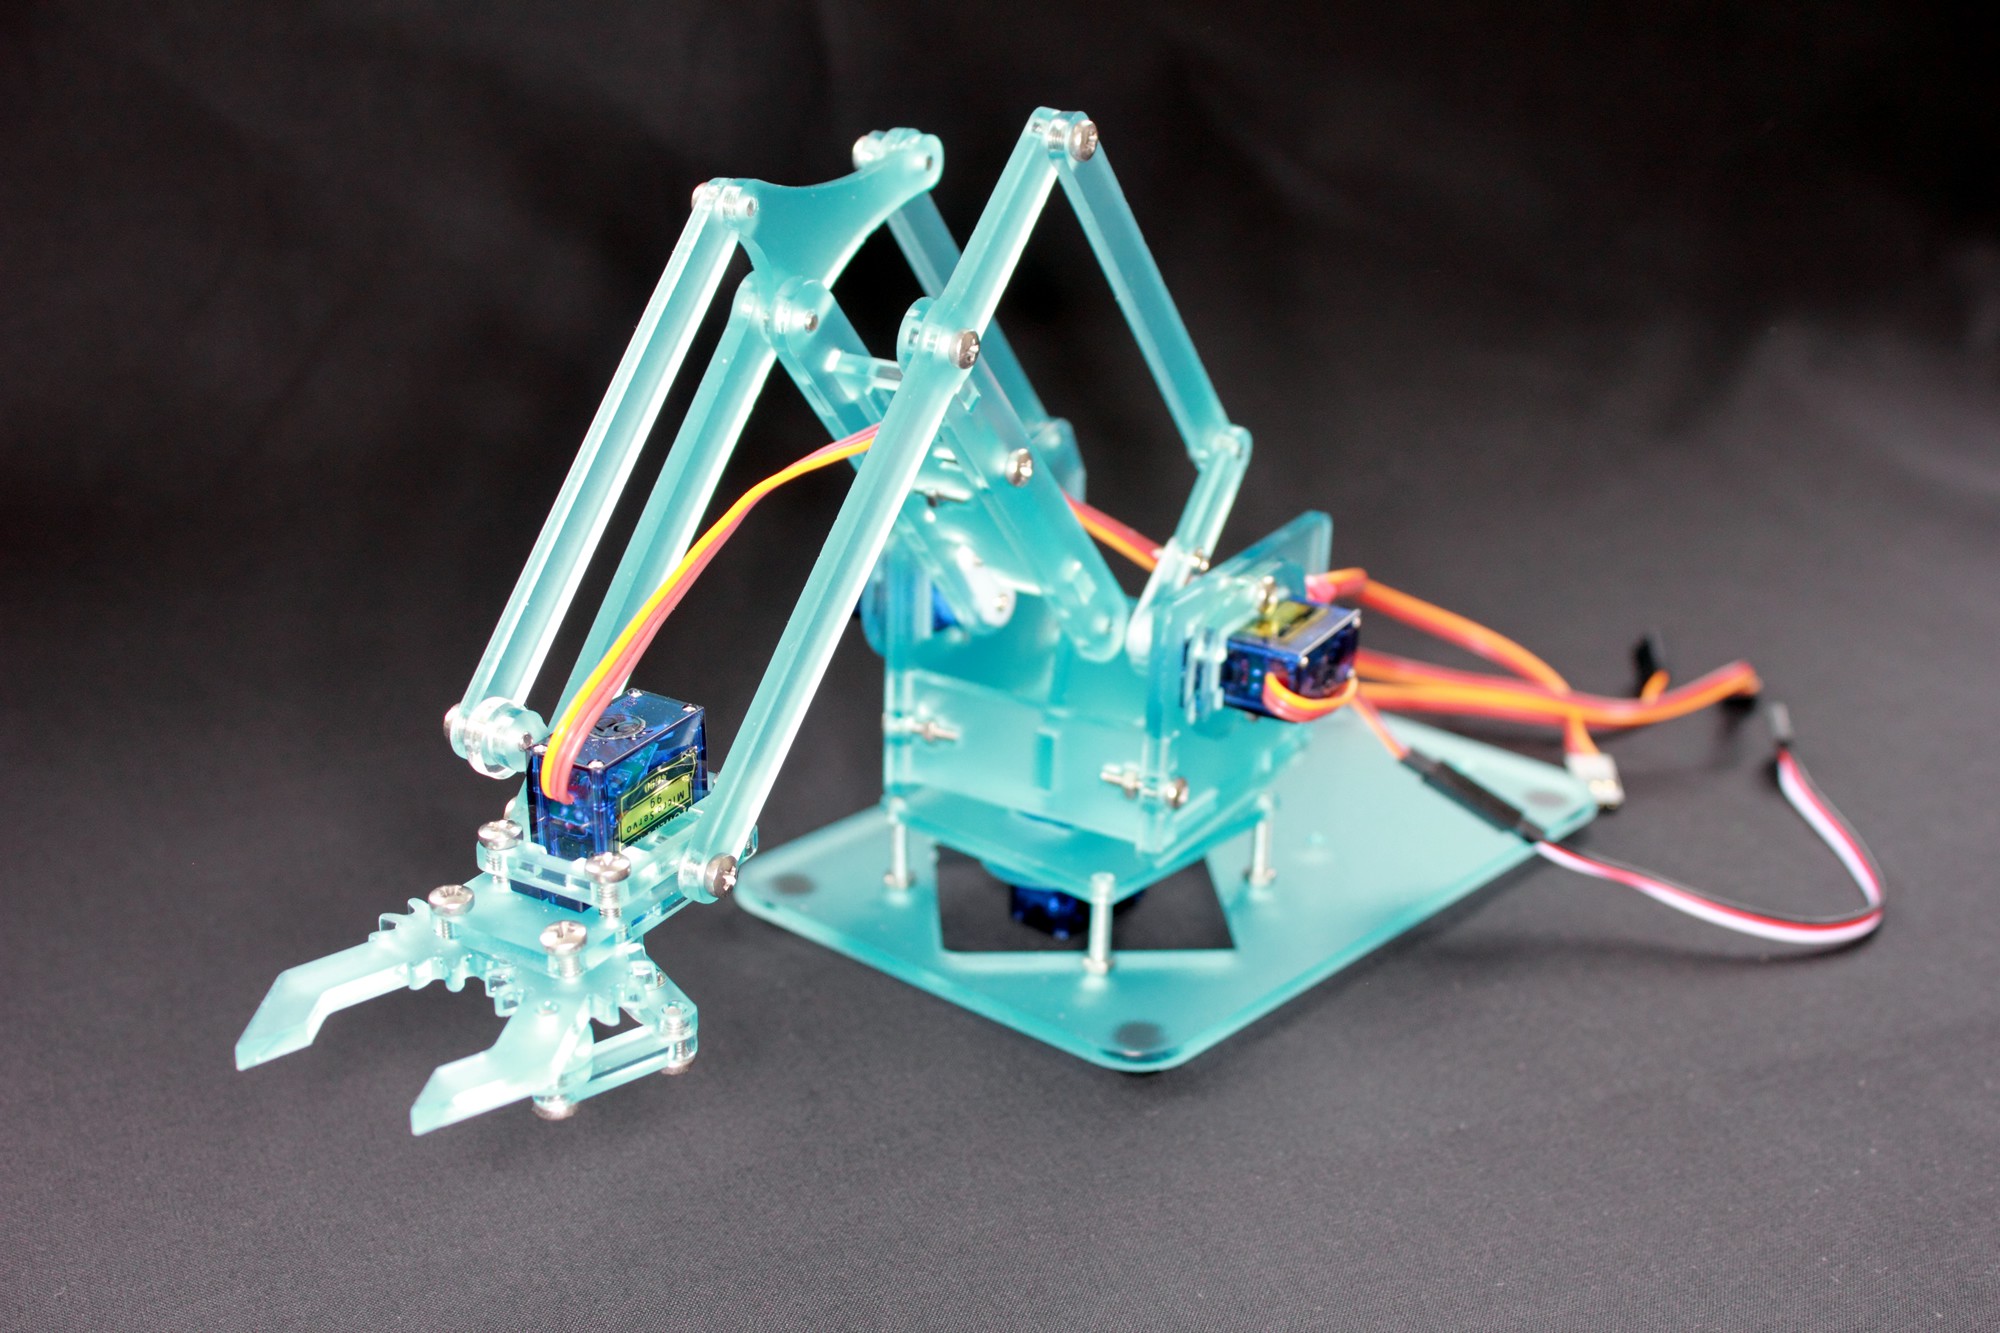
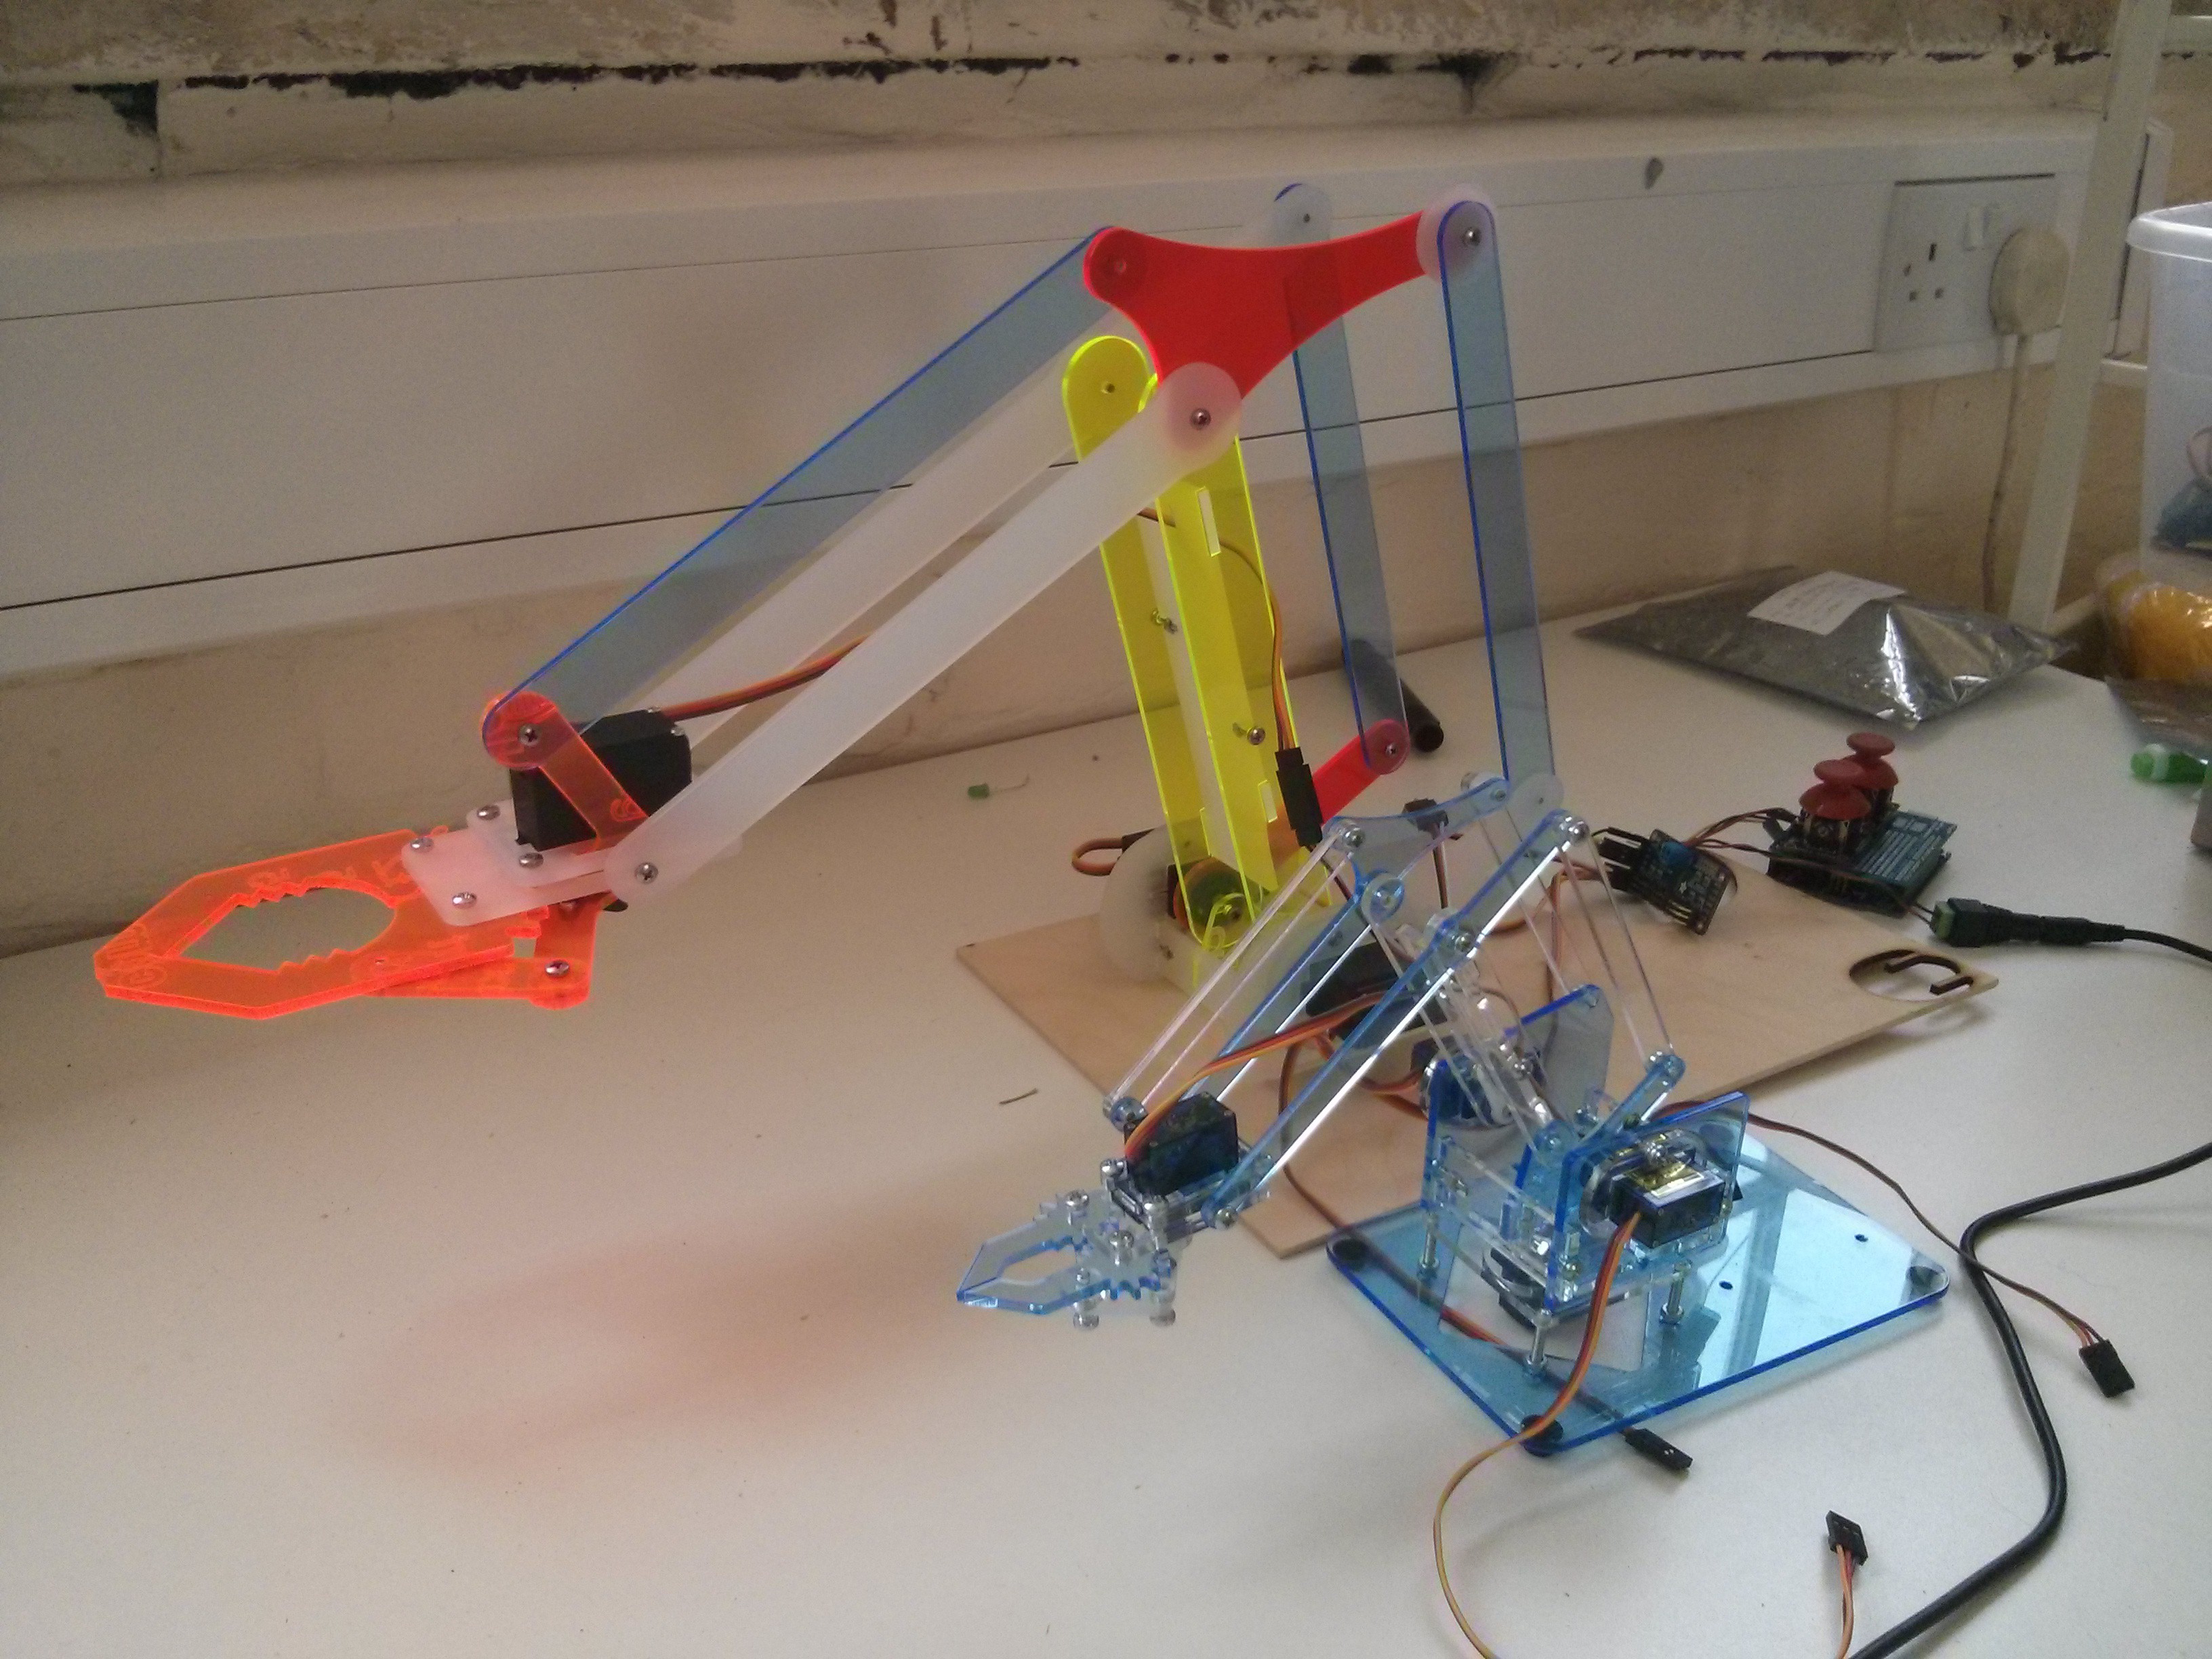
Whoomp! (There It Is) v0.4 that is!
06/11/2014 at 16:03 • 0 comments![]()
So here it is! And here it is http://www.thingiverse.com/thing:360108 v0.4 all the tweaks previously mentioned rolled into an improved version. This is where the mechanical tinkering will largely park for now. Although I was looking at the gripper teeth and mechanism closely earlier... lets put that to the back of our minds eh!?
Next up is the electronics part. A lot of thought has gone into this already and currently it's an amalgam of multifunctional parts inside my head. Need to strip down and focus on what a single arm needs. I've already worked out how to control a couple of hundred at the same time but most people aren't going to want that! A mega328 board offers the most off the bat, would be easy to replicate from off the shelf components too keeping things reasonably accessible and open. Will be throwing together in KiCad too so it will be Open all the way down.
-
v0.4 Completed bar the glamour shots!
06/10/2014 at 16:44 • 0 commentsActually found the time today to finish the list of updates to v0.4.
Added holes for cable management
Cradle redesigned using less fixings and reducing the number of incorrect configurations to one (left handed version
Longer elbow lever
Shortened "pig" (central support) to stop slight flexing on construction - wasn't a problem but people expressed concern.
Swapped fixings on bicep - no long can collide with elbow lever screw
Removed extra holes on base to avoid confusion
Added spare collar and claw clamp as they are most easily broken
Widened collars by 0.2mm to save stickers on the servos
Added extra spacer to reconfig wrist support rod allowing extra height - also adds a 10mm and removes a 6mm screw from build
Resized X slots to better accommodate 12mm fixings. Now you can add nut before mating (excuse any double entredres)DSLR comes out tomorrow and we can push out the DXFs!
![]()
MeArm - Your Robot
Cheap, Small, Open Source Servo Controlled Robot Arm
 in the UK! Interview about the meArm project! As developed on Hackaday.io!!