f4hdk
f4hdk-
5) And after, what’s going next?
12/17/2017 at 07:17 • 2 commentsOne year has passed without any blog post...
Several people asked me what I plan to do next on this A2Z project.
Probably nothing, I will explain why.
Porting Linux ? Retargeting a compiler?
What A2Z is not:
This question was asked several times. Some people consider A2Z as a 100% open source platform which could run a 100% open source Linux. They are wrong, I will explain that.
There is a misunderstanding.
I’m afraid, Linux and a C compiler is totally not feasible.
A2Z lacks many things to achieve the goal of C retargeting and Linux porting.
- A2Z only manages Direct Addressing in hardware. No complex address computation. If you want to implement data stack, recursive functions, then direct addressing is not enough. You cannot retarget a C compiler with only direct addressing (or if you emulate complex addressing modes by software, it would be very very slow).
- A2Z has not interrupt management. You cannot implement/port a pre-emptive multitasking OS (Linux) without interrupt management.
- A2Z has no memory management unit.
- A2Z’s ALU is compatible with nothing.
- Etc…
What A2Z is :
A2Z is “just” a very simple and didactic project. The DIDACTIC aspect is the most important.
When I started this project in my mind 3 years ago, the goal was to make things very simple, and start from a blank page. I didn’t want to copy other CPU architectures.
I didn’t want to take the constraints of “being compatible”, or using one existing compiler / language. I wanted a lot of freedom in this project.
Therefore, A2Z is compatible with… nothing.
I don’t think that lots of people have made such usable computer starting really from scratch, from a blank page.
I’m very proud of the result.
Anyway, What’s going next?
I consider A2Z totally finished, so there will be nothing more on A2Z project.
Of course, I have several ideas to improve the A2Z, with the same principle, the same CPU architecture. There is a list:
- Accelerate to 50MHz (currently 25MHz) : I know that it is feasible
- Instruction cache : I could put an instruction cache inside the FPGA, and switch to a faster “Harvard” architecture when the CPU uses it
- Small pipeline : Now that the pipeline concept is clear in my mind, I could improve the CPU with a small (2 steps) pipeline
- Flexible CPU state machine : the state sequencer of the CPU core is currently too simple, too rigid, and wastes a lot of cycles. Making a flexible state machine could improve the computing power.
- Video part : 2D hardware acceleration with sprite management
- Reprogramable graphics palette (256 colours out of 4096) for better pictures rendering
- Ethernet and networking : The idea would be to code a very simple Ethernet card directly inside the FPGA.
BUT… I will not make any of these improvements. I simply don’t have time, and I have already moved to other projects. Robotics and amateur radio projects (F4HDK is my amateur radio callsign). Even if I come back to CPU architecture study sooner or later, it will be with a brand new project.
Your turn!
But I remind you that all the source code is freely available for download, everythink is open source. So you can play with it, improve it. I will be very happy if someone proposes improvements for A2Z. Of course, I can bring support about topics that I have not well documented.
-
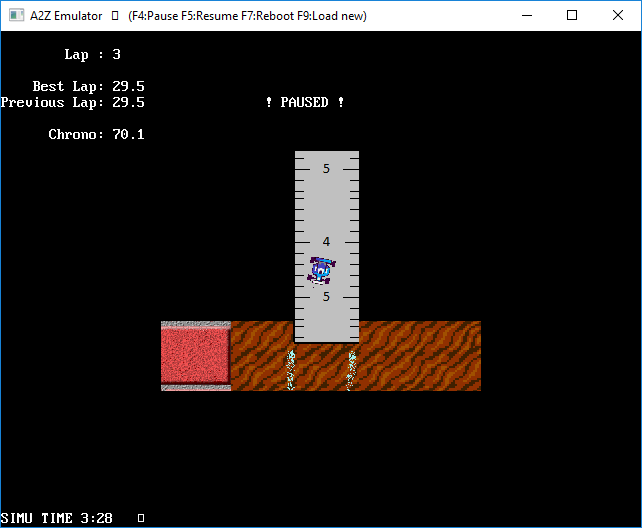
4.5) The game : Micromachines
01/07/2017 at 10:35 • 0 commentsThis is a car game, with a view from above, like the old “MicroMachines”.
![]()
This application is the most fun. It uses the graphic capabilities of A2Z, especially the double buffering.
Keyboard:
- Right and Left arrow : direction
- A : accelerator / Q : brake and reverse gear
- F12 : exit
Unfortunately, because of the slow speed of the CPU( 12.5MHz), the viewing window is only 320x240 pixels.
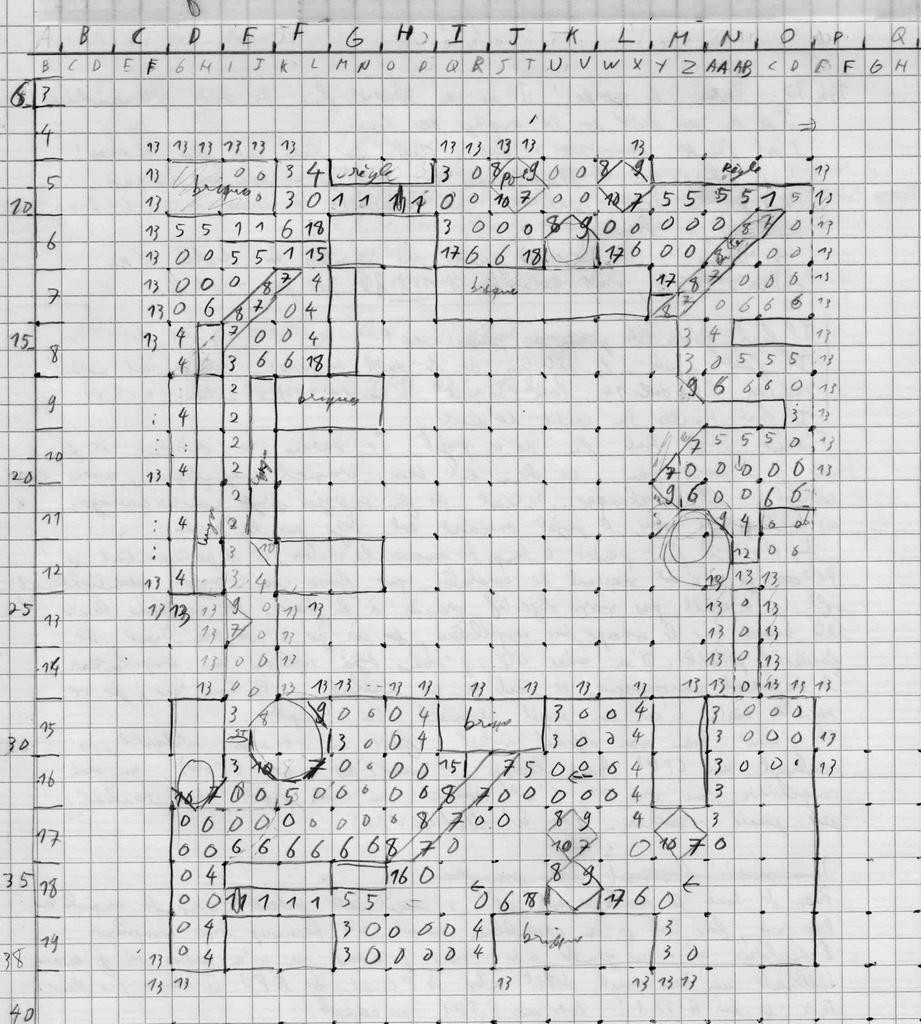
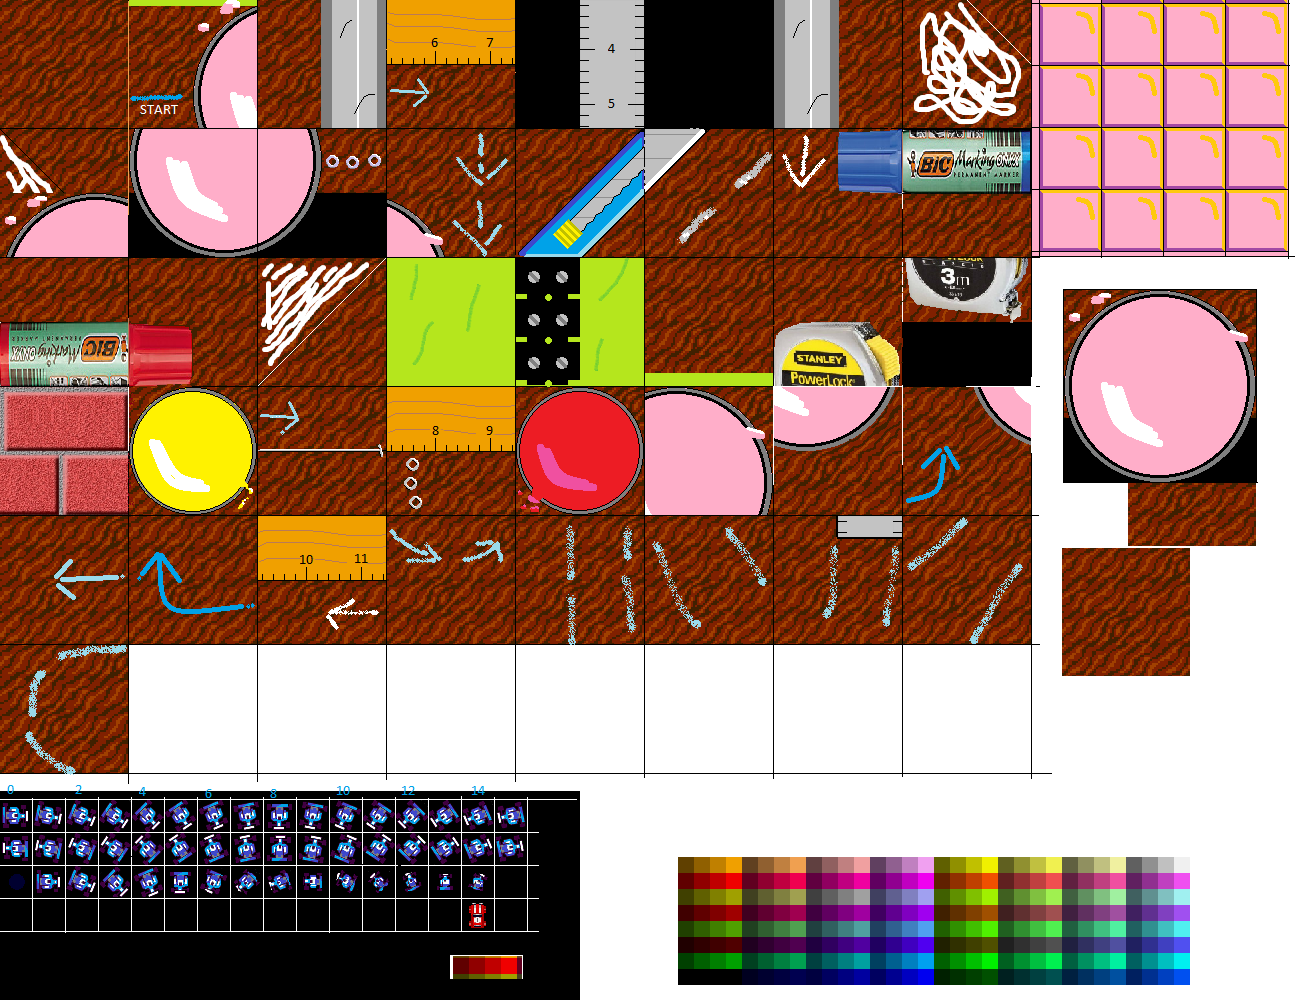
The field is created with a concept of “tiles”. Graphic tiles and obstacles tiles are not the same size: graphic tiles are 128x128 pixels, and obstacle tiles are 64x64 pixels. And the whole field (circuit) is made with tile matrix, which are 2D tables : 40x40 for graphics, and 80x80 for obstacles.
Obstacles Matrix on paper:
![]()
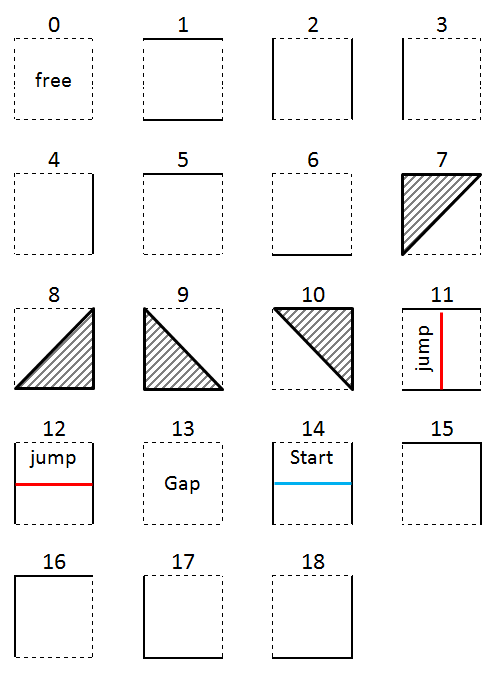
Obstacles tiles coding:
![]()
I have coded a program on my PC, in C language, that generates all the data needed to the game : graphics, and tiles matrix. The 2 tiles matrix are extracted from 2 .csv files, and the graphics are extracted from a single bmp file.
![]()
The process of creating a circuit is quite long; therefore, I only took time to create one circuit.
I found that collision management was difficult to code. I use the 4 corners of the vehicle. For each corner, the collision detection determines to which obstacle tile it belongs, and then check if it collides with an obstacle of the tile or not.
I am happy with this result. It is the final result of the A2Z project, and the last thing that I have developed.
-
4.4) Image viewer and Map viewer
11/18/2016 at 19:24 • 0 commentsThe 2 applications manipulate images.
F12 : Exit for both applications.
Image viewer:
This is a very simple application. It displays image on the screen with its filename. You can browse all the images inside the folder where the first image was opened, with the left and right arrows.
Transitions between images are made with the double buffering.
Map Viewer:
It is a little bit more complex. We display a 7MB “raster map file” (bitmap format). This map is stored with 256 x 256 pixels tiles.
For each update of the display, the software determines which tiles have to be displayed for the current X-Y position. Then it draws the tiles already stored in RAM to the hidden frame buffer; then it switches the frame buffer; finally it loads the tiles that are missing from Flash to the RAM and displays them to the displayed frame buffer.
-
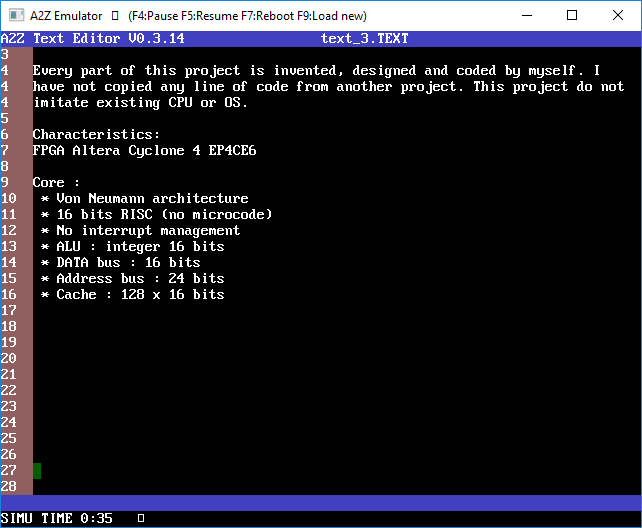
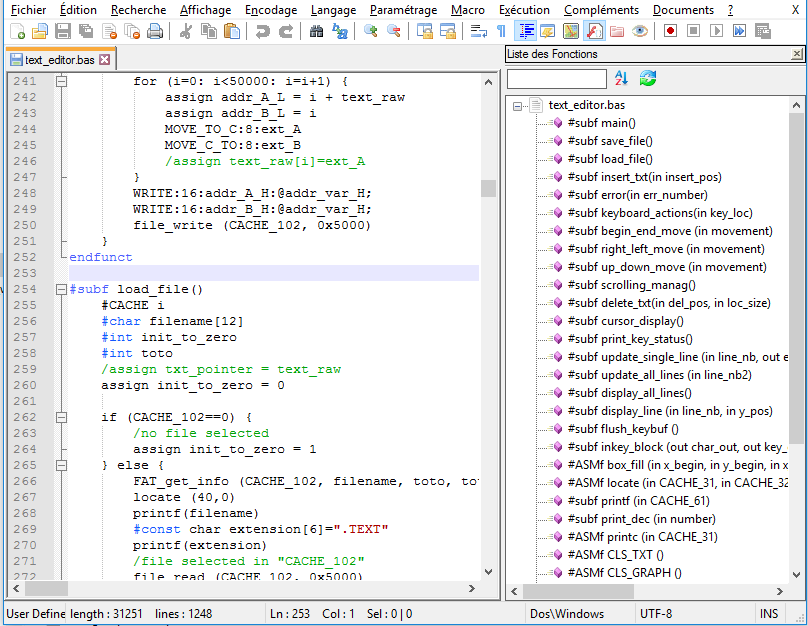
4.3) Text editor
11/18/2016 at 19:23 • 0 comments![]()
The text editor allows vertical scrolling, lines counter, automatic line return without word split.
I had planned to code copy/cut/paste functions, but I never get enough motivation to do it.
The data of one text file cannot exceed 50kB (which is enough), because I manipulate it as a table inside the RAM range dedicated to variables (64kB maxi).
The editor cannot create, delete, or rename a file. It cannot modify the FAT. All the modifications have to be made on the file explorer before or after editing the content of the text file.
Function keys :
- F10 : save the current file
- F12 : exit
This is the first software that I have coded. I needed to develop the keyboard interface (interpretation of key codes). I found this part more difficult that I thought.
-
4.2) File system and OS
11/18/2016 at 19:23 • 0 commentsFile system:
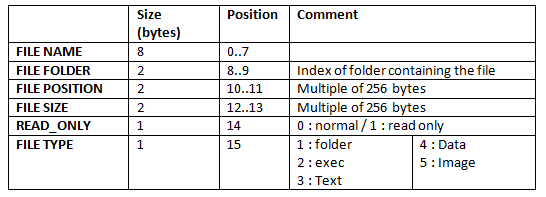
The file system is very simple. It is based on a FAT (file allocation table). Each file entry (file or folder) contains the following information:
![]()
The index of a FAT entry is its position on the FAT table. I limit the file number to 1024, which is enough for 16MB, and the demonstrations.
The filesystem enables a tree structure, of course, with the help of the “folder field” of each FAT entry.
The FAT is the portion of the Flash that is re-written the most. Each modification of the file system leads to a FAT modification. I wanted to avoid re-writing always the same Flash blocs, therefore I implemented a mechanism that writes the FAT in 8 different places, written successively at each FAT update. A FAT index is used to find the freshest FAT out of the 8 FAT stored.
It is a bit useless because the usage of this computer is very small, but I coded that especially for fun.
The FAT is small (less than 64kB) and it is therefore always stored in RAM.
Limitations:
- The filesystem do not manage fragmentation of files. Files are stored in a row. If there is not enough contiguous free space, a new file cannot be created.
- Each file has a fixed size, declared once at the file creation. The file size cannot be modified later.
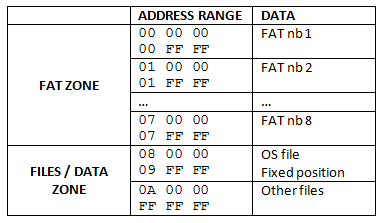
Flash Memory organization:
![]()
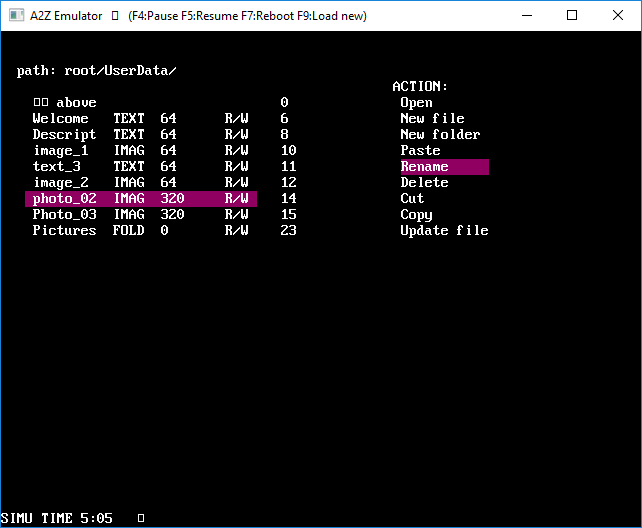
Human – Machine Interface : the file explorer.
I didn’t want a “command line” HMI. I hate command line OS, since my young age, when I used MS/DOS.
Therefore, I have coded a simple file explorer, with pseudo graphic interface, that shows the content of a folder, allows the user to select one file/folder with arrows, and propose actions to the user depending on the type of file/folder selected. This looks like the old “Norton Commander” on MS/DOS.
![]()
All the basic commands of a file explorer are available : copy, cut, paste, rename, create a new file or folder, delete.
You can also open a file. The action made while opening a file depends on the file type:
- For an EXEC file, the program is loaded to RAM, and then executed
- For TEXT or IMAG files, the explorer loads the right program for the file type, and executes it. The program will then open the selected file by itself; the OS just passes the index of the selected file as an argument. The EXEC files corresponding to programs used to open these types of files must have specific file indexes:
- Text editor : index 2
- Image viewer : index 3
In the “action menu”, a specific action allows to update the content of the selected file, from the PC to the Flash. This is made in 2 manners:
- Choice 1 for real A2Z hardware, uses the serial link, with the same protocol than the bootloader. All download must end with a “goto” instruction, that will not be executed, but that is just present to detect the end of transfer. For example, you can download a “bina” file, and then the file “goto.bine”.
- Choice 2 On emulator : you can download a bina/bine/binc file. The transfer is initiated with an F9 command. The transfer of the file must be done before validating the selection of “choice 2” in the OS.
OS or not OS ?
Finally, what I call “OS” is not really an OS. It is just a file explorer. All applications are almost totally independent from the OS, and they integrate their own driver to access to the hardware. There is no hardware abstraction made by the OS.
-
4.1) The Boot
11/18/2016 at 19:22 • 0 commentsThe bootloader is put in the boot ROM inside the FPGA. It is small enough for the 2kB of this ROM. The boot code is directly executed from this ROM.
At the start of the boot, the user has 2 options:
- F1 : loading a content from serial link to the RAM, and execute it. It is used when developing programs that have just been compiled on the PC. And this was also the only way to execute programs when I had not coded the OS, the filesystem, and the Flash drivers.
- F2: loading the OS from Flash and execute it. This is the normal way to start the computer for a “user”. The OS is a 64kB executable file, put in a specific portion of the Flash.
The serial port must be configured at 57600bds, without handshake/flow-control, and if possible 2 stop bits instead of 1. Warning : files must been sent in raw format, not ASCII format. Under Windows, I use the TeraTerm soft.
Remark : the bootloader is not simulated inside the emulator, because I didn’t want to emulate the serial port. Some of the functions of the emulator are directly coded in C, and take the same file format (bina/bine/binc) than the bootloader itself.
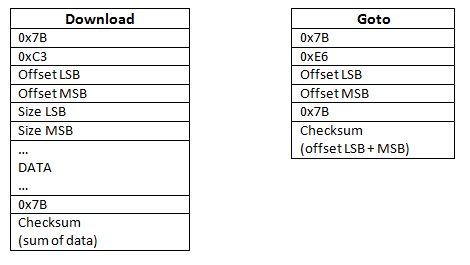
Bootloader protocol:
The bootloader protocol allows downloading content from a file in the PC, to the A2Z RAM. I use the same protocol for the bootloader, and for updating files in the OS. The protocol is simple and mono directional. I have not wired the TX part of serial port. There is no acknowledge mechanism, no repetition, no flow control, etc…
This protocol allows 2 actions:
- Download a portion of data to the RAM at a specific address. I use 256bytes blocs.
- Goto command : starts execution of the code that has been downloaded, at a specific address.
There is a checksum mechanism for both actions, to detect data corruption.
The bine/bina/binc files contain not only the data to download, but also the commands with this protocol. These file can be direcly transferred, in a raw format, via the serial port.
Warning : the bine/bina/binc are therefore not raw binary files.
![]()
-
3.6) Emulator on PC
11/18/2016 at 19:21 • 3 commentsThe emulator is very helpful tool to develop programs for A2Z, without downloading them to A2Z (which is slow). I can also develop programs with just a small laptop, when I am away from my electronic lab.
![]()
This emulator is also the easiest way to share my project, if somebody wants to play with it, without building the real hardware. It is available for download at the start page of the project (inside the ZIP file). The emulated flash memory is already loaded with all applications and data examples.
This is a “functional emulator”. It imitates the behaviour of the A2Z computer, but not the internal structure of the computer.
This part was much easier to code than I first expected.
The emulator is also coded in C, and uses the SFML library to acquire keyboard strokes, and to display the output graphic window. Therefore, the emulator should be easily ported to other platforms (Linux, Mac) with only small modifications.
The emulator imitates the speed of A2Z : it executes 52083 instructions every 16ms, and then waits until the end of the next 16ms period. This is equivalent to the 12.5MHz speed of the real CPU. I chose a 16ms step because it corresponds to the framerate of 60Hz : graphics are updated 60 times per second, like for VGA output.
Limitations:
- The Flash memory is emulated very basically, and the emulation does not correspond exactly to the real Flash. Therefore, a code that works on the emulator might not work on the real hardware.
- I use a French keyboard (AZERTY), and therefore an US keyboard might not work properly.
- The serial port is not emulated at all.
User guide:
The best way to call the emulator is via command line. You can optionally put filenames as argument. Here is the behaviour:
- If no argument/parameter is put, the emulator loads the OS from the emulated Flash to the RAM, and executes it.
- Parameters should correspond to name of binc/bine/bina files, that you want to load and execute. Files are interpreted in the same order that they appear. Therefore, you should put the bine (or binc) file at the end.
During execution, you can use the following function keys:
- F4 : pause the execution
- F5 : resume execution
- F7 : restart execution / reboot
- F9 : load a new file to RAM, like the bootloader would do. This allow the user to update a file in A2Z file system, from a bin file in the PC. The update takes place in A2Z OS.
-
3.5) Other tools
11/13/2016 at 18:17 • 0 commentsBin generator
This program generates .bina or .bine files from several formats. These files are destinated to be downloaded to A2Z via the "bootloader protocol".
If you want to generate an executable binary (bine), then the input should be a MIF file from the assembler.
Otherwise the input file should be a raw file that you want to transfer to A2Z, and the extension of the output file will be "bina".
Image / pictures manipulation:
2 tools are used to create bitmap images with the right format and the right palette for A2Z.
Palette_256 creates a windows bitmap file with 2 things:
- A rectangle that has the size of the image that will be drawn
- A palette of the 256 colours specific for A2Z. These colours can be easily collected and used with windows-paint for example
BMP converter : it converts a windows-bitmap image (24 bits) into a raw bitmap image for A2Z, with the right palette. The image extracted must be located inside the rectangle drawn by palette_256.
![]()
Notepad++:
I have learned Notepad++ to recognise and understand my A2Z language. I have integrated 2 things in Notepad++:
- Syntax colouring for declarations, for comments, and for text
- Automatic detection of function declaration, with REGEX formulas.
The configuration files for Notepad++ are available in the global ZIP. Refer to Notepad++ website to know how to integrate them to Notepad++.
The call to the whole toolchain (compiler, assembler, and bin generator) can be automated via keyboard shortcuts inside Notepad++.![]()
-
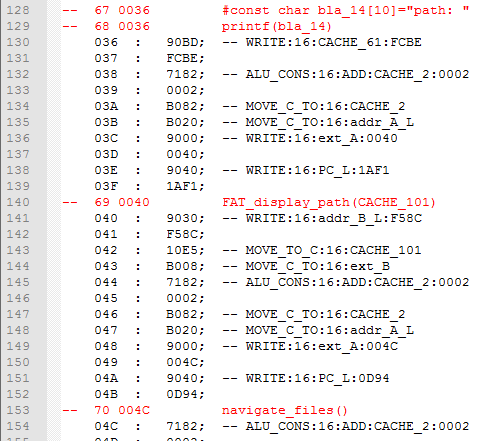
3.4) Assembler
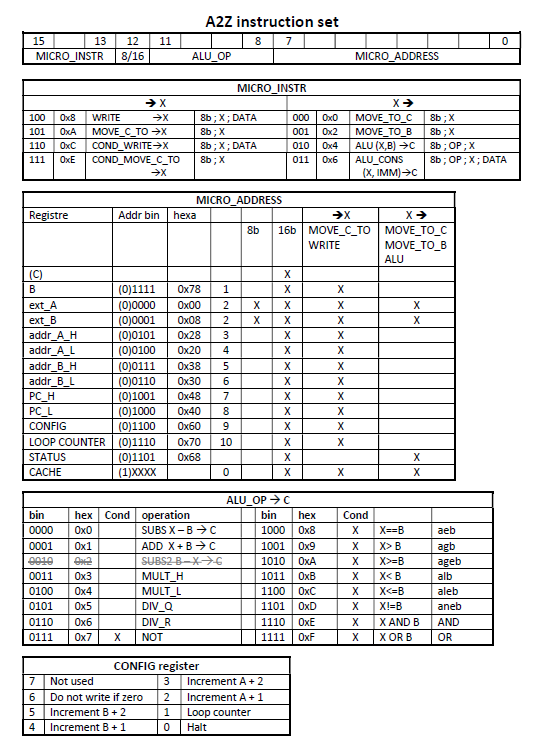
11/13/2016 at 18:17 • 0 commentsThe language is invented by myself, and corresponds to the instruction set architecture of the A2Z CPU.
![]()
The generated code is in MIF format (Altera Memory Initialization File). I have chosen this format, because at the beginning of the project, I downloaded executables to the Boot RAM via the tool “in system memory content editor” that uses this format.
The generated file also contains the source code in comments (both basic code and assembler code), and it is therefore easy to debug the tool chain.
- Line commented : original source code in A2Z basic language
- End of line comment : assembler code
![]()
-
3.3) A2Z Compiler
11/13/2016 at 18:16 • 0 commentsOnce again, the compiler is 100% homemade.
It is a cross compiler that runs on PC, that takes A2Z basic source at its input, and that generates ASM code at its output. Making a native compiler (that could run on A2Z itself) would have been too difficult, and my computer lacks too many things (tables more than 64kB, recursive functions, string functions, etc…).
The compiler is, for me, the most difficult part of this project. I am more used to code low level control-command on small microcontrollers, than to code such applications that manipulate string, lists, etc…
I needed lot of thinking and organization before beginning to code the compiler.
But I really enjoyed coding this compiler, because it is a new matter for me.
Sequencing of the compiler
1) Storage of lines :
the source code is split into a table of lines. Every line means a new instruction
2) Configuration :
the compiler then looks for the “configure” directive. This directive enables to configure max size, and memory position allocated to executable code and variables.
3) Functions, first pass:
the compiler then browses the code, and looks for functions declarations (subfunctions, ASM functions, and macros). It looks for first line of the function, and last line of the function “endfunct”. Each line of the code is tagged with its membership to a function. The first function must be “main”, and is executed at first.
4) #define management :
the #define are substituted with their real values.
5) declarations of variables:
the source code is once again browsed, and the compiler looks for variable declaration. For each variable declaration, the compiler stores its name, its function membership, its type, and the 2 sizes (for tables). If a variable is declared outside of a function, it is considered “global” (function = 0). We check that there is no double declaration (variable with the same name inside a single function), and that the RAM allocated for variables is enough.
6) Allocation of variables :
We then allocate the variables to the RAM, in a fixed (static) manner. The code for initial value of variables is also generated at this step.
7) Functions second pass :
for each function declaration (at the first line of a function), we look for inputs and outputs of the function. One function can have several inputs, and several outputs. The variables used for inputs and outputs must belong to the function.
8) Instruction decoding:
It is the biggest part of the compiler, and the most complex. This is the only part that generates executable code. I use the concept of “expression” : a value that can be computed with several things, that can be : variables, constant, register, cache, result of a mathematical or arithmetic expression. The expression analysis is of course recursive inside the compiler, this enable to code complex formulas in a single line. The result of this expression can be used for 3 things : assign the value to a variable/cache/register, use it as a parameter for an input of a function, or use it for an input of a condition (if/while/for).
The compiler browses the source code from beginning to the end, looks for instructions, and generates executable code on the fly. We also count the code size and determine the address of each instruction inside the executable code. This is necessary for the branching that will be managed later.
There are 4 types of instructions:- 8.1 : assembly code
- 8.2 : assign. It is the most simple instruction, that assigns a variable, cache, or a register, with an expression.
- 8.3 : branching (conditional or unconditional) : if/else/for/while/goto
- 8.4 : function call are managed in 3 steps:
- 8.4.1 : first we copy the content of the inputs of the functions from the calling function to the called function.
- 8.4.2: then we call the function. We also manage the execution stack at this step. It is 100% software, there is no hardware stack.
- 8.4.3 : last, we copy the outputs of the function from the called function to the calling function.
At this step, all branching instruction do not contain their destination address, because it can be unknown, if the destination is after the instructions already parsed.
9) Branching management :
then all the branch are treated: goto/for/next/if/while/function call/etc… we must give the real address on the executable code to which the branch refer. For this, we use the position of each basic instruction determined in previous step.
10) ASM generation :
finally, the compiler generates the ASM file, which is a concatenation of 2 things : the executable code, and the initial value of variables.
A2Z Computer
A computer invented, designed and built from scratch. Custom CPU on FPGA.