POR Reset: Getting Everything In Sync
Before we get into the logic of reading the time out, there is another thing we have to take care of first: We have to make sure that the circuit is in the correct state every time it powers up. This is called a Power-On Reset (POR) circuit.
We can build it simply with an RC timing circuit and a couple of transistors. When power is connected, the reset signal is in one state (reset), then the capacitor will be charged up at a specific rate and then turns the transistor on or off, locking the reset state in another state (run) forever.
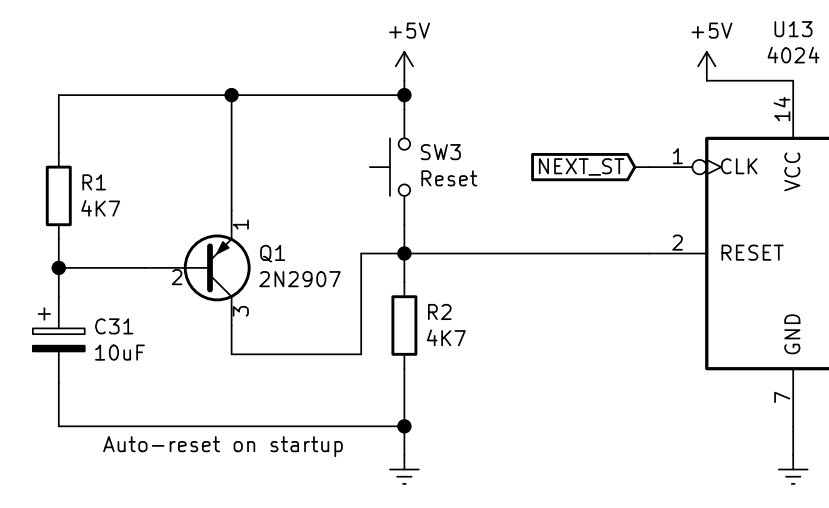
However, in this project, I've decided to use a dedicated chip for the purpose: TL7705A
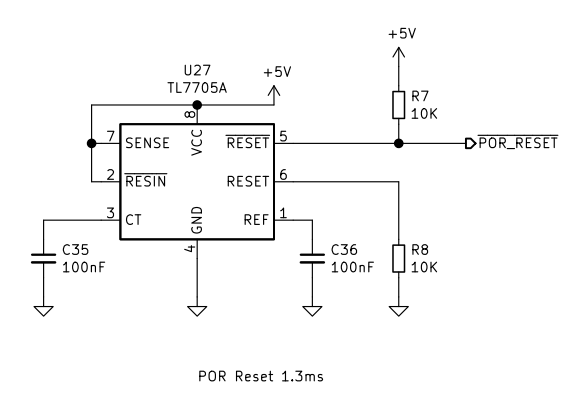
The TL7705A is a supply-voltage supervisor for 5V systems. To put it simply, this chip will hold a circuit it is supervising in a reset state (both active low and high outputs are available, very convenient) until the supply voltage reaches a specific value (3.6V in this case) then it will release the reset signal and let the circuit runs. It only requires a single capacitor to set the timing. I use the circuit below to generate a 1.3ms long reset pulse.
Datasheet here: https://www.ti.com/lit/ds/symlink/tl7705a.pdf
The Reading Steps
From what we know about DS1302 in the last log, we see that we need to follow these steps to get the date-time data out.
- Get our SPI bus into write mode.
- Start the SPI transaction by driving the CE signal high.
- Enable the SPI clock, then send the clock burst command 0xBF to the RTC.
- Switch the SPI bus into read mode.
- Send 64 additional clock pulses to get 8 bytes of date-time data (including WP byte) out, and then store it somewhere. (Noted that we need to send out 72 clock pulses in total.)
- Stop the SPI transaction by driving the CE signal low.
The Clocks (pun intended)
We need two clocks in the system, one to trigger time reading and another to act as an SPI clock.
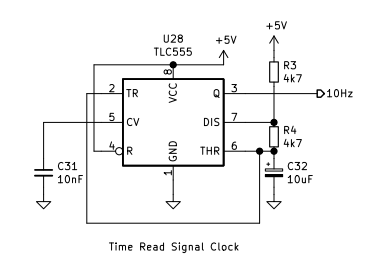
The first clock is easy. A rather slow 555 Astable circuit will work just fine. I decided to use 10 Hz.
The SPI clock could be made much faster because DS1302 could work up to 2 MHz but there's no need to push that limit. I use only 100 kHz. Again this is also a 555 Astable circuit, but with some twists.
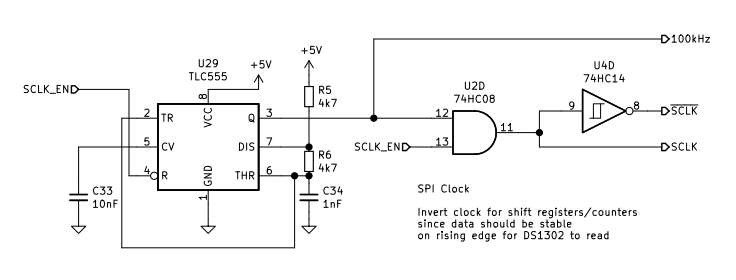
You can see that the reset pin is connected to SCLK_EN signal. This signal is high when something needs an SPI clock. By connecting it to the reset pin it ensures that we get full clock cycles right from the start every time. Without this, I observed that the display often glitches out because the first clock pulse is too short (i.e. we enable the clock in the middle or at the end of the 555 cycles).
Another point is that we have both SCLK and ~SCLK signals outputs. From the DS1302 datasheet, we can see that we need to put the data on the bus on the falling edge and the chip will sample data/put data on the rising edge. Therefore we need to put the DS1302 and the receive circuit on the SCLK signal and put the transmit circuit on the ~SCLK signal to make everything in sync.
Counting the Pulses
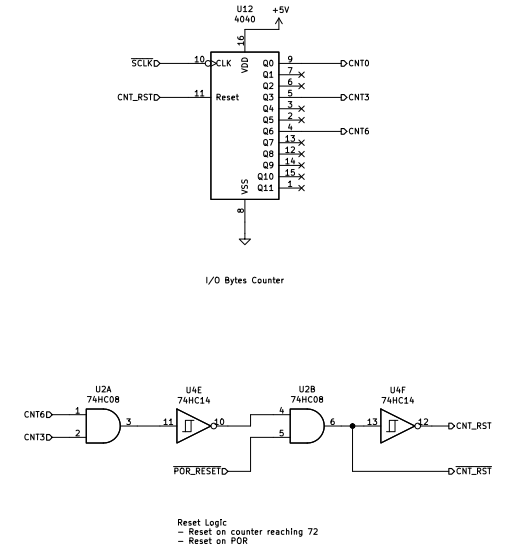
To read the time correctly, we need exactly 72 SPI clock pulses (8 for command byte, and 64 for 8 data bytes). More or less than 72 pulses will result in a display glitch. Here I use a 12-bit counter to count the SPI clock and send a reset signal out when it reaches 72 (2^3 + 2^6 = 72). This is a common trick to reset the ripple counter prematurely.
[This log will continue in part 2.]
 Sleepy Pony
Discussions
Become a Hackaday.io Member
Create an account to leave a comment. Already have an account? Log In.