Hello guys, today I am documenting how to upload .hex files into Arduino microcontroller. This simple tutorial will COVER some main topics like:
- How to generate .HEX file from .INO file.
- Which software we can use.
- How to upload this hex file into Arduino.
HEX and INO files:
A HEX file is a hexadecimal source file typically used by programmable logic devices, such as microcontrollers in remote controls, office machines, and automobile engine control systems. It contains settings, configuration information, or other data saved in a hexadecimal format.
An .INO file is also known as Arduino compatible file, Which can be edited using Arduino IDE. Means, A software program created to use with Arduino. These files are written in wiring C/C++ language.
Need of .HEX file:
Arduino is an open-source electronics prototyping platform. If you share .INO file, anyone can edit or see the main program. But HEX files are much more secure than .INO, no one can edit them because of the Hexadecimal format.
Example: INO File:
HEX file:
So It is like encoding your files, But there are some programs available through which we can extract the hex files directly from the Microcontroller and upload them to any other microcontroller. But we can't edit them. And the main program remains like copyrighted.
Generating HEX files:
We are starting from the most basic Blink example,
- Go to Arduino IDE and open the written program, Don't use prewritten programs from examples. But you can copy them into a new tab and then save them as .INO file.
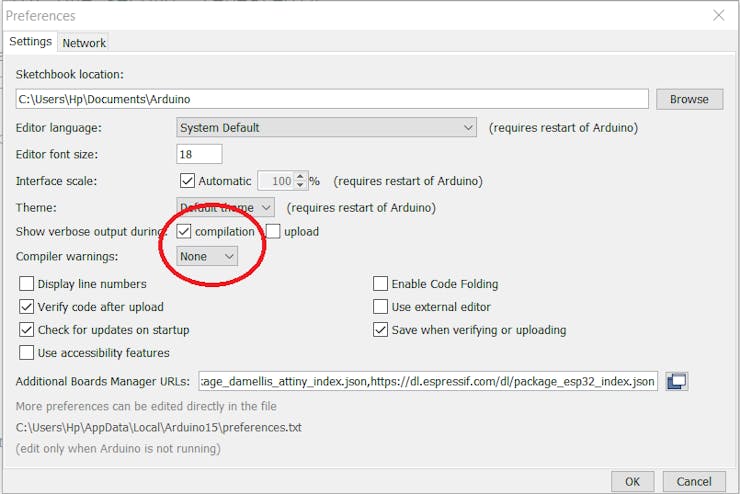
- In the preference section under the file menu, Tick the compilation button.
- Verify your sketch, not upload it, only verify.
- Search for the .HEX format in the compilations section and copy the address
- Paste the address in the search tab of file explorer, make sure to tick the option of show hidden files.
- Then copy the .HEX file from that temporary folder and paste this on the desktop.
Now our Hex file is ready, and we can use this as we want, like in simulation circuit programs, virtual Arduino lab experiments, and program the Arduino board.
Software to upload .HEX file into Arduino microcontroller:
We are using X-loader to flash the .HEX files into Arduino Board; this is open-source software and can be downloaded directly from here.
- Extract the software from the files and then run it.
- Then, locate the file or choose the .HEX file you want to upload.
- Plug the Arduino board into the PC.
- Choose your COM port and Microcontroller.
- Don't change the baud rate and upload the file.
And this will upload the file, and this X-loader supports 4-5 microcontrollers listed in the list.
Atmega168, Atmega2560-Mega, Atmega328p, Arduino Nano and UNO.
If you want to use any other microcontroller, then AVRDUDESS can do the job. In future, we will document a separate tutorial on this one also. For proper instructions and better understanding see this video.
video:
For hindi users:
JLCPCB:
I have my own Arduino boards because of JLCPCB to program them/troubleshoot them and learn from them. If you want to make your own board, the JLCPCB SMT service can be the solution.
JLCPCB is the one of the most popular PCB makers. Price is just $2 for 2, 4 and 6 layer PCB. They just launched new purple solder mask, aluminum Pcb and 3d printing service in very low cost. Pcb quality is not compromised at any cost. Check them out right now from Here.
JLCPCB Is also providing new user coupons and sign-up rewards of up to $30. So, check them out from here. Register using this link to get Free PCB assembly service coupons. Get your 2 layer to 6-layer PCB’s just in $2, stencil and PCB assembly service in just $7.
For PC: https://jlcpcb.com/SSRFor mobile phone: http://m.jlcpcb.com/ssi
Here are some exciting projects, which you may like:
1) How to make Arduino Uno clone board.
2) How to program Arduino Using Smart Phone.
3) Arduino Nano clone board problems and solutions.
4) How to make Inductance Meter Using Arduino.
5) Raspberry Pi- PICO Oscilloscope.

Think you enjoyed my work, stay tuned. Follow us on Instagram (sagar_saini_7294) and hackaday.
please support us- No donations, just follow and leave a comment.
 Sagar 001


