Close
0%
0%

ZeroKeyUSB

Offline USB-C password manager. No cloud, no apps, no battery.

Public Chat
Similar projects worth following
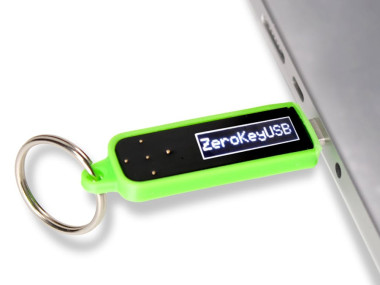
ZeroKeyUSB is a standalone hardware password manager built into a small USB-C keychain device. It works as a standard USB HID keyboard, so it can type your credentials on almost any device without installing software, browser extensions, drivers, or cloud services.

The device stores credentials locally, encrypted inside the hardware. A small OLED screen lets you browse saved accounts, while capacitive touch pads are used to navigate, select an entry, and type the username or password.

ZeroKeyUSB is designed for people who need a simple and portable way to keep passwords offline, especially in environments where installing password manager software is not possible or not allowed. It works with Windows, macOS, Linux, Android, iPadOS, and other systems that support USB keyboards.

The current version is USB-C powered, battery-free, compact, water-resistant, and designed to be manufactured at small scale. The project is open source and is being prepared for launch through Crowd Sup

Many people still reuse the same password across different online accounts. Even when that password is strong, attackers do not always need to break into your most important accounts directly. They can compromise a weaker website, steal a reused password, and try it somewhere else.

In the physical world, almost nobody would use the same key for their house, car, office, mailbox, and storage unit. We accept that different locks need different keys. But online, remembering a unique password for every account is difficult, and many people end up reusing passwords, writing them on paper, or storing them in places they do not fully control.

ZeroKeyUSB was designed around a simple idea: what if your digital keys could live on your physical keychain?

It is a small USB-C hardware password manager that works as a standard USB keyboard. You unlock it with your PIN, select the account on its OLED screen, plug it into a computer, phone, or tablet, and let it type the credentials for you.

The basic workflow is:

  1. Unlock ZeroKeyUSB using your personal PIN
  2. Browse your saved accounts using the capacitive touch controls
  3. Select the account you want to use
  4. Plug ZeroKeyUSB into the target device
  5. Use the touch controls to type the username, password, or login sequence

Because ZeroKeyUSB behaves like a normal USB HID keyboard, it does not need drivers, apps, browser extensions, or cloud synchronization. It can work on Windows, macOS, Linux, Android, iPadOS, and other systems that support USB keyboards.

Credentials are stored locally inside the device and encrypted before being written to memory. The PIN is not meant to be sent to any server, and the device does not phone home. Your password database stays in your pocket, not in a cloud account.

The current hardware version is compact, USB-C powered, and battery-free. This makes the device thinner, simpler, and more durable over time. It also avoids the problem of an internal battery ageing, swelling, or needing to be recharged. When you plug ZeroKeyUSB into a device, it powers up from the USB port.

The device includes:

  • USB-C connector
  • OLED display
  • Capacitive touch controls
  • Local encrypted credential storage
  • Support for up to 64 credentials
  • USB HID keyboard output
  • Compact keychain form factor
  • Resin-encapsulated body for improved durability
  • Open source hardware and firmware

ZeroKeyUSB is not trying to replace every software password manager. It is designed for situations where simplicity, portability, offline storage, and universal compatibility matter more than cloud synchronization.

It is especially useful when you cannot install software, when browser extensions are not allowed, when you want to keep credentials offline, or when you want a physical backup that works across many devices.

ZeroKeyUSB is my attempt to make digital credentials feel more like physical keys: personal, portable, offline, and under your control.
Carcasas_Configuración 1_Carcasa trasera.stl

Standard Tesselated Geometry - 349.98 kB - 06/12/2026 at 12:06

Download

Carcasas_Configuración 1_Carcasa delantera.stl

Standard Tesselated Geometry - 160.24 kB - 06/12/2026 at 12:06

Download

BoxBotom1.stl

Standard Tesselated Geometry - 269.61 kB - 06/12/2026 at 12:06

Download

BoxTop1.stl

Standard Tesselated Geometry - 208.09 kB - 06/12/2026 at 12:06

Download

ZeroKeyOS.bin.signed.bin

octet-stream - 240.00 kB - 06/12/2026 at 12:05

Download

  • 1 × Microchip SAMD21E18A Main microcontroller. Handles the user interface, encryption logic, USB HID keyboard output, OLED display, touch controls, and EEPROM communication.
  • 1 × 0.96 inch OLED Display Small 128 × 32 pixel OLED screen used to display the selected credential, menu options, device status, and user interface feedback.
  • 1 × Capacitive Touch Controller Touch input controller used for navigation, selection, and triggering actions without mechanical buttons.
  • 6 × Capacitive Touch Pads Gold-plated touch pads on the front surface of the device. Used to browse accounts, select entries, and type credentials.
  • 1 × 64 Kbit I2C EEPROM External non-volatile memory used to store encrypted credential data locally inside the device. 5

View all 11 components

  • ZeroKeyUSB launches on September 22

    zerokeyusb2 hours ago 0 comments

    After years of development, prototyping, testing, and refining the design, ZeroKeyUSB finally has an official launch date.

    The crowdfunding campaign will begin on September 22 on Crowd Supply.

    ZeroKeyUSB is a small, offline password manager that works as a standard USB keyboard. It requires no application, no cloud account, no battery, and no drivers. Just connect it to a computer, phone, or tablet, unlock it with your PIN, and select the credential you want to type.

    The final hardware is already designed and industrialized, and the campaign will allow us to move into larger-scale manufacturing.

    You can follow the campaign and sign up to be notified when it launches here:

    https://www.crowdsupply.com/depbit/zerokeyusb

    Thank you to everyone who has followed the project, tested the prototypes, shared feedback, or helped spread the word.

    See you on September 22.

  • ZeroKeyUSB Update: From Early Prototype to Battery-Free USB-C Hardware Password Manager

    zerokeyusb06/12/2026 at 12:14 0 comments

    ZeroKeyUSB started as a small personal experiment: a simple hardware password manager inspired by the idea of carrying digital keys on a physical keychain.

    Since the first prototype, the project has changed a lot.

    The current version is no longer an early Arduino-style prototype with a battery. ZeroKeyUSB is now a compact USB-C device, powered directly from the USB port, with no internal battery, no charger, no cloud account, and no companion app.

    The device works as a standard USB HID keyboard. That means it can type credentials on many computers, phones, and tablets without installing drivers, browser extensions, or password manager software. If the target device supports a USB keyboard, ZeroKeyUSB can usually work with it.

    The hardware has also been redesigned around a much smaller and more durable form factor. The current version includes:

    • USB-C connector
    • SAMD21 microcontroller
    • 128 × 32 OLED display
    • Capacitive touch controls
    • External encrypted credential storage
    • USB HID keyboard firmware
    • Resin-encapsulated body
    • Battery-free power architecture

    This change was important for the product. Removing the battery makes the device thinner, simpler, and more robust over time. There is no charging cycle, no battery ageing issue, and no need to remember to recharge it. You plug it in, unlock it, select the account, and type the credentials.

    ZeroKeyUSB is designed for people who want a physical, offline way to store and use passwords, especially in situations where installing software is not possible, not allowed, or simply not desired.

    The project is now being prepared for launch through Crowd Supply. I will keep updating this Hackaday.io page with new photos, files, hardware details, firmware information, and manufacturing progress as the project moves closer to production.

    Thanks to everyone who has followed the project since the early prototype stage. It has taken many iterations to get here, but ZeroKeyUSB is now much closer to the product I originally wanted to build: a small, offline, personal password manager that lives on your keychain.

  • Crowdfunding Now Available for ZeroKeyUSB

    zerokeyusb03/31/2025 at 13:32 0 comments

    We’re excited to announce that the crowdfunding campaign for ZeroKeyUSB is now live! After months of development and community feedback during its early stages on Hackaday.io, we’re thrilled to invite you to join us on this journey and help bring ZeroKeyUSB to life.

    Why Crowdfunding?

    Launching a hardware project comes with its own set of challenges, from prototyping and manufacturing to ensuring quality and reliability. Crowdfunding provides us with the opportunity to secure the necessary resources while also building a community around the project. Your support not only helps fund production but also contributes to refining and perfecting ZeroKeyUSB based on real-world feedback and use cases.

    What Can You Expect?

    By backing ZeroKeyUSB, you’re not just purchasing a product—you’re joining a community dedicated to innovation and open collaboration. Some of the exciting aspects include:

    • Early Access & Exclusive Updates: Backers will receive exclusive updates throughout the development process and early access to firmware releases and documentation.

    • Community-Driven Improvements: Your input will be invaluable. We’re committed to actively incorporating feedback from our backers to ensure the final product meets the needs of a diverse user base.

    • Open-Source Ethos: In true Hackaday spirit, ZeroKeyUSB will feature an open-source hardware and software approach, empowering you to explore, modify, and expand its capabilities.

    Join Us

    The campaign is now live on CrowdSupply. We invite you to check out the project details, watch the introductory video, and see the rewards available for different levels of support. Every contribution makes a difference in turning ZeroKeyUSB from a promising prototype into a fully-realized product.

    You can learn more and back the project by visiting our ZeroKeyUSB Crowdfunding Campaign.

    Thank you for your continued support and enthusiasm. Let’s make ZeroKeyUSB a success together!

View all 3 project logs

  • 1
    How to use ZeroKeyUSB

    Screen-by-screen walkthrough of the wizard that appears the first time you plug your ZeroKeyUSB in. Orientation, keyboard layout and master PIN.

    The first time you plug your ZeroKeyUSB into a USB-C port, a 9-page setup wizard starts automatically (in Spanish by default — the localized strings appear below). This guide walks you from the welcome screen to a device ready to store credentials.

    Step 1 — Welcome splash

    When you plug the cable in, the OLED lights up showing the bootloader logo for a couple of seconds. This confirms that the firmware booted correctly and the ECDSA signature of the binary has been validated by the ATECC608A secure element.

    ZEROKEY USB splash screen

    Wait about 2 seconds. The wizard appears automatically — you don’t have to press anything.

    Step 2 — Page 1: Welcome

    First page of the wizard. The inverted top bar shows the title and a page indicator <1/9>. The body briefly describes what the device is and what to do.

    Wizard welcome page

    Press Right to advance. If the body has more text than fits on screen, use Up/Down to scroll before continuing.

    Step 3 — Page 2: Navigation

    Explains what each of the 5 pads does. This is the only page that describes the controls explicitly.

    Navigation page

    Read the page and press Right to move to the next one.

    Step 4 — Page 3: Rotate screen

    If the golden dots end up on your left instead of on the right, flip the device physically — or rotate the screen in software with Center. The orientation is saved in EEPROM and persists across power cycles.

    Rotate screen page

    Press Center to toggle the orientation (you will see NORMAL ↔ ROTADA on screen). When the controls feel right, press Right to continue.

    Step 5 — Page 4: Keyboard layout

    ZeroKeyUSB emulates a USB keyboard. So that passwords with special characters (@, !, #, etc.) type correctly on your computer, the device needs to know your keyboard layout.

    Keyboard layout selection

    Press Center to cycle through EN-US, ES-ES, FR-FR, DE-DE, IT-IT, PT-PT, DA-DK, SV-SE, HU-HU. When yours appears, press Right.

    You can change this later from Menu → Settings → Keyboard.

    Step 6 — Page 5: Master PIN (introduction)

    This page explains the PIN rules before asking for one. Pick between 4 and 16 digits (0–9). It is the only thing standing between an attacker and your credentials.

    Master PIN explanation

    Press Center to move on to the PIN entry screen.

    There is no PIN recovery. If you forget it, the only option is a factory reset that wipes all your credentials. Memorize the PIN — or write it down somewhere physically safe.

    Step 7 — Enter the PIN

    The numpad screen. Each digit is entered with Up/Down (to choose 0–9) and Right (to confirm and advance to the next digit). The small arrows on the sides of the active digit remind you of the available moves.

    PIN entry numpad

    For each digit of your PIN: Up/Down to the correct number, then Right to confirm it. When you finish the last digit, the cursor jumps to the tick (✓) symbol. Press Center on the tick to save the PIN.

    To erase the last digit if you make a mistake, press Left.

    Step 8 — Page 6: PIN saved

    After entering the PIN, the wizard shows it back to you once so you can memorize it. This is your last chance to see it in cleartext.

    PIN saved page

    Write the PIN down or memorize it. When you have it, press Right.

    Step 9 — Page 7: Unlocking

    Explains that from now on, every time you plug the USB in, you will have to enter the PIN. And that repeated failures trigger an exponential wait.

    Unlocking page

    Read the page and press Right to continue.

    Exponential backoff: first failure = 5 s wait, second = 10 s, third = 20 s… up to ~43 min max. The counter resets when you enter the correct PIN. Nothing is wiped automatically.

    Step 10 — Page 8: Accounts

    A preview of the main screen — how credentials are navigated once you are unlocked.

    Accounts navigation page

    Press Right.

    Step 11 — Page 9: All set

    Last page. Reminds you that you can reach the main menu by pressing Left on the first credential (or Right on the last, going through “Add New” first).

    All set page

    Press Center to exit the wizard and reach the PIN screen. That’s it — the device is set up.

    Step 12 — Ready to use

    After pressing Center, the device takes you to the PIN numpad to enter the PIN you just created (the same one you will see every time you plug the device in from now on). When you enter the PIN correctly, you will reach the main screen — but since there are no credentials yet, the Add New screen appears directly.

    Add New screen

    Press Center to create your first credential — or follow the dedicated guide at Create your first credential.

  • 2
    Managing credentials with the WebTool

    Restore from a backup or migrate from another password manager. Screen by screen, from the menu to imported data.

    Import loads credentials (site, username, password and optionally a TOTP secret) from a CSV file over USB serial. It happens after unlocking the device and requires physical authorization via the Center button.

    Import overwrites the destination slots without asking. If you already have credentials, create a backup (guide) before continuing.

    Before you start

    You needHow to get it
    >td >Plug it in and enter your PIN
    A CSV file with your credentialsA previous export, or an export from 1Password / Bitwarden / Keepass adapted to the format (see below)
    A serial toolWeb manager (recommended), screen, minicom, PuTTY at 115200 bps

    Step 1 — Open the menu

    While on the first credential, press Left.

    Open the menu from credential 1

    Press Left while on credential 1.

    Step 2 — Enter the Backup submenu

    In the root menu, Backup is selected by default. Press Center.

    Root menu, Backup selected

    Press Center.

    Step 3 — Select “Import”

    Inside Backup, Import is at the top. If it’s not highlighted, press Up to reach it. Then Center.

    Import selected

    With Import highlighted, press Center.

    Step 4 — Physical authorization

    Just like in export, an authorization screen asks for a long Center press before enabling the import channel.

    Import authorization screen

    Before continuing, prepare your CSV file on the host. When ready, hold Center for ~1 second. The device sends REQUEST_SAVE over USB serial waiting for the data.

    Don’t press Center short by mistake — a short press won’t authorize anything (it just moves to the next menu screen if there is one).

    Step 5 — Send the CSV from the host

    With the device in “waiting for data” mode, send over USB serial:

    1. A line with the total number of records to import (example: 5).
    2. One CSV line per credential in this format:
      slotIndex,site,username,password[,totpSecret]
      

    Full example:

    5
    0,github.com,alice,MyP@ss123,JBSWY3DPEHPK3PXP
    1,gmail.com,bob@gmail.com,correct horse battery staple
    2,bank.com,12345678X,s3cur3P@ss,JBSWY3DPEHPK3PXP;algo=SHA256
    3,aws-prod,admin,A!7zQ#mYpL2v
    4,banca,12345678X,Pin-only2FA
    

    Each line is processed like this:

    Host → device:   "0,github.com,alice,MyP@ss123,JBSWY3DPEHPK3PXP"
    Device:          AES-128 CBC encrypt → write to EEPROM slot 0
    Device → host:   "Record 1 stored correctly."
    

    The web manager has a file picker that sends the lines in the right order and shows progress. If you don’t want to fight with the terminal, use it.

    Step 6 — Progress

    During import you’ll see the slot being written and overall progress on screen.

    Import progress

    When done, the device shows “Import complete” for 1 second and returns to the menu. Press Left to exit to the credential list and verify they’ve been added.

    Step 7 — Verify

    Press Left repeatedly to exit the menu to the credential list. Navigate with Left/Right and check that the imported data appears.

    Imported credential on main screen

    Use Right to walk through the newly imported credentials. If everything looks good, consider making a new backup now.

    CSV format

    FieldDescriptionLimit
    slotIndexTarget slot0–61
    siteSite or service16 characters
    usernameUsername16 characters
    passwordPasswordAny printable ASCII
    totpSecret(optional) TOTP secretSee below

    Accepted TOTP secret formats

    FormatExample
    Bare Base32JBSWY3DPEHPK3PXP
    Base32 + algorithmJBSWY3DPEHPK3PXP;algo=SHA256
    Full otpauth:// URIotpauth://totp/GitHub:alice?secret=JBSWY3DPEHPK3PXP&algorithm=SHA256

    Default algorithm if not specified: SHA-1.

    Validation and errors

    CaseBehaviour
    slotIndex outside 0–61Reject the line: "Index out of range"
    Invalid Base32Reject the TOTP secret: "TOTP invalid"
    Line with fewer than 3 fieldsSkipped with an error log
    Empty lineTerminates the import early

    Migrating from other managers

    To migrate from 1Password, Bitwarden, Keepass and others:

    1. Export to CSV in the source manager.
    2. Adapt the CSV to the ZeroKeyUSB format (a simple Python script — trim each field to 16 chars and reorder columns).
    3. Import following this guide.

  • 3
    Editing credentials directly on ZeroKeyUSB

    How to open the editor, move the cursor, use the three keyboard pages, generate random passwords and save.

    This guide details every operation in the on-device editor. If you just want to create your first credential, start with the Create your first credential guide.

    Step 1 — Select the credential

    From the main screen, navigate to the credential you want to edit using Left/Right. If you have many, hold Left/Right to jump 10 slots at a time.

    Selecting credential 4 (github)

    When the right credential is on screen (you’ll see its number at the top left — here 4), move on to the next step.

    Step 2 — Select the field and open the editor

    The active field shows as an inverted white block on the left (globe = site, silhouette = user, padlock = password, key = 2FA). Switch between fields with Down/Up:

    • Site ↓ User ↓ Pass ↓ 2FA (if the credential has TOTP)

    When you’re on the right field, hold Center for ~1 second to enter the editor.

    Long-press Center to open editor

    A short Center press types the field to the host (not what you want). A long press (~800 ms, until you see the large halo) opens the editor.

    Step 3 — Editor anatomy

    The editor looks like this:

    Editor anatomy

    ElementFunction
    Row 1Shows the current field content (max 16 chars) with an inverted cursor at the insertion point
    Row 2 — < >Move the field cursor (insertion position)
    Row 2 — KB1Uppercase keyboard: A B C D E F G H I J K L M N O P
    Row 3 — RandFills the entire field with 12 strong random characters
    Row 3 — KB2Lowercase keyboard: a b c d e f g h i j k l m n o p
    Row 4 — SaveSaves changes and returns to the main view
    Row 4 — KB3Numbers/symbols: 0 1 2 3 4 5 6 7 8 9 - + ! @ #

    Step 4 — Move the cursor across the keyboard

    When you enter the editor, focus starts on KB1 (row 2). Left/Right move the keyboard cursor within the current row.

    Keyboard cursor on L

    Press Right to advance the keyboard cursor, Left to go back. At the end/start, the cursor jumps to the control in the adjacent row (Rand, Save, <, >).

    Step 5 — Insert a character

    With the desired character under the keyboard cursor, press Center. It gets inserted at the field cursor’s current position, which then advances automatically.

    Character L inserted

    The L is inserted at position 5 of the field and the field cursor advances to position 6. If you wanted to replace instead of insert, read the next step.

    Step 6 — Move the field cursor (not the keyboard)

    Sometimes you want to edit characters in the middle of the field, not just append to the end. For that, use the < and > symbols on row 2.

    Field cursor active

    Reach the < or > symbol with Left (from KB1) and press Center. The field cursor moves one position left or right. When it’s on the position you want to edit, go back to KB1/KB2/KB3 and press Center on the new letter — it overwrites the existing one.

    Keyboard insertions overwrite the character at the current position, they don’t push existing content. So “deleting” a character is simply moving onto it and entering a space (KB3, first character).

    Step 7 — Generate a random password

    For password fields, instead of typing letter by letter, use Rand: 12 alphanumeric + symbol characters from the ATECC608A’s hardware TRNG.

    Rand highlighted in editor

    Navigate to Rand with Down from row 2. Press Center: the field fills up. If you don’t like it, press Center again to regenerate.

    Step 8 — Save

    When you’re done, navigate to Save (bottom-left corner) and press Center. The changes are encrypted with AES-128 CBC and written to EEPROM.

    Save highlighted

    The editor closes and you return to the main view. The credential now has the changes.

    Leaving the editor without pressing Save discards the changes. There is no confirmation: the moment you change screen via any path other than Save, what you typed is lost.

    Shortcut table

    ActionHow
    Enter the editorLong-press Center on a field
    Move keyboard cursorLeft/Right
    Change row/keyboardUp/Down
    Insert characterCenter on the letter
    Move field cursorCenter on < or > (row 2)
    “Delete” a characterMove the cursor there and insert space (KB3 first character)
    Generate random passwordCenter on Rand
    Save and exitCenter on Save
    Discard changesUnplug USB before pressing Save


View all 3 instructions

Enjoy this project?

Share

Discussions

Does this project spark your interest?

Become a member to follow this project and never miss any updates