JP Gleyzes
-
Printing with PET filament
05/06/2022 at 12:50 • 0 commentsIn this log we will cover
- the temperature concern... is your hotend ok for PET?
- the slicer parameters
- how to protect your bed
PET printing temperature
PET, which stands for polyethylene terephthalate, it is a form of polyester (just like the clothing fabric).
PET is a polymer of ethylene glycol and terephthalic acid. Pellets of PET resin are heated to a molten liquid, which can be easily extruded or molded into almost any shape.
PET is a crystalline resin, a specific gravity of about 1.4, a melting point of 245 ℃, the molding temperature between about 290 ~ 315 ℃.
For Pullstruding the best "printing temperature" has been tested to be above 265°C and not more 270°C.
These temperatures are very high compared to PLA filament (190-220°C). If you do not want to destroy your printer you should verify that it is able to handle such a temperature.
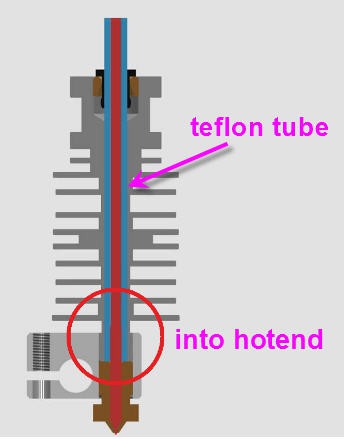
Issue will occur with cheap devices where a PFTE tube is inserted down into the hotend
![]()
In this configuration the tip of the teflon tube will heat and start to produce toxic fumes... It may clog the hotend and it is unsafe for your health.
DO NOT PRINT PET filament with cheap hotends...
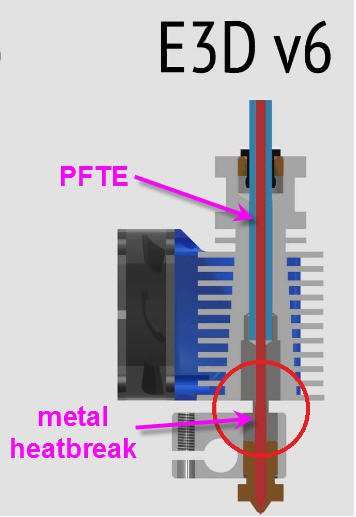
On the other hand, full metal hotends have a metal heatbreak so that the PFTE which is cooled by the top fan will never reach these high temperatures. These fullmetal hotends are safe to be used for PET printing.
This was the case for my Prusa i3 MK2S printer (and all Prusa's printers). It is equiped with a EV-3DV6 full metal hotend (I was lucky !)
![]()
Slicer parameters
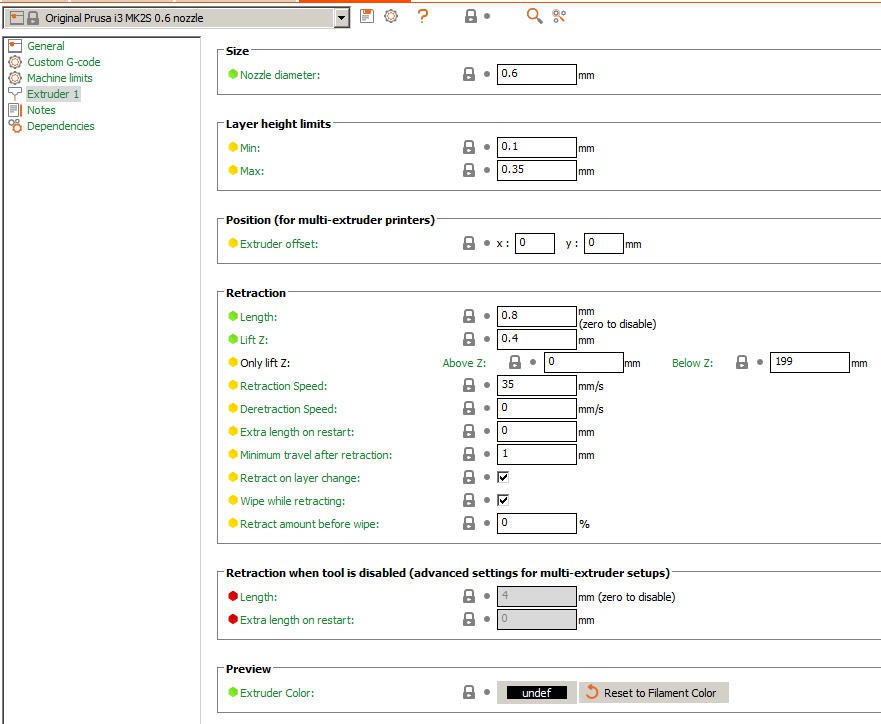
Nozzle
Let's start by the nozzle. I do use an old .4mm nozzle which is totally worn out. So that its diameter is now .6mm!
My advice is to print this PET filament with a real .6mm nozzle as it will help to print faster but also to be tolerant to slight variations of the filament diameter and thus will prevent clogging your hotend.
The settings under PrusaSlicer are the regular ones. No modification ...
![]()
filament settings
Your PET filament has not exactly the nice 1.75mm dameter of a perfect circle... It has rather the shape of a "C".
But don't worry, provided that you used a 1.5mm hole on the PullStruder side, then you can safely assume that it is 1.75mm filament.
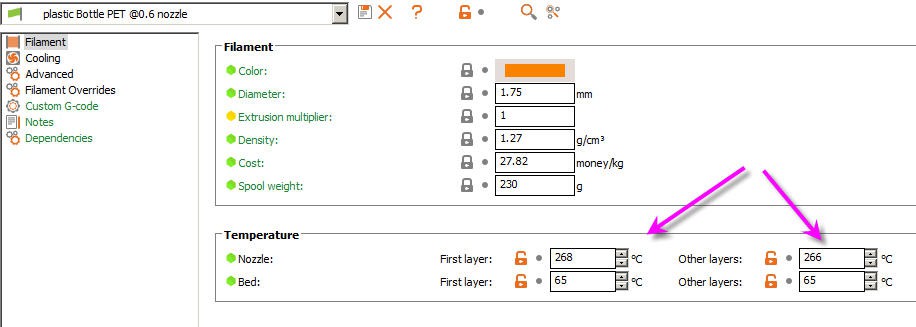
Start with all the settings of a regular 1.75mm PETG filament and modify these parameters.
You just have to change the temperatures (hotend and bed) as follows :
![]()
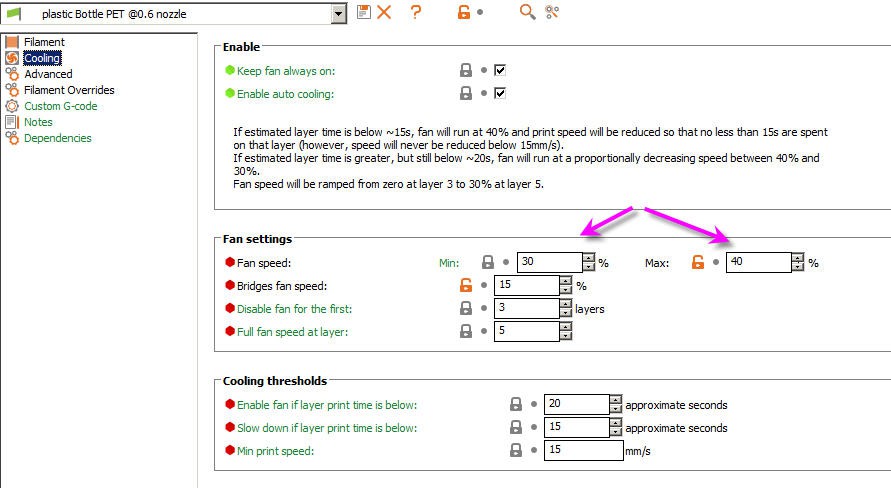
Now go into the cooling section and decrease the fan speed accordingly. These slow values prevent the "temperature runaway" error that may otherwise occur if the fan is blowing too much air on the nozzle...
![]()
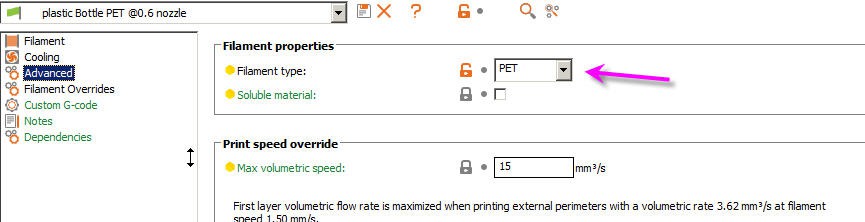
Now go into the "advanced" tab and just precise that you are using PET filament. Don't change the other parameters.
![]()
Print Settings
You can do pretty much what you prefer into this tab.
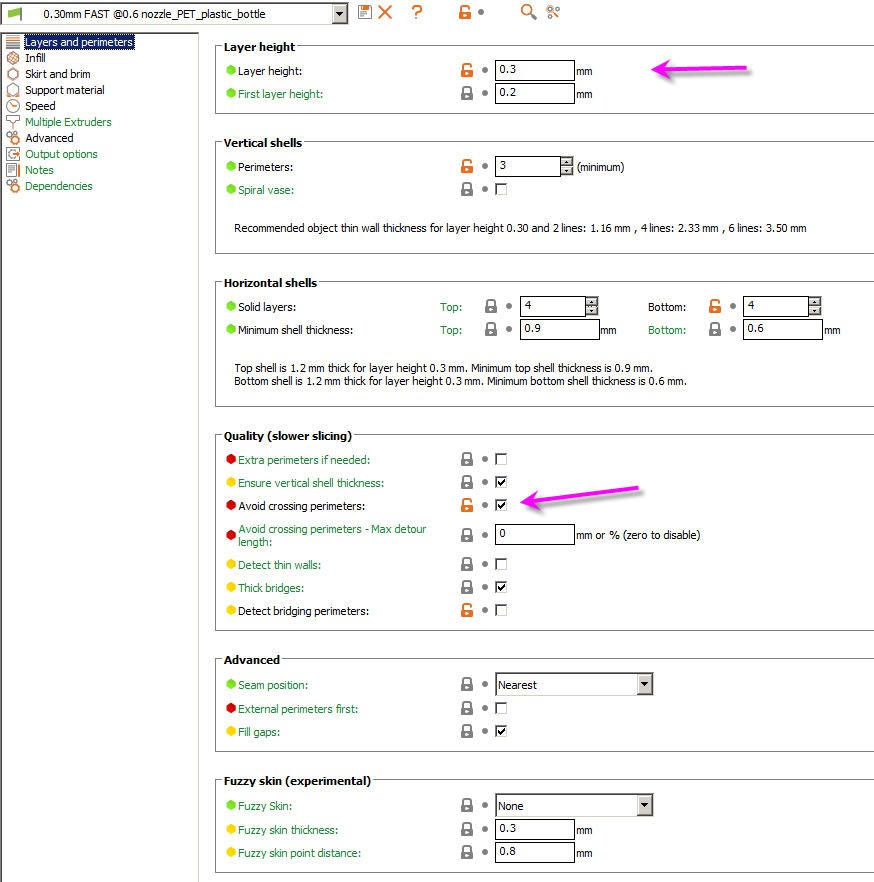
I did configure my printing to "fast 0.3mm" but you can of course stay to the standard .2mm.
More important, IMHO, is to tick the box "avoid crossing perimeters" it helps a lot to "hide" oozing and stringing into the printed parts !
![]()
Apart for this you can safely leave the other parameters unchanged from the PETG filament settings.
How to protect your bed
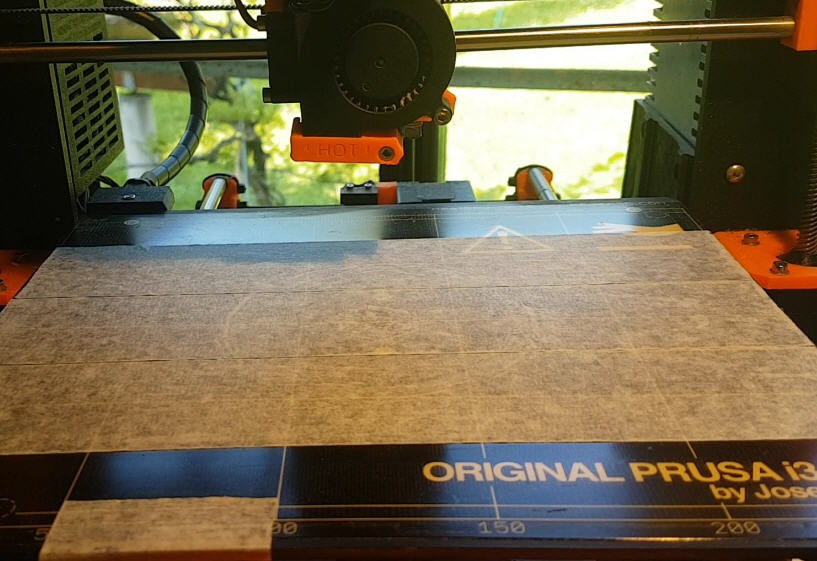
Do not try to print directly on a PEI sheet, the adherence will be too strong and you might destroy your PEI when removing the part.
Rather use Painter tape that you will stick on yor bed.
![]()
Happy printing with PET
-
Filament cost
05/05/2022 at 06:59 • 0 commentsThis page is devoted to explain the price of 1kg recycled PET bottle filament
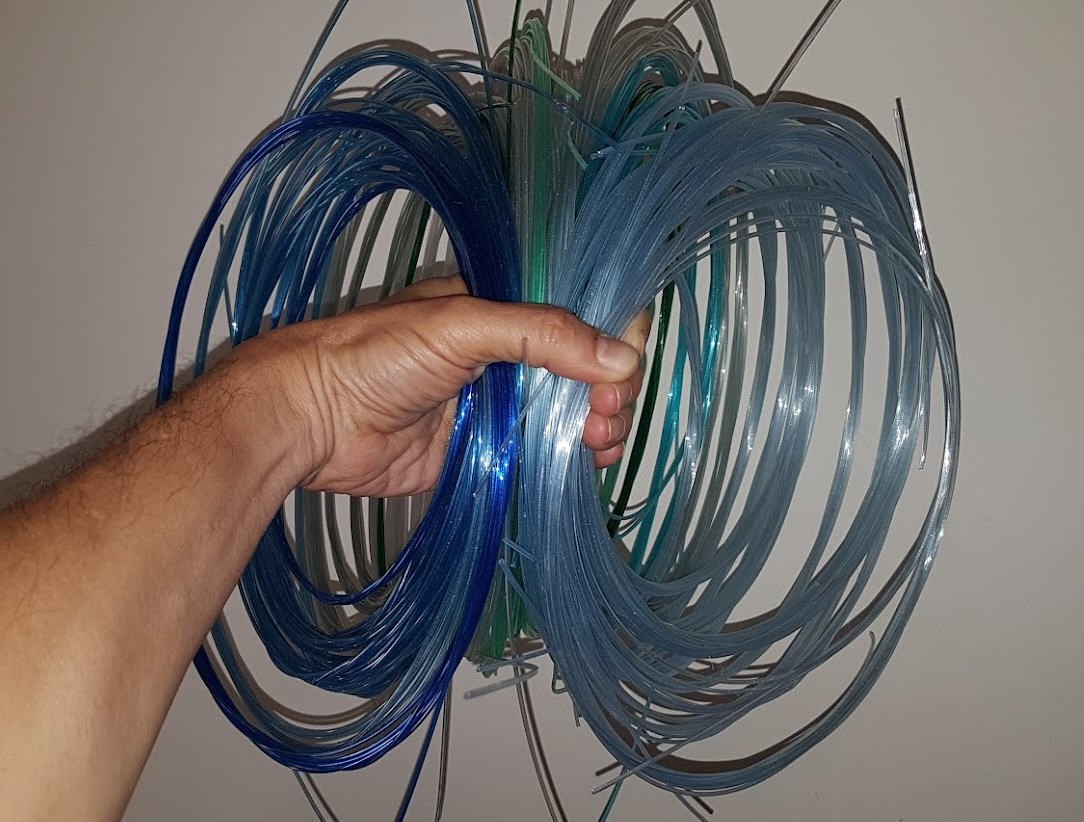
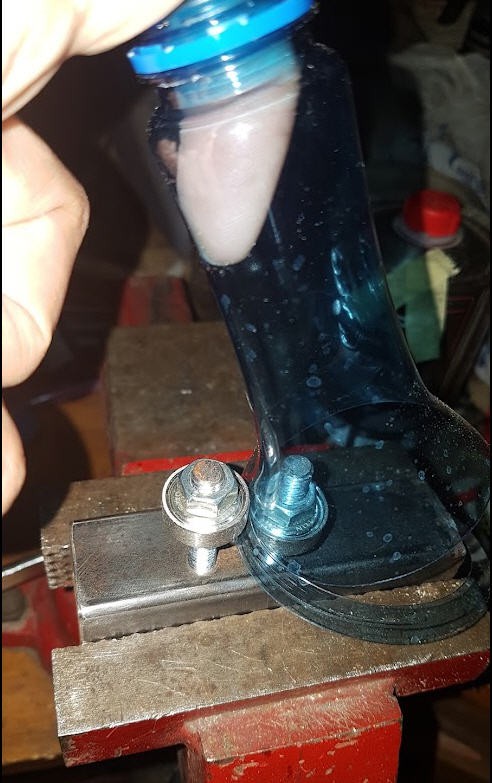
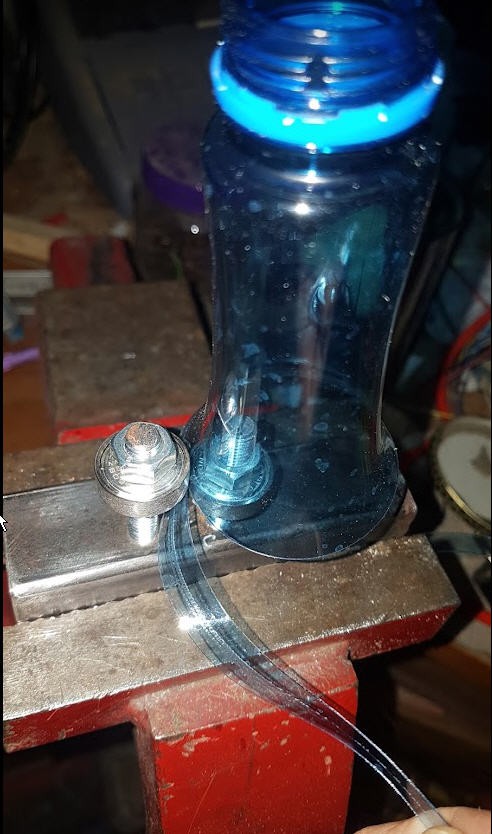
We will study the worst case : 1 small bottle producing only 5 to 6 m of filament. This is the blue one of my video !
To get these 5m we have a sequence divided into two steps
- pre heating the nozzle
- pullstruding the filament while the PID is regulating the temperature
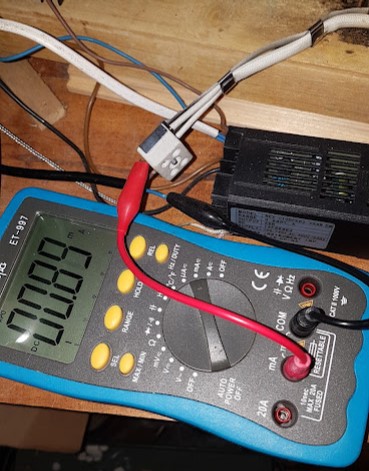
The heatband has a power of 200W (specified by the manufacturer) and this figure is consistant with the measurement done in situ. (230V * .89A = 204W)
![]()
The preheating phasis lasts 2 minutes and draws 2 * 200 /60 = 0.167 Wh of energy
The Pullstruding phasis lasts 10 minutes (for ~5 m ribbon) and draws :
- 5W during 10 minutes for the wiper motor (5V, 1A) = 5 * 10 /60 = 0.833 Wh of energy
- the PID regulates the temperature (1min 40s heating, 8min 20s Off). That is 200 W during 1 minute and 40s. 200 * 1.66/60 = 5.55 Wh of energy
Thus the final energy required to pullstrude one 5m bottle is : 0.167 + 0.833 + 5.55 = 6.553 Wh
Now 1kg of PETG filament has a lenght of 330 m it will require 330/5 = 66 bottles and will eat 66 times more energy to be produced than a single bottle.
So the total energy will be 66 * 6.553 = 433 Wh = 0.433 kWh
Knowing that 1kWh costs 0.18€ (here in France), we get our total cost of 0.433*0.18 = 0.078 €
In conclusion producing your own filament is really a cost saving solution
- 1kg of bottle recycled PET filament costs 0.08 €
- yes 8 cts €
- 250 to 300 times cheaper than buying it !
![]()
-
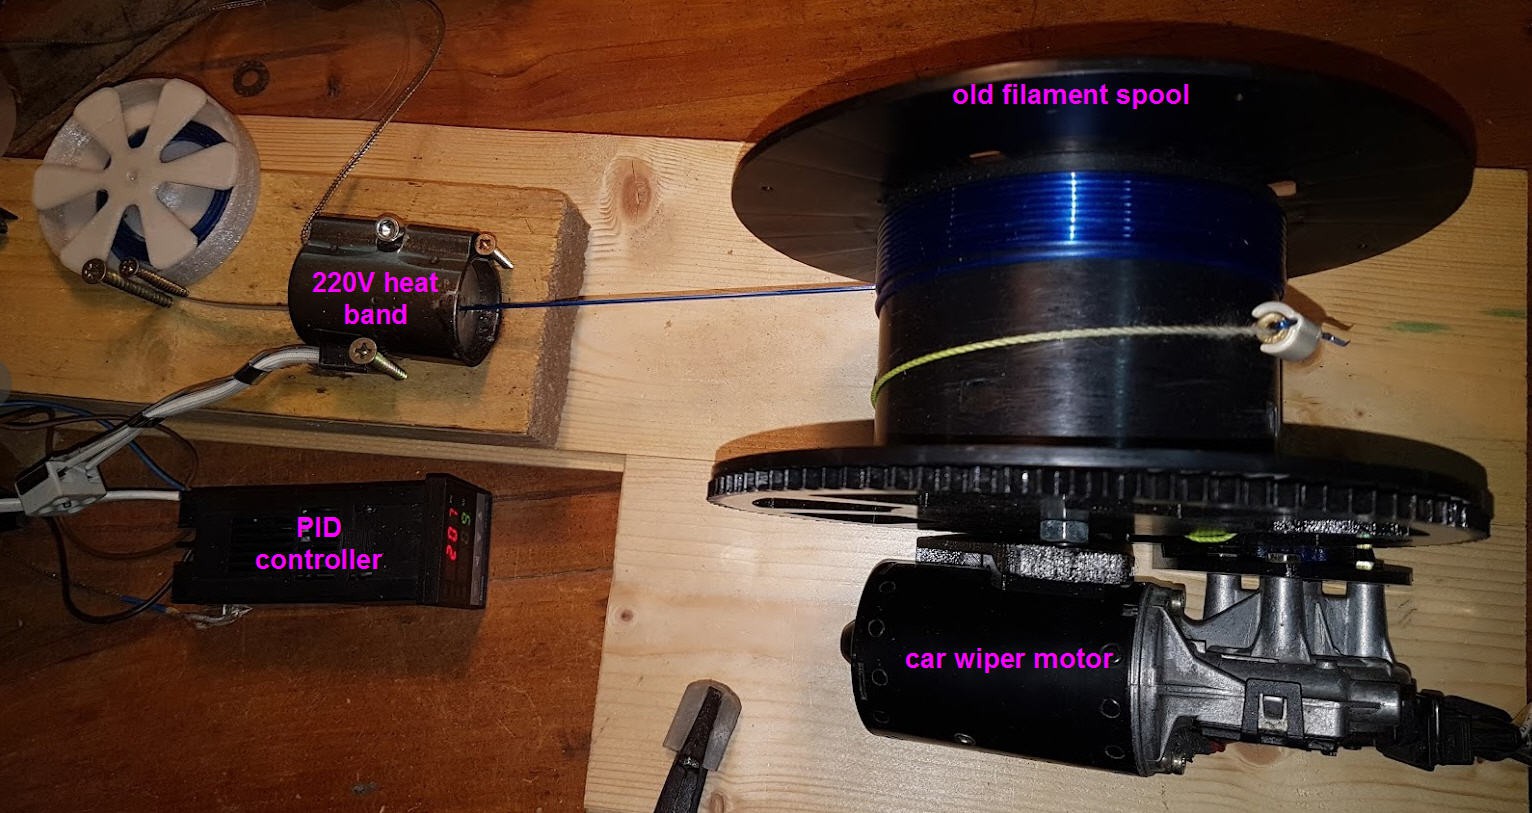
Building the PullStruder
05/02/2022 at 12:53 • 0 commentsNothing complex to build your PullStruder machine
![]()
you will have to find in your scrapyard
- a PC tower ATX power supply (note that any DC 5V power supply able to deliver 1A or more will work !)
![]()
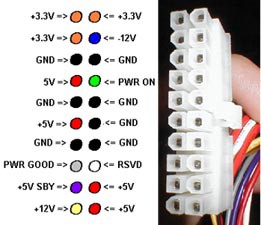
To use this power supply you will have to short the green cable (power On) on the big connector with any black one (gnd). This is explained several times on internet. Pick any link you want !
![]()
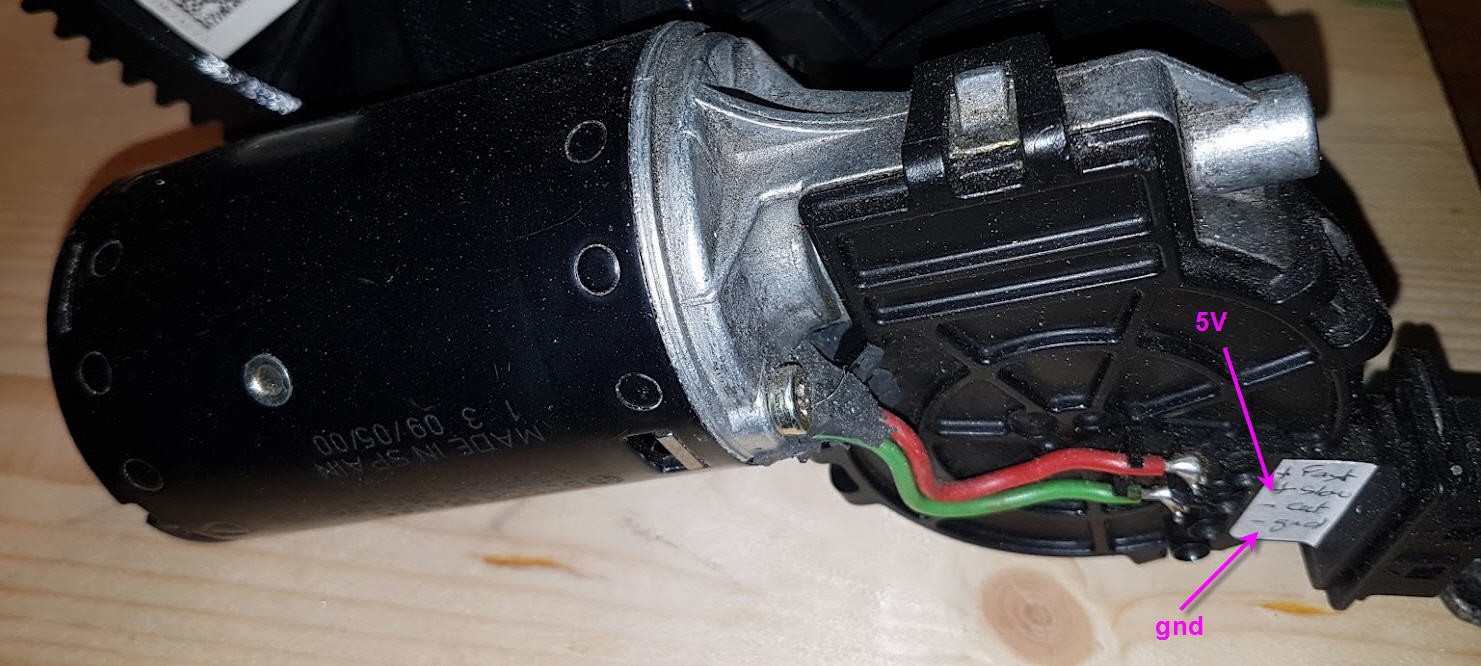
Then you can pick the ground on any black wire and the +5V on any red one !
![]()
- a wiper motor
I used an old car wiper motor. It has classically two speeds and should be powered at 12V.
Mine is a Bosch 954 065.
However to get a strong slow motion I power it at 5V on the slow speed
You will have to search a little how to get the right wires !
Here they are on my wiper motor. Finally if the motor is not rotating in the right direction, simply reverse the two wires !
![]()
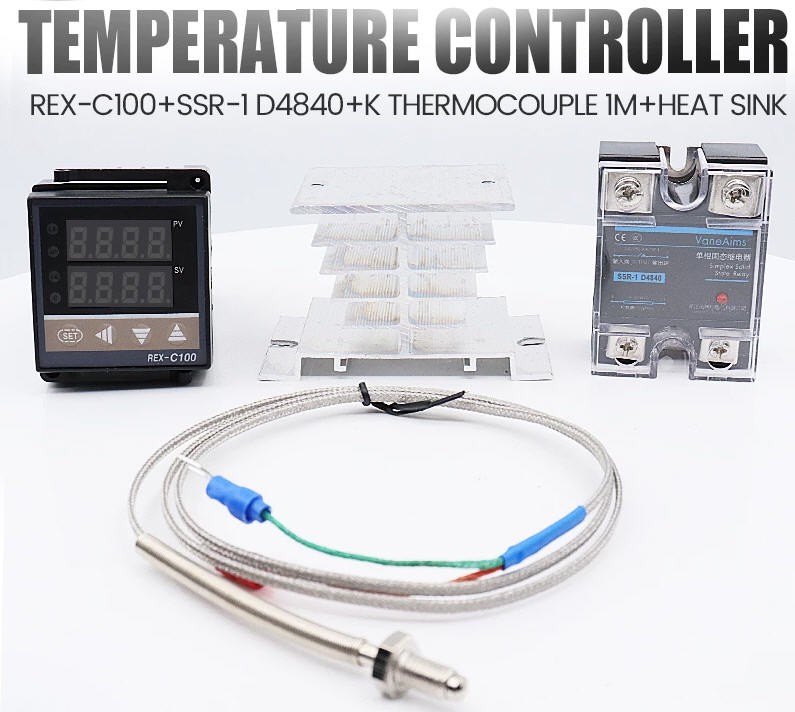
You will have to buy
- a full temperature controller :
![]()
- A heat band (one compliant with your MAINS value 220V or 110V)
![]()
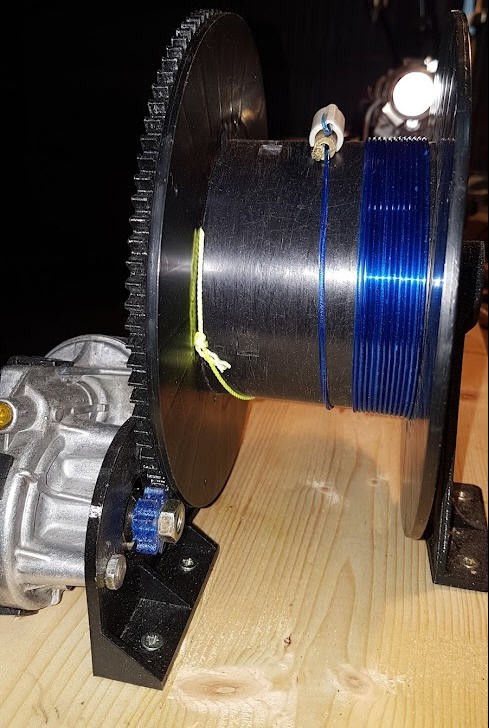
Then you should print all the parts
![]()
The old filament spool is going between the two spacers and is fixed with a 8mm rod + 2x8 mm nuts
The wiper is also fixed on its support on the left side.
All the 3d printed parts are fixed on a wooden base. Be sure to align evrything and cut the 8mm rod at the exact dimension of your filament spool (plus nuts + bearings + a little margin)!
You can find the parts on my thingiverse account.
![]()
If you print the parts in PLA (which I did), it will be Ok but after some time (weeks), the small gear (in blue on the picture) may break... Reprint it with PET plastic bottle which is much stronger than any other filament !
Finishing the hotEnd
There is still something missing in your PullStruder : the hotEnd
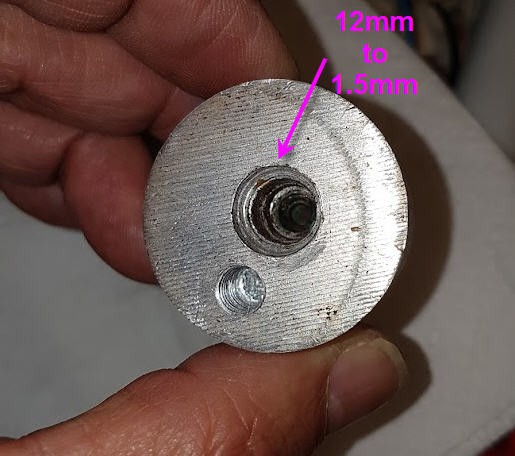
Go again in your scrapyard and look for any cylinder of metal that could fit into your heater.
Preferably use aluminium or copper for better heat conduction and ease of machining...
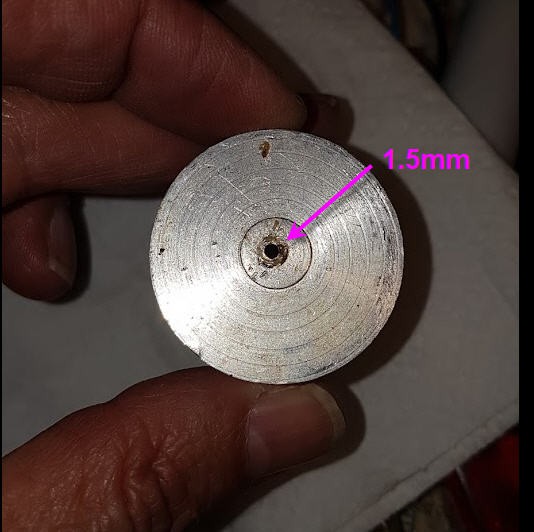
I found a 35mm diameter cylinder 35mm height.
Drill it in the center with several bits from 1.5mm to 12mm. It does not have to be very precise, but the smallest diameter must be 1.5mm and should span over 2mm long.
This will make a kind of steps into which the ribbon can enter and progressively shrink down to 1.5mm. It will then expand a little after the extrusion to reach the magic figure : 1.75mm (almost !)
![]()
![]()
A second hole is drilled on the input side to accomodate the thermocouple. you can thread it with a tap.
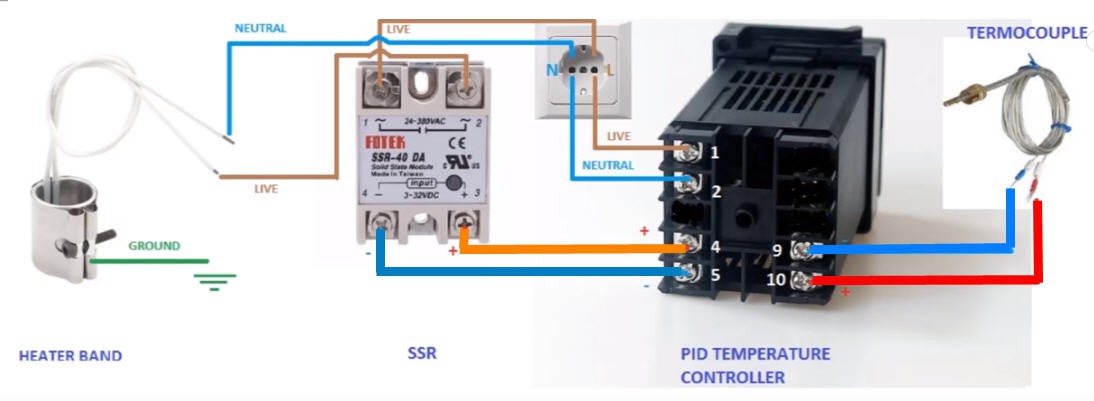
Wiring the temperature controller
Be careful when wiring the PID and the temperature controller. Mains voltage can be lethal, check and re check your wirings.
- You MUST connect the earth wire to protect yourself in case of any leakage of current into the heating element.
- You MUST protect the Mains terminal blocks so that you cannot touch them by mistake.
If you are not familiar with these dangers, please ask an electrician to help you. Don't risk your life ...
This being said (and understood) wiring the PID is not very complex. If you bought the recommended REX-C100 model then it is like this. If not, refer to the user guide !
![]()
Basically,
- the thermocouple goes into pins 9 and 10 (beware of the polarity). It is not a dangerous voltage.
- The plus and minus of the PID and the Solid State Relay go on pins 4 and 5 (beware of the polarity as a few PID have pins 4 and 5 swaped compared to this picture... ). It is not a dangerous voltage.
- the ground of the heat band will go to the ground of your installation (it is not dangerous !)
- neutral and live of the MAINS are wired as on the top left of the picture. You can swap Live and neutral. But NEVER touch directly these pins... MAINS is lethal...
Now
- put the other end of the thermocouple into the devoted hole of the aluminium block .
- Fix the aluminium block into the heat band.
- Put all this in a safe place and power the unit. The PID should display temperature, the heat band will heat very fast and will stabilize at the setpoint.
DO NOT TOUCH the heatband you can burn yourself badly... Even when the power is disconnected, temperature will decrease slowly... DO NOT TOUCH the heat band...
If you suceeded in doing all this, then your pullStruder is almost finished and you can test it !
-
Preparing the bottle
05/02/2022 at 10:36 • 0 commentsStart of course by cleaning the bottle.
- If it is a water bottle nothing to do.
- if is a soda one, then rince it to remove sugar.
Remove most of the stickers. The remaining glue will be suppressed after.
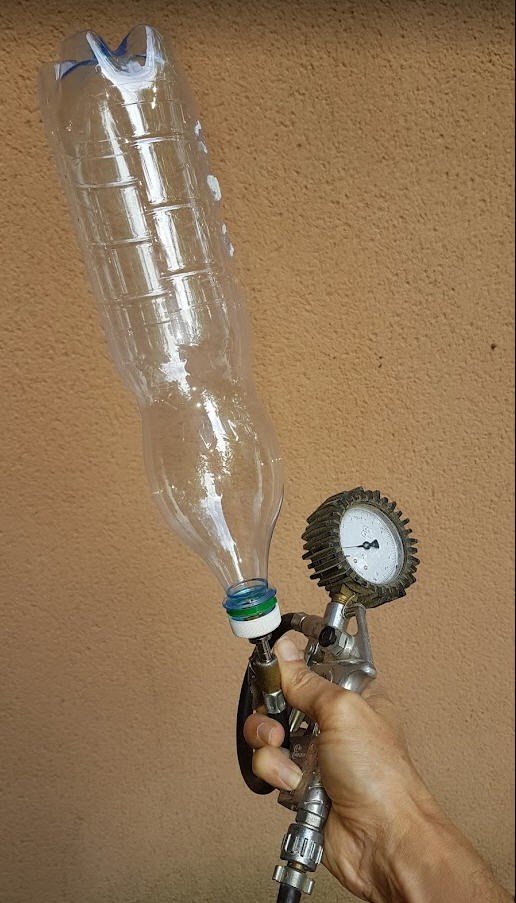
Although it can be considered as optionnal I do start by putting some pressure into the bottle. I have adapted a tyre valve to a bottle cap and use it to connect to a compressor. No need to put a lot of pressure !
![]()
Then you should use a hot gun to start to warm the bottle so that any "carving" will be progressively removed and you get an almost cylindrical bottle !
After what, the pressure still there, you can finish the cleaning stage. Pressure helps a lot, you can push on the bottle without deformation. Use solvant to remove strong glues or water and soap if enough.
Then insert a cutter blade at the very bottom of the bottle where you usually can see a "line". Once again pressure helps to enter the cutter !
Then with scissors simply cut le whole bottom, progressively shifting the cut to the right (if right handed) so that a primer of the ribbon is visible (will help to cut the ribbon !)
-
Using the bottle cutter
05/01/2022 at 19:15 • 0 commentsUsing the bottle cutter
Using the cutter is quite easy.
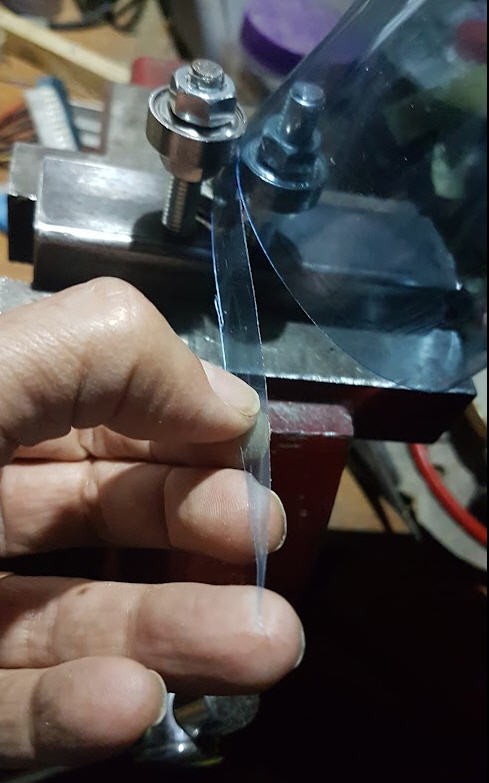
Put it into a vice with the "finger" in the back. Then insert the left side of the bottle into the finger and under the right roller bearings. You can start pulling, while keeping the bottle vertical and gently pressed into the notch.
![]()
After a few centimeters, the ribbon will become nice and consistent (no dent and good height). You can sharpen the tip, this will be used for starting the pullStruding !
![]()
Take your time, pull evenly, and go to the top of the bottle, while a finger in the bottle neck helps a lot to keep the bottle in place.
![]()
![]()
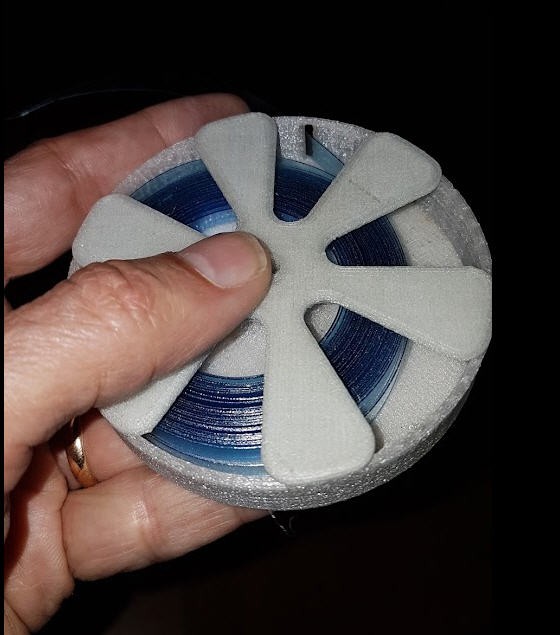
Now cut the end, and starting from this side, roll the ribbon in a nice flat disc shape and insert the tip (previously sharpened) into the spool holder (The top of the bottle is in the center of disc).
![]()
If properly done the ribbon will be very consistant and with a width of 8.5mm
![]()
You are ready to make the filament !
-
Building the Bottle cutter
05/01/2022 at 16:41 • 3 comments![]()
The bottle cutter was designed to propose a precise template to build it.
![]()
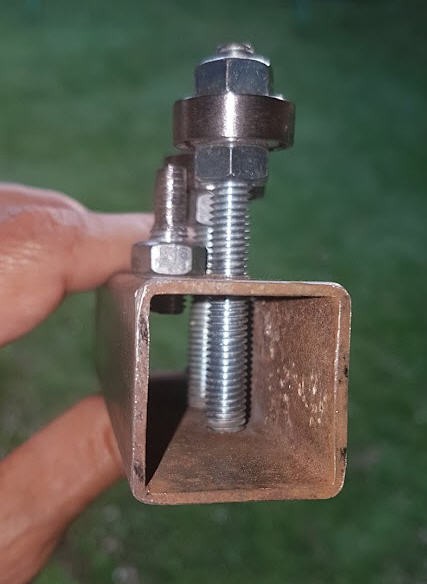
Building the cutter
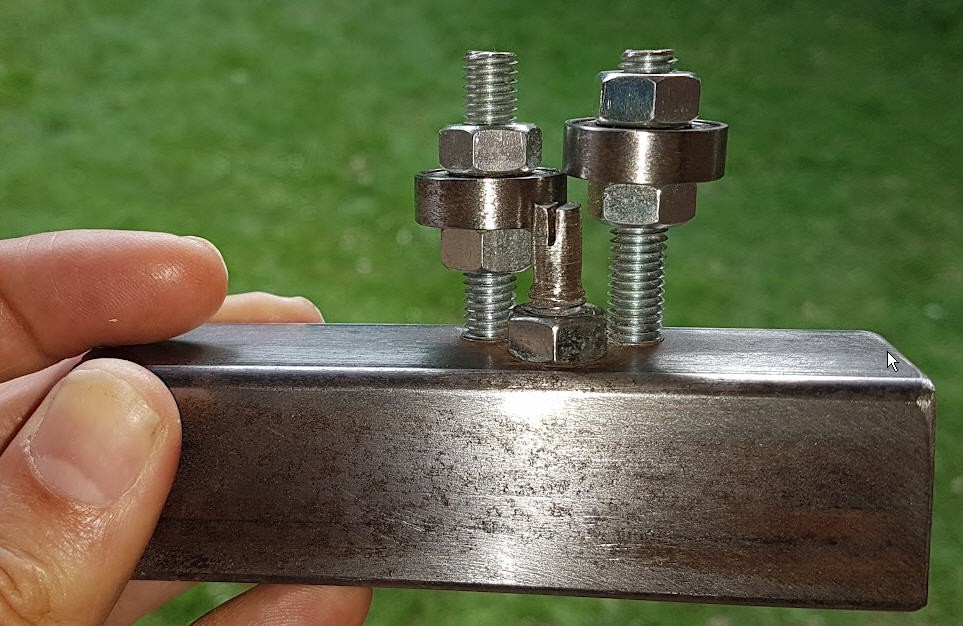
You will need
- a scrap 10cm long square pipe 3x3cm section
- 2 x 7 cm long 8mm diam threaded rod
- 1 x 3 cm long 8mm diam threaded rod
- 2 x 608Z roller bearings
- 5 x 8mm nuts
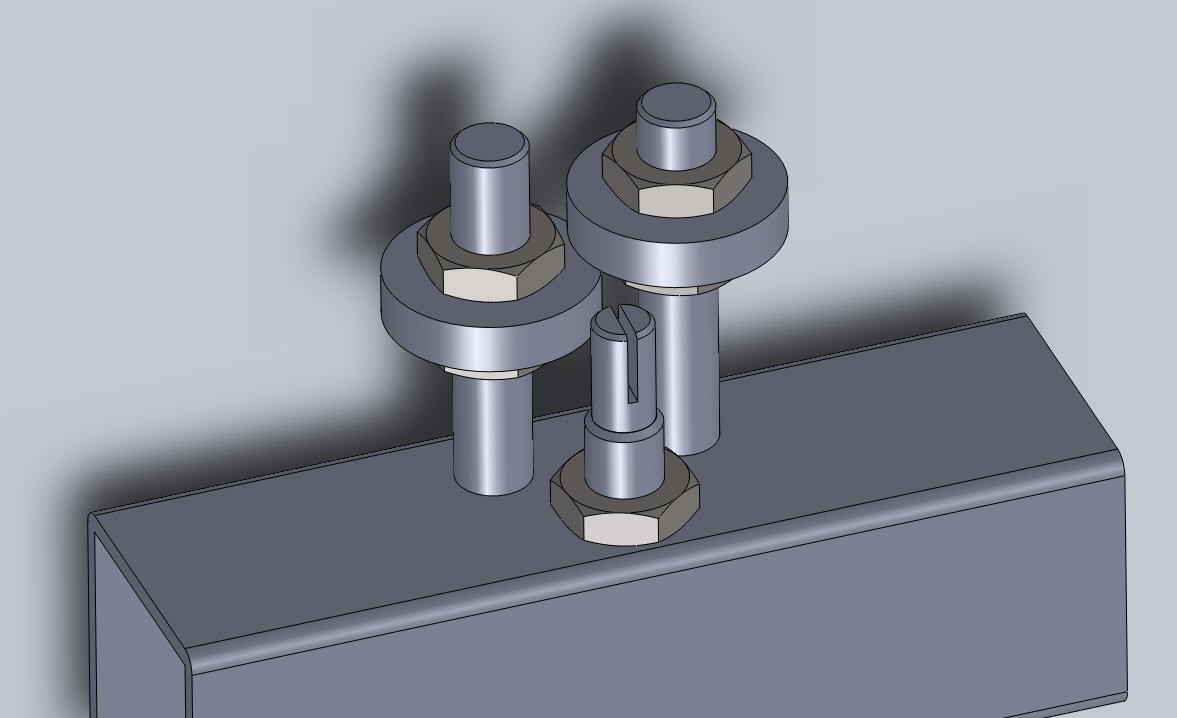
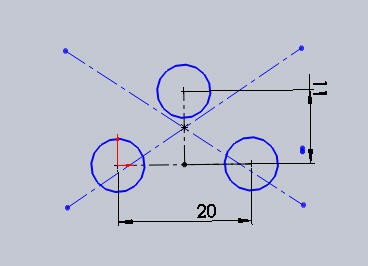
Drill the following holes into the pipe
![]()
![]()
Drill them so that you can tap them at 8mm on the top face only.
You can use the 3d printable gauge to help positionning the holes and keeping the drill perpendicular.
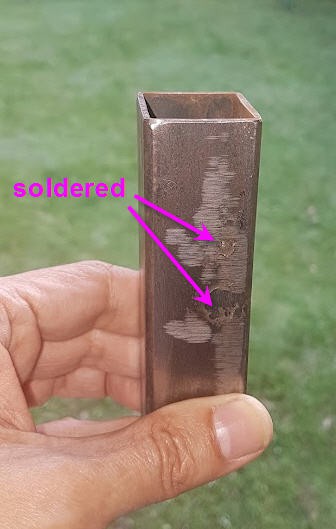
The long rods go down to the other side and can be soldered to fix them. If you prefer you can make them longer and use nuts to fix on the bottom side.
![]()
![]()
Then, with a metal saw, cut a 8mm notch into the small "finger"
![]()
If needed you file or grind the top part of the threads so that the finger will not touch the bottom roller bearing (the one on the left).
This "finger" is positionned at the correct height and then blocked by the nut.
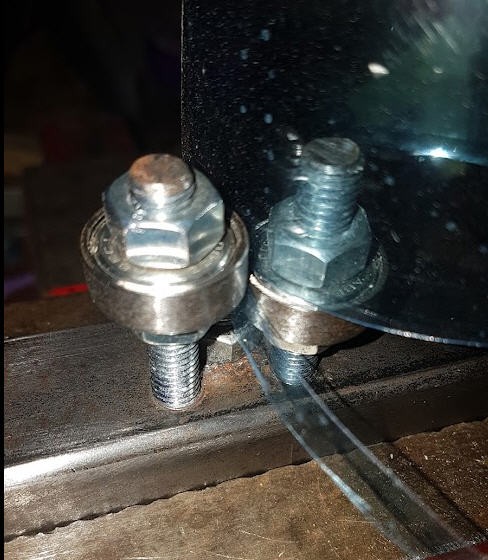
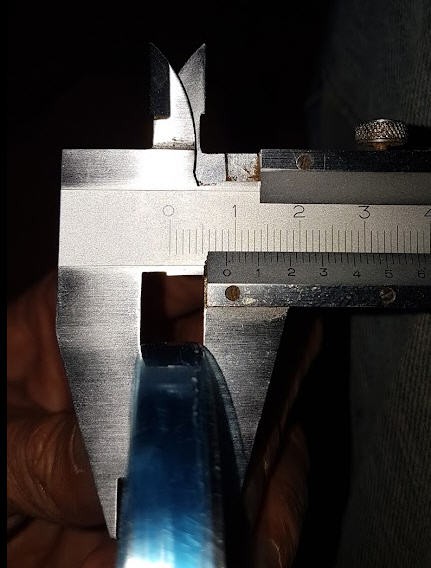
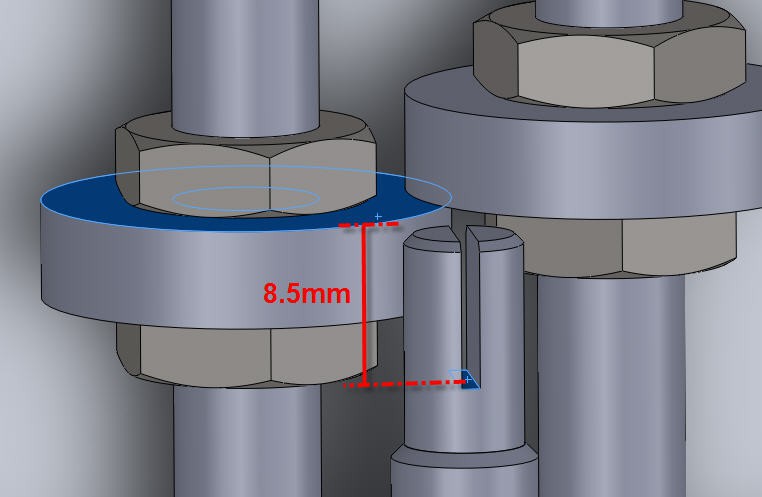
The rollers bearings will be first sharpened and then tuned so that :
- the bottom of the notch in the finger and the top of the lowest roller are at the exact wanted height of the ribbon. I do cut my ribbons at 8.5mm.
- the two bearings must turn when rotating only one of them (as if they where gears). You can achieve this when fixing the top bearing with the nuts.
![]()
Sharpening the roller bearings
PullStruder: from plastic bottle to PET filament
Ever wanted to use plastic bottle for 3d printing ? Here is how to !