Close
0%
0%

Rain Barrel Pump

Charge a battery via PV to safely run a pump or other load.

Similar projects worth following
Rain barrels are a great way to reduce water uptake, particularly in times of drought or where rain is infrequent. But, getting that water to where it is needed may require work, especially if the need is higher than the barrel.

This simple circuit combines a PV pulse charger with protection circuitry for the battery and a pump to efficiently get the water where it is needed. It uses widely available 12V/10W PV panels, 12V LFP or LA batteries, and dual 12V 800 LPH pumps. It can easily be scaled to support larger loads and/or add more advanced features like timed watering schedules.

Specifications (as pictured):

  • Power: 12V LA (Lead Acid) or LFP (Lithium Iron Phosphate) battery. Recommended minimum capacity 3.8Ah (dependent on pump/load & desired run-time).
  • PV panel: 10W, 12V or similar. MPP voltage ~ 17V. Open circuit voltage should not exceed 24V.
  • PV charger efficiency: 93%.
  • PV charger type: pulse.
  • Charging cut-off: 13.8V.
  • Pump / load: 12V DC (nominal), 3.4A max continuous.
  • Pump drive circuit efficiency: 94%.
  • Pump type: centrifugal, 800LPH max each.
  • Protections:
    • Battery Under Volt Lockout (10V).
    • Pump Over-Current Lockout (3.4A).
    • Battery fuse (5A).

The core of this project is the PV charger & pump control board. It is designed to be cheap (most of the cost is external: pumps, PV, plumbing, etc.), rugged, and easy to build. Also flexible: it is shown here powering a set of  [cheap] high-volume pumps widely available on eBay but can be used with any compatible load - an off-grid charger for electronics gear, a cooling fan, etc. The pump control circuit can also be scaled up to handle higher power levels, say, 100W.

Moving up the complexity scale, a microcontroller could supplant the pump control section to provide scheduling functions like watering garden beds, transferring water to a cistern, etc. Load current could also be intelligently monitored to stop running when the barrel runs dry.

You can find the KiCad v5 project here if you'd like to work with it. Note that if you opt to use an LFP battery I recommend NOT using one with a BMS (Battery Management System) since this circuit provides the basic protections.
rbp-220613.zip

KiCad 5.x project.

Zip Archive - 53.73 kB - 06/29/2022 at 17:03

Download

  • Updated Case & Plumbing

    Brian Cornell07/14/2022 at 18:29 0 comments

    Plumbing has been redone for improved efficiency and to easily connect standard garden hose. Also fabricated a poly-carbonate case (3/8" thickness) to protect from weather and provide a mount for the hose connections. See updated pictures.

    Also, one small modification to the control board: I had to add a 1M-ohm resistor across C101 to discharge more timely (~1s). I had relied on leakage currents in the FETs to take care of this but it took hours.

  • Theory of Operation

    Brian Cornell06/29/2022 at 17:46 0 comments

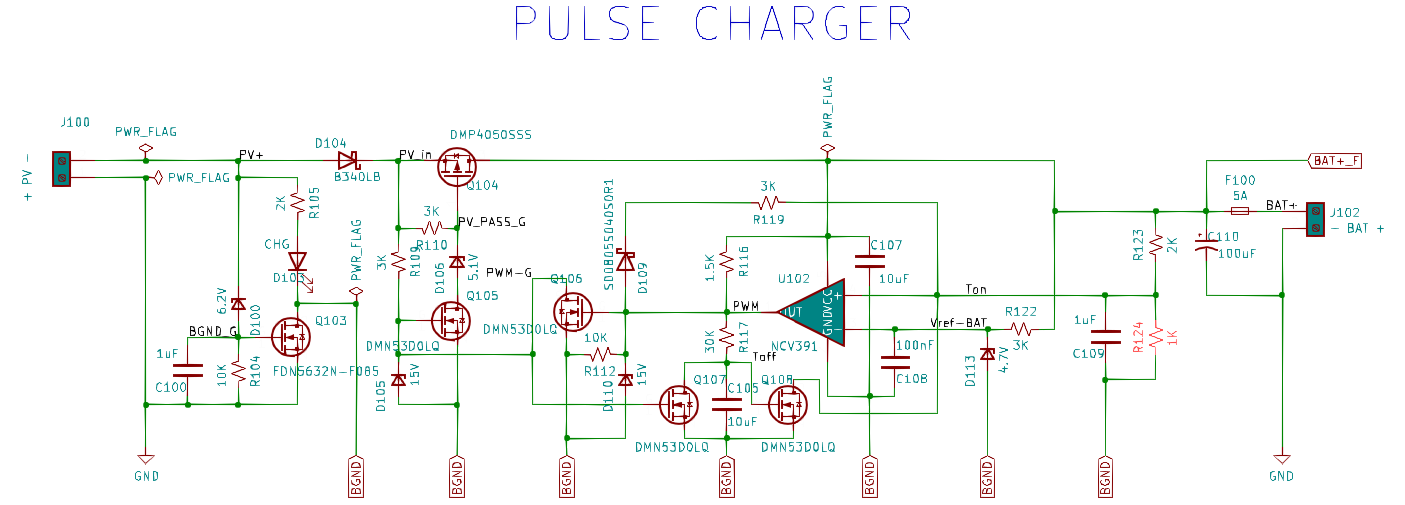
    The unit consists of two distinct and independent sections: a PV driven Pulse charger and Pump Control. They share a fused (F100) connection to a 12V LFP or LA battery. C110 provides bulk capacitance to protect the Pulse Charger when no battery is present and the PV panel is energized. Battery drain during dark or fault conditions (e.g. low battery voltage, pump over-current) is ~ 23uA.

    Pulse Charger
    The Pulse Charger is responsible for charging the battery. At battery voltages below the set threshold for a charged battery (13.6~13.8V), the PV panel is connected directly to the battery. When the battery reaches full charge the panel is disconnected until the battery voltage drops below the threshold. This process repeats at a varying frequency and duty cycle based on the battery's State Of Charge (SOC). Hence the name Pulse Charger. Maximum Power Point Tracking (MPPT) is not possible with this design.

    The pulse charger is engaged via the bias control circuit when the PV voltage sufficiently biases Q103. The threshold is set by the combination of D100 and R104, and C100/R104 form a low pass filter to reduce oscillation that may occur in marginal lighting or shading conditions. LED D103 indicates when the pulse charger is active.

    Q103 engages the pulse charger when biased by connecting the pulse charging control circuitry to ground. This is done to prevent the control circuit's bias current from discharging the battery at night or when stored. Similarly, D104 prevents battery discharge thru the bias control circuit.

    The core of the pulse charger is PFET pass transistor Q104. When voltage is first applied to its source, pull-up R110 keeps the transistor off. R109 charges the gate of Q105 which biases the gate of Q104 on. R109 also turns on Q107 which ensures that C107 is discharged and Q108 is off. Zener diodes D105 & D110 protect the gates of Q105/Q107 & Q106, respectively, from excessive voltage which could occur when no battery is present (or failed, fuse opened, etc.) and the PV panel is energized.

    Comparator U102 controls battery charging. Its charging threshold reference is set by zener D113, and R122/C108 form a low-pass filter to reduce noise. Voltage divider R123/R124 sense battery voltage with C109 providing noise decoupling. The time constant of this network also sets the on time (Ton) of the pulse charger.

    When the sense voltage on U102 exceeds the reference voltage its output goes high and turns Q106 on. Positive feedback via D109 & R119 keep U102's sense input high to prevent oscillation. With Q106 on, Q105 & Q107 turn off. Q104 turns off, disconnecting the PV panel from the battery. With Q107 off, C105 begins to charge via R117. Their time constant sets the pulse charger off time (Toff). Q108 turns on when its gate threshold voltage is reached and pulls U102's sense input low, thereby resetting the Ton time by discharging C109.

    U102's output goes low, discharging C105 and turning Q104 on again, and the process repeats. The Ton & Toff time will vary with the battery voltage but Ton much more. Practically speaking (but not entirely accurate), Toff is relatively constant and could be thought of to set the PWM frequency and Ton the duty cycle.

    Pump Control
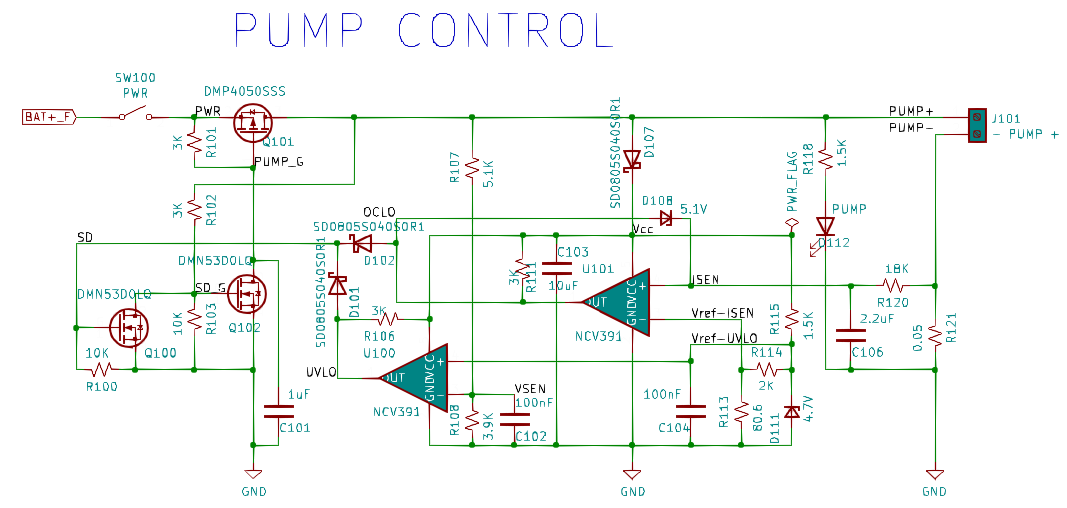
    The Pump Control circuit provides Under Volt Lockout (UVLO) and Over Current Lockout (OCLO) protection for the battery. When either feature engages the control circuitry is locked out (unbiased) and must be reset by turning SW100 off. The UVLO threshold is ~ 10V and OCLO ~ 3.4A.

    The circuit is energized when SW100 is turned on by the user. Pass transistor Q101 immediately turns on due to the initially low impedance of C101. The time constant of R101 & C101 provides the delay necessary for the control circuit to begin normal operation. Q102 turns on and pulls the gate of Q101 down hard. This positive feedback loop maintains power to the control circuit and pump. LED D112 illuminates to indicate that the circuit is operating normally.

    The control circuit receives...

    Read more »

View all 2 project logs

Enjoy this project?

Share

Discussions

Steven Orvis wrote 08/05/2022 at 11:23 point

Hello, I started looking into having jlcpcb.com create a circuit board but a few parts they didn't have in their library. Do you have any suggestions as to a place to get the board made that you utilized that has the parts in their library? For reference these are the parts that weren't being found.

D106,D108
D100
F100
D112
D101,D102
D111,D113
U100,U101,

  Are you sure? yes | no

Brian Cornell wrote 08/05/2022 at 16:12 point

Hi Steven, unfortunately I don't have experience with the Fabs doing assembly. You might try PCBWay (pcbway.com) - I've used them for high power/complex PCBs and their quality is excellent.

I had OSHPARK (https://oshpark.com/) make this board and did the assembly (hand-solder) myself. I purchase most of my parts from DigiKey (https://www.digikey.com/) or Mouser (https://www.mouser.com/), and used DigiKey for all the components in this design. This said, the semiconductor shortage is far from over & it wouldn't surprise me if you can't get everything. The good news is that the design is pretty lose on tolerances so substitutions shouldn't be a problem as long as you stick with the values in the schematic. 5% tolerance on Zeners is fine and you could go with 2% on D111 & D113 if you want to be more precise. The fuse is Eaton #CB61F5A-TR2 fast acting (over-kill for the design - I had them laying around), but again, you can substitute with another meeting similar spec. You will want to be more precise with substitutions on the NCV391 Comparator. Get the data sheet for this and make sure you match at least the following: supply voltage range (at least to +30V), differential input voltage, common mode input voltage range, maximum output low voltage, output sink current, open collector output, and in->out propagation delays.

Good luck!

  Are you sure? yes | no

Similar Projects

Does this project spark your interest?

Become a member to follow this project and never miss any updates