Mark J Hughes
-
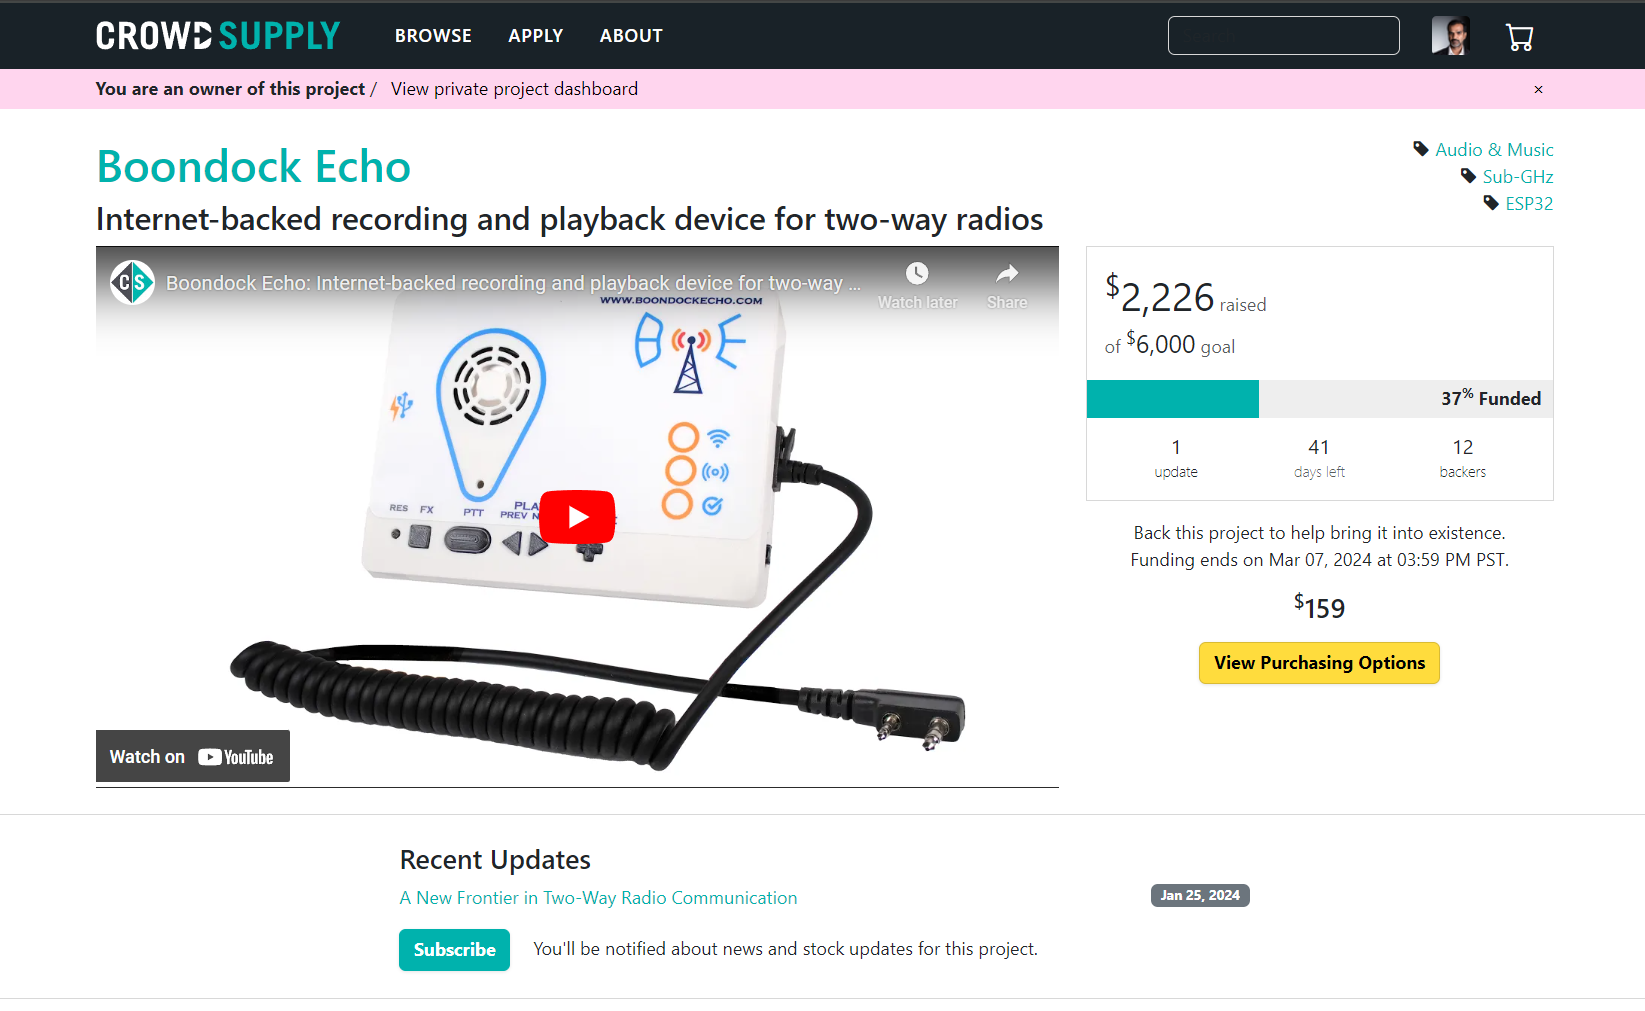
Boondock Echo is available
01/26/2024 at 13:45 • 0 commentsHi All,
We are thankful for support, encouragement, and advice.
Today, we went live with Boondock Campaign. Please check it out if you want your own Boondock Echo, and want to support the Project.
https://www.crowdsupply.com/boondock-technologies/boondock-echo -
Almost time to go-live!
10/26/2023 at 17:16 • 0 commentsHello all and thank you again for your continued support. We had far more people offer to help beta-test than we have units available to beta-test. Which is a good problem to have, and a bad problem to have.
But there's good news! A Crowdsupply campaign is in the works! You can sign up now! https://www.crowdsupply.com/boondock-technologies/boondock-echo
You can also visit www.boondockecho.com/#contact to leave us your contact information and we'll notify you when the product is available for pre-order!
-
We're in Pre-Beta
05/22/2023 at 22:26 • 0 commentsHello everyone, apologies for a long time between updates. We've been busy working, and have neglected to communicate here at Hackaday.io. We've been hard at work since winning the $10,000 from Hackaday/Supplyframe. Here's where we're at:
The Boondock Echo team has five members: three full-time programmers, hardware engineers, and one adviser.
We designed and built a prototype board -- it failed spectacularly due to bad parts acquired during the silicon shortage. So we reverted to the dev-board we used during the Hackaday contest. We've added a "side-kick" board that allows us to attenuate the signal and potentially interface with other radios.
The MVP (minimum viable product) features work -- you can hook up a boondock echo to a baofeng radio tuned to a particular frequency and capture all traffic. No internet is required. You can also (via the UART interface) transmit audio at prescribed intervals, start and stop recordings, set up the wifi, control the sensitivity, file length, etc. In an emergency, you can put one or more Boondock Echos on frequencies of interest and capture all the traffic. If there are two or more transmissions at once, you listen to one transmission, and play the missed one back a few moments later when it's convenient. Or, if you are away from your radio for a time and want to find out if you missed any important contacts, you can play back any traffic you missed while you were away.
But the Boondock Echo really shines when you give it access to the internet. There you can de-noise, transcribe, translate, and transmit messages to one or many boondock echos at once. For around $50 (final price tbd) for a radio and a Boondock Echo, you can deploy a miniature repeater network across your city or around the world.
We'll make some videos in the upcoming weeks/months to demonstrate functionality and post them here. But in the meantime, here's our path forward.
We're currently in the middle of a "pre-beta" test. We've given two Boondock Echos to expert Amateur Radio operators we know to be fault-tolerant. They've got them for one more week before we debrief them about their experiences. Then we'll take their feedback, improve the software and hardware experiences, and deploy to another 18-20 people. After that, we'll do 100. Our plan is to scale slowly and learn as we go.If you'd like to participate, please leave your contact information in the form below!
-
Preparing a Prototype
12/17/2022 at 03:11 • 0 commentsWe've added hardware designers and two software developers. Would you like to be part of the initial testing? Participants will receive a prototype board but will have to supply their own radios and internet access. (Baofengs are available on Amazon for <$25). Participants should also have an active amateur radio license.
Sign up here! https://forms.gle/QPXUH5DNkQaPSe5J6
-
Boondock Echo Audio capture Test
10/23/2022 at 12:33 • 0 commentsIn this video sample, Boondock Echo is listening tand captures the audio.
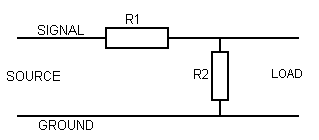
Boondock is connected to the Radio with a custom-made cable. Audio out on the Radio is much higher voltage than the mic in, so we use resister divider-based audio attenuation.
![]()
In the first example, Baofeng Radio is tuned and listens to NOOA Weather radio. Weather radio transmits audio continuously.
In the second example, we are using second radio to transmit. The Radio has a Dummy load attached as an antenna so as not to transmit to nearby stations.
-
What is the Future of Boondock Echo
10/22/2022 at 20:05 • 0 commentsBoondock Market
Boondock Echo started as a project to support emergency communications such as the La Habra Heights "Fire Watch". However, that is a myopic use for such a versatile device. The more we use the Boondock Echos, the more ideas we have for new use cases.
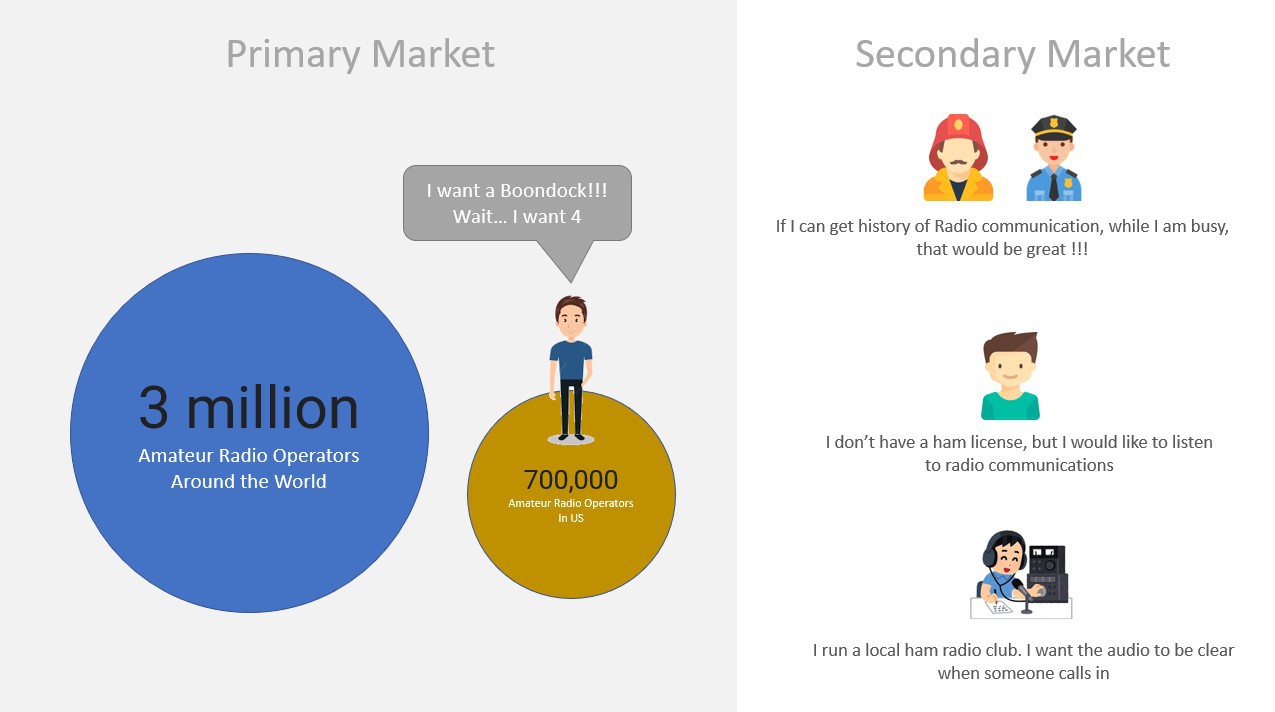
We now believe there is a large global market for Boondock devices.
Over the past 30 years, society has grown accustomed to text chat, voicemail, and other services that provide asynchronous support for synchronous communication. There is every reason to believe that commercial and individual radio customers would like that same support.
Anyone who uses a radio will want a Boondock Echo.
![]()
Advanced Features
Once the recorded audio is uploaded to a server, "the cloud" provides advanced processing capabilities. Cutting-edge AI technologies can automatically denoise, transcribe, translate, and retransmit audio. Storing data in the cloud will allow anyone to track the history of transmissions, and time-shift the conversations.
With Boondock Echo, Speech-to-Text, a Translation Service, and Text-to-Speech, an English-speaking person in California with a 1-watt handi-talkie can talk to a French-speaking person in Paris.
Business Model
Boondock Echo Interfaces are one-time long-term investments. While we expect that most users will want more than one Boondoch Echo interface, we expect the lifespan of each interface to measure between 5-10 years (longer if possible.) Wherever possible, parts will be interchangeable or user serviceable. This is an attempt to reduce waste. It is unlikely that it would ever be possible to find a path to profitability with a product-based model with a ten-year life cycle. So we won't even try -- Boondock Echos interfaces will be sold just a bit above cost.
The main revenue stream will be the "Software-as-a-Service" (SaaS) model. Users who purchase a Boondock Echo device or who make their own can run their own server, or they can pay a modest fee per device per month to send their messages to our server for processing. There, users will enjoy all the advanced features mentioned above and new features as we implement them. While the code base will be open-source, we believe that most users would rather not spin up their own servers, and would rather be part of a larger supported community than go it alone.
In short, by centralizing the Boondock Servers and offering the service at a modest profit, we will be able to take advantage of economies of scale that make it more economical for users to subscribe to our server than to run their own, especially when personnel costs are taken into consideration.
Planned Features
- Drastically reduce the size of the Boondock Echo interface
- Battery Backup for stationary interfaces
- Fully encapsulated inline interface for harsh environments (fire, police, construction, military)
- Simplify the Boondock Echo setup
- Link to a phone using Bluetooth
- Fully offline Boondock Server
- Ability to change Radio frequency remotely
- Analyzing the importance and sentiment of audio
- Relay DTMF codes
- Implement KISS protocol
- Add APRS and digital modes
Manufacturing Boondock Echo
We have already seen several issues with off-the-shelf hardware. The ESP32 Audio kit is excellent, but there is much room for improvement. We would like to make a custom PCB with the right analog and digital components to suit the needs of a Ham Radio.
Here are the things we want to do
- Design a custom PCB
- Pick from available components
- Design enclosure for injection molding
- Design custom cables for radio
- Sample PCB testing
- PCB mass manufacture with paneling
- Mass-manufactured PCB testing ( Bed of nails )
- PCB components pick and place
- Drastically reduce the size of the Boondock Echo interface
-
Boondock Echo server setup
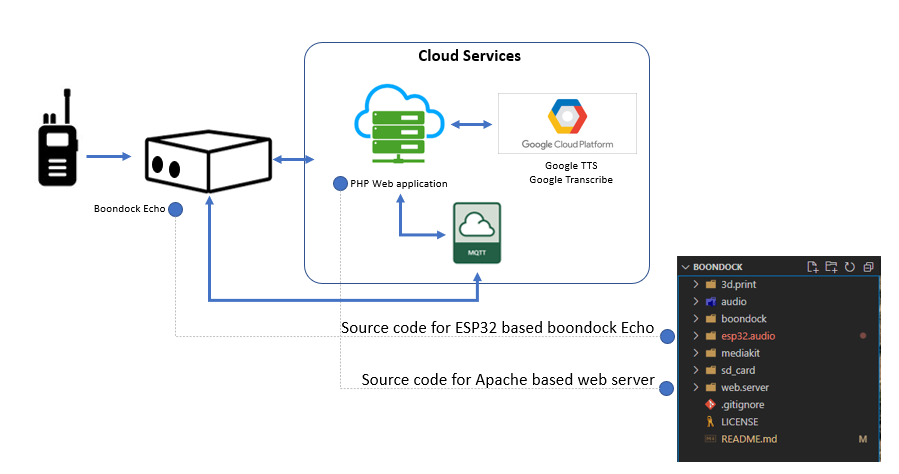
10/21/2022 at 23:11 • 0 commentsBoondock has two core components. One is the Boondock Echo device with custom-built firmware, and the second is the webserver. Boondock echo records the audio files and sends them to the cloud. And a web-based interface can be used to listen to audio files and transmit the audio using a radio connected to Boondock Echo. When you want to play an audio file, the server sends an MQTT message to Boondock Echo with a link to the audio file on the cloud.
![]()
To set up Boondock web server, you will need:
- Web server (Linux server is preferred)
- Apache Web server
- MySQL database
- MQTT Broker
- Google Cloud services account
After downloading the code from the Github link, you will find the source code to set up the web server. Boondock server can be hosted on windows or a Linux-based web server. You can find cloud service providers like AWS, Google, or Azure. in this example, we are hosting on Amazon Lightsail, which is a part of AWS. You will find a link to a video, showing the setup process in detail. here is the summary of steps to perform.
1. Setup Linux-based Web Server
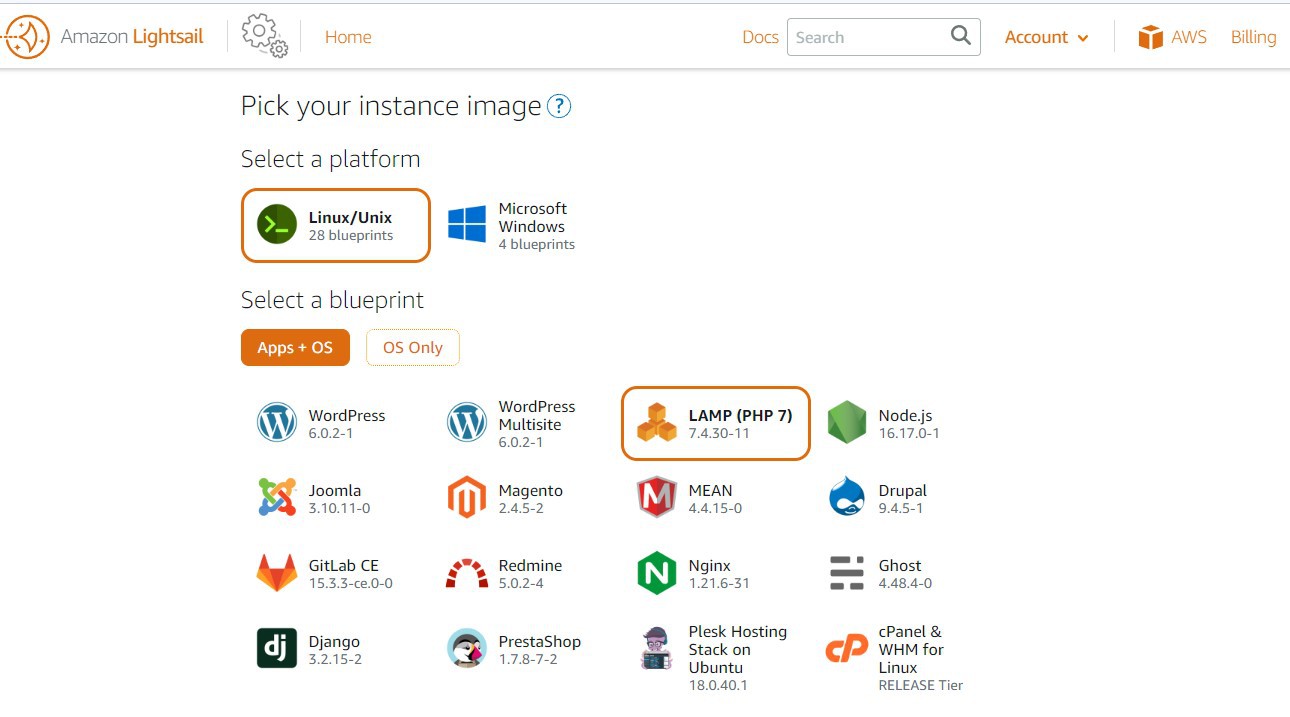
In this example, we are using Amazon services for hosting the server. Amazon lightsail provides pre-configured images with Apache & PHP. Pick a suitable image.
![]()
Pick LAMP ( PHP 7 ) Image. it comes with PHP & Apache server fully installed. Follow the steps and complete the server setup.
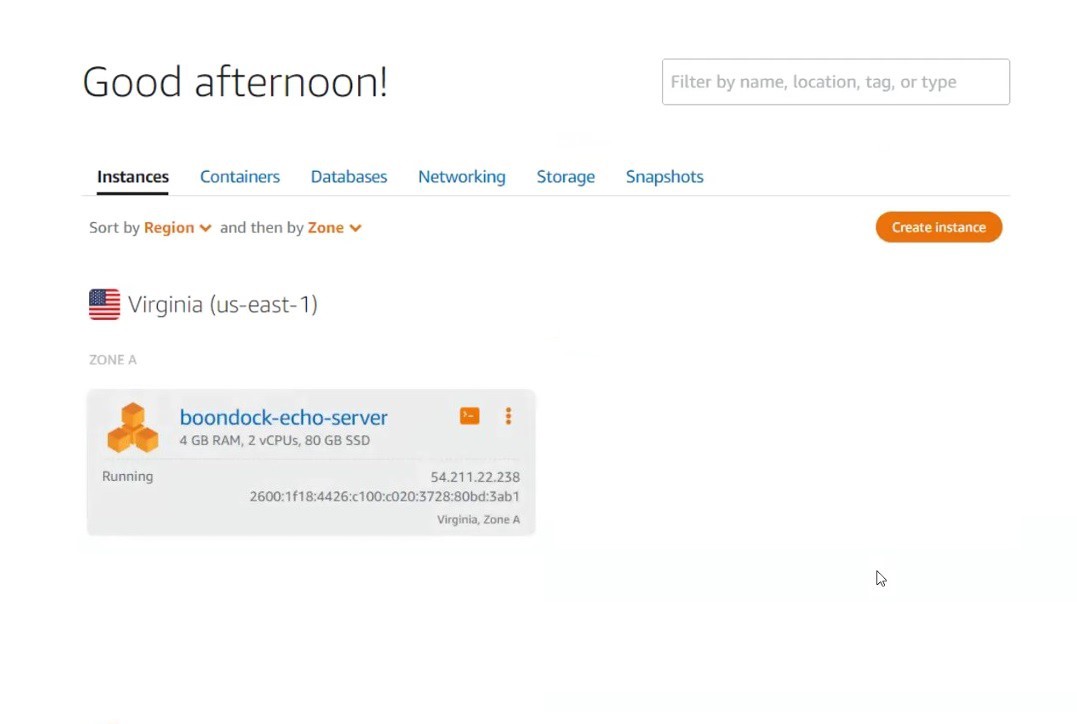
It takes about five minutes to complete.
![]()
Once complete, you will see your newly minted server. Notice the public IP 54.211.22.238. You will use this IP to access the server.
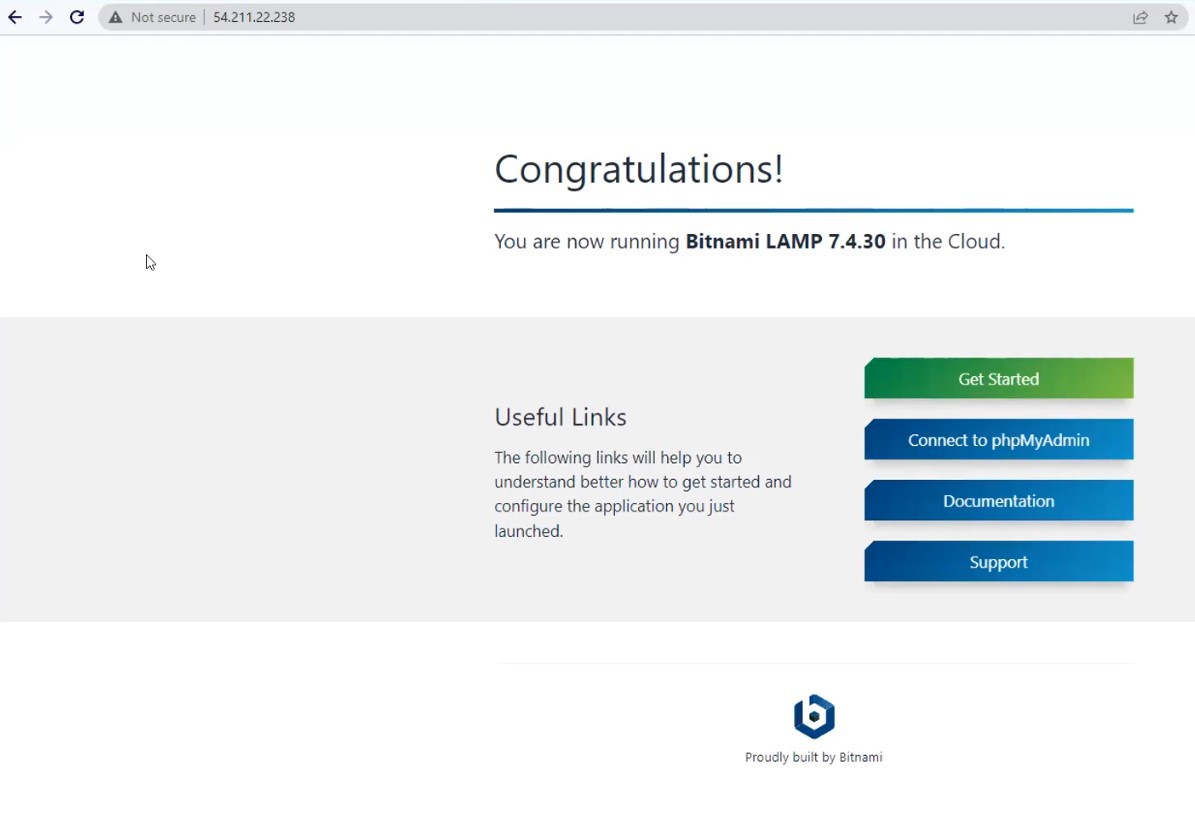
![]()
With all setup, you can open the IP address on the browser, and you will see the success page. This means that your server setup is complete.
You can read this Amazon tutorial for more details on setting up servers.
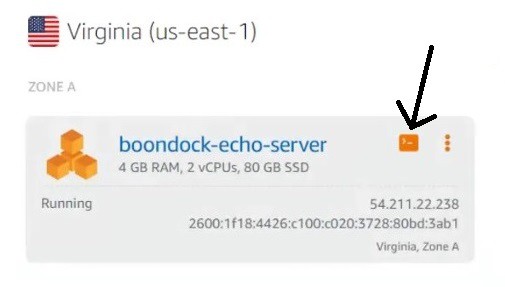
2. Install MQTT Broker
Installing an MQTT broker is simple. Go to your Lightsail server page, and access the server command line. Lightsail gives a convenient browser-based SSH. Click on the terminal icon to launch the web-based command line interface.
![]()
In the terminal, run the following commands to install MQTT Broker.
sudo apt-get update
sudo apt-get install mosquitto
sudo apt-get install mosquitto-clients
After you install MQTT Server, you need to set up authentication. here is a fantastic tutorial on setting up Mosquitto authentication. Make sure you write down the MQTT username and password. You will need that when programming your Boondock Echo.
Follow the Link to set up your Boondock Echo
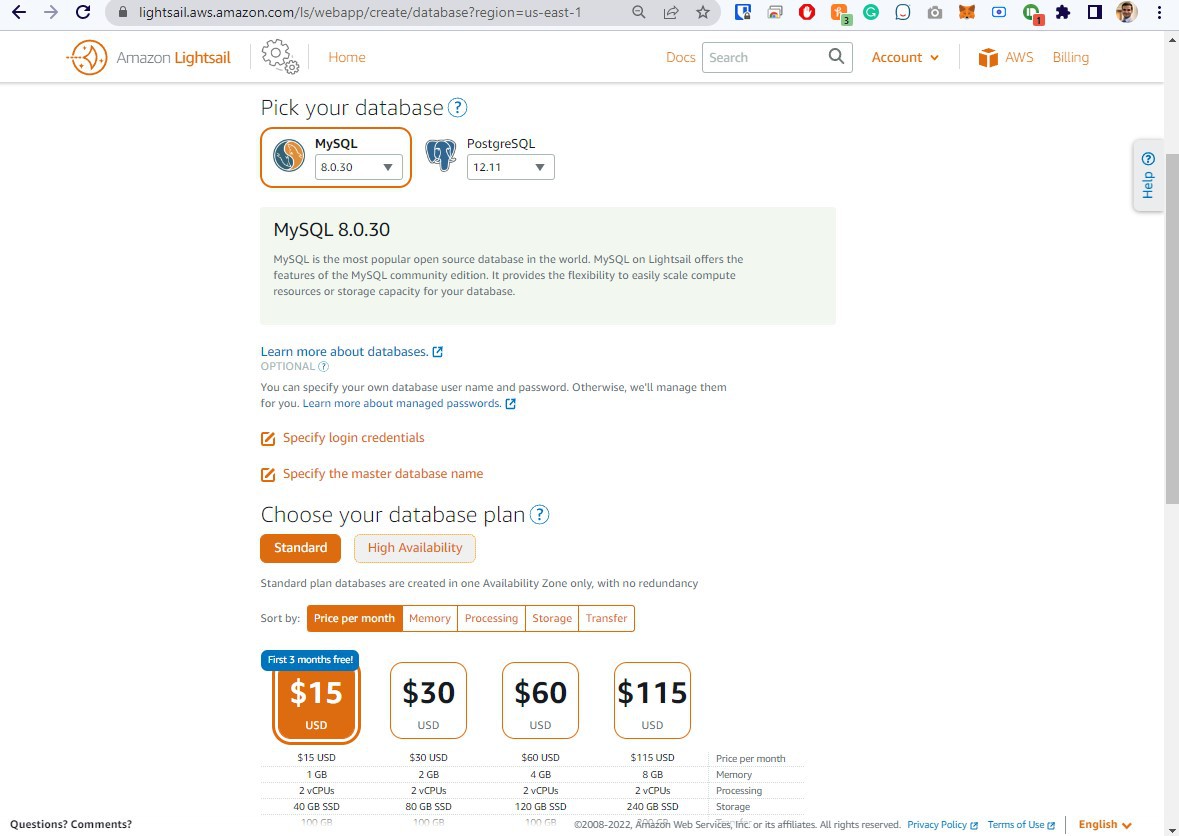
3. Install MySQL Server
Amazon Lightsail also provides database as a service. in this example we are using Amazon lightsail database. However, you can easily use a locally hosted MySQL server.
Open your lightsail account, and select Databases. Click on Create database button.
![]()
Pick MySQL database type, and pick your monthly plan. I recommend the base plan if you are expecting only a few users. Follow the instructions and create the database.
![]()
it takes up to 20 minutes for this step to complete.
4. Create tables on MySQL Server
Lightsail gives you easy access to the database hostname, username, and password. Copy and save the credentials.
![]()
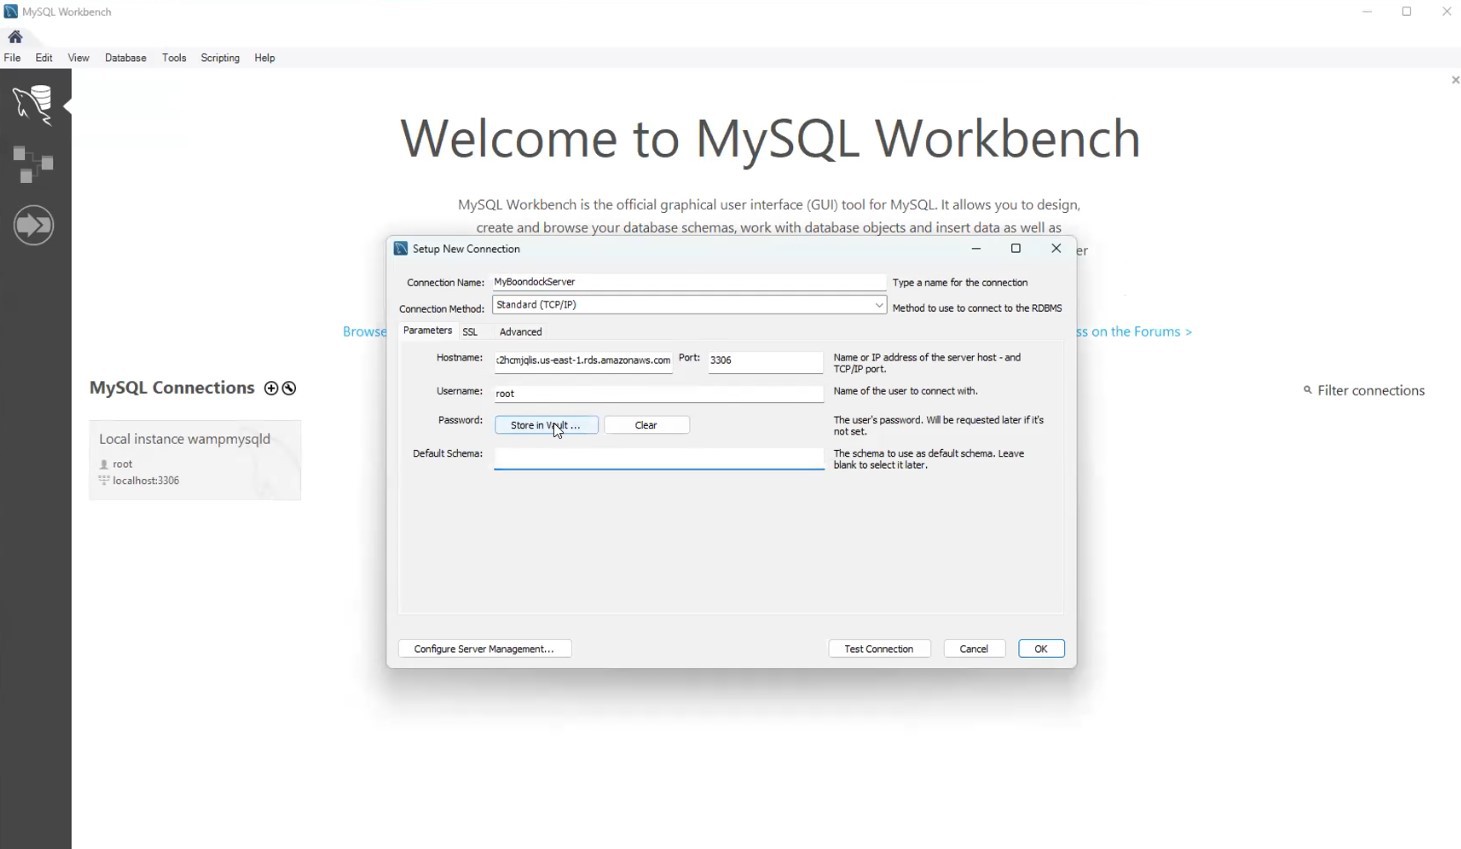
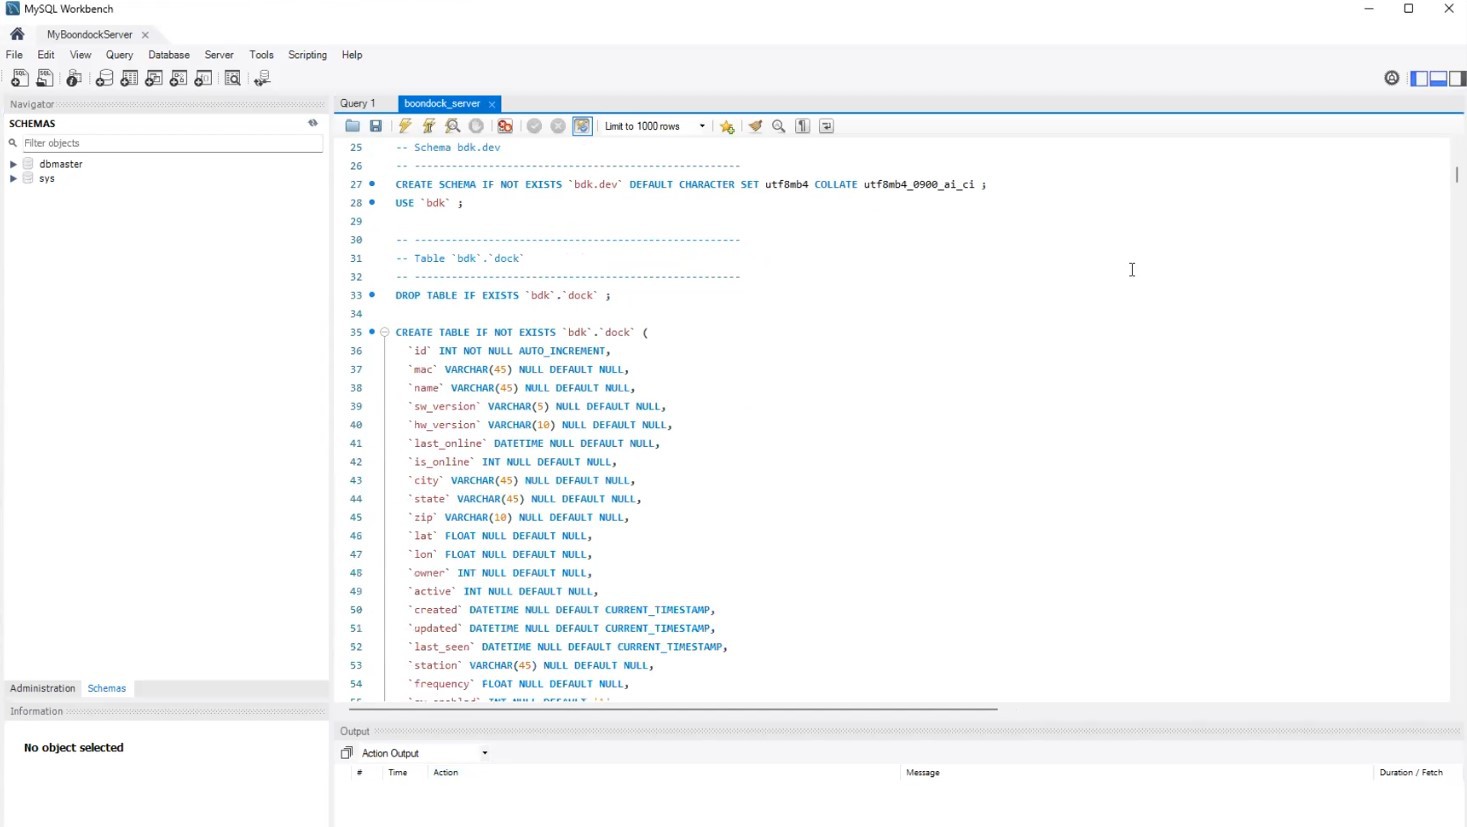
I like using MySQL Workbench to create the tables. Connect to your MySQL database, and create the table using the database script provided in the source code.
![]()
![]()
Once loaded, your will have a database named bdk with the necessary tables, stored procedures, and functions.
![]()
5. Update the PHP configurations
Boondock server code needs the right configurations to access the MySQL Server and the MQTT Server. Modify the _config.php file before uploading the files to the Apache web server.
<?php

# This is the Server configuration file
# If you host your database and MQTT on same server, use localhost, or replace with the server

$mqtt_server   = 'localhost'; # Localhost or IP Addrss of MQTT Server
$mqtt_port     = 1883; # MQTT Port
$mqtt_clientId = rand(5, 15);
$mqtt_username = 'boondock'; # MQTT username you created
$mqtt_password = 'boon!dock'; # MQTT password you used
$mqtt_clean_session = false;

$uploadFolder = "uploads/";

session_start();

$db_host = "localhost"; # MySQL Database hostname
$db_user = "boondock";  # MySQL useranme
$db_password = "boon!dock"; # MySQL Password
$dbname = "bdk"; /* Database name */

$pdo = new PDO("mysql:host=$db_host;dbname=$dbname", $db_user, $db_password);


$con = mysqli_connect($db_host, $db_user, $db_password,$dbname);
// Check connection
if (!$con) {
 die("Connection failed: " . mysqli_connect_error());
}
6. Upload the code to the server
Using your favorite sftp tool, transfer the file to the root of your web server. Here is a link to tutorial on using file transfer tools with lightsail servers
![]()
Once the pages are uploaded, you will be able to access Boondock Echo web interface on a browser.
Default username : admin@boondock.live
Default password : admin
-
Programming Boondock Echo Firmware
10/21/2022 at 22:28 • 0 commentsThe source code has been generated using Visual Studio Code with PlatformIO Extension. Follow the steps and links to set up the Development Environment.
Setting up environment
Install Git-SCM. Download the latest version of Git using the link Download Git for Windows. After downloading Git-scm, follow the instructions and install git. Git-SCM is necessary for Visual Studio code, and download the latest codebase.
Install PlatformIO for Visual Studio Code
Microsoft Visual Studio code supports extensions. PlatformIO is one of the extensions. PlatformIO makes it easy to program any microcontroller. As we are using ESP-32 it makes it a breeze to program with PlatformIO. Link to installing platform IO on Visual Studio Code
Here is a list of my favorite Visual Studio Extensions that will make programming easier.
![]()
Download the code from the Git repository.
After setting up your development environment, download the latest code from the git repo.
Link to Boondock Github
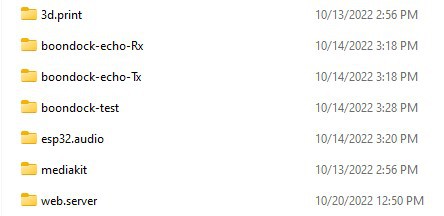
The repository has detailed instructions for each folder. Here is a summary.
- 3d.print : Has the STL files to print the Boondock Echo case
- boondock-echo-Rx : Source code for Rx only mode
- boondock-echo-Tx : Source code for Tx only mode
- esp32.audio : Common Source code
- web.server : Source code to setup your web-server.
![]()
Compiling the uploading code
Considering you have already assembled your Boondock Echo, you need to connect Boondock Echo using a micro-USB cable to start programming.
Click here for Boondock Echo Assembly
In Visual Studio, open the folder named esp32.audio. The next step is to update the server information in the config.h file
![]()
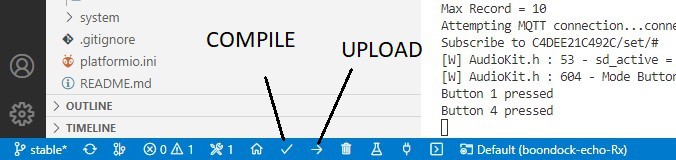
Change the server names, usernames, and passwords, and compile the code. The image below shows the buttons to compile and upload the code.
Click here for details on how to set up server, getting the right serverName, mqttUser, mqttPassword
![]()
Once successfully compiled, your Boondock echo is ready to use.
-
Cabling Issues
09/26/2022 at 16:30 • 0 commentsThere are two issues with the direct cable connection between the radio and the ESP32 Audio Board we're using. Fortunately, each issue is easy to solve with a slight cable modification
1) Audio level clipping
The ESP32 audio board provides high-voltage speaker-out audio levels and the radio expects low-current mic-in audio levels. It's a difference of several orders of magnitude. Fortunately, it's very easy to put a resistor inline between the two and burn off the extra energy as heat.
2) PTT inadvertently triggered.
Radios with 3.5/2.5mm audio interfaces tend to use a trick to trigger Push To Talk : they short-circuit the shield pins. The ESP32 uses the shield pins as "ground" connections. That means if you connect the radio mic to the ESP32 audio out with a 3-wire cable, and then connect the ESP32 audio in to the radio speaker with a 3-wire cable, the radio will transmit. That's because the ESP32 audio board uses shield on both boards as "ground." Plugging in either cable is fine. Plugging in both cables is a problem.
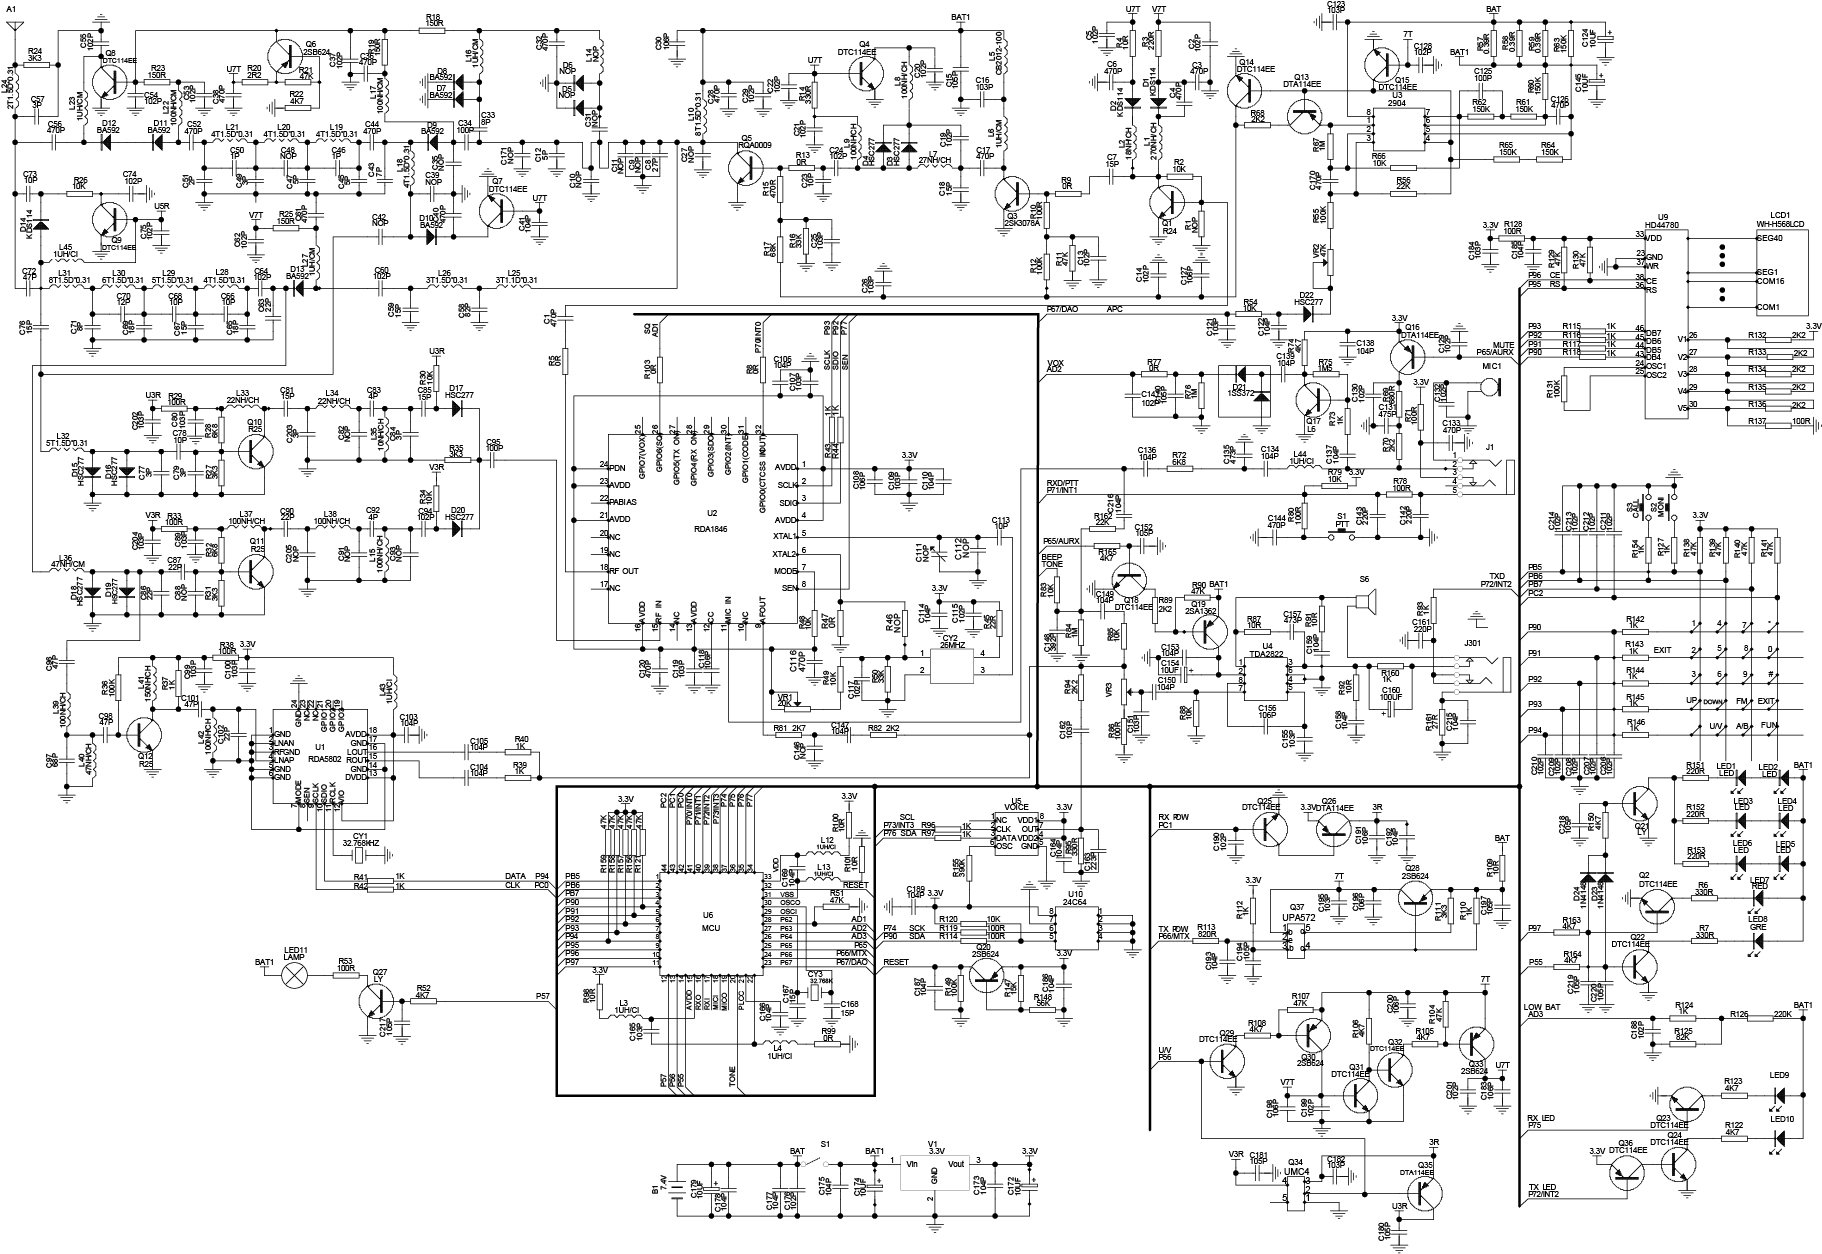
![]()
If you take a look at the Baofeng schematic, you'll see why. Typically R79 in the Baofeng pulls that net to logic high. But when shorted through an external PTT button, R161 pulls to logic low. So it's just a matter of placing a diode (quite literally any diode you have on hand, I used a 1n4001 on the mic audio shield pin between the radio and the audio board, with the cathode towards the boondock echo side). Another solution is just to disconnect the shield pins entirely..
![]()
-
Preparing for the Future of Boondock Echo
09/23/2022 at 18:18 • 0 commentsKC is putting all of his energy into the Boondock Echo web interface. We have all basic features incorporated at this time. We can receive messages and push them to the server and pull messages from the server to transmit. KC is working on the web interface to add advanced features such as noise cancellation, speech-to-text, and more.
Should we win the prize, we plan to create a custom PCB that plugs into a handi-talkie and derives power from the audio connectors. However, there's no time to develop and iterate before final judging. Additionally, custom hardware hurts us here since we can achieve all our current goals with commercial off-the-shelf components for well under $100.
But since I'm not half the programmer KC is, there's not much for me to do in the source code modifications that wouldn't just slow KC down.
So I'm working on other roadmap features for the Boondock Echo. Future feature tackled last night was Remote tuning
Remote tuning
Baogeng-UV5R
Remote tuning of a Baofeng HT appears to be a non-trivial task. I can quickly open the HT radio and interface the keypad with a microcontroller, but that might be difficult to make a long-term solution, and there's an excellent chance it will void any FCC certification the radio has. There is no direct serial interface, but it might be possible to use a microcontroller as a device programmer through the speaker/microphone port. Then find out where in device memory the current frequency is stored and change it. Not terrifically difficult, but even if it is technically possible, it might require power cycling the HT, and it would take a little while to decode the memory bit map.
Anytone-778UVII
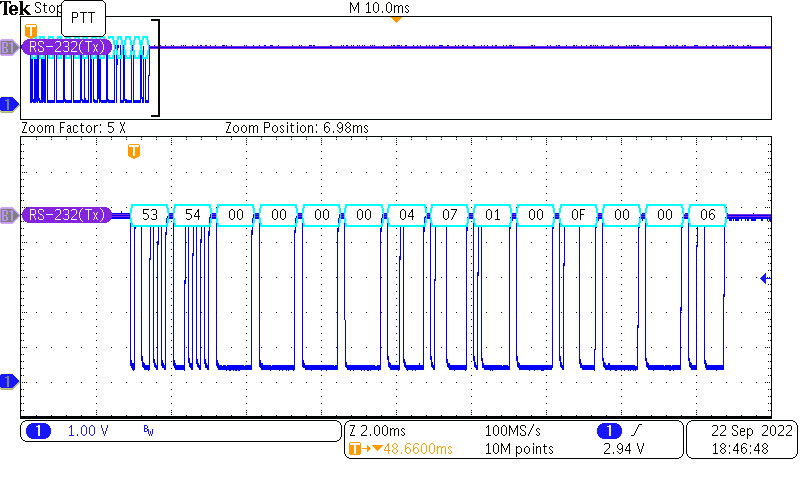
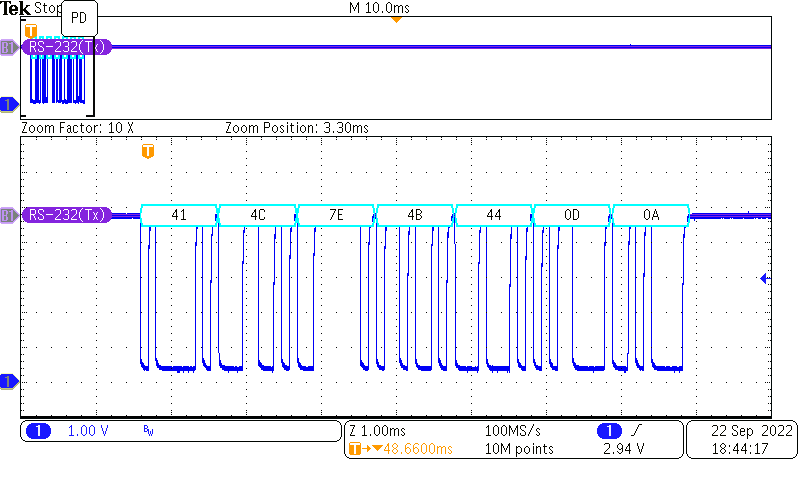
The Anytone-778UVII is an inexpensive ($129) 25 W mobile radio with an RJ-45 jack on the front that accepts a remote handset. The handset has 17 push buttons, a PTT switch, an up switch, a down switch, and a button lock. And since it's an RJ-45 plug/jack, it's trivial to listen in on communications between the handset and radio (tap pos 1 and 8). Once I probed and found the data pin and set the RS232 specs (9600, 8N), decoding took 10 minutes. Here's what the radio sends when you push the PTT
![]()
This is the most complicated data packet the handset has in it. 53 and 54 are the ASCII codes for "ST" or "Start Transmission". 04 is "EOT" or "End of Transmission", 07 is "BELL", etc. In short, they made this thing very, very easy to understand. I'll play with this a bit more when an antenna dummy load arrives. Right now, the radio detects the high SWR and shuts off immediately. I expect the radio keeps churning out 00 bytes to indicate continued transmission as long as the PTT button is pressed.
Each key is similarly easy to understand. A 7-byte data packet contains the packet header, data, and then Line Feed and Carriage Return
![]()
The key information is encoded in the 5th byte. And again, it couldn't be easier to understand. The programmers used the ASCII codes for each key 0-9, "/" for "A/B" button, "*" and "#" are the relevant ASCII codes for those characters, and "PA", "PB", "PC," and "PD" are just ASCII codes for "A", "B", "C", and "D" respectively.
Button Data stream from Handset A/B 41 4C 7E 4B 2F 0D 0A 0 41 4C 7E 4B 30 0D 0A 1 41 4C 7E 4B 31 0D 0A 2 41 4C 7E 4B 32 0D 0A 3 41 4C 7E 4B 33 0D 0A 4 41 4C 7E 4B 34 0D 0A 5 41 4C 7E 4B 35 0D 0A 6 41 4C 7E 4B 36 0D 0A 7 41 4C 7E 4B 37 0D 0A 8 41 4C 7E 4B 38 0D 0A 9 41 4C 7E 4B 39 0D 0A * 42 4C 7E 4B 2A 0D 0A # 43 4C 7E 4B 23 0D 0A PA 44 4C 7E 4B 41 0D 0A PB 45 4C 7E 4B 42 0D 0A PC 46 4C 7E 4B 43 0D 0A PD 47 4C 7E 4B 44 0D 0A So, to send a command to set the frequency to 442.675, you'd just send the following.
#41 #4C #7E #4B #34 #0D #0A #41 #4C #7E #4B #34 #0D #0A #41 #4C #7E #4B #32 #0D #0A #41 #4C #7E #4B #36 #0D #0A #41 #4C #7E #4B #37 #0D #0A #41 #4C #7E #4B #35 #0D #0A
I know that might look complicated, but from a microcontroller interface perspective, it's about as easy as you could hope for.
The Anytone 778UVII increases the overall cost of the project -- but it is a future development, and is still quite affordable. A radio, a battery, charger, Boondock Echo, and waterproof case should still come in under $250, which is rather affordable for all the given functionality.
Project Boondock Echo
Remote Radio Message Recording, Queueing, and Transmission (for Normal and Emergency Communications)