Introduction
This project uses the Whisper and Codex models to create an AI assistant that translates voice commands into micropython.
It is capable of understanding commands such as: “Create a task that checks the weather every 10 minutes at www.tiempo.com and if it is cold in Alicante, turn on the heating”

Although the project is very promising, it is still a bit slow. Each request can take more than 10 seconds to complete and this makes it a little too slow, but I think the potential is perfectly shown.
Application

The application is defined in main.py and is quite simple. All it does is connect to 2 internet services and display text on the screen. Here we see the main class that initializes and contains all the necessary objects.
In the callbacks is where the actions are performed and these are linked to the buttons defined in the user interface.
Note that once initialized, all it does is periodically call display_driver.process, which internally only calls the LVGL task.

HAL
The hal is defined in hal.py and includes the basic hardware initialization needed to drive the LCD, TSC, and microphone.

LCD
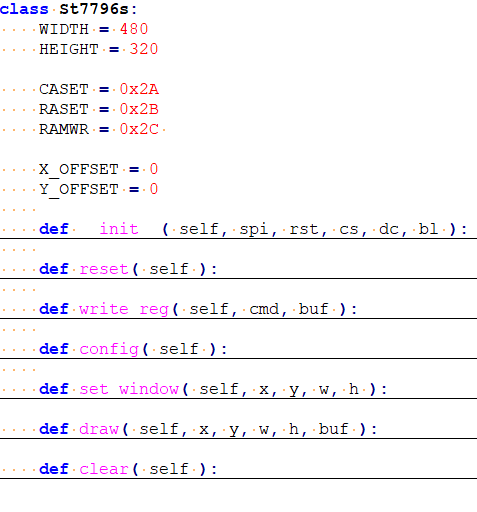
The LCD used is an ST7796s, with a resolution of 480x320, managed by SPI at 20MHz. The code is pretty simple, it does some basic initialization and then just uses the draw function to send an entire buffer. No DMA or anything is used to keep things simple.
TSC
The Touch Screen Controller is tactile and controlled by I2C. We just have to read a register that will tell us if the screen has been pressed and the coordinates. Support more than 1 point, only the sw only use one. In addition this class incorporates the calibration parameters ax, bx, ay, by and swap_xw to convert the TSC measurements to screen coordinates required by LVGL.

MIC
The microphone used is an INMP441, which is connected by I2S and offers 24 bits of resolution. But since it doesn't require any special action, it has no class and it's enough to just initialize the peripheral in HAL.
Note that the selected sample rate is 8KHz.
LVGL
The LVGL library is responsible for representing the entire user interface and is the largest component of the project, although this application is very simple, achieving a good and visually attractive result would not be possible without this library.
To integrate into our project we have to compile micropython from source, but since the ESP32 port is supported in the lv_micropython repository, this is a simple process.
Display driver
Once the firmware is compiled, we will have to tell LVGL how to paint on the LCD and read the TSC that we defined in hal. This is done in display_driver.py, which defines some callbacks and buffers used by LVGL.

User interface
The user interface defines the different elements of the screen, its style, its composition... this is what the LVGL library provides and it's all calls to its API.

Wave
The WAVE class allows you to create .wav files to save the data captured by the microphone. The header is the first 44 bytes of a wav file, which contains the sample rate, bits, and a few more parameters. When we open a wav, this data is filled in and then we just have to insert samples with the write function. At the end the wave is rewritten since the number of samples field has to be updated.

Recorder
The recorder class allows to collect the data from the microphone (I2S peripheral) and record it in a .wav file. It is implemented as a state machine so as not to block everything for the duration of the recording. Thanks to the simple API that micropython provides for the I2S peripheral and interrupts, the implementation is quite simple.
The recording is started by calling the start method and it continues until we stop thanks to the I2S interrupt that is configured to call the process function every time the buffer is full.
Note that the time it takes to write the buffer to flash the I2S peripheral will be writing the data to its own buffer, initialized in hal.py, and the size must be large enough according to the selected sample rate.

Online services
ESP32 is specially designed to connect to the internet and micropython provides the requests.py module, which facilitates all the required HTTP operations.
Secrets
The secrets.py module simply contains the different keys to access wifi and internet services so that these keys are all together and easier to control and avoid distributing them when publishing the code.

Wifi
The wifi.py module is very simple and handles connecting and disconnecting the ESP32 to the wifi network.

Google
The whisper model is state of the art in AI, but since I don't have a GPU environment on the PC, I tried to use the google speech2text and translate services, which also give good performance for this app.
To transcribe the audio, the transcribe function is used. This function reads the previously created wav file and encodes it in the HTTP request. A format called base64 is used that allows binary data to be inserted into http, but due to the size of the wav file, about 100Ks, this takes up a lot of memory. Thanks to the fact that the ESP32 has a SPIRAM memory it can do it, but this would not be possible in other platforms such as STM32 or RP2040. Also this conversion takes about 5 seconds. Once encoded you have to send it, which probably also requires a lot of RAM, but this is faster.
The google response is converted to JSON. Google separates the different phrases so you have to put them back together before returning.


Whisper
The whisper.py module handles the connection to the AI model, created by OpenAI and published open source here: https://github.com/openai/whisper . This model is responsible for translating audio to text, it does so in any language and can automatically translate into English.
For this project, we will be running a web server on our PC with flask.

In this case we send the data in binary, instead of doing the base64 encoding required for the Google API. This allows us to greatly reduce the RAM requirements for the application.

Codex
Codex is the heart of this app. Although the work done by Whisper/Google is very powerful, it is Codex that gives the real utility to the application. Access to Cedex is similar to the others, but here we have to take into account some parameters such as temperature, number of tokens or stop conditions. Other than that, it's just an HTTP request

For this project I have only put some buttons and LEDs that are connected to the ESP32, something like a user HAL. But you can put anything, like useful websites, command examples, specific hardware, etc. Codex, who has read more code than a human can read in his entire life, will understand it without problems.

Prompt
The prompt.py module manages the conversation between the user and Codex, controls the turn by inserting the texts “# Human:” or “# Esp32:”, colors the text to represent it on the screen and executes the code.
In the conversation the REPL is simulated, with “>>>” and “...” and to execute the code you have to delete it. This is done in the run function. Once cleaned, it is executed with "exec" and to access variables declared in previous executions, the globals() argument is passed to it.

Conclusions
This has been a simple project that offers some very interesting capabilities for all IoT systems. With or without audio, services like Codex are here to stay and leave behind those systems with a set of predefined instructions. I am convinced that this will soon become common in many IoT or robotics systems.