David Tucker
-
Polish
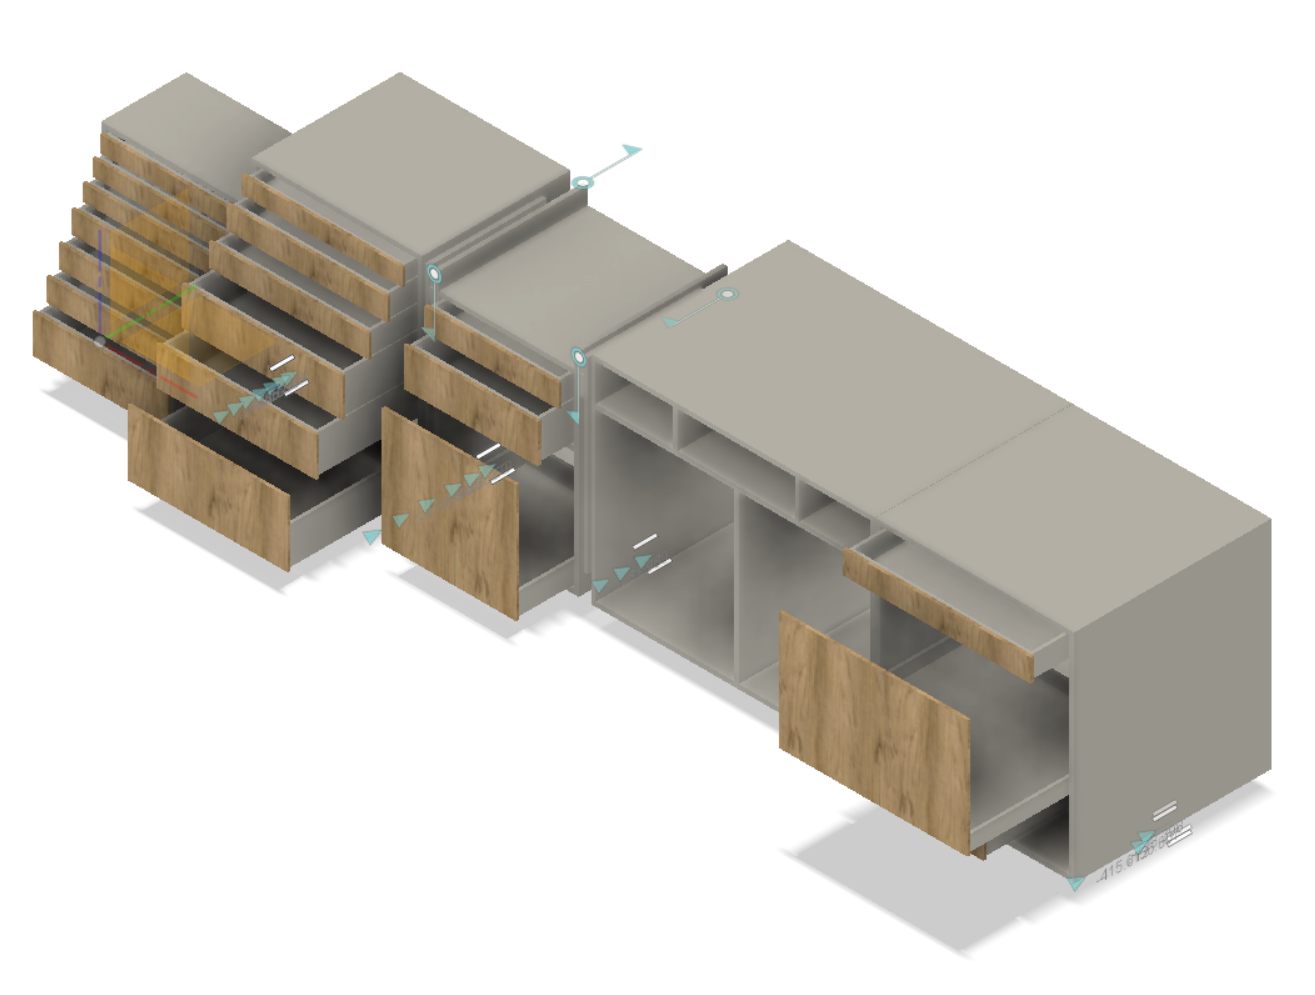
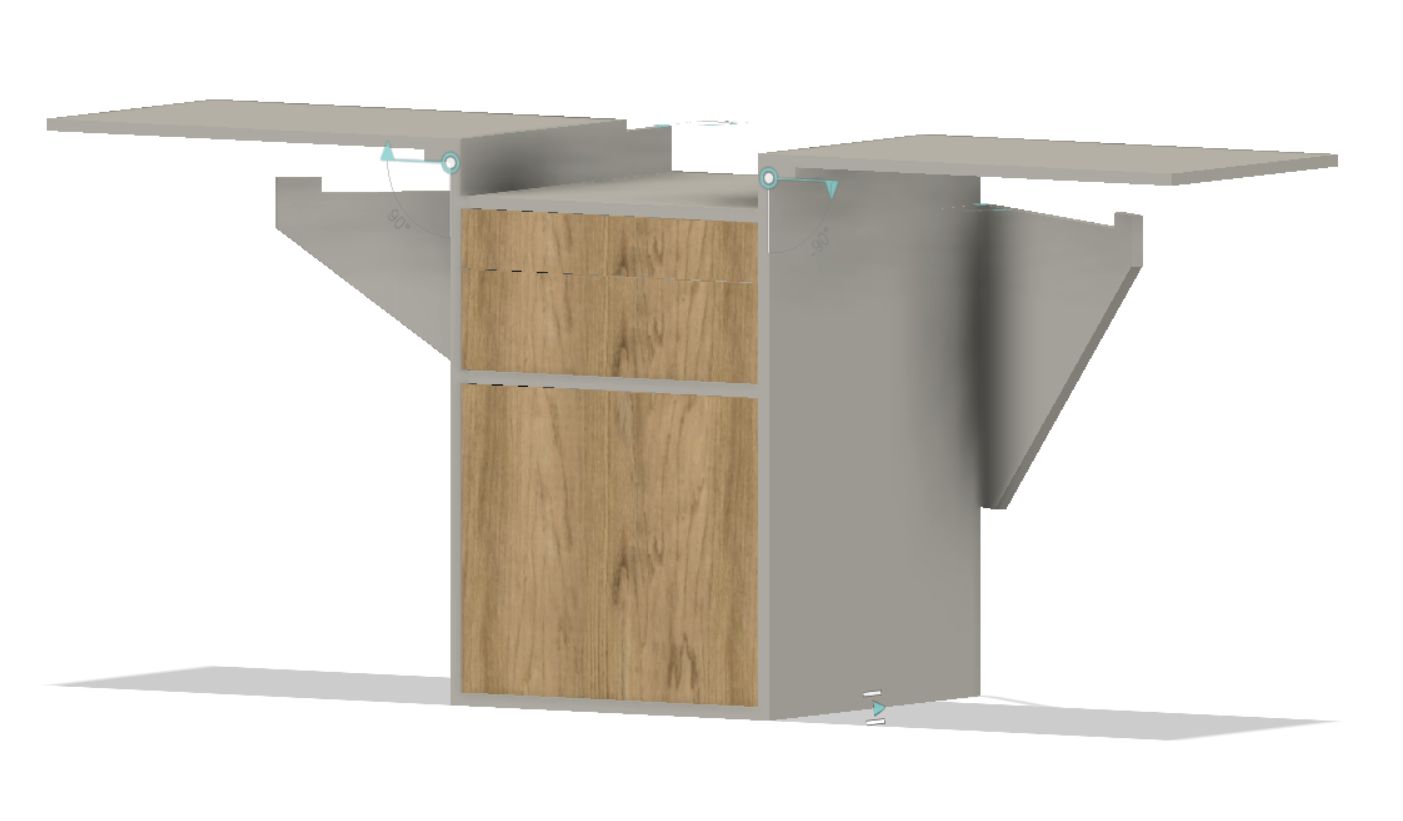
03/17/2023 at 02:13 • 0 commentsI managed to put some polish on my designs. Now I have movable drawers.
As well as movable wings on my miter saw cart. You can see the wing design is in need of some help. I roughed it in but have not really put any proper dimensions on it yet.
It looks fancy, but I still need to finish cleaning everything up. Still this is a fun achievement.
-
Slow and steady
03/16/2023 at 05:08 • 0 commentsThings have been slow going, most of my weekends have been full with family time. However were almost to the end of that stuff and I'm starting to get ready for some more cutting in the shop.
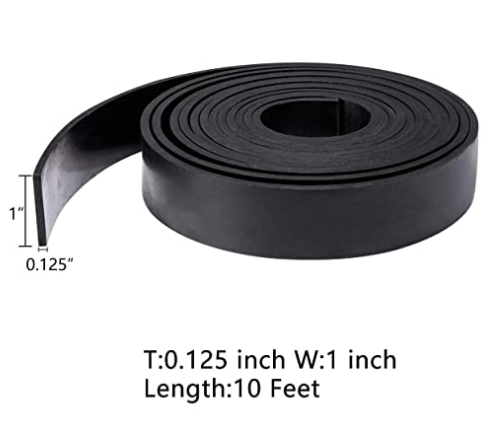
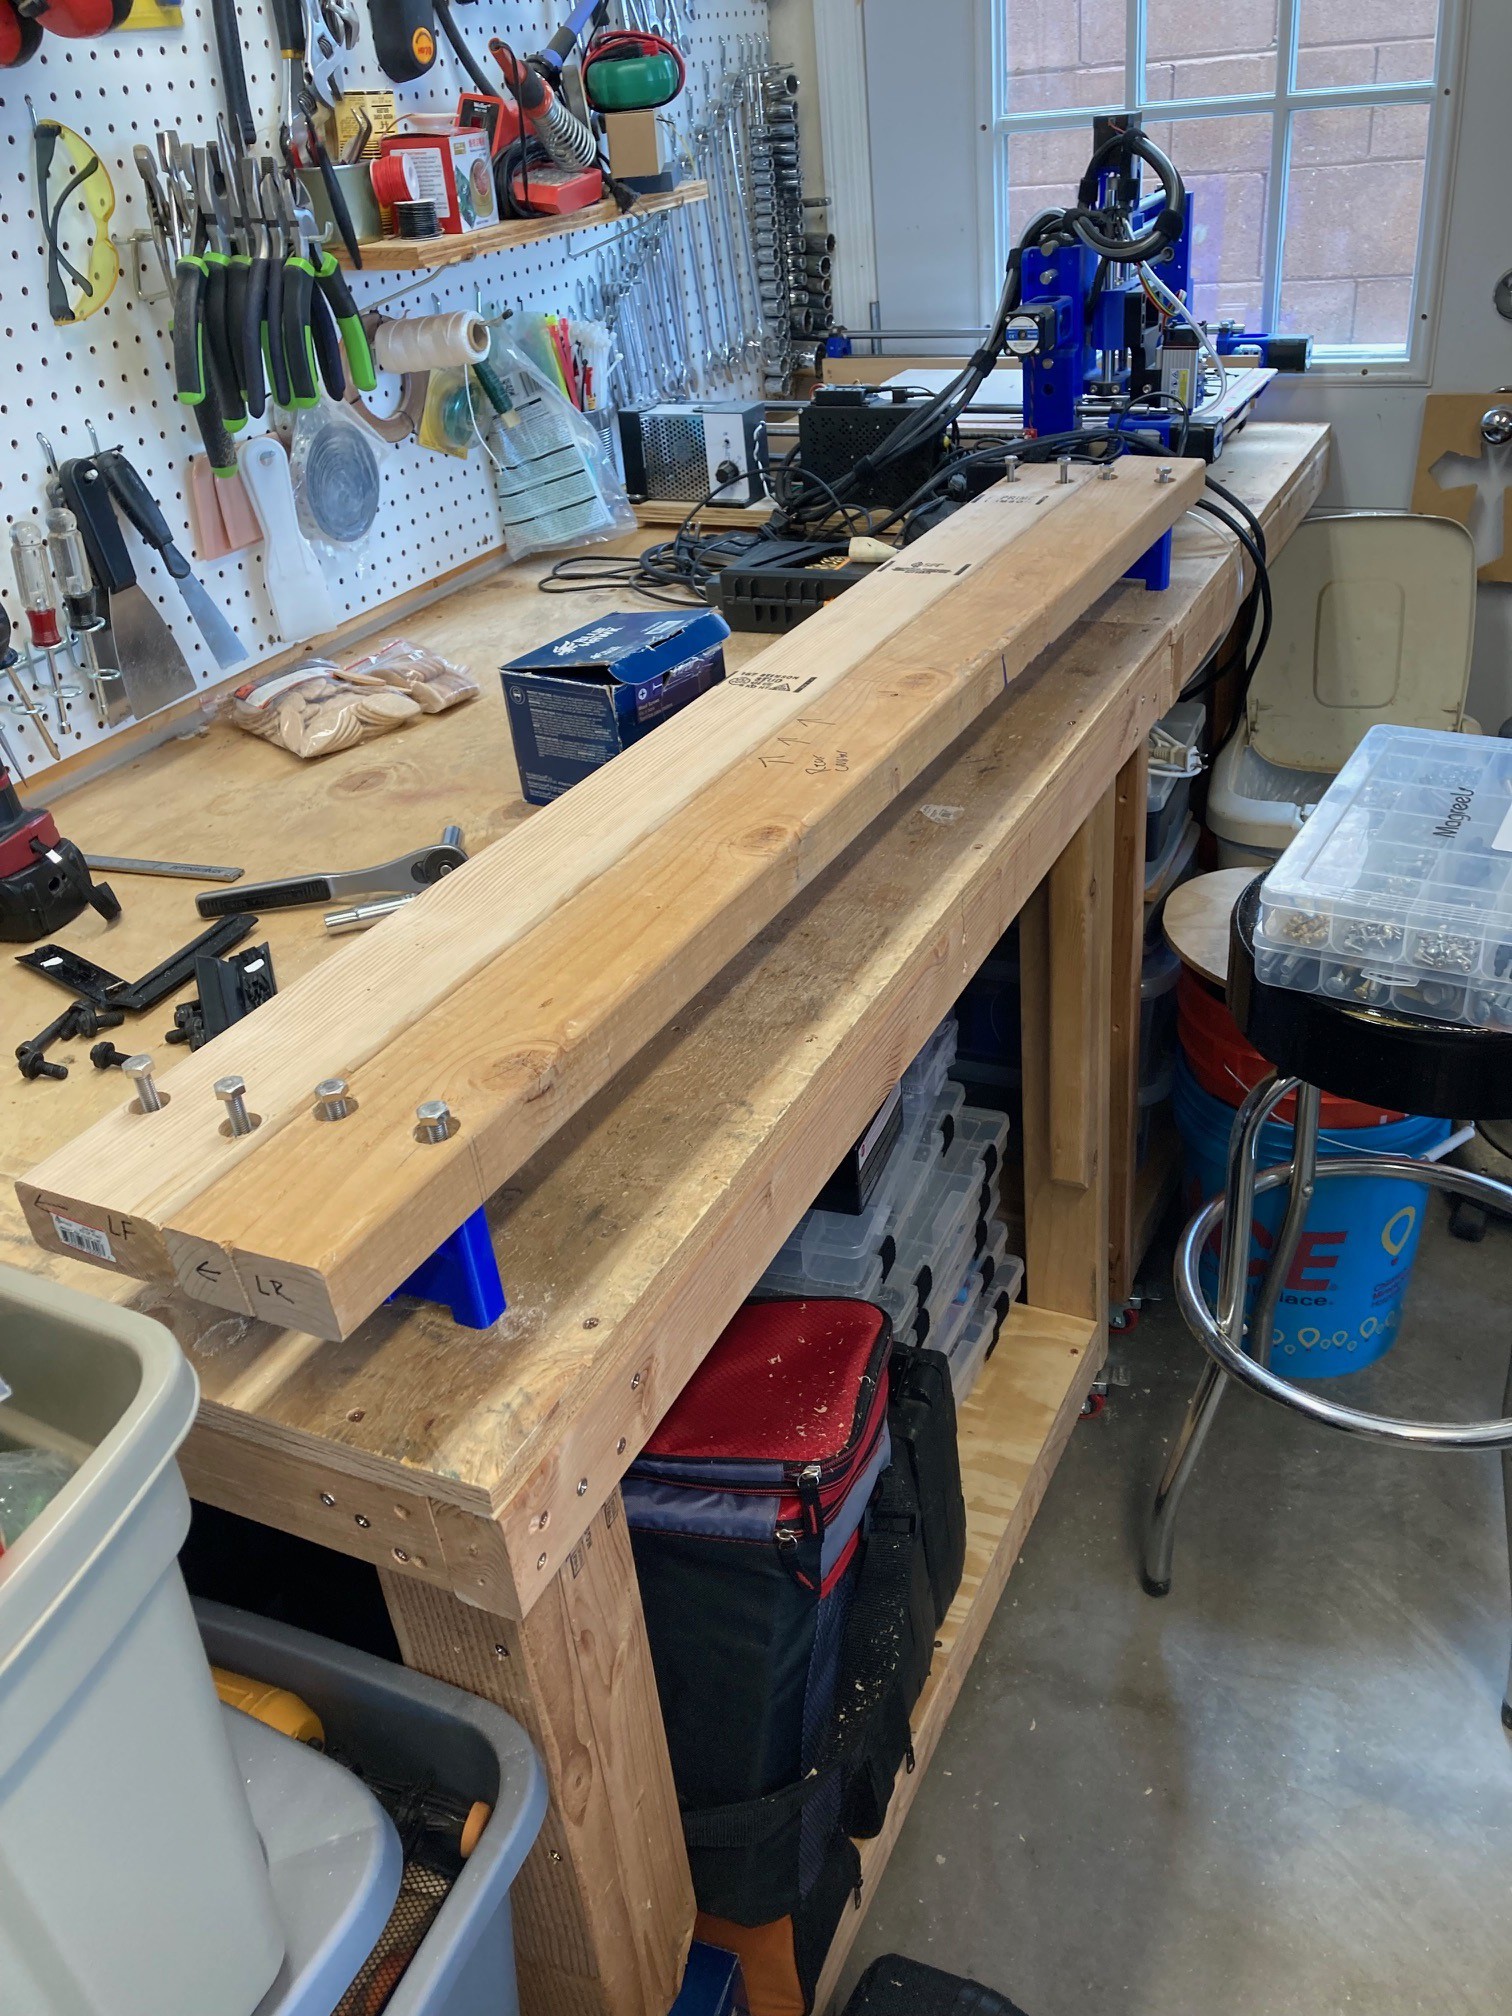
To that end, I picked up some 3mm thick neoprene rubber material to replace the splinter guard on my track saw track. This works out great, it is a closed cell plastic that is just a bit softer than the original splinter guard. More importantly it is just thick enough to level up the track and prevent it from rocking. I was able to carefully remove the old strip and apply these strips while reusing the old double sided tape, it seems to stick well.
![]()
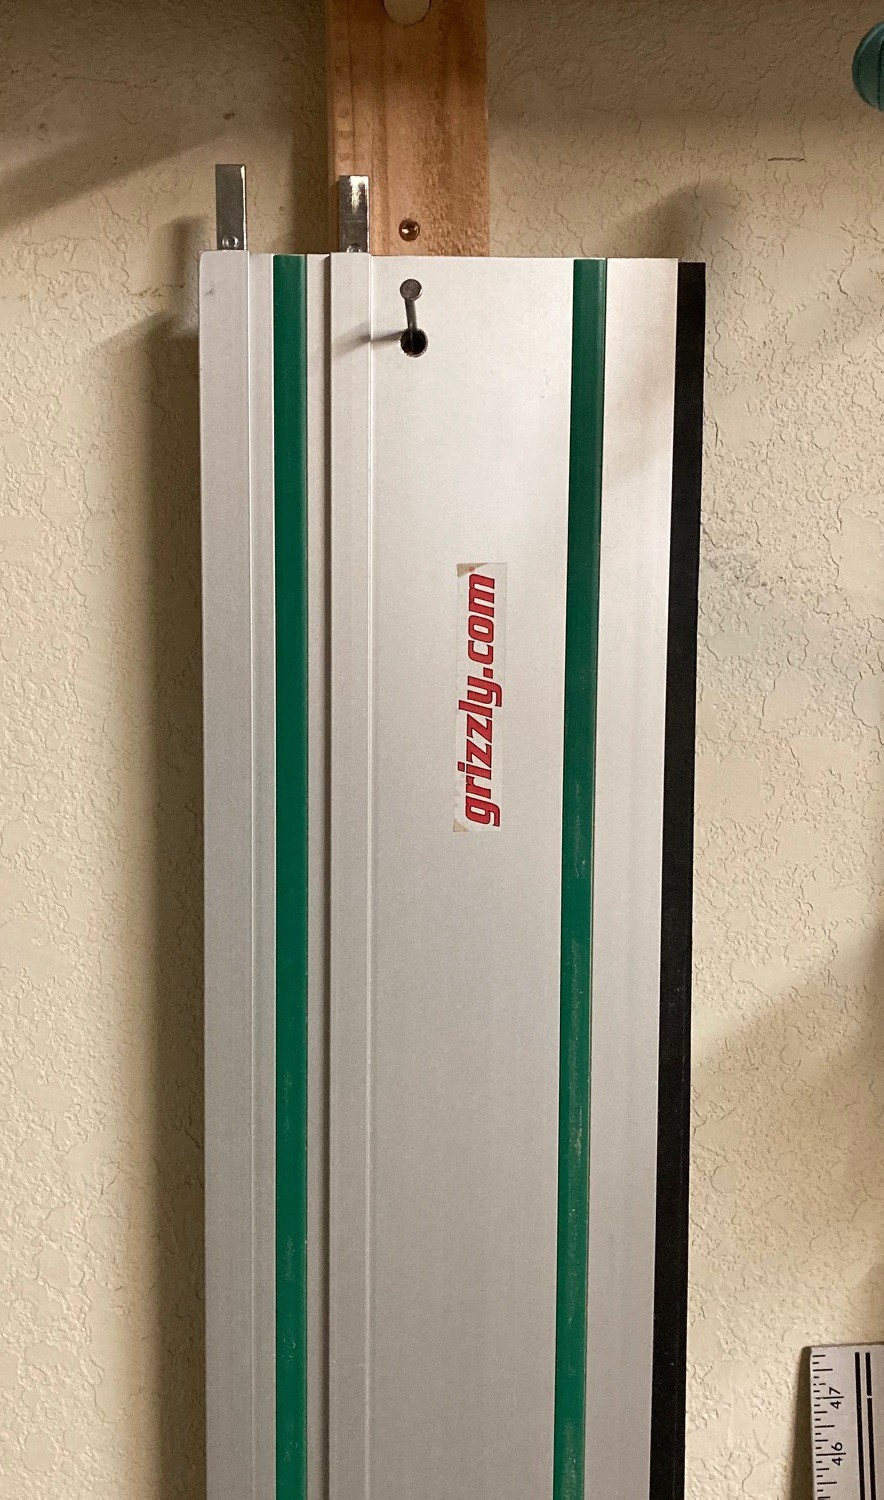
For whatever reason, my track saw tracks did not come with a hole in them for easy hanging, so I added some holes to them. You can see the new splinter guards here, they have not been trimmed back yet.
I don't have pictures of it, but I spent an hour messing with my biscuit joiner, trying to square it up a bit. I carefully measured the blade height at three points, worked out what direction the base plate needed to tilt, and shimmed it up with several pieces of foil tape. After some back and forth I got it level to within 0.2 mm. That is within the accuracy of my measuring abilities, I probably can't make it any better. I still need to go over the rest of my tools and make sure they are square.
![]()
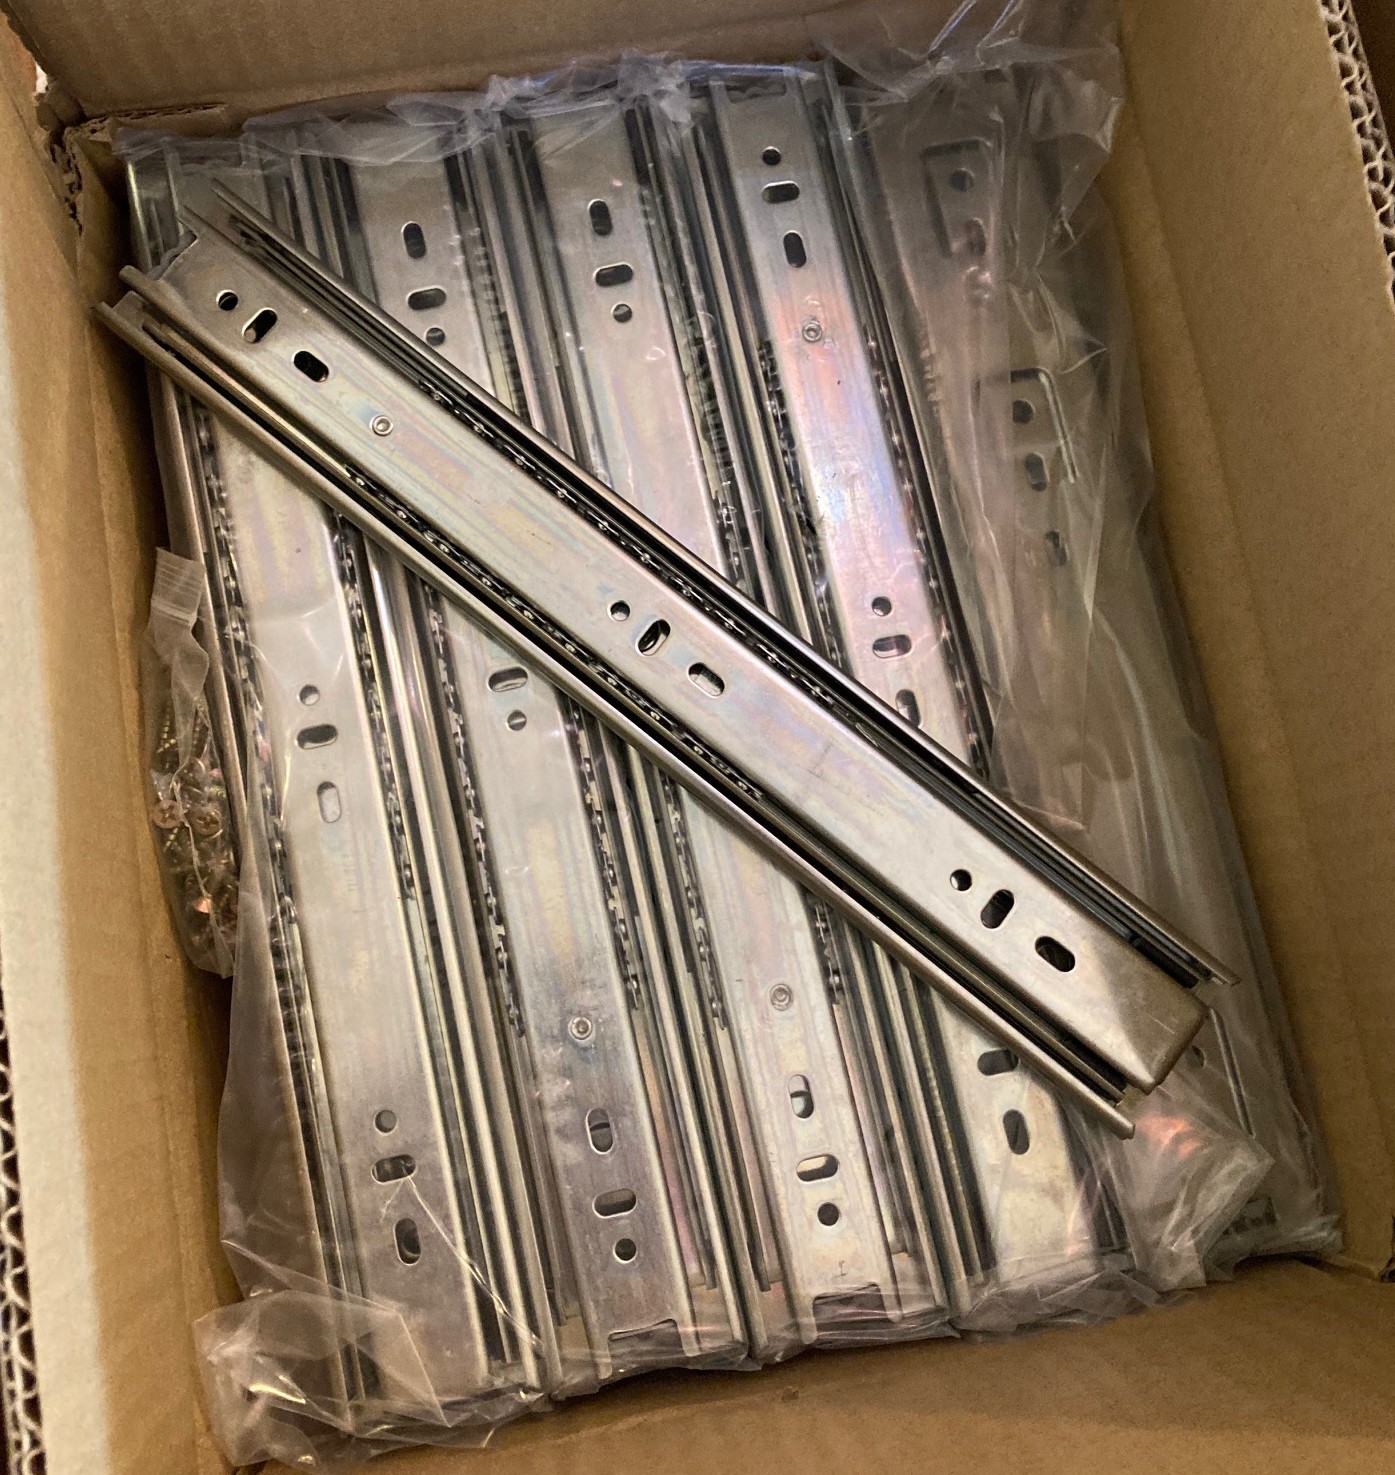
I have been on the fence about some of my design decisions, and finally decided to just bite the bullet and pic something. So I ordered a 10 pack of 12" drawer slides and another 10 pack of 22" drawer slides. I received the 12" slides earlier this week and they are in really great shape. These have a rubber bit at one end that locks the slides closed so it takes a small pull to open the drawers. This is perfect, I really did not want soft close slides, but I did want the drawers to stay closed when I roll them around.
![]()
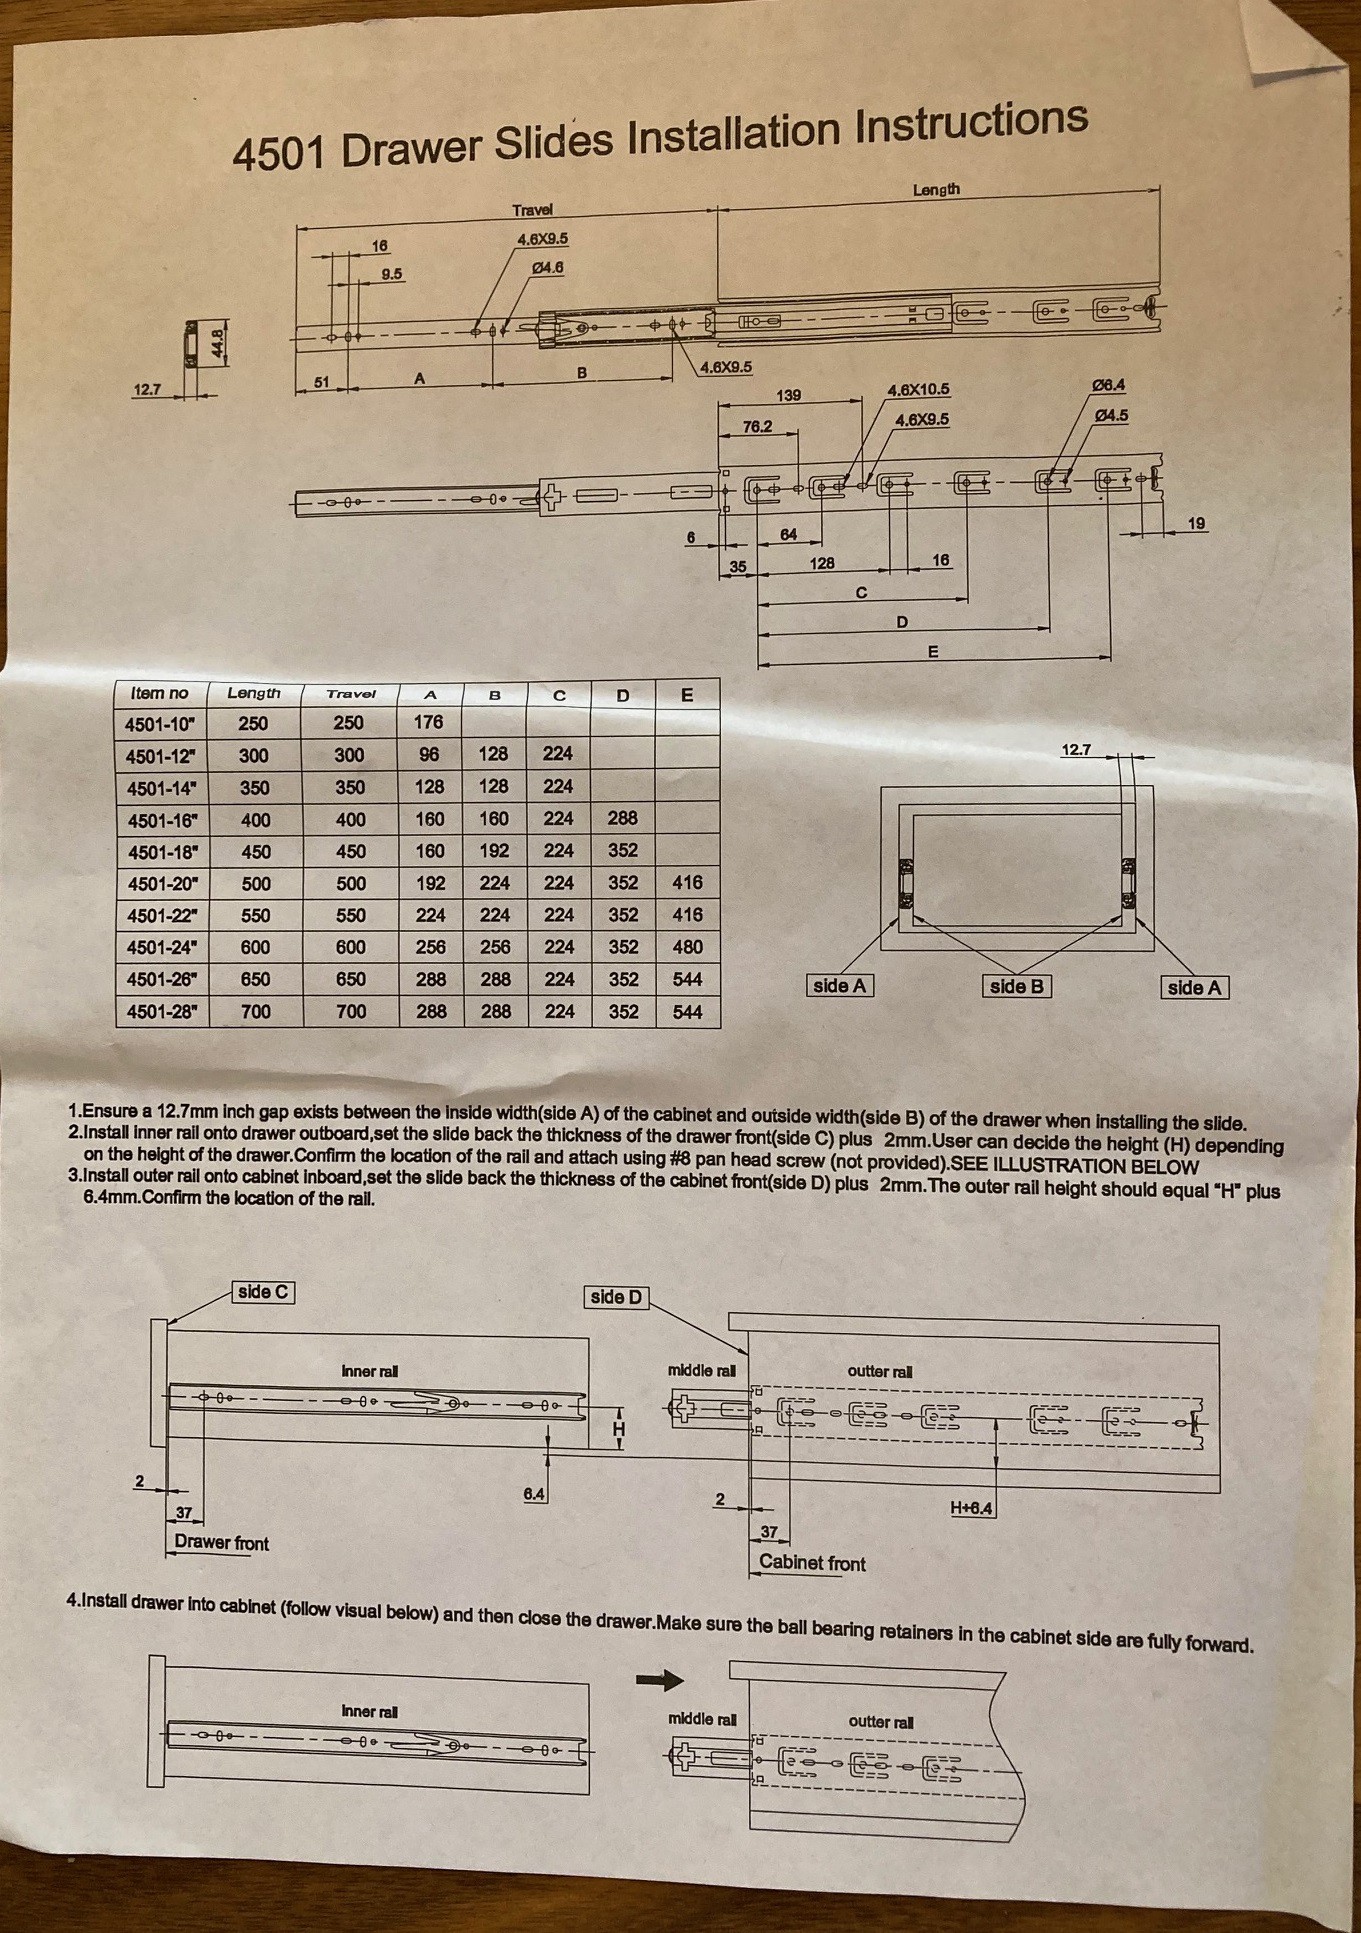
There was very little on Amazon about these, but they came with a nice instruction sheet. The quality seems good so far. I'm hoping the larger rails are in as good a shape. The price was great as well, at around $5 a pair for the 12" rails and $7 a pair for the 24" rails, many times cheaper than at the big box store.
I'm still refining my drawings, trying to pin down the final dimensions of everything. Once I feel that is settled, and I have a free afternoon, then it is time to start cutting. Probably not this weekend, but maybe next.
-
Bolted
03/04/2023 at 05:03 • 0 comments![]()
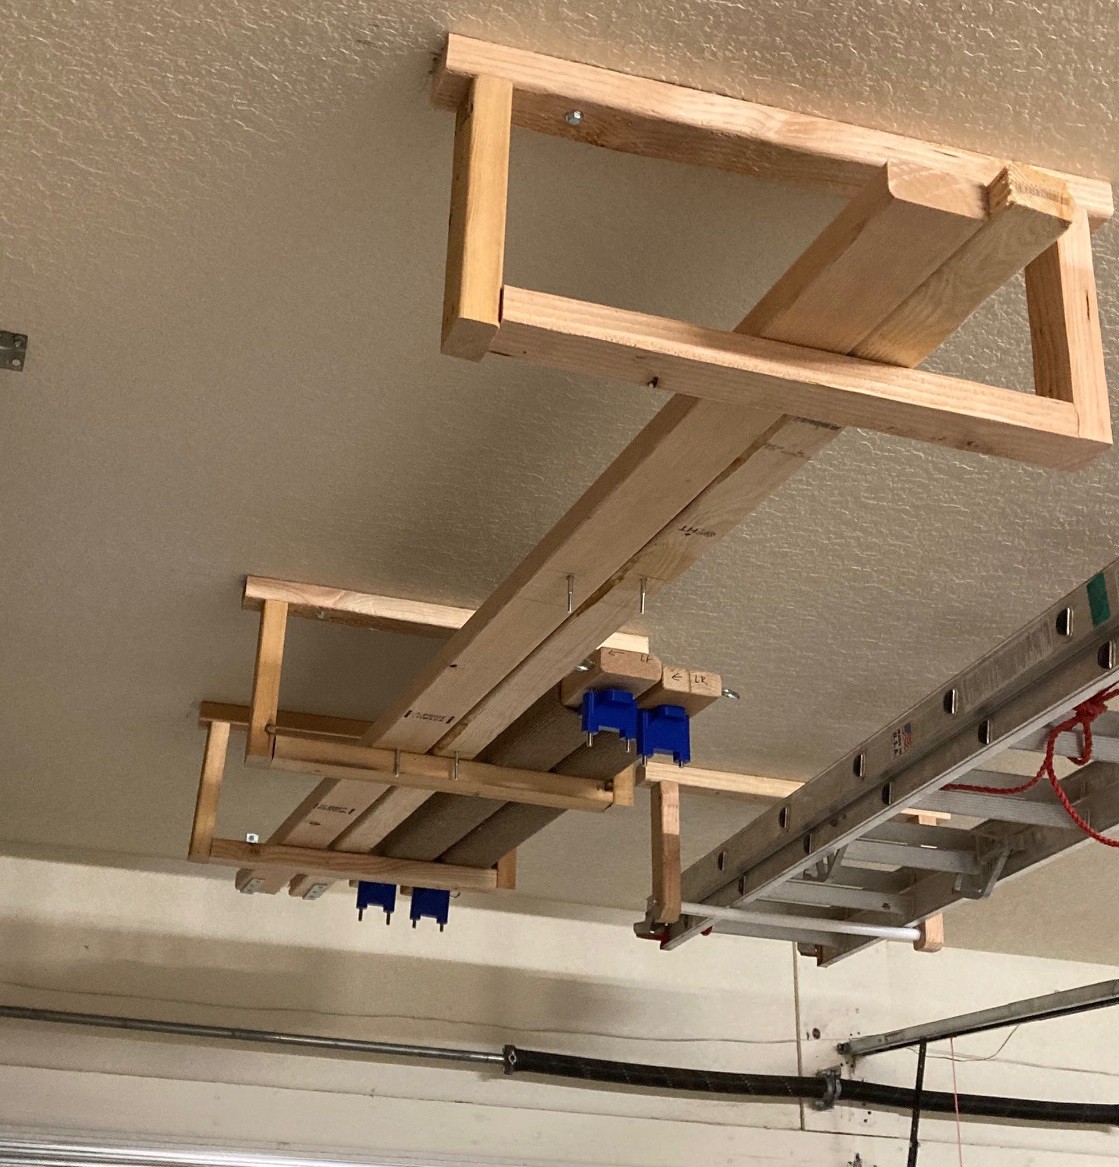
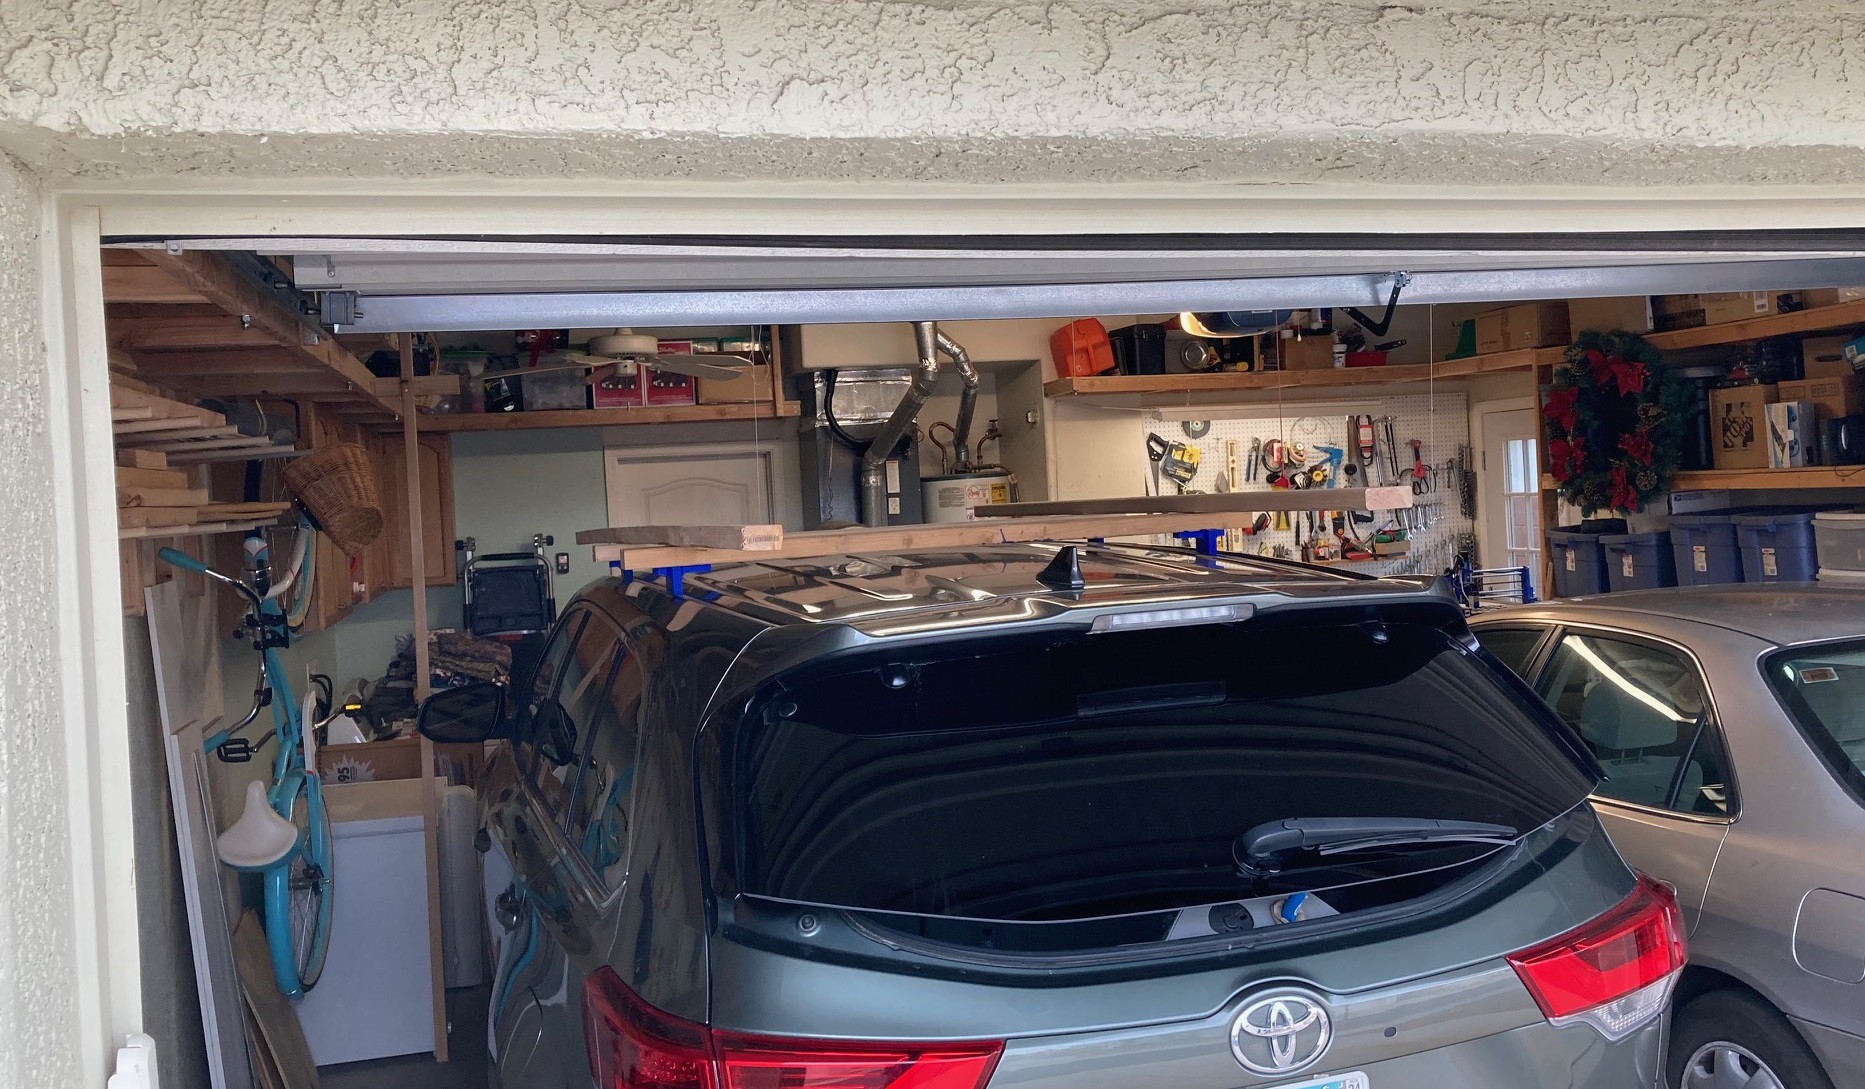
I was finally able to get my hangers up on the ceiling to hang my roof rack up. I can also use this space later to store full length boards, if I collect any. I had a hard time getting this screwed into the roof. I was using 3.5" long deck screws butt they were only grabbing a thread or two after going through the 2x3 and what appears to be two sheets of sheetrock. So I ended up going with 4" lag bolts instead. These hold really well and I think I will go ahead and shoot a lag bolt into the later hanger as well, just for added piece of mind.
![]()
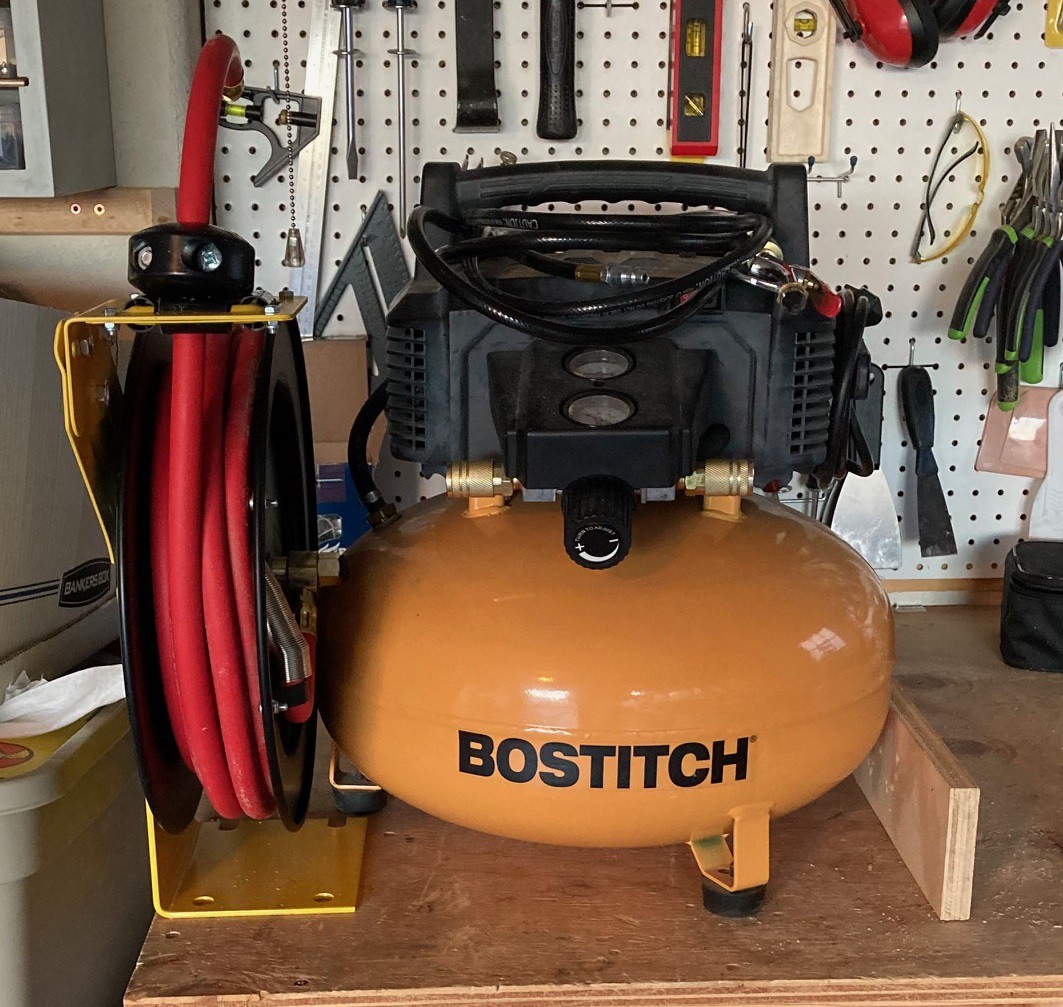
I picked up a 25' air hose reel from harbor freight for $60. Normally these are 50' but I really don't have the space to waste on the extra lenght, and I don't expect to need anything more than this. I can always bring the air compressor to the work if I need more range.
By placing these just right they only take up about 20" width. I should be able to just squeeze these both side by side into the miter saw cart. That leaves a bit of space at the back to store any extra hoses and room to put in 2 drawers to hold all my air tools. I still need to wire this up and make sure the hose is in good shape, but otherwise it seems to work quite nicely.
I'm getting closer to finalizing my designs. I have almost everything fleshed in properly. I still need to decide what to do with the work bench. I roughed in something as a place holder but there is a lot of room here for improvement. I have not modeled the faces for any of the drawers here.
Right now I have 17 drawers and 2 rolling shelfs for my CNC and air compressor. I will probably put some quick shelves into the work bench as a place holder for future growth. Those could be pulled out later and converted to more drawers as my needs grow.
I have been going back and forth between euro style drawer slides (cheap) or ball bearing side rails (full extension, more solid). The only real attraction to the euro style rails is the price, they run around $5 apiece. The ball bearing rails run around $10 apiece, but I think I have a handle on some lower cost ones that may be good enough. With nearly 20 drawers I'm investing a significant amount of money into drawer slides. I estimate this all will take 8-10 sheets of MDF as well, that makes it a fairly expensive undertaking at todays price of $60 a sheet.
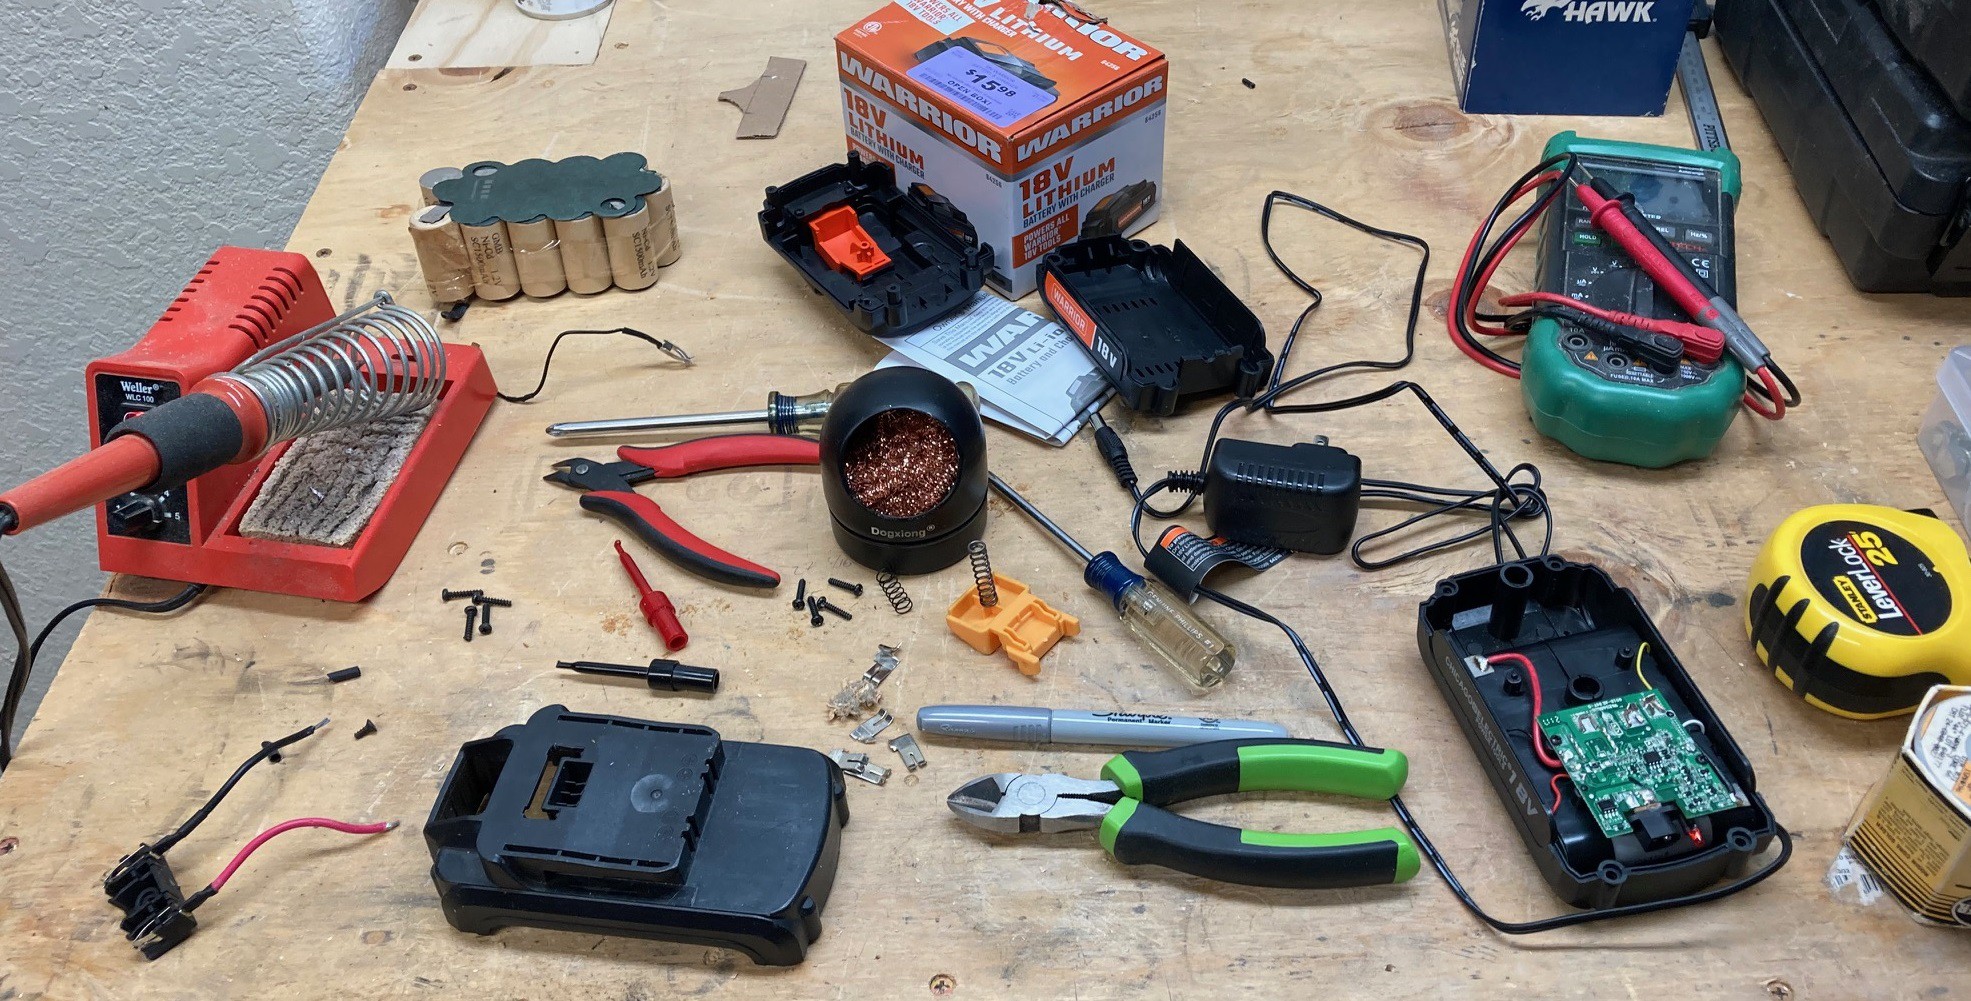
Finally I have been collecting up some tools to help me work out how square everything is. It is time to step up my game a bit before tackling such a large project.
-
Dis-Charged
02/27/2023 at 03:17 • 0 commentsI wanted to post a follow-up to my lithium battery experiment. I have only charged it up once when I first got it and I have now had a chance to use both my drill and impact driver many times over several weeks with no signs that the battery is weakening or that the drill is running hot. This worked out good enough that I went ahead and picked up a second battery so I have one for my impact and drill without needing to switch them over. For the $40 or so investment this was a great deal and really helped revive my old drills. It remains to be seen if this is a better investment than buying new drill and impact drivers, but for sure it was a more environmentally friendly move, even if it is a tiny bit sketchy. I really should have done this years ago, I'm not sure why I resisted for so long. Mostly I was worried I would melt something, but so far so good.
![]()
I spent most of my day getting use to a new laptop I got for my birthday (I have the best wife) and refining my layout for my workshop. I have most everything roughed in approximately where I want them. I'm planning on squeezing in an air filter into the base of my CNC cart with access at the front to route an exhaust hose. And on the miter stand I'm thinking through ways to seal up the lower portion of the box while having some sort of baffle at the back to allow air flow as well as reducing the sound so my air compressor won't over heat but can be muffled.
I'm still stuck on the workbench itself. I need to think on it for a bit and maybe make some test cuts. I think I will cut out a board with a few 20 mm holes in it to experiment with making my own bench dogs as well as to see if my track saw clamps fit nicely into the holes. I also plan on using the cnc to make some clamps to help hold my builds together more squarely when doing a glue up. And I may make a right angle adapter for my track as well. Finally I think I will turn the top of my existing workbench into a cross cut sled for my tracksaw using a few offcuts of mdf pinned to the top. That will be simple enough to setup and easily removed if I hate it. If it works then it will justify putting in more effort on a proper solution in the final build.
-
Thoughts
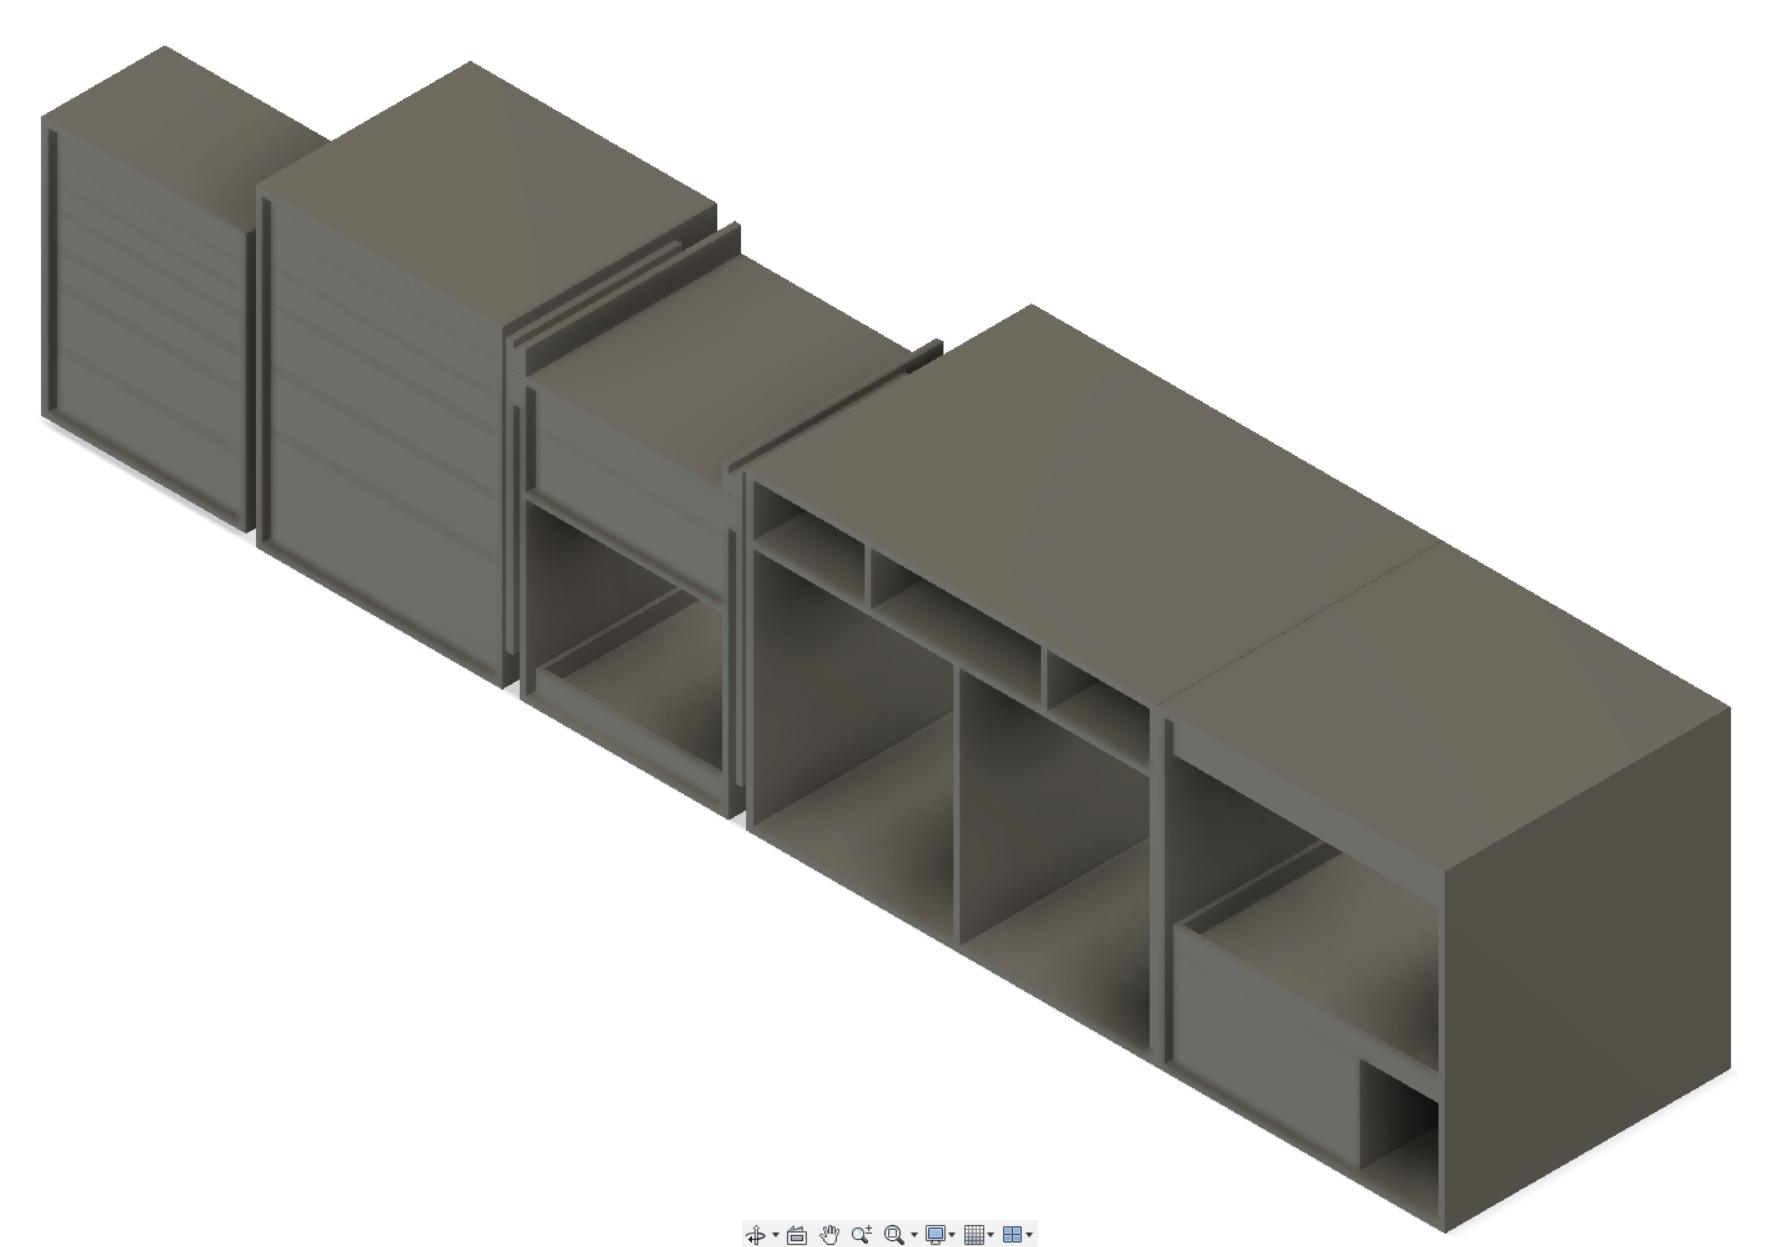
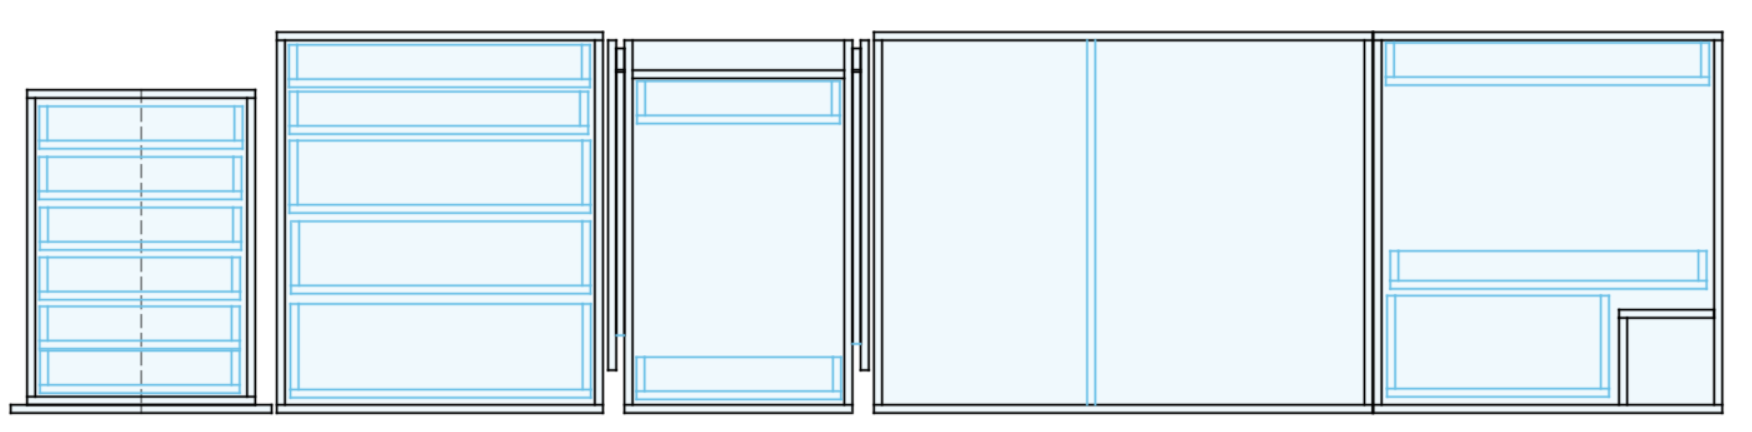
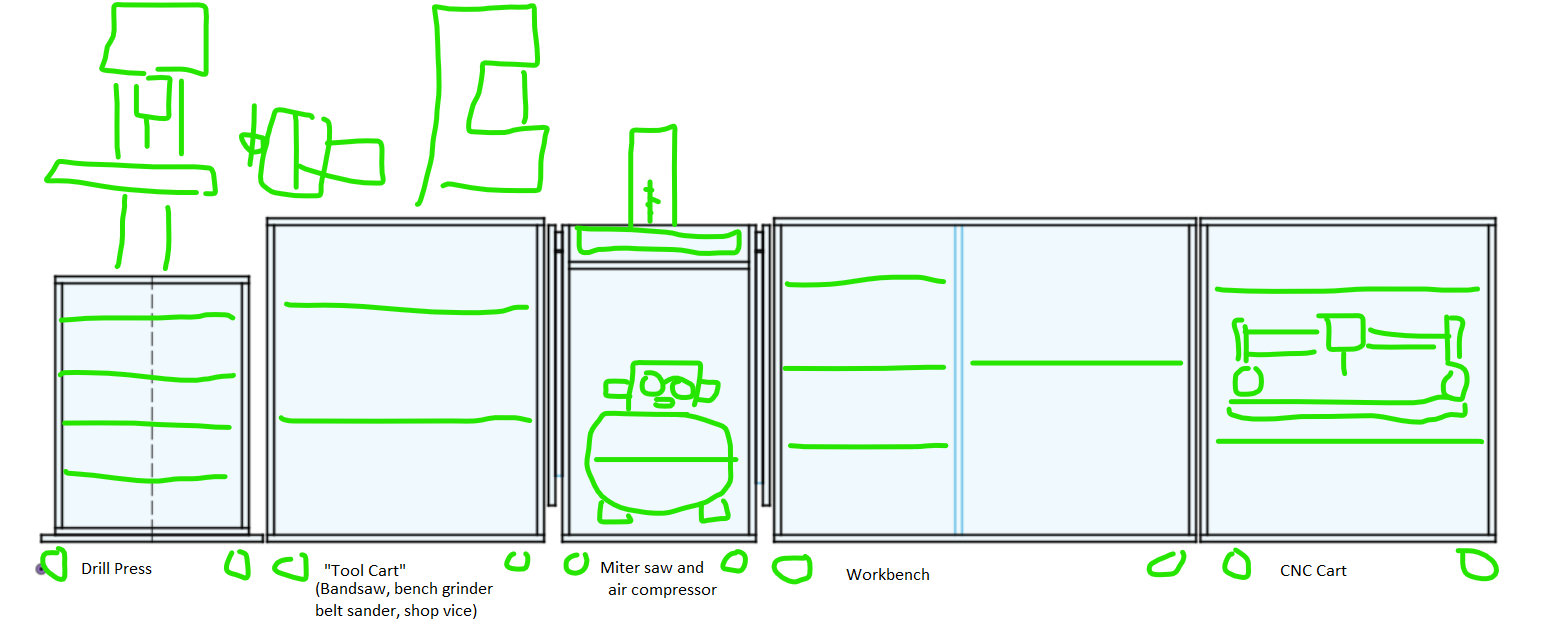
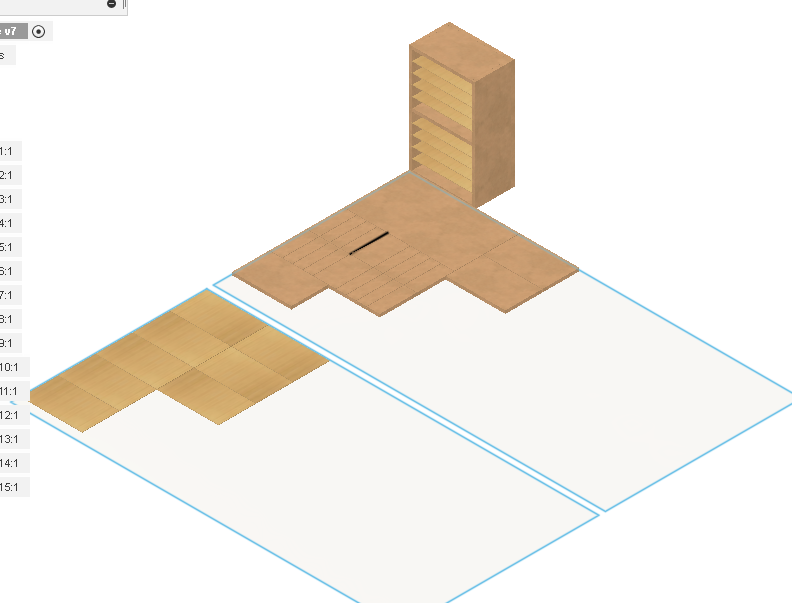
02/26/2023 at 17:57 • 0 commentsSo now that I have my first piece built it is time for me to get serious about designing the rest of the carts. I have the dimensions basically worked out, here is a front view of the carts together. This fully fills in the available space, so there really is no way to increase things beyond this.
The drill press is relatively simple, there is a very limited amount of space to work with so it is best served with a small tool storage box. Something that could hold files, drill bits, router bits and other smaller items. There is some space beside and behind the main column that I could possibly use for storing clamps or something, but for now I will leave that alone. I think I will make the tool box removable from the base. I will put two pins in the base that interface with the tool box so you can lift it off if you need the full range of the drill press. I need to decide if I want to use fancy drawer slides or use wood strips for drawer runners here.
I think I have the top of the tool cart worked out, but the inside is up in the air. I could fit my air compressor into this cart and store larger tools along side it, or I could make this medium sized drawers that are roughly 3-4" tall and that can be used for everything from screws to hammers. For now I think I would rather have more drawers.
The miter saw stand is fairly fleshed out already. My only worry is that it will be unstable when the wings are fully extended. I think I could fit stabilizing feet that swing out from the base if I need it. I don't expect to need to extend the wings all that often. And one of my design hopes is that I can make it so I can cut 45 degree miters without opening the wings. I need to come up with some sort of dust collection port on the top end, but that can be worked out after the fact.
I think I will fit the air compressor into this cart. I really hate using the air compressor because it is so loud, and I think fitting it into a drawer that can be closed while it is running will help a lot. I'm contemplating picking up a hose reel as well and fitting it into the cart permanently so I can more easily access air without dealing with pesky hoses. I need to pick out a reel and test it out, it may not fit into this smaller cart so I may need to move it back over to the tool cart. But I feel this smaller cart would be easier to wheel around if I need to use it somewhere else.
For the CNC cart I have settled on two drawers for CNC related storage, and a third drawer to hold the CNC itself. I'm hoping to fit in an air filter and fan into this contraption that can be routed out of the house when cutting. I think I will leave the top bare and use this as a small outfeed/assembly table.
The big one is the main worktable. I have been going back and forth on what to do with this for a very long time. My workbenches in the past were just a place to store things. I had a shop vice on the corner for holding the occasional item and otherwise there was no sort of hold down system at all, and I did not worry much about it being flat either. I think I want to integrate some sort of system into the bench to help with shaping, cutting, and building items that are square, but there are so many ideas out there.
- I really want some way to clamp material to the table from the edge. I do this all the time on my current workbench and don't really see wanting to give up on this. This could be a relatively shallow lip all the way around the bench. Or a series of holes or notches that clamps could be slotted into.
- I could build a torsion box top to ensure a perfectly square and ridged top. This is very attractive to me, but it takes up a lot of vertical space and is complicated to assemble and I don't know how important a perfectly flat top is, especially on such a small bench.
- I'm very intrigued by the MFT style tops with t-tracks on the edges for clamping boards vertically and evenly spaced (and square) bench dog holes on the top. This has a lot of potential for making things very square and being much more flexible for glue ups or other such work. However all those holes are difficult to drill accurately (but I do have a CNC) and they require space under the top to allow for the clamps to be inserted as well as for dust to fall through the holes, and it will require either a lot of work to produce my own bench dogs or a lot of money invested in commercial clamps and dogs.
- I'm very intrigued by the idea of having a MFT style cross cut sled built into the table top. Having a way to place a rack square to a fence repeatably and reliably with a built in clamp on the fence would solve a lot of my cutting problems as well as making it much faster to perform a cut. I think I will find a way to do this no matter what top I come up with. I can make a fence out of an aluminum extrusion and have it slotted into the bench in such a way that I can remove it if I need the full top to be flat. And coming up with a way to hold a track at right angles to the fence should not be that difficult.
- I looked into t-slots on the top of the bench. I'm not really a fan of t-slots in general. They are cumbersome to use and I always find it frustrating slotting clamps into them. However they are fairly low profile and don't need a lot of space below the top of the bench and can easily be retro fitted to any bench. They only help with holding down material, there is no sense of square with them.
- I could go with a more traditional table with a vice and bench dogs for clamping. However I own exactly one plane and it is only 3" long and complete junk, so I don't see myself using any traditional wood working skills any time soon.
- I'm intrigued by the benches that have a cavity under the top where you can store items. That would help unclutter the top and it compliments the bench dog system as well as providing a face to clamp onto. I'm extremely nervous that this would soon become a pit of despair, but my bench top already trends that way and this may actually help things out in the end.
- In the back of my mind I would like to have room to put a router into the table top. I know router tables are not that safe, but they do seem quite useful. However I don't know if it is worth designing around this any more than designing around some future table saw I will probably never buy.
I'm thinking of combining a few of these ideas together and making a (sparse) torsion box style top with holes in the side so you can easily store tools inside as well as providing a lip to clamp onto if needed. I could put some MFT style holes into parts of the top and leave the rest alone. Those could allow for a cross cut setup without having to have swiss cheese for a table top. And if I size it right I could add in a bench vice or a router lift at some point in the future.
I'm also contemplating making some sort of registration pins so that I can lock the CNC table and my workbench together firmly to form an uber table for the few times where having one continuous flat top is important. However I'm unsure if I could make this strong enough to eliminate any sag caused by an uneven shop floor. If I can't then it is probably enough just to push the tables together and lock the casters.
In summary I really need to pick a location for the air compressor, and work out the style of top for my workbench. Everything else can be planned more or less as we go along. Once I have the carcass up and running the shelves and drawers could be retrofitted if needed (although having a proper plan in place is always best).
I'm quite happy with my 2" caster wheels. They work even better once you have some weight on them, so I'm going to stick with those. I do need to pick drawer slides out. Part of the hang-up there is that my CNC and workbenches are actually quite deep at 32" and I can't decide if I should try to push it and make 30" deep drawers or try to come up with a way to have limited storage on the back side of the carts that is not accessible very easily. I could make these workbenches less deep but I have the space for them and I don't think I will ever regret the depth.
So many thoughts running through my head, I need to make some hard decisions so I can move forward here. Anything is probably better than nothing and my guess is whatever I come up with is more than enough, since I only have simple benches right now and really am happy enough with them, other than the total lack of storage.
-
Success!
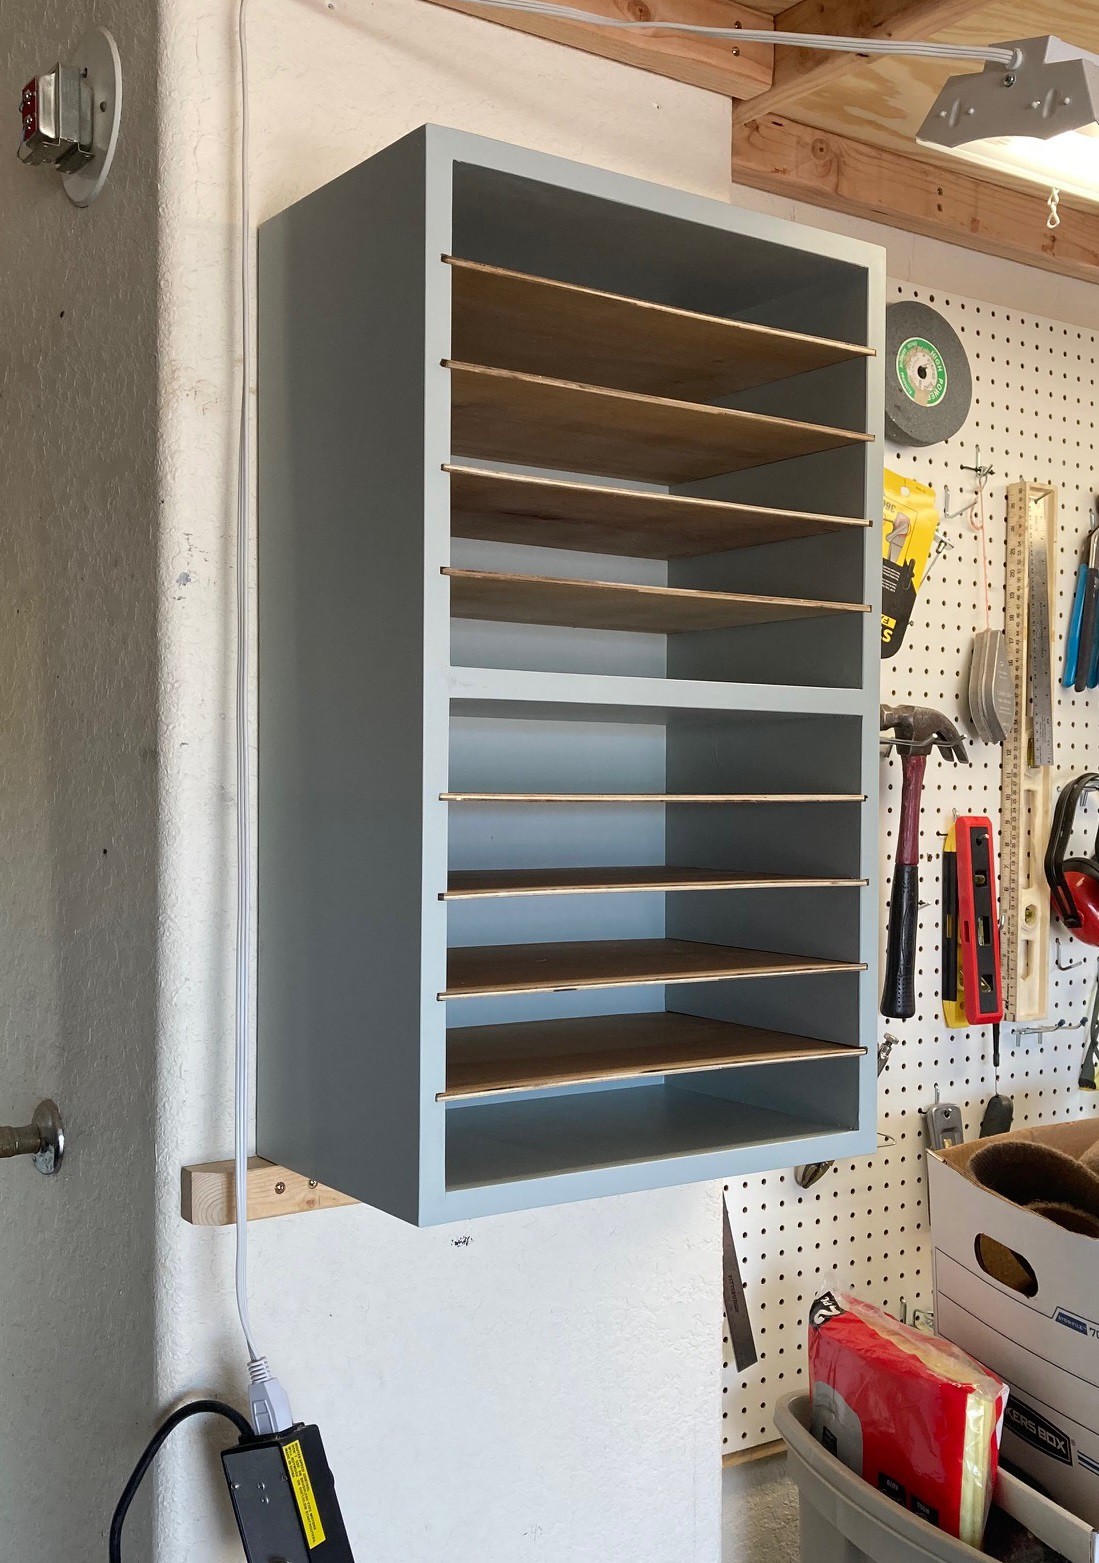
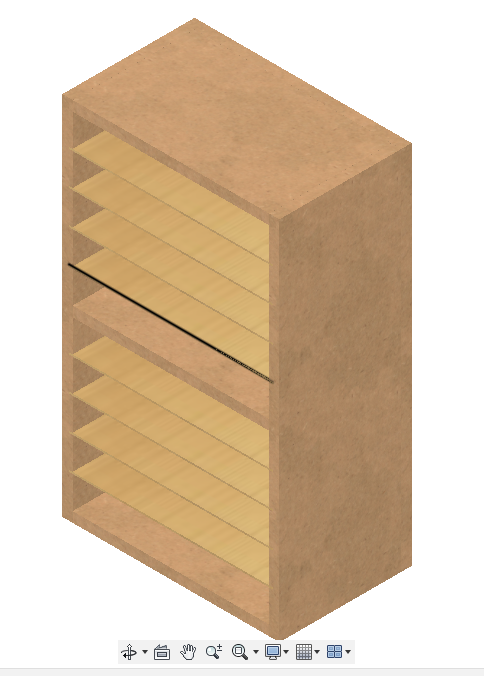
02/25/2023 at 23:38 • 0 comments![]()
I was able to get this project wrapped up and onto the wall. I mounted it a bit higher than I would have normally so that in the future I can make a bracket under it to hang my drills from. It turns out a rotary sander is a really nice thing. I have had a pad sander basically for ever and last year I asked for a rotary orbital sander. This is the first time I have had a chance to use it and it was a very pleasant experience. It turns out a bit of sanding can cover up all sorts of mistakes.
![]()
I ended up gluing and screwing this together. The glue is surprisingly strong, I did not even need to put a back on it for rigidity, although I went ahead and used a piece of 1/8" plywood for the back anyway. To cover up the screw holes I used a bit of spackle I had laying around. It worked out better than you would have thought, although wood filler is probably the better choice.
![]()
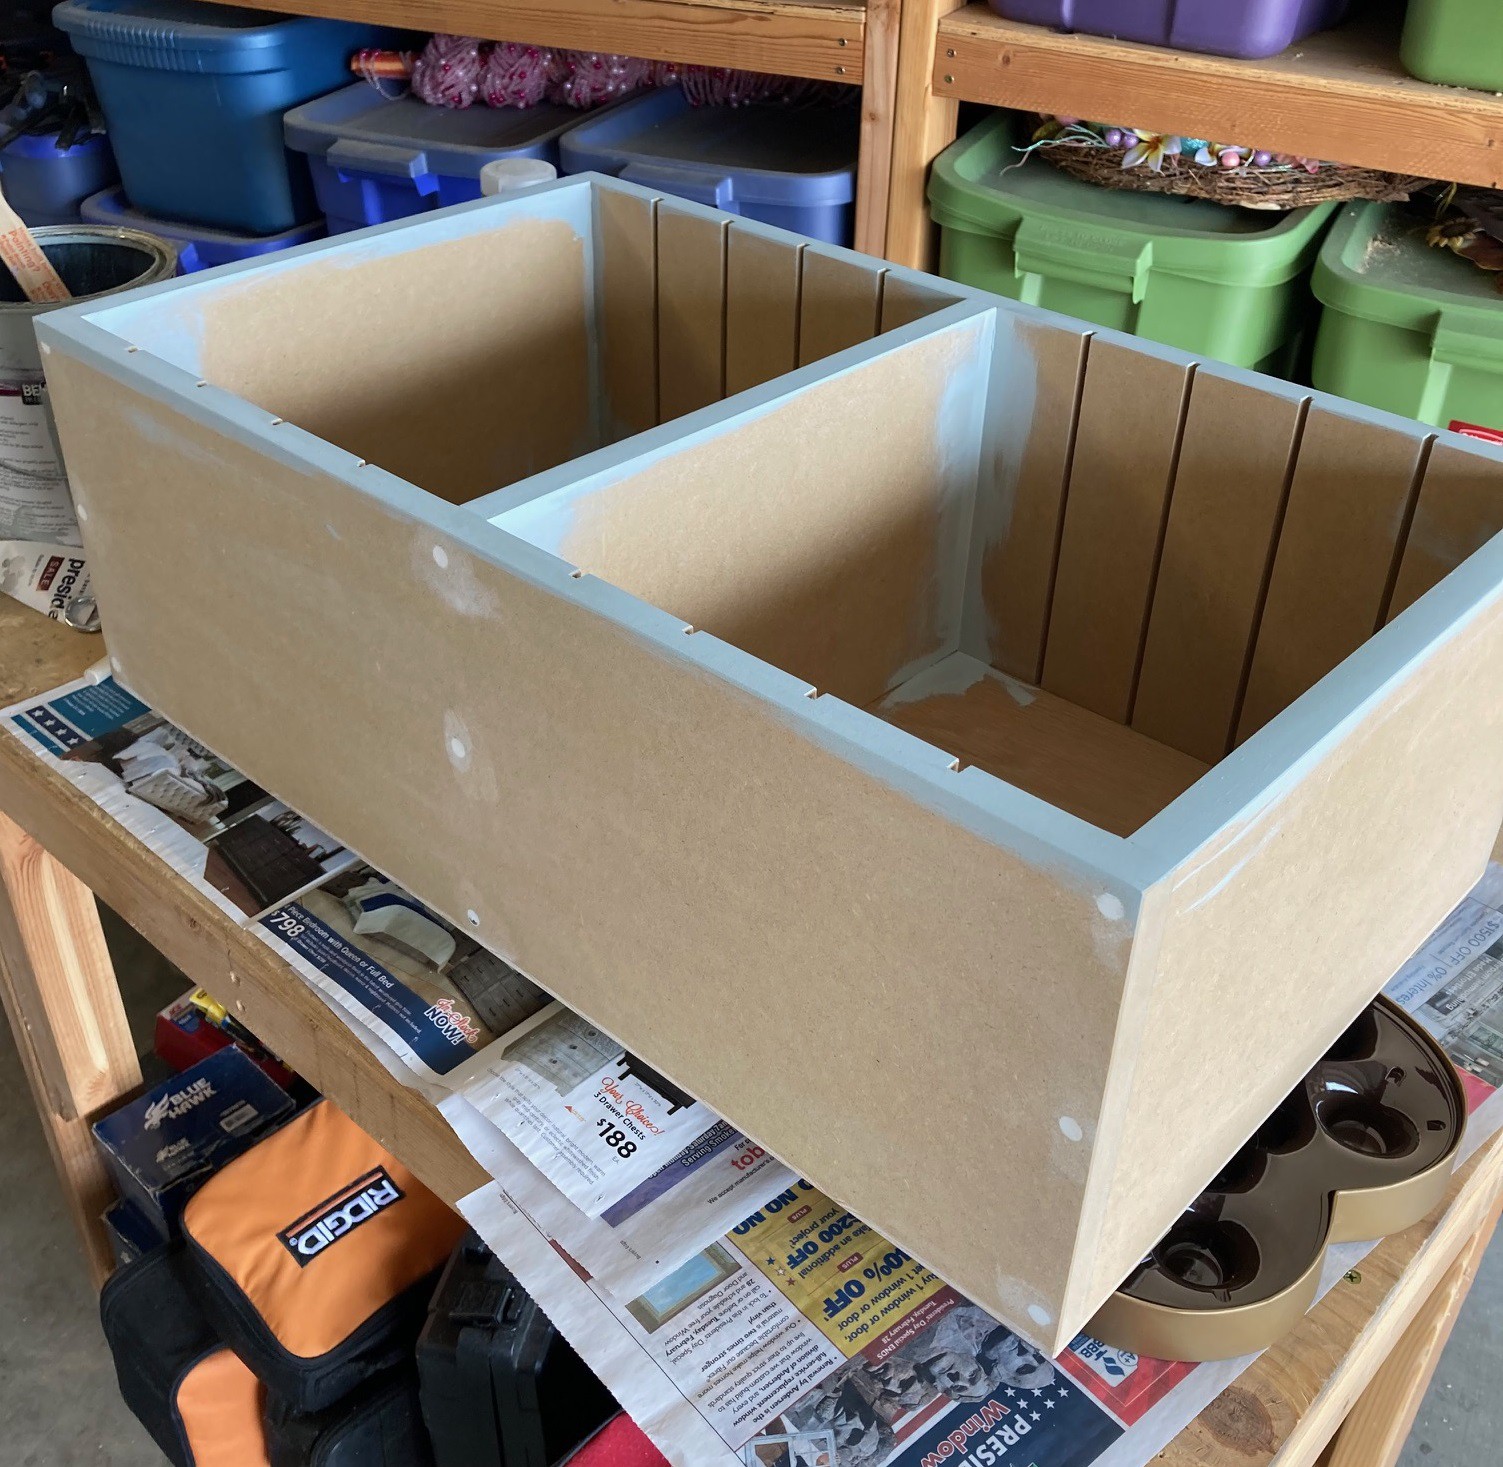
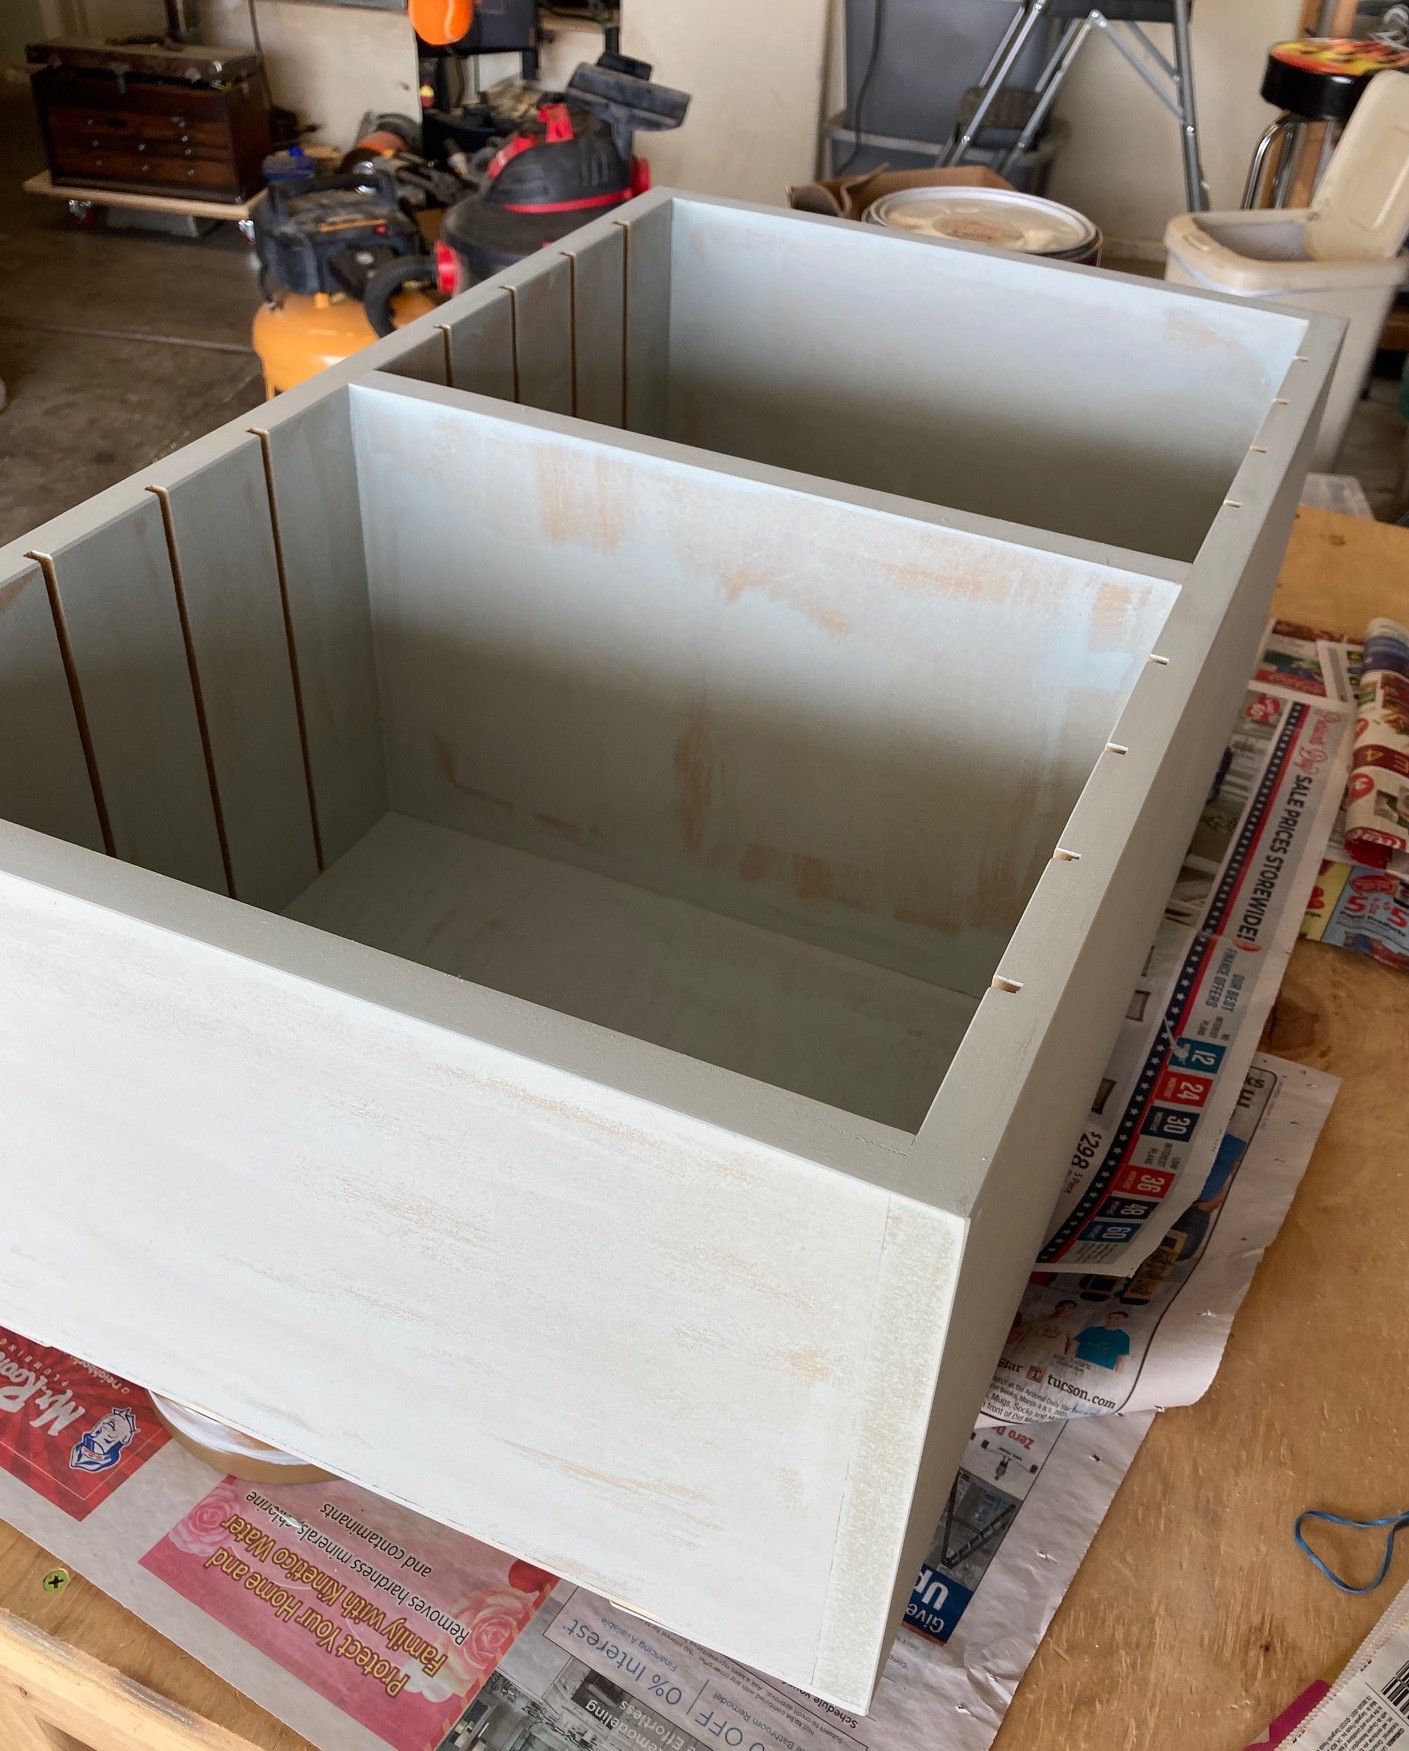
I have been trying to work out how to finish my MDF cabinets. I'm very intrigued by the idea of using osmo oil for a natural finish. It is natural, has less VOC's and should be easy enough to touch up later if it gets scratched. However it is very expensive and not available at the regular hardware store. I could use another type of oil finish, but they also are fairly expensive for MDF. After googling around a bit I found a woodworker that uses water based latex paint to finish MDF. He said the secret was to dry brush on the first layer very lightly to seal up the MDF and then add two thin layers on top of that. I had a can of latex paint laying about so I decided to give it a try, and while it looks horrible at first, the end result was great. He also suggested a very light hand sanding between the first and second coats to knock off the fibers.
![]()
The third coat really goes on nicely and it feels and looks like a professional paint job. I put this all on with just a foam brush, but a foam roller would have worked better. For the shelves I lightly sanded them then used a spray lacquer to seal them up. I thought the natural wood would contrast nicely with the painted cabinet.
This thing weighs in at around 50 pounds fully loaded and I really did not want it coming off the wall. So in addition to using metal corner braces with screws through them to hold it onto the wall, I added a piece of wood under the cabinet for it to rest against with extra screws in it as well. I figured the wood strip is stronger than the mdf and less likely to split under load.
I learned a lot in this initial project and with a bit of extra effort I think I could pull off a much larger build. I need to force myself to finish the cabinet designs and spend a weekend in the garage coming up with new jigs to help cut wood more consistently, and then I think I'm ready for the big project.
-
Oh Snap
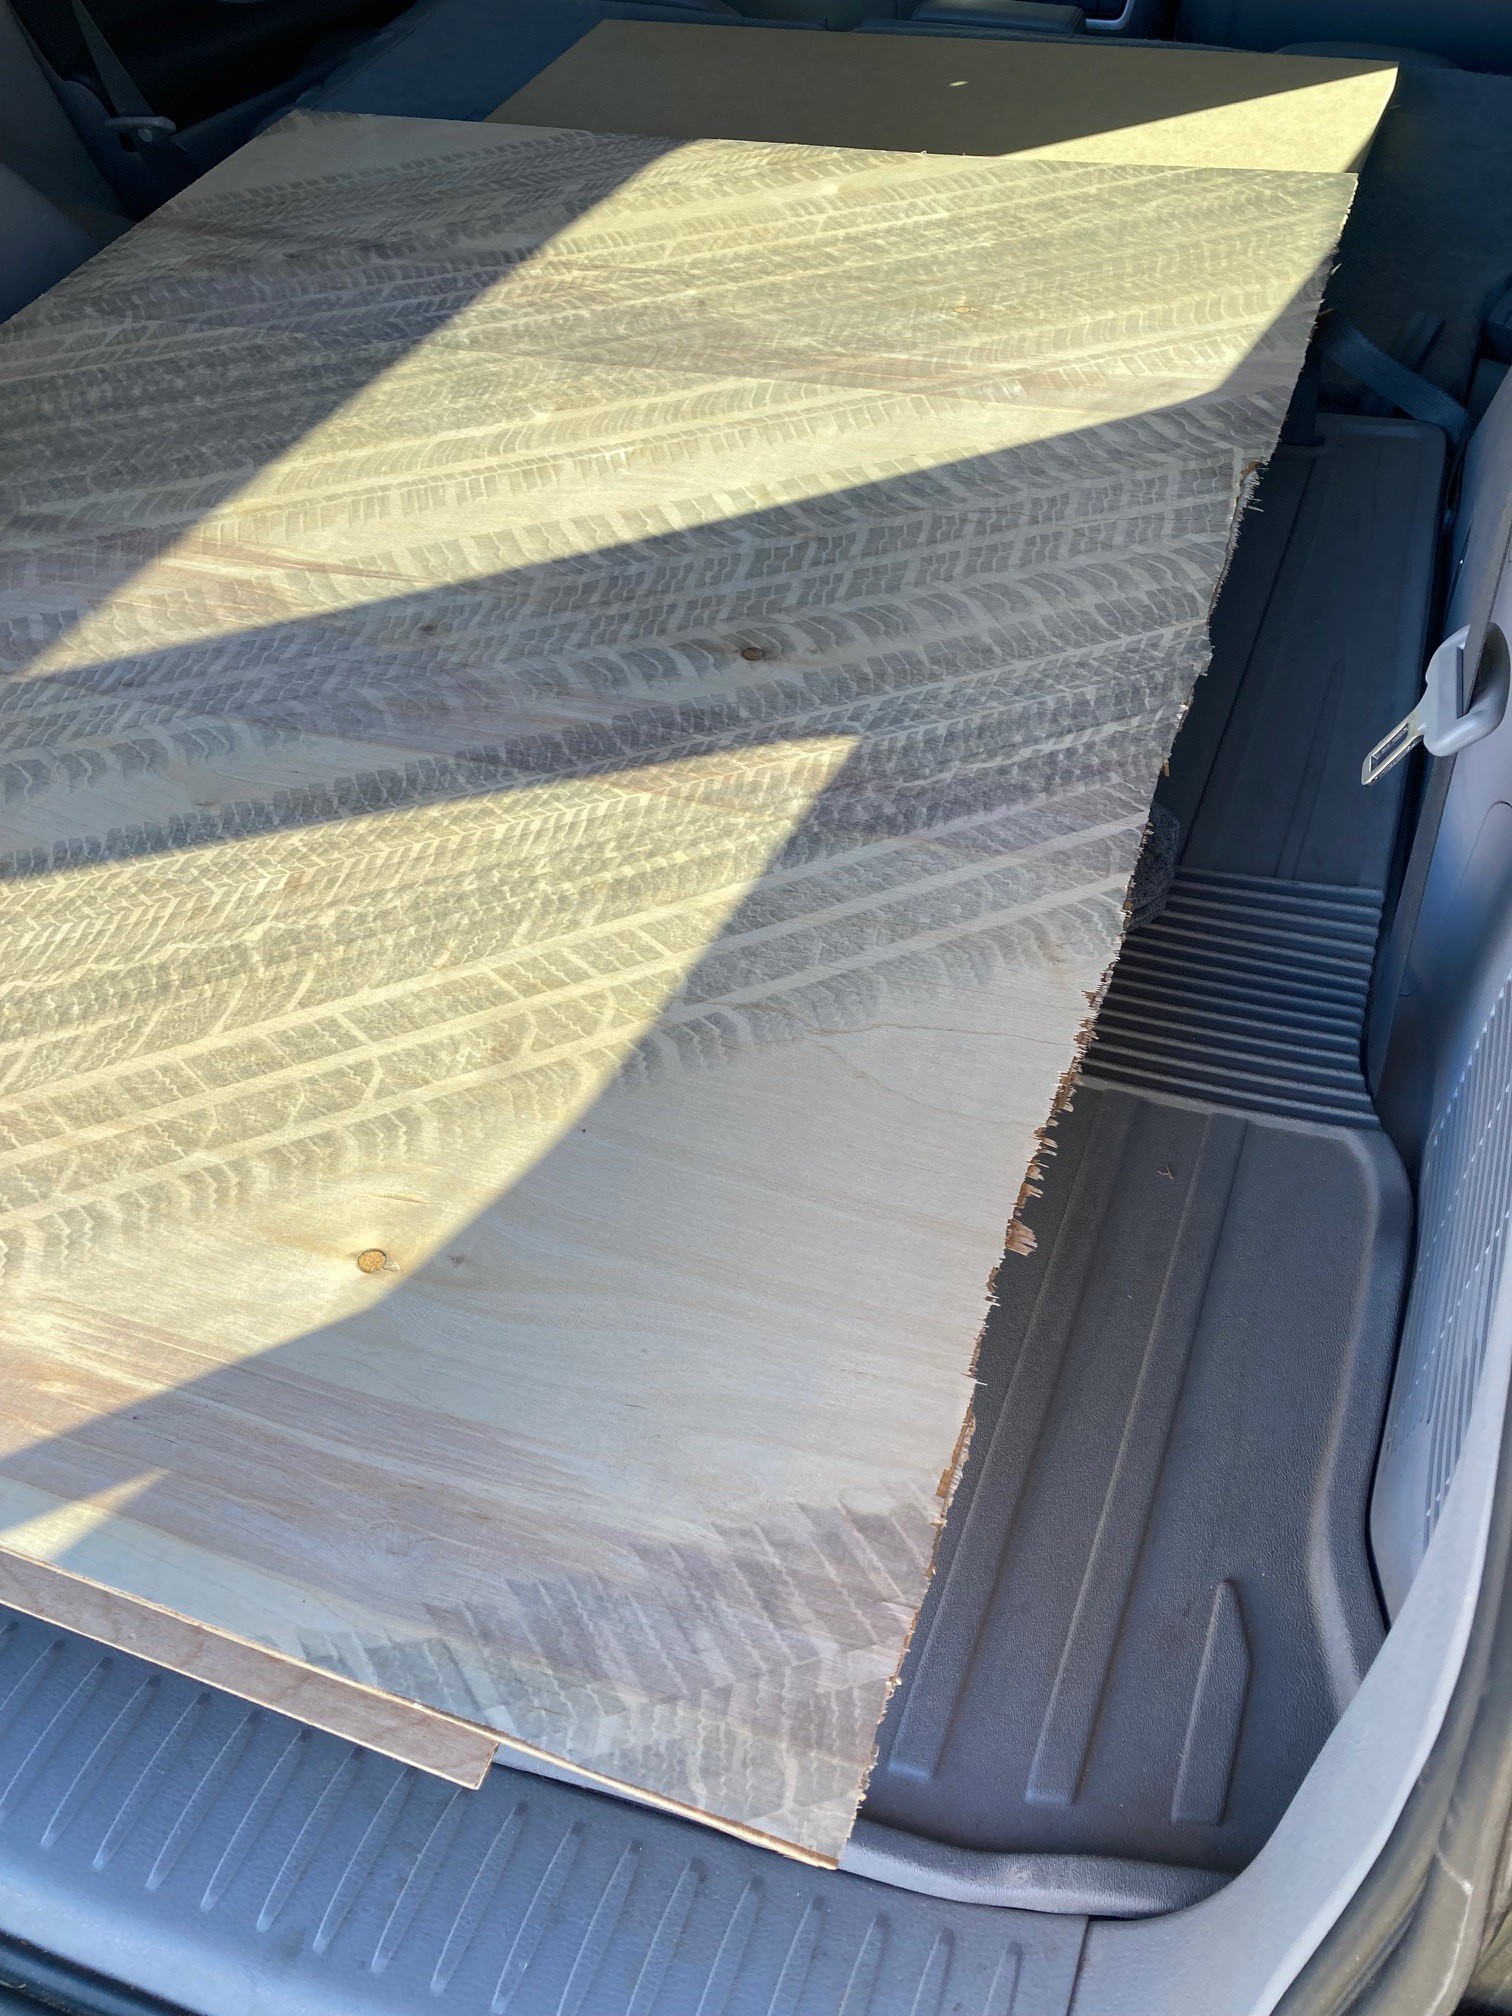
02/25/2023 at 06:22 • 0 commentsI have not been very active on here but I have been working on this project. I was able to put my roof rack to the test and picked up a 3/4" sheet of mdf and a 1/8" sheet of plywood.
![]()
I got it all loaded up ok, but I foolishly put the 1/8" plywood on top of the MDF and forgot to put a strap on the front end of the stack. The minute I got up to 40 mph the 1/8" sheet snapped right off. Fortunately no one was behind me and I was able to circle back around and pick it up.
![]()
Going forward I will use the front strap and stack the thinnest pieces on the bottom and I think it will work out well. Once I got the front strap on it was very solidly connected to the rack. There was no real harm done, I only picked up full sheets because they are 3x cheaper than buying 1/4 sheets, something that makes absolutely no sense.
![]()
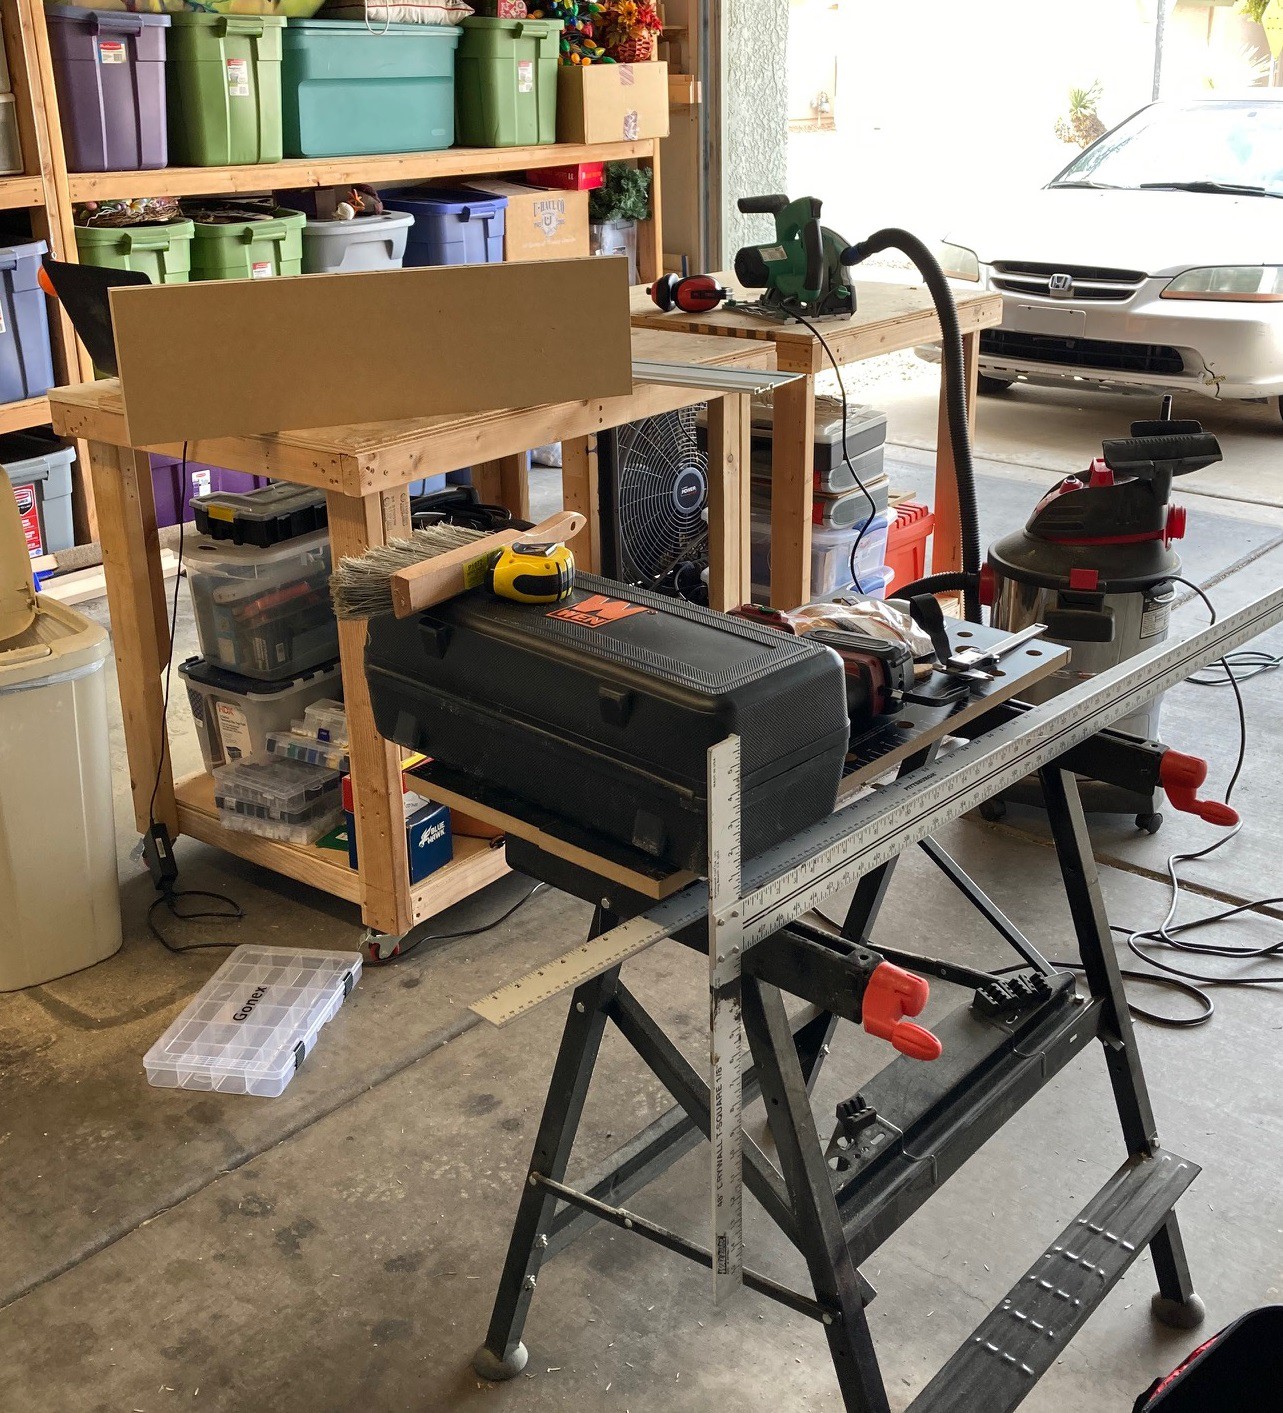
I pulled my newly refactored carts out and used my workmate for tool storage. This worked out fairly well, I was able to use the gap between the tables to cut material and it was large enough to comfortably hold a full sized sheet without feeling sketchy.
The track saw is great, but the dust collection is not. I suspect putting a piece of tape over the access port for removing the blade would help a lot, I need to give that a try. I also need to experiment with ways to accurately make repeatable cuts. Most of mine were not that bad, but two were off by 1/16" and 1/8" respectively.
![]()
I also had issues with the track rocking a bit on some cuts. Looking at the profile off the track you can see that there is a foam anti slip strip missing on the right side, and the splitter guard is really thin, about half as thick as it should be. Both of these together let the track rock a mm or two up and down. That effects the squareness of the cut and in the case above you can see it can effect the depth of cut as well. It looks like you can get rubber strips in various thicknesses for relatively cheap. I'm thinking of picking up something much thicker to try and stabilize the track better.
![]()
I was able to use my biscuit jointer as well, it seemed to work very nicely. There is a small tip to the base plate that I need to shim up. That caused a very small misalignment of the boards when putting the caraccas together. However I was able to push it back into place easily enough. Now that I have some scrap wood to work with, it should not be too hard to clean that up.
I'm in the process of prepping the cabinet for painting, and then I need to work out how to hang it on the wall. It weighs about 50 pounds when fully loaded, so whatever I do I need a strong way to mount it. Hopefully I will have time tomorrow to finish this all up. This is all a bit rougher than I wanted it to be, but I can see ways to improve almost every part of the build, and that ultimately is the point of making a test project. I'm looking forward to starting on my benches, once I have this polished up.
-
Rack-em-up
02/12/2023 at 20:43 • 0 commentsSo we had a family weekend, my son came home from college and we went out last night and have more plans for today. However I did find an hour or so yesterday morning to sneak out and finish the crossbars for my roof rack.
![]()
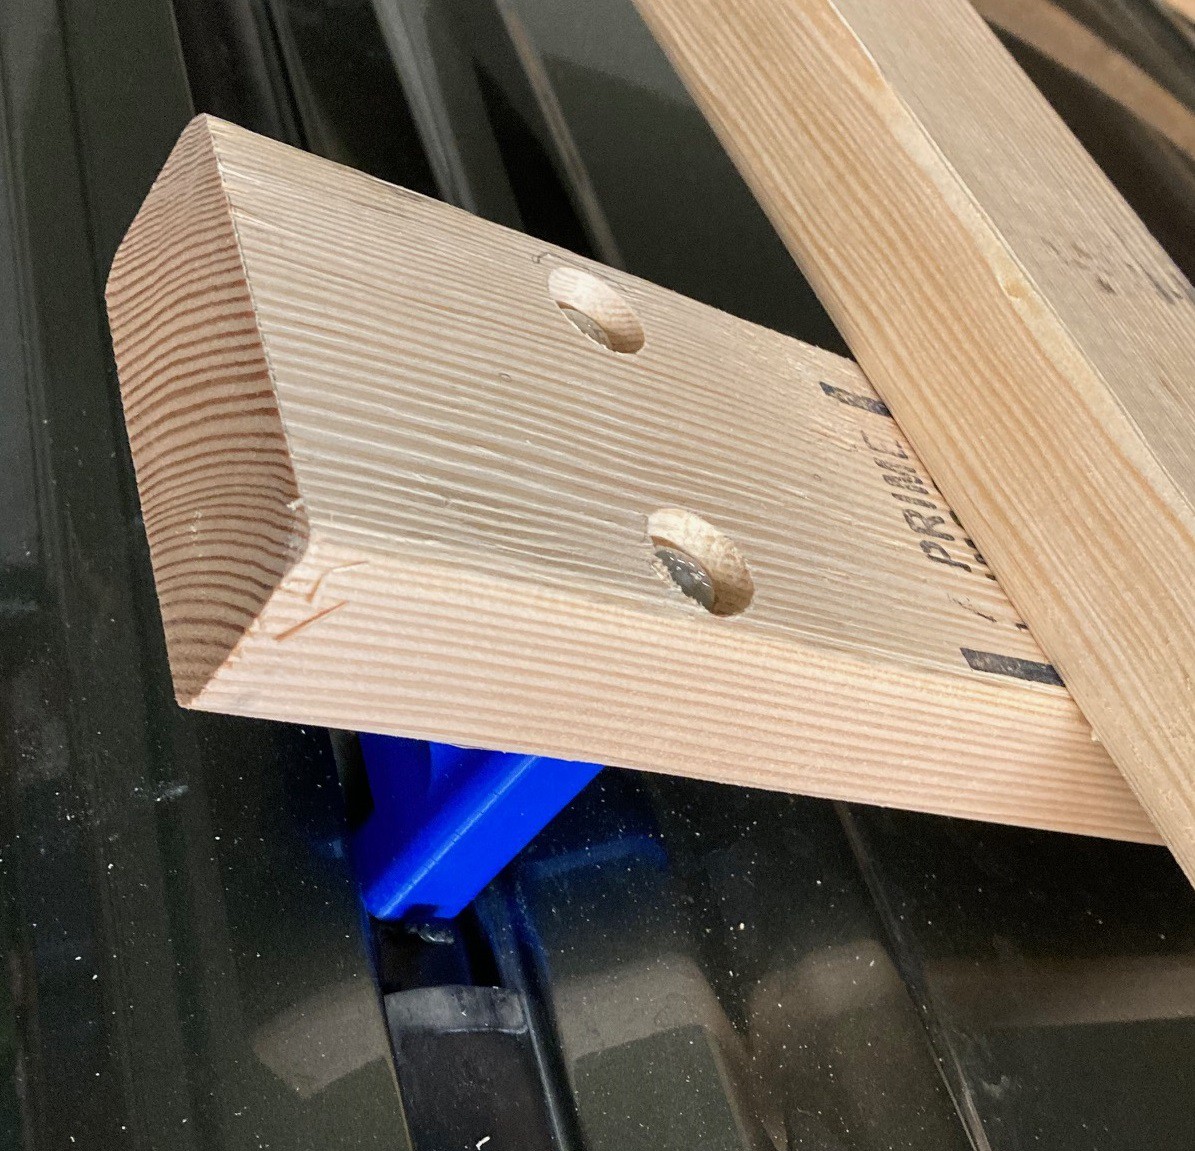
I just finished the cross bars, I can optionally add these 8' 2x4's (ones temporarily a 2x3) to further add support to thinner sheet goods. That would let me add a stop to the front (and possibly back) of the extensions so the sheet goods can't slip out of there holder under heavy braking as well.
![]()
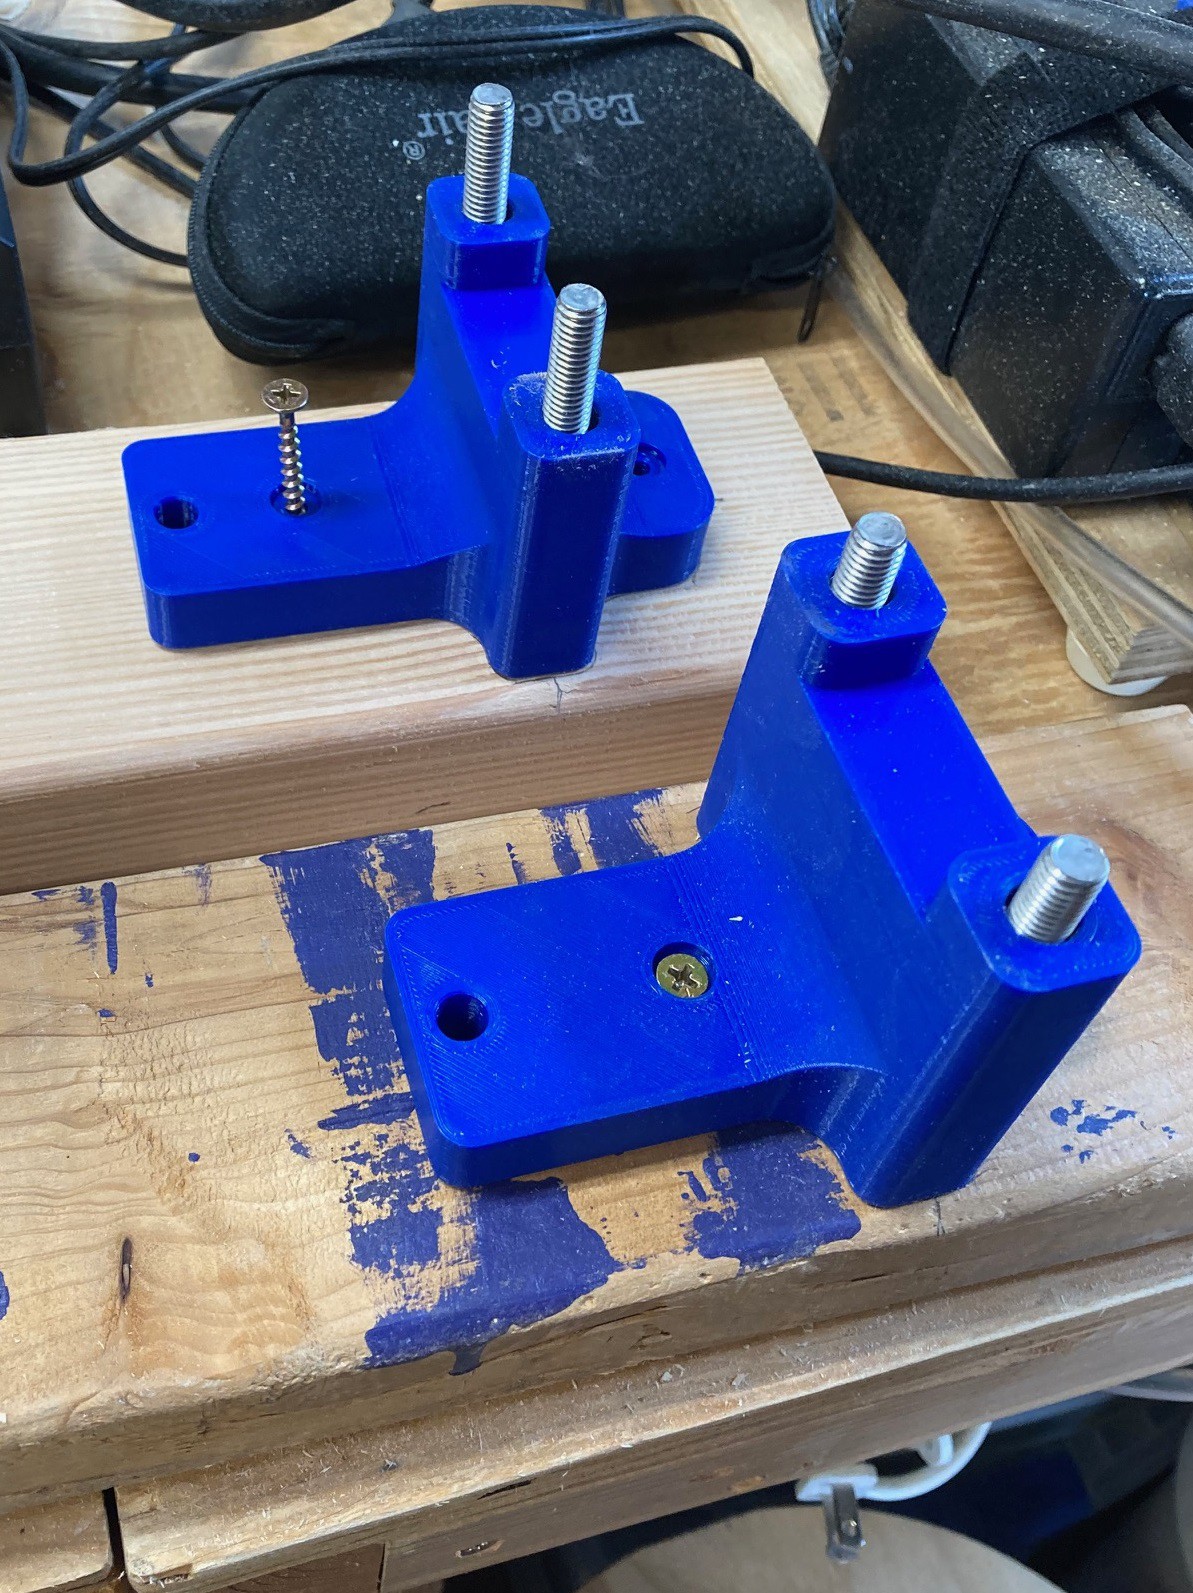
This uses 3D printed standoffs to get the crossbars high enough to clear the roof. I put a single screw into the standoff to roughly hold it in place to make assembly much easier, but it is loose enough for these pieces to move around. The holes in the roof are all askew and this allows it all to line up easier when assembling it.
![]()
I'm using 8mm bolts countersunk into the cross bars that are 110 mm long. This bolts straight into holes in the roof. Because they pass through everything they should be able to contain the whole mechanism (for a while) if there is a catastrophic failure of any one part.
![]()
![]()
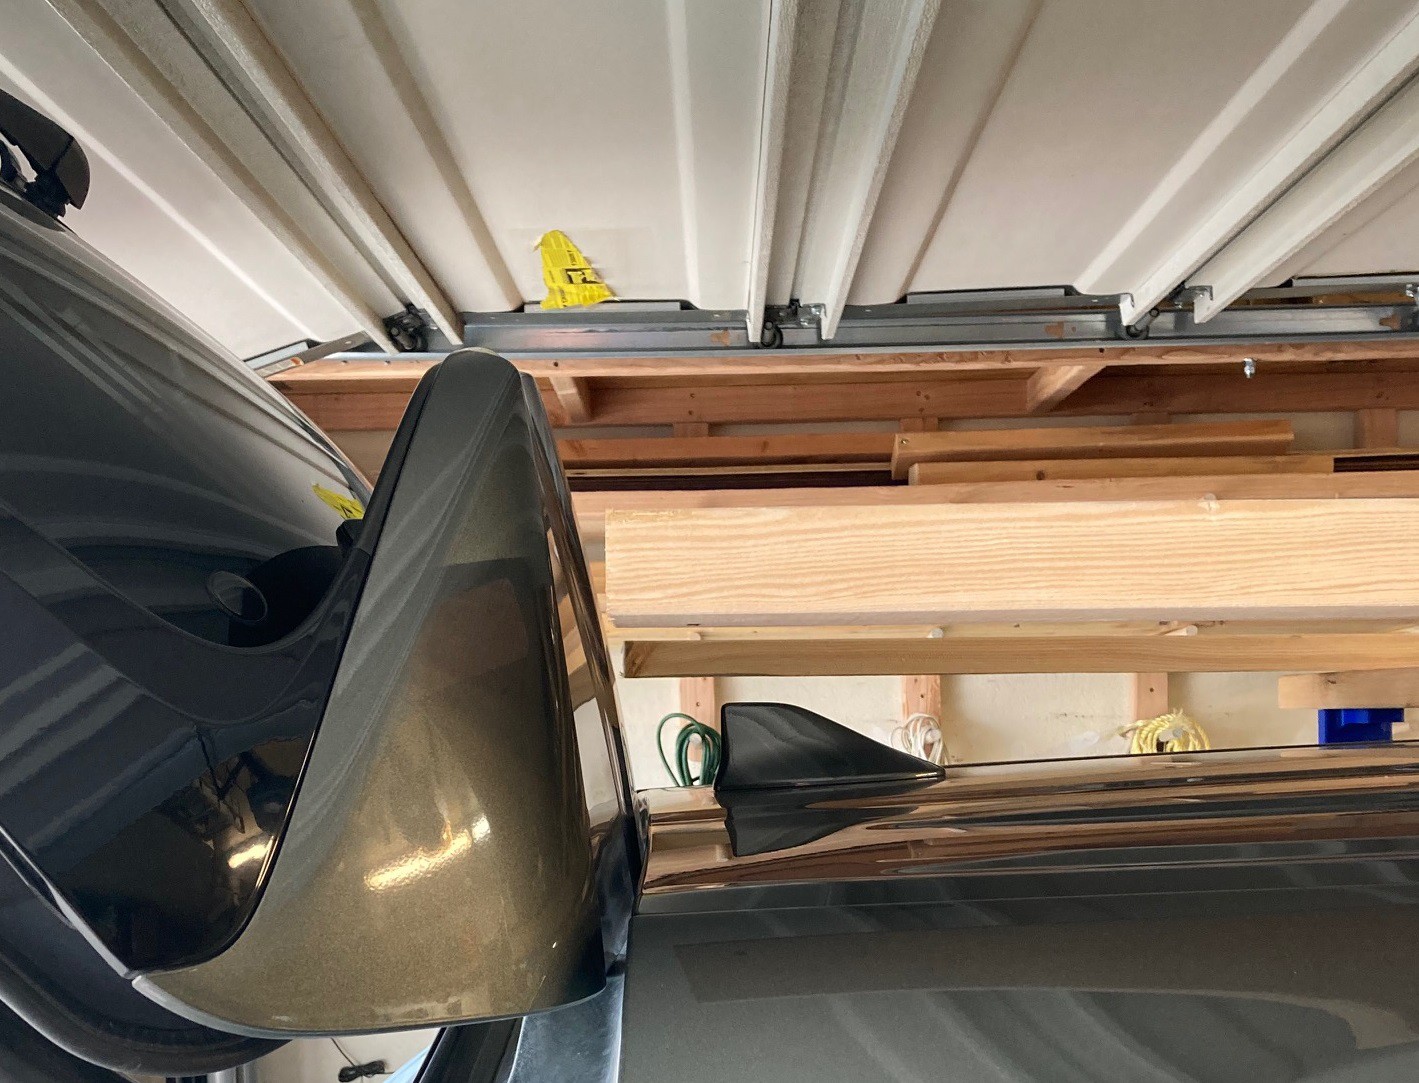
By carefully placing these extensions I can still open my rear hatch and not obstruct my view in the front. And the cross bars are 53" wide and still fit within the roof space so your not at risk of hitting your head on them when entering or exiting the car.
![]()
When removed from the car they don't take up much space. I can hang these on the wall without much effort. The extensions are even simpler, I'm not quite sure how I will attach them but I think I will just run a bolt through them into the crossbar so they essentially are just 2x4's with a hole in it.
I think these are a much better version of a roof rack than the commercial models, at least for carrying sheet goods. The official roof rack from Toyota cost $325 and can handle 165 lb (75kg) of load. It seems like a fine enough rack at that price, but mine cost around $15. More importantly for our uses there rack is far from flat and there is no straight forward way to mount the extensions to it directly. Amazon has much cheaper crossbars for $80-$200 but they all seem to have a fatal flaw. The crossbars are attached to the legs with set screws rather than a proper bolt through the whole mechanism like the Toyota ones. There are loads of reports on amazon of them separating at highway speeds, that is unacceptable. There are probably many other crossbars that are much flatter and have plywood storage in mind, but they will certainly cost more than the stock bars and look worse as well. So in that case my DIY bars are as good and much cheaper.
I figure these bars can hold far more weight than the roof could safely handle. I don't see why they could not hold up to 500 lb or more of weight. However I suspect that much weight on the roof would be very scary to drive around with. I'm going to try to limit myself to 2 sheets of 3/4" mdf or 3 sheets of 3/4" plywood at a time. Honestly I'm most likely to buy sheets one at a time for the small amount of work I do.
I still need to pick up some eye bolts to add to the crossbars so that I have a good place to attach my straps and I need to come up with the final position and attachment for the support extensions, then work up the nerve to try this all out. My house is only about 3 miles away from the plywood store and all the streets are 45 mph or slower so it should be safe enough, but my goal is to not make the evening news.
--
I had a bit of an epiphany on my main workbench. I have been trying to watch a bunch of videos on how to use track saws better and two ideas kept popping up. One was to have a sacrificial grove cut into the top of your main workbench for track saw cuts. By aligning future cuts on the same cut line you can make rapid cuts without needing to mess around with hanging things off the side of the table or using sacrificial pieces. This seems like a very smart idea, I think I will incorporate it into my table top.
The other idea is to have two tables at the same height that can be used when breaking down larger pieces of material, aligning the cut between the benches. I have two benches, but one of them will have my CNC on top of it. I always wanted to make a cover for the CNC so it can be properly vented and safer to run the laser without needing to wear glasses the whole time. It occurred to me that I could build a box inside the table with a rolling shelf for easy axes. That box could then be vented and provide the cover for the CNC while also leaving the table top free for work.
If it works then this is great! I don't always use the CNC so I can use the extra space it would take up for assembly or other work while still having it available anytime I need it. It would cut into storage a lot, but I think the little space I have left in the cart would nicely hold all the other accessories and filters for the CNC.
-
This and That
02/11/2023 at 04:45 • 0 comments![]()
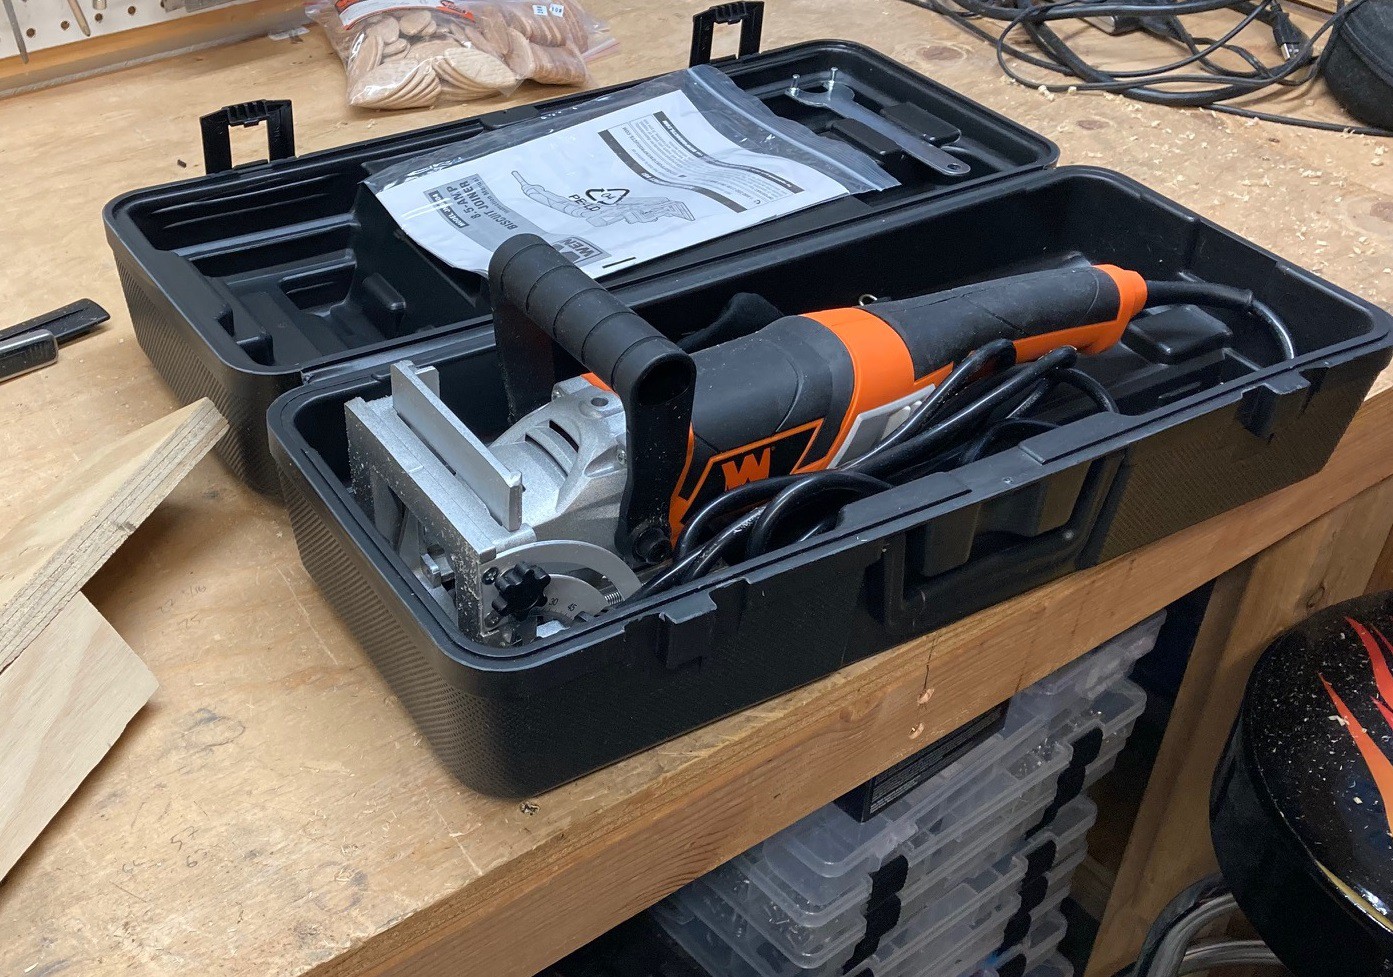
My biscuit joiner came in! It was crazy cheep at around $50. I picked this one over the harbor freight or grizzly model mostly because it came with a nice blown plastic case.
I spent some time with the calipers and a square verifying it was all put together well, it seems well built for the price. There is a bit of slop side to side on the main axis of motion but the more important vertical play is very minimal. The fence has a tiny bit of slop in it but for the most part it works well. I had a look at a porter cable model at woodcraft and it was very close in feel to this one with similar amounts of play.
One negative is that the springs on the plunge are a bit stiff. It really takes 2 hands to push this into the material. That is fine because this also does not have a soft start feature and it really jerks in your hands if you try to start it up one handed. You really need to clamp everything down well before using this (or any plunging spinning blade of death).
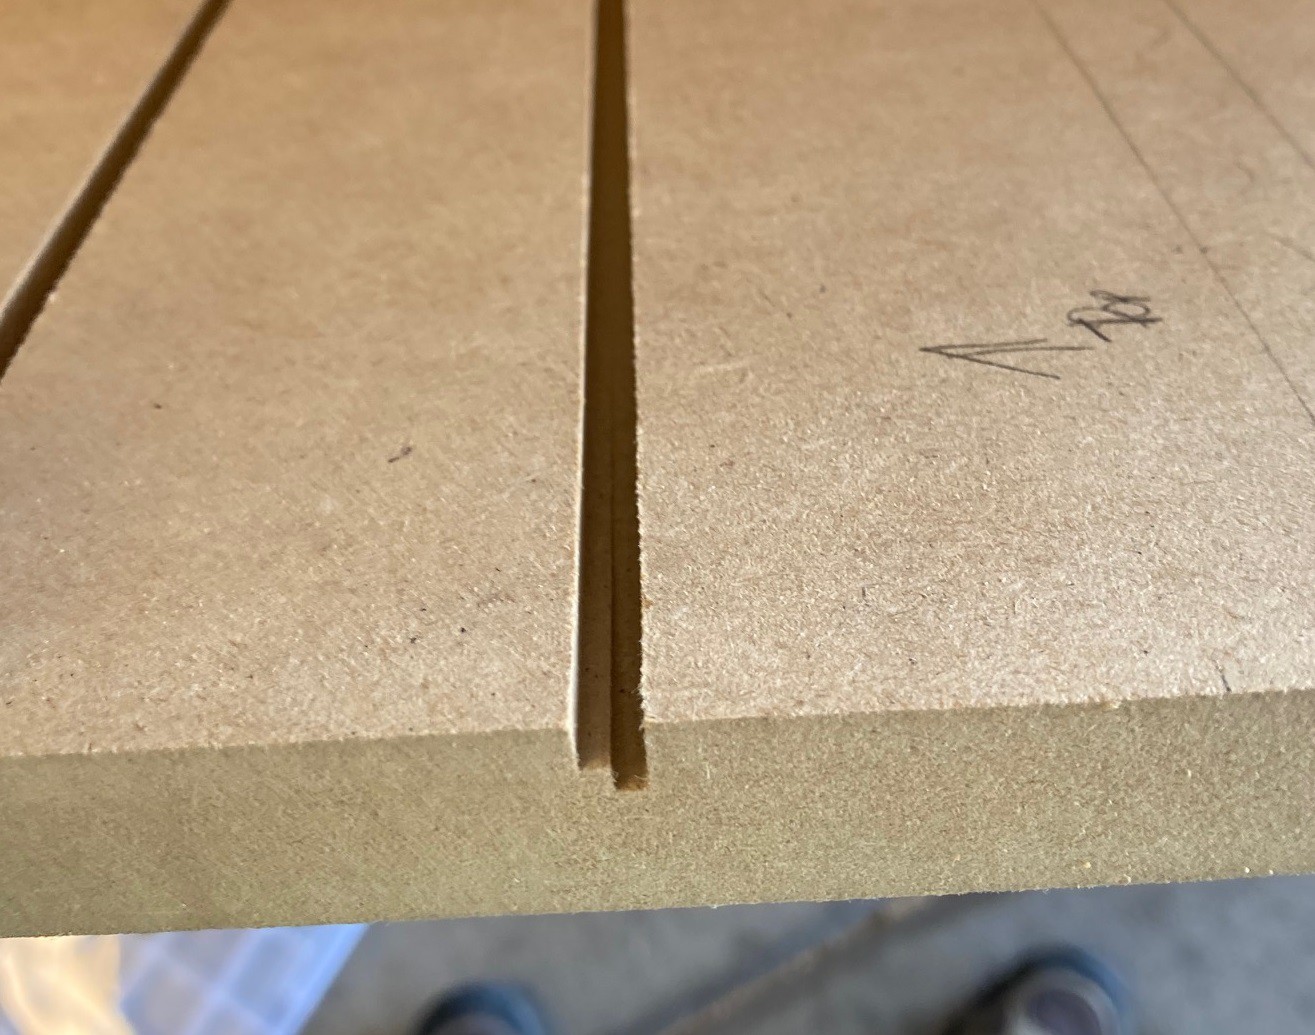
I did a quick test on some very warped and un-square scraps and it worked out surprisingly well. I measured only 0.2 mm of tilt in the slot across the full plunge depth. And the included biscuits fit nice and tight in the slot and held everything together very well. I'm looking forward to trying this out on something more serious.
![]()
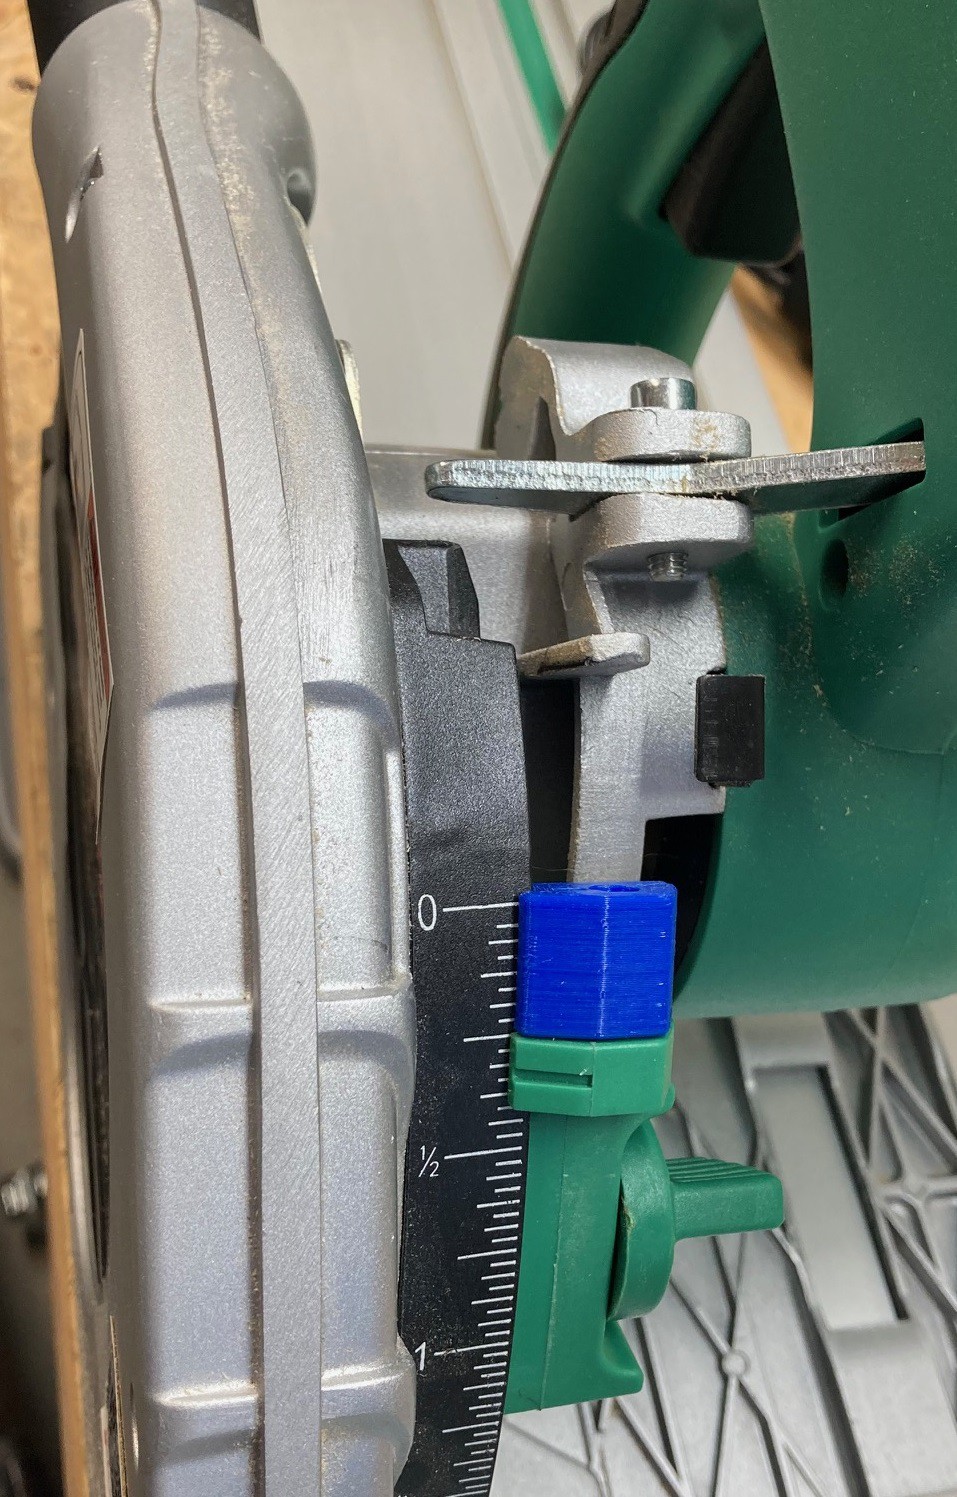
My track saw has a very annoying flaw. The indicator on the depth gauge is off by 5/8". It took me too long to figure this out, I kept setting my blade with plenty of room and it kept coming up short. I went through lots and lots of ideas on how to fix this, but eventually just printed a small spacer out to move the edge of the indicator up 5/8" of an inch. I attached this with a dab of CA glue, I think it will hold up well enough. I could just remember it is off, but that is bound to bite me eventually. Honestly I have been over this several times and can't see how they messed it up. Maybe it was originally designed for a larger blade.
![]()
I was out for a walk and noticed that my neighbor had filled in there expansion joints with foam sausage and some silicon. This was an interesting chance to see how this hold up and how it looks. It does not look that good and has not held up that well either and the foam sausage is not very stiff so it is fairly squishy as well. However it was not completely terrible, and I would be applying this indoors so it should hold up better.
One idea I have been thinking about is filling the crack with sand, then using a 1/4" layer of calk to seal it in. That may work better and provide more support than the sausage, without needing several cubic feet of sealer. I'm not sure if sand is a good idea, it won't compress that well, but should handle expansion just fine.
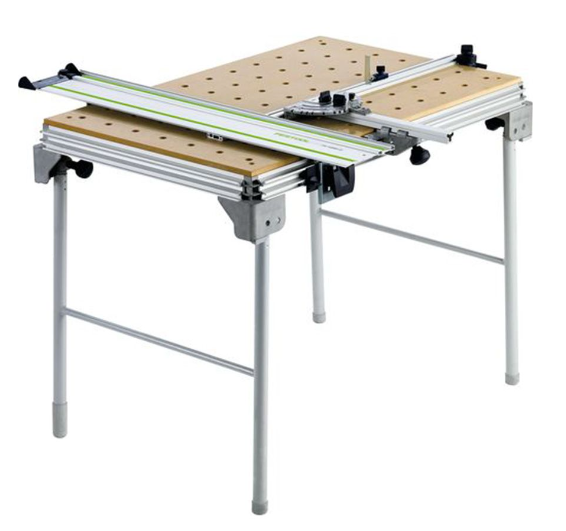
I'm a little behind the times, I just discovered the Festool MFT table. I was able to see one in person at woodcraft. It feels a bit rickety but I really like the idea of the elevated track that is held at a right angle to the workbench and using bench dogs to align and hold down the material.
I can't afford a festool keychain let alone a workbench, but this does not look that complicated to make yourself. I have a small CNC that could cut out a template, then using a router I could copy the holes into a sheet of MDF. It would cost very little to put together. However I would end up with lots of holes in the worktop, so I would need to make some sort of a torsion box so I can fit clamps into it and so material can fall through the holes.
The bigger concern I have is how much would it cost to get the bench dogs and clamps and other accessories. There seem to be several lower cost copies from China but even these are quite expensive. I have a 3D printer, so I could 3D print most everything as a first pass, however I'm not sure how well those would hold up over the long hall.
Another issue is that my workbench is going to be rather small, so this would only be useful for smaller cuts. At best I could handle a 30" width of material, not exactly amazing. Still this is a more modern take on a workbench, so it is worth thinking about.
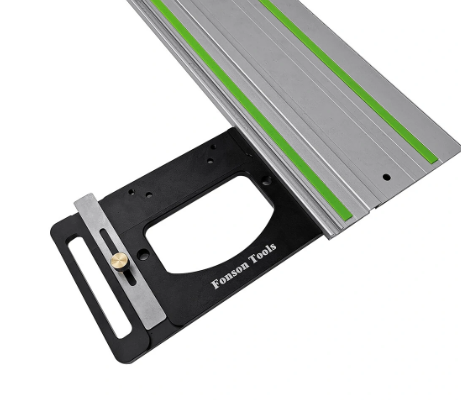
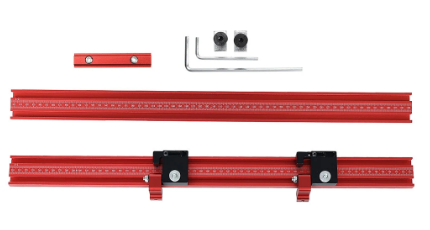
I will soon have a lot of material to break down and so I was looking around for some ideas on how to make this go smoother. There are these fancy parallel guides you can get for festool style tracks for $100 or so, but my tracks don't have the right slot to use these, and there a bit expensive.
Another idea would be to get a square for the end of my track. They range from $30 to $60, but I think I can make one on my CNC out of MDF fairly easy for free.
You can get these extensions for the square that allow you to repeatable make a cut from the edge of the board. This is basically a poor mans parallel guide system. Together this is runs about $110, or basically the same as the parallel guide system, but it offers two different ways to reference the edge of the board.
Again I can't really afford all of this, but I could build something similar out of wood or 3D print it. It is something to experiment with.
-
That's Nuts
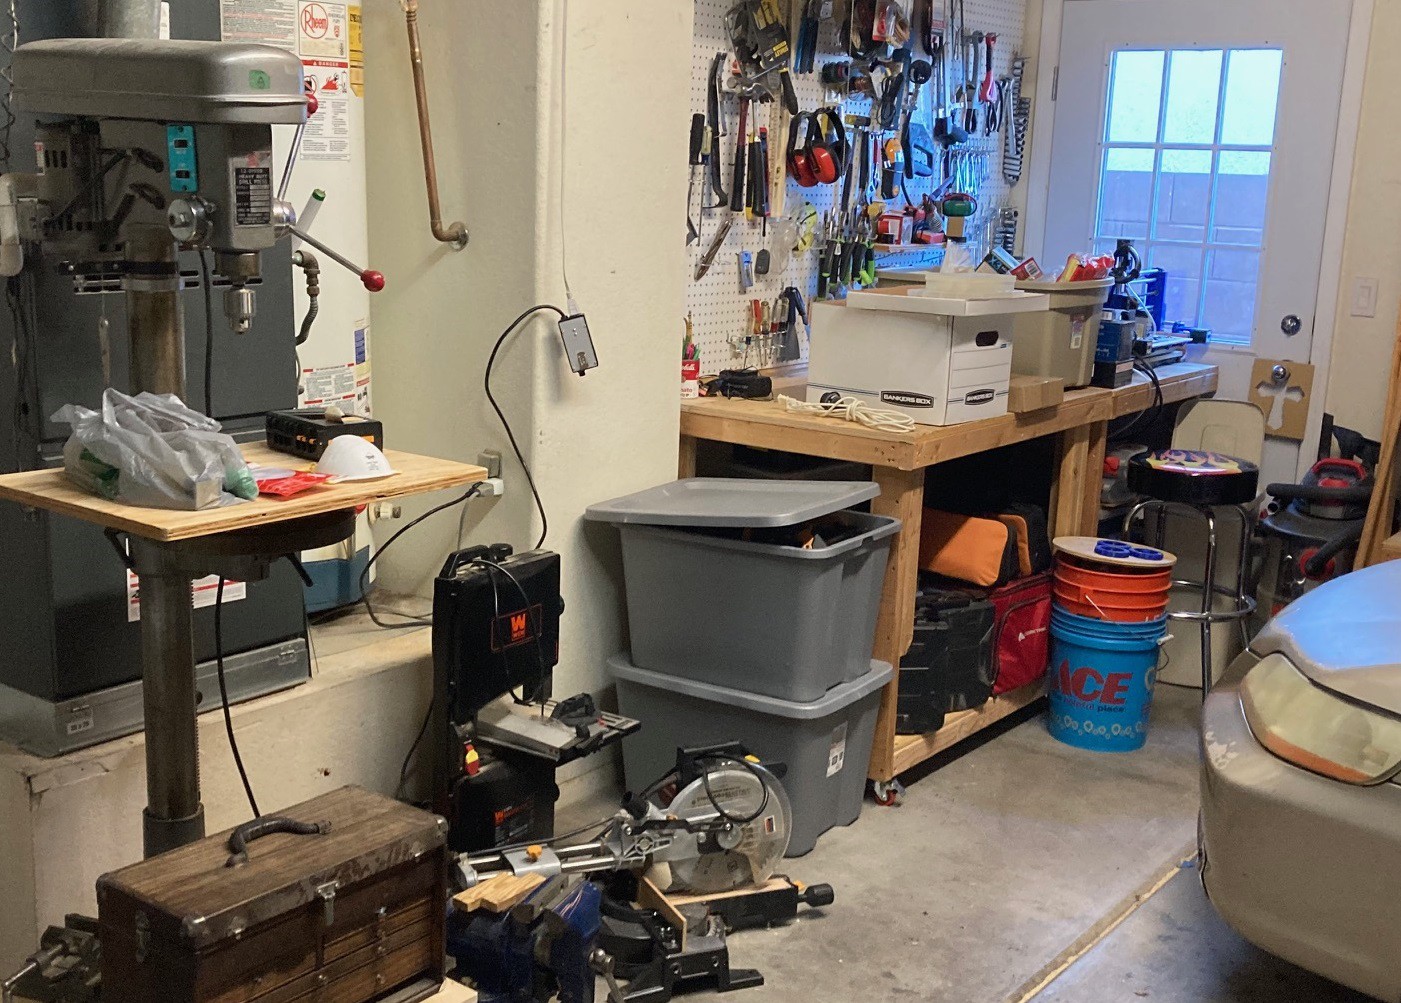
02/05/2023 at 18:04 • 0 commentsSo I managed to finish sorting through all my stuff and packing it away into boxes of related items. That allowed me to get my car back into the garage, although it does not leave me with lots of space to work. Still it is good to have things cleaned back up and now I can get my hands on anything with much less effort.
![]()
I have been thinking about my new workshop carts for a while now, but I'm fairly overwhelmed by the process. I have not made anything this complex before and with the price of sheet goods I really only want to do this once and get it right the first time.
To help things along I purchased plans from alch.shop for there miter saw stand, assortment cabinet, and assortment box with inserts. There carts are similar but not identical to what I want to build and I thought I could get some good ideas from there plans. The dimensions are surprisingly close, that gives me some confidence that I'm not heading off the rails.
One thing I really like that he came up with are these small 3D printed storage boxes that are roughly 2"x2" wide and 3" tall. They have boxes that are multiples of that base dimension that can be used to store larger items. And being even multiples makes it easy to pack may different sized boxes together. I have not tried to print any of there boxes out yet, but my hope is to incorporate something like that into my design.
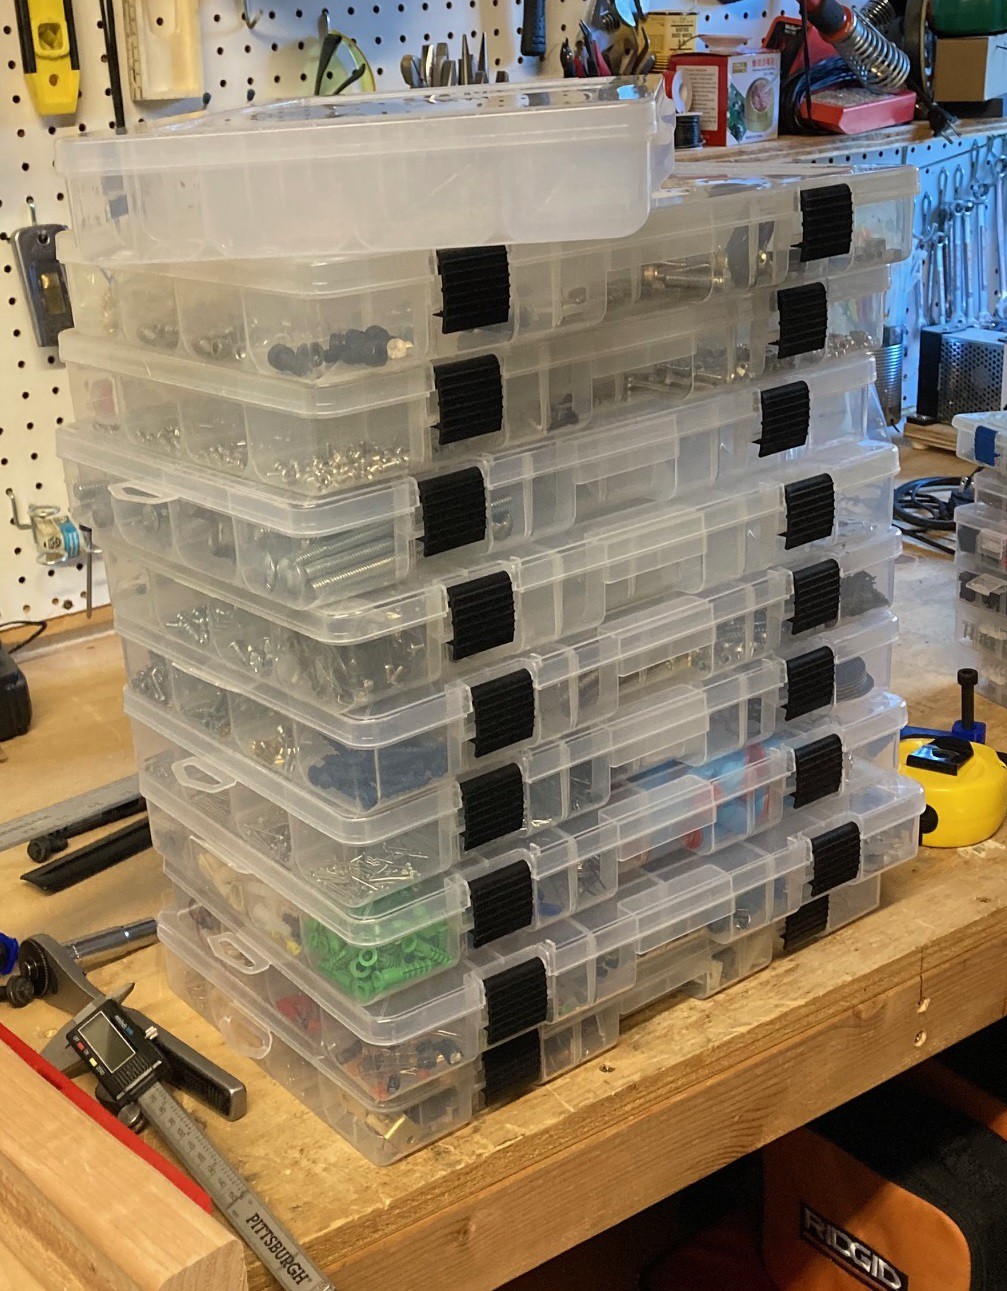
![]()
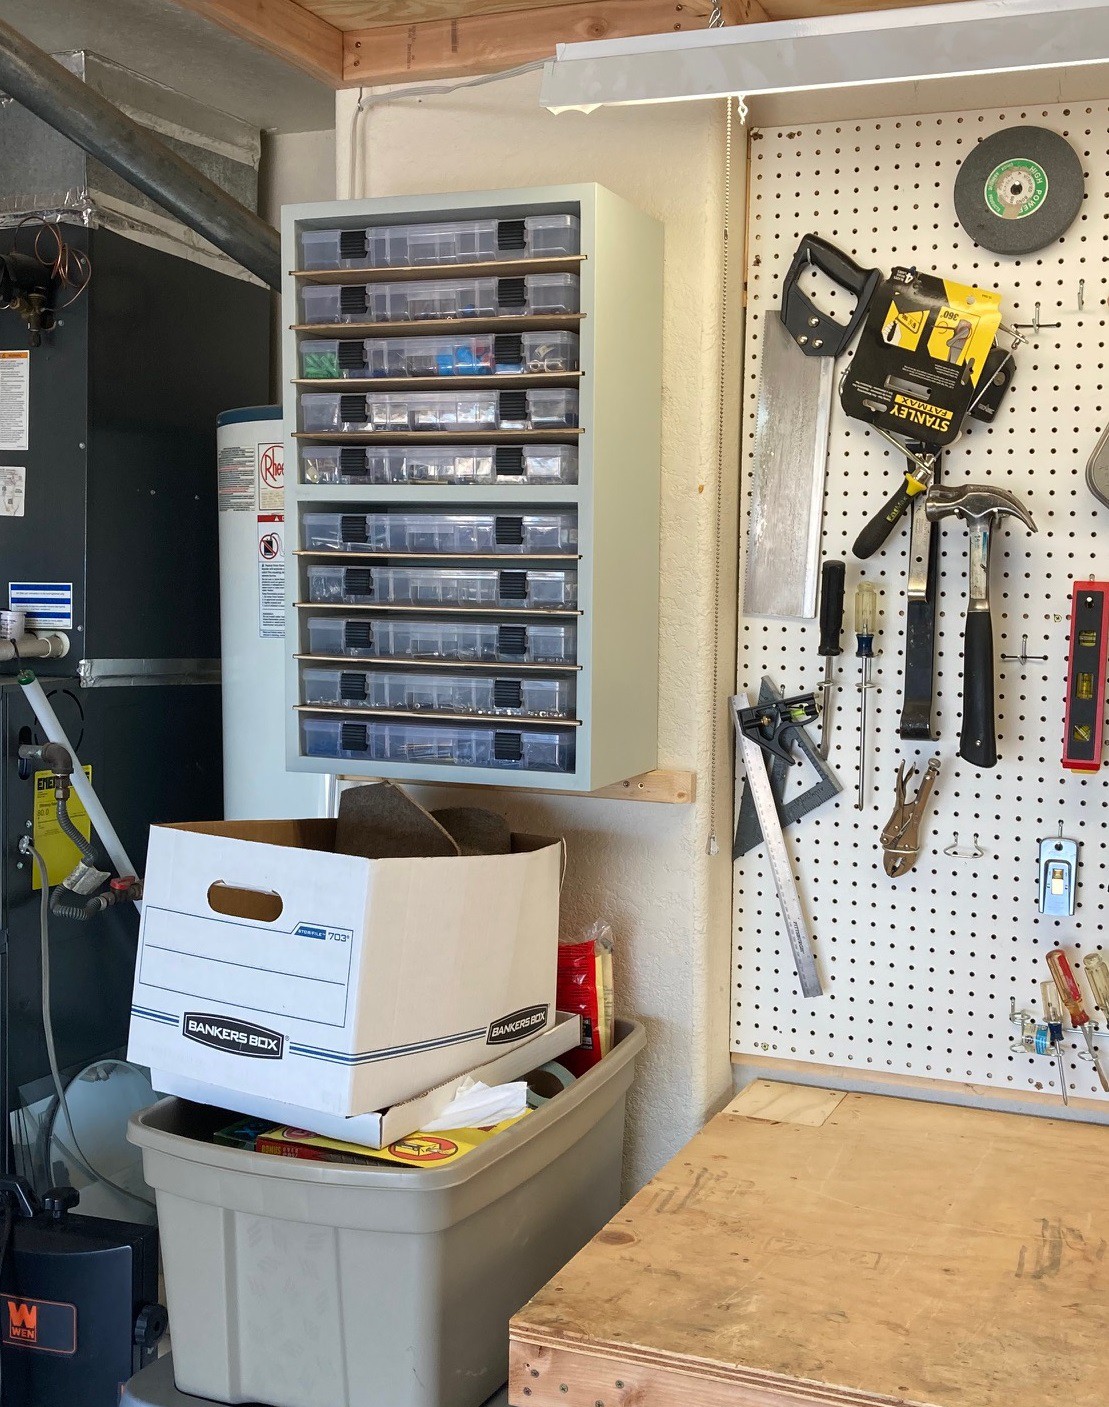
I have 10 of these large fishing tackle boxes that I have picked up over the years. They are 14"x9"x2" and they work out great for holding smaller items. However I have always just stored them on a shelf in stacks and that makes then fussy to work with since your always needing the box at the bottom of the last stack.
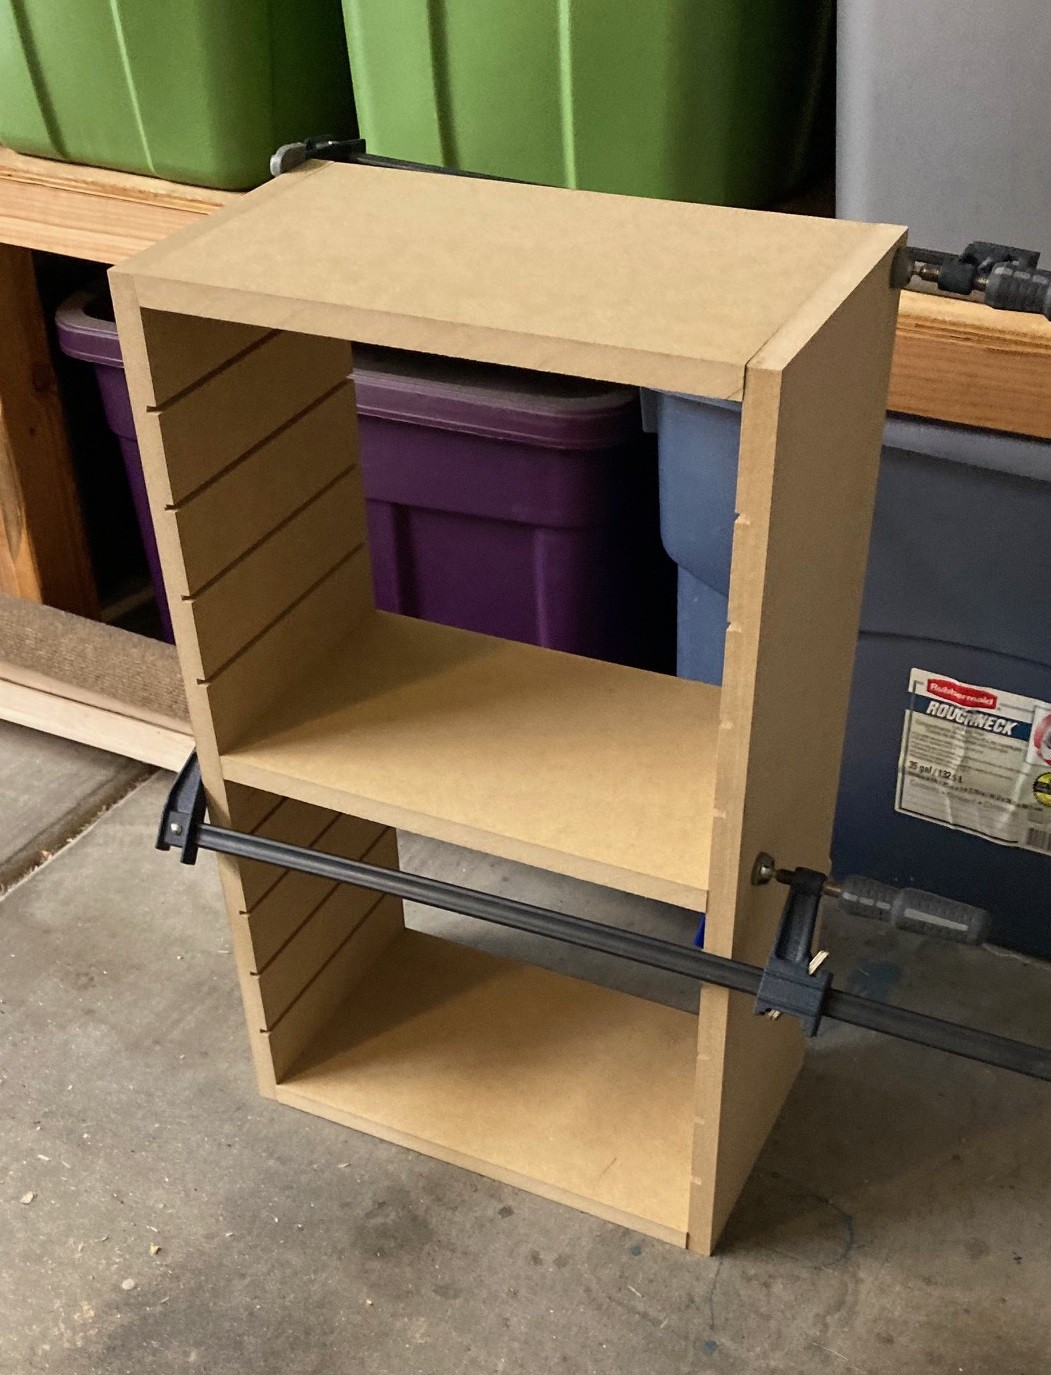
So as a first step I decided to make a small wall cabinet that can store these organizers so I can reach each of them in one move rather than unstacking them. This will use roughly 1/4 of a sheet of 3/4" MDF and 1/4 of a sheet of 1/8" plywood. That is relatively risk free, I will have lots of material left to cut from if I make a mistake.
To help things along I have ordered a WEN biscuit joiner and a box of #20 biscuits. While I wait for that to come in I'm trying to refine my design. Part of my process was working out how to best layout the parts on a 4x8 sheet of material. I experimented with doing the layout myself in fusion but that is frustrating and it really feels like there must be a better way. I came across the Map Boards Pro plugin and it seems to do a reasonable job of pulling your model apart and doing a layout. I don't think it is optimal, but it gives you a good starting point with a single click of a button.
I have a problem, the largest vehicle I have could fit a 2'x8' sheet in it, and possibly a 4'x4' sheet but there is no way to fit a 4'x8' sheet in the vehicle. After playing around with map board pro it became fairly obvious that cutting the sheets down at the store is going to make it difficult to optimally use the material without a lot of hard work. So I need to come up with a way to bring full sheets home from the store.
I looked into delivery but that adds $70 or more to the price, that only makes sense if I'm buying 10 or more sheets at a time. I could try to rent a trailer, however that is $30 or more and unlikely to work out better than the delivery. My vehicle has mounting holes for a roof rack but no rack. I could pick up a rack, but I don't have any other use for it. So I decided to go ahead and build my own temporary rack out of 2x3's and a 3D printed spacer. The whole bunch will be bolted down to the roof and should comfortably support a sheet or two of wood, allowing me to pick up small runs of material. The best part is it can all be broken back down into its original parts and stored on my wood rack when not in use.
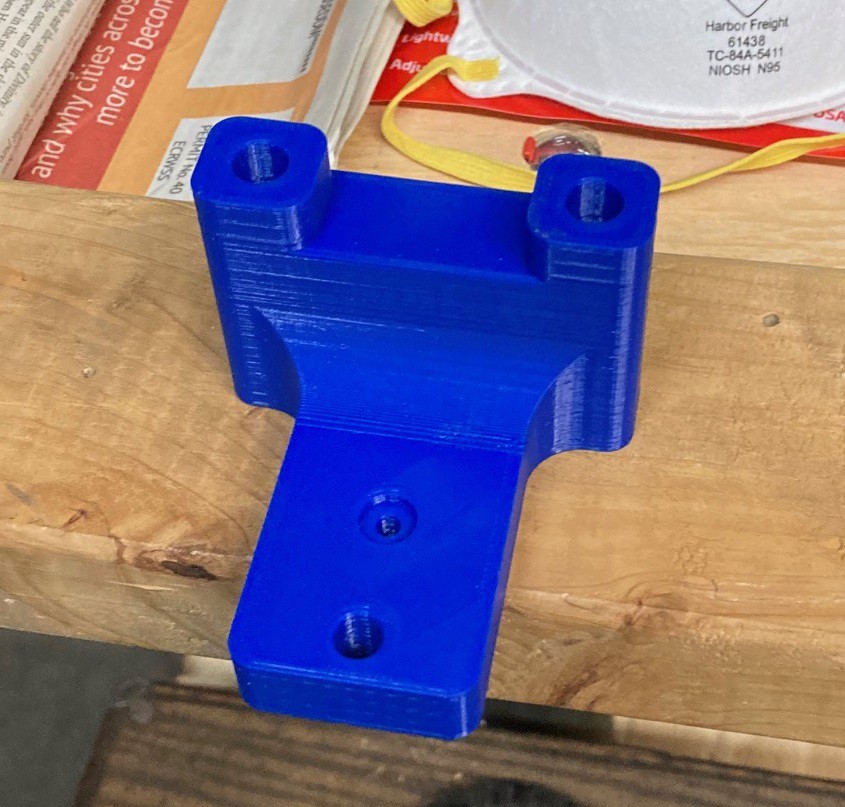
![]()
I spent most of yesterday working out the spacer bracket and it seems to work well. I will run a 100 mm M8 bolt through the wood, through the spacer and into the roof of the vehicle. That arrangement should be quite secure, even if the spacer failed it would not come loose from the vehicle (but may mar the roof, so we don't want that). It will take a few days to finish printing these out, so again were waiting.