David Tucker
-
Chipping away
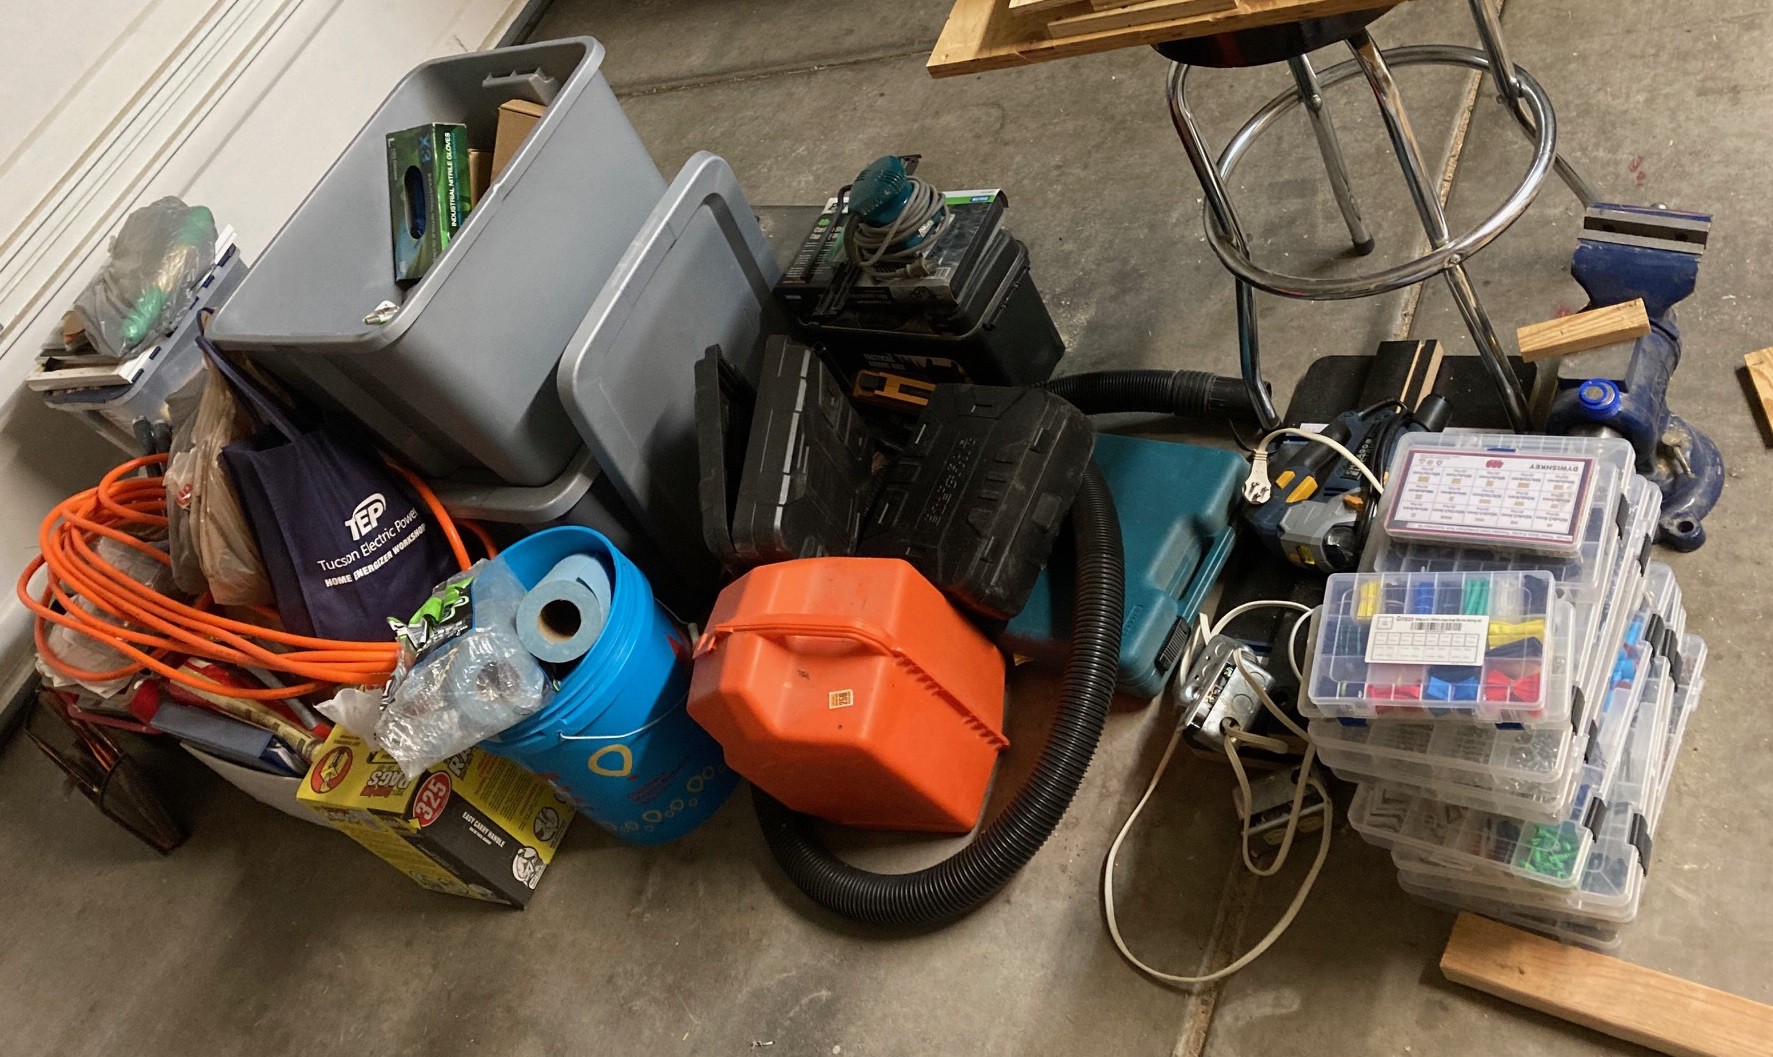
01/29/2023 at 00:48 • 0 commentsSo I'm still slowly chipping away at this project. I have been forcing myself to go through my remaining boxes of junk to sort it out. So far I have about a box worth of stuff to get rid of and about 1/3 of the total pile sorted by type.
The goal is to sort this into things I want easy access to or things I can pack away on my high shelf, as well as sorting them into things that belong together in boxes. My short term goal is to get this all packed up so the car can come back into the garage.
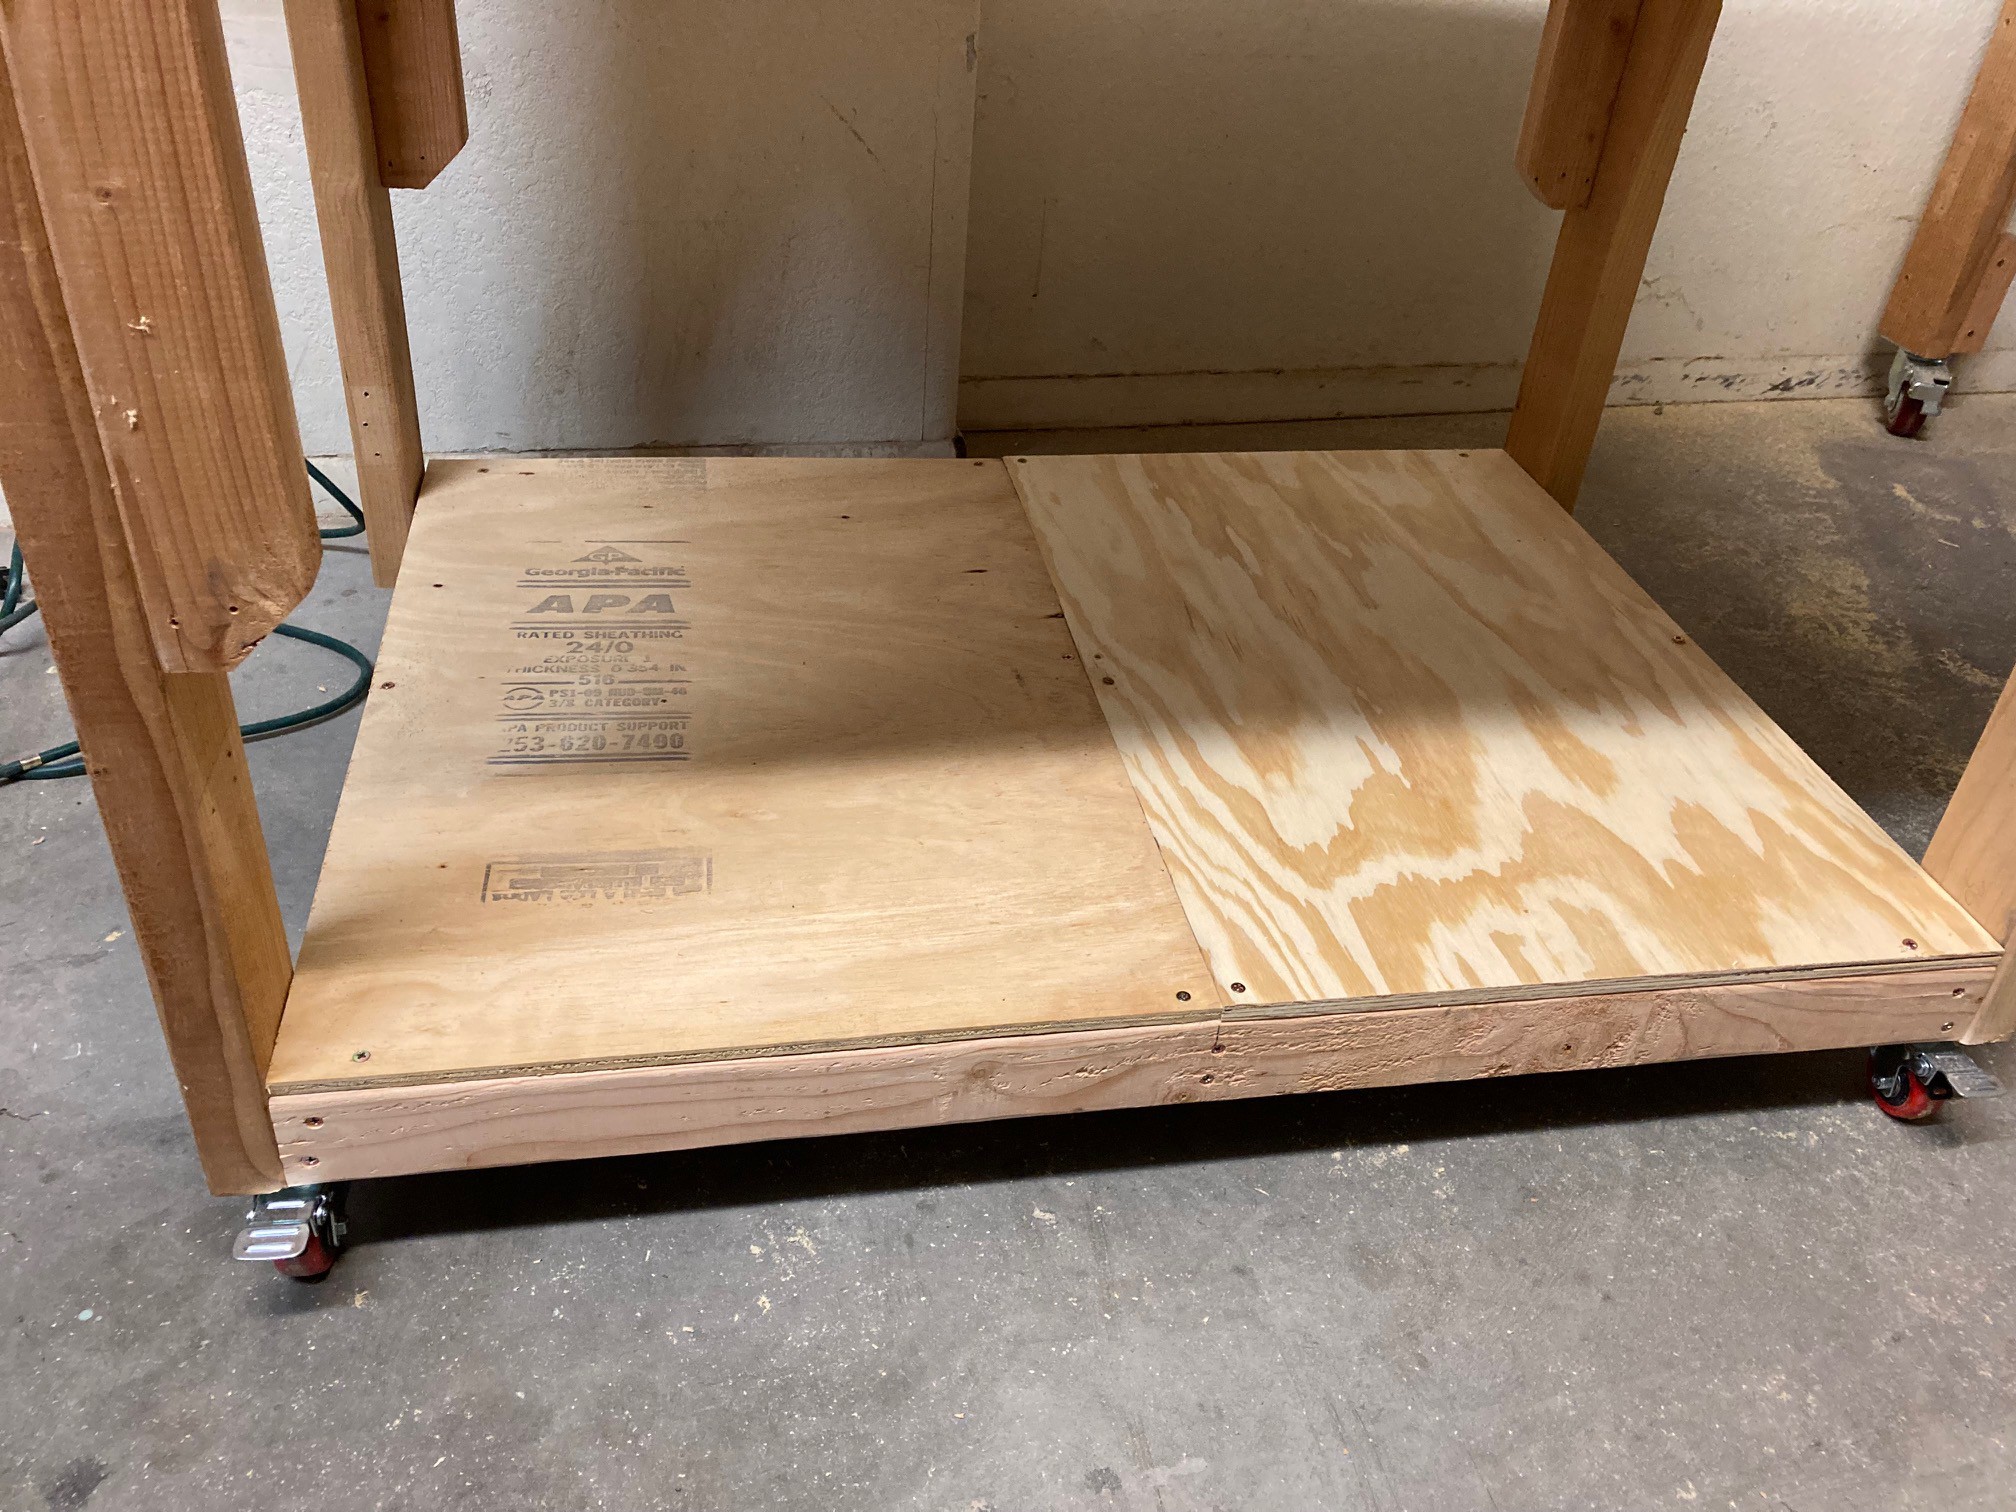
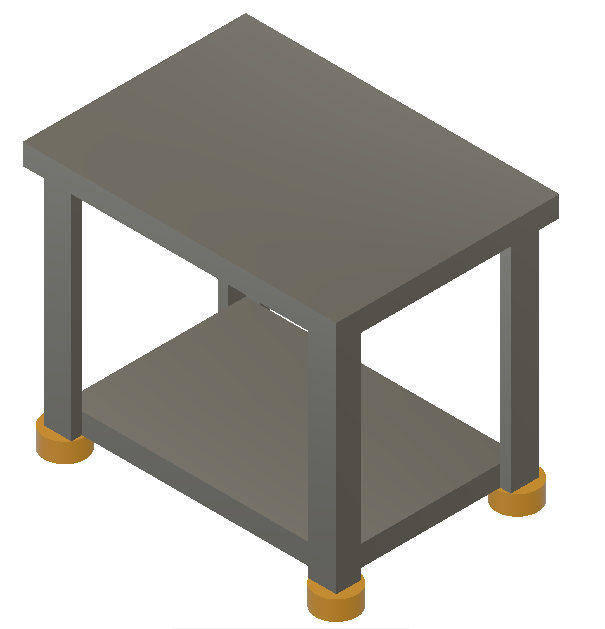
Last time I was planning on adding new shelves to my tables. However I decided to only add a lower shelf to the CNC table. I just don't have enough plywood on hand to finish two extra shelves and I don't see the point in investing in this just yet. Maybe as things progress I will have enough scraps to make shelves. It is nice having the lower shelf on the CNC table, it makes things simpler to organize and keeps my ability to roll things around.
![]()
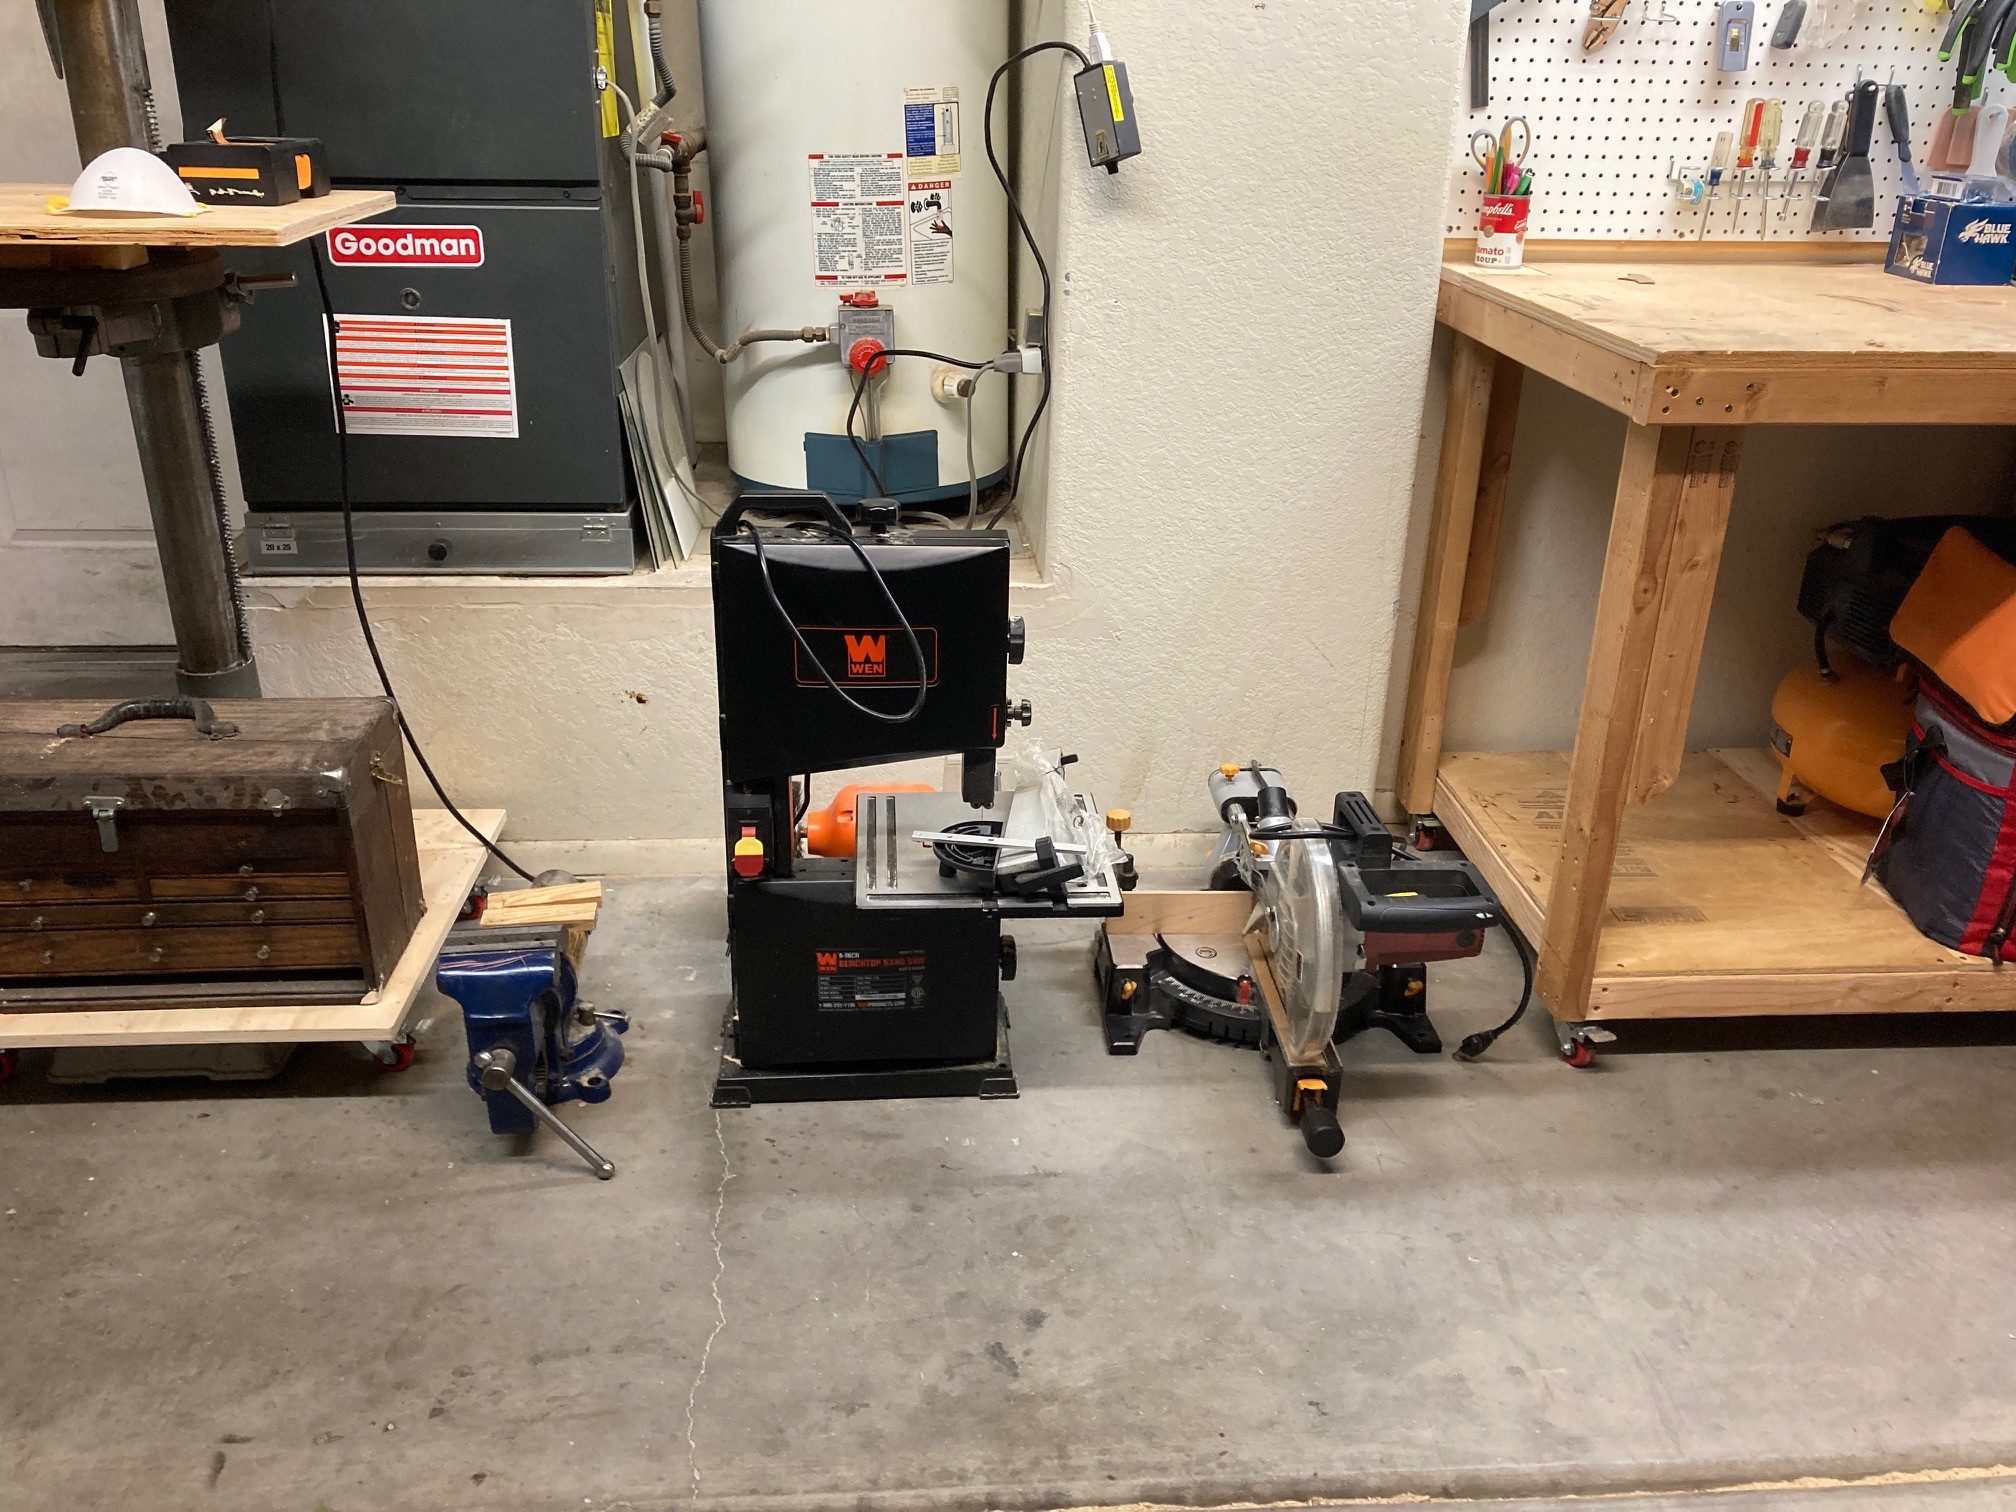
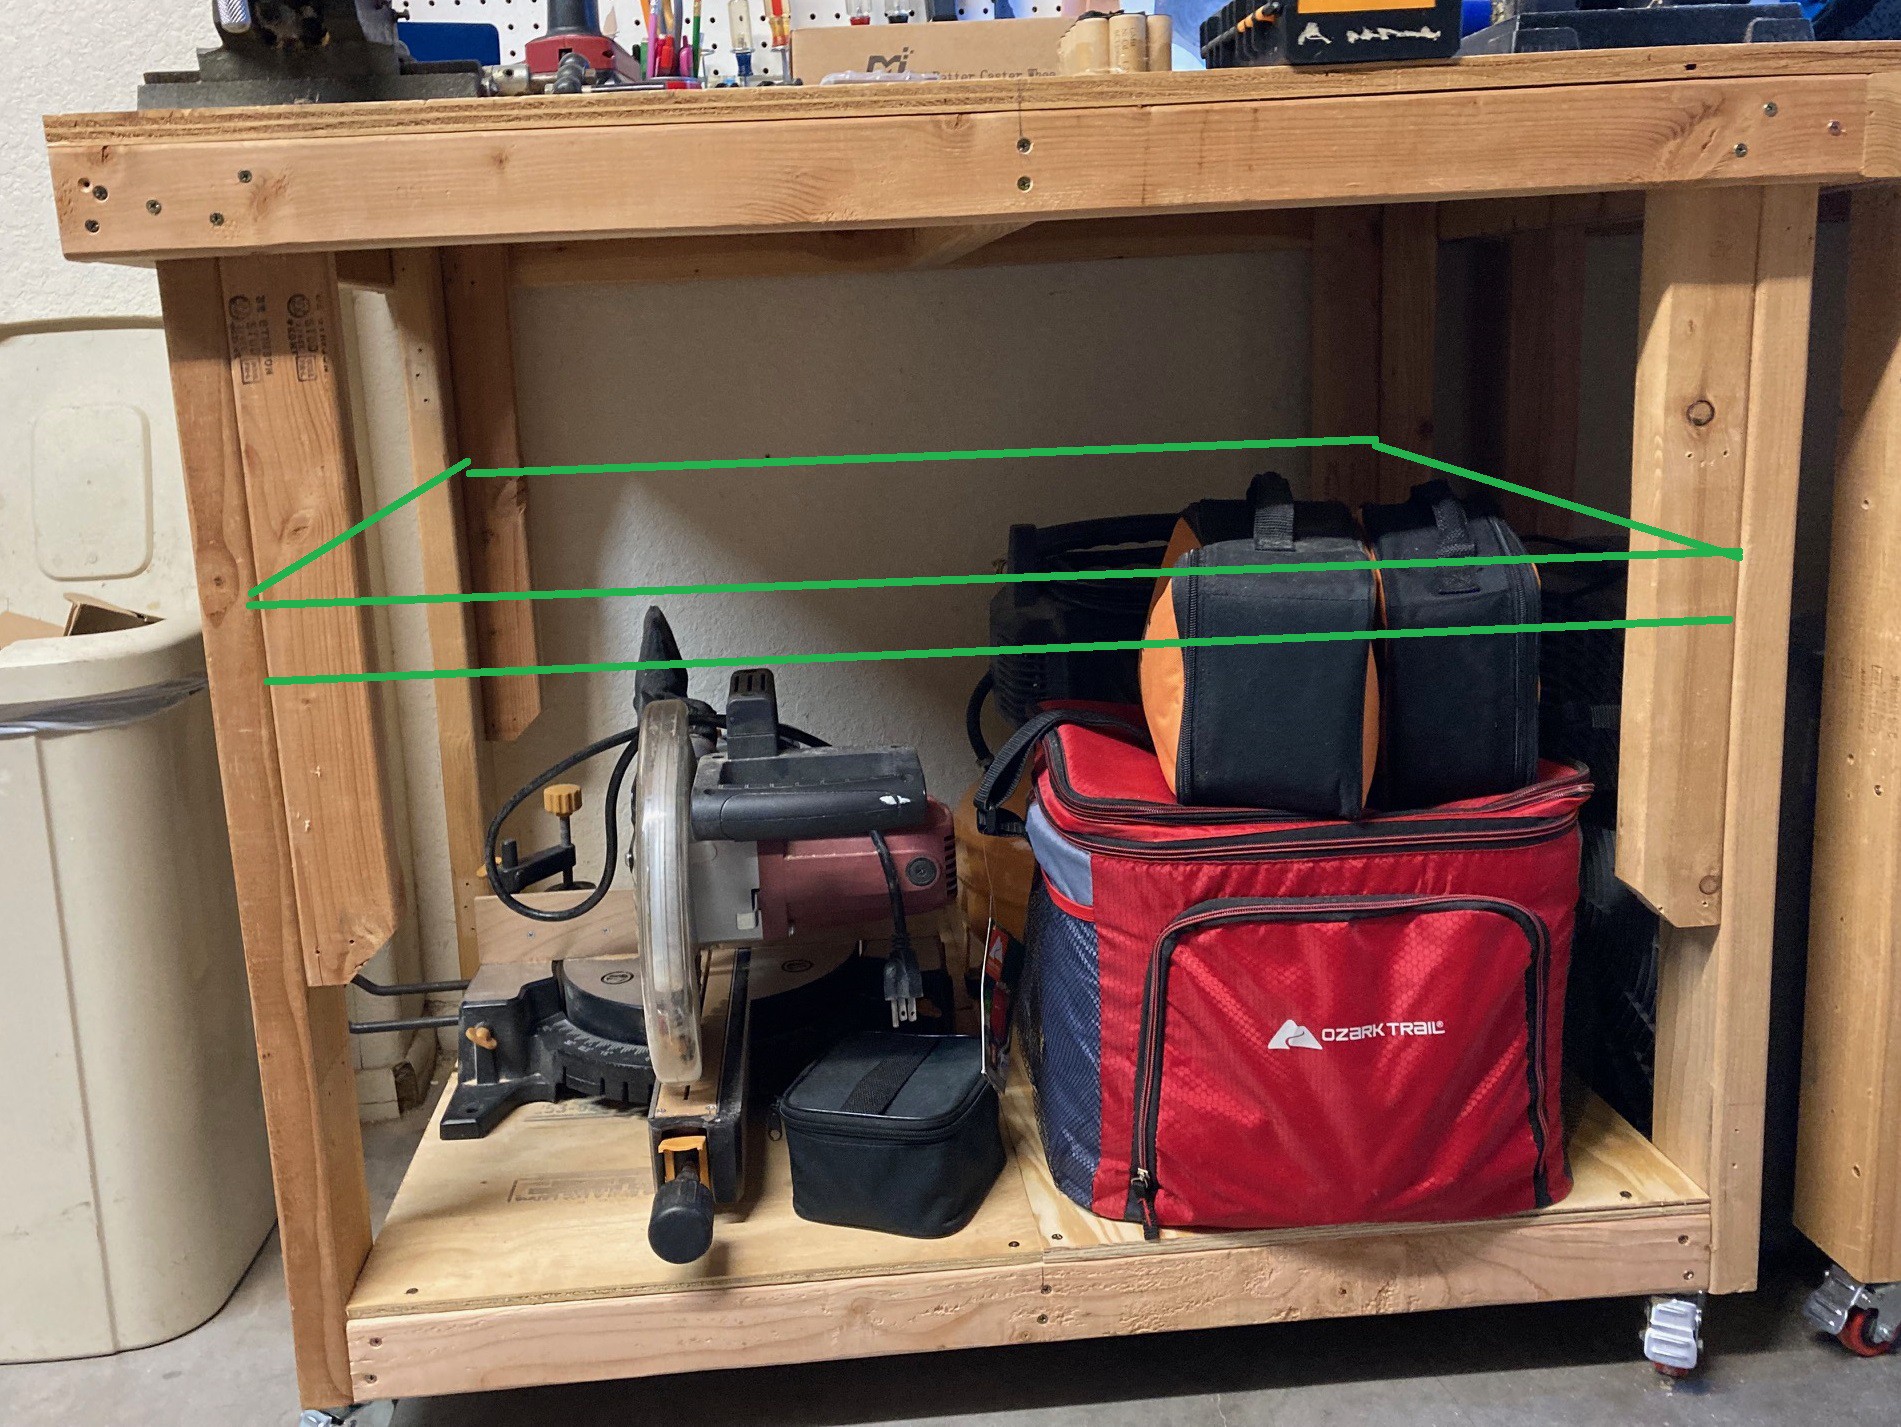
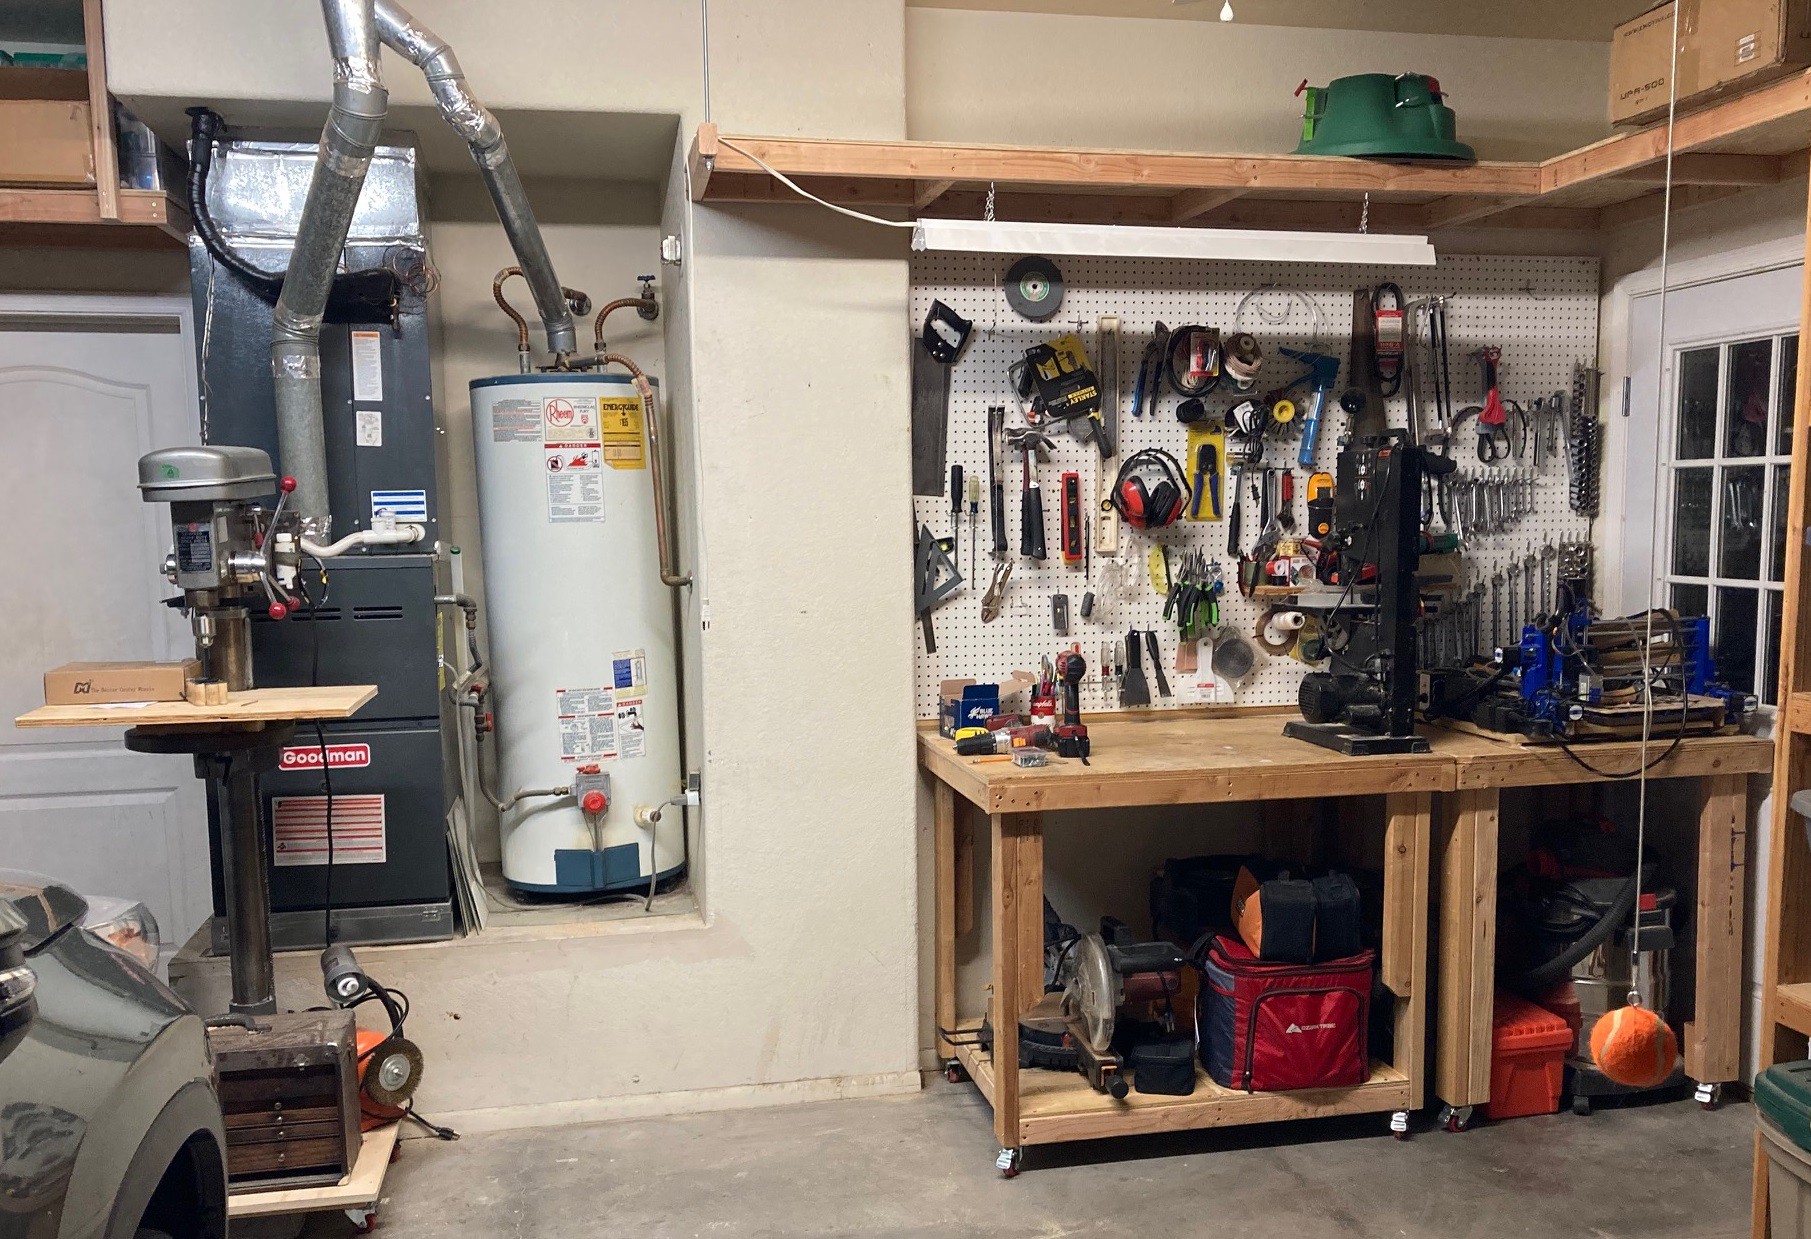
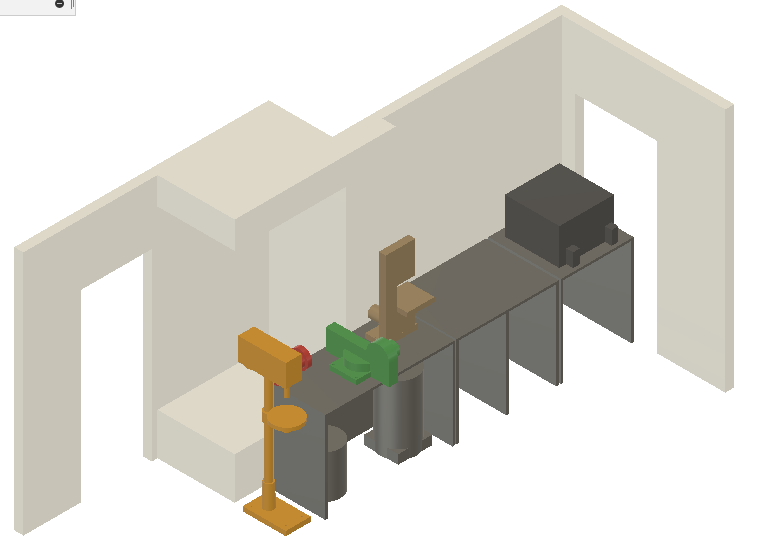
I have been playing with different layouts of tools that I have left to deal with. I think I like this arrangement. There is a space here about 55" wide, 25" deep and 38" high for one or two rolling carts.
![]()
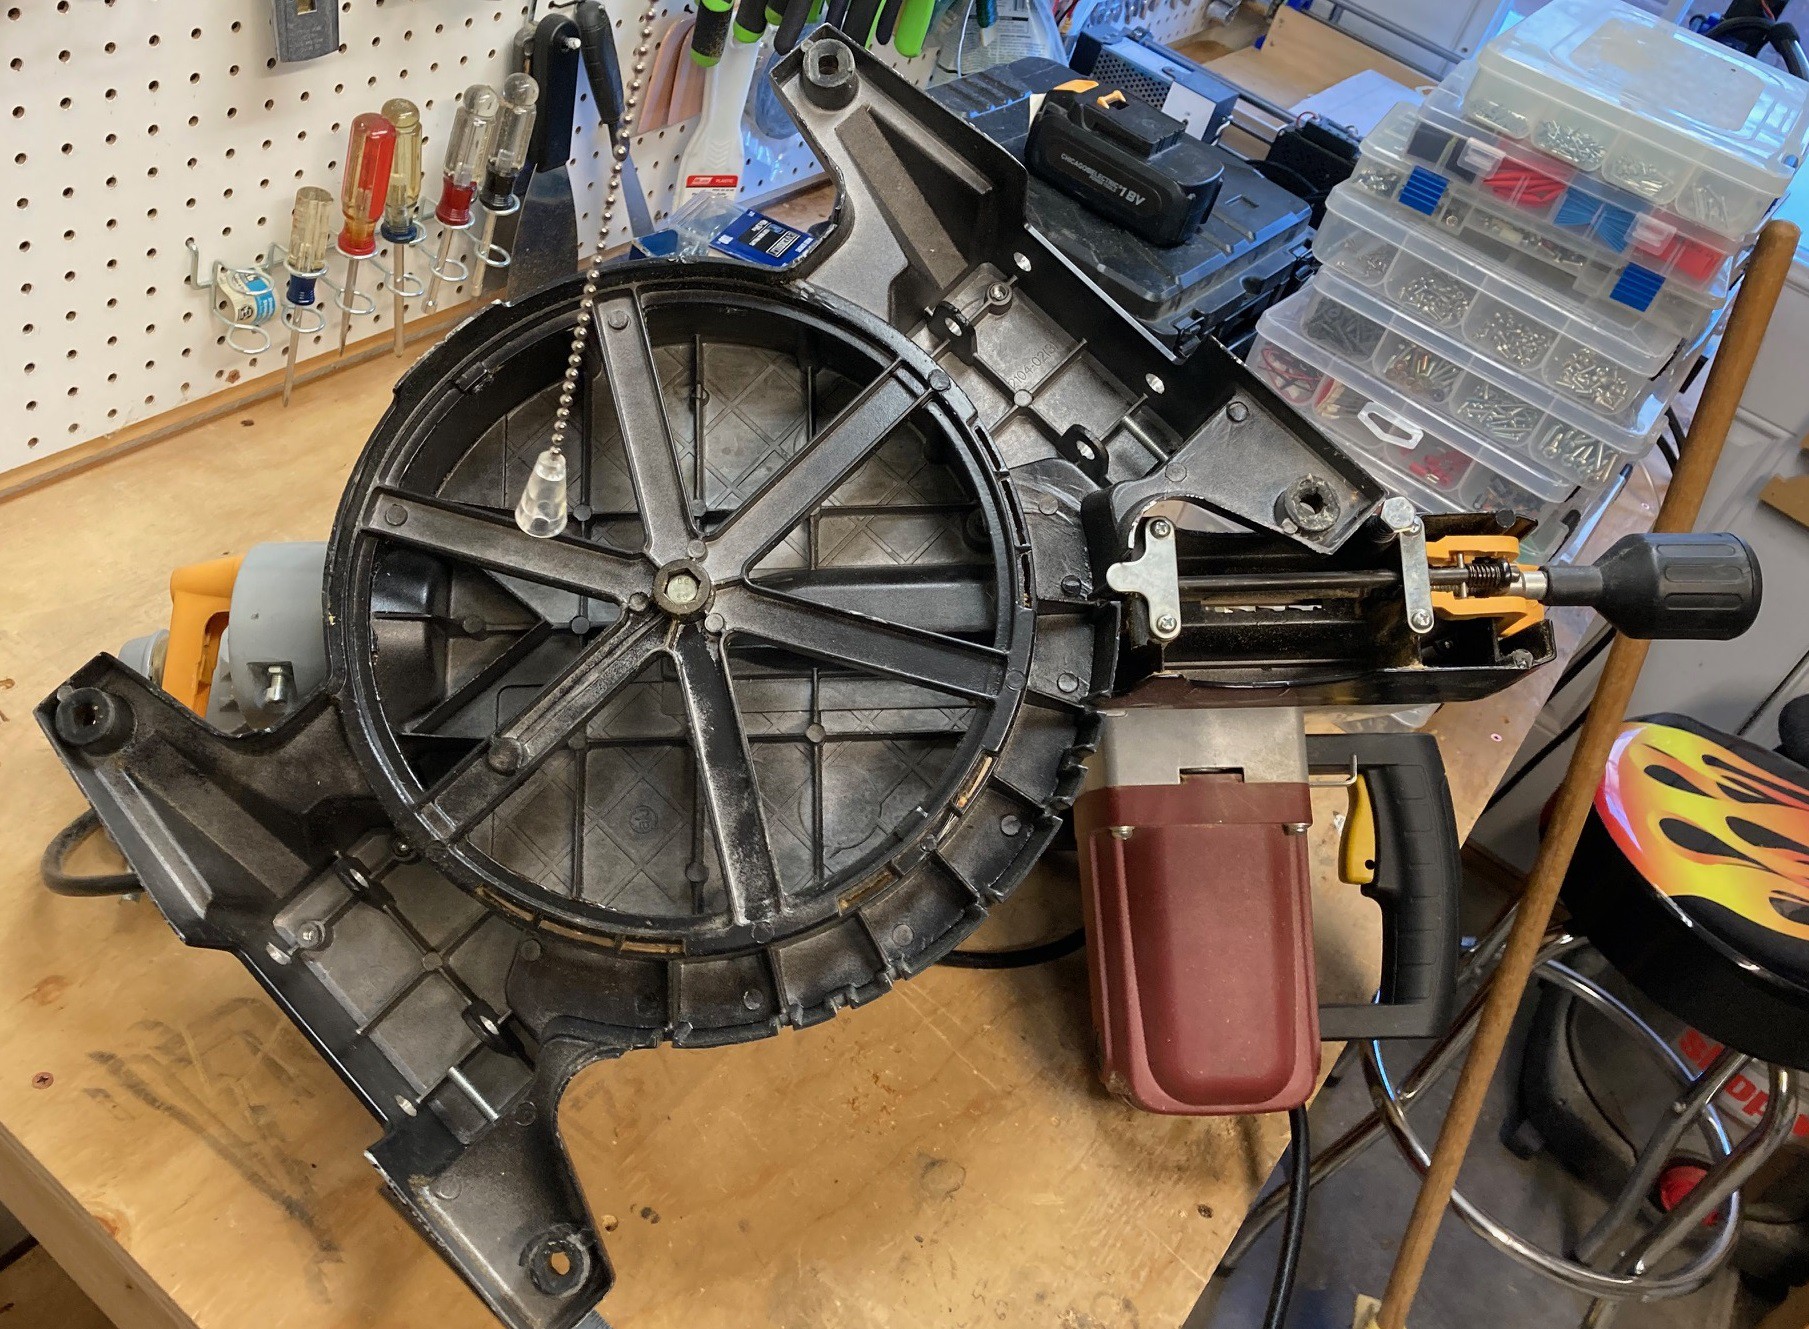
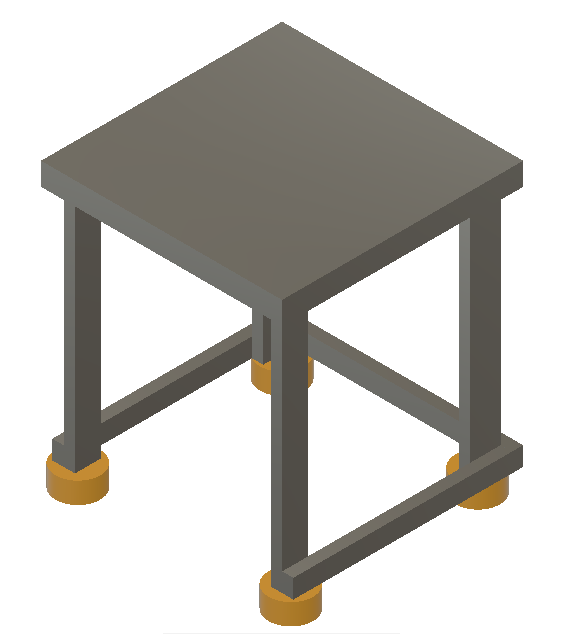
I think it makes the most sense to make the miter saw live on its own cart so you can properly deal with really long pieces of material. The miter saw base is 17" wide and 12" deep.
![]()
That is a bit small for miter saws, but I think given the tiny space I have I need to make this cart 24" wide and maybe 24" deep. I was a bit worried about this being 38" tall, but the drill press is a bit narrower than this and it seems quite stable in spite of having most of its weight a good 60" off the floor.
That leaves about 30" for a separate 'tool' cart to hold the bandsaw, vice, grinder and possibly some sort of belt sander in the future. This does not need to be as specialized as the miter saw cart, just a simple box with some drawers in it.
I have been spending some time in Fusion trying to model things up. I'm not super happy with the results yet, but I'm slowly making progress. Hopefully tomorrow I can finish up the shop cleanup and get the car back in place. Then it is just forcing myself to spend more time in Fusion to try and finalize the designs. Then I need to collect up the various bits and pieces, and get around to the whole building part of this project.
-
Re-Charged
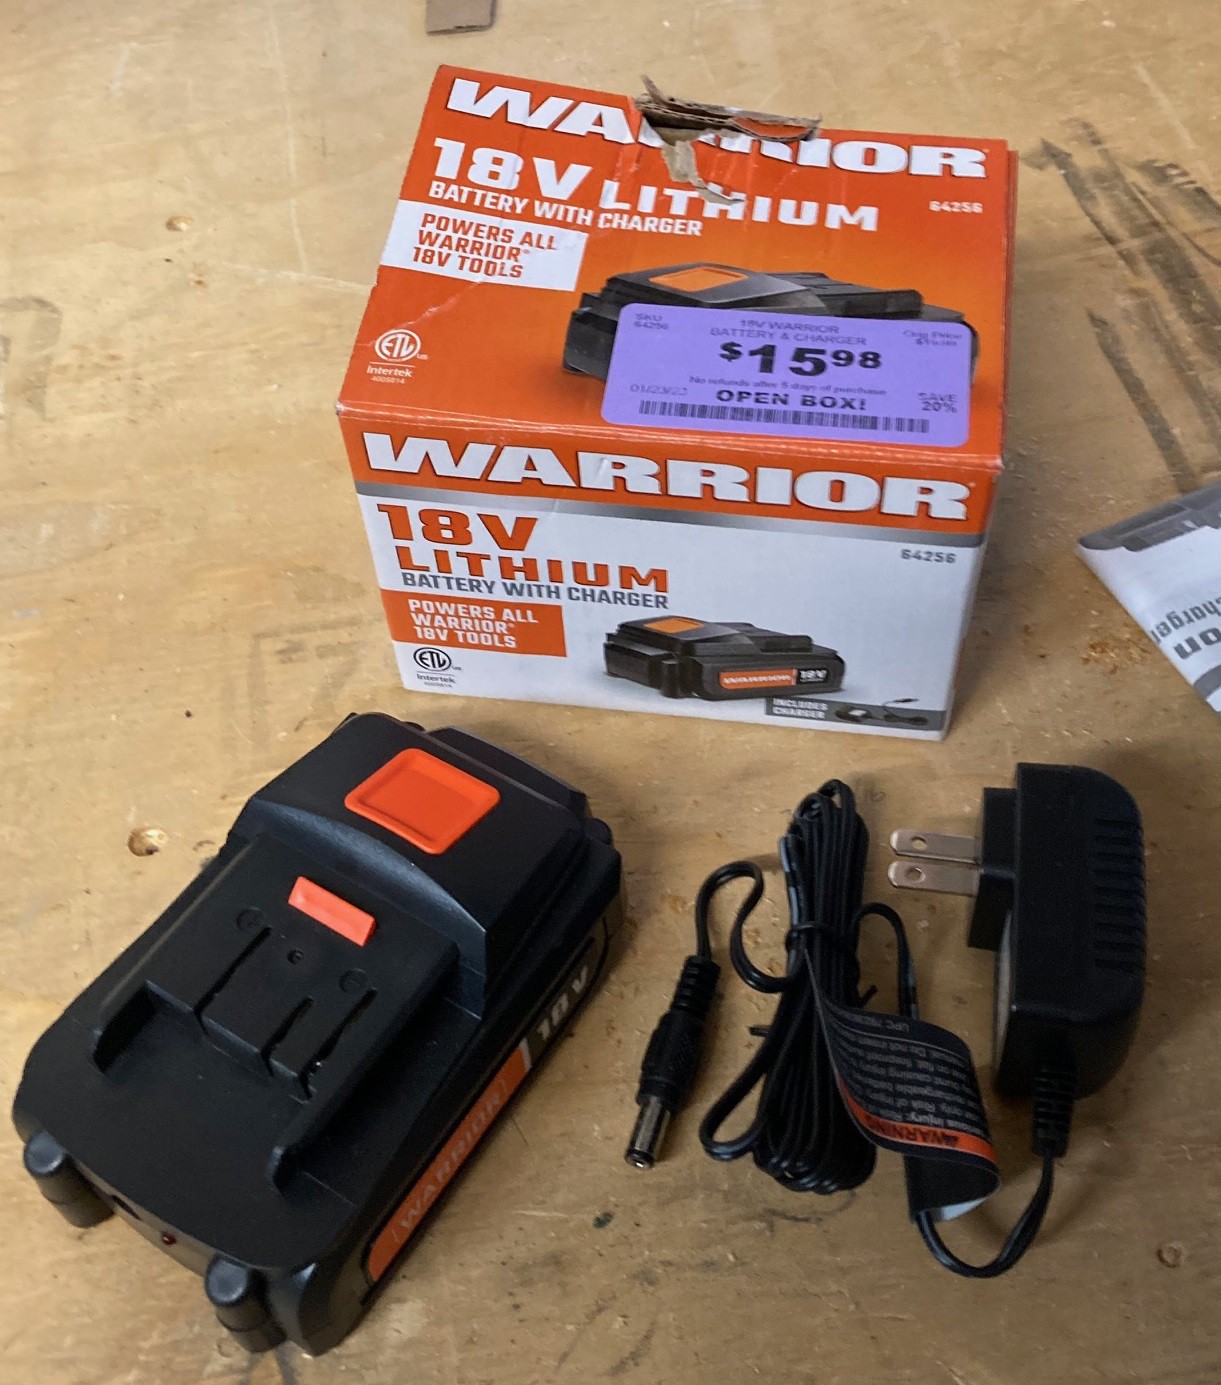
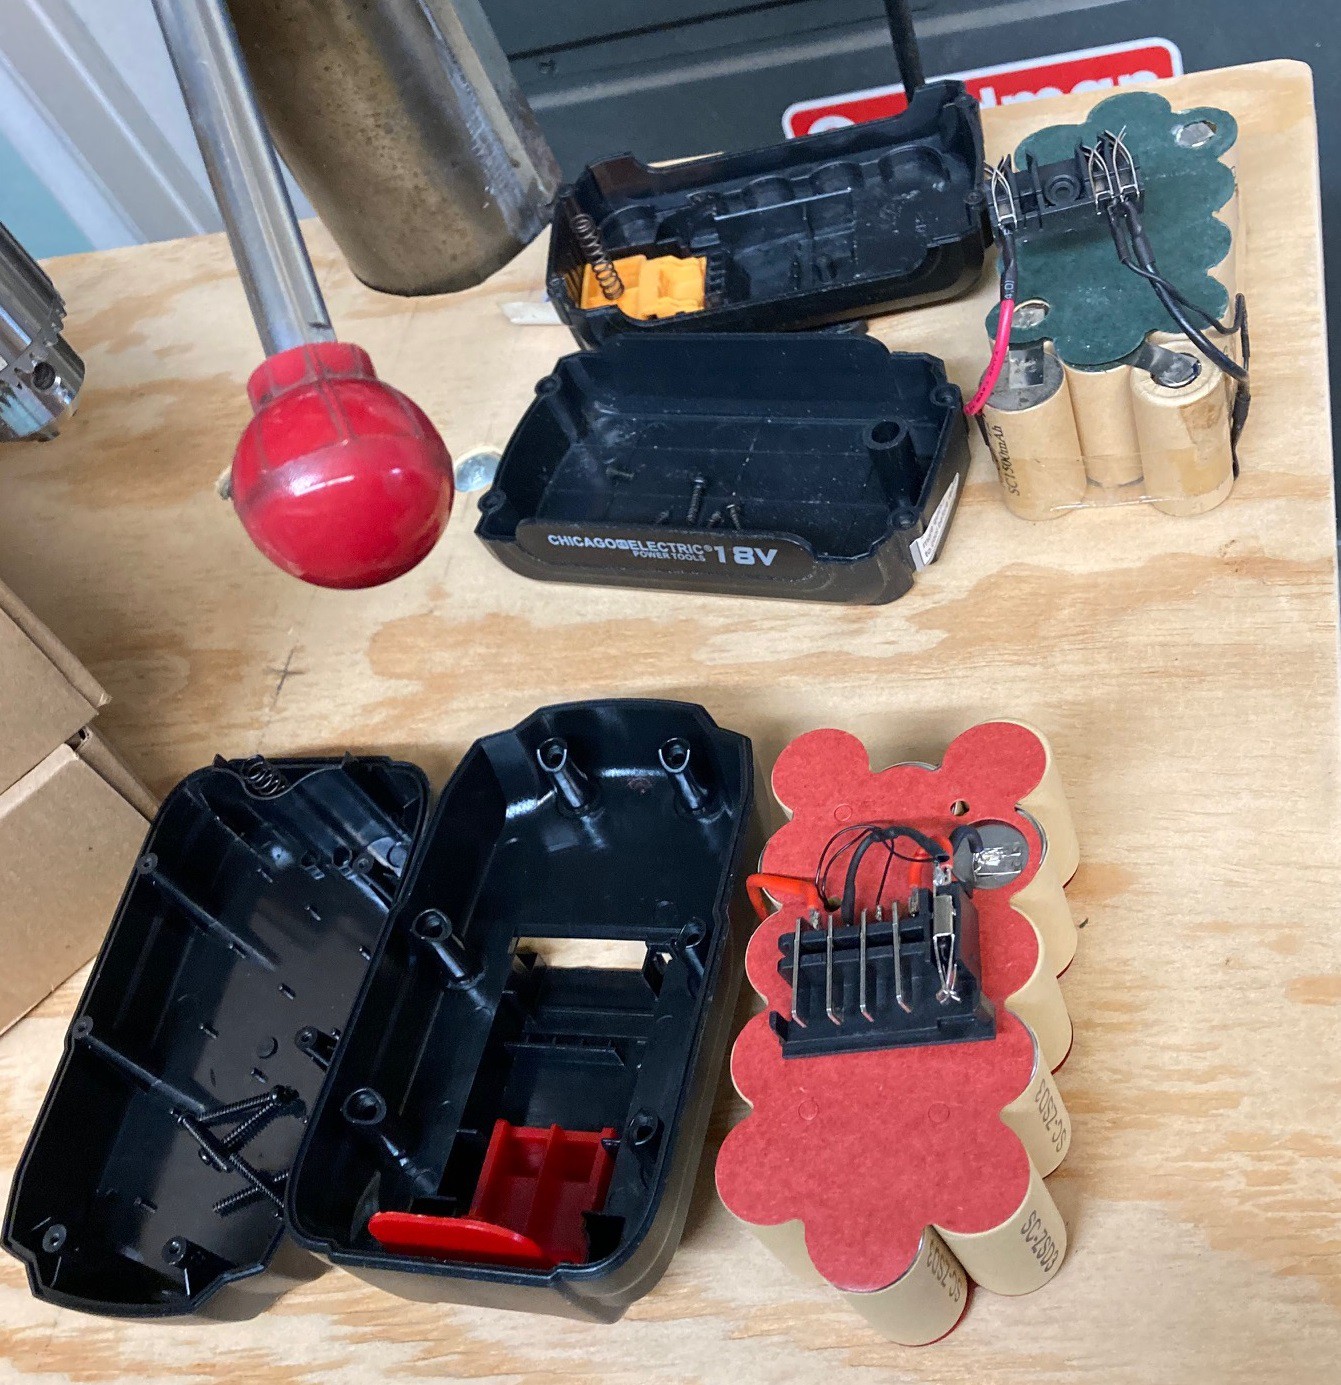
01/29/2023 at 00:20 • 0 comments![]()
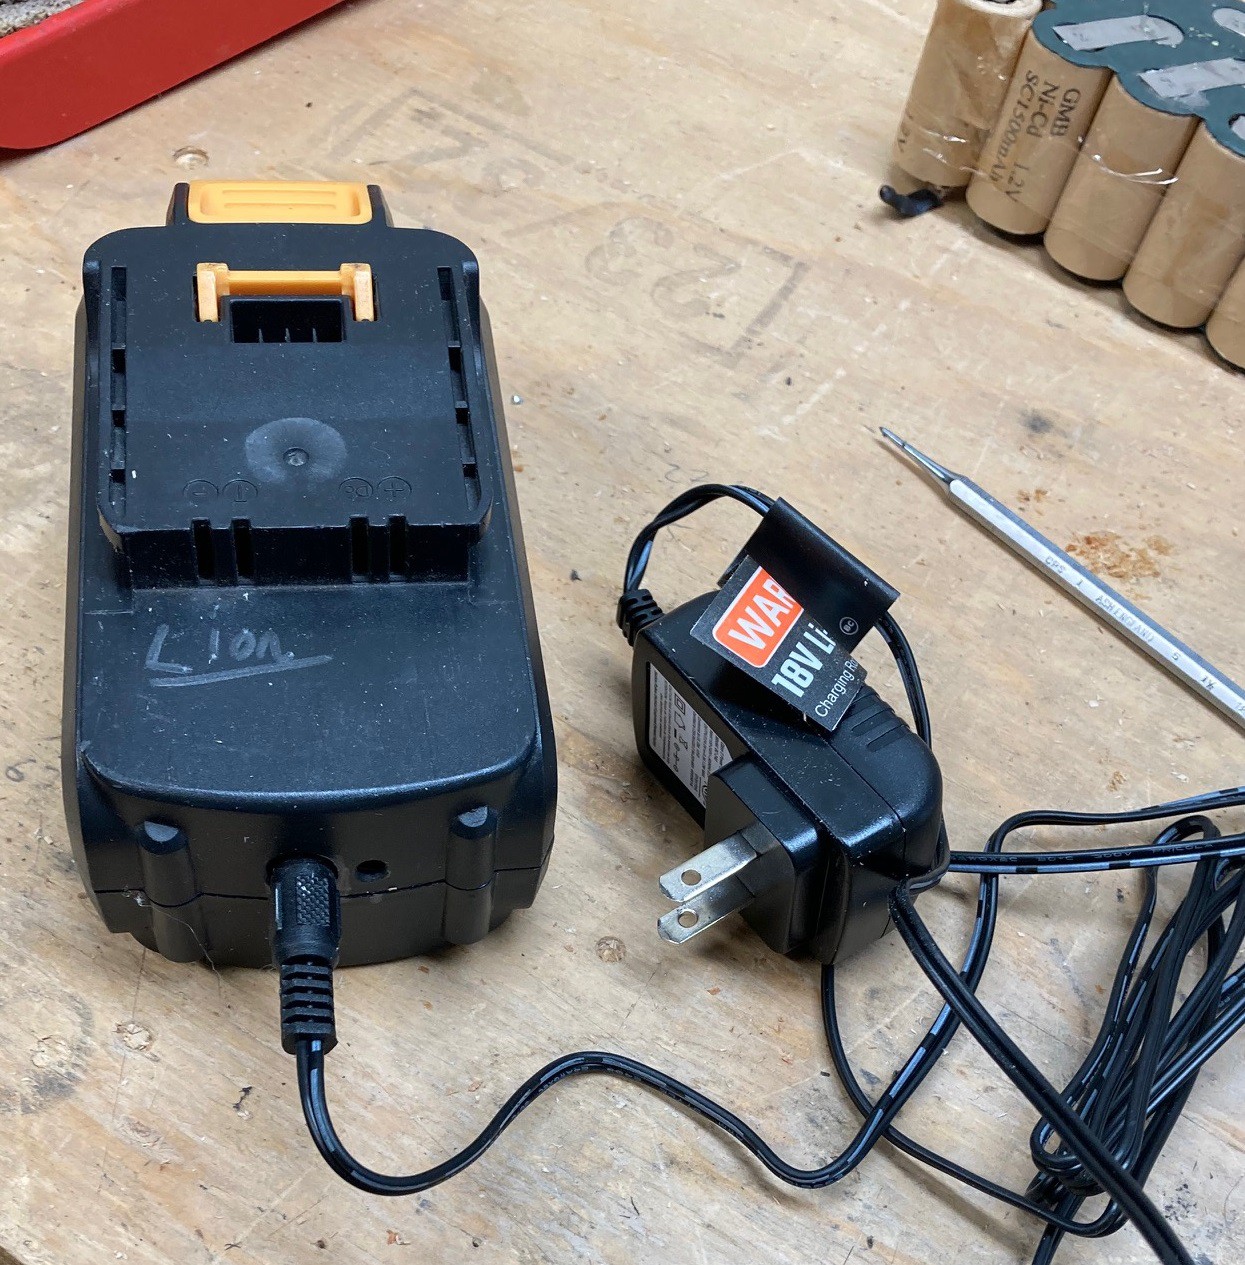
I know I said I was not going to do this but I stumbled across a harbor freight warrior 18v lithium battery and integrated charger for $16 at harbor freight. I figured at that price I may as well try and convert my drills to lithium.
![]()
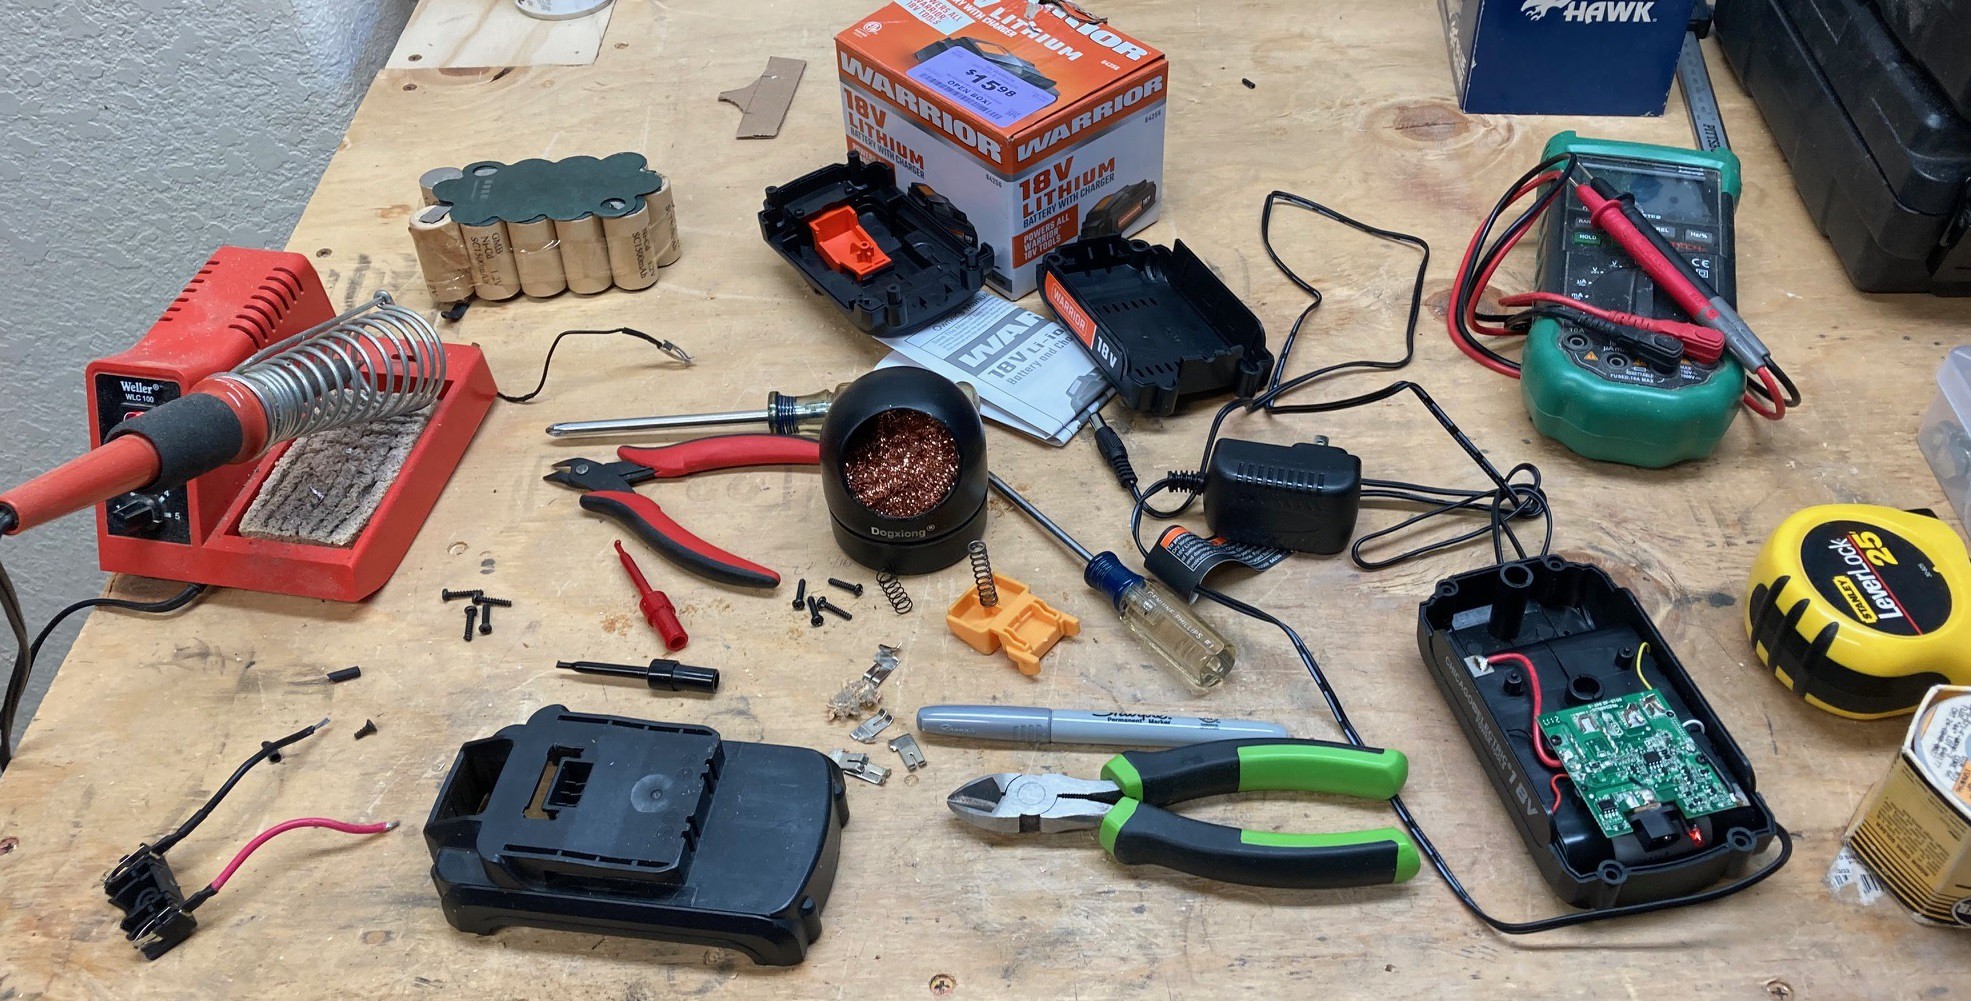
Unfortunately these don't pinout the same and it was basically impossible to build an adapter with just the parts I had on hand. So I had to once again sacrifice one of my old battery packs in the name of science.
![]()
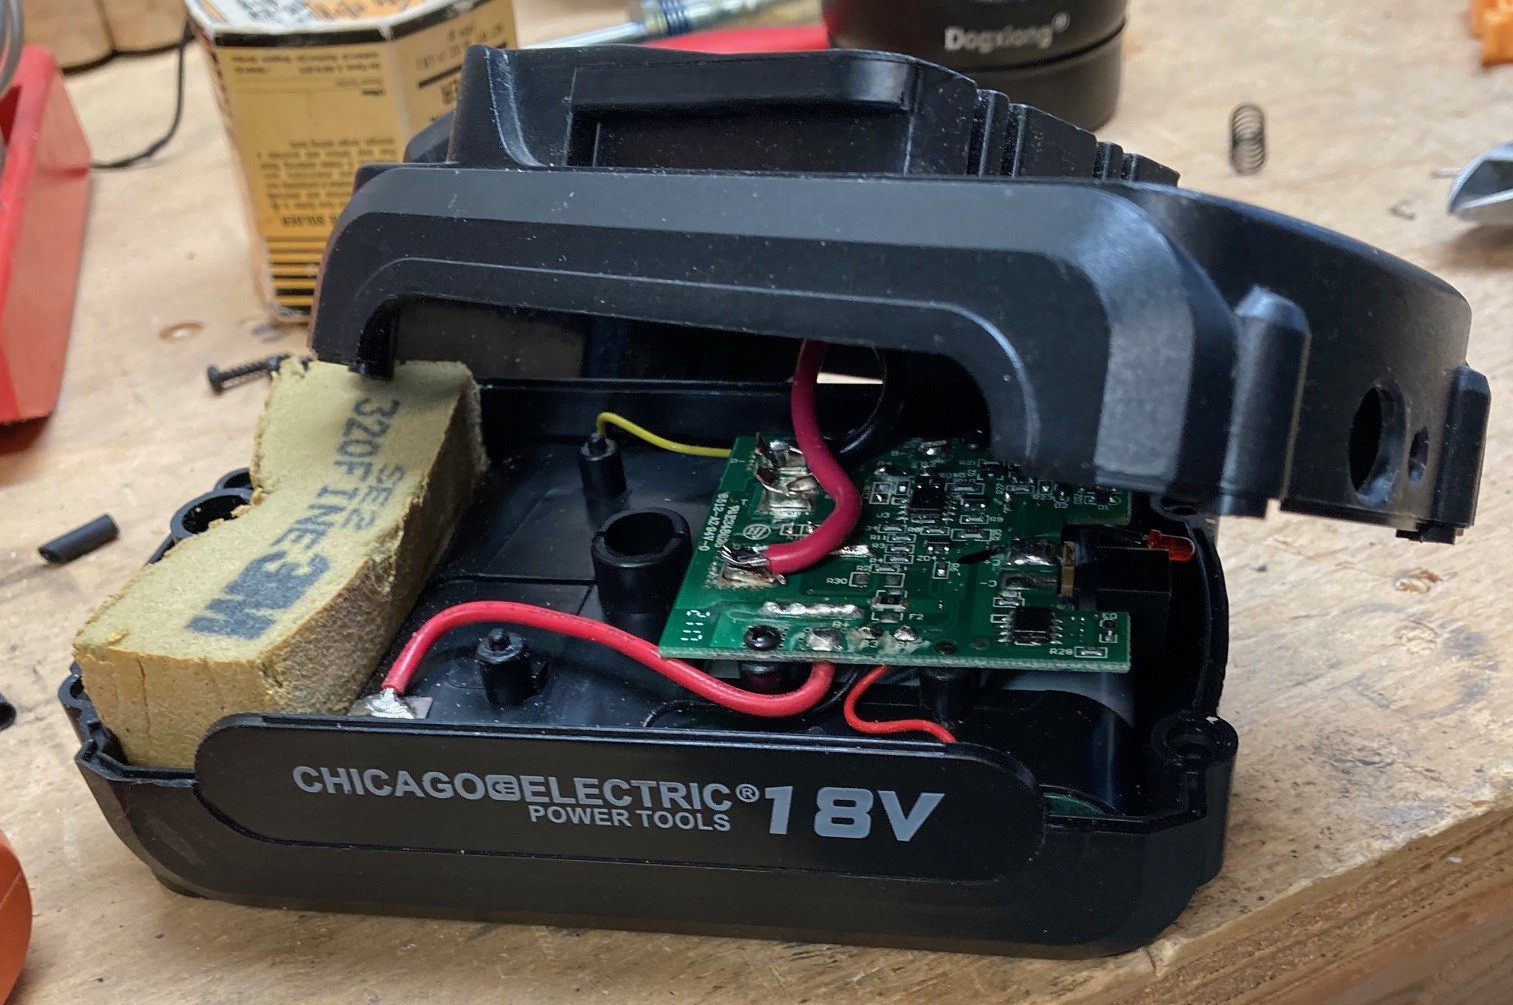
I had to cut the pins from the new battery and solder in the connector from the old battery to make it all fit. I also verified while I was at the store that the drill that goes with this battery does not use the temp sense line, so I was fine with just cutting that off and leaving it unconnected. That has the advantage of making it impossible to accidentally use the old nicad charger on my new lithium pack.
I ended up cutting up a sanding sponge that was headed to the garbage to help take up space in the old pack. I also hot melt glued the new pack in place. Finally I drilled holes in the front of the pack to allow for the charging cable to connect.
![]()
Buttoning it all up, the charger fits and a quick test in the drill shows that it still runs. Time will tell if this has enough oomph to run things for a while. It is also outputting 24v when fully charged while the older pack was closer to 18v. I don't know if that will wear out the drill faster or not. Still these were basically heading for the bin, so if this works even for a while then it is a win.
-
Next steps
01/22/2023 at 17:58 • 0 commentsI was up half the night trying to think of where to go next with this project. Were getting to the point where big decisions need to be made and real money spent. So I thought I would get my ideas down on paper before they all fell out of my mind and I had to start over from scratch.
![]()
Looking at my new benches, I don't think I'm using the space I have effectively. I think I will take some of the scraps I have left and add in a shelf on the workbench. Maybe I can fit my screws and other smaller items on this shelf.
![]()
I left the CNC stand open at the bottom, partially because I had not decided what to do with the space and partially because I hoped to fit the shop vac in under the space. However the vac is huge and it is nearly impossible to fit anything around it and still make it free to roll in and out. Plus I have at least 6 different tools that really should use the vac and none of them will be placed near each other so the vac really should be out and free to roll around.
So I decided to take it out from under the stand and fill in the bottom and center with two shelves. I don't think I have enough plywood to cover all three shelves, I may have to break down and buy some more. I'm loathed to do this, but I suspect I will be using these stands for a good long while so it is not bad to invest a bit of money in them. This will let me get all of the various CNC jigs up and on the machine, and should provide a space to add in some filters for the laser and hopefully an enclosure as well.
![]()
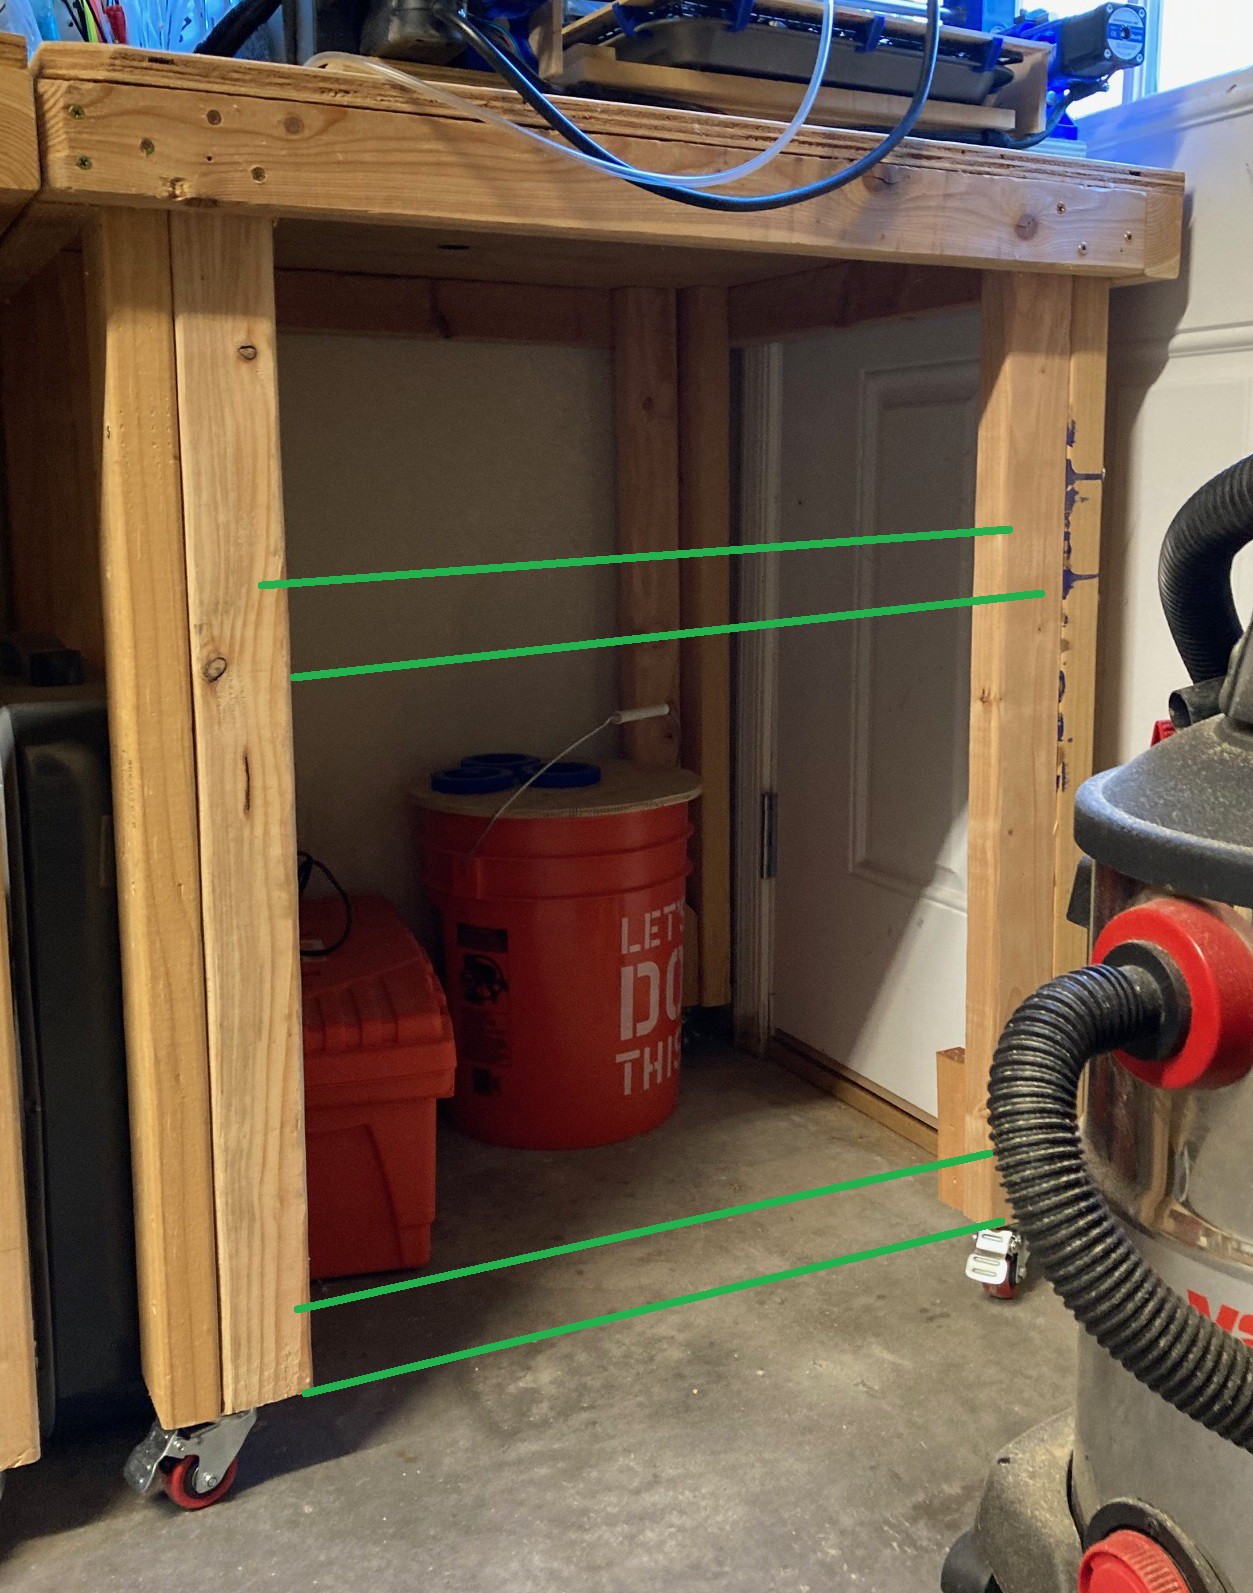
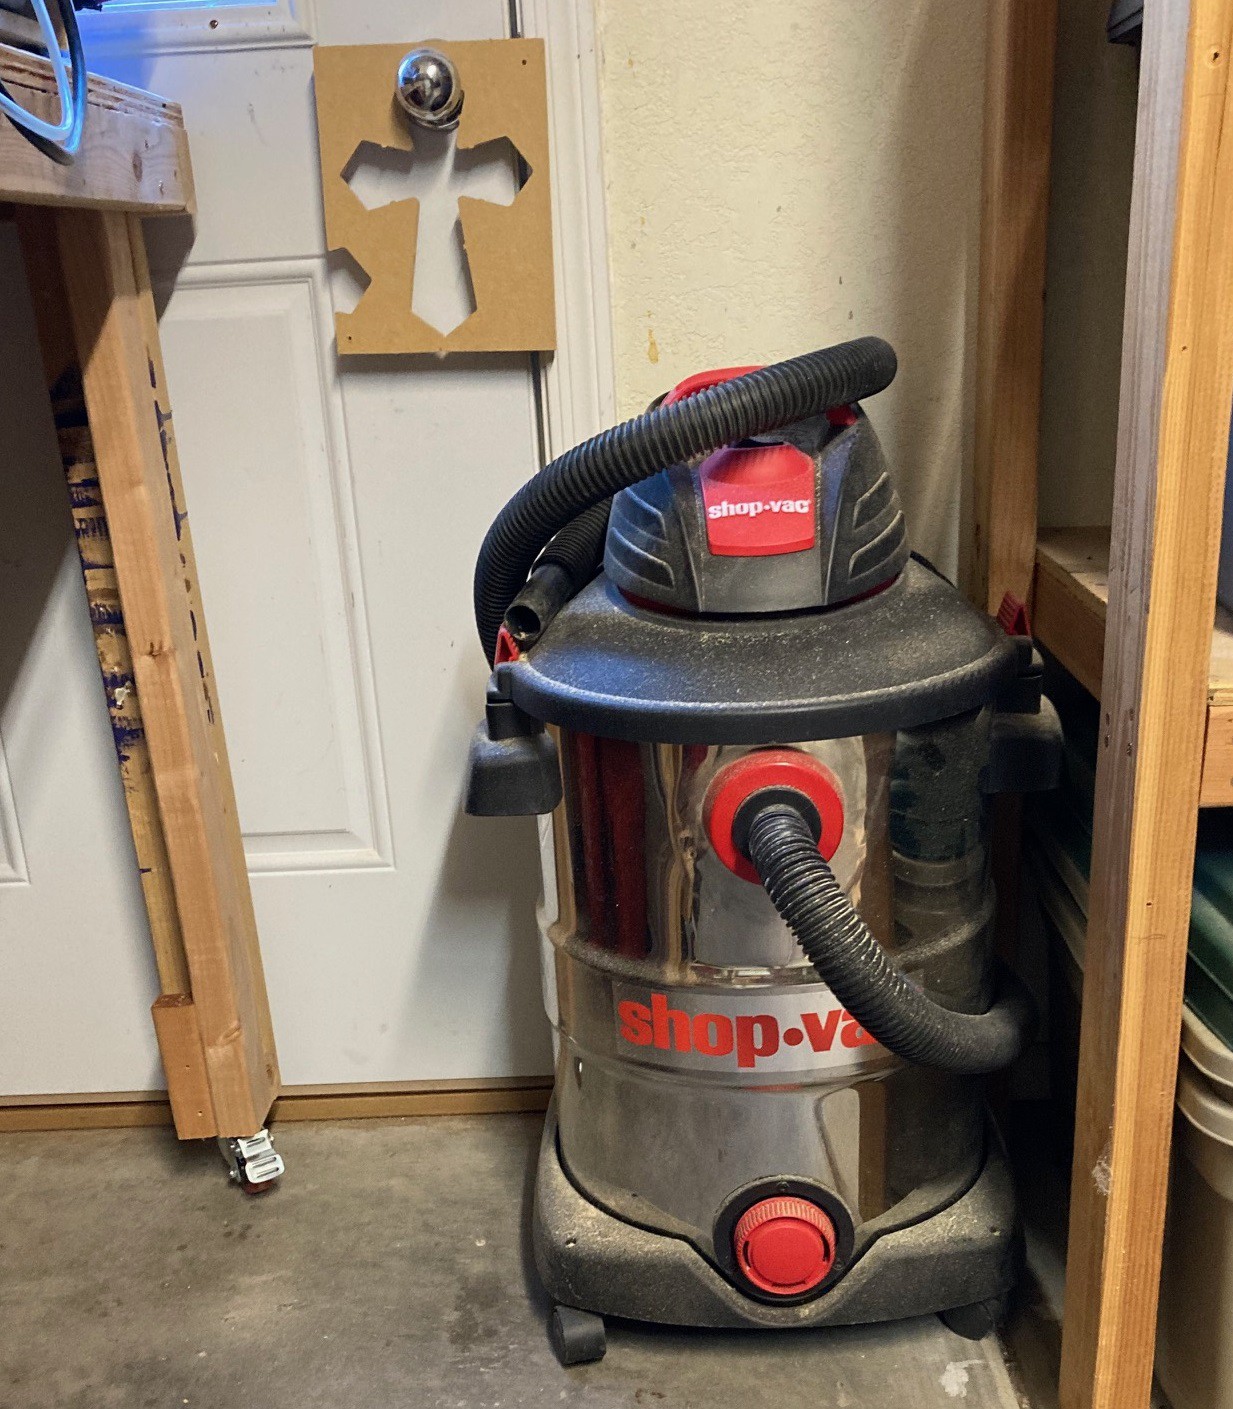
For now I will tuck the shop vac in here next to the door. There is enough room here to still access stuff on the shelfs and it is easily rolled out of the way if needed. I have thought about finding a smaller vac, but there really are no compact (or quiet) vacs that still have enough suction that don't cost as much as a used civic. I think instead I will invest a bit in getting some better hoses for this vac so they are easy to wrap up and less gangly. The vac came with a very small and cheap hose (pictured here) and as an experiment I picked up a larger hose that is super stiff and almost impossible to work with. I also have a wide array of accessories, none of which are very useful. I think one nice long tube and wand for moping the floor and some sort of smaller nozzle with a brush for getting into crevises and the rest can pass on to good will. That way I can store everything on the vac and not have a jumble of things laying around to keep track of.
![]()
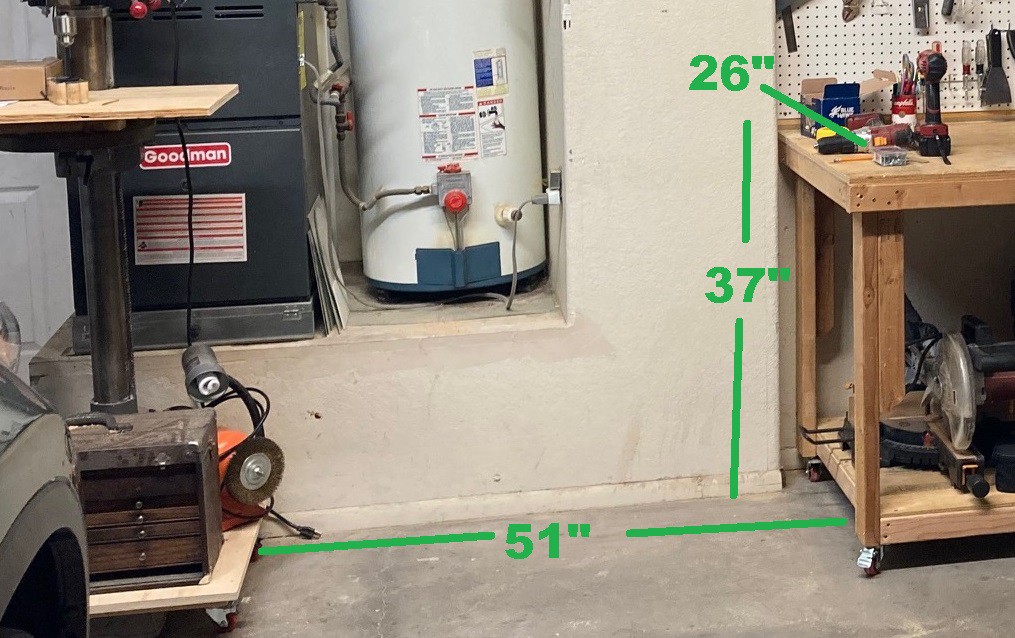
I have a space 51" wide, 26" deep and 37" tall to build my new cabinets. I could push the drill press out further into the space by the door if needed, and It is already sticking out about 3" so I could push it back flush with the wall if it turns out (unlikely) that I don't need all this space.
![]()
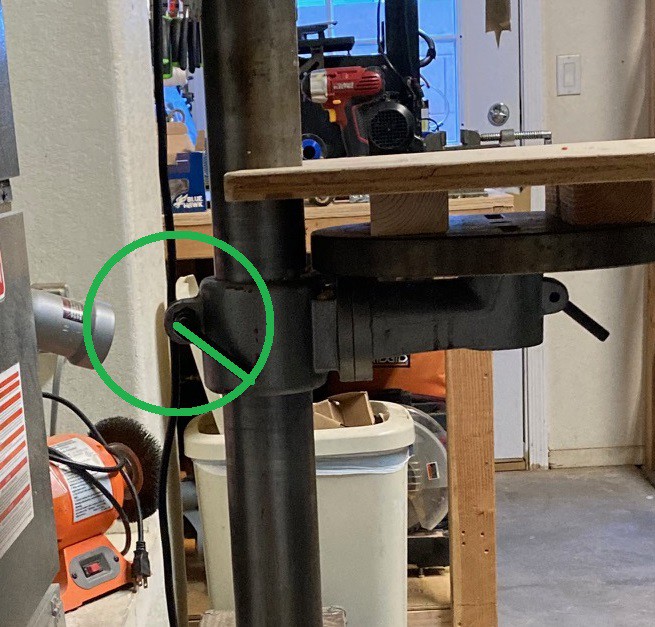
On the drill press there is a lever here on the left side that needs clearance to rotate. This works in conjunction with the lever on the right side to raise and lower the bed so it must be easily accessible.
![]()
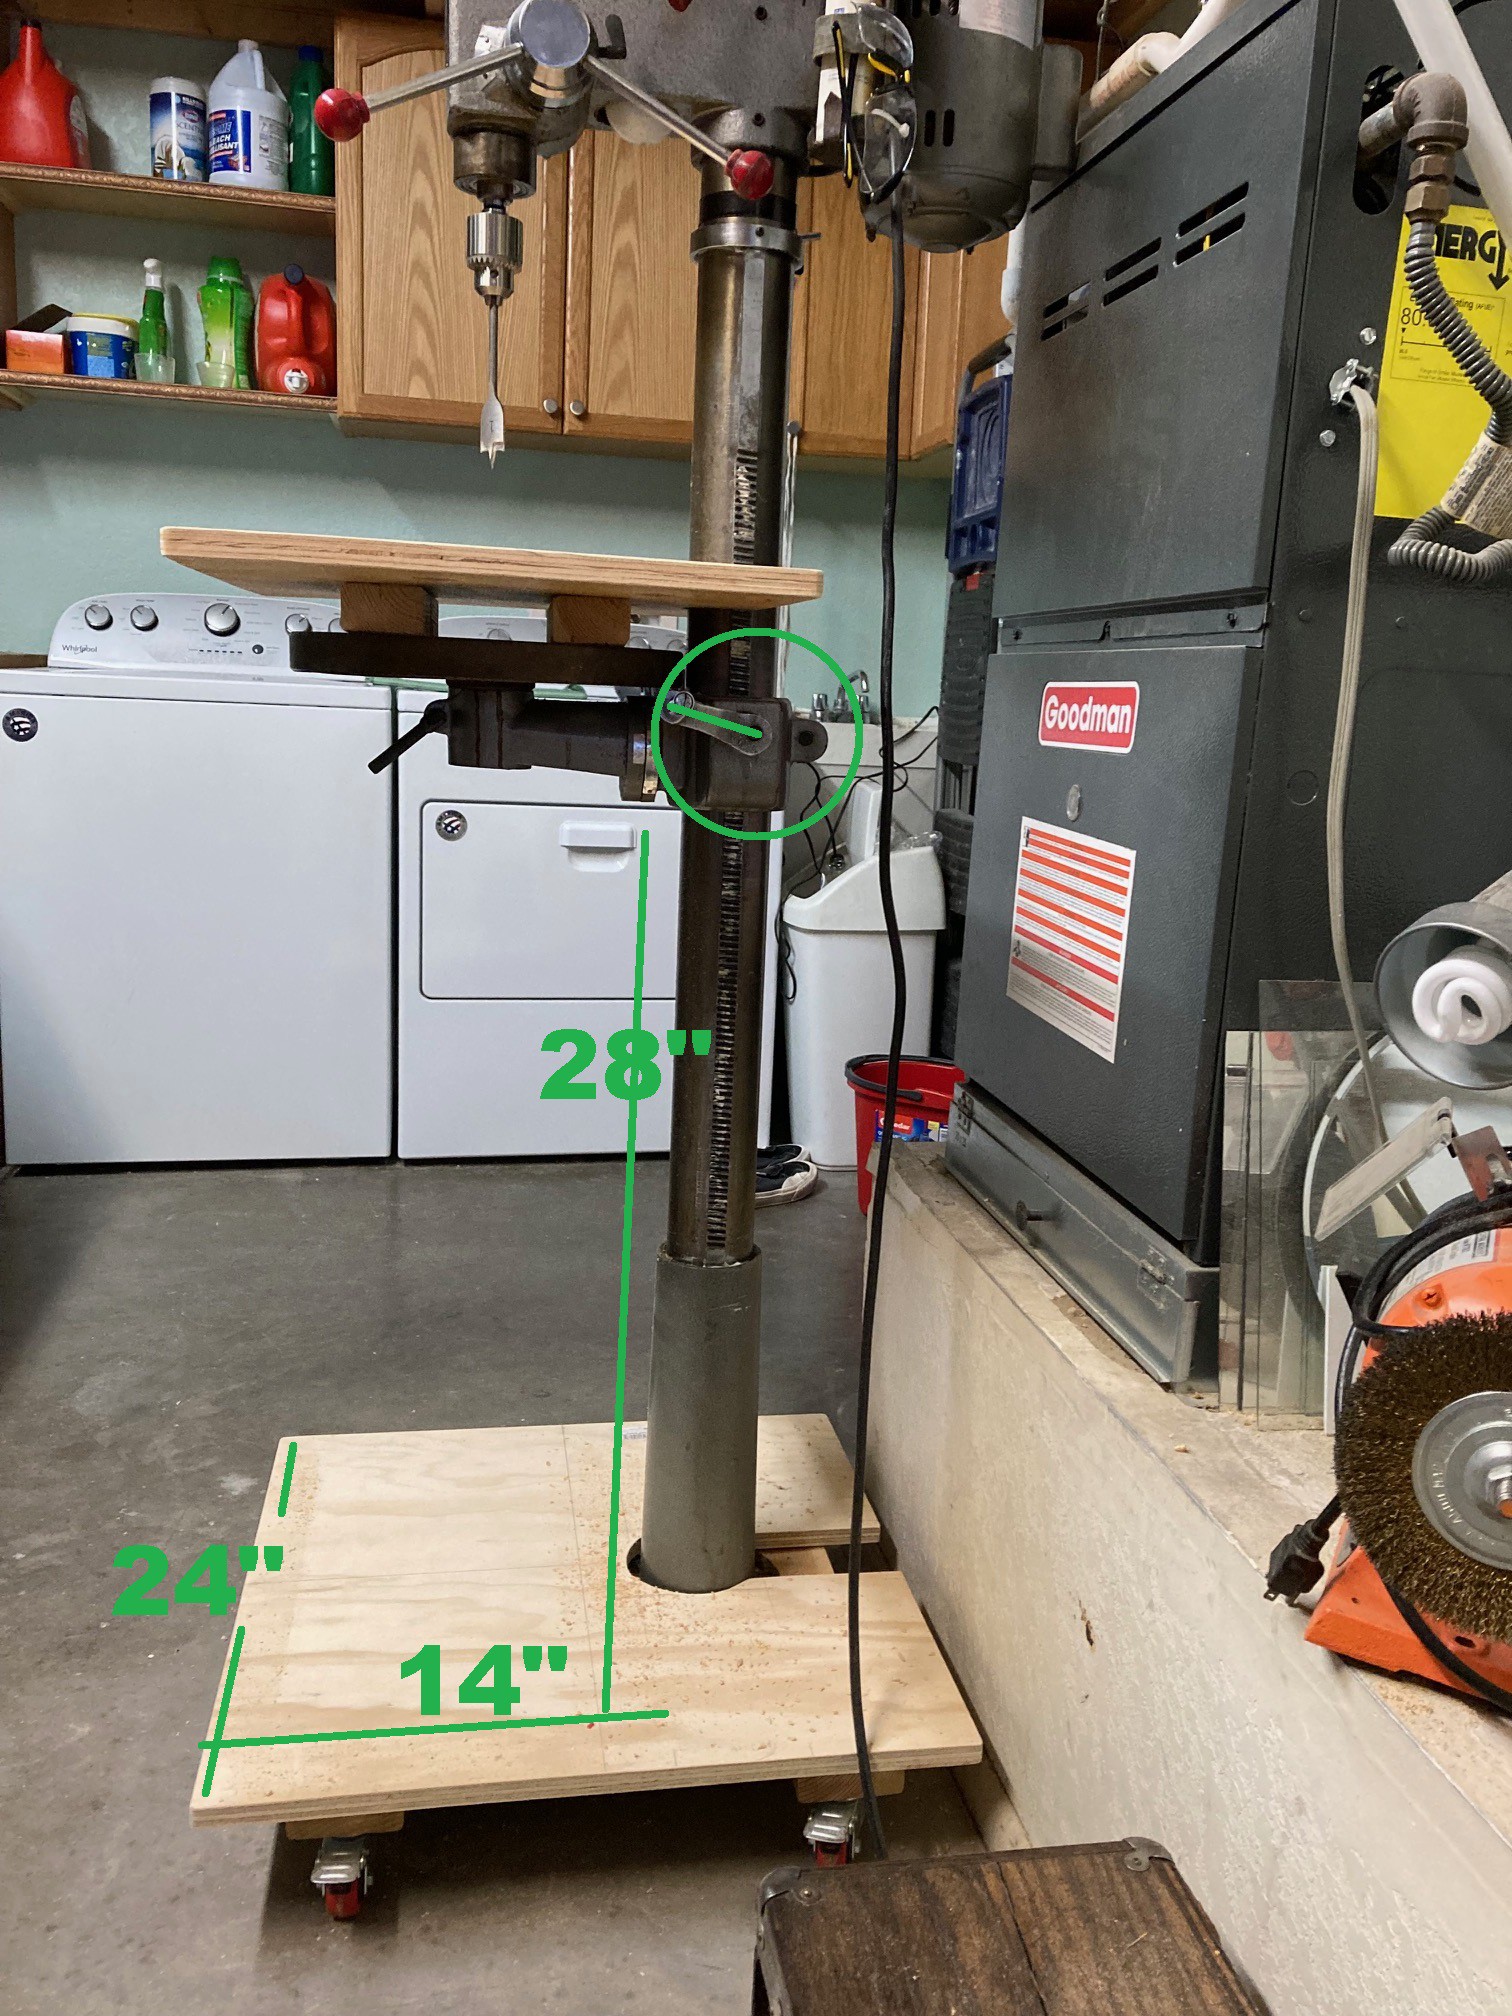
I put in the longest drill bit I have and lowered the bed so the bit just touched when the drill was plunged all the way down. That leaves a space 24" wide, 14" deep and 28" tall below the drill press table and in front of the column. I think I will make a series of drawers here to hold my drill bits and possibly my cordless drills as well. I don't think I will try to run the drawers past the edge of the column, there is just too much space lost there trying to close it off properly. Maybe I will make some open shelves on the back side or store clamps there. My longest clamps are too long to properly fit back there but maybe I can cut some slots in the top of the shelf to let the ends stick up. I may or may not put my grinder back there as well, however it does not look like it will be a good fit, and I would like it o be a continuous and flat surface so any dust from the drill press can be easily taken care of.
I spent quite a lot of time thinking about drawer slides. There are basically 4 types of slides I can work with. One is just using wood on wood like an old fashioned drawer. My small tool box uses this and it works ok for smaller drawers and it basically only cost time. The next up are the sheet metal slides you find on most (contractor grade) kitchen cabinets, these are relatively inexpensive, I can get twenty 22" slides for $100. There all we have in the house, and I have yet to see one fail or even really struggle with the weight. There not high quality but they are good enough. Next up is proper ball bearing side mounted slides, these can be had ten for $100 with a 22" depth. And finally the under mount ball bearing slides are five for $100 at 22" (for the non name brand units).
I'm going to need lots of drawers, I really want everything covered up so I'm not cleaning sawdust off of everything every time I'm cutting things. As much as possible I want to avoid open shelves. Ideally even the air compressor would be mounted in a drawer, both to keep it quieter and to make it simpler to remove if I need to carry it over to the car to fill up a tire. For those heavy drawers I will use some of the nice slides, but for most I think the cheap slides make a lot more sense. I don't see the point in spending more money on slides than wood for all these projects.
-
Benched
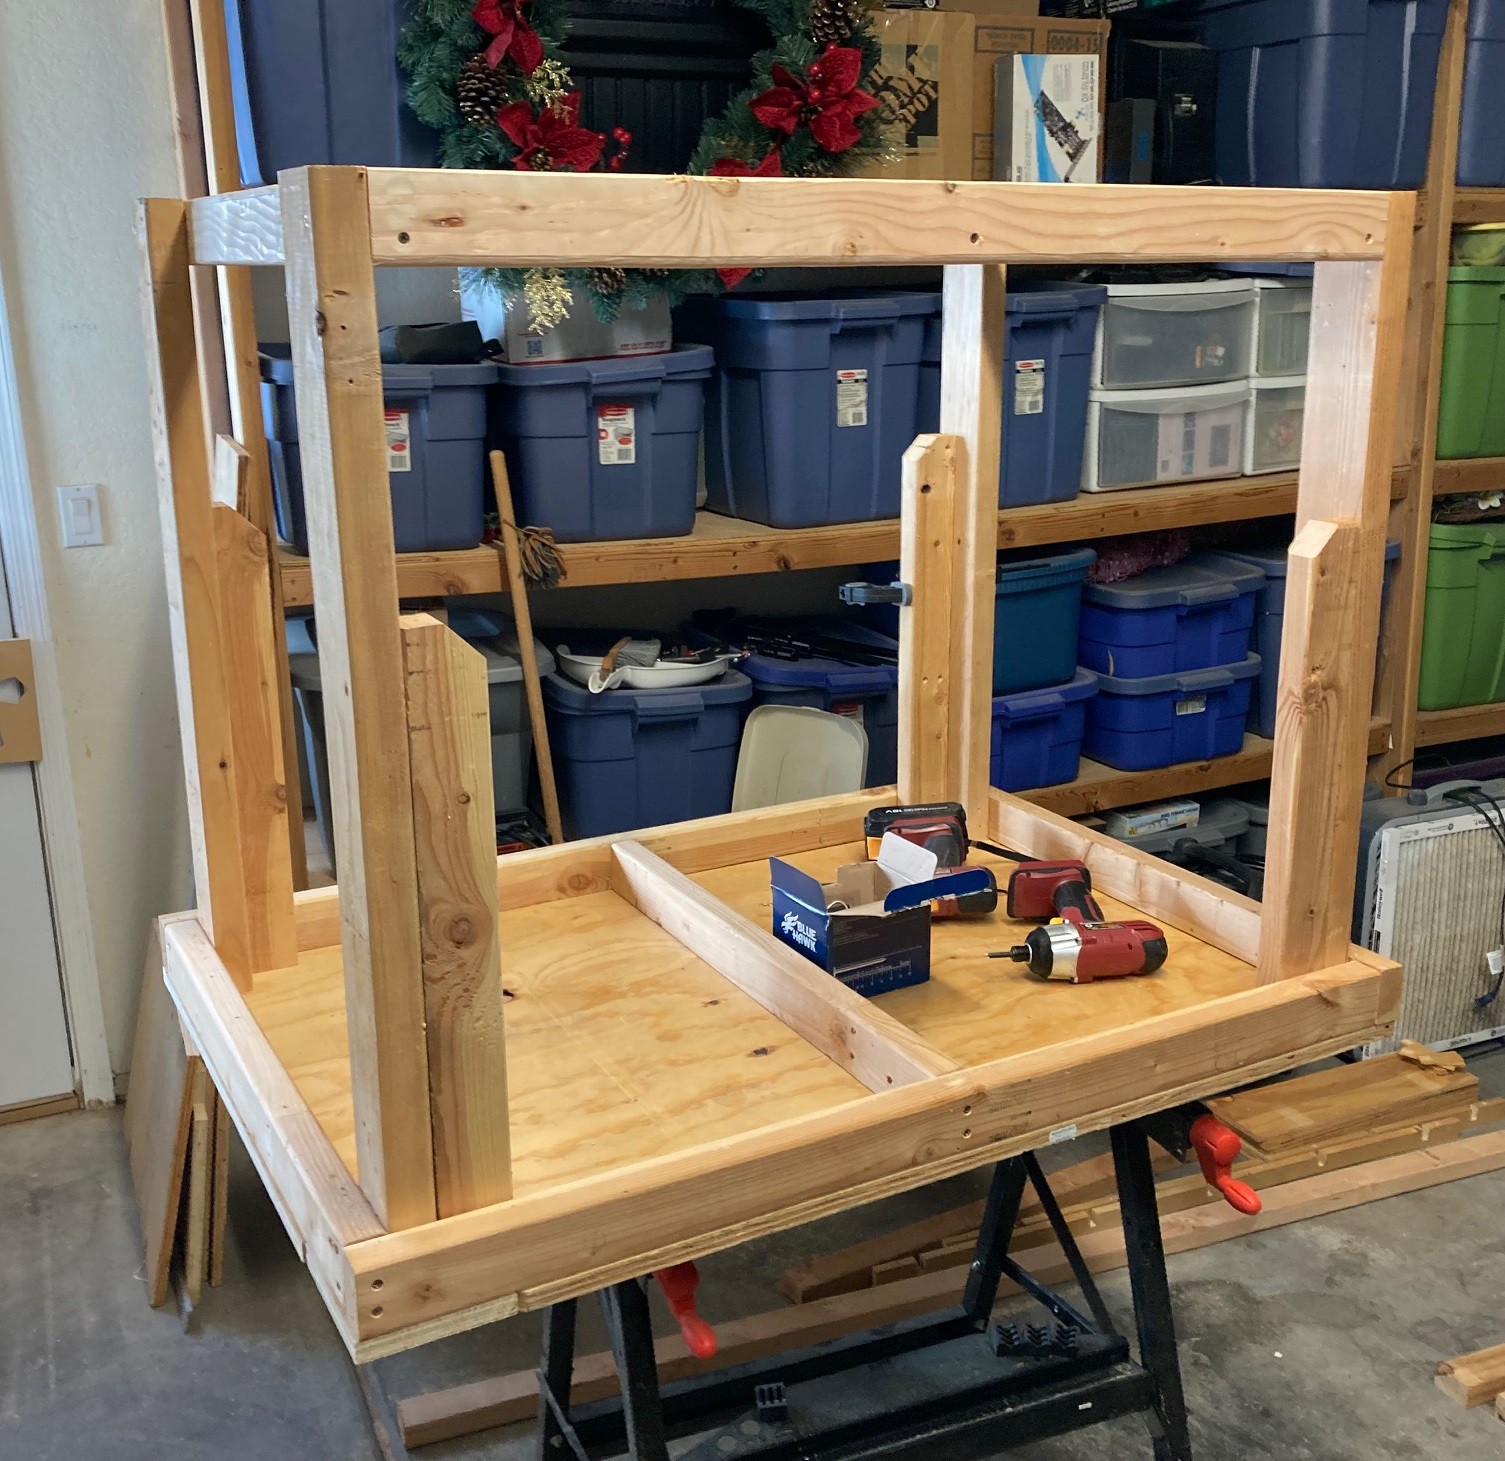
01/22/2023 at 04:29 • 0 comments![]()
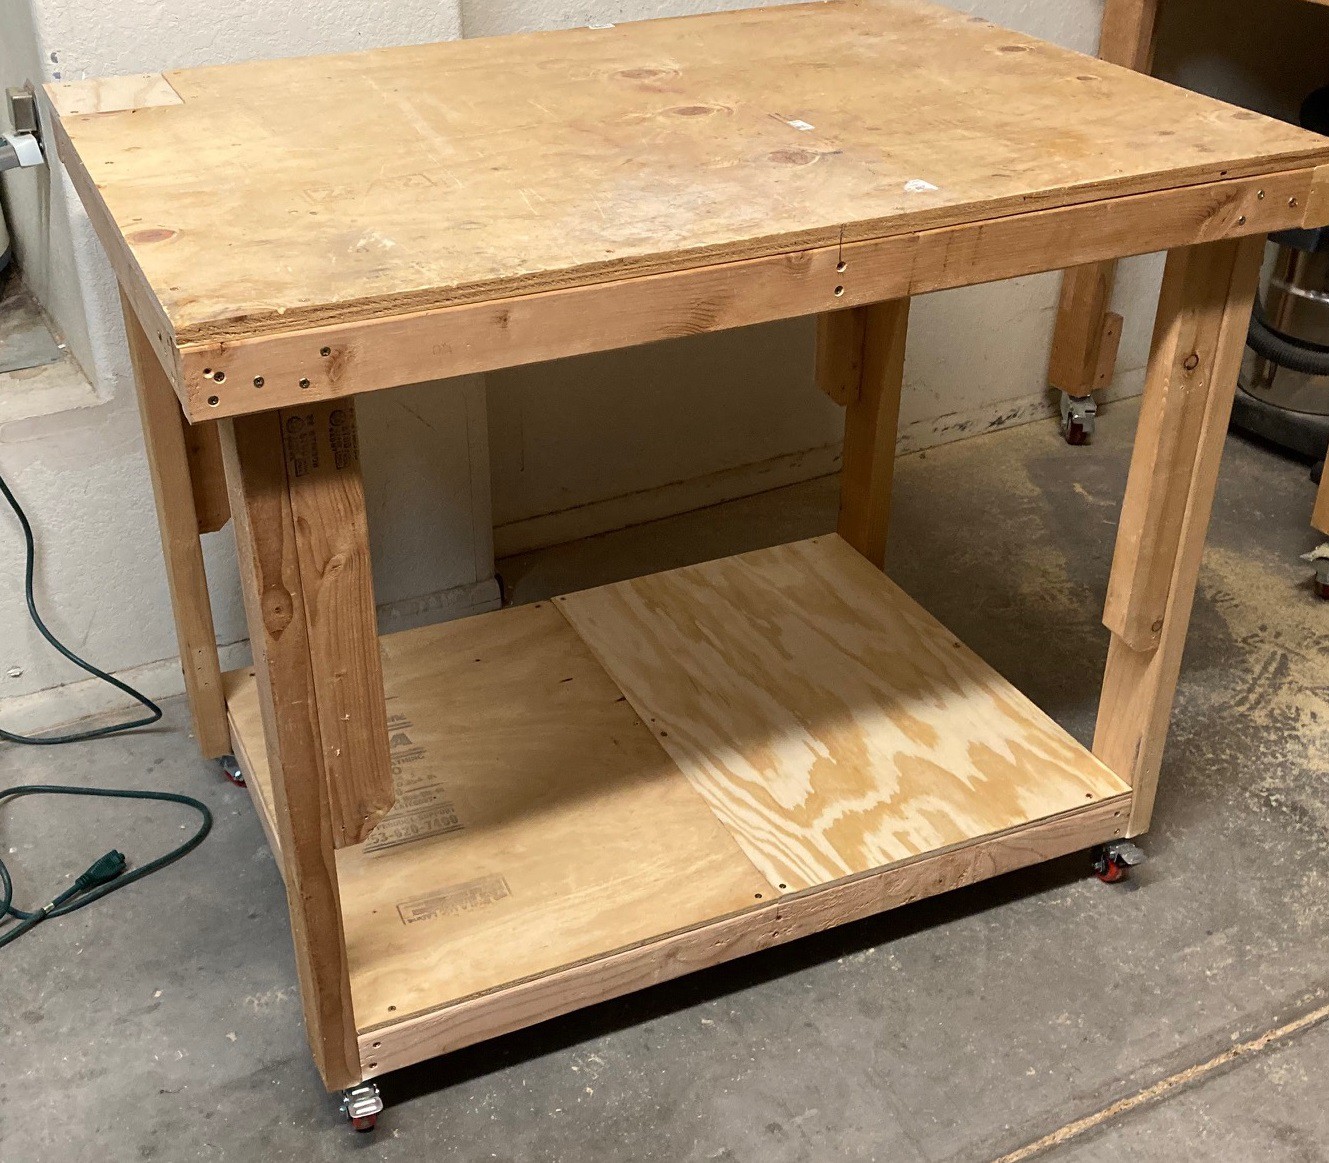
I finally had time to cut down my old workbench. It is now 32"x45". I was able to do this using only scrap wood laying around the shop, so my only expense so far was new casters.
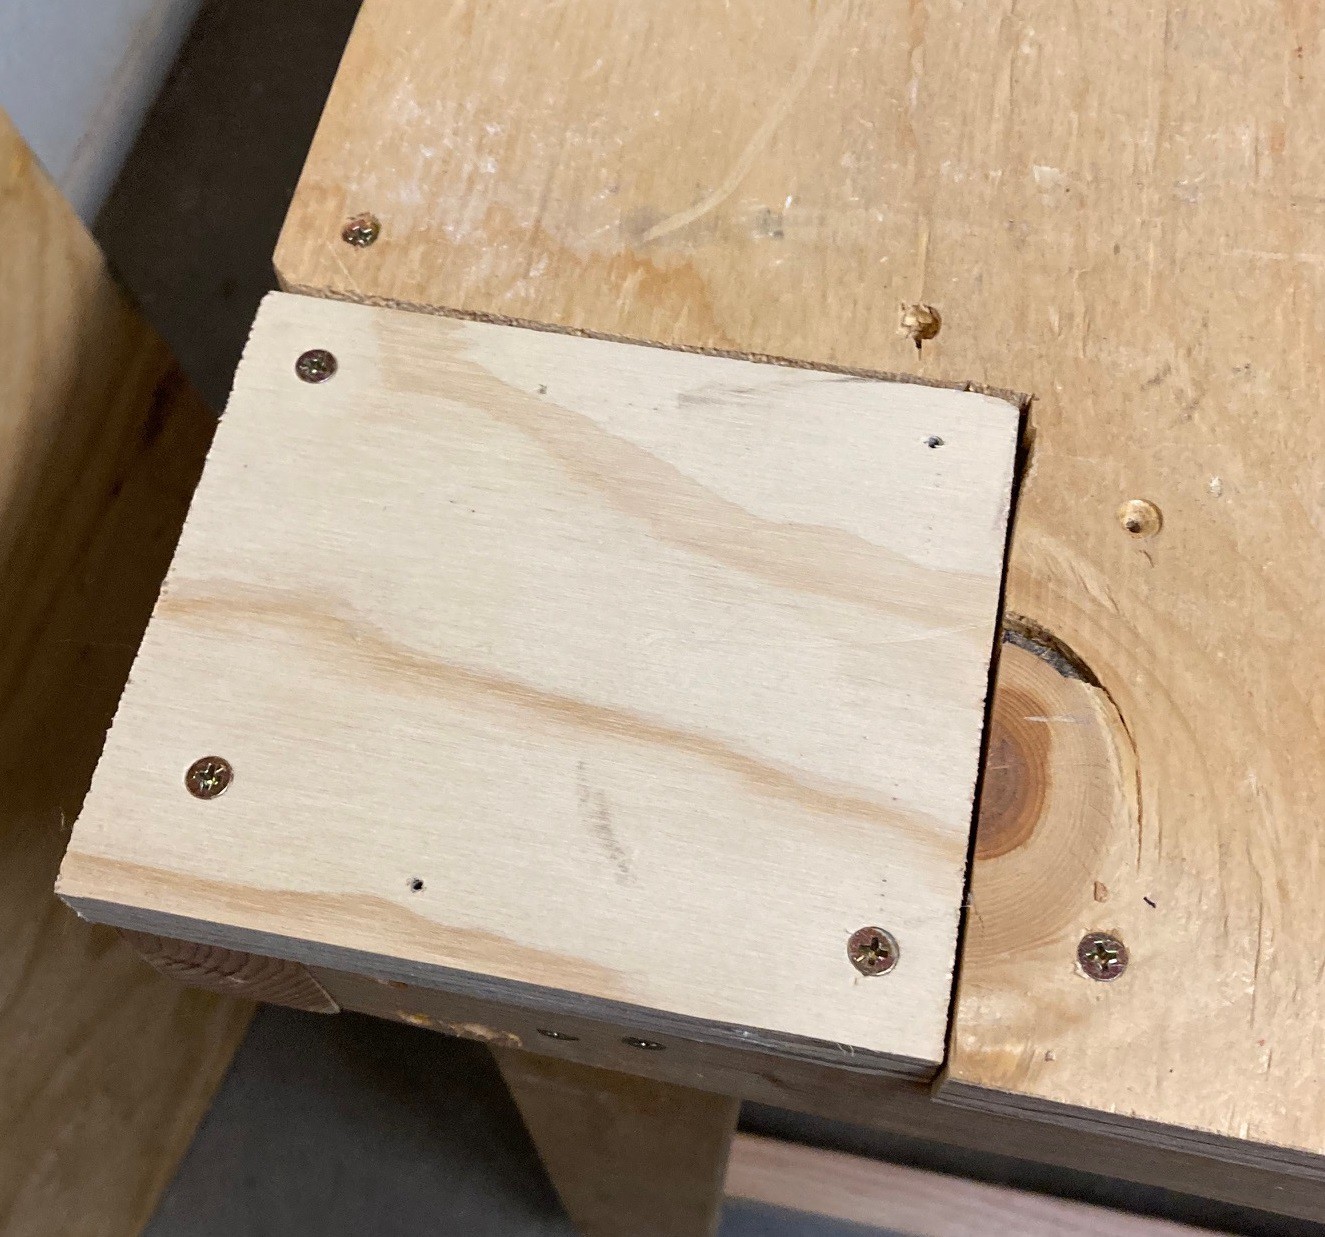
![]()
Because I was reusing material I had to patch a hole in the top where the old workbench was notched out to fit my walls profile.
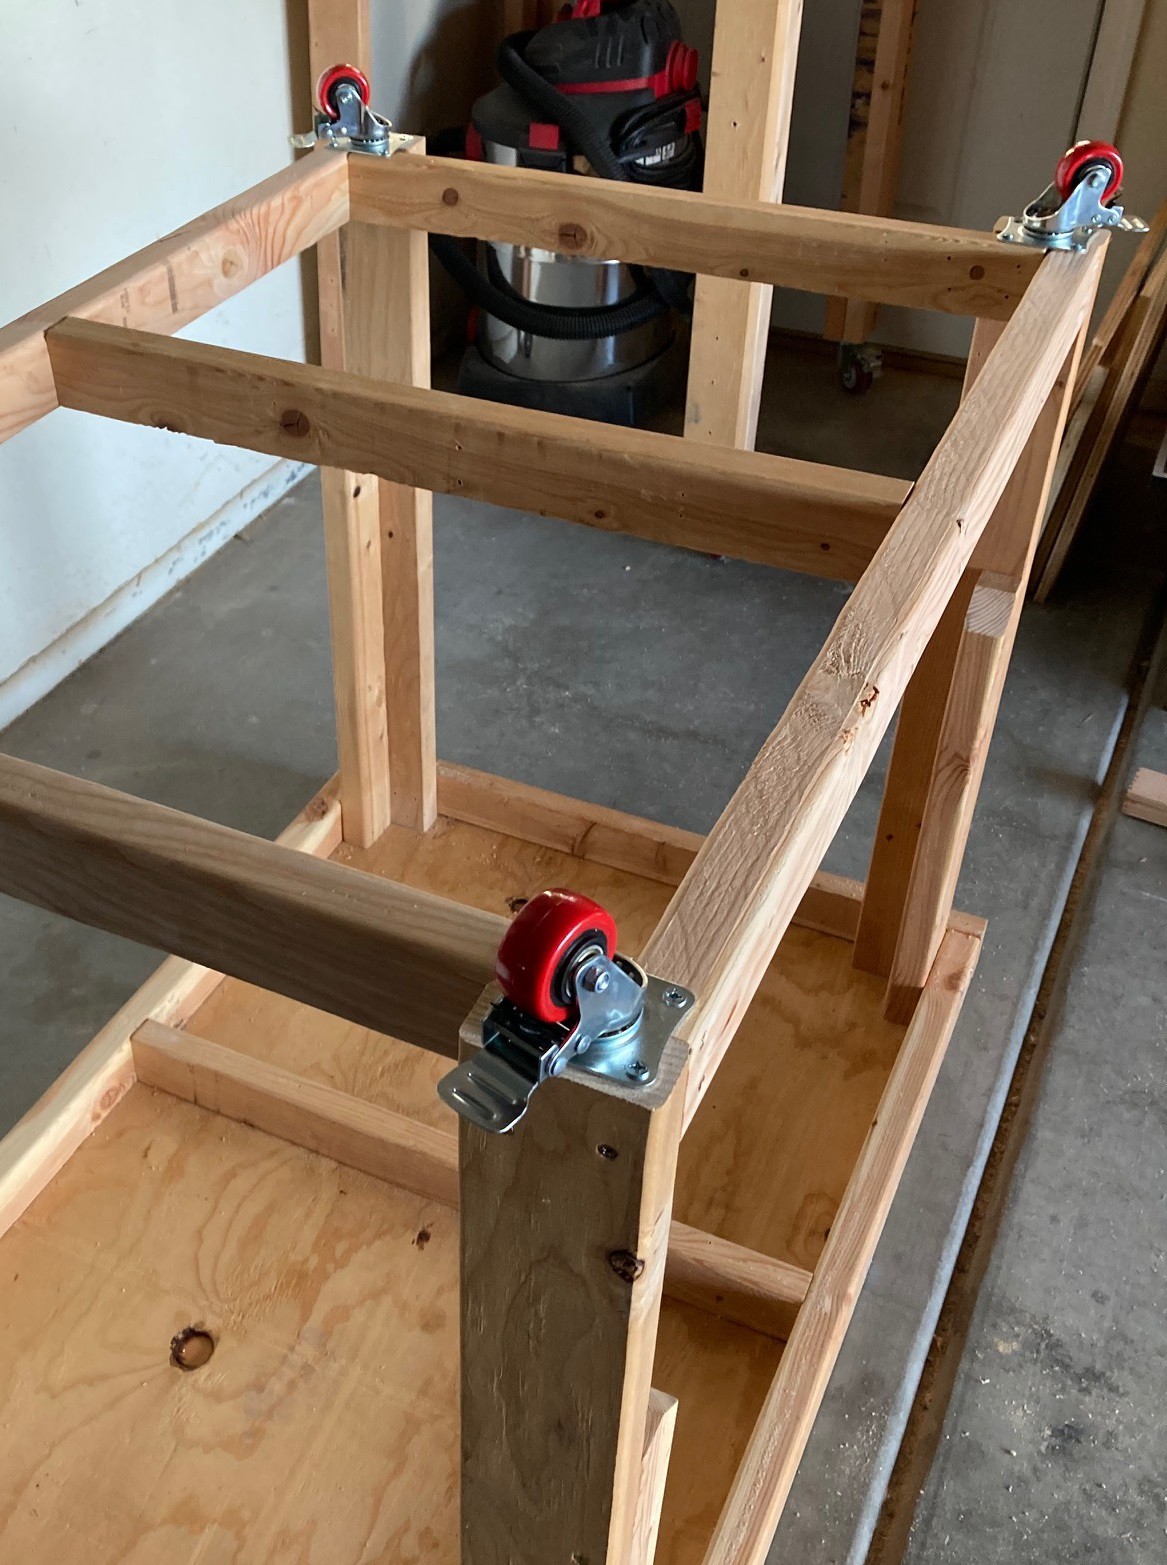
![]()
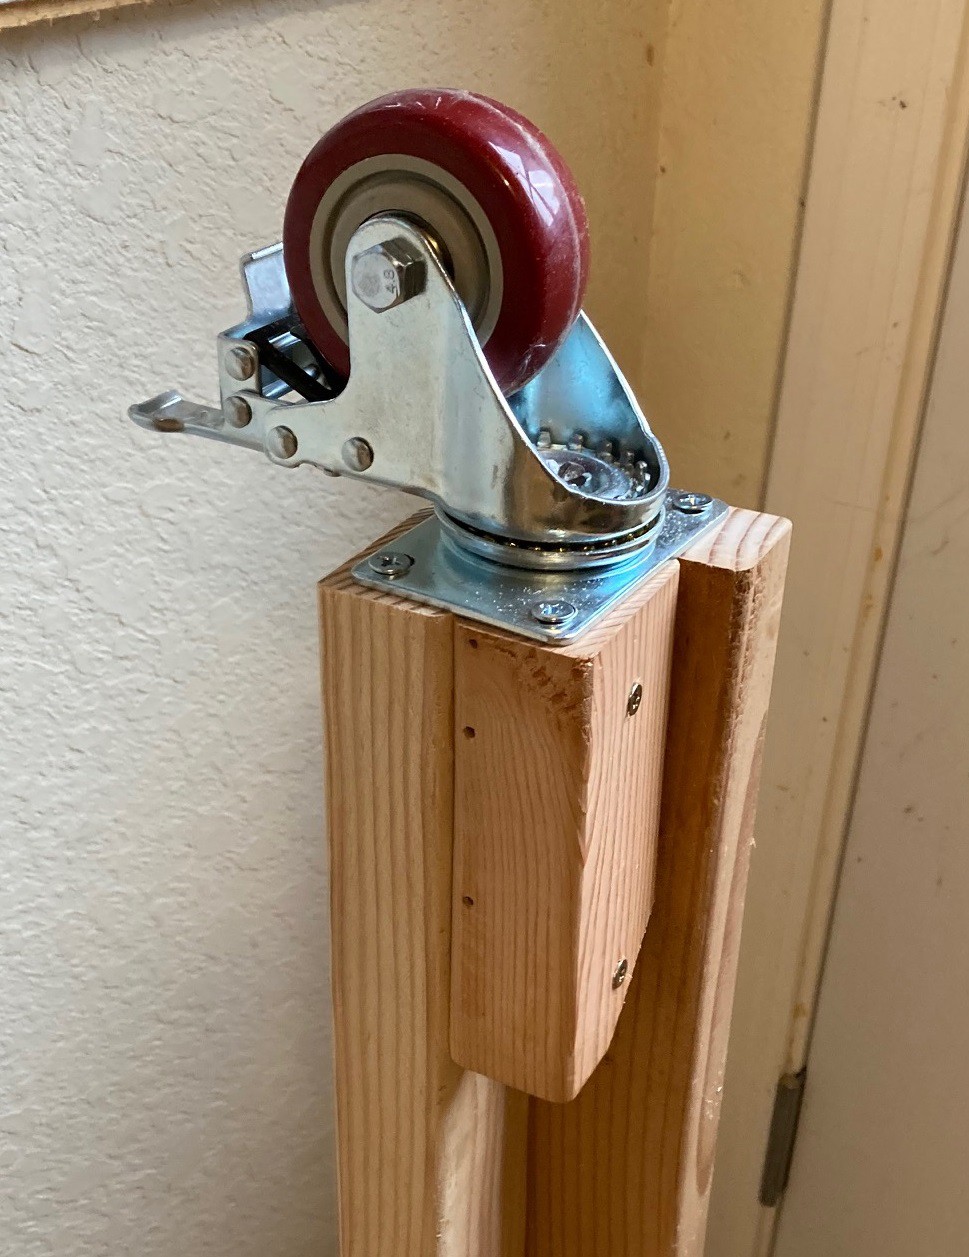
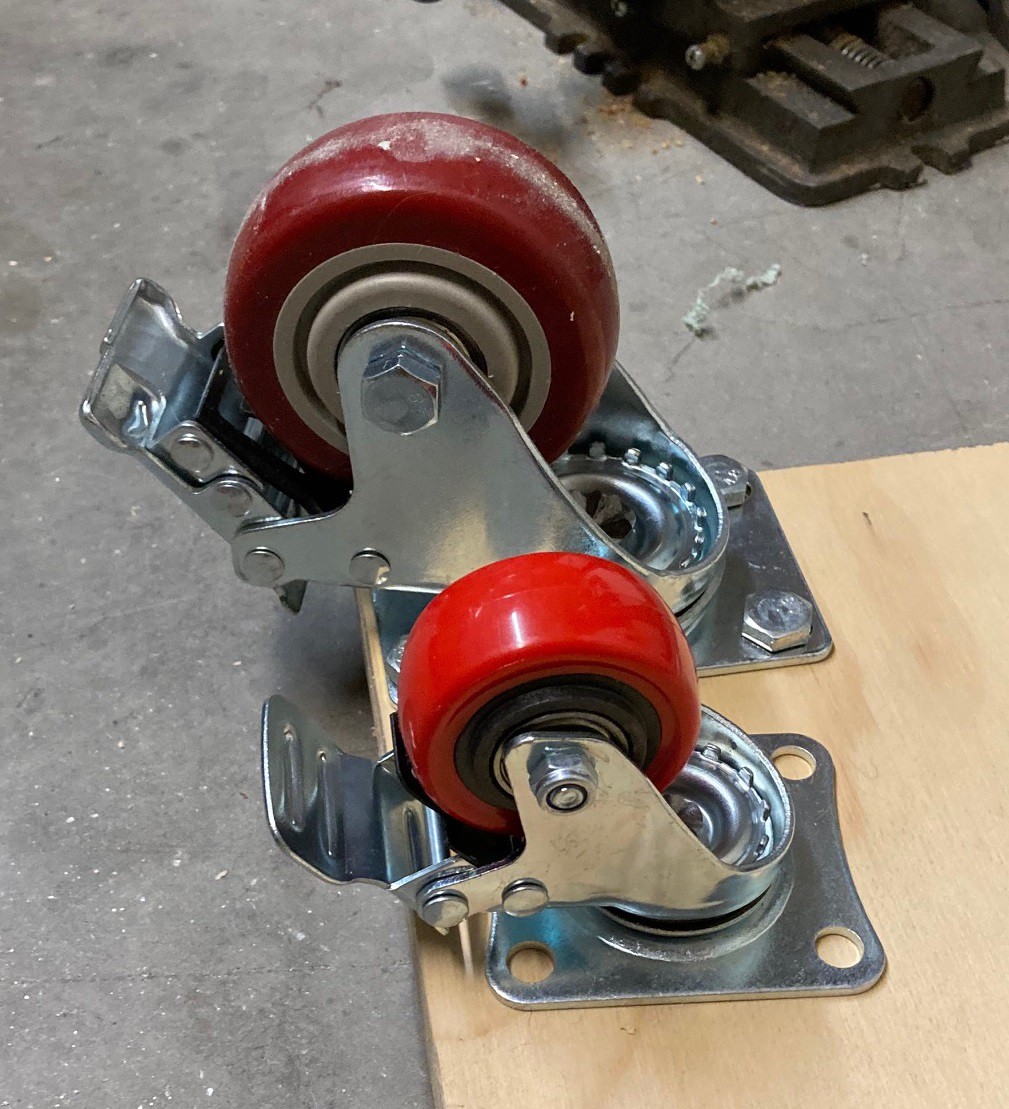
I decided to go with the smaller 2" locking casters. They seem to work just as well as the 3" casters but take up much less space in all directions. I'm going to save off the 3" casters just in case these don't hold up, but I don't see it being a problem.
![]()
I did not have enough 2x3's to fully support the 2x4's like I did on the smaller table. However I had these shorter pieces that I used to brace the legs. I think it provides 80% of the benefit and it is plenty for this temporary workbench.
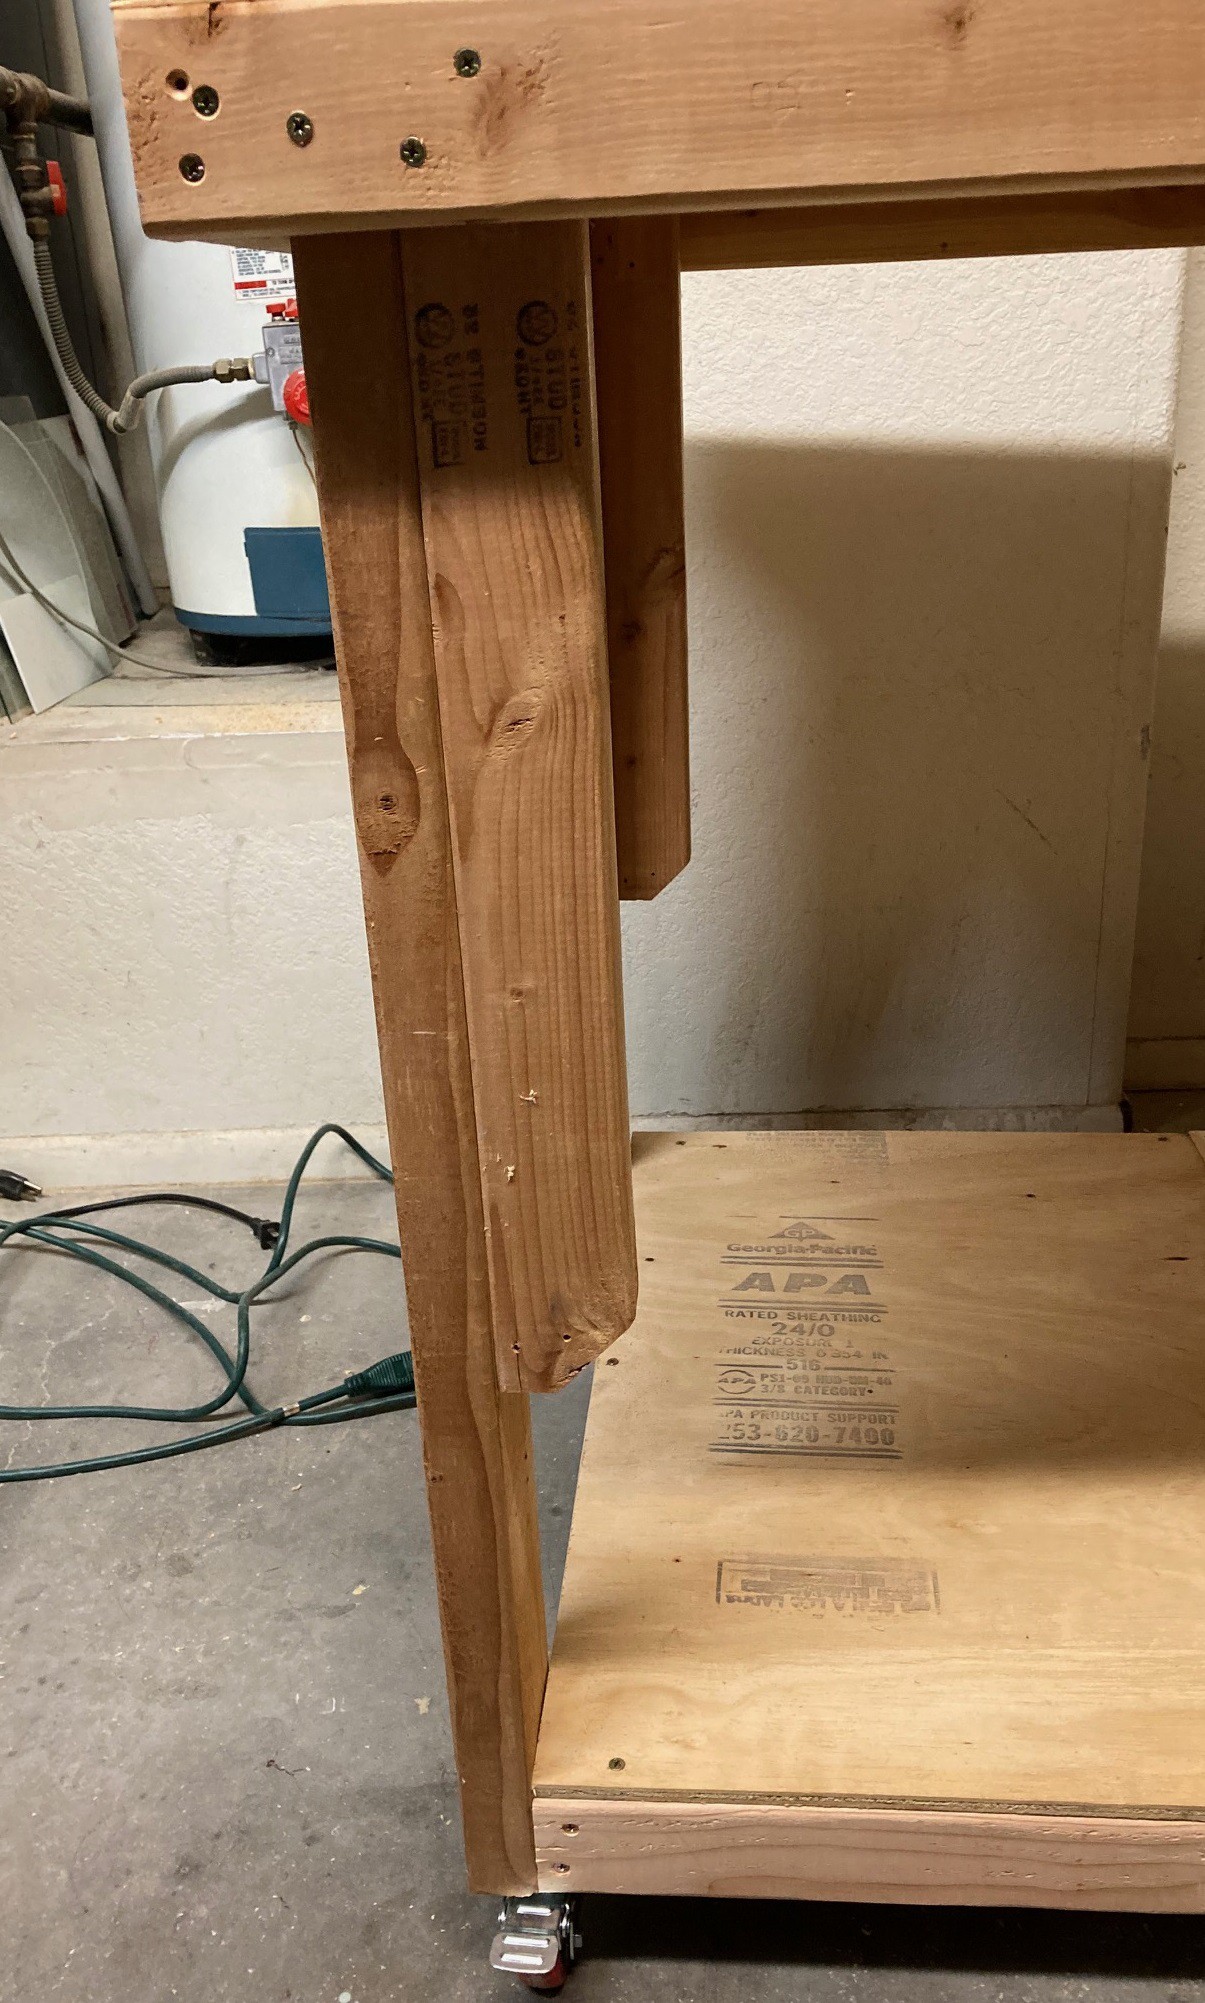
![]()
Because I'm rebuilding this with scraps I did not have a piece of plywood large enough to finish the bottom shelf. So I had to use two pieces that were slightly different thicknesses. Seems to work ok for now.
![]()
Here it is all finished up. It is far from pretty, but it gives me the chance to try out my new ideas without spending any money on the experiment. That is a win in my book and it takes quite a load off of trying to find the perfect design for this small space.
![]()
I threw a bunch of stuff on the tables just to see how it all fits. This is far from organized in any way. It seems to fit well in this space, I think this is the correct move. And I have that wide gap between the workbench and the drill press to put in other storage carts.. Plus I still have my new shelf above the workbench that needs to be filled up as well.
![]()
I still have quite a pile of stuff that needs to be stored away, it is probably time for me to start sorting this into things I want easy access to and things I can store up on the shelf.
--
So the new battery I put together in the last post is not working that well. It discharged itself overnight even thought I had it on the charger just before going to bed. And even after charging it back up it only held a charge for about 10 minutes. That is slightly better than the old batteries but no where near as good as when the batteries were new. Back then they were good for a half hour or more and could hold a charge for a week or so. I suspect these cells are old surplus stock and that is why they are going so cheep on Amazon. There were several comments by other users saying they did not work out of the box. I tried to pick a seller that had more positive than negative posts, but I knew this was a risk when I picked up the cells. That is a big part of why I'm reluctant to spend more money on this idea, it is unlikely to give nearly as good of results as moving on to Lithium batteries.
--
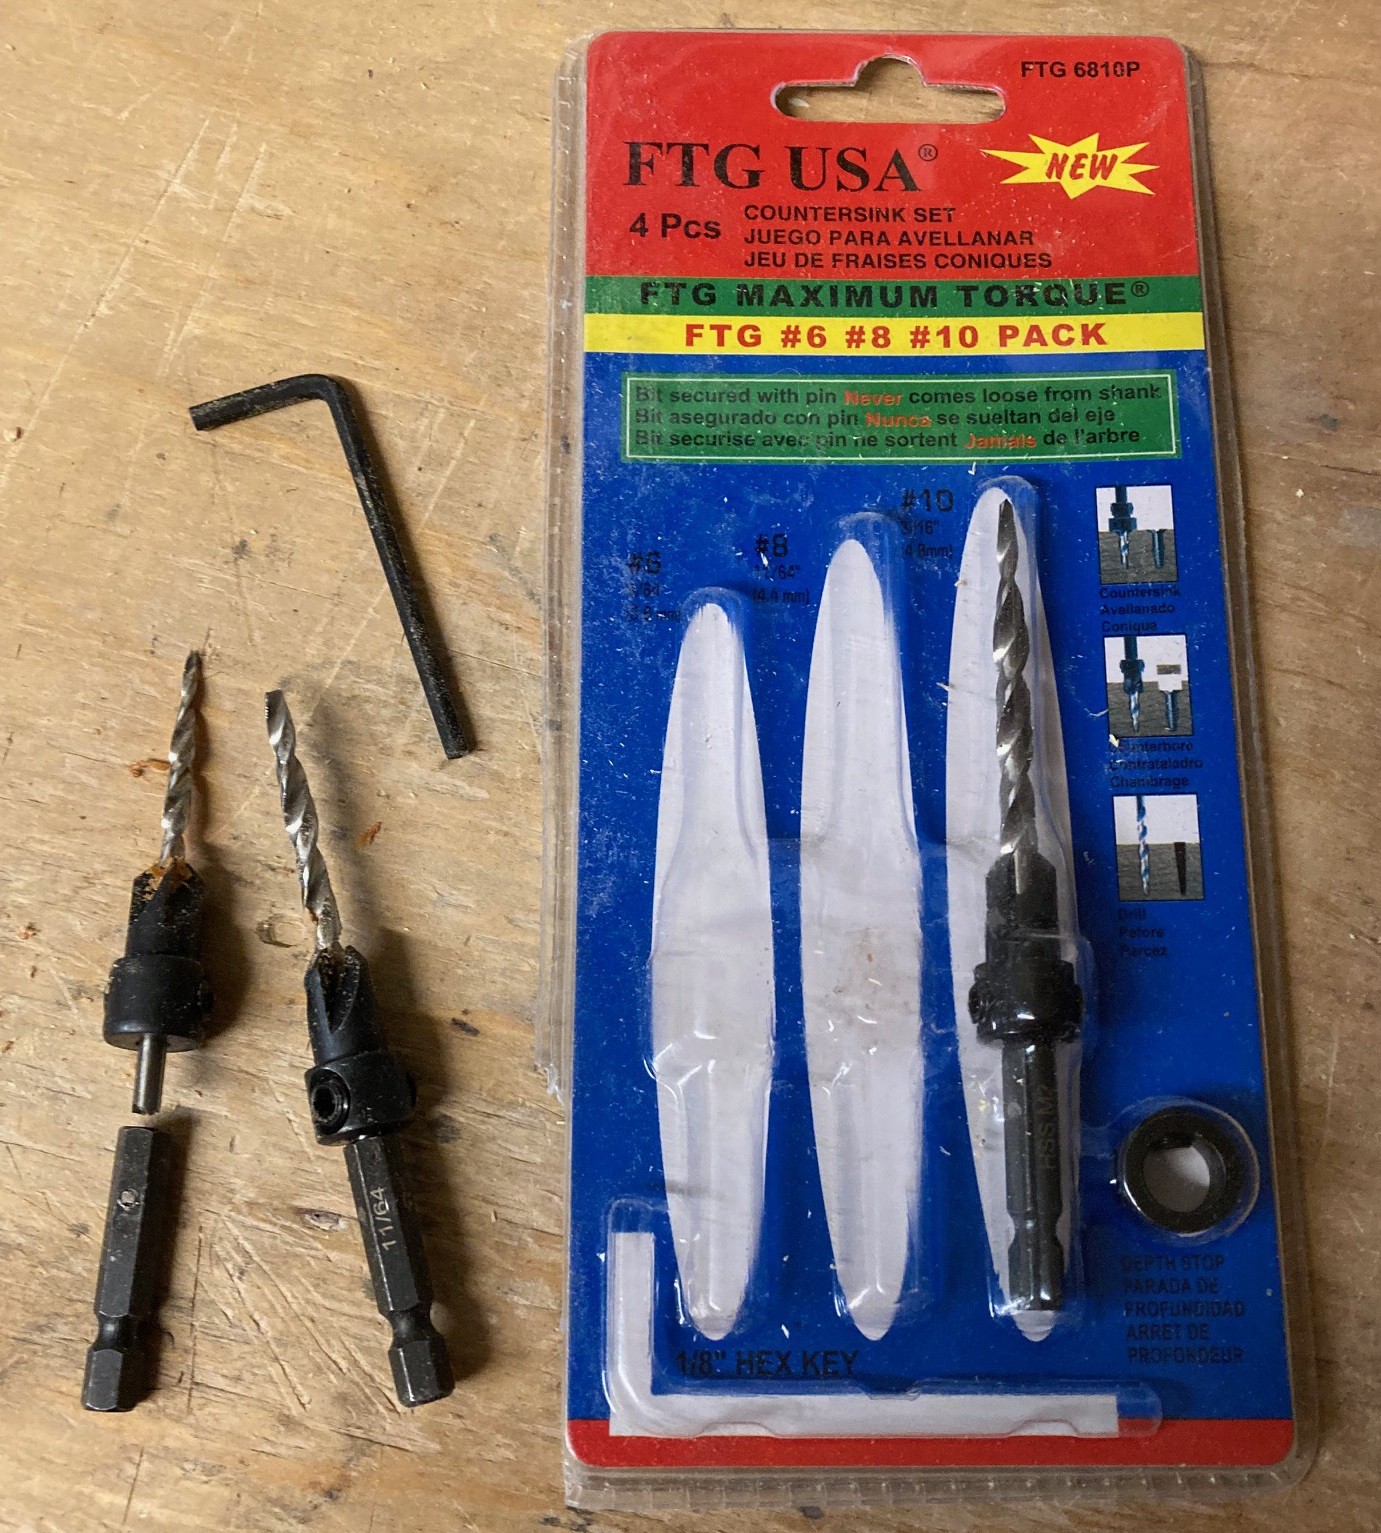
![]()
As another experiment I picked up a pack of tapered drill bits with built in countersinks. I have always used a straight drill bit and no countersink but I thought I could see if these would make things go together a little faster. However these were a huge disappointment. The smaller bit broke half way through the first hole. The shank is pinned into the hex adapter and it snapped right at the pin. It should have been friction fit into the hex adapter, that would have been much stronger. The second drill bit lost its tip on the second hole I drilled and after that it was basically useless. It appears these are not actually made out of high speed steel as they claim.
For the few seconds I had with them they seemed to work ok. I may pick up a better brand and see if they hold up. However I don't have super high hopes on these. That is I don't know that they are any better than a straight bit. It also proves that Amazon is not the best place to find tools. They seem to be much lower quality than even Harbor Freight tools. I suspect that Harbor Freight knows they will be stuck with lots of returns if they sell something this fragile.
-
Fully Charged
01/20/2023 at 04:16 • 2 commentsSo I have some older Harbor Freight Chicago Electric drill and impact drivers. I have had them for 8 or so years and I picked them up on clearance for very little. They have served me well, but the Ni-Cad batteries they came with have completely worn down. I'm getting about 5 minutes per charge out of each battery.
I searched around for replacement batteries, but unfortunately the world moved past Ni-Cad's years ago. I tried to find a 3D printed adapter to allow newer batteries to work with my old drill but I came up empty there as well. I thought about just picking up an 18v Lithium battery and trying to work out my own adapter but I was worried this would be too far of a leap and it would not work for some reason (maybe some communications needed between drill and battery, etc).
![]()
After digging around for a while I found some 18v NiMH batteries for $20 on Amazon and decided to take a chance on them. They were for a different drill and did not even pinout the same, so I had to swap the pack into my own case. Fortunately the cells are the same size and in the same configuration, however I needed to exchange the connectors and lengthen the wires so they could reach properly since the pack was wired in a different configuration.
This was a very sketchy project, but in the end it worked. However these cases are extremely tight and it took some care to squeeze it all back into the case. I could not find a pack with NiCad batteries so I had to go with the slightly newer NiMH batteries. However I still have my older NiCad charger and spending another $30 to get a NiMH charger, as well as modifying it to fit my batteries, seems like throwing good money after bad to me. So I'm going to try and time how long the batteries stay on the charger in order to not overheat them.
What is the final verdict? The battery was able to charge up on my charger, and after 10 minutes of use it is still running much stronger than my older batteries. It was a relatively small investment at $20, but to be fair I only got one battery. I really should spend another $20 and get a second battery, but that brings the total investment up to $40. For $100 I can pick up a name brand drill and driver set with two Lithium batteries and a charger (on a loss leader sale). That would be a much better investment in the end, I would have batteries that last longer and that hold there charge for weeks on end, and better built tools that have no wear on them.
I think I will take my win and walk away. I will use this battery while it lasts and then invest in something more quality in the end. I hate that perfectly good drills must be tossed because the batteries wore out, but unfortunately that is the world were in right now.
-
Simplification
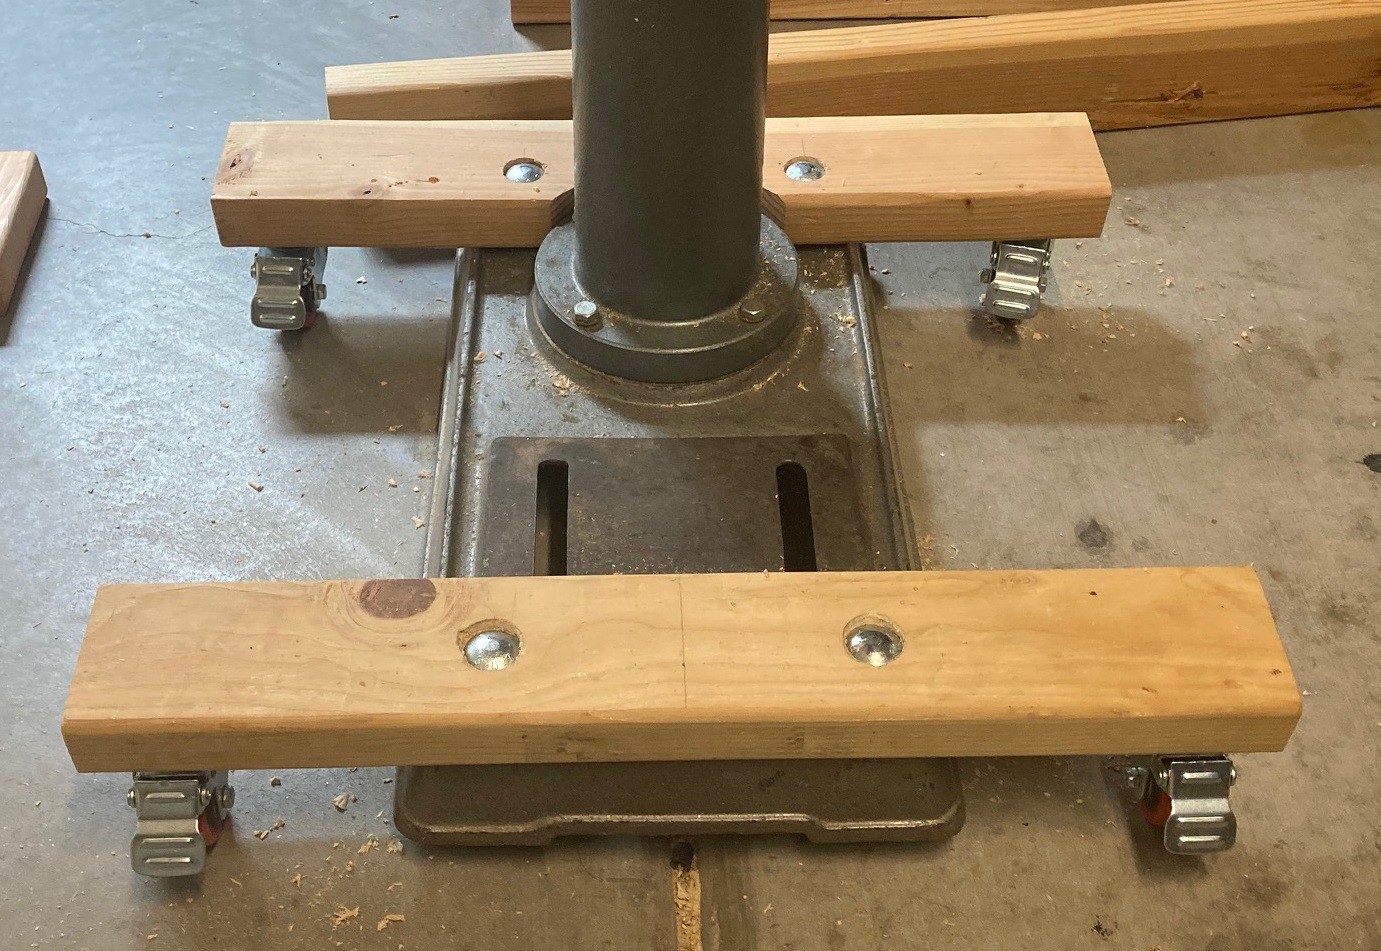
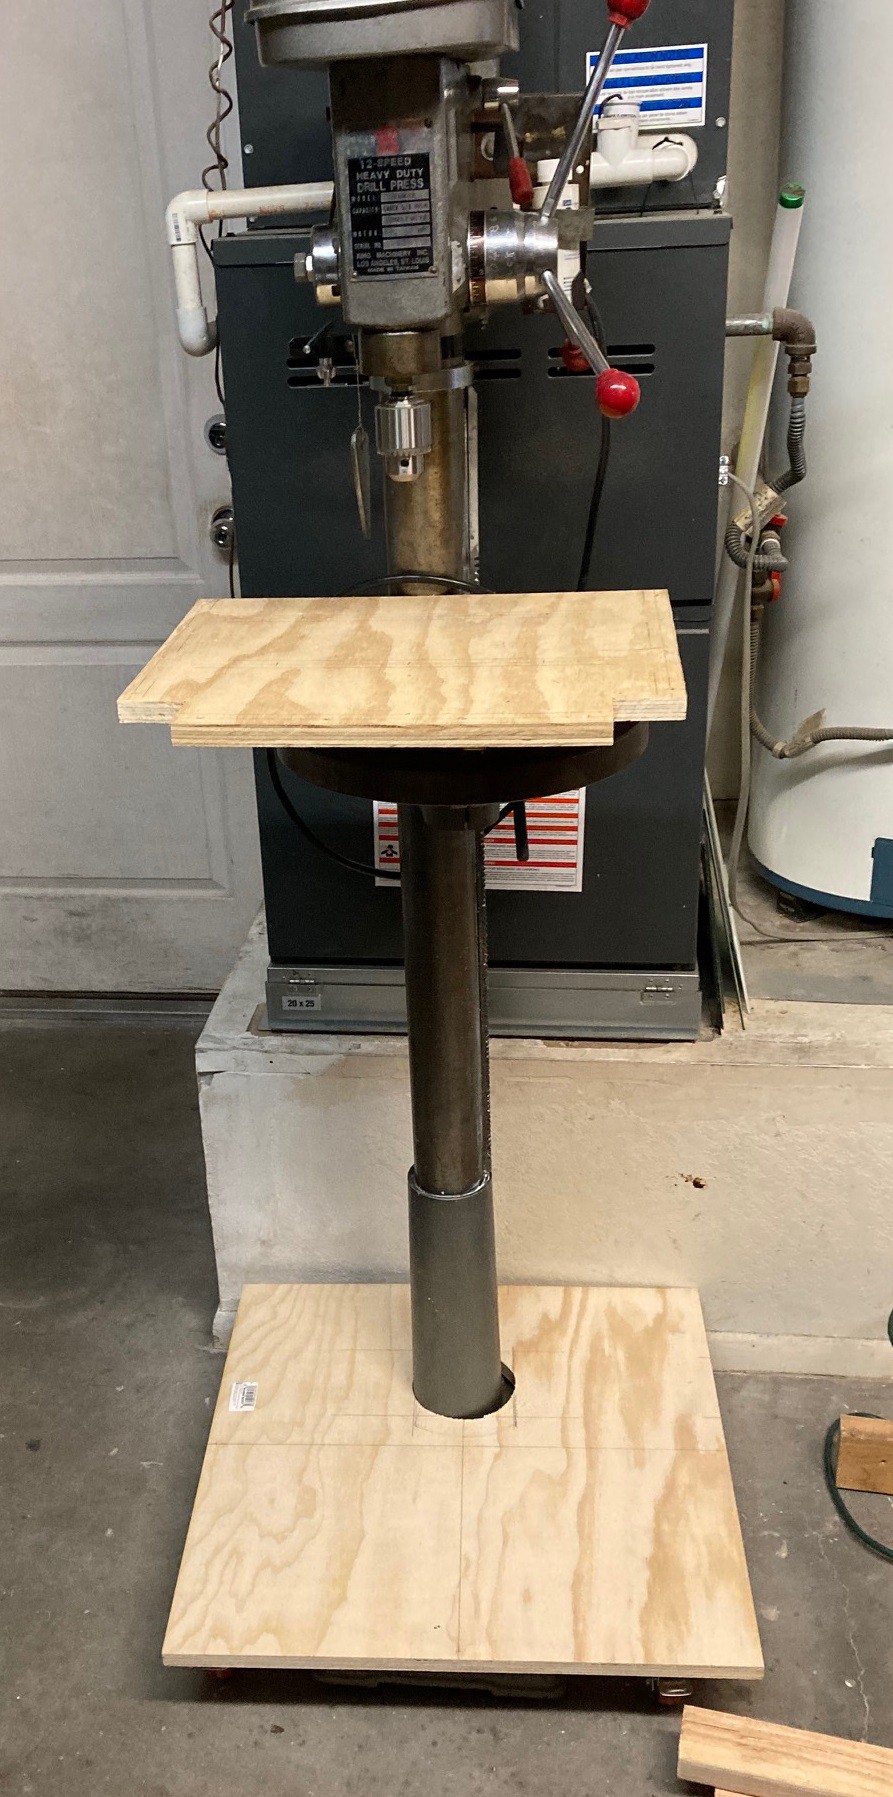
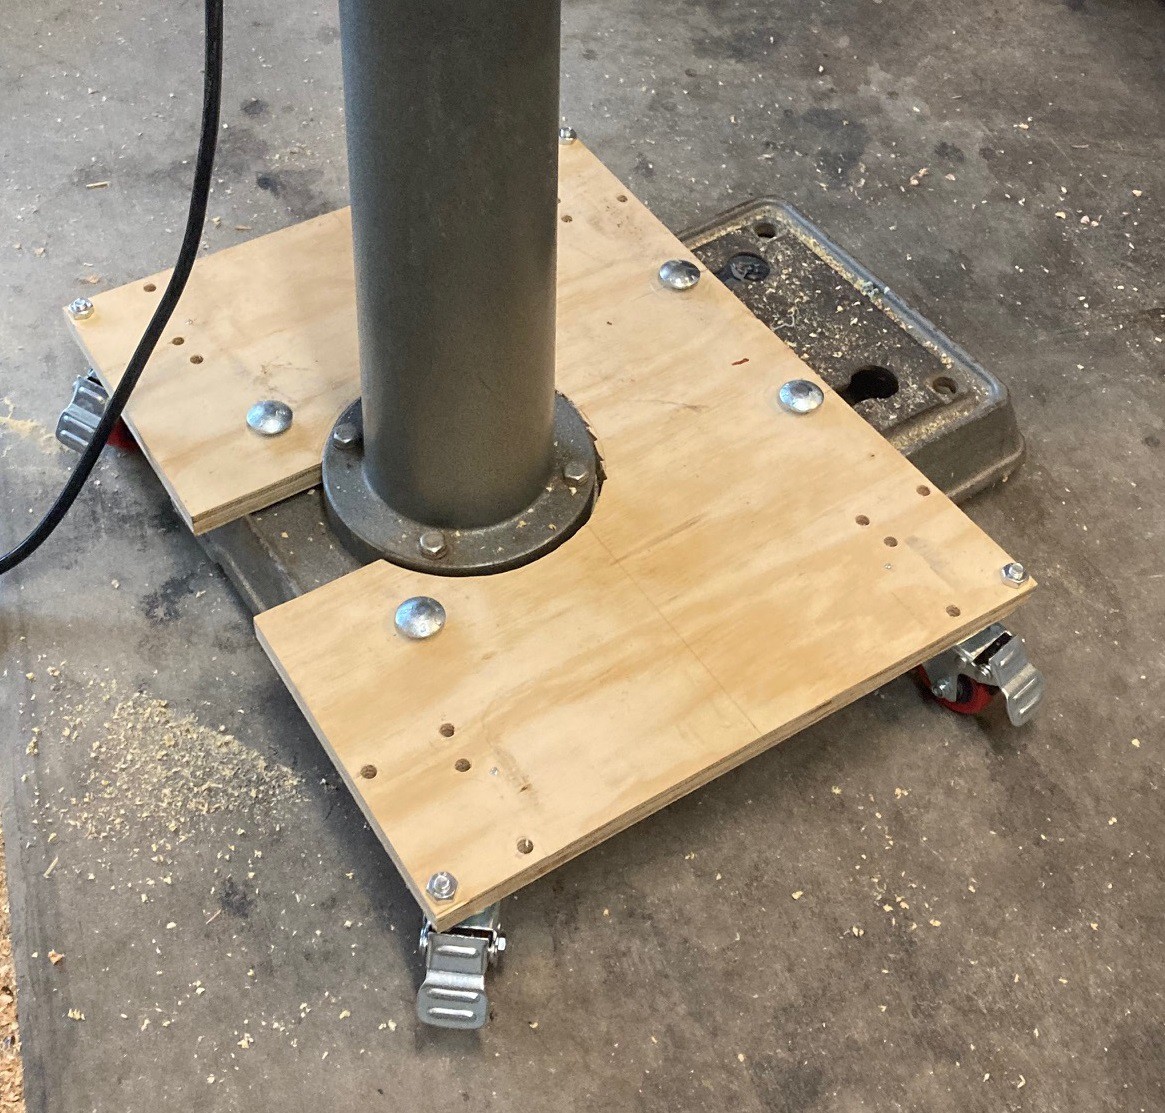
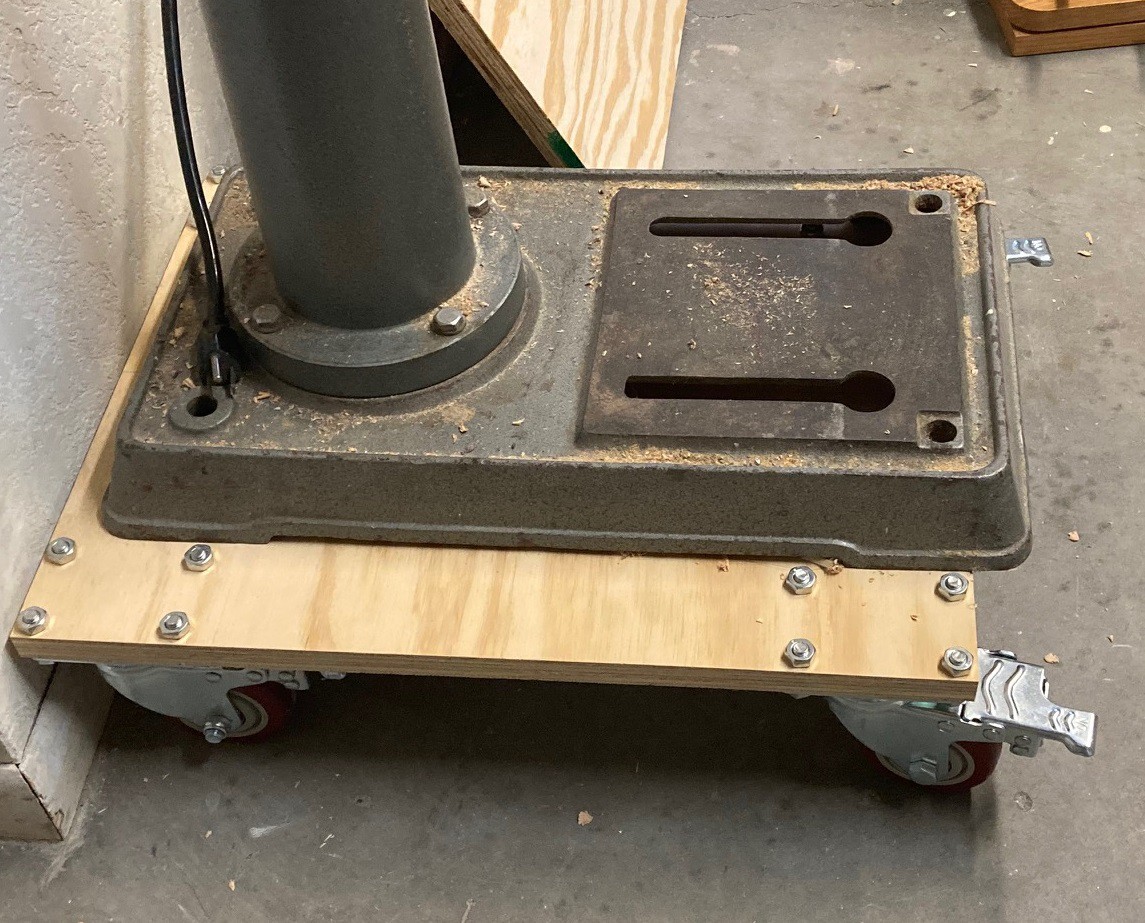
01/16/2023 at 01:40 • 0 commentsSo I realized I have been overthinking the drill press. I really just needed to use some 2x4's to hold the wheels on. This works so much better than the 3/4" plywood, there is no flex in the board that I can detect.
![]()
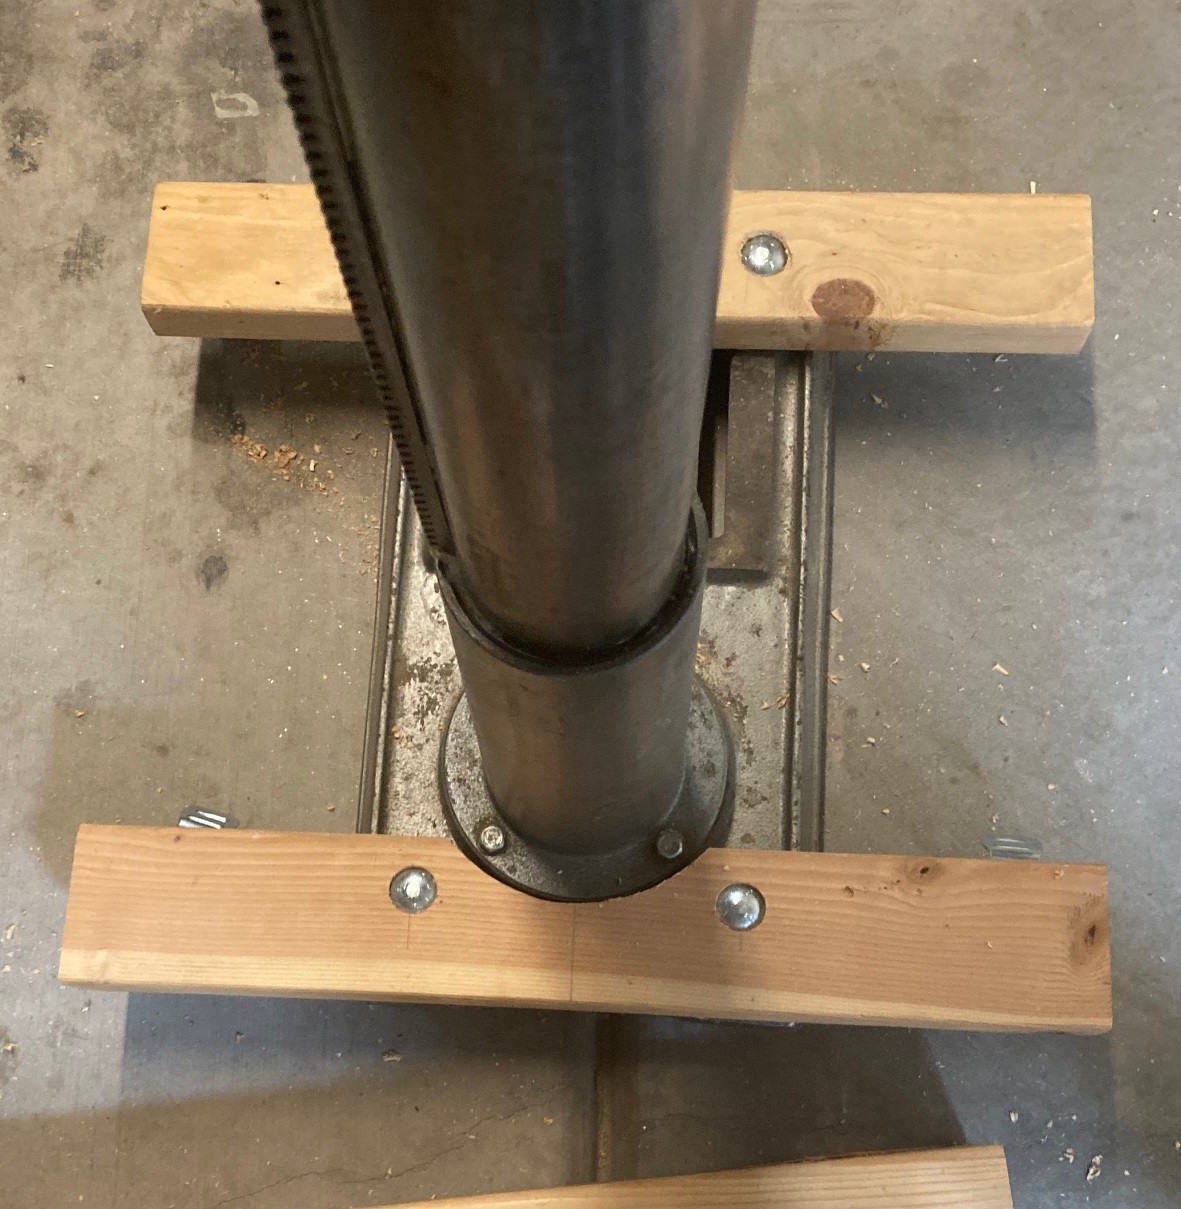
I had to cut out a small chunk out of the back board to fit it in around the base of the pillar. I offset the bolts a bit to minimize the amount of material I had to remove. It seemed to have worked, it is still very strong.
![]()
This works well, but there is still some flex in the casters, even when locked. I don't know if high end casters are more stable, I suspect not.
![]()
I went ahead and cut a notch in a 3/4" piece of plywood that was 24" square. I'm going to attach this to the base. There is just enough gap between the top of the wheel lock and the base of the plywood to get a toe in to lock and unlock the wheels. In theory I could cut this down from 24" to 19" wide, if I need the space. There is a bit of room on the back to reduce the size as well, however the motor on the back of the drill sticks out a good bit past this existing base, so there is probably not much point there.
![]()
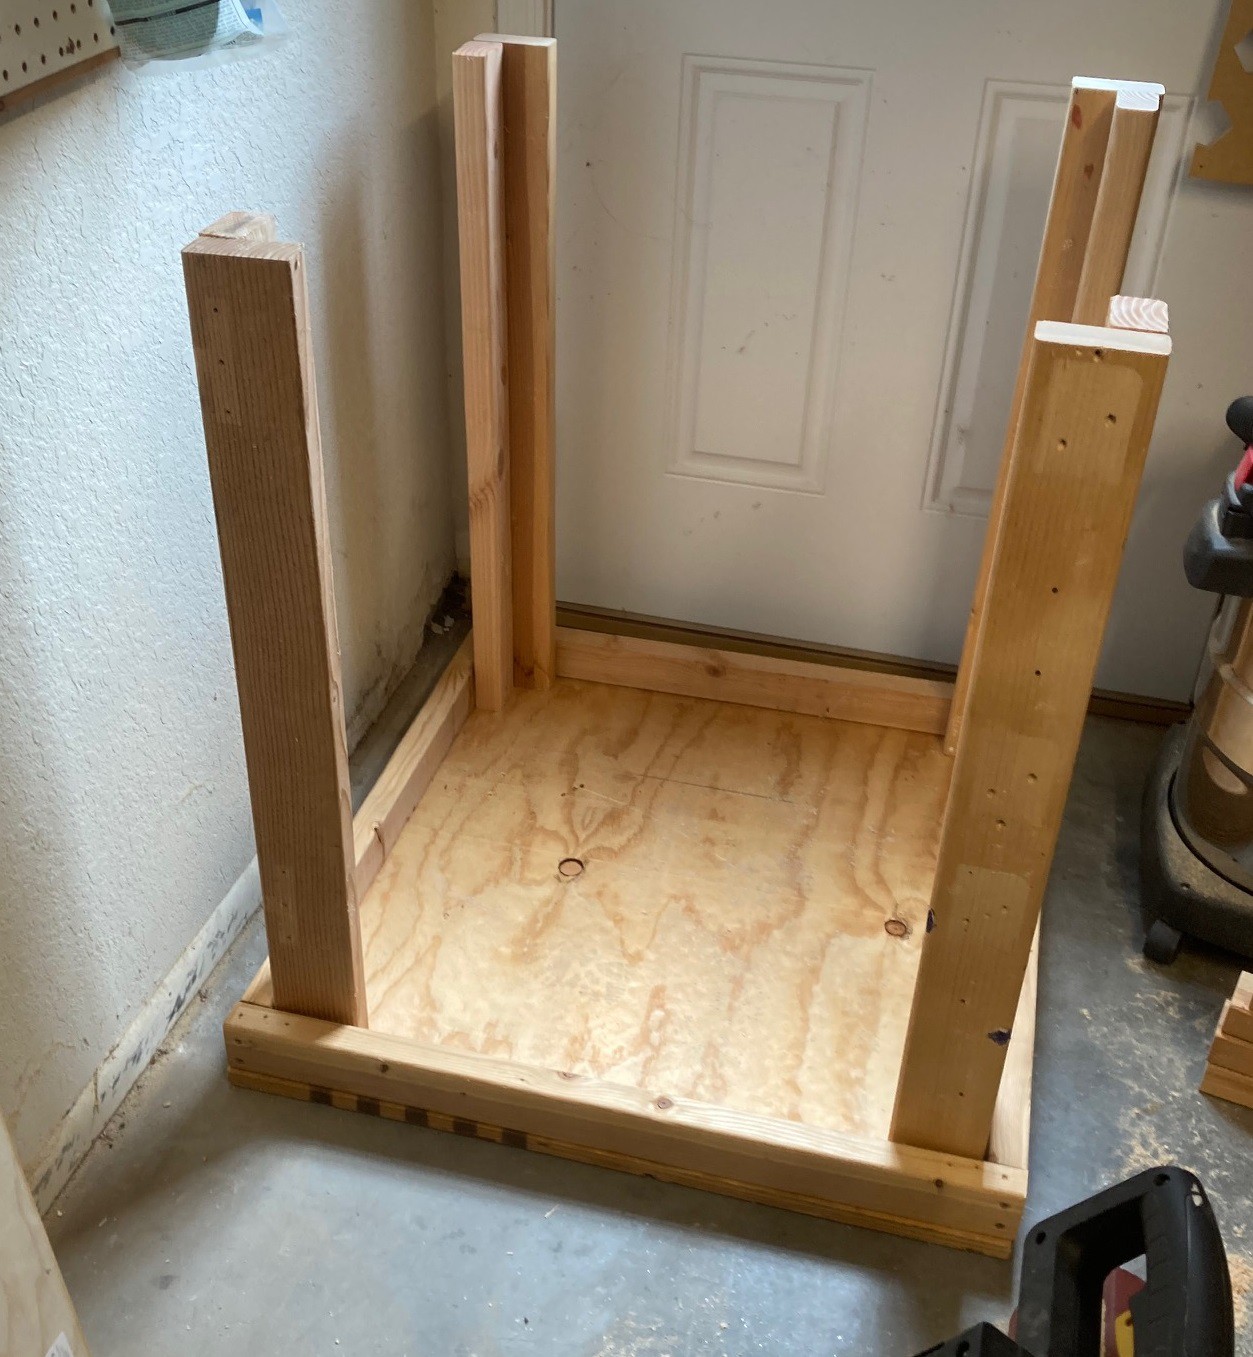
I found the time to attach legs to my old fold out work top. It is quite ridged! I have not added in any side braces or a shelf yet, I have not decided how to use the space under the table.
![]()
I temporarily added a small wedge of wood to help secure the wheels to. This could be replaced by a side brace or other item at a future time if needed.
I set this up to be 38" tall when all put together. However that feels an inch or so too high to me. I may cut it down a bit, or may switch out to smaller 2" casters. The 2" casters seem to work as well or better than the 3" casters in practice and would lower the workbench the right amount.
![]()
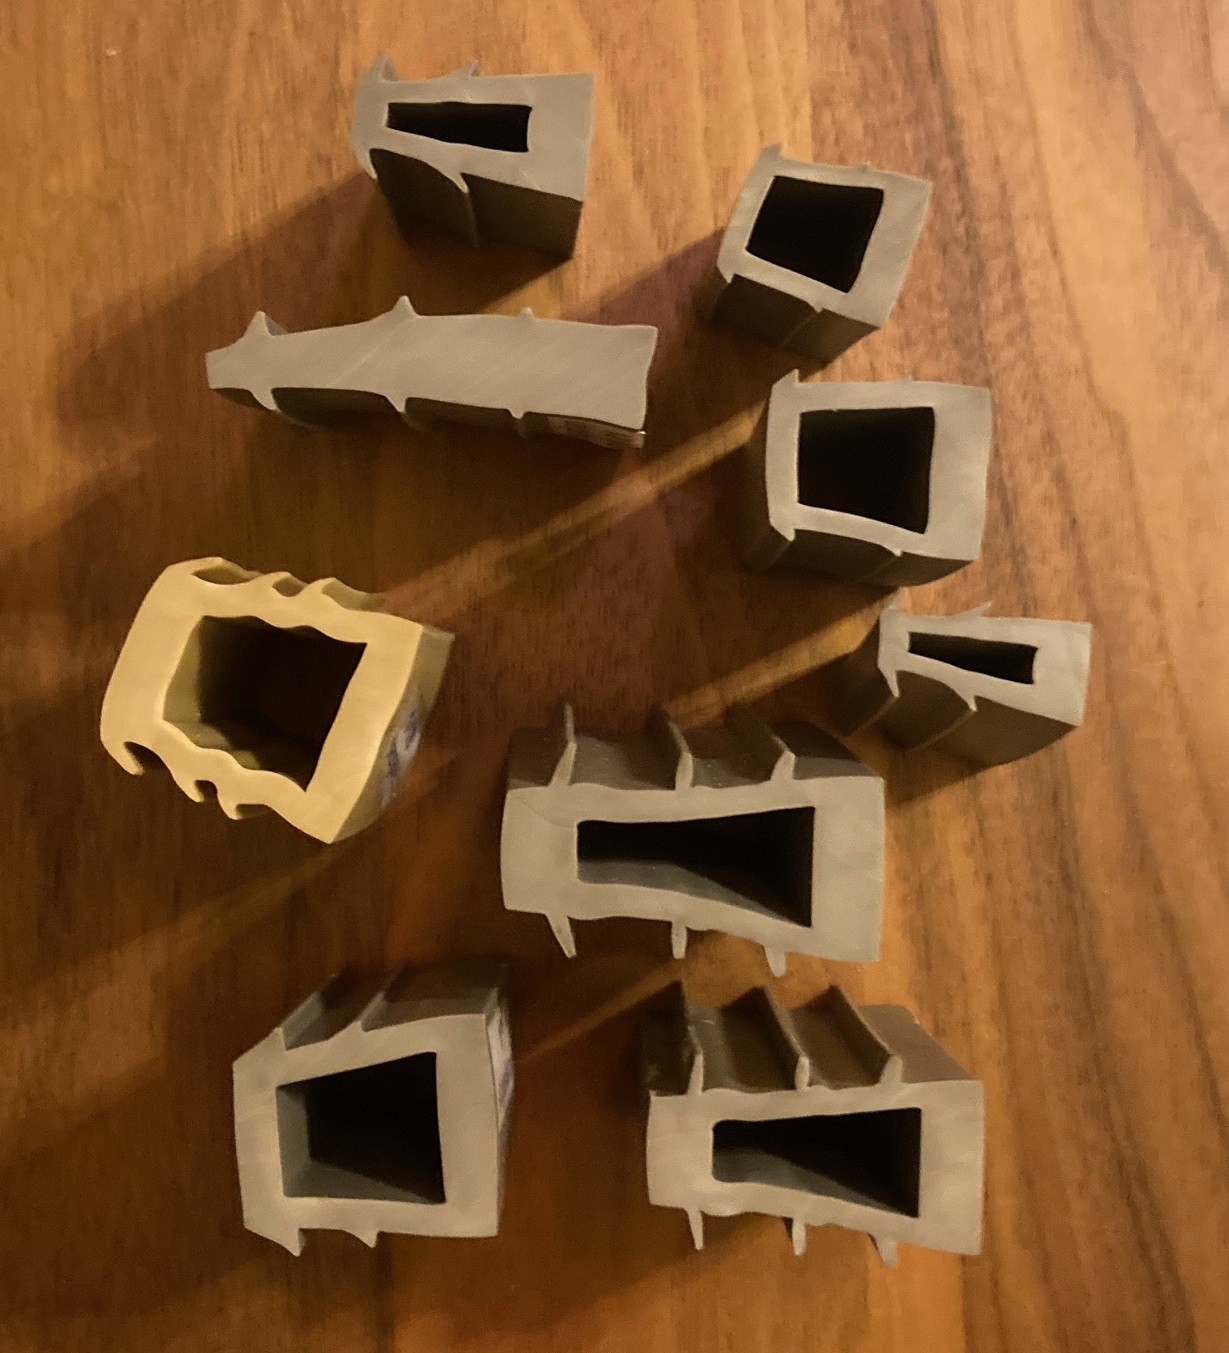
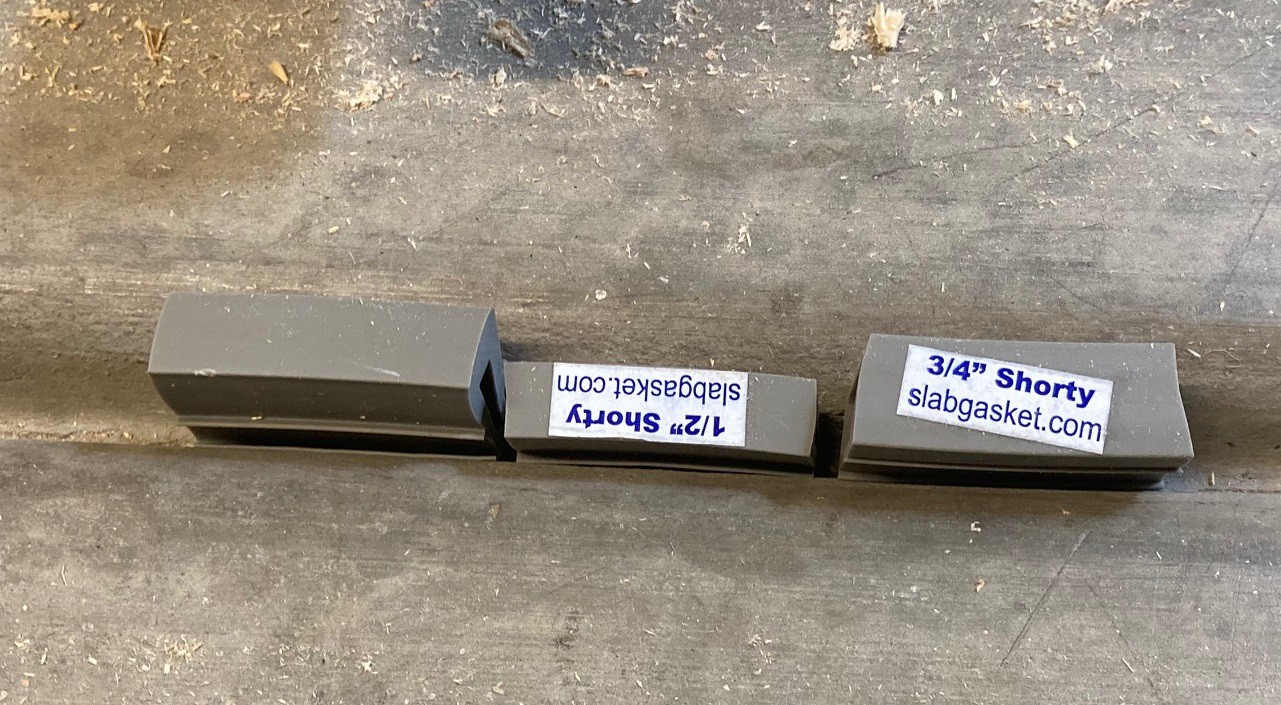
I picked up a sample pack of expansion crack fillers. They seem well made, however they are clearly not a good fit for my expansion (compression?) cracks.
![]()
Even if I manually cut them down the smallest ones would not get the job done. I need to think of another solution for this.
Up next is reworking my main bench and possibly reinforcing everything. I think I will go ahead and order a few more packs of the 2" wheels as well and see how I like them. And I want to make a proper table for the drill press that matches the base as well.
-
Wheels
01/12/2023 at 00:32 • 0 commentsSo my 2" dual locking casters came in. I have very mixed feelings on them. They are significantly smaller and I think they would work well for a medium loaded cart. As a quick test I swapped them out with my 3" casters that I had been using under my drill press and it seemed to hold up ok and roll just fine. Not quite as nice as the 3" but good enough.
![]()
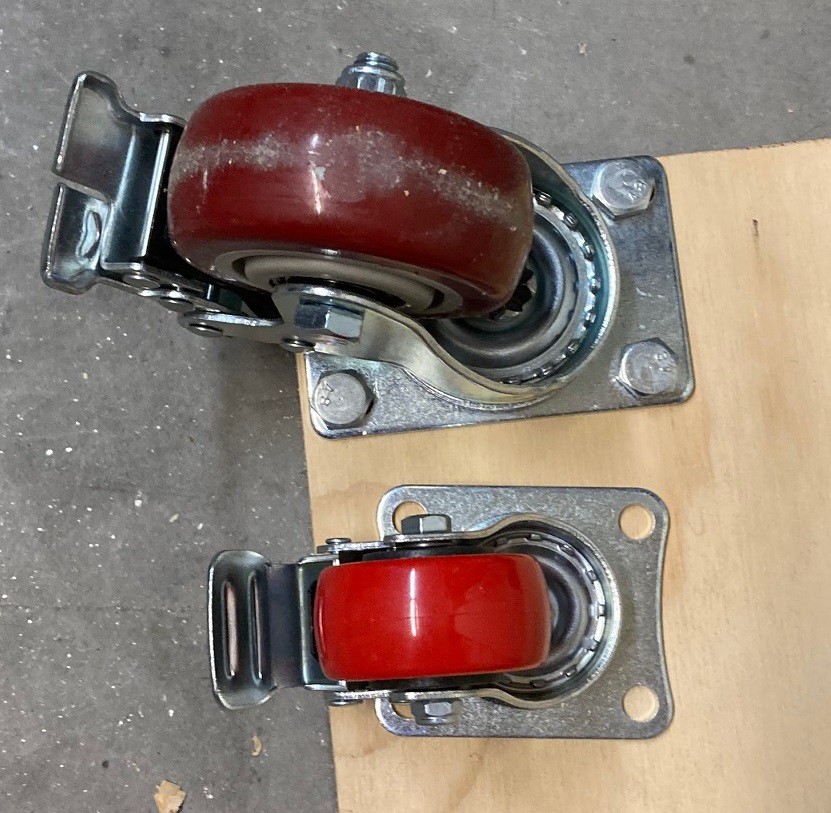
However on the flip side these are made a lot cheaper than the 3" casters and I find it hard to believe they could hold 600 pounds. I think I will keep them for smaller carts and leave the larger casters for the benches.
![]()
One thing I did not think about with these smaller casters is that you really need to use screws and not bolts. There is only about 1/4" of room between the end of the brake release and the base of the caster when the brake is engaged. It is easy to get the release hung up on a bolt. There were several reviews online complaining that the brake was sticky, I suspect this was the real culprit.
Another thing about casters in general that I did not think about is that the brake lever must have some clearance around it so you can get your foot in on top and underneath it. This means no hiding the casters under the cart, they must stick out at least the width of the brake lever. And with these smaller casters it is tricky to get your foot under the lever, but fortunately it does not take much force to release.
![]()
I really don't like having my drill press up high and I wanted to see if there was a way to keep it down low by hanging the base from a platform rather than resting it on top of one. So as another quick experiment I cut a notch out of my scrap board so I could slip it over the post and used the 2" casters to roll it around on. This works, but not well. I would not be comfortable leaving it permanently like this. There is a noticeable amount of bow in the 5/8" plywood and I can easily rock the top of the drill back and forth and watch the board flex. On the upside the whole thing sits nice and low and it feels more planted on the ground and less likely to tip over.
I may come back to this idea later and build some sort of a base that envelopes the pedestal and provides some rigidity. Unfortunately they were not thinking about mobile carts when designing this pedestal and there is no way to run a 2x4 (or any other lumber) straight across the rear mounting holes on the base without notching out a significant amount of wood.
It is not a success but not a total failure, I will keep thinking on this. Raising the drill press by 4" may not be the end of the world, maybe I should just let it go.
-
Rework
01/08/2023 at 22:20 • 0 commentsI'm going to take my existing workbench apart and use it to prototype my CNC stand and new workbench. This should be relatively straight forward, the old bench is similar in size to the new bench. However ultimately I want to build this all out of sheet goods and build in drawers to it all.
Here is the CNC table, for now I'm going to make it have an open front and no shelf so I can roll my shop vac in under it. I have this sized up large enough to support my future larger CNC machine.
Here is the workbench, you can see it is not very large. However it should be large enough to do most of the work I can manage in this small space.
I spent some time modeling this up with different sized casters. The 3" casters sick out quite a bit, the tang makes a diameter of 8.9 inches when rotating through its full path! The 2" wheels I have ordered work better, they only make a diameter of 5.9" or a savings of 1.5" in either direction. We will see how well they roll when they arrive. I may end up using the larger swivels on the workbench and smaller ones on the drill press and CNC table.
I have my table partially stripped down, I need to finish this up and build it back up in its final form. I don't think this will take too long, I have all the material to do this and I only need to strip it part way. With this done I can focus on making the new utility carts for the saws using my existing workbench to build on. Then as a last step I can rework these two benches into there final form.
-
More Thoughts
01/08/2023 at 04:37 • 0 commentsHere is another new idea. By rearranging things a bit I can manage to grow the size of my support tables, at the expense of the work table size.
My current CNC is 24"x24" but I have parts to resize the CNC up to roughly 32"x32" with thicker rails that will increase the stiffness as well. However I can't make my CNC workbench larger without moving it beside the workbench. However in order to move it over there I have to shrink the size of the workbench down. This may work out fine, if I have all my tools off the workbench then I will still have more actual space to work with.
Anyway by doing this I now can use all the space on the left side to house all my saws. I may split this back apart into a miter saw station and a tools table that has my bandsaw, bench grinder and vice. That would allow me to better position the tools without worrying about worrying about clearance around the miter saw.
I'm also still on the fence about where to put the drill press, or even if I want to add wheels to it at all. If it is at the end of the chain of benches then it really does not need to move.
-
Finishing the Storage
01/07/2023 at 23:43 • 0 commentsI had a chance today to knock out the last two shelves. They turned out nice and went up very quickly, now that I have put up several in a row. I ended up using 4.5 2x3's and 3/4 of a 1/2" sheet of plywood for a cost of roughly $70, not a bad investment.
![]()
Here is the initial frame going up, I have a cross piece missing on the left side. The board at the far left sticks out further so I can run a lag bolt into the roof to hang the end of the shelf on.
![]()
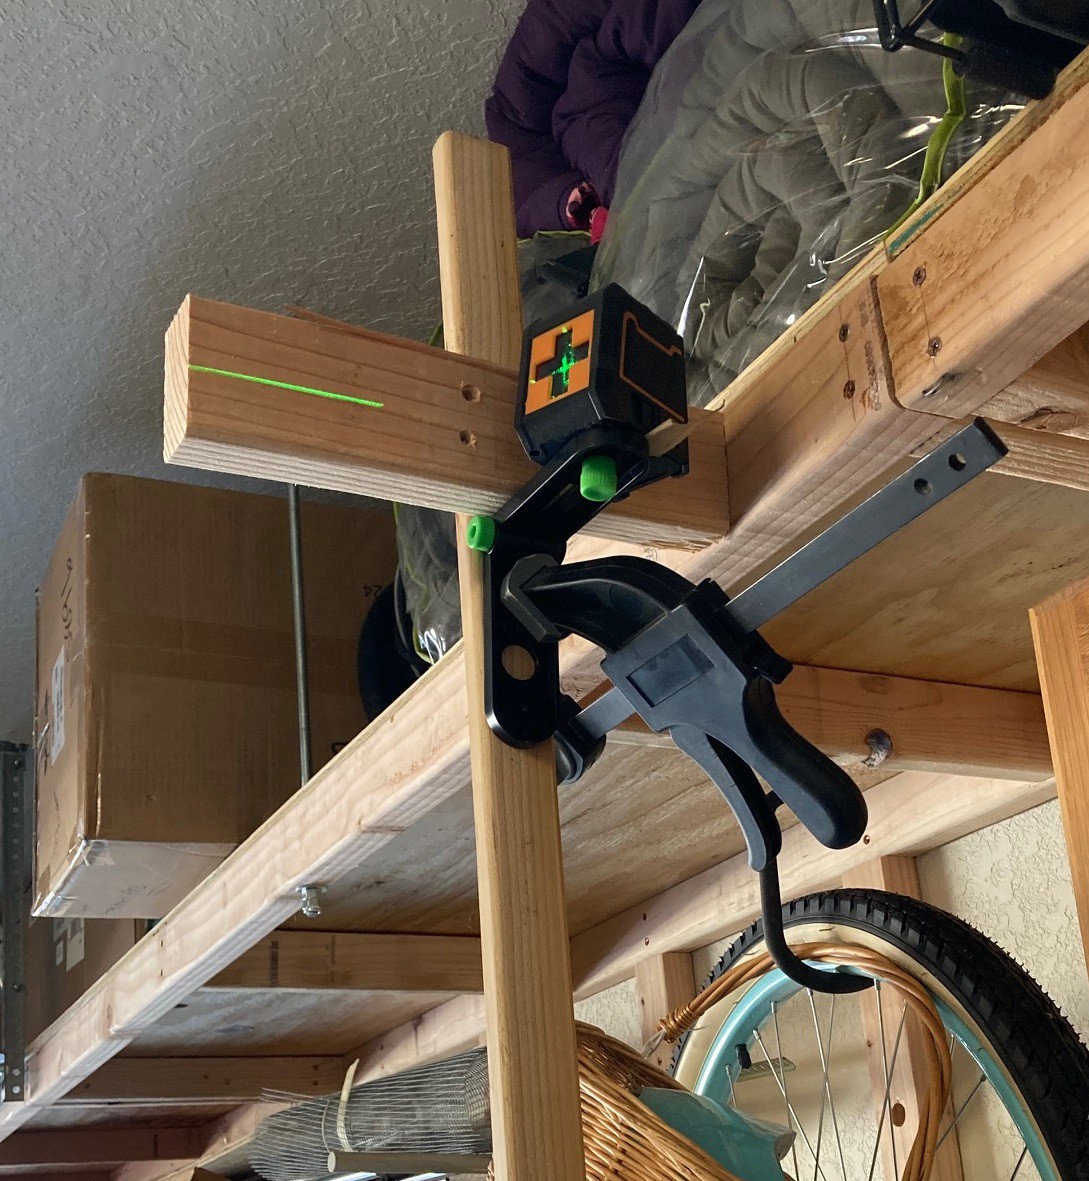
I had to get a little creative with hanging the laser. I need to come up with a better solution going forward.
![]()
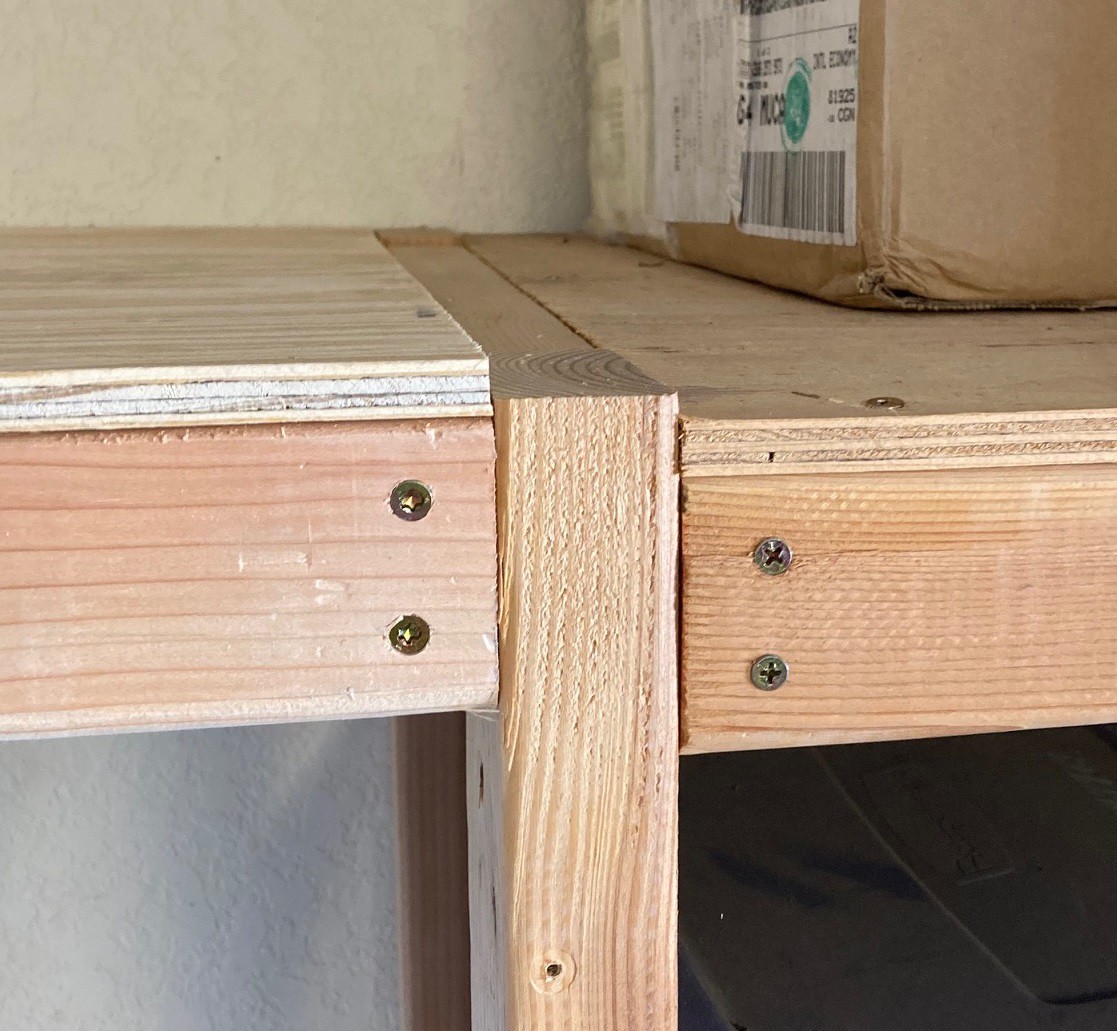
Being a dope I used the top of the existing shelves as a reference line rather than the top of the 2x3, so the new shelves sit a half inch proud. It was too late to move everything once I discovered this, hopefully no one but me notices it.
![]()
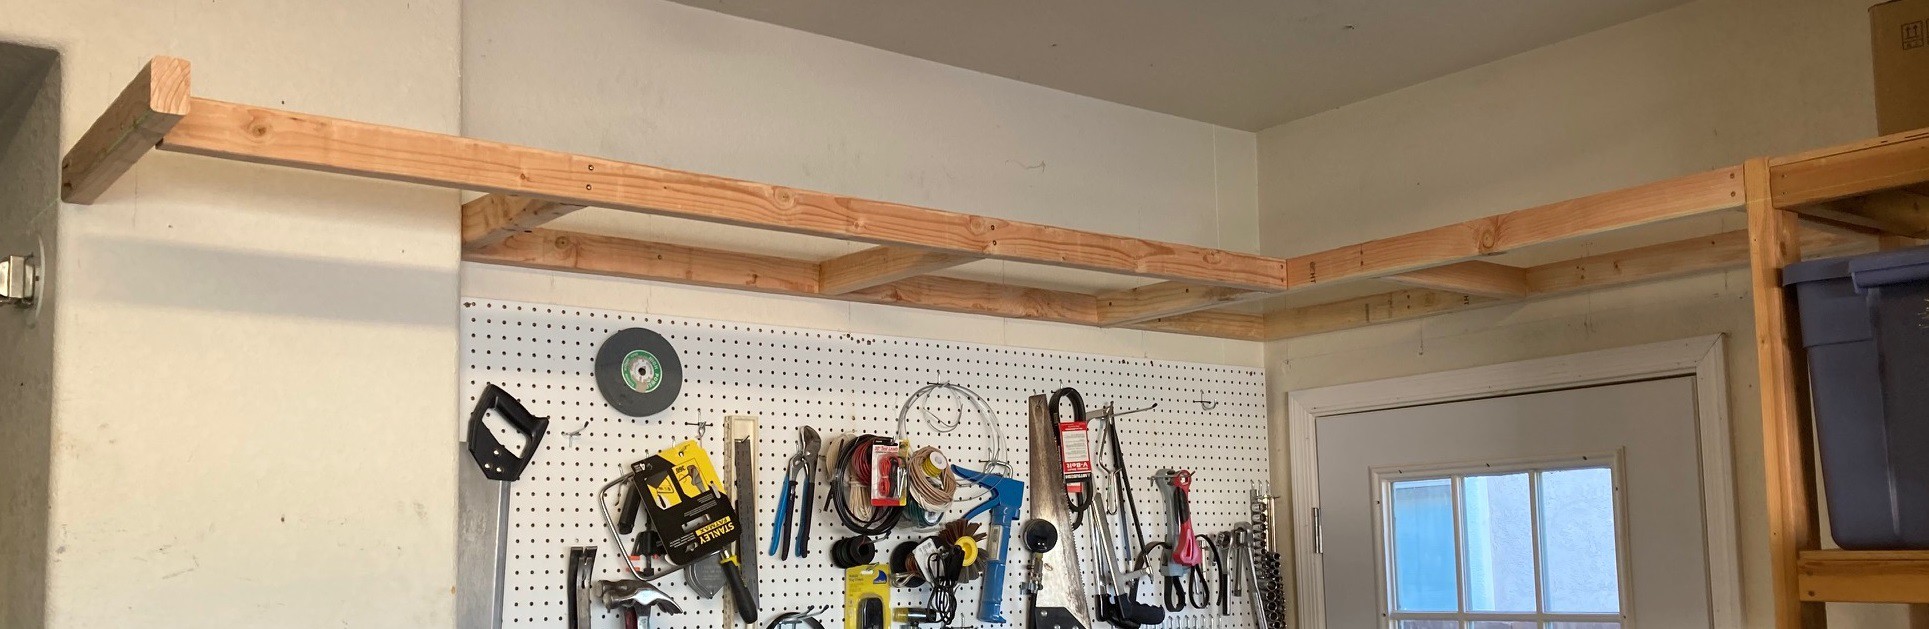
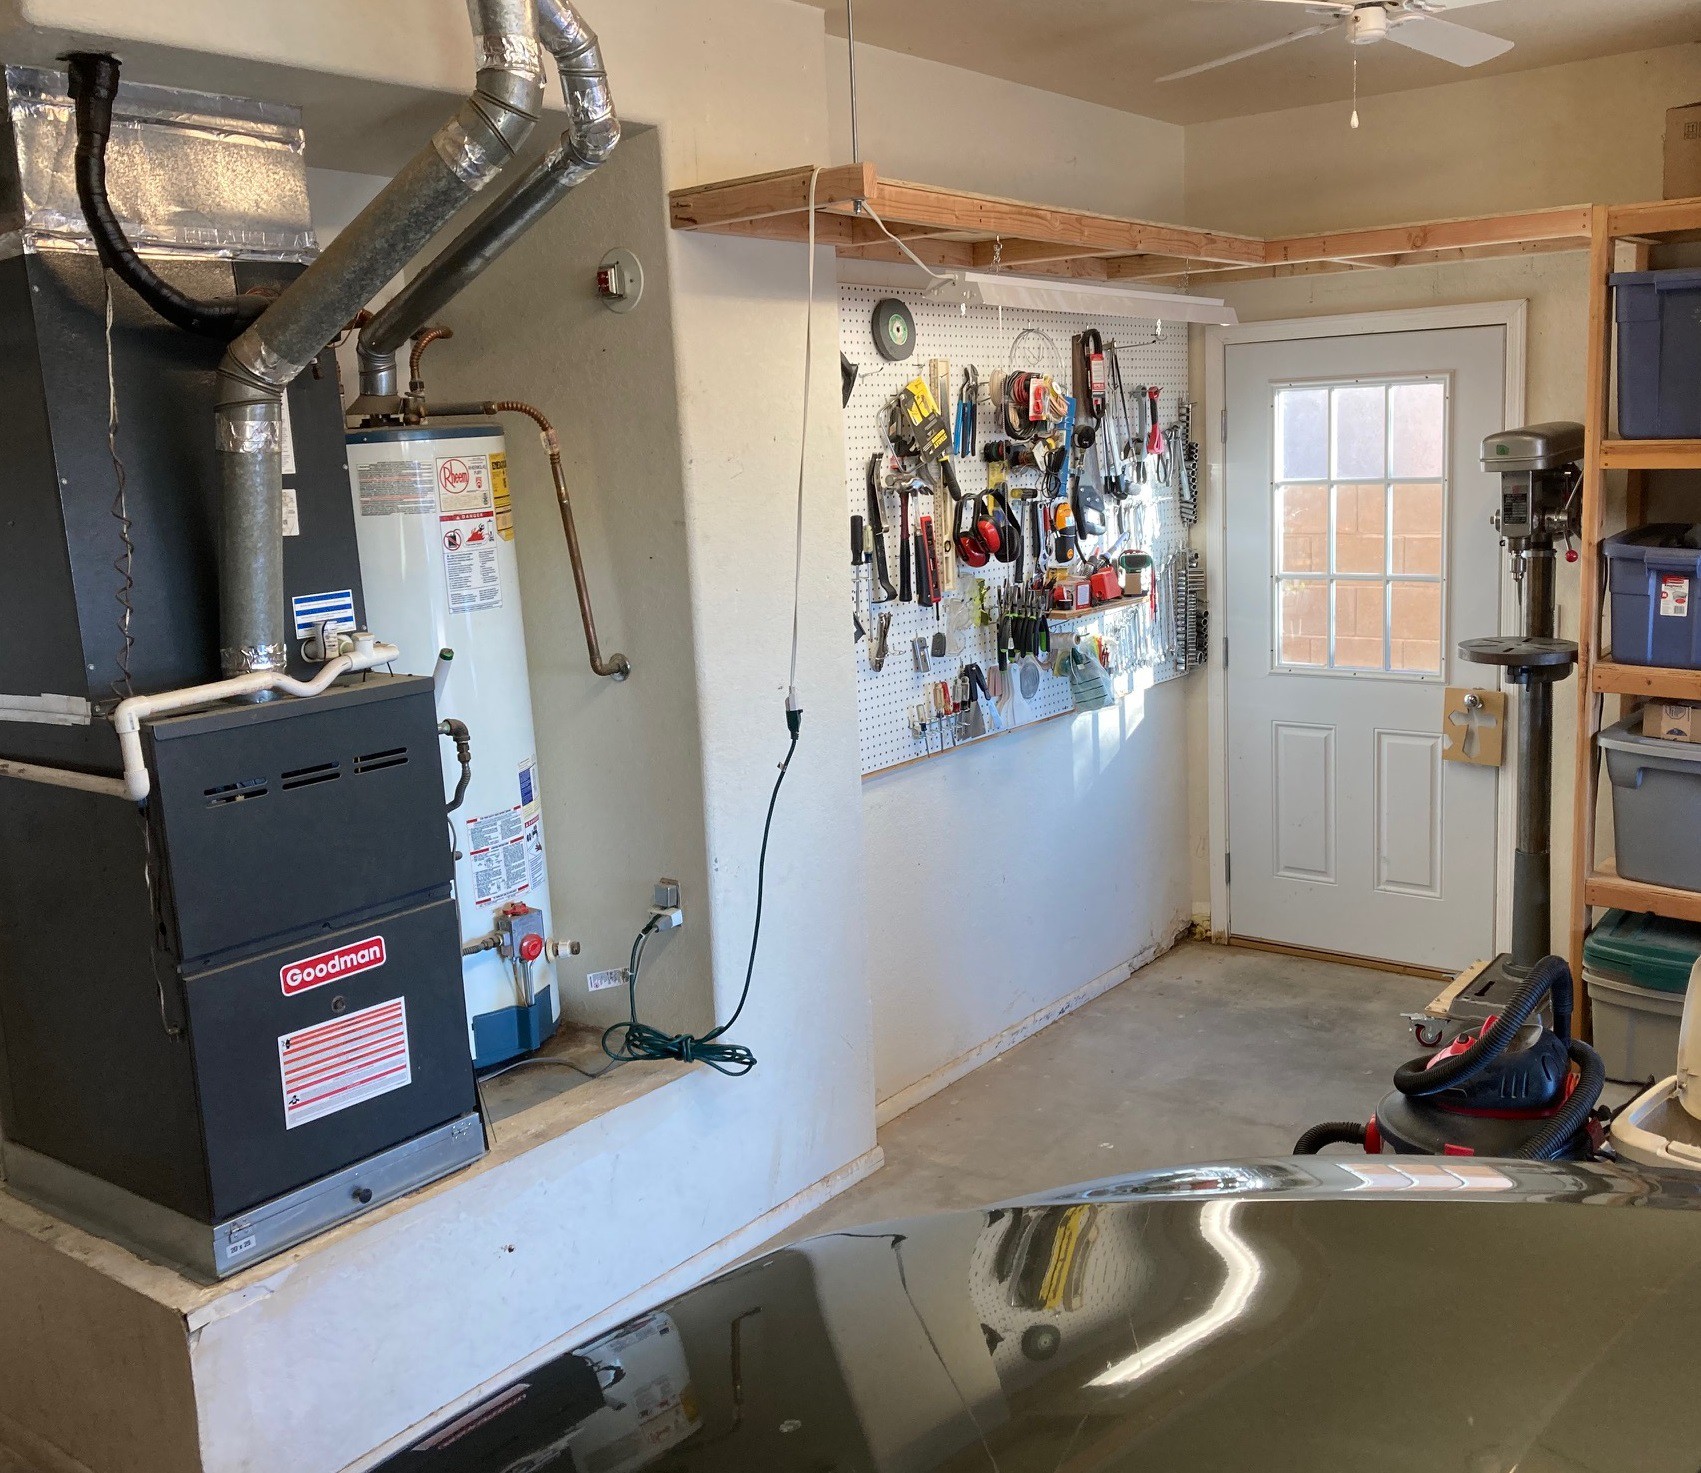
Here is the space all finished and cleaned up again. I need to go through my tools and chemicals and package up the ones I don't often use into small containers for easy retrieval later and pack them up and out of the way. Then I should have a rough idea of what is left that needs storage in the shop space.
![]()
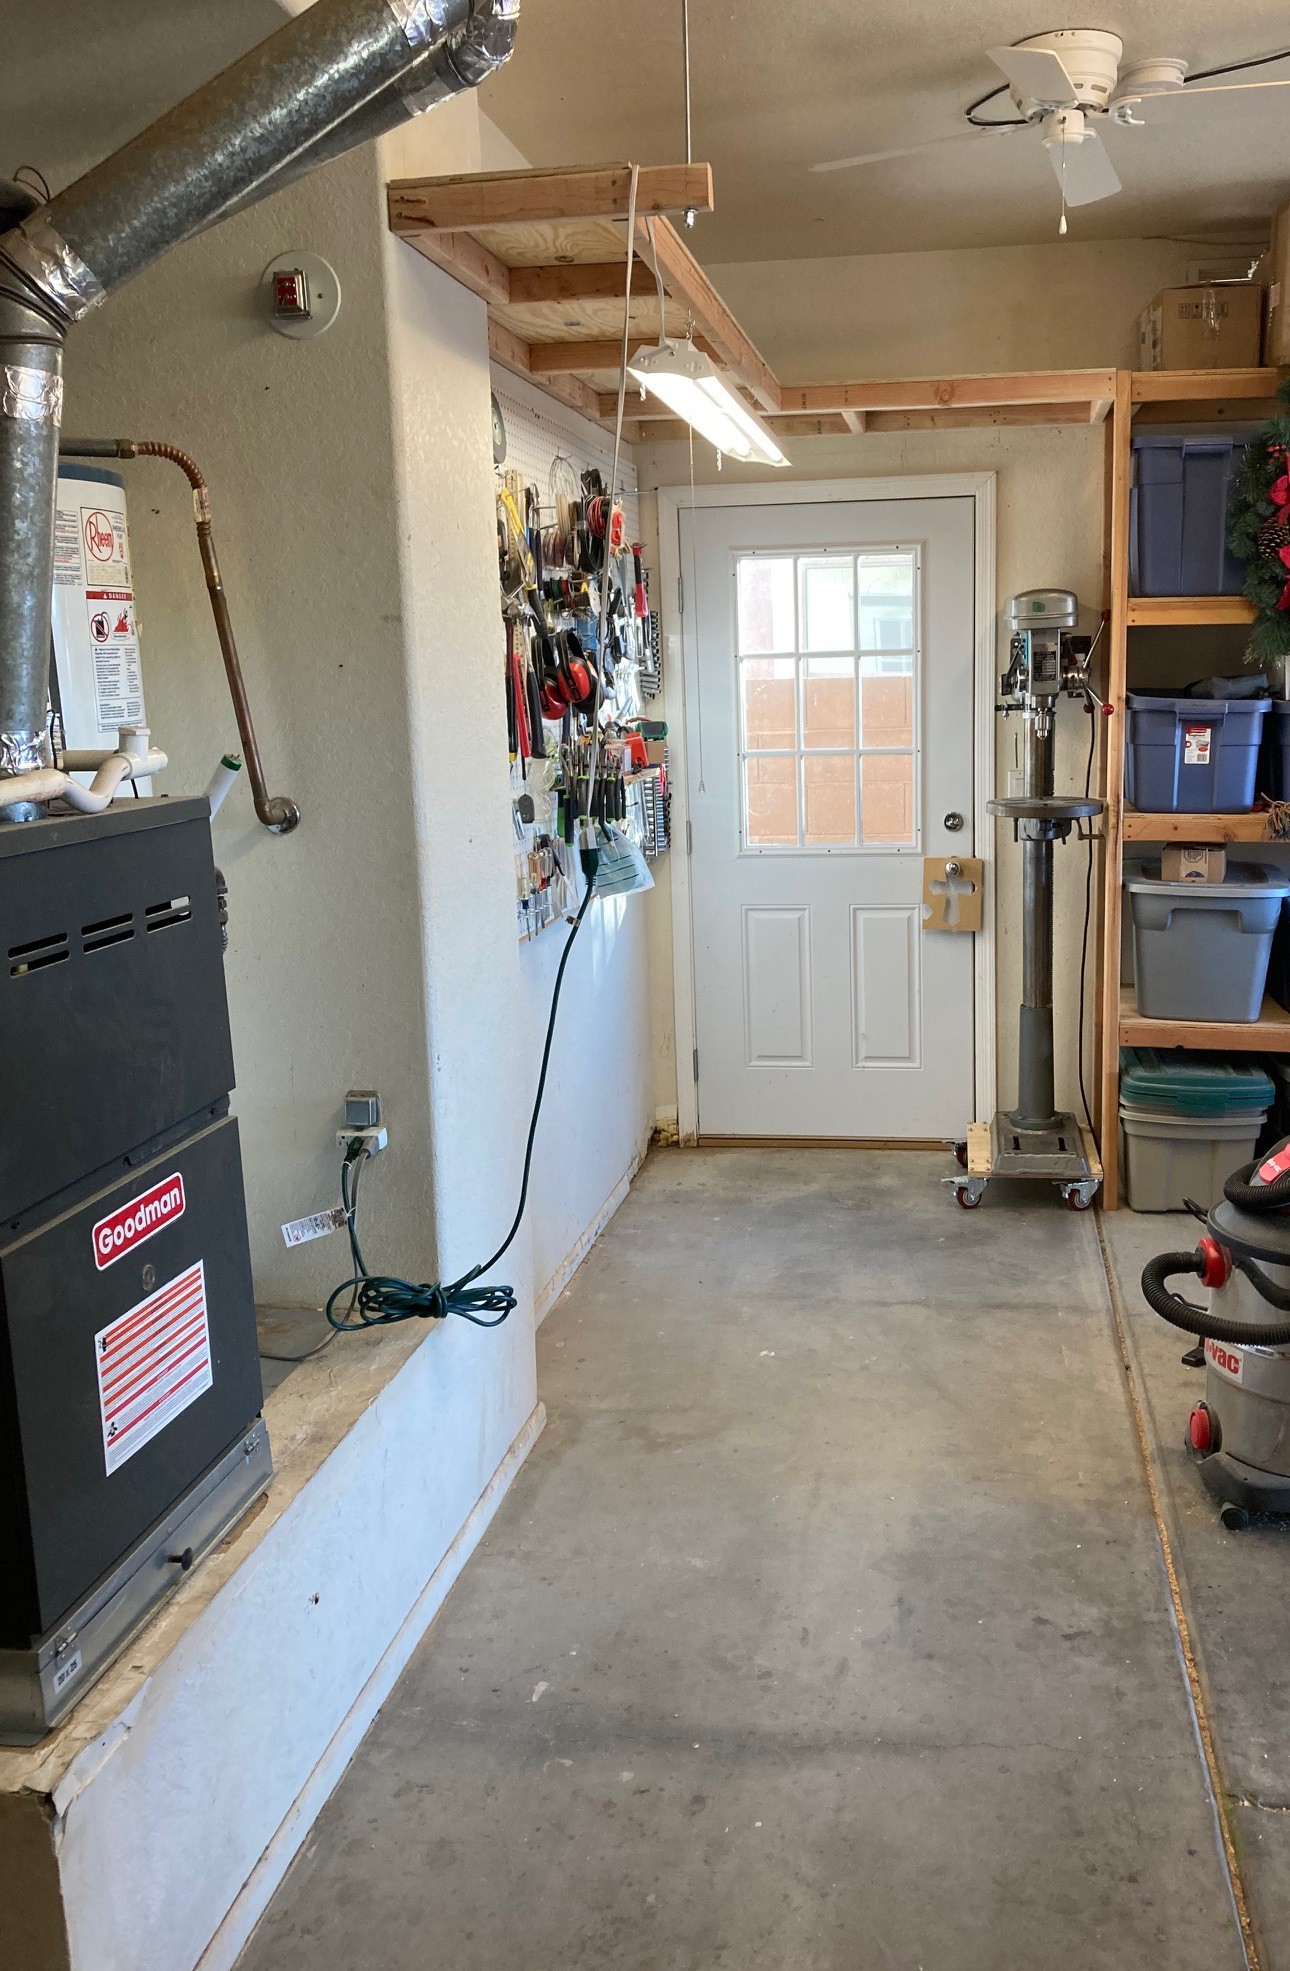
Here is a different angle on the same space. It is nice and long but not very wide. The nose of the cars goes right up to the expansion crack on the right sides. So whatever I come up with needs to give 2' or so of space from the line.
I really am starting to like the idea of moving the drill press over here by the door and having only some minimal storage added to the base. Not trying to fit it along the long wall would allow me to make the other carts a bit larger and that will give me more breathing room going forward. But it means loosing my large top to the drill table and it means the drill will need to be moved out for every use. I think it is an ok compromise, we will see.
![]()
I have never worked with casters before so I decided to grab a piece of scrap wood and attach them. It was just big enough to wrestle the drill press onto. It is a bit sketchy but it lets me see how they work in practice.
I really like these casters, they roll nice, they lock easily, they unlock easy as well with a downward force (very nice!) and when locked they really stay put. However I don't really like them on my drill press. One thing I failed to take into account is that the center of contact of the wheel moves with the caster (seems obvious now). This means the casters can roll in towards the center of the stand and that makes everything more tippy. So the base needs to be 3" or so wider than the original base you are trying to support to maintain the same stability. This is no problem for a large workbench, a few inches hardly matters. But the skinny base on the drill press causes trouble and it is quite wobbly. They also raise the drill press a full 5" off the ground in this configuration. That is too much and it all feels too high when using the press.
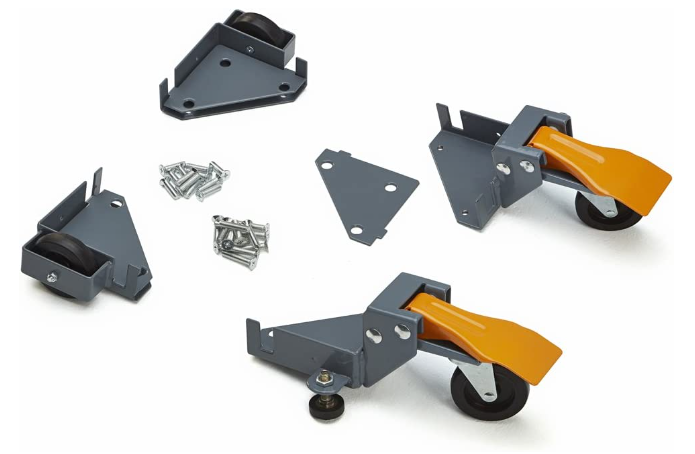
One idea for the drill press is to pick up this mobile base kit. The idea is that you mount these to a piece of plywood then bolt the drill press onto that The front wheels can be raised or lowered to allow the unit to roll around. The benefit here is that it is slung a lot lower and it uses solid feet that can rest on the ground when not moving. The disadvantage is the price ($60) and the fact the yellow pieces stick out a fair bit so your more likely to kick them.
Another idea would be to either get much smaller casters, making things more difficult to roll but providing less movement of the caster so a more stable base with less extra width needed. Or to hang the base from a board mounted across the top of the drill press to provide a lower overall stance. Smaller casters that lock in both directions are only $18 for a set so it is a much more expensive solution.
Finally the 3" casters I'm using don't work well with the expansion cracks in my garage. I need to think of a way to fill these cracks that will still allow them to function yet smooth out the surface so my wheels roll smoothly across them. I could use some sort of self leveling concrete, but I worry that would be too stiff and it would just crack over time as the pad moved. There are plastic strips made to replace the fiberboard you see crammed between pads, but they don't look like they would fit in my cracks and they are crazy expensive. And there are leveling epoxies and glues that would be plenty soft enough to avoid cracking, but they may be too soft to support real weight. I was wondering if I could put pvc pipe in the cracks then heat it with a torch to reshape it to fill the crack properly. And I could certainly 3D print something but only in 12" segments so it would take forever and be fairly non continuous. This all needs more research.