David Tucker
-
Small Details
12/10/2022 at 22:14 • 0 commentsThings are slowing down. I'm at that awkward stage where I need to make some big decisions on what direction to go and I'm waffling a bit.
![]()
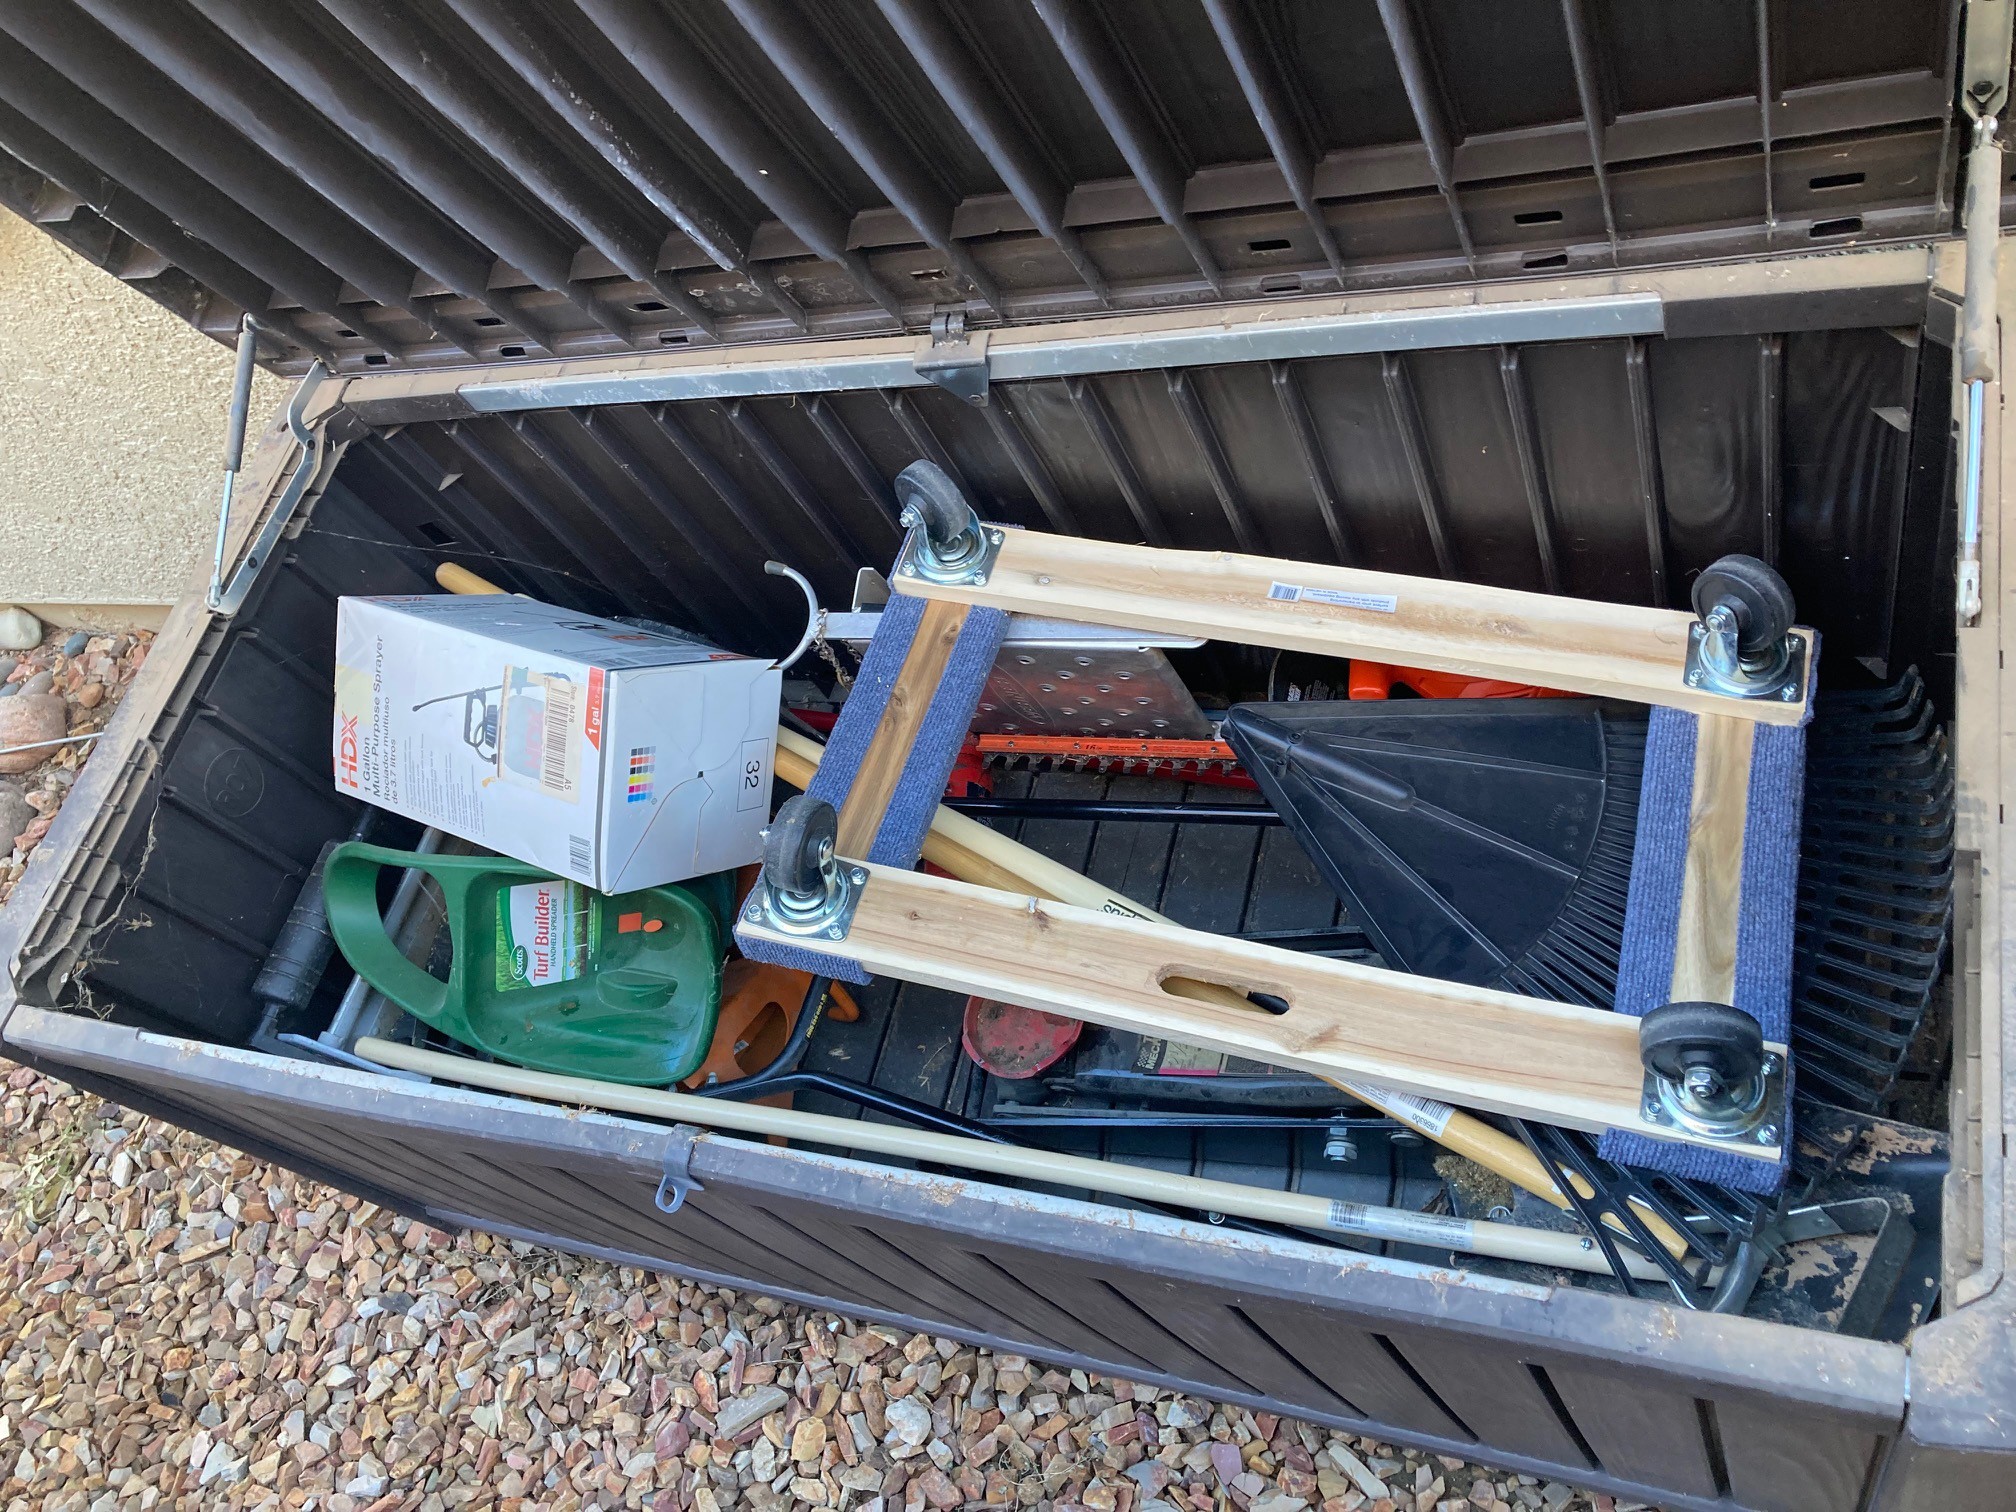
I have a small chest outside that we use to keep pool supplies in. I have a heart condition and I really can't care for the yard like I use to so we pay someone these days. That has lead to my garden tools becoming neglected. I'm not quite ready to part with them, but they take up a lot of space in the garage so I decided to stash them outside in the bin. Normally I would hate doing this but if it is this or give them away then the risk to the tools is small enough.
![]()
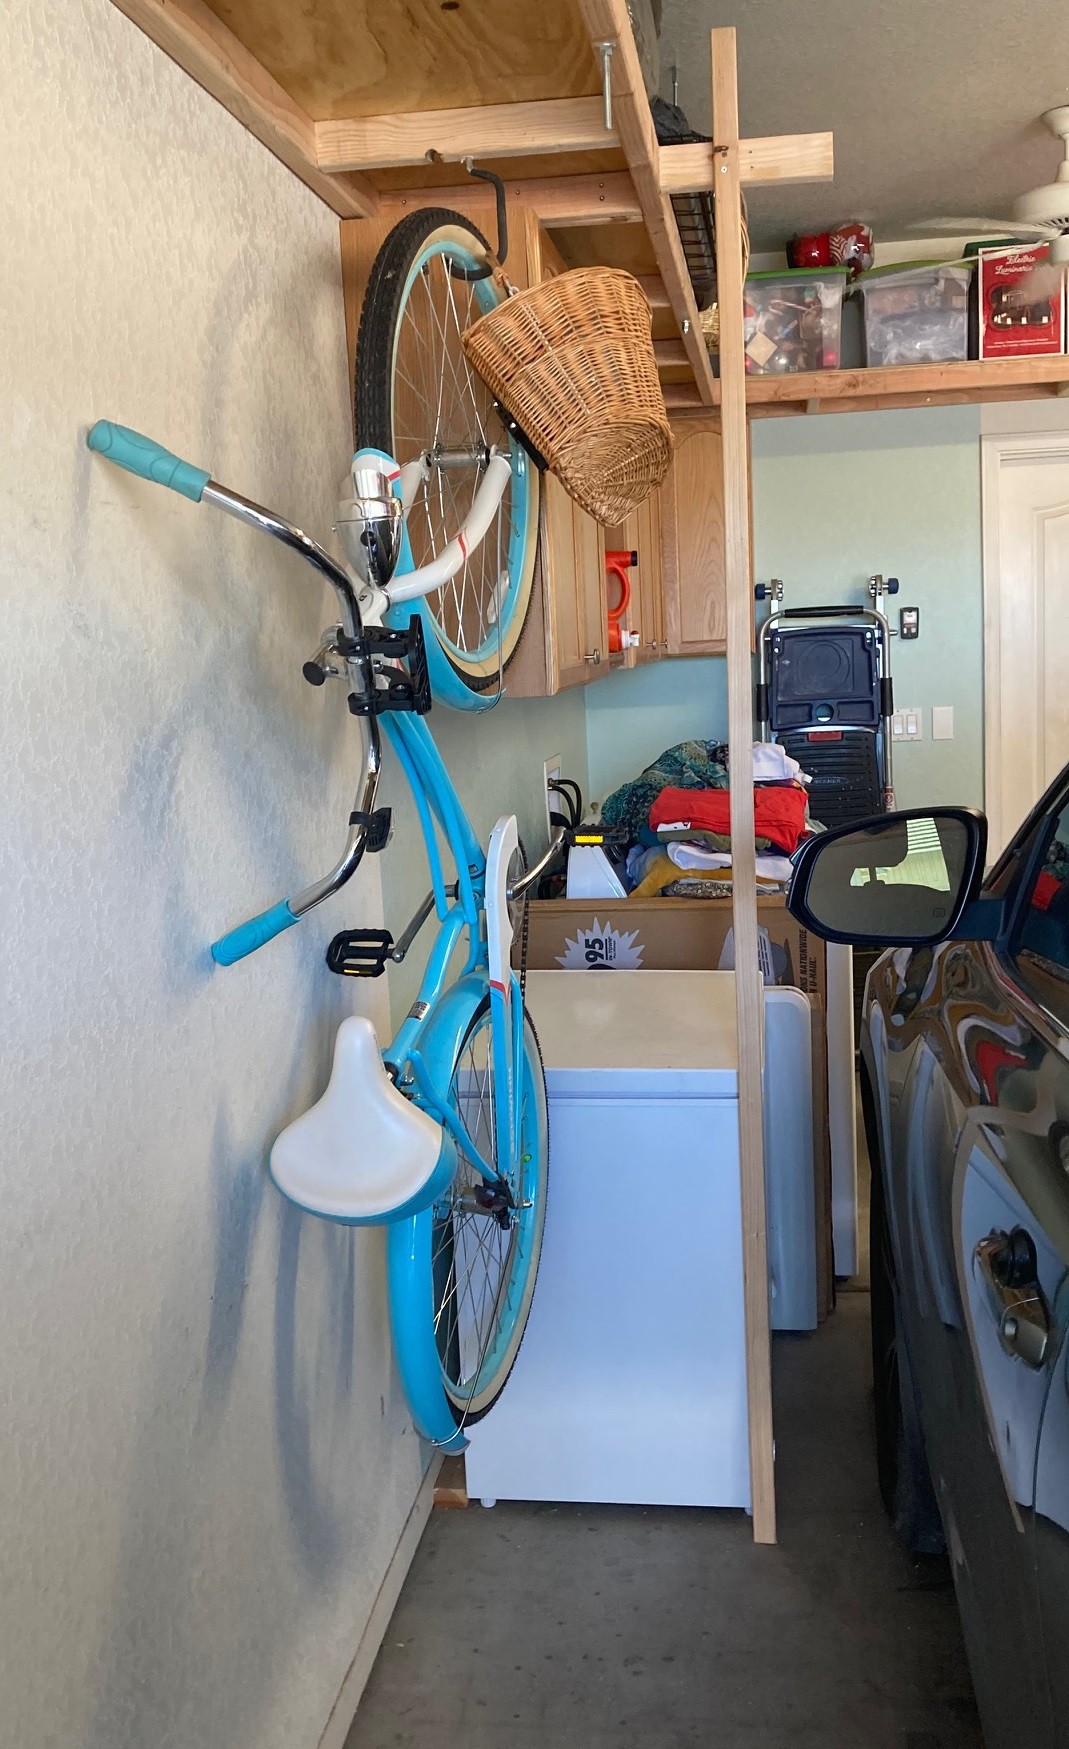
That really clears up the wall by the car. I also got rid of a decent pile of junk including one of the bikes that our kids grew out of. We have one bike left. It has not been ridden in a long time but my daughter is going off to college next year and if she wants a bike on campus then it is a good one since it is free so theft is not a big concern. I ended up folding up the handlebars and hanging it out of the way.
![]()
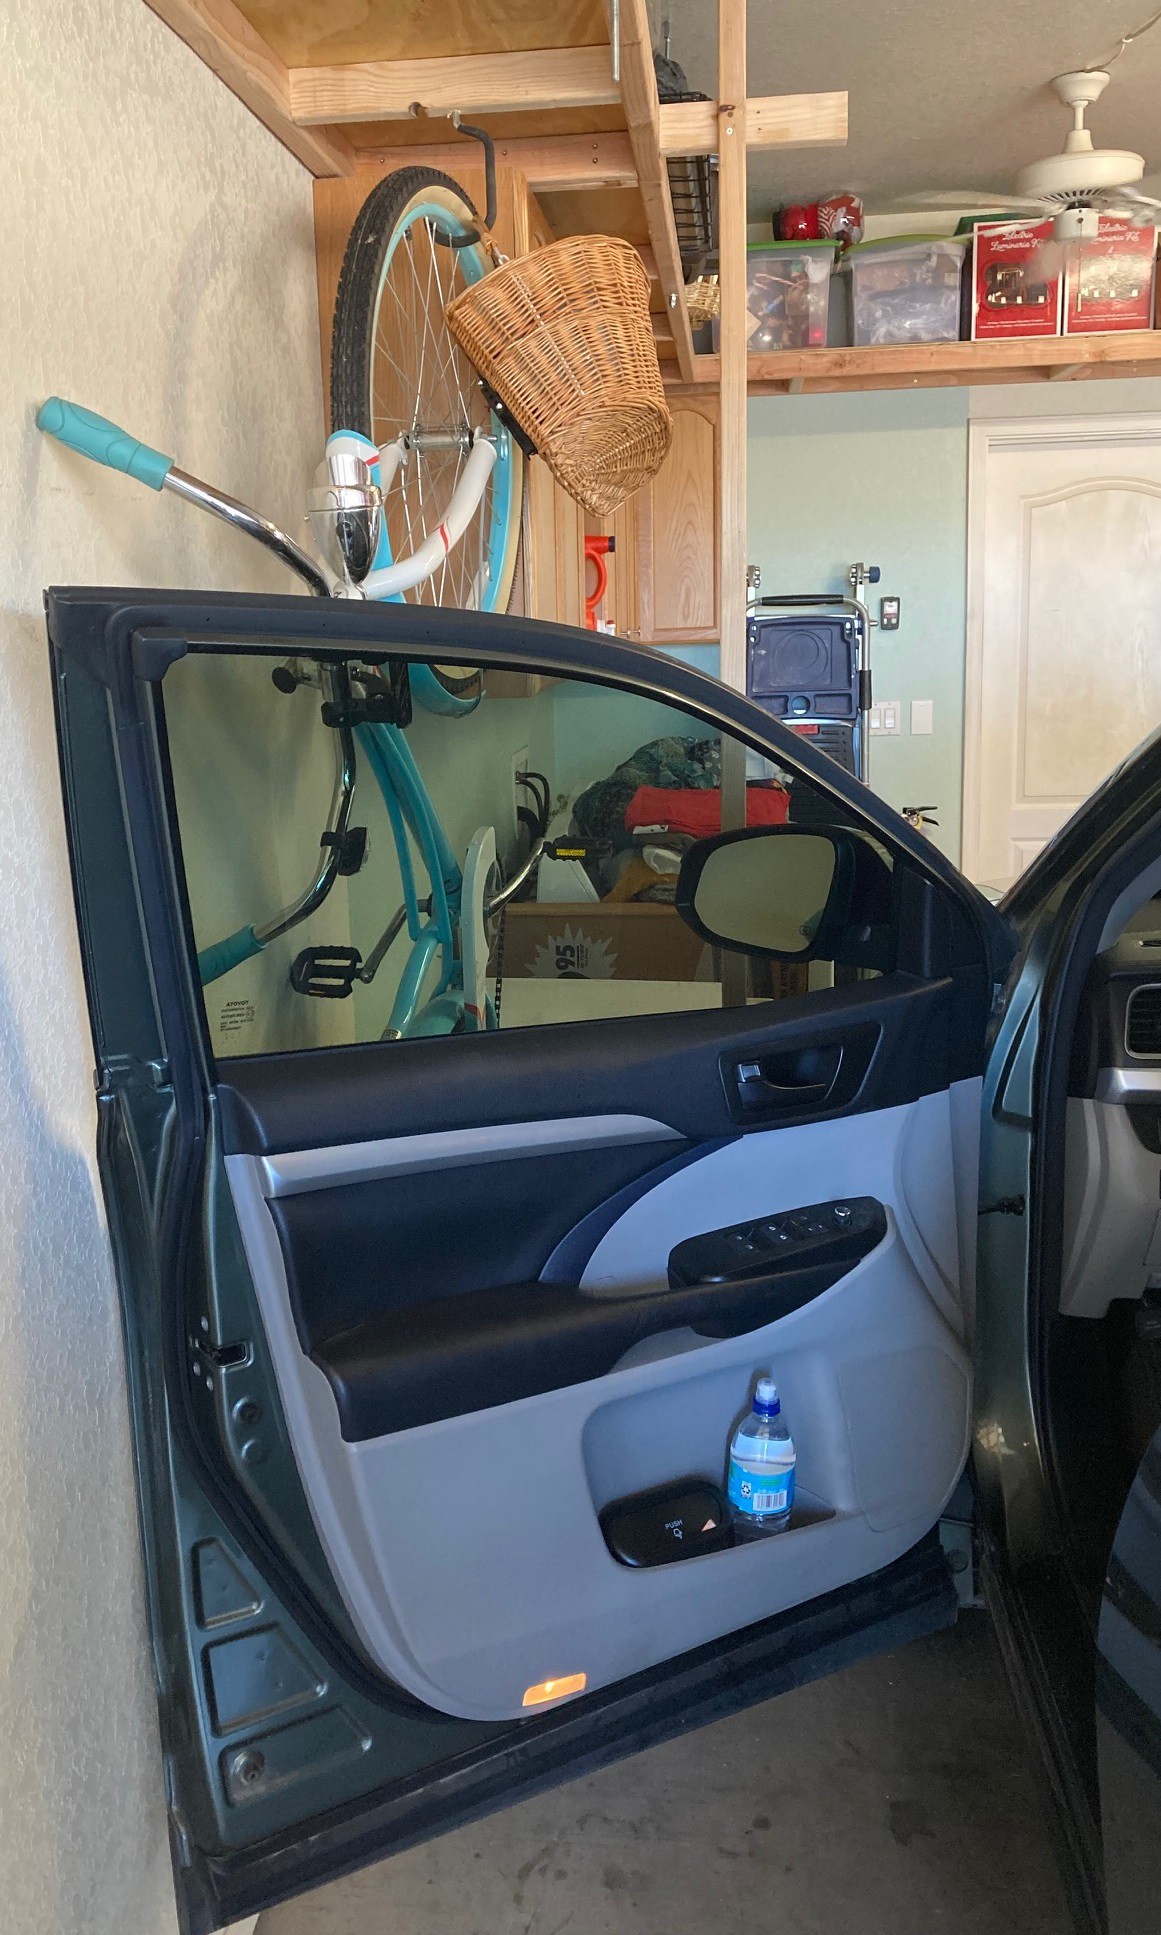
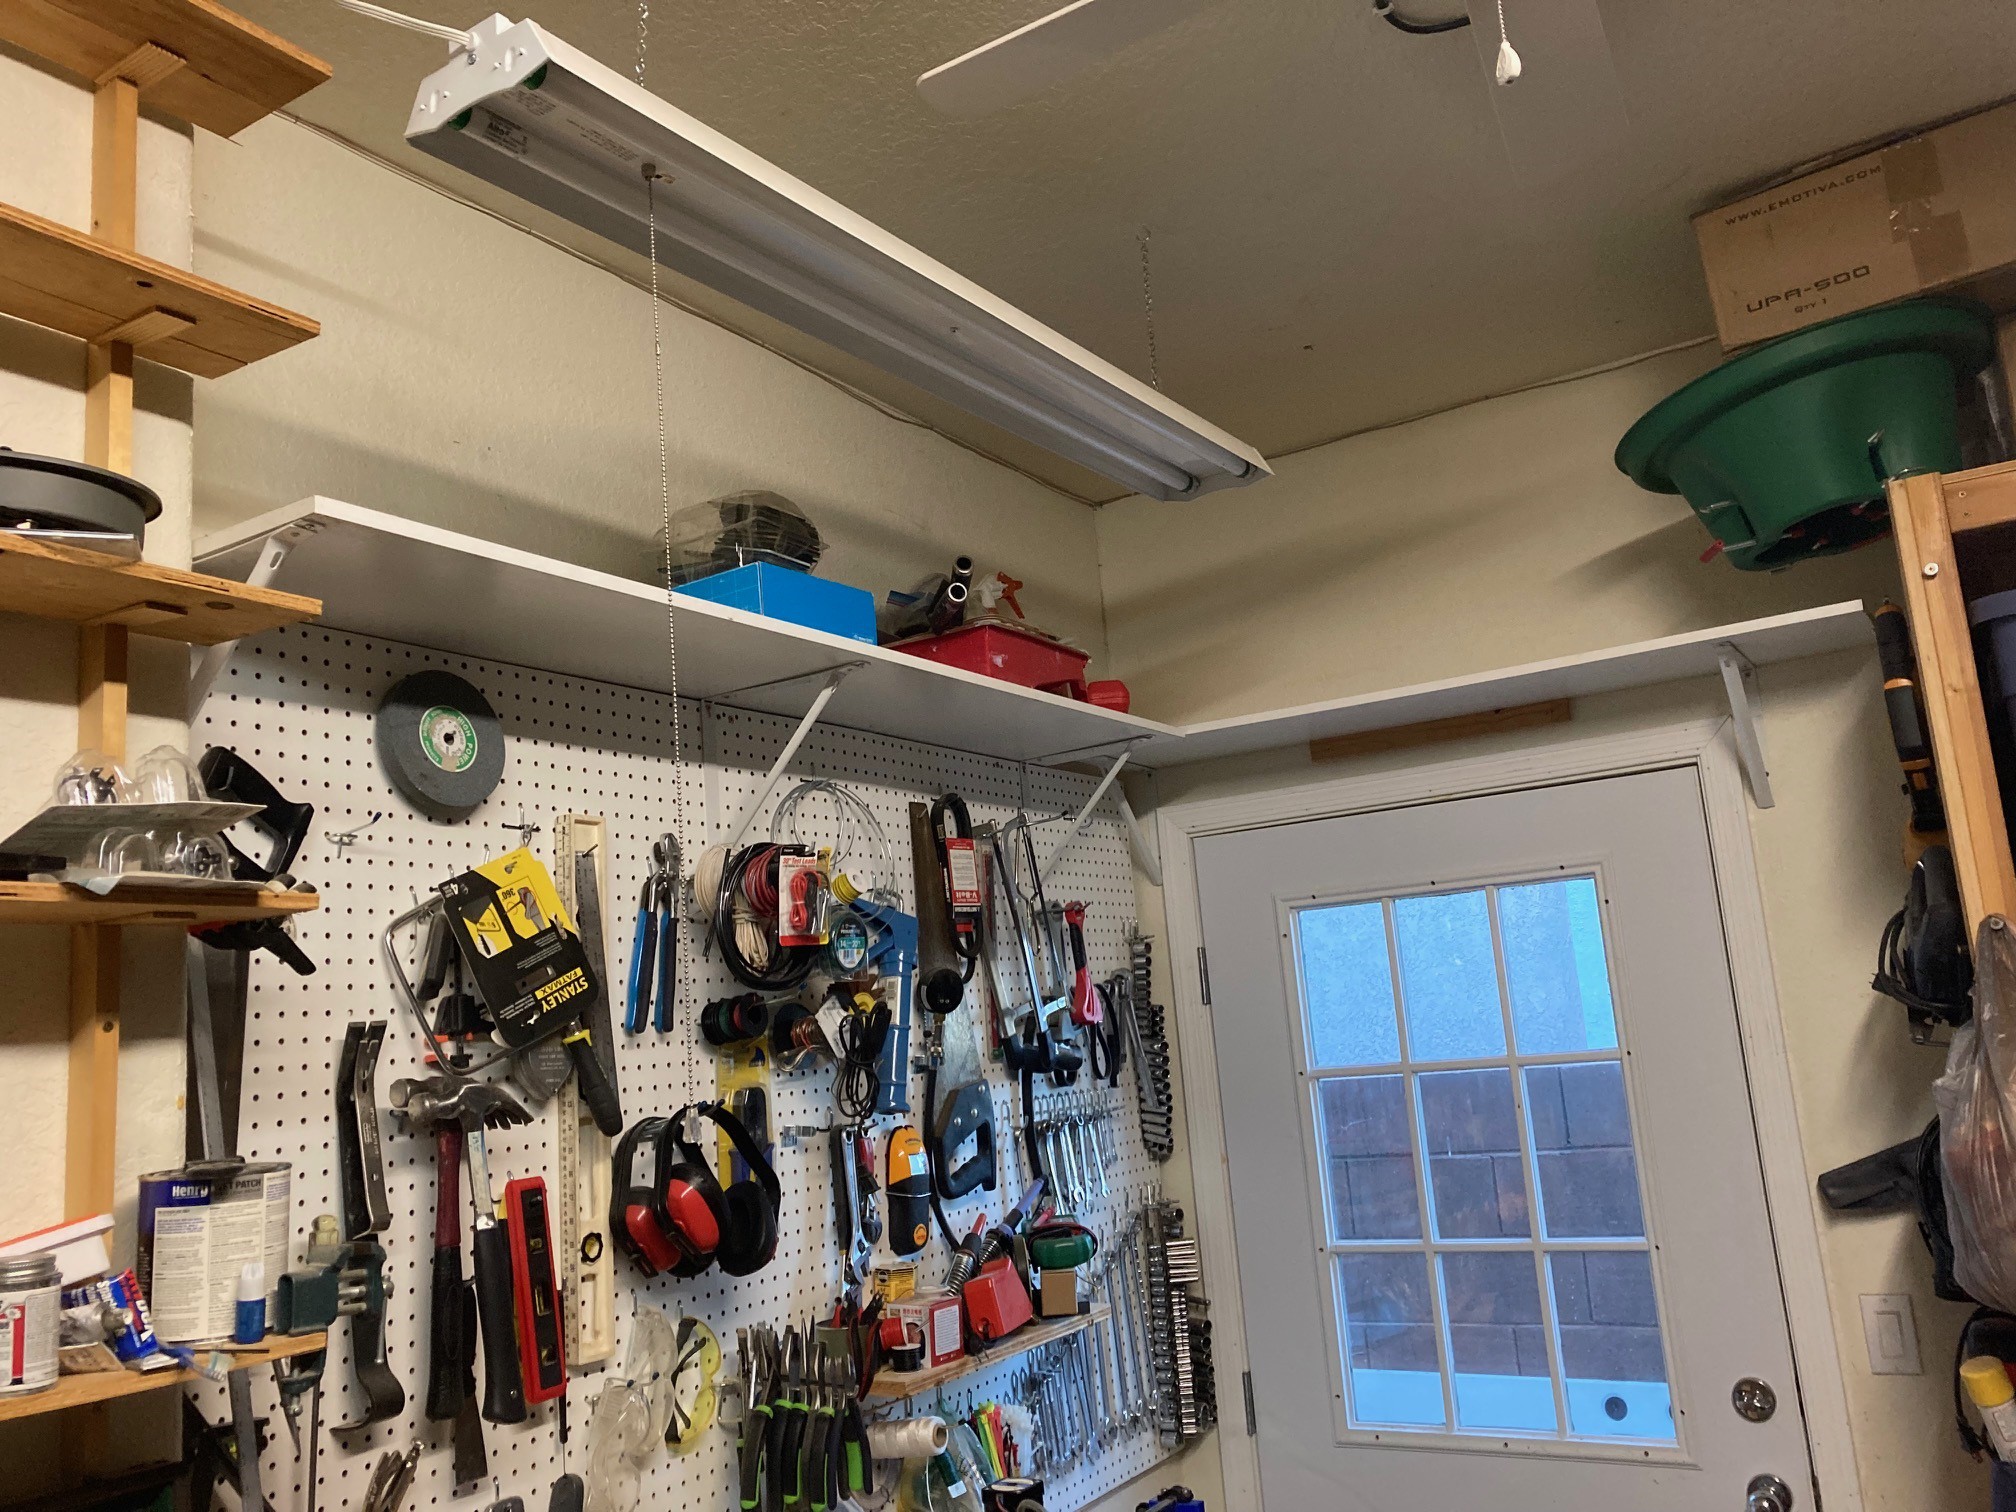
This still leaves enough room for the door to open all of the way. Something we have not been able to do in a very long time.
![]()
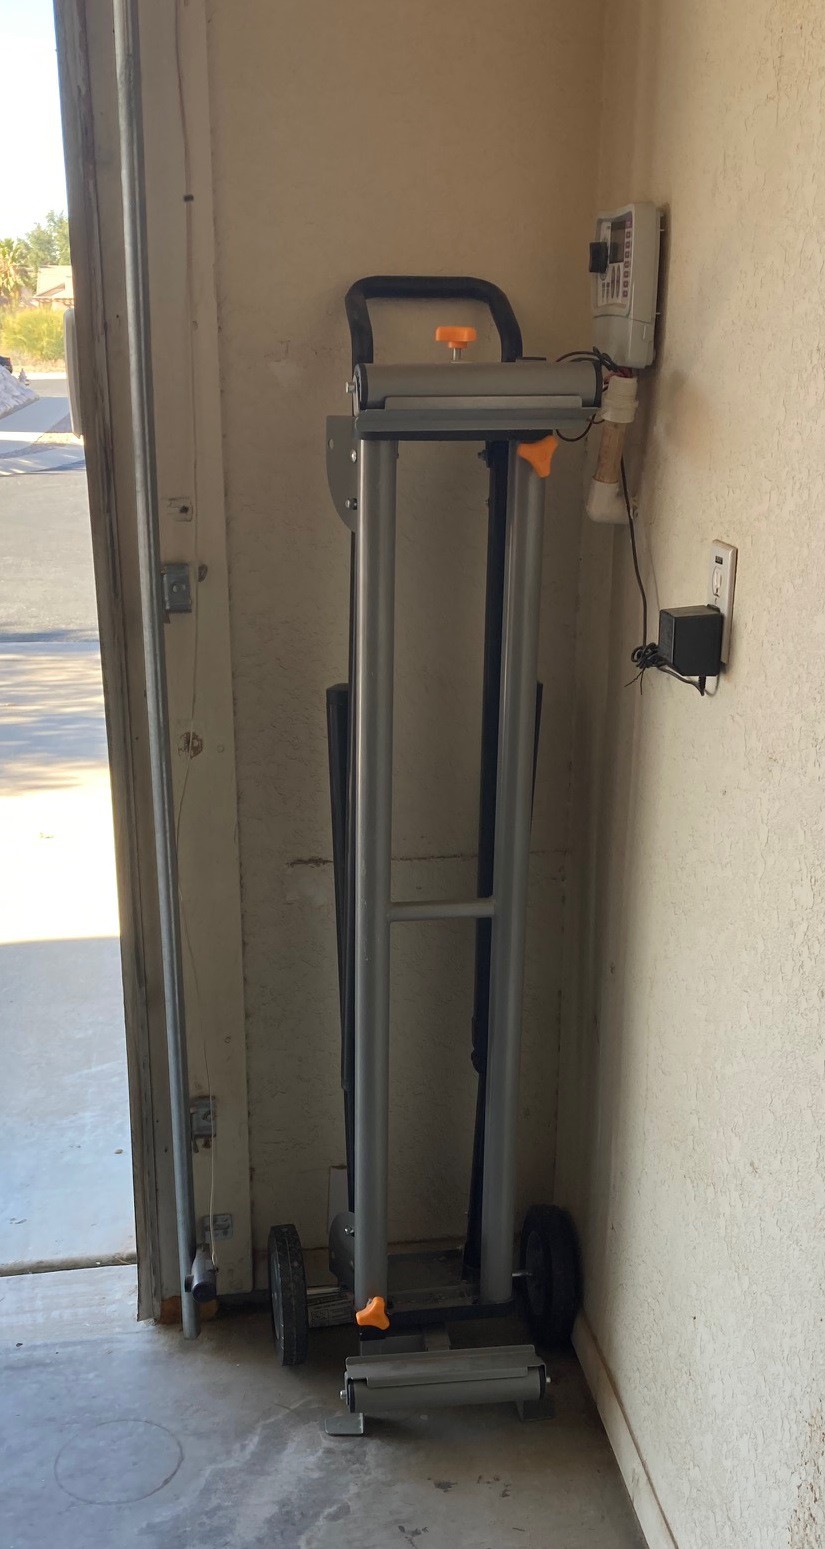
For now I have moved my miter saw stand into the corner. This thing is huge and I'm hoping to replace it with a fixed cart, however I'm not ready to part with it just yet so this is a reasonable compromize.
![]()
I started to dig through the various shelfs and cupboards and have managed to get rid of a lot of it. That will help in the future when I'm trying to find good places for all the treasures I have left.
![]()
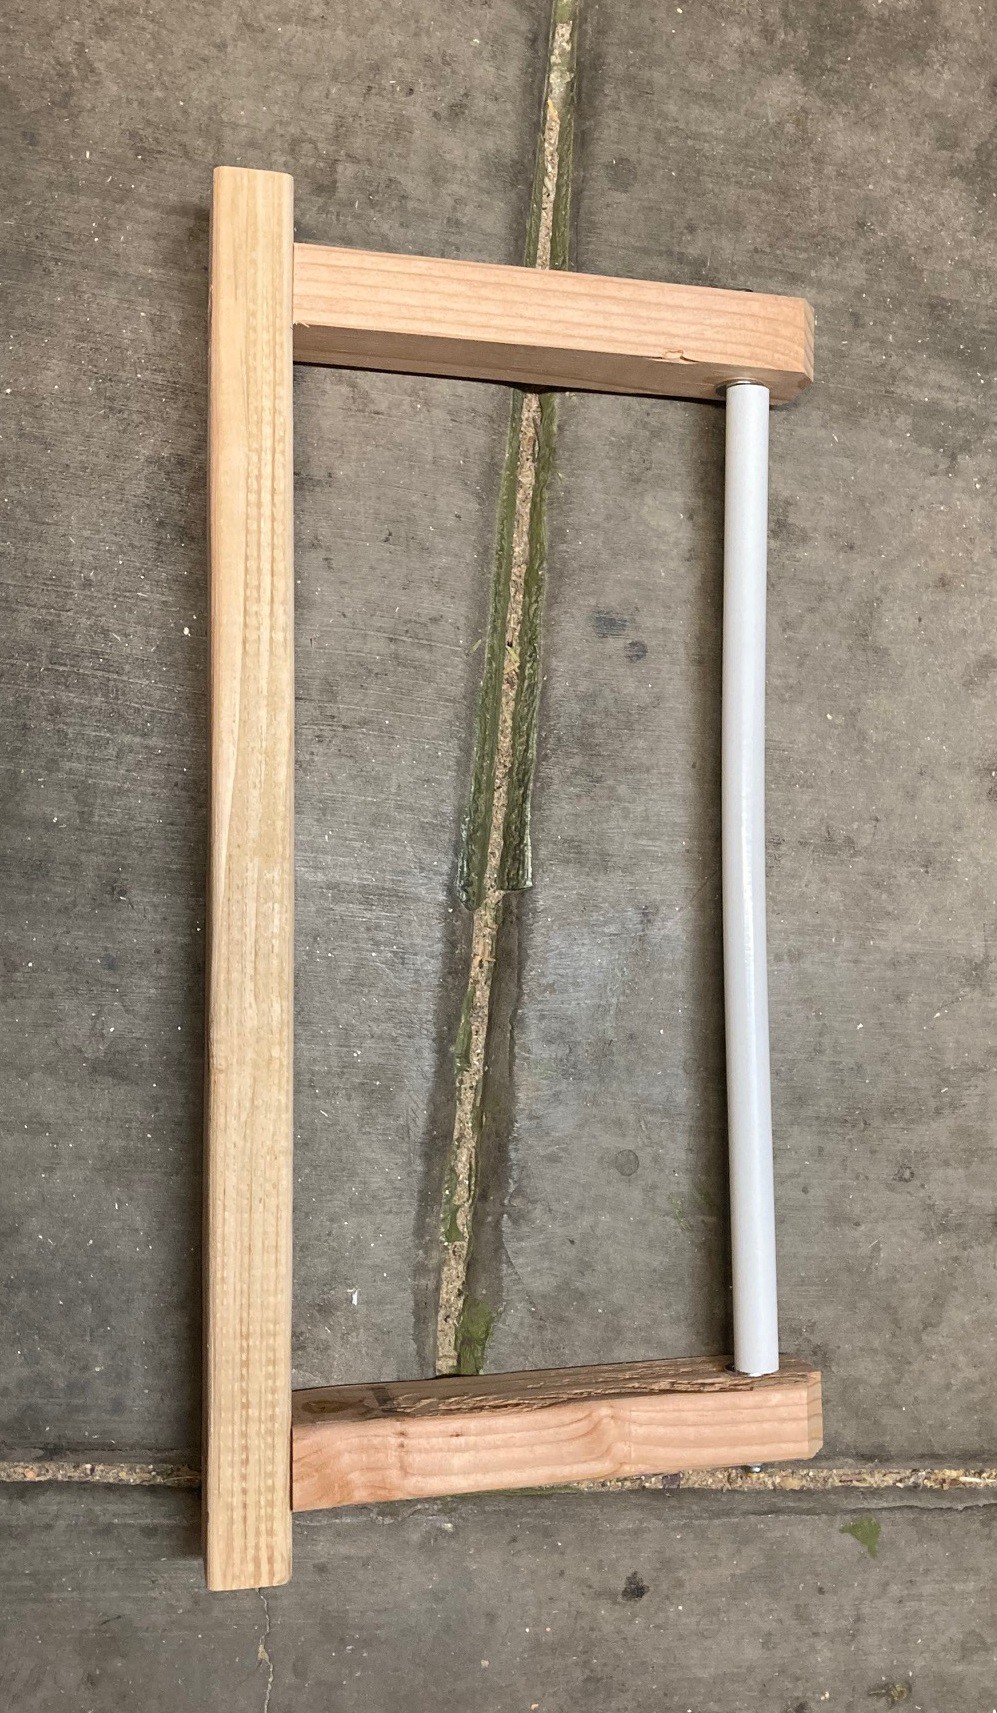
The last big awkward item I have left to deal with is my extension ladder. I built this hanger out of 2x3's and a 24" length of allthread with some water pipe sleeved over it to protect the ladder from being scratched.
![]()
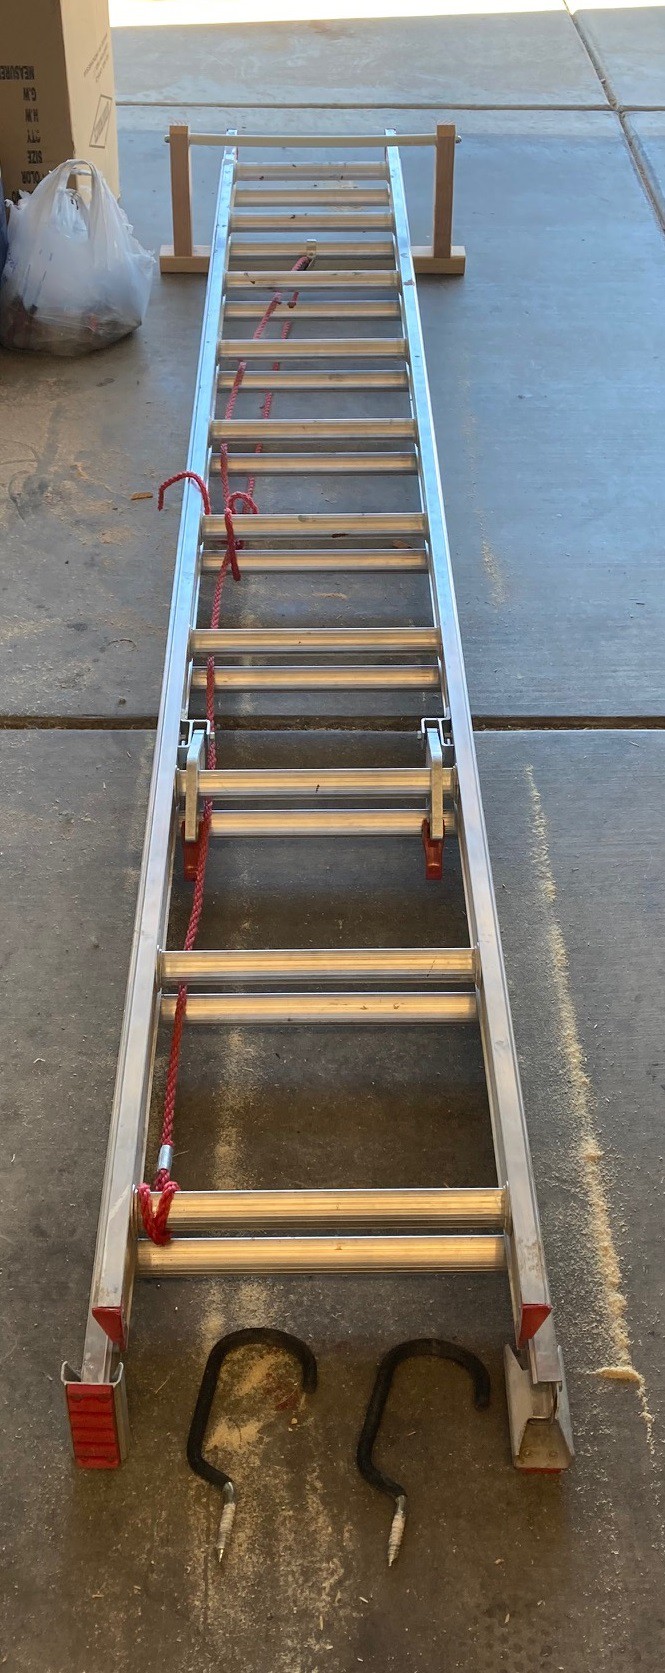
I have it laid out here roughly where it will go on the roof. The idea is that you can lift one end into the bracket and then climb a step ladder to hook the other end up. This should be less difficult than trying to dead lift the ladder over my head and hook it onto two hooks at the same time. Plus I can use a different part of the roof and get this good and out of the way. I'm hoping to get this up and mounted tomorrow.
Now that I'm nearing the end of the reorganization and it is down to the final pieces I need to start seriously considering what sort of shop I want to have. My hope is to lay out all the heavy equipment I have to deal with on the floor and mock up what pieces will go together in a single rolling cart.
I also have way too much scrap wood laying around. I need to sort through that and make some sort of storage solution that gets it up off the ground but also accessible.
I'm probably going to slow down on this project for a bit. I will keep chipping away on it, but I need to make it through Christmas with money in the bank so I won't be able to spend money on wood until the new year. Plus I need to spend some serious time modeling out what I want to make. I'm hoping to keep the momentum up by working in cad, we will see how well that goes.
-
Research
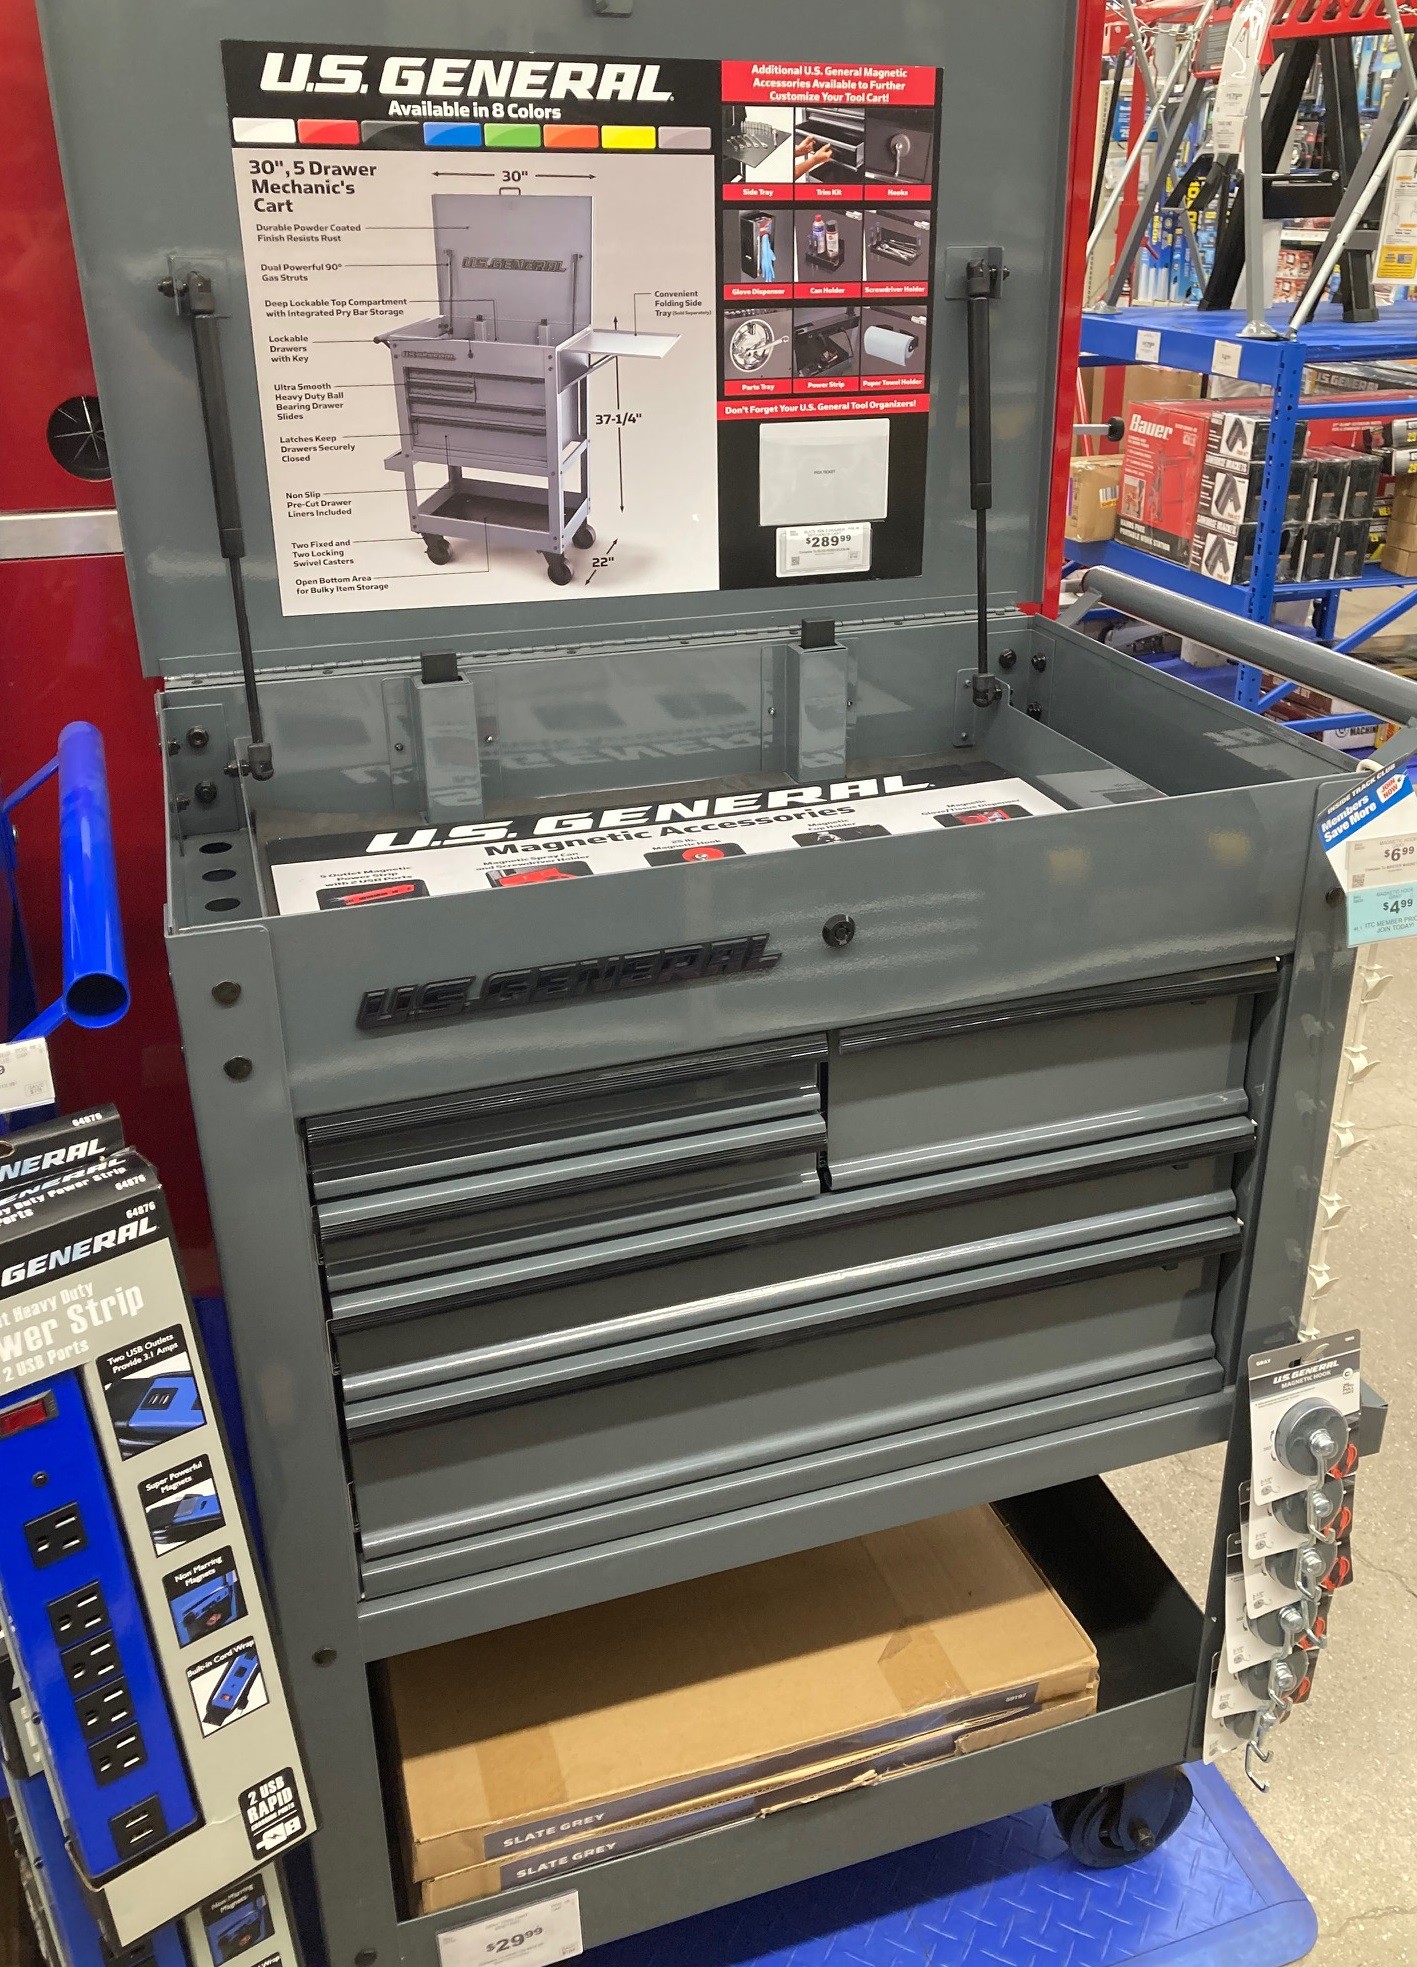
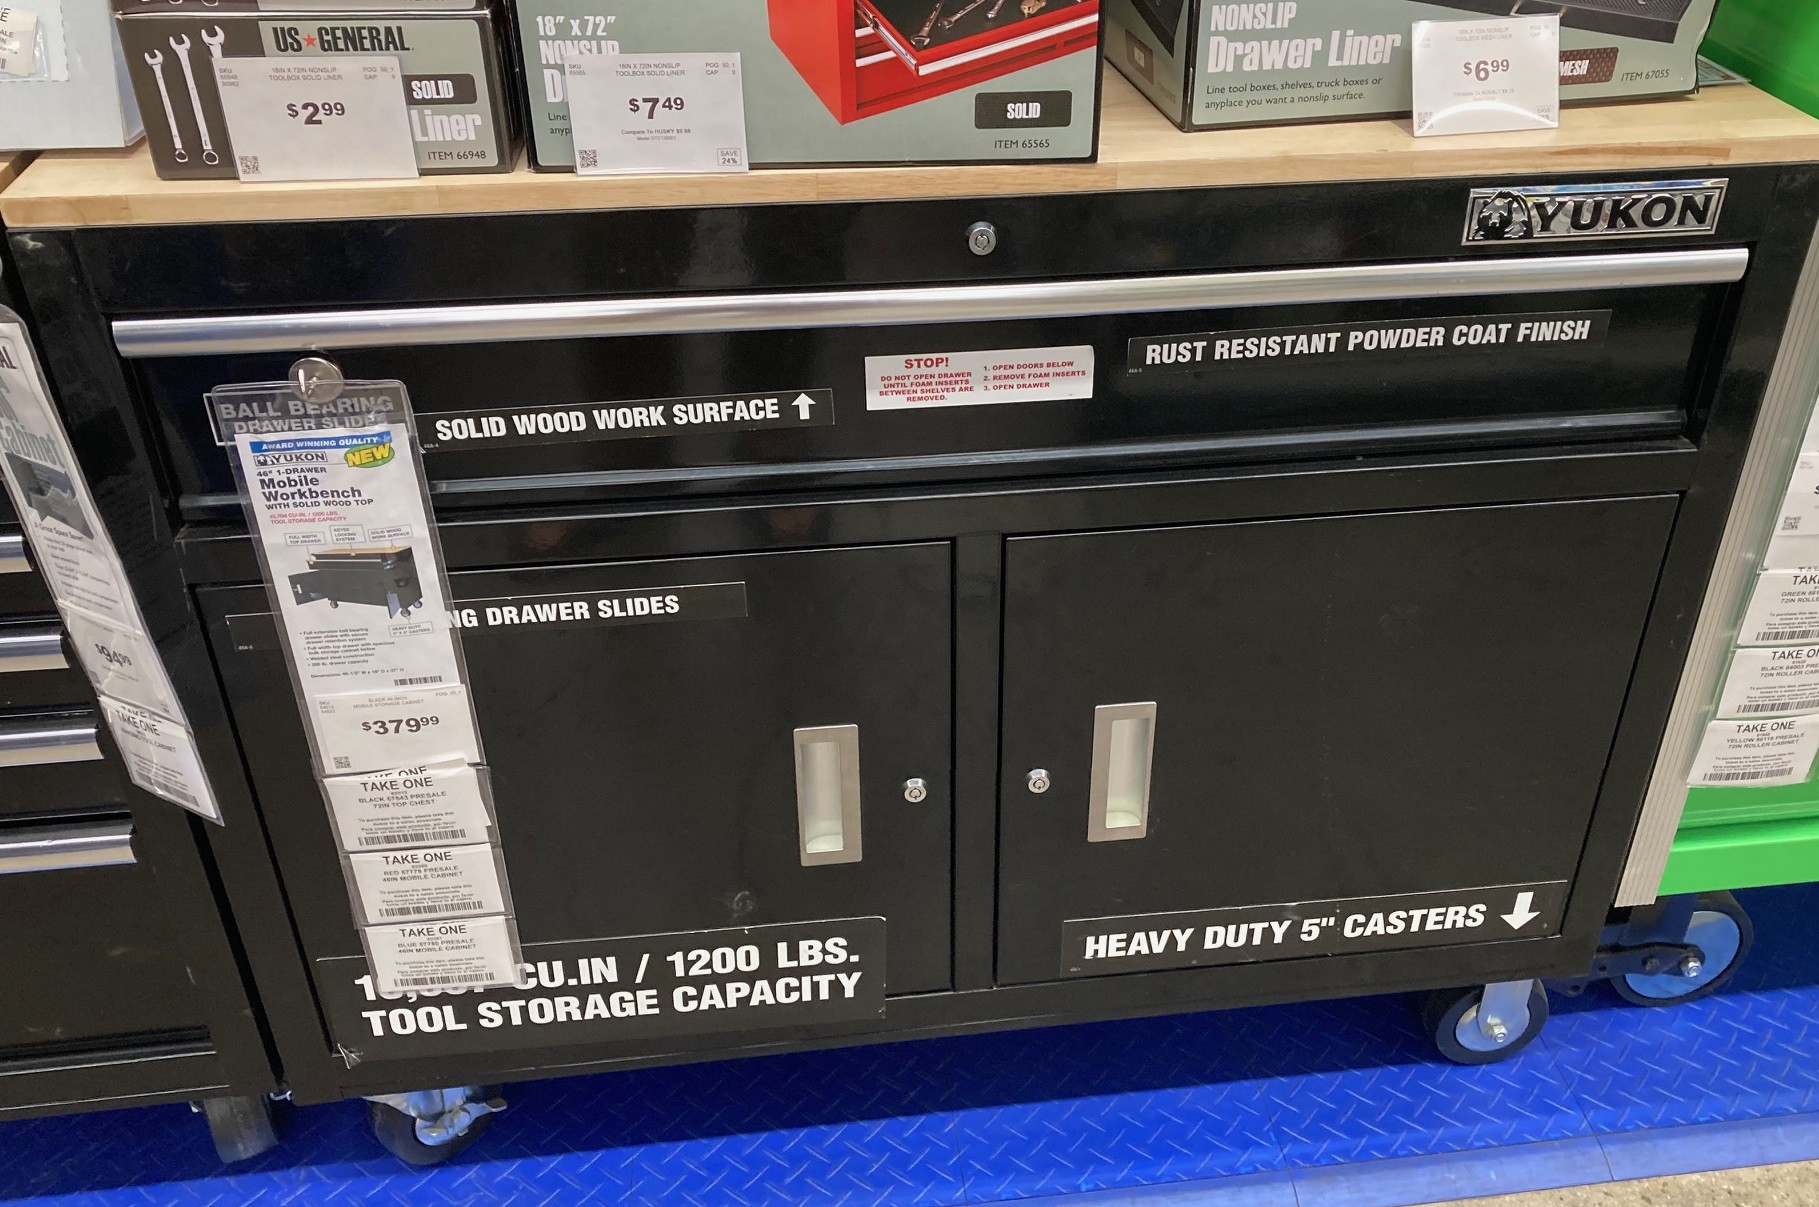
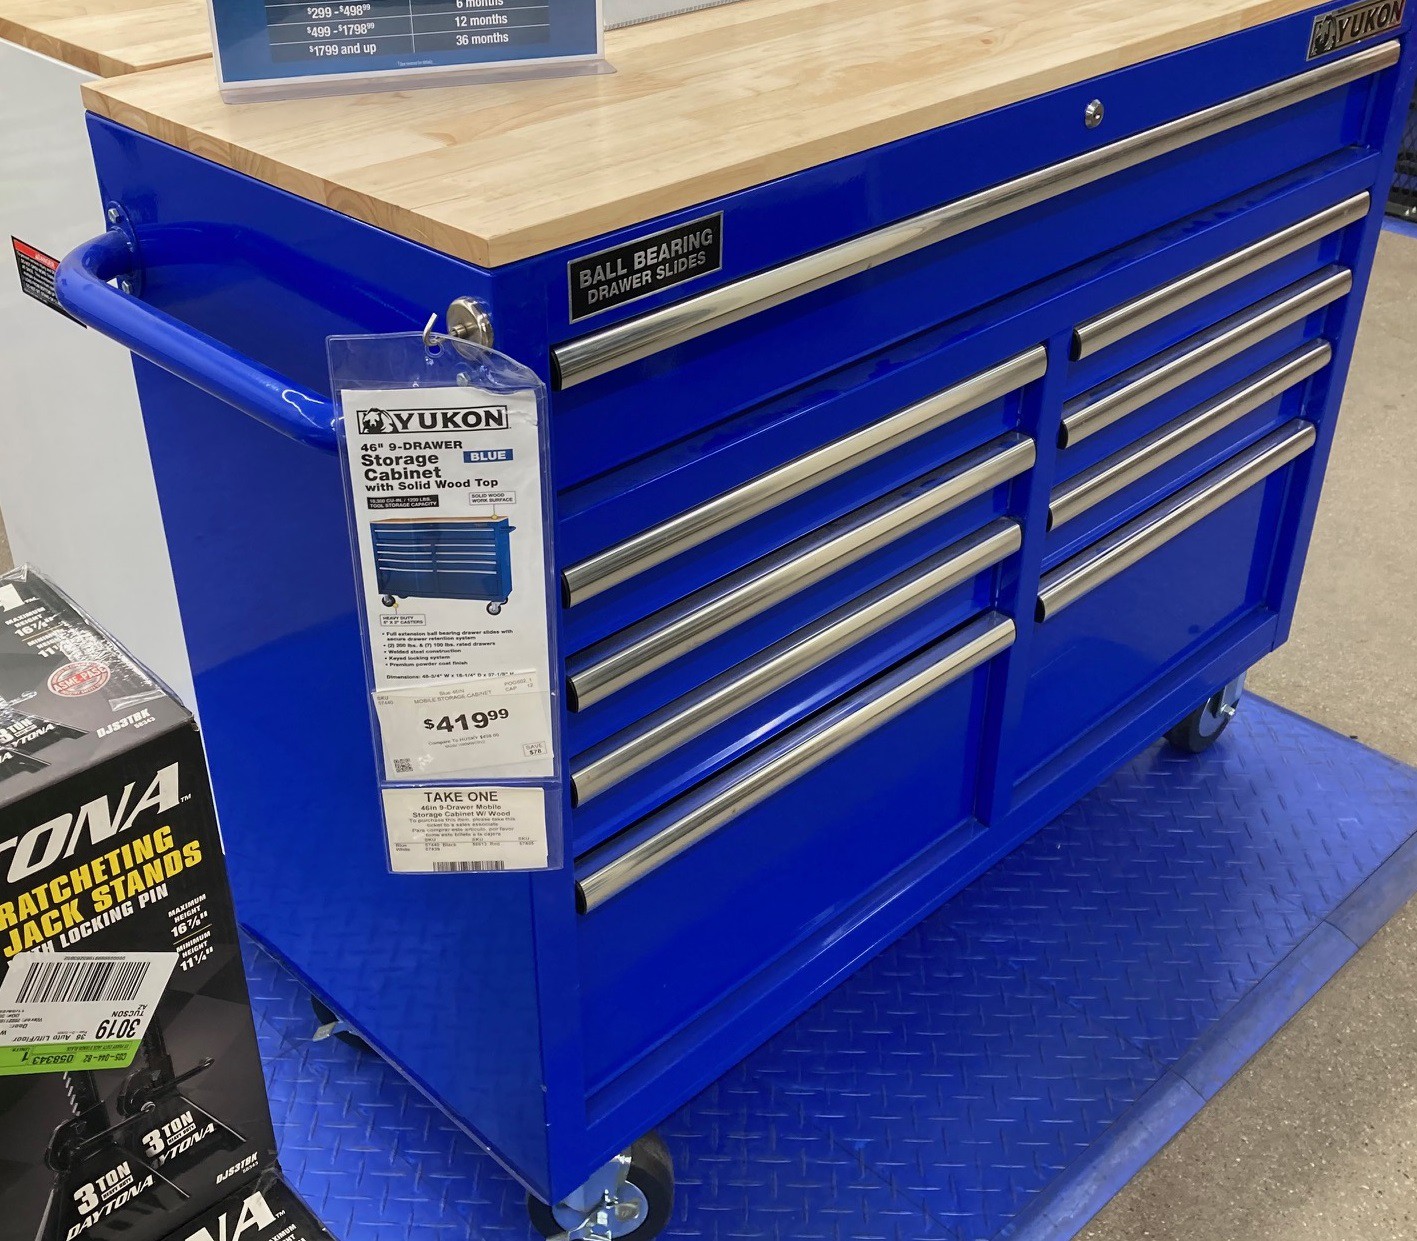
12/08/2022 at 03:38 • 0 commentsSo before committing a lot of time and money to building shop furniture I think it is worthwhile taking a look around to see what other low cost options there may be out there just to make sure I'm not making a bad investment. So I took a quick stroll through Harbor Freight and cataloged some of the furniture they had on hand. I also looked around home depot, but there prices are not really comparable (there quality probably is not either!).
![]()
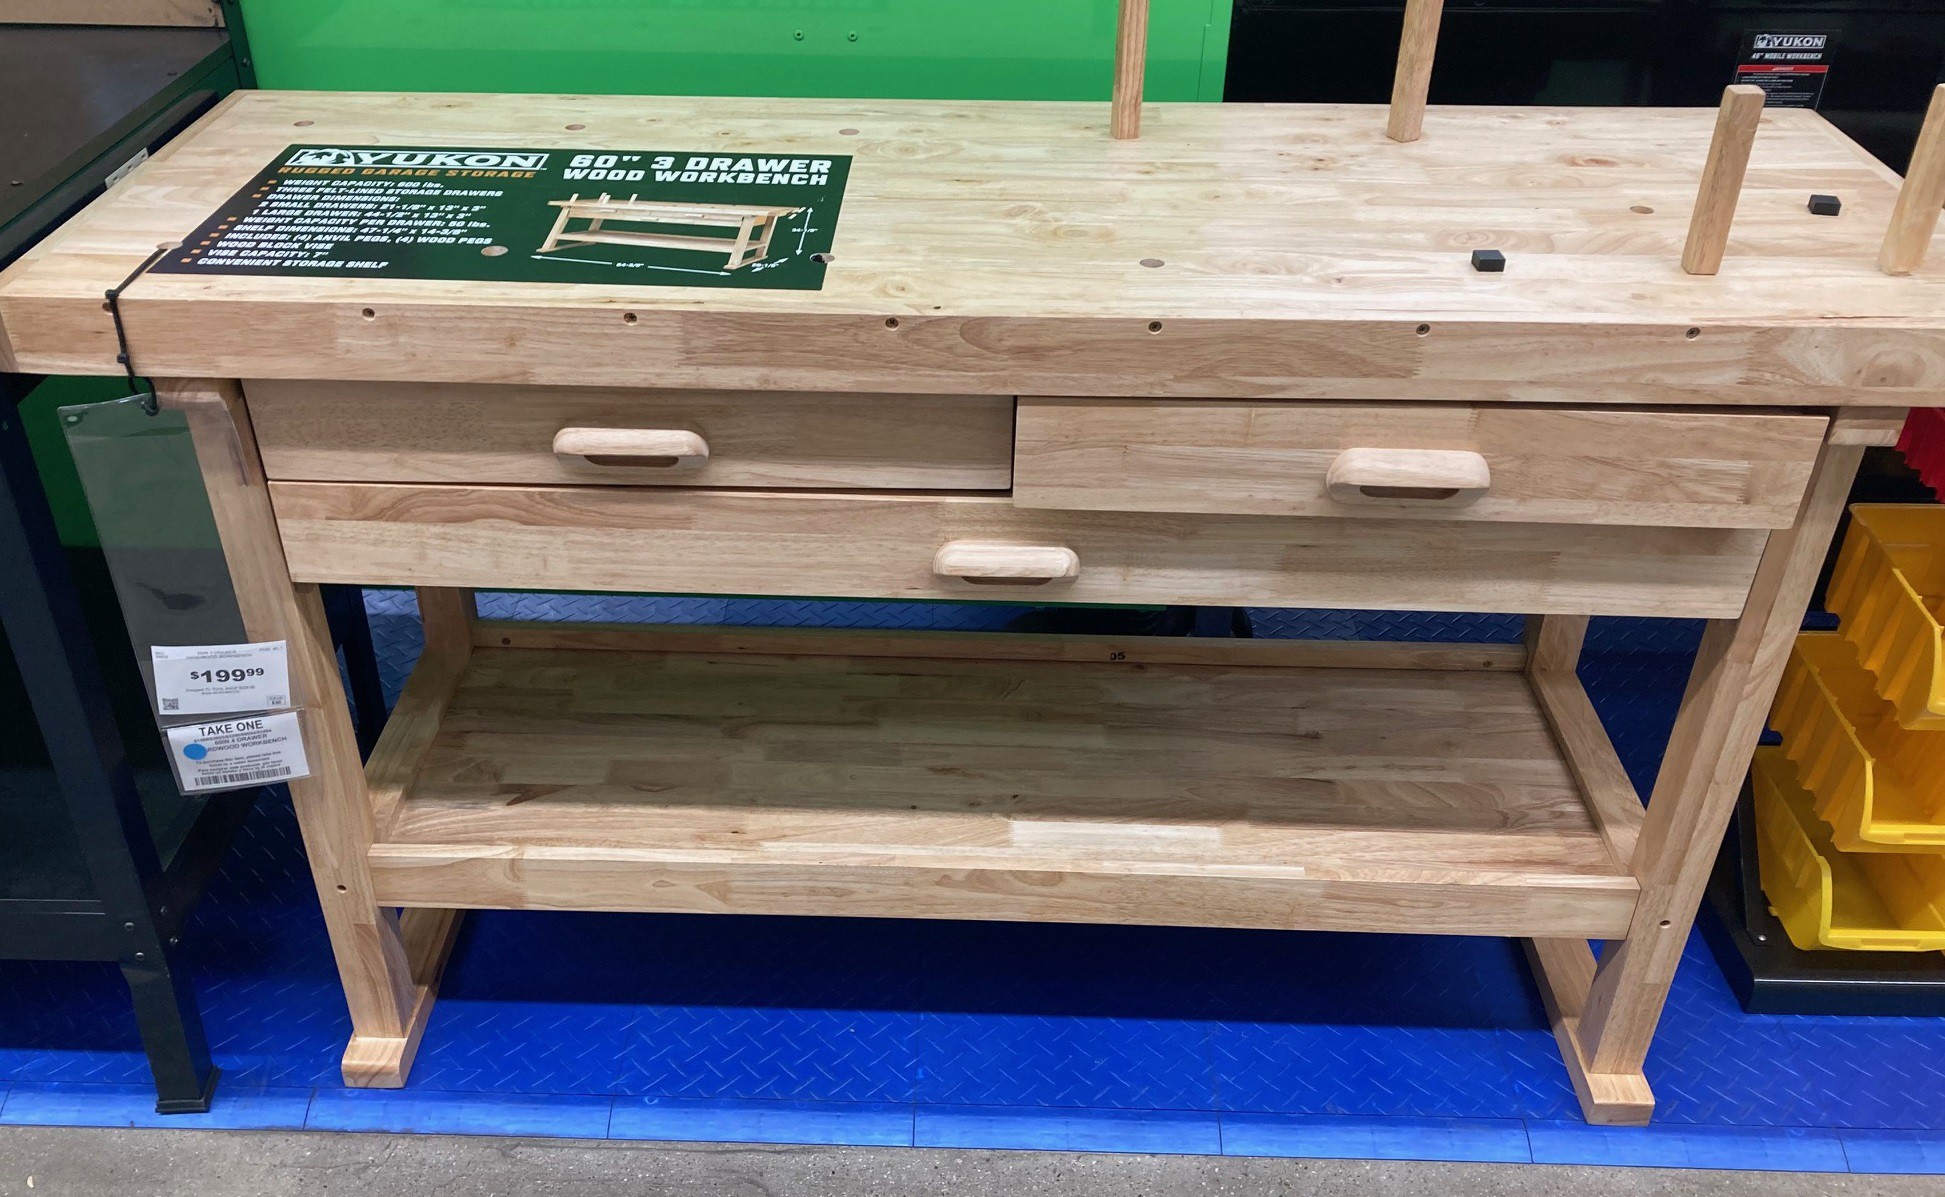
At the bottom end they have this wooden workbench. At only $200 (and $150 on sale) I seriously considered this when I built my first bench. However it is not very deep at all, and it is extremely rickety, you can move it several inches side to side without effort. It could just be poorly put together but I suspect it would take some serious effort to reinforce this. Still I'm probably not building a new bench for less, even if I reuse most of the material from my current one.
They actually have a cheaper workbench made out of some thin pieces of angle iron, but I doubt it would hold up to much of anything.
![]()
Next up we have this tool cart for $300. It has plenty of drawers but I can't really put any of my machines on top of it so it can't serve double duty. It is really only on the list because of the price.
![]()
![]()
Finally we have these oversized toolboxes with wooden tops. They are a bit tall but could be used to store some of the smaller tools on top. The price is way up there, my guess is I could build something cheaper (out of wood of course) that would better suit my needs.
-
All Finished! (with the first part)
12/08/2022 at 01:20 • 0 comments![]()
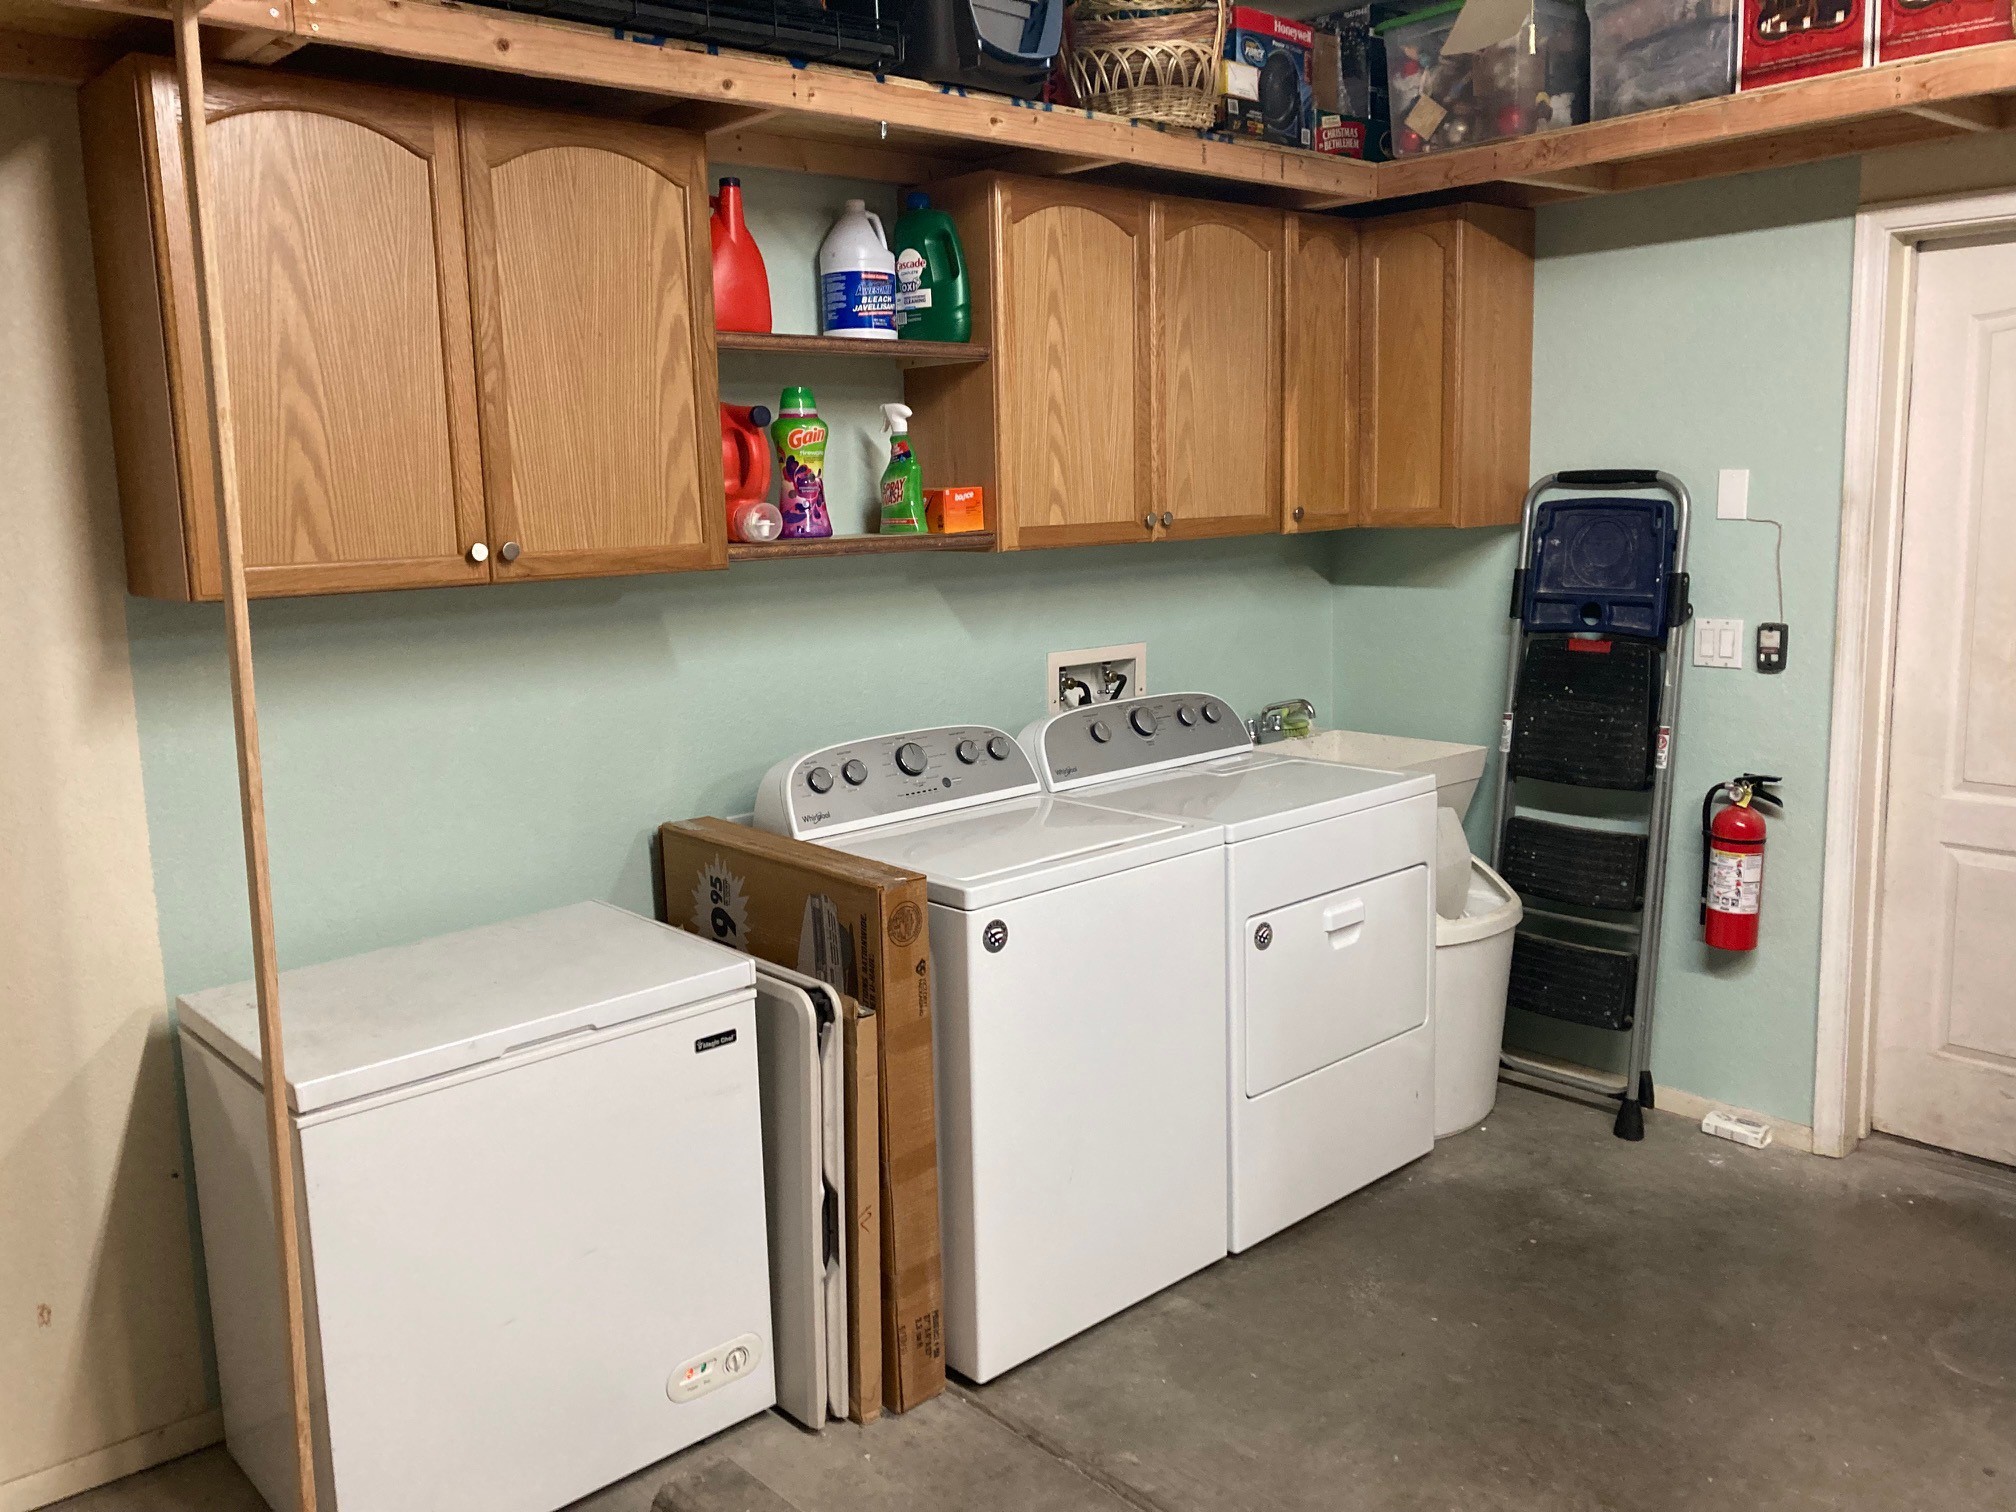
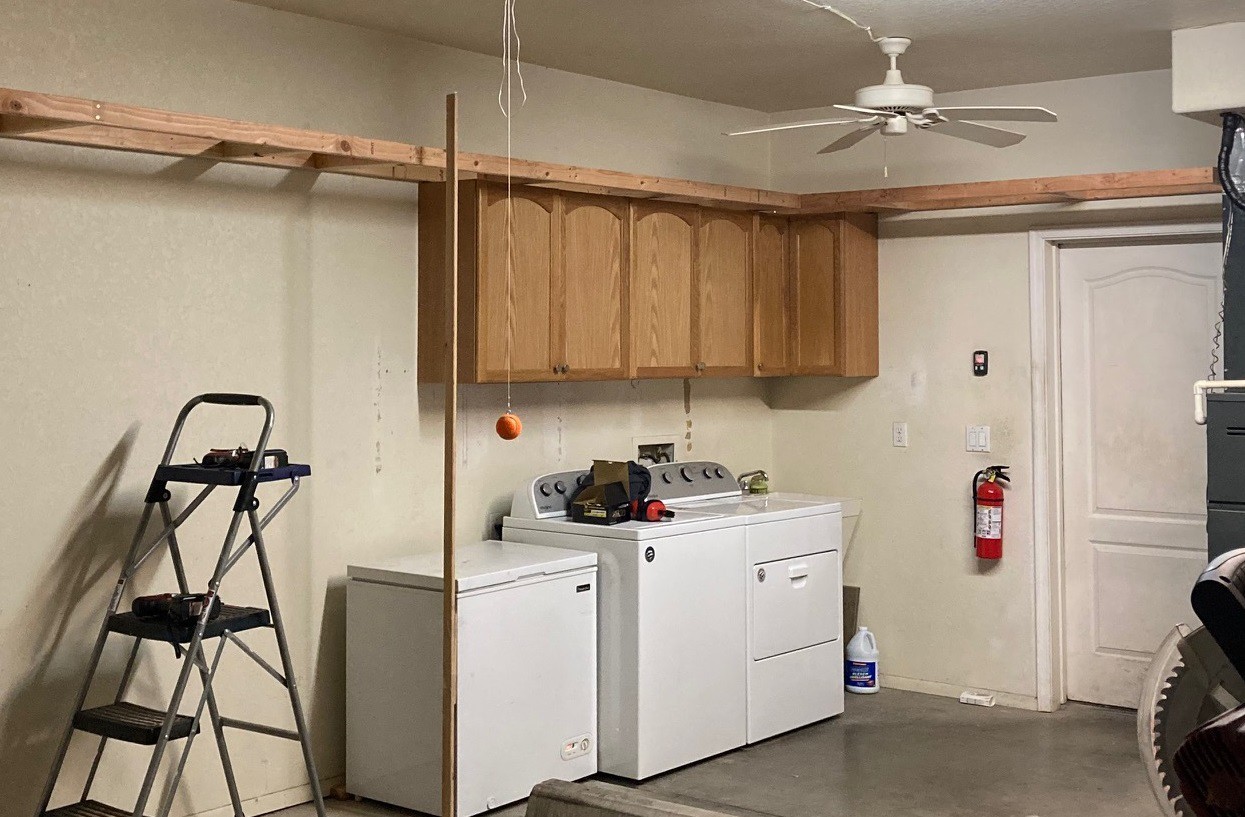
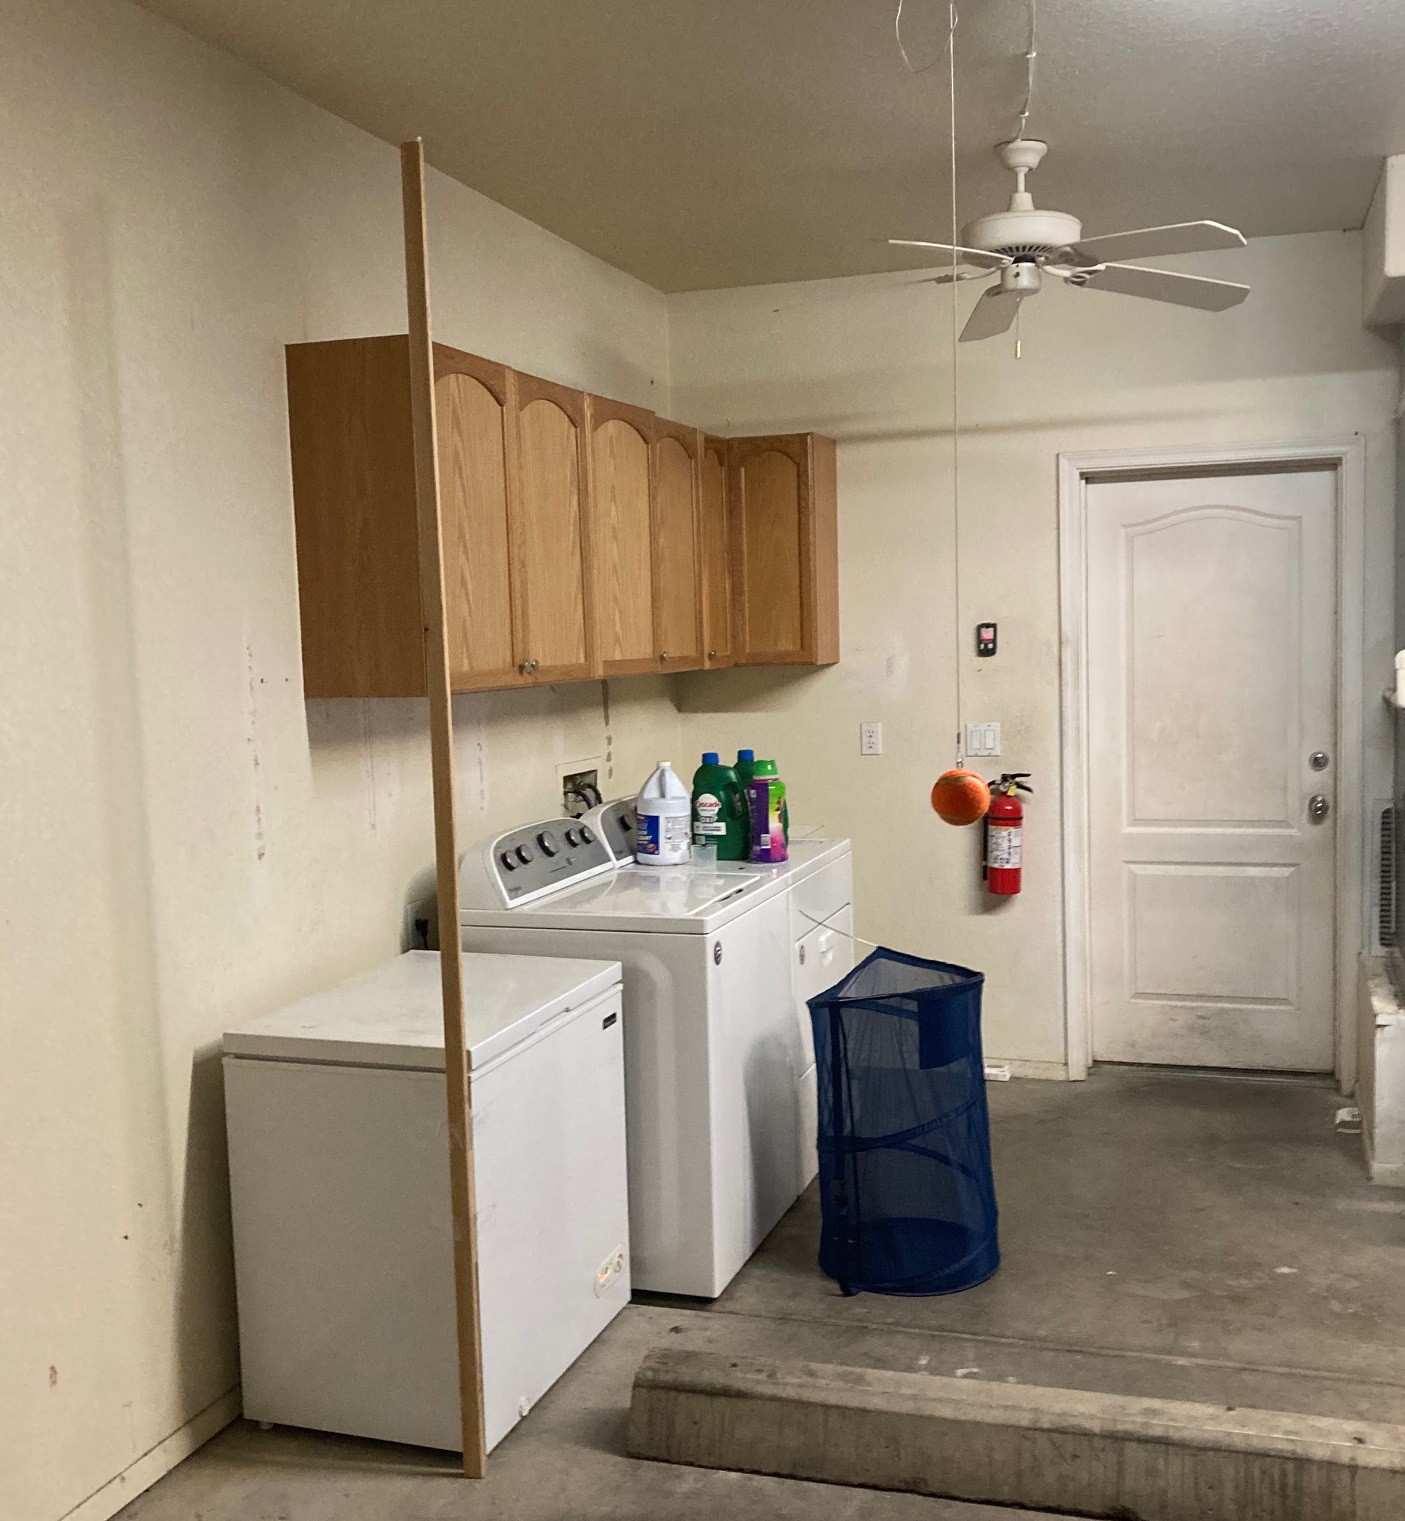
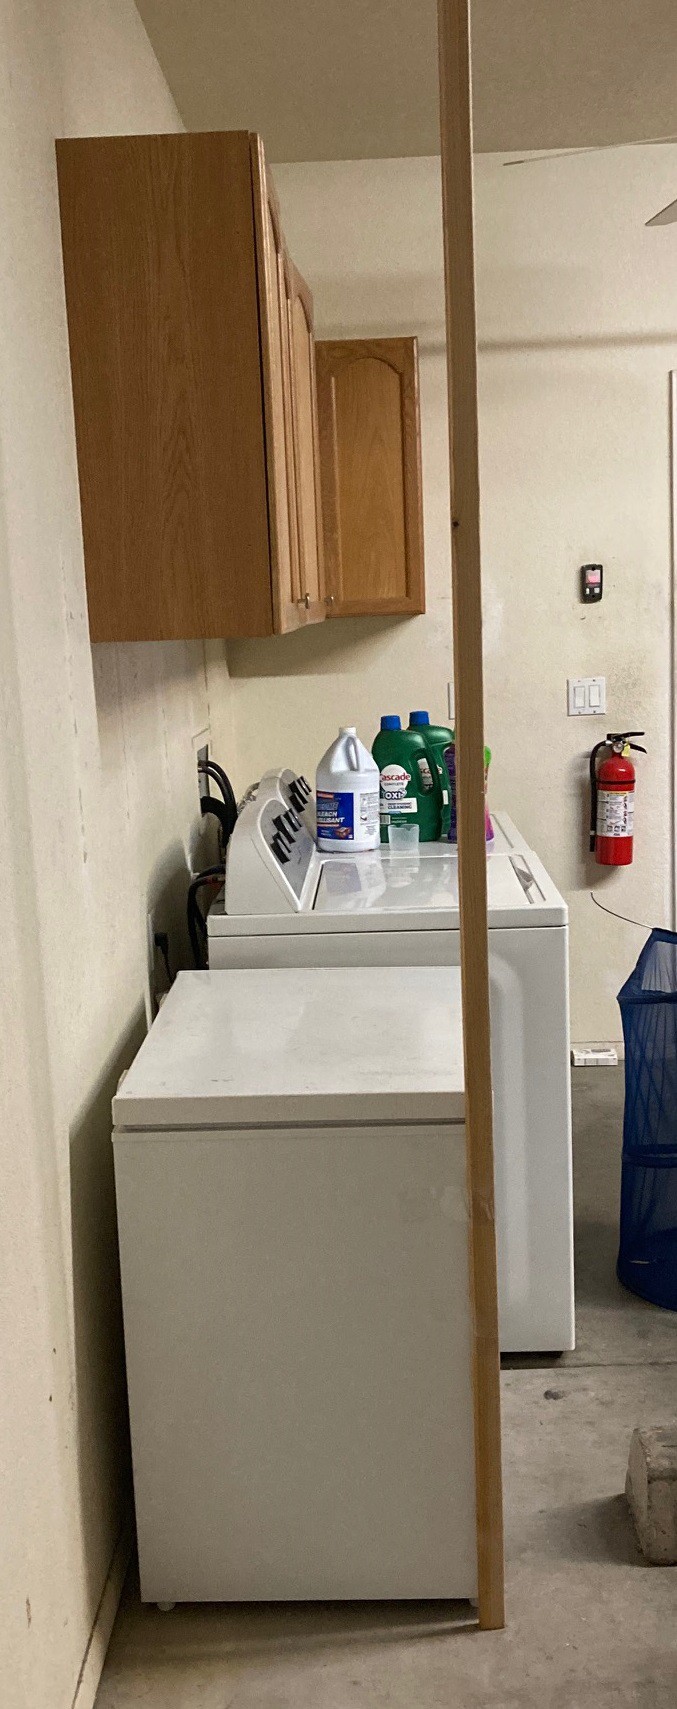
The laundry area is all done, and it looks really nice! I'm still contemplating if I want to store the step ladder there by the door or not. It gets used a lot so having it nearby is convenient. I may end up hanging it on the wall too make it a touch easier to reach the sink.
![]()
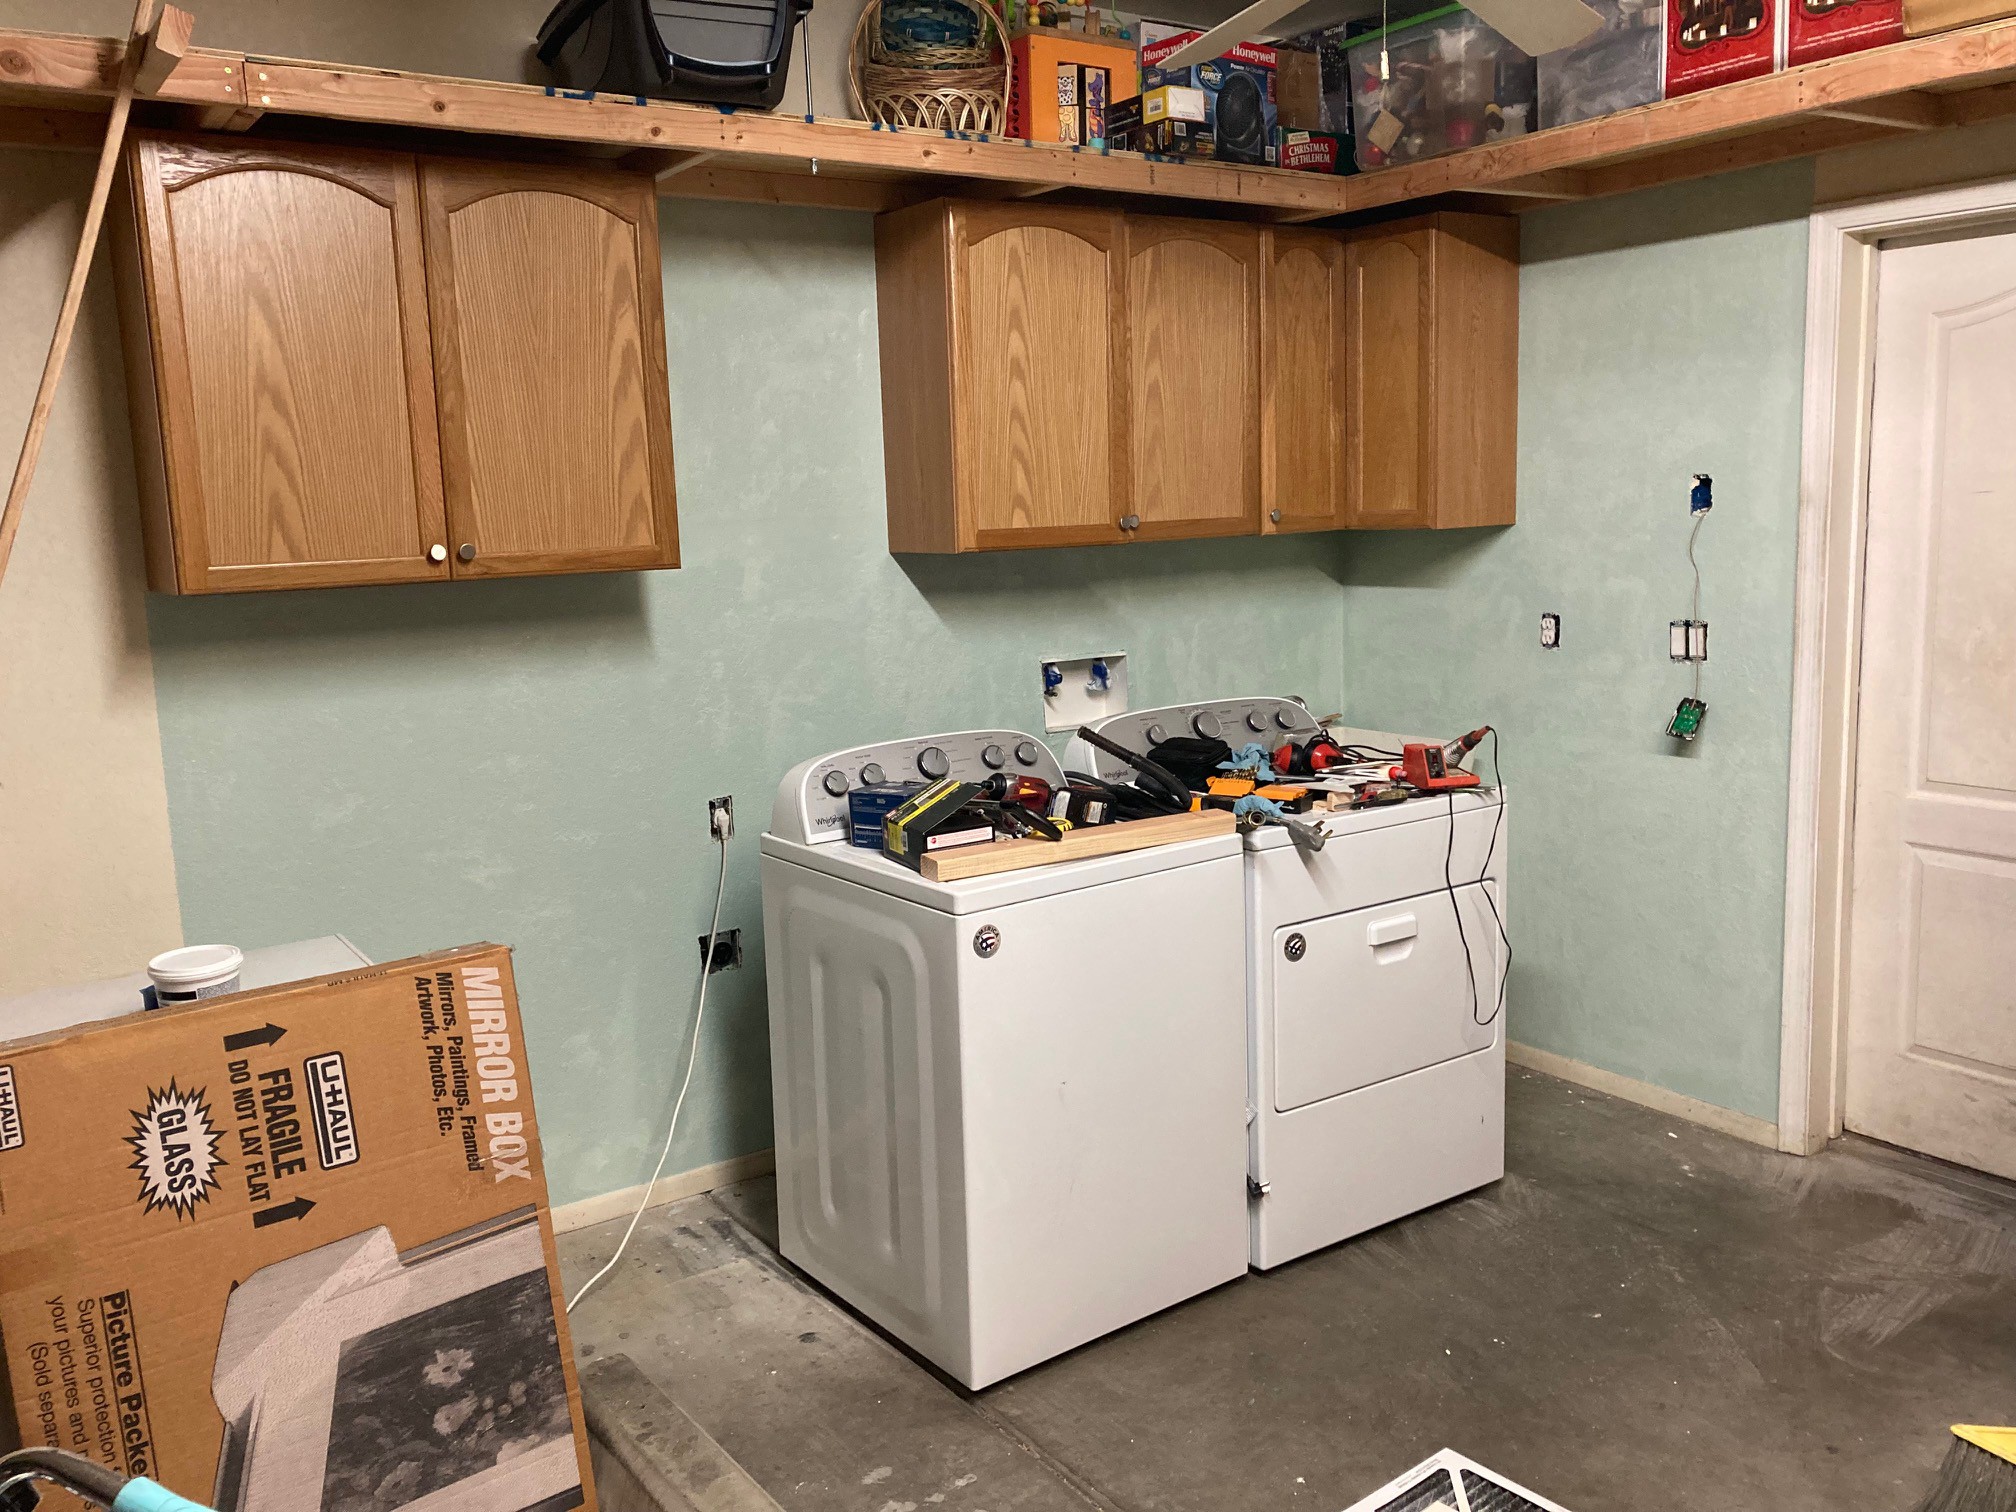
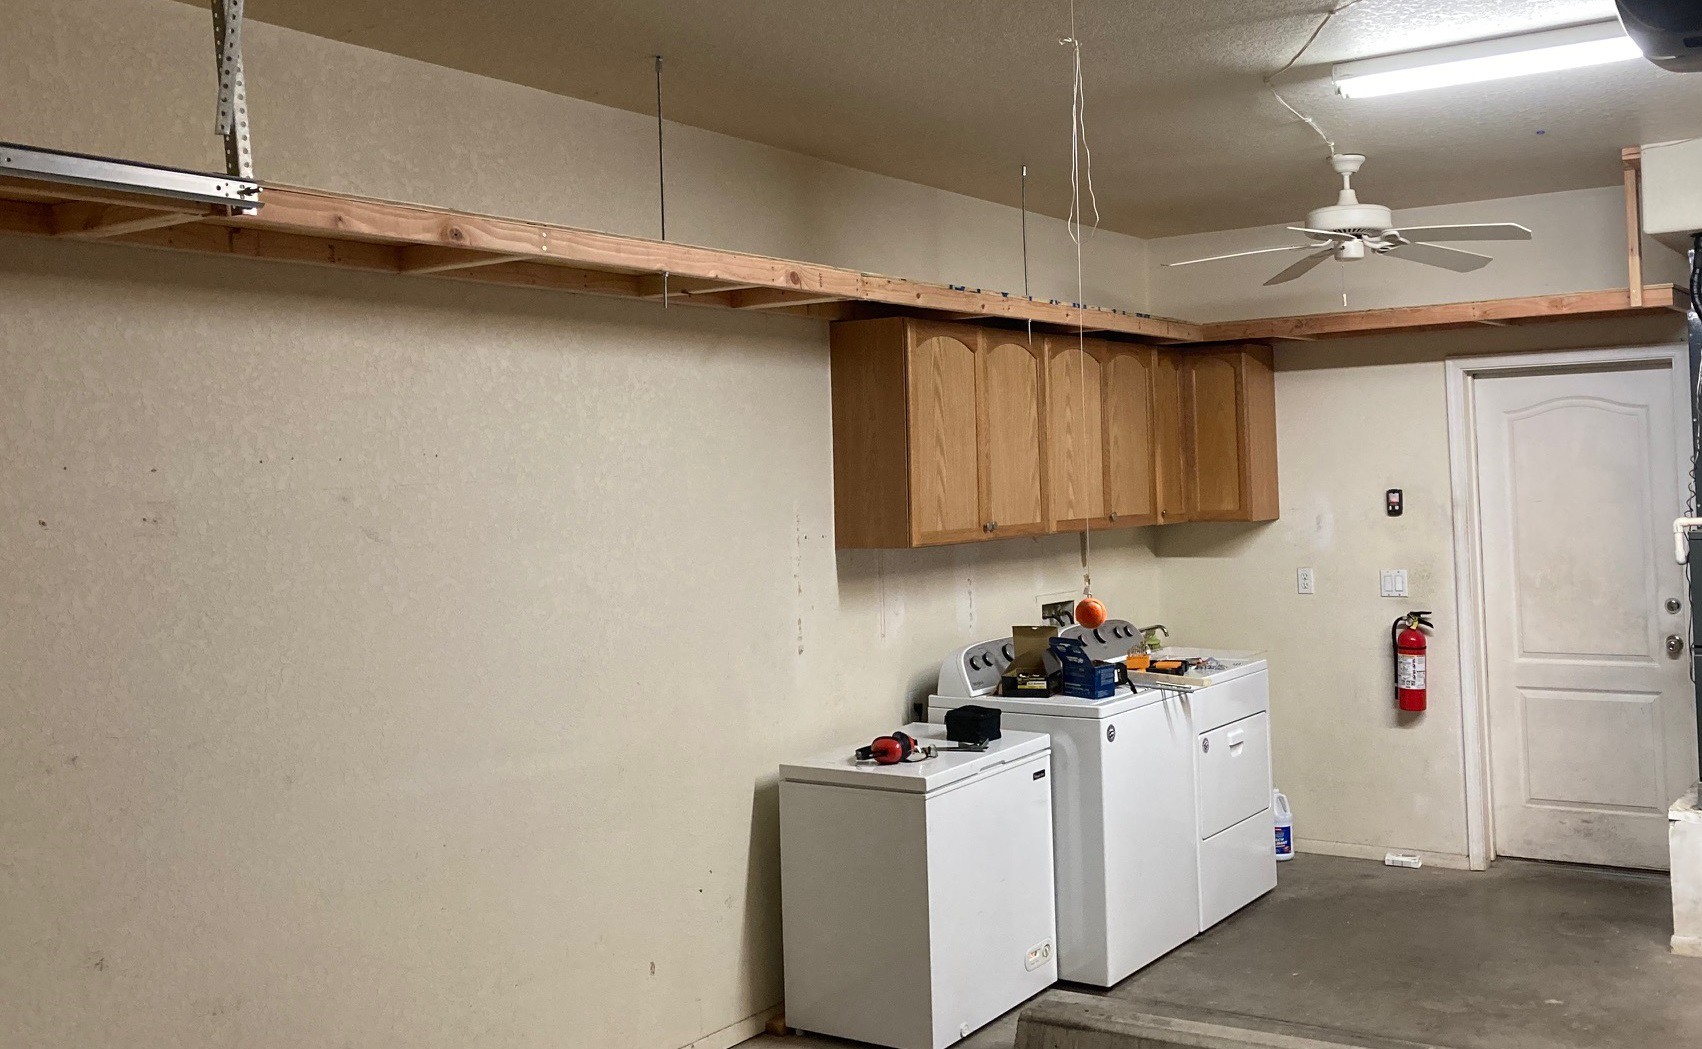
Here are the finished shelves. I used a piece of 3/4" plywood with a finished face and some one inch poplar strips to attach them to the cupboards. Then I used some fancy trim I had laying around from a previous project to make it all look professional. The whole thing is held together with wood glue and nails from a nail gun. I also sunk two screws into each strip of poplar to give it a big more hold. I'm not seeing any flex when loading them up, I think they will work out great. And I can now store my larger laundry items without issues.
![]()
I have a small space next to the car that I could use for something. There is a space about 15" down from the bottom of the shelf, 20" deep, and around 15' long that could be used. And I could put anything on the wall as long as it does not stick out more than 5" or so. Ideally things would be clear by where the car doors open so you can fully extend them to make entry and exit easier. And I want to build some sort of a small wall on the right side to isolate the laundry room from the rest of the garage and make parking easier.
I'm thinking of using the green shaded area for wood storage. I have a large collection of longer pieces of wood I need to stash somewhere. The items on the floor are things I'm getting rid of. It is a depressingly small pile so far.
![]()
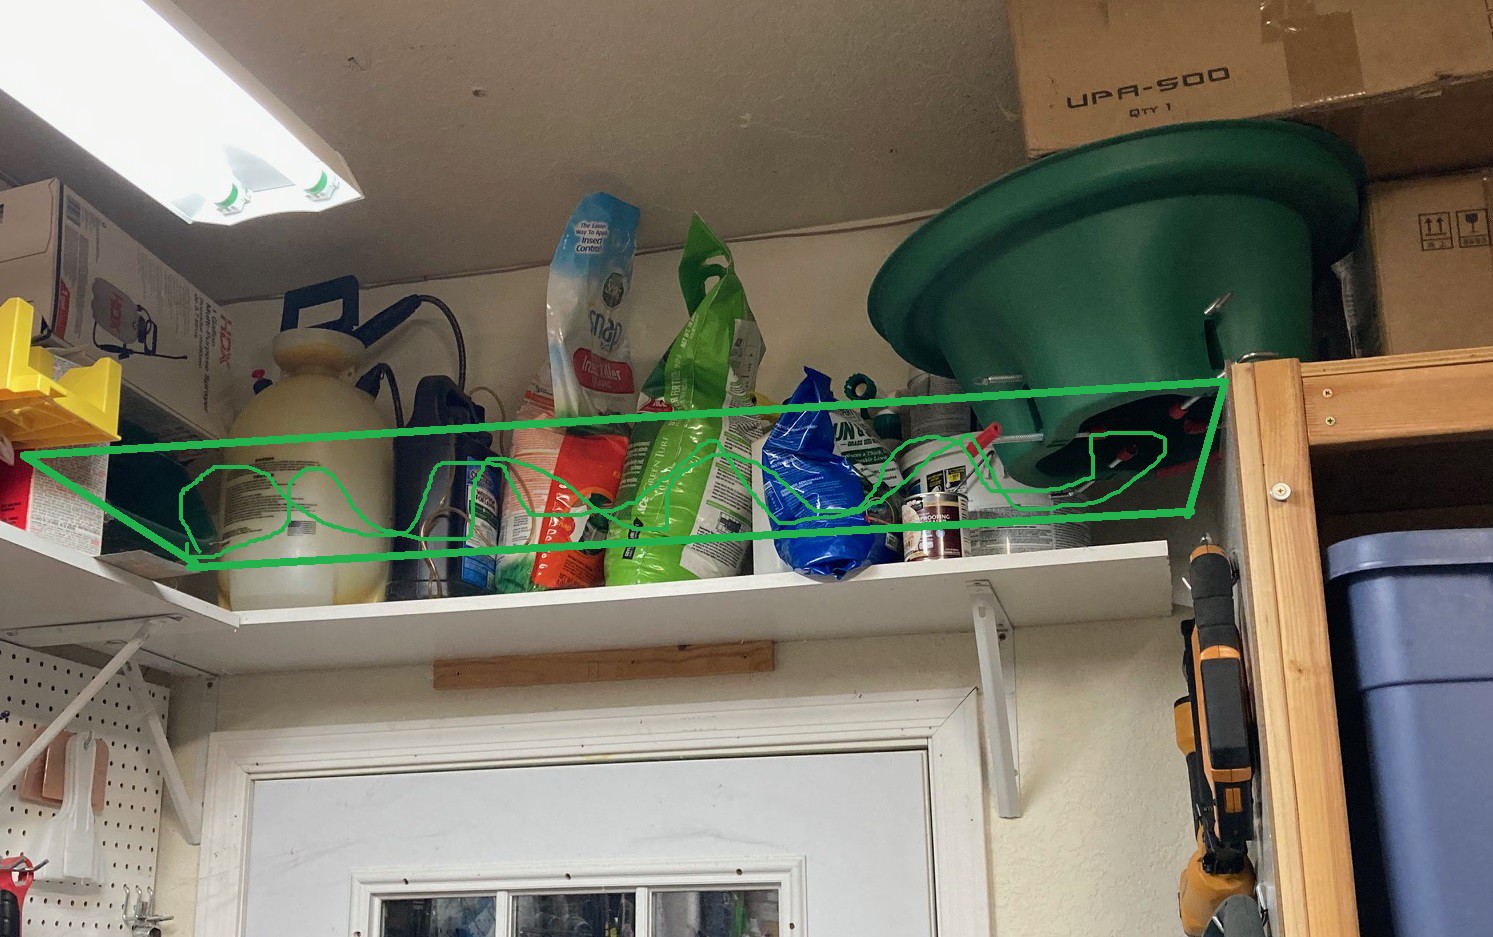
On the other side of the shop I have this small 12" shelf with random junk from past attempts to make grass grow in the desert. I'm seriously considering ripping this out and making another 20" deep shelf that connects to my existing shelfs and extends them all the way to the wall. This would add another 4' of storage, enough to give me some breathing room for any future treasures I feel I can't let go of.
![]()
![]()
Finally I still have all this junk to deal with. 90% of it will end up in storage I build in my small workshop space but there are a few things like the bike and ladders that need to be dealt with as well.
-
Paint!
12/06/2022 at 03:56 • 0 comments![]()
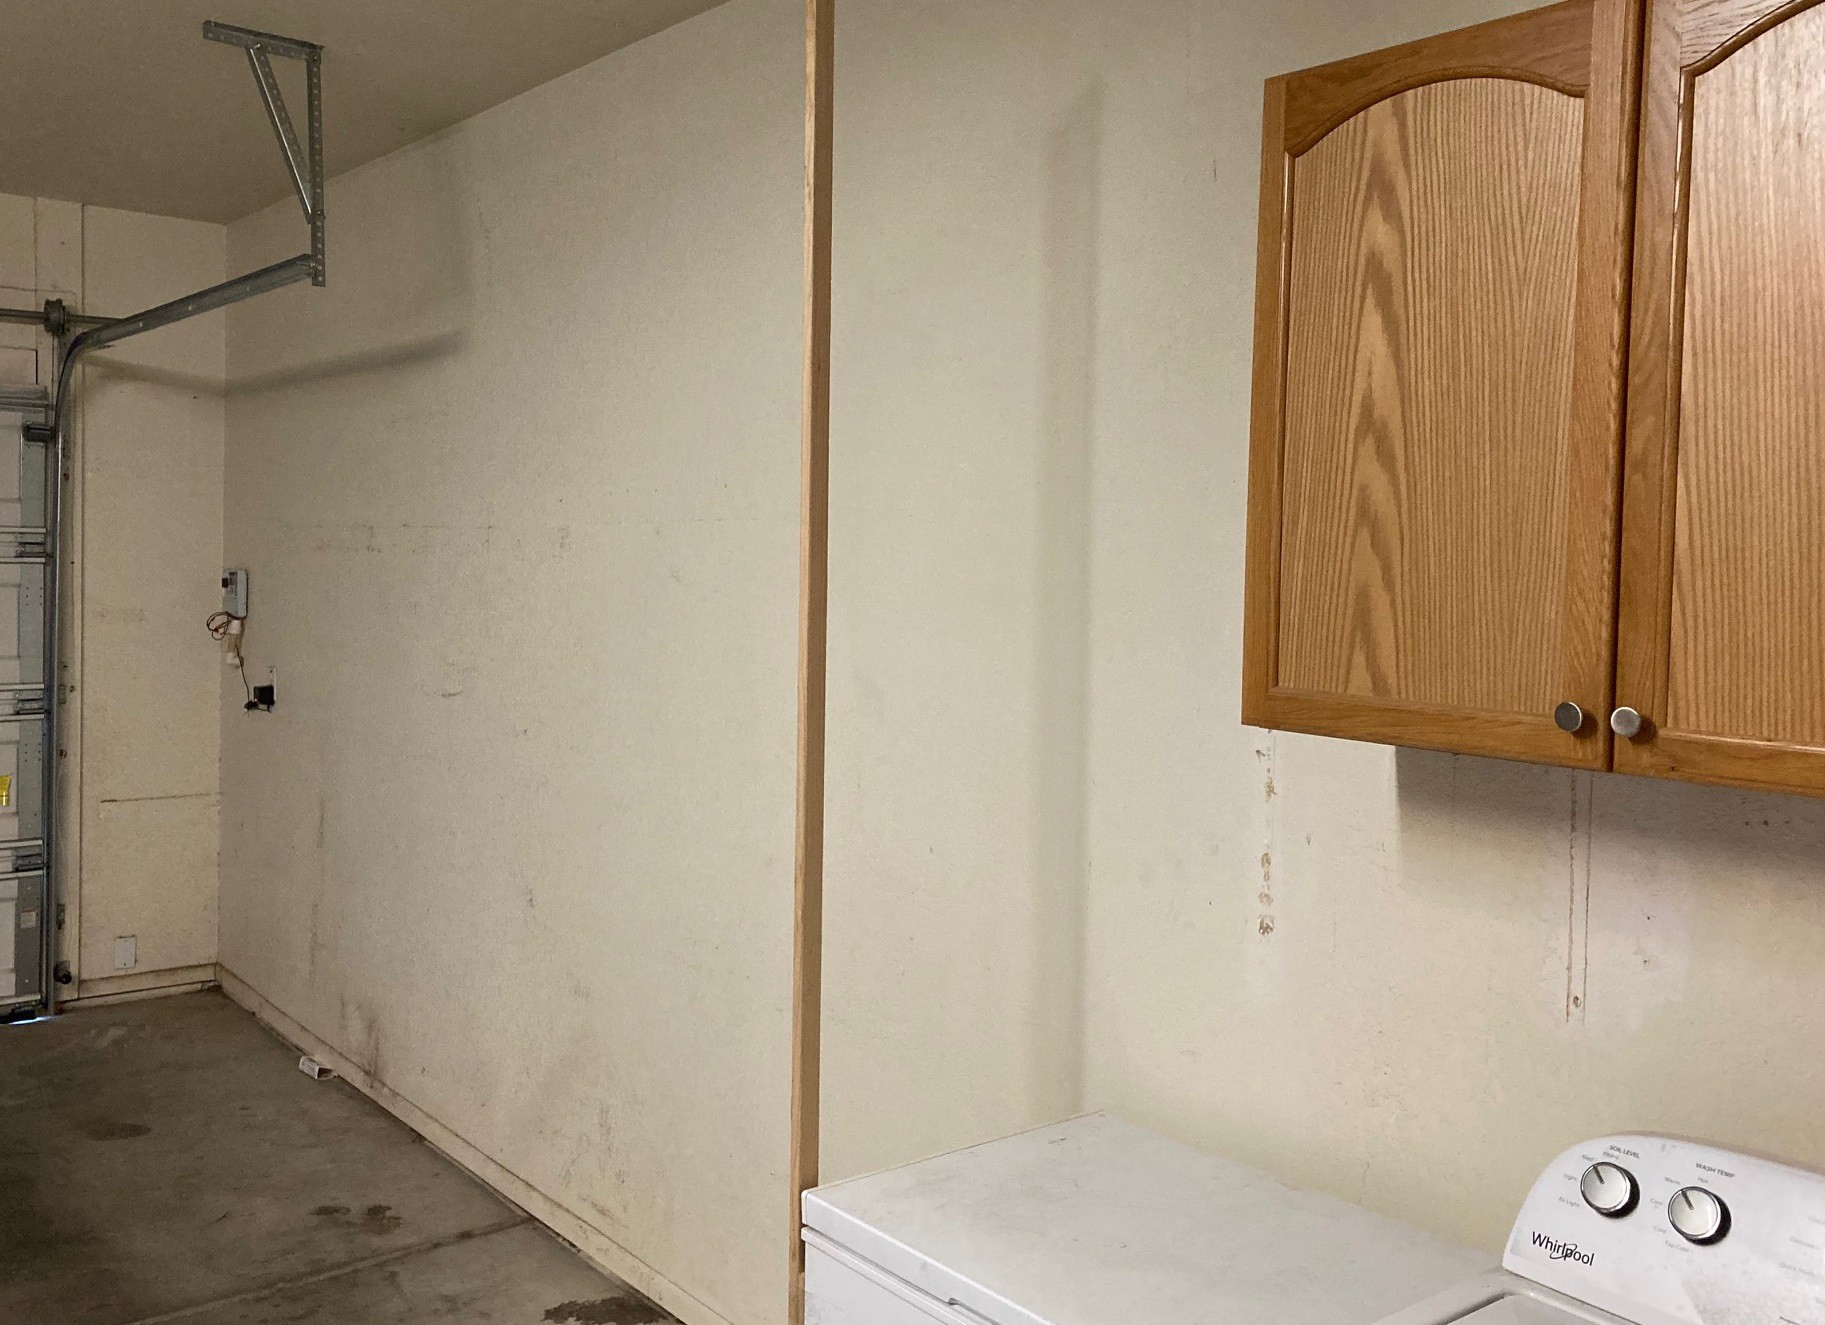
So after moving the cupboard over a bit I uncovered a lot of holes in the wall and other mess from years of previous owners. So I went to work trying to clean it up. I picked up a small can of spackle and patched up all the holes and scars. Then I dug up some old paint I had laying about and painted just the laundry area of the garage. My hope hear was to define this area as separate from the rest so it does not feel quite so grungy when your doing laundry. I think it turned out really nice.
Anyway tomorrow I'm planning on putting up the shelves between the cupboards and putting the laundry back together. That will basically wrap up this side of the garage.
After that I need to hang my two large ladders from the roof and sort through the small pile of stuff that still needs to be hung up somewhere in the garage. And then I can work on the fun part and start building a workshop.
-
Progress
12/05/2022 at 02:53 • 0 commentsSo I had a busy weekend and was able to get the shelves up and loaded with goodies.
![]()
I built a simple frame out of 2x3's and secured it to every stud in the wall. This makes a very solid base, and it cost relatively little money at around $2.50 for each 8' board.
![]()
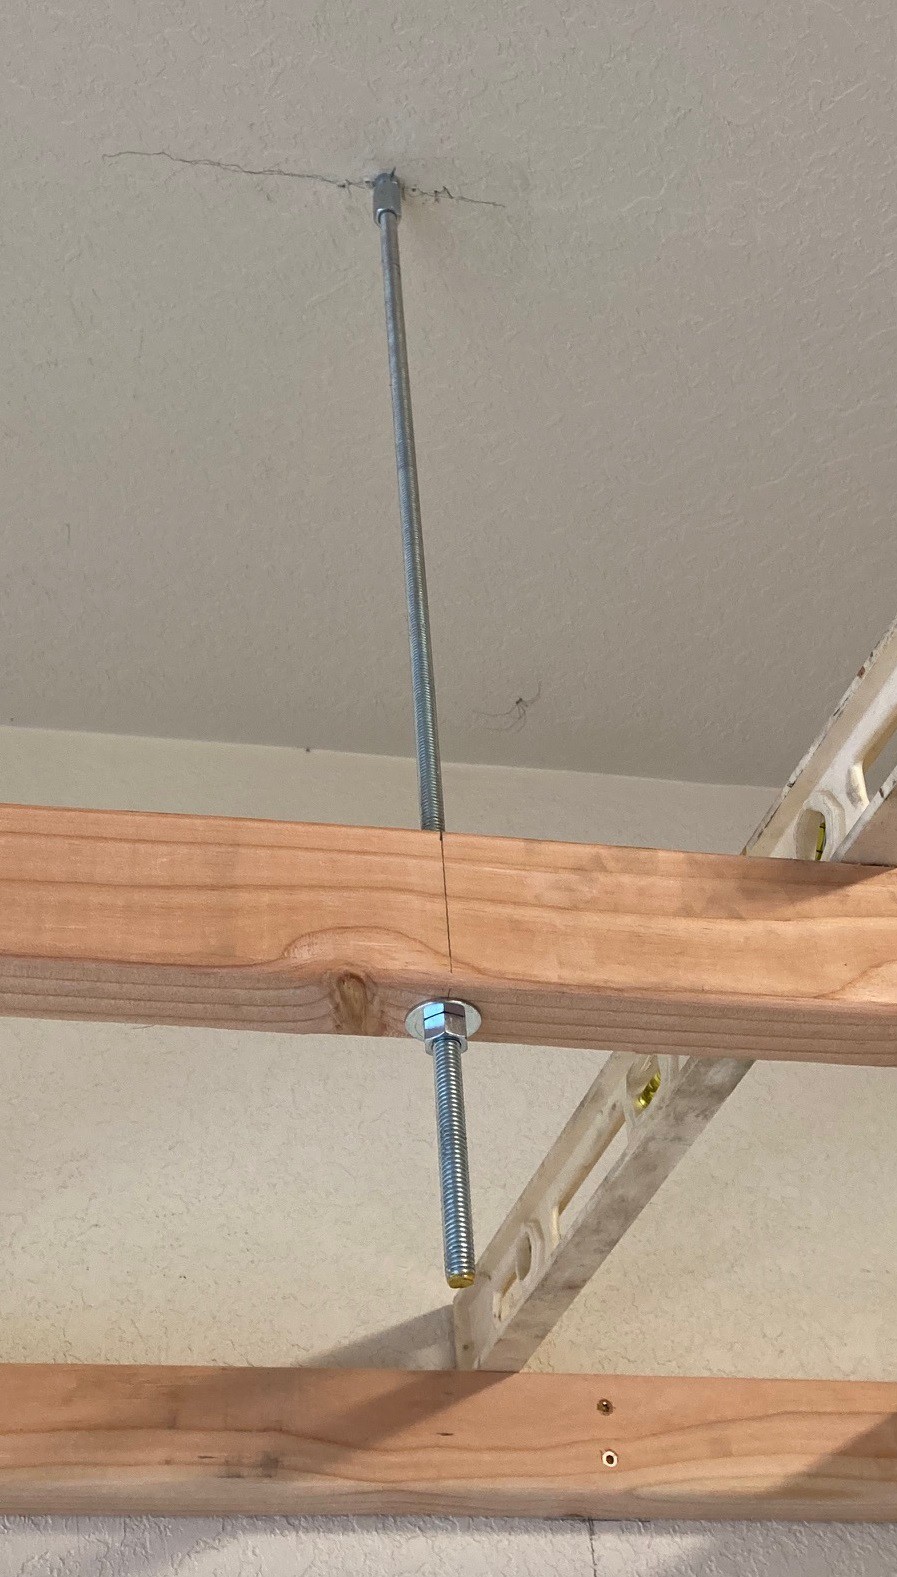
I used a piece of 3/8" allthread and a lag bolt to make a front support that connects straight into the joists in the ceiling. This was fairly simple to put together and also cost very little. I ended up using fewer of these than I had originally planned. Everything is very sturdy and as an added bonus you can level the shelves just by turning a nut. I still need to chop the allthread down a bit.
![]()
Then I used some construction grade 1/2" plywood as a top deck. This was by far the most expensive part of the whole build. Plywood prices are very high, and the quality is the worst I have ever seen. Hopefully things turn around soon.
This shot shows why I used the allthread. I have a continuous shelf that is basically unobstructed by any supports as well as plenty of space under the shelfs free for whatever use I may need. Note that this is early on before I added the rest of the hangers.
![]()
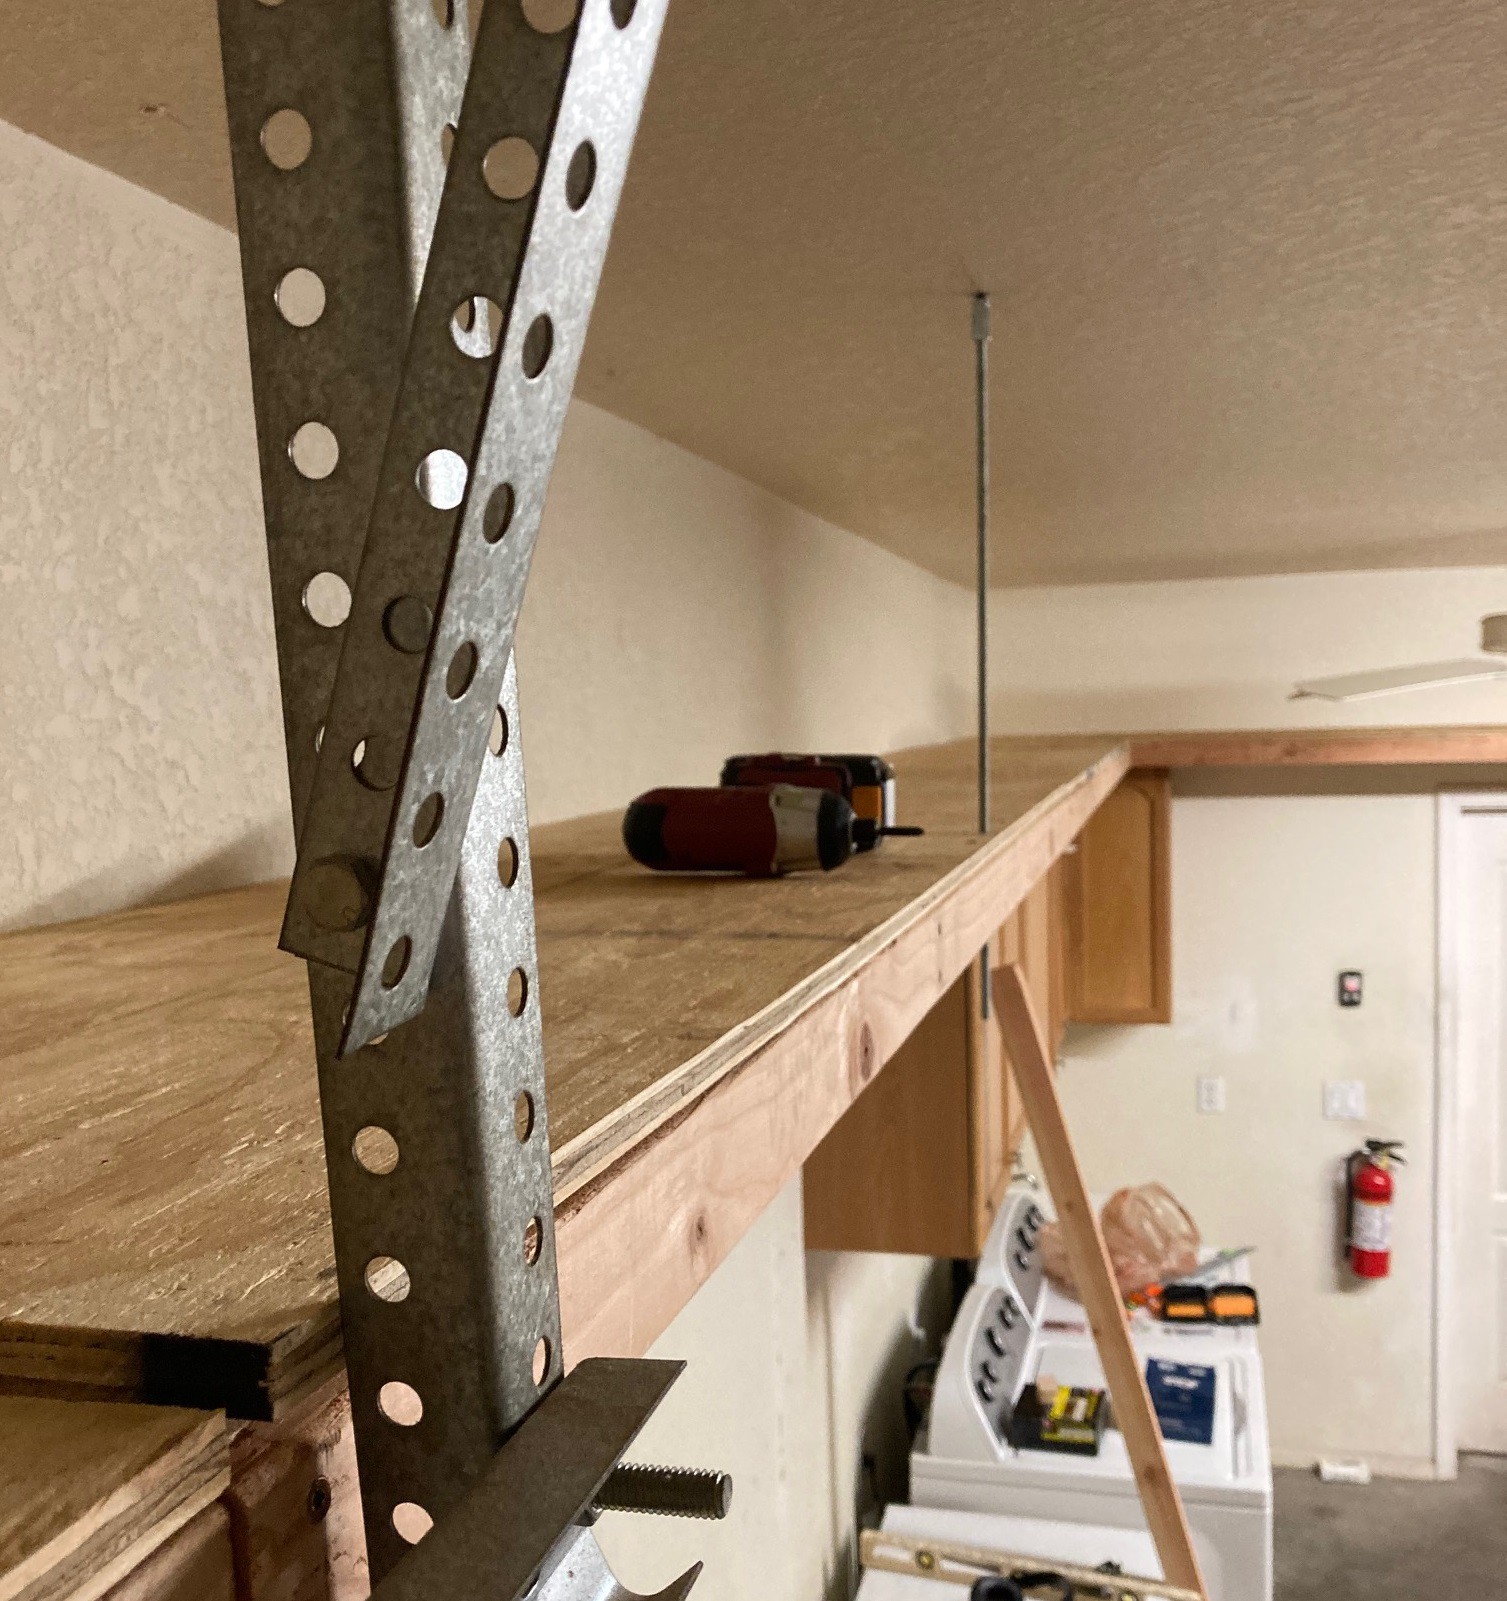
Here it is all finished up. I ended up using 3 allthread hangers and a 2x3 for the hangers.
So I ended up with roughly 30 linear feet of shelf space, or just under 80 cubic feet of storage. I spent around $200 for the materials for these shelfs. This includes a $30 5 pound box of 3" screws that will keep me in screws for years to come. Comparing this to a $100 5' tall utility shelf, the shelf has around 25 cubic feet of storage, and 12 linear feet of shelf space. I would need 3 of these utility shelfs to match my solution, and I would not be using the space as efficiently. I think overall this was not a bad deal. It would be nice if this was closer to $100 than $200, but what can you do.
![]()
I already started on my next project. I'm moving one of my cupboards over so it lines up with the freezer and plan on adding in new shelves between the cupboards to be used to store larger items that don't fit easily in the cupboards. I have the frame moved over and mounted on the wall. I just need to do a bit of cleanup and put the doors back on.
I'm planning on building a small dividing wall on the left side of the cupboards and freezer to both define the edge of the freezer when parking as well as keeping this part of the garage isolated from the rest a tiny bit. I'm also planning on spackling up all the holes in the wall left by the previous owners and putting some paint on the walls as well to better define the space. Anything to make doing laundry feel a bit less dull.
-
Ladder Storage
12/01/2022 at 04:37 • 0 commentsI have two large ladders that take up a lot of room but are almost never used. They are both very handy every once in a while so I don't want to get rid of them, but I don't want to give up the space either. I previously had them hanging from the roof in the space between the garage door and the wall, however that space is going to have shelves in it.
I thought about moving both ladders outside and just leaving them by the side of the house. That space is not used for much and they are aluminum. However there is a bit of plastic on each, and they will certainly deteriorate in the elements. I hate to wear them out faster if I don't have to. I spent some time thinking about ways to cover them outside, but nothing I can come up with is cheep or really space efficient.
I had originally planned on hanging them from the bottom of my new shelfs. That would be slightly easier to deal with when taking them down. However I feel this space is going to be premium. I'm hoping to store wood here, or something else I'm going to access more often.
In casting around I stumbled across this video. They use a piece of allthread with some pvc pipe over it to make a roller to support one end of the ladder. On the other side they use regular old ladder hangers. This allows you to take the ladder down and put it back up from one end with only a step ladder. And it can be placed in the fairly useless space over the garage door.
I'm a bit nervous hanging heavy ladders over the top of my cars, but I think with some care I can make this sturdy enough that it won't come crashing down in the middle of the night. If this works then this will open up quite a bit of space.
The only other huge space hog are the two bikes I have hanging up. One is much too small for my kids so I can just pass it on to some cousins. The other I'm going to hold onto for a bit just in case my daughter wants to use it at college. However I suspect I can get rid of it in a year or so. Neither have been ridden in years.
-
Clean Up
12/01/2022 at 04:20 • 0 comments![]()
![]()
So I spent most of the weekend cleaning up the left side of the garage and stripping everything off of the walls. It looks really good, as long as you don't look at the right side of the garage!
![]()
So the plan is to build the shelves that wrap around the top of the garage first. These will be made out of 2x3's like my previous shelves, with 1/2" construction grade plywood for the top. Nothing fancy, but nice and cheap.
The back side of the shelves will be screwed directly into the studs, but the front of the shelf will need some sort of support.
- I could run polls all the way to the floor, but these would be a big pain to deal with, even if I only put a couple in over the span.
- I could make a simple diy triangular shelf bracket that sits under the shelf out of 2x3's. This should be relatively strong, and there would be nothing above the shelf blocking access to them so I would get the most use out of the space. However these shelves are 21" deep, even with a relatively shallow angle on the support this is going to eat up 18" or so of space below the shelfs.
- I could invert the triangle supports and have them above the shelf, but then I'm relying heavily on a few screws to hold this all up, and I loose storage space on the shelf.
- I could run 2x3's up to the joists in the ceiling. This is marginally stronger than the triangular shelf support, but my garage has a covered ceiling so I cant screw these directly into the joists. I would need to screw a length of wood into the joists then hang the hangers from that, loosing several inches of space above the shelf.
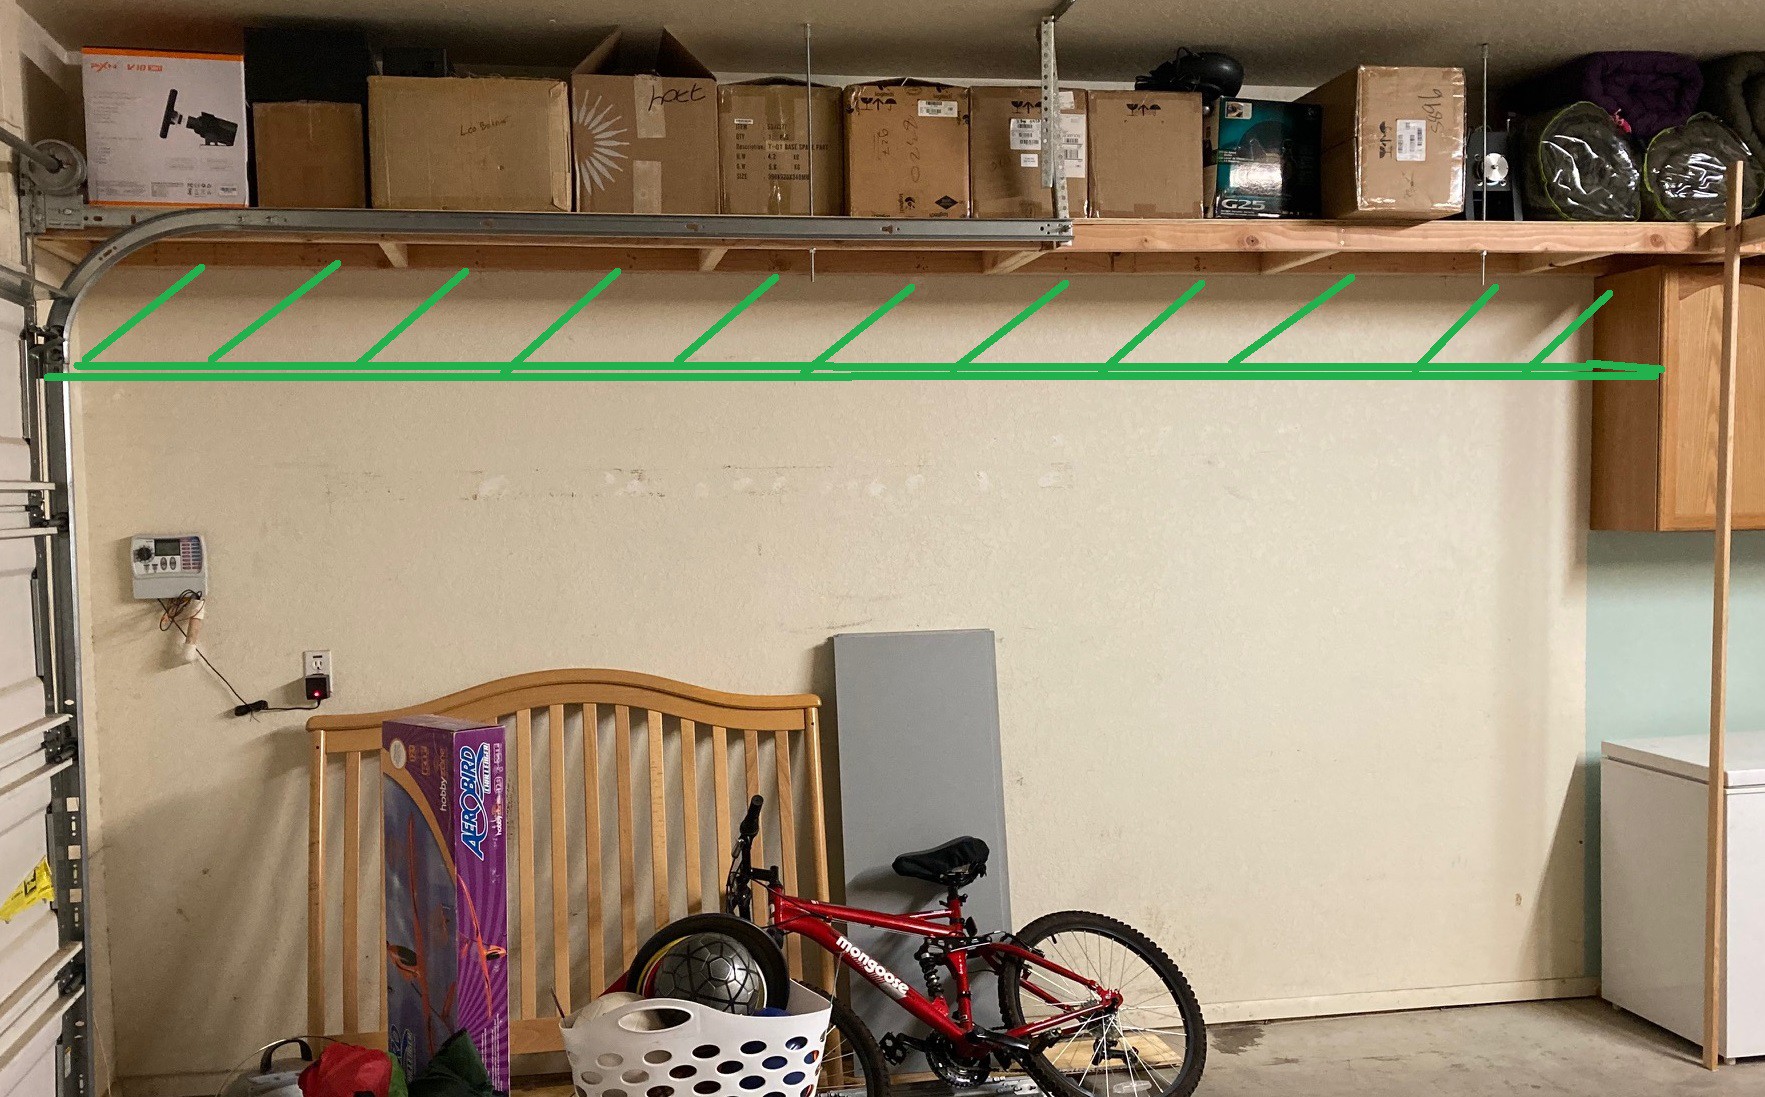
- Finally, the idea I hit on is to drive a 3/8" hanger bolt straight up into the studs, then use a 24" length of allthread to hang the front of the shelf from the ceiling joists. This only takes up a tiny bit of space and should be much stronger than trying to fix a 2x3 stud into the wall or ceiling and it allows the shelf itself to remain continuous.
I did a bit of weighing of my existing boxes and worked out that for each 8' span I'm never going to be putting more than 500 pounds on the shelf. Honestly I think it is closer to 200 pounds max, but I want to overestimate things. Doing a bit of math I think each hanger should be able to handle more than 500 pounds, but in practice they only need to handle 1/4 of that if I use 2 hangers and 1/6 of that if I use 3 hangers for each 8 foot span. That works out to 125 or 83 pounds per hanger, well within spec.
I have picked up the parts for the hangers as well as a pile of 2x3 boards. I also marked out all my studs along the wall.
Finally I picked up this little $30 laser level to help work out where to hang the shelfs on the wall. This worked out so much better than I thought it would. I was able to paint a level line over half my workshop and it made finding the low spots in the ceiling so easy. For $30 this is a must for any sort of work where level is important. This particular unit is a bit cheap, but it is perfectly functional. More than good enough for home use.
This weekend I'm hoping to put the frame of the shelves together and get them hung up. My hope is that this will allow me to put a lot of the loose junk in my garage back up on the wall, as well as allowing me to better visualize the remaining space (and junk) to best work out how to store it all.
![]()
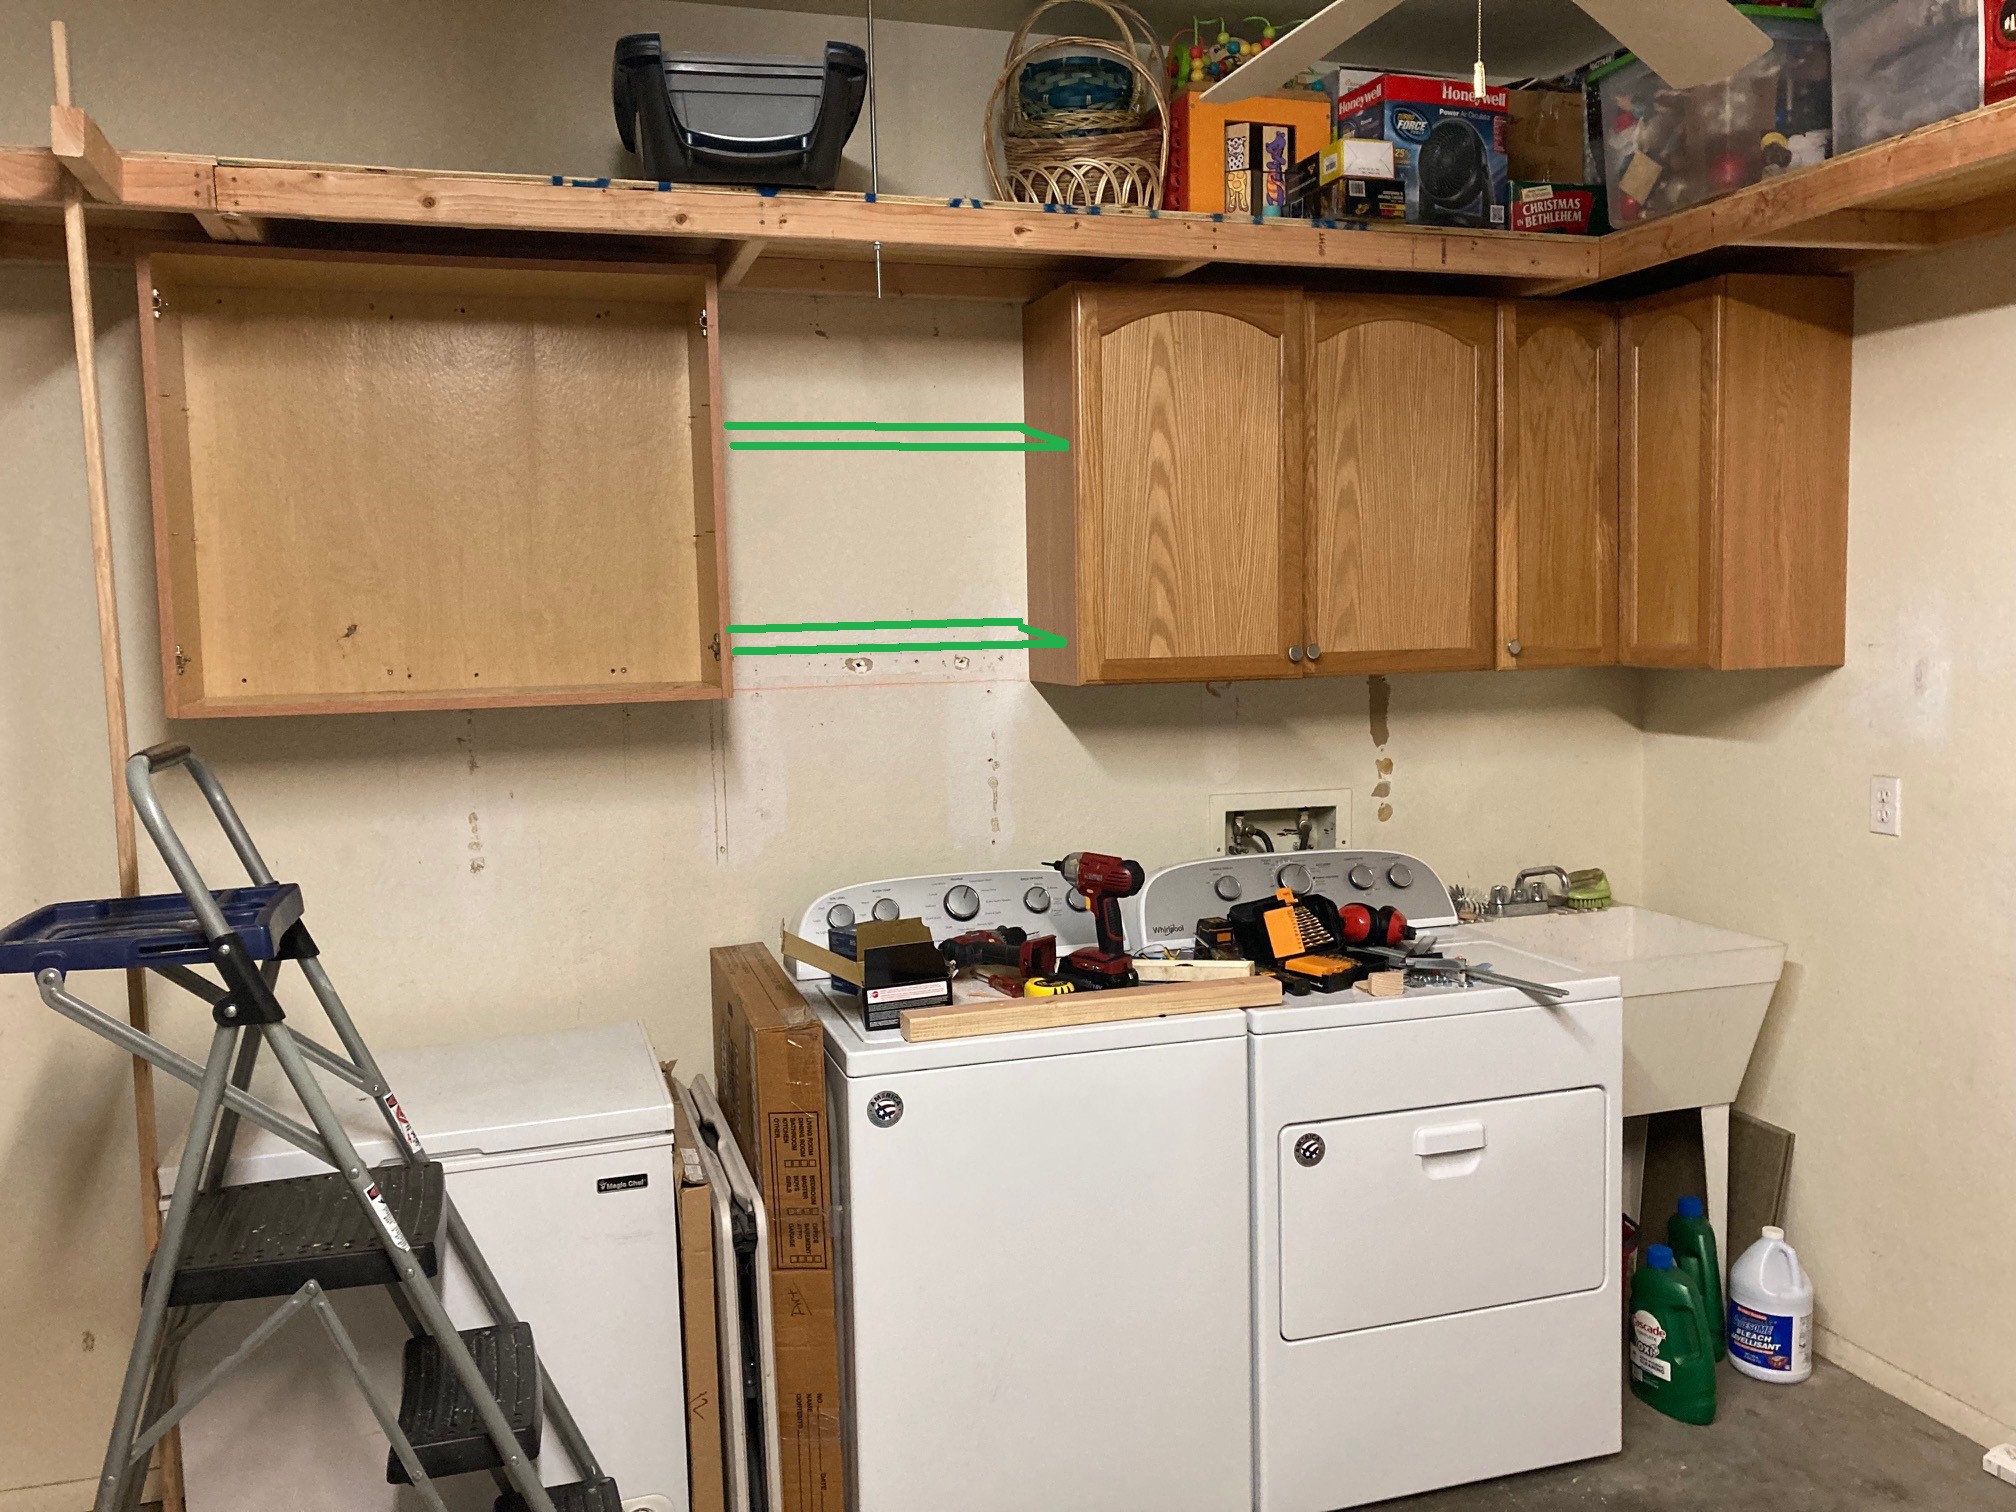
Finally I have this small issue to work through. A big motivator for all this work is to get this small freezer moved away from my workbench so I have a continuous space to put all my tools. It is narrower than the opening for my garage door, so in theory I can park a car next to it without hitting it. However I only have about 6-8" of room between the fender of the car and the freezer. That is a bit tight and it makes me nervous when parking. Most of the issue is that the freezer is lower than the nose of my car so I can't see it while pulling in the car.
As a quick fix I taped this stick to the side of the freezer. It works quite well and really reduces the anxiety of parking. The cabinets I have mounted on the wall over the washer and dryer partially cover the freezer, but not fully. I'm thinking of moving the furthest cabinet over so it extends past the end of the freezer. Then filling in the new space between cabinets with a couple of big shelfs for storing larger laundry chemicals. This would allow me to fix a wall to the side of the cabinet that extends down to the edge of the freezer, forming a site line for parking as well as making a usable wall for storage of some sort, as well as dividing the washing area from whatever else I add here.
-
Getting Closer
11/26/2022 at 05:48 • 0 commentsSo I spent some time measuring out things and coming up with a more solid plan. I have a grey shelf full of junk that I can't really get rid of. Half the shelf contains tools and screws, but half the shelf needs to be stored somewhere. To that end I want to extend my existing shelves so they go all the way around the garage, with about 20" of height and 24" of depth. That is big enough to fit any size box I have. I also want to add in another cabinet by the washing machine for more storage of cleaning supplies. The original cabinets are from IKEA. I could try to match them, or just build a simple box.
![]()
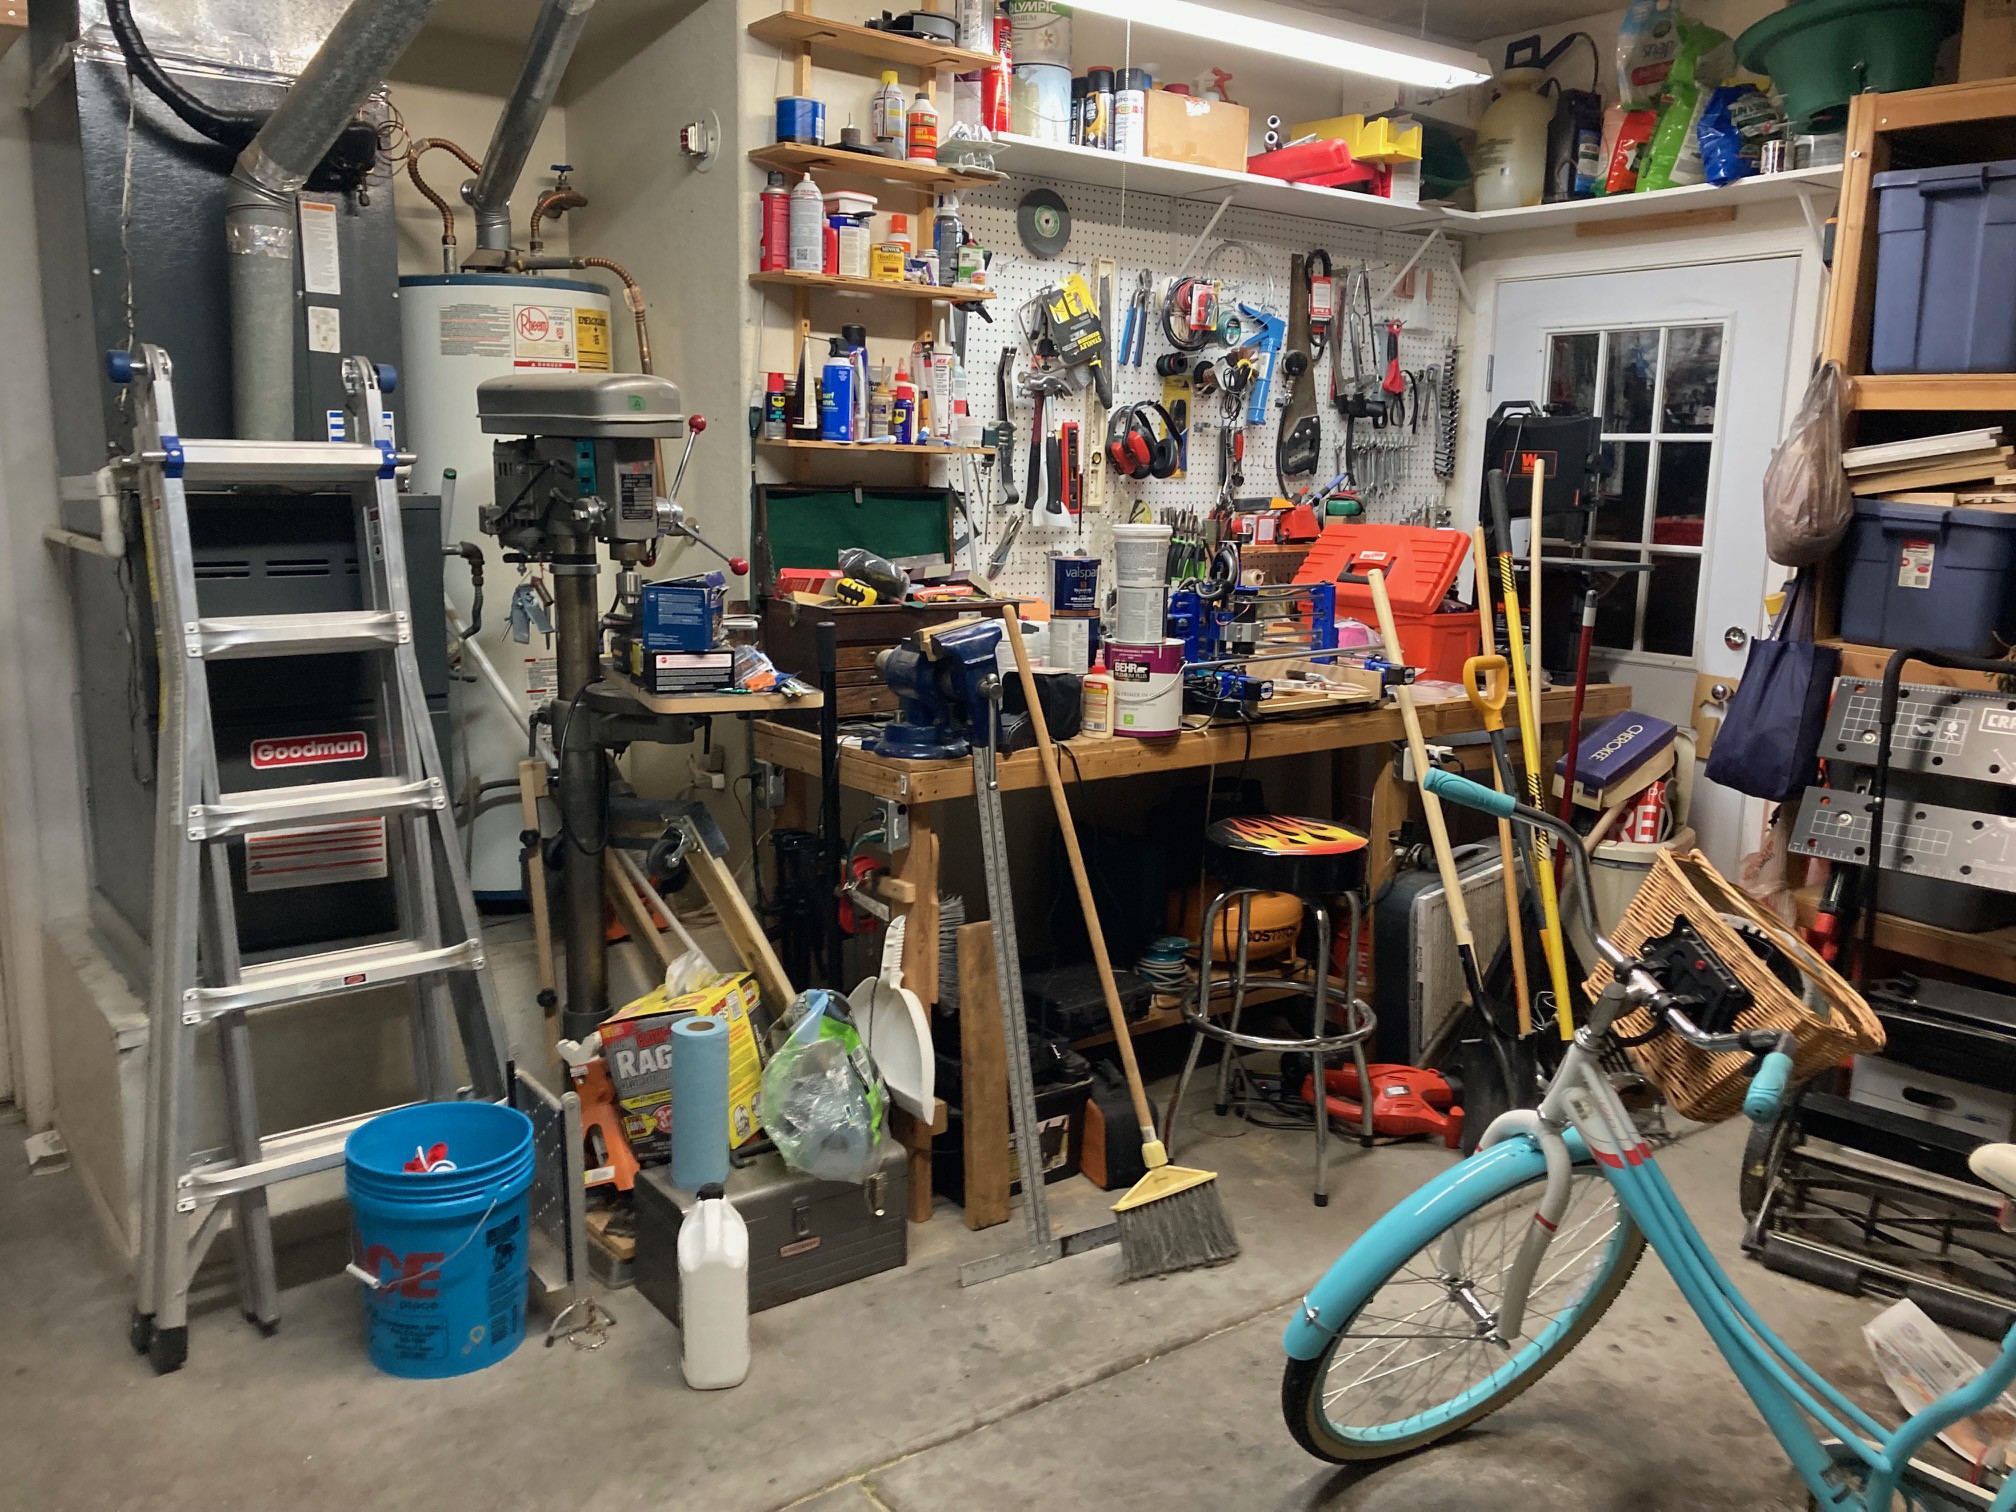
Then for my workshop itself I have this plan. On the left is my drill press. I will probably put that on wheels and build some sort of storage onto the base. I really don't need to use the full depth of the press. Next comes my miter saw on its own rolling cart, then my band saw on a cart, then my cnc on a cart and finally a 2'x5' workbench with drawers and cabinets for storage.
![]()
I'm thinking of building a box for my air compressor into the miter box stand, with storage for the hoses and tools. Maybe a place for the shop vac under the bandsaw with only minimal storage so I can keep the fence and any spare blades close to the saw (maybe a circle cutting jig). And under my cnc I want to store my dust deputy, an air filter for the laser, as well as the large pile of accessories. I also want to make some sort of a hood for the machine, both to contain the dust as well as for when I'm using the laser.
Anyway I need to spend some time with a tape measure and make sure all of this will work. I also need to sort through the tools I have and see if any can be gotten rid of.
-
Baby Steps
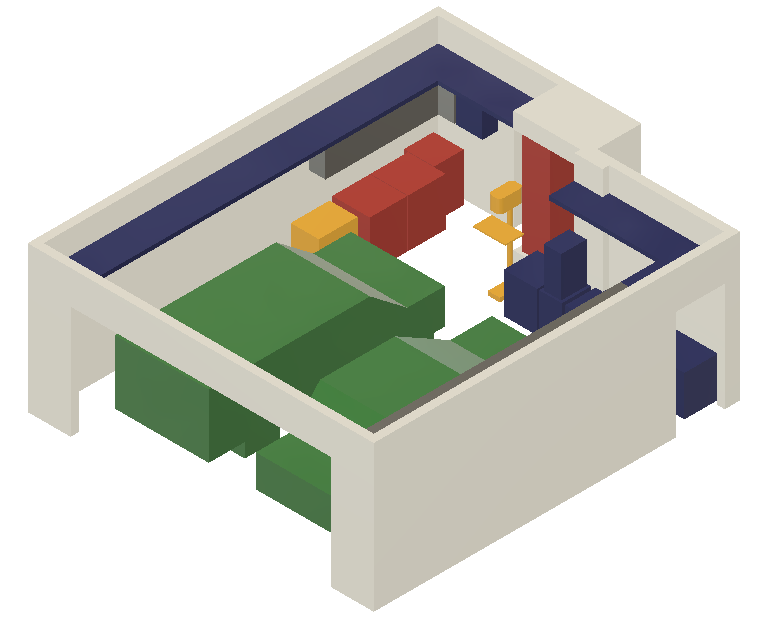
11/26/2022 at 01:09 • 0 commentsSo I'm starting to get an idea of what I want to do. Here is a more filled in picture of my garage. The grey boxes are storage cabinets and shelves that I already have. I could move them, but it would be best if they stayed right where they are.
The yellow box is a movable freezer, I could put it in several places, but for now this seems like the right place. The yellow drill press is also movable, I have not settled on a final place for it.
My first idea is to add in shelves about 20" from the top of the ceiling all around the room. That will let me move some existing boxes up and out of the way so we have more room to work with. In addition I would like to build in a storage solution next to the existing ones by the washer and dryer. There is some space on the wall that is not being put to good use and this would nicely fill it out.
This has one issue, I already have some bikes and a ladder hanging from the roof. I will need to come up with a plan for both of those. The bikes have not been used in years, but the ladder is the only way to get to the roof.
![]()
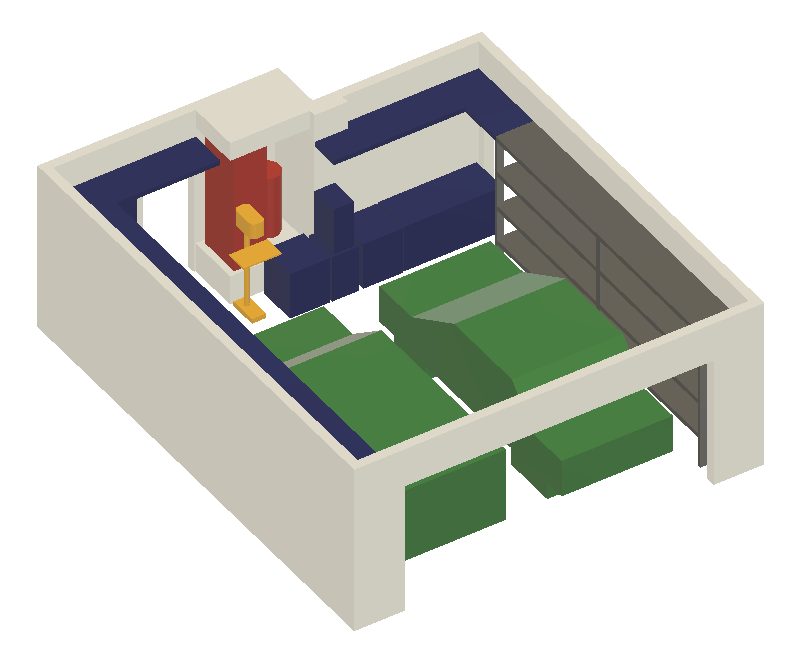
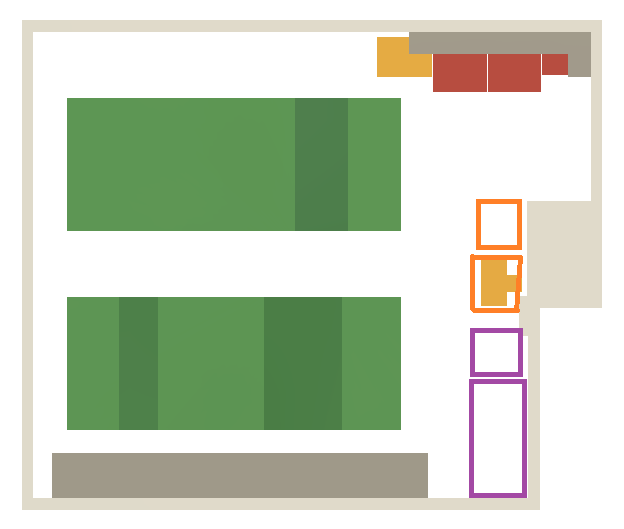
Once we have freed up space then this is my rough idea for the actual shop area. First off you can see that we don't have a lot of room to work with. We need a minimum amount of space next to the drivers side of each car in order to be able to pull them in and out of the garage. We also need to leave some clearance around the ac/heater as well as leave a path into the house and a space to use the machines. That leaves a small space at the lower right side of the image below to store all the tools and tables.
![]()
So the idea here is the larger purple square would be a work bench with built in storage. This would be on wheels and easily rolled out if I need to do serious work. The smaller purple square would be my CNC with all the storage needed for the various parts, as well as some air filtration and so on. The stand alone orange square would have my chop saw on top of it. And the other orange box would be some additional storage that wraps around the base of the drill press.
-
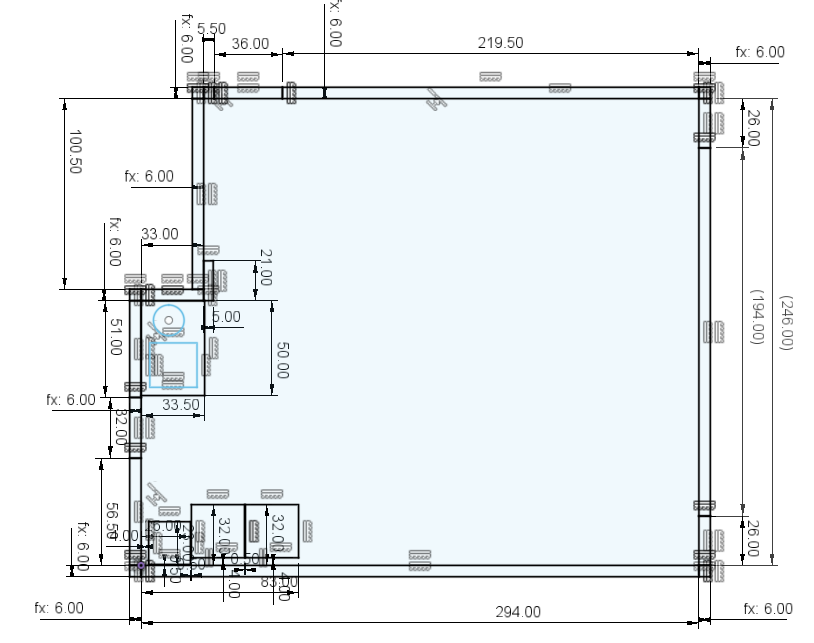
Base Layout
11/25/2022 at 20:53 • 0 commentsSo my cad skills are still not great, but I'm beginning to understand components and have a loose handle on how to deal with joints. I still need to work out how to make drawings and renders, but that will come.
![]()
Here is a rough sketch of the space I have to work with. On the right side is the garage door. We live in the desert and it gets up over 110 F (43 C) in the summer so being able to keep the cars in the garage is a top priority. That eats up 80% of the space in the garage. On the left side is the entrance to the house, along with the AC, hot water heater, a small sink, and the washer/dryer. This is all the fixed furniture that can't be moved around.
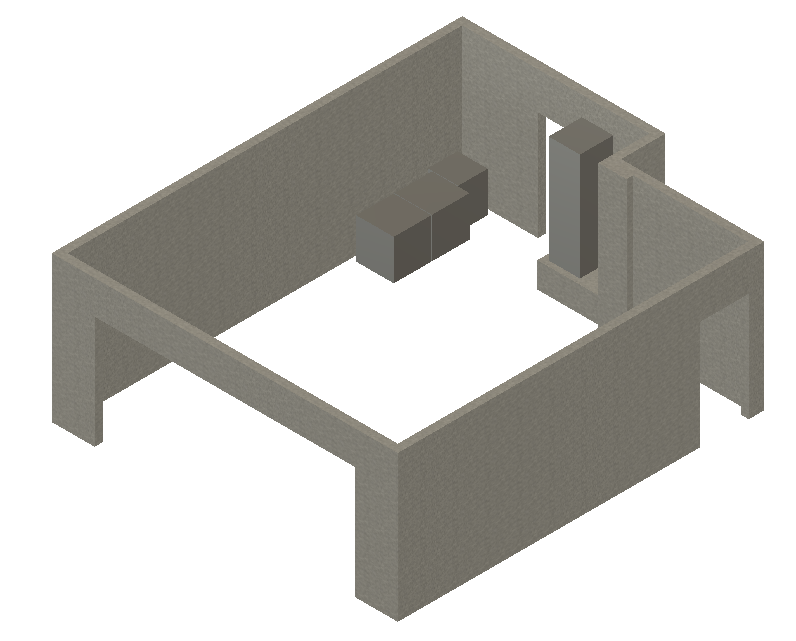
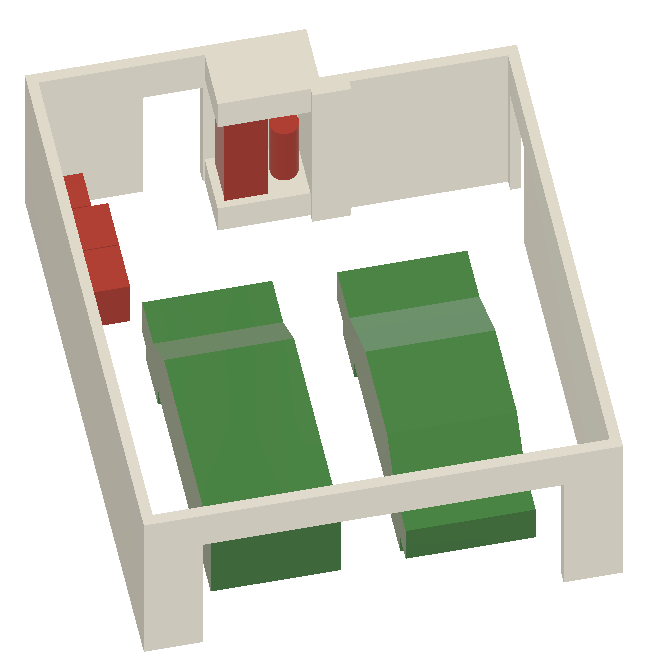
![]()
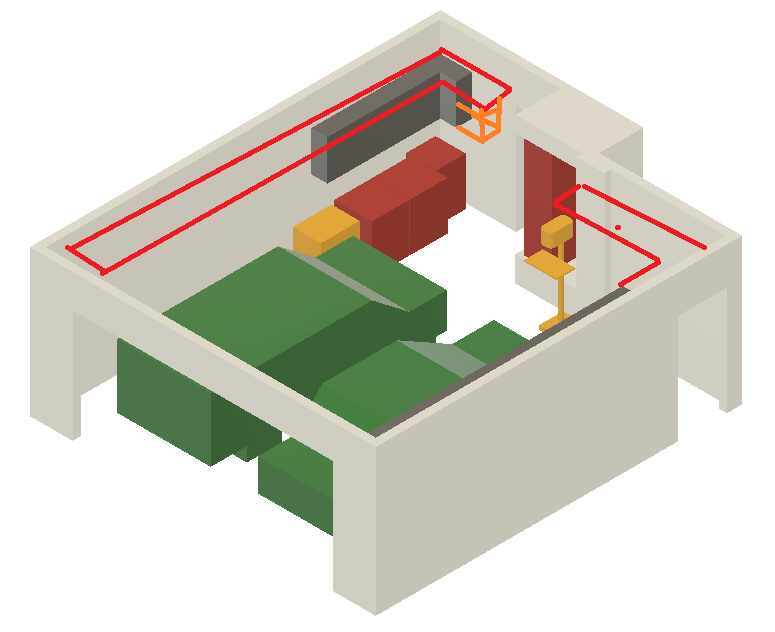
Here is a 3D render of the space. You can see a third door on the right front side of the render. This leads to a very small side yard that leads out to the back yard. I have only used this door a few times in the last 10 years, so I'm ok with blocking it up, as long as it is not permanent and I can gain access to it if needed. The AC condenser is out there and if it ever needed to be serviced then this door would be important.
![]()
In the past I built a workbench that has a fold down feature that allows me to open the door if needed. I think moving forward I will rework this to be a more traditional workbench on casters that can be rolled out if I need access to the door as well as being rolled out to do work on if needed. The wall as a small bump in it as well and my current bench has a cutout so it can fit around that cutout. I think I will split the bench into two parts so there is a longer continuous bench that fits up tight to the door and a smaller box (possibly with a miter saw on it) that can be easily rolled out.
![]()
Here is a more filled out view with the cars added in.