Close
0%
0%

The Learning Terminal

A tablet focused on helping the user learn. Learn how to complete a task, use a new tool or understand advanced concepts.

Similar projects worth following
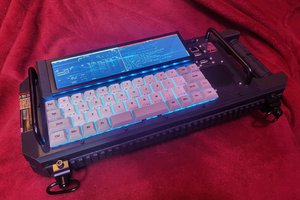
The Learning Terminal (TLT) is a tablet for learning all kinds of skills through an easy to use interface. We have so many tools available to us on modern computers and tablets it can be distracting. The Learning Tablet is designed for a focus use of learning, while alllowing each user the flexibilty to create lessons that match their needs. The software will be based around the FullPageOS and a server that you can run anywhere, even on the tablet. Users can easily expand the functionality of the tablet to suit the course provided through the use of the GPIO header. Lessons about meteorology could include a weather station or GPS for a boating guide and geocaching, modules could be shared or unique to each lesson. Simpler lessons with basic text, image and video content could be defined using just a basic JSON file. One common element is the button control panel below the screen, allowing for lessons to disable the touch interface and rely on dynamic labels along the screen's edge

All code and OpenSCAD files are GPL v3 licensed and available in the linked GitHub repository.

To build the OpenSCAD files with nice rounded corners you will need to download the roundedcube library from https://danielupshaw.com/openscad-rounded-corners/ and place it in `hardware\case\`. Otherwise you can use the `no-dependencies` branch

tlt-case.scad

Case design file

scad - 14.24 kB - 04/25/2023 at 15:31

Download

  • 1 × Raspberry Pi 3 Model B+
  • 1 × Micro SD Card
  • 1 × Freenove 7 Inch Touchscreen Monitor for Raspberry Pi
  • 1 × Camera Cheese Plate
  • 1 × V-lock plate for V-mount battery

View all 11 components

  • Case Design

    William Buttenham04/25/2023 at 02:47 0 comments

    I usually prefer to design my models for printing using OpenSCAD and the TLT was no exception! I did end up regretting this slightly as I had a need for faster iteration than usual.

    I wanted to start this project with the case so I had something tangible to work on and motivate me. The basic design I chose is based around the mounting posts on the back of the touchscreen module and two plates that lock into the top of the simple box case. Even though the name of the project includes `tablet` I was not concerned with making the case thin or light. I wanted to make it sturdy and easy to mount, for more of a hands-off use case, so I included an aluminum camera cheese plate with plenty of options for threaded mounts. Additionally, the battery is external and mounted using a camera v-mount. This allows for easy battery swaps and the ability to use a larger battery or no battery if needed. I imagine that a Power over Ethernet solution would be ideal for a permanent installation in a manufacturing environment but I do not have the proper equipment to test/design the case around that.

    The dimensions of the case are based around the measurements of the screen module and Raspberry Pi assembly. The screen assembly is mounted to a mid-plate that holds it close to the face of the case body and aligns the screen's panel with the centre of the tablet. The mid-plate is mounted to the case body using 2x M3 screws with heat-set inserts and two tabs that interlock with pockets on the top side of the case body. The final case part is a lid that uses a similar interlocking tab design to lock into the top of the case body but with one tab that spans most of the tablet's width. The lid is secured using another 2x M3 screws with heat-set inserts and supported by some rails along the sides of the case body. The lid is designed to be easily removable so that the screen assembly can be removed from the case body for maintenance or repair. Originally I wanted to include easy access to the GPIO of the Pi but I was running into difficulties with iterating the design quickly and decided to remove it from the scope of the project for now. I was thinking a lid shape that allows for the GPIO to poke through or use an extender to allow for more flexible positioning. The cheese plate and battery is on the lid, simply bolted on using some through holes.

    The button area of the tablet is centred to the screen and with the 7 inch screen chosen, there was exactly enough room for eight switches using standard MX key switch spacing. This works out nicely for the software key map display that will appear along the bottom of the screen. As I worked on the case and printed some prototypes, I saw the need for more of a modular approach to the button area and in the future I plan on separating the button area into a modular part that can be mounted to the case body. This would allow for different button layouts and sizes to be used with the same case body with the possibility of using other inputs like rotary encoders.

    These parts were designed for 3D printing so I have tried to reduce the need for supports. I didn't mind the plain aesthetic of the case but I did want to add some visual interest to the design and make it more comfortable to hold so I decided to add some fillets to the edges and corners of the case. I am currently on my third printed revision of the case and I am happy with the results so far. I have included the OpenSCAD files for the case in the repository and I will continue to update them as I make changes.

  • Initial Thoughts

    William Buttenham03/30/2023 at 03:36 0 comments

    I have been thinking about the terminal for some time now, so I am finally going to make it and cross the project off my to-do list.

    One half of the project will be a hardware tablet with a touchscreen and buttons for ease of use while focusing on learning materials elsewhere. The other half of the project will be software for running tutorials and training courses on the tablet, allowing non developers to create content for the platform.

    The project will be based around a Raspberry Pi 3B and the screen I have collected but the software will aim to have simple system requirements and flexible display output and configuration. The buttons for the tablet will be in the form of a custom modular mechanical keyboard, allowing for different sized tablets to be created in the future. Creating courses should be easy but allow for expansion in the future as I explore the terminal concept.

    The case for the tablet will feature a large carrying handle, various mounting points, optional battery support and access to most of the RPi IO. I want to include HAT support through a clever case design or a GPIO extender allowing the tablet to be customized with existing hardware. Currently I am planning on 3D printing the case but I would like to incorporate some wood or metal elements.

View all 2 project logs

  • 1
    Install the server
    1. Clone the git repository
    2. Run the server using docker
    3. Test the server using a desktop and the number keys on your keyboard
  • 2
    Flash the Raspberry Pi

    1. Image the SD card for the Raspberry Pi using the [Raspberry Pi Imager](https://www.raspberrypi.org/software/).
        a. Select `Choose OS`
        b. Select `Other specific-purpose OS`
        c. Select `FullPageOS`
    2. On the newly flashed drive, edit `fullpageos-wpa-supplicant.txt` to include your WiFi credentials.
    2. Insert the SD card into the Raspberry Pi and power it on.
    3. Connect to the Raspberry Pi using SSH.
        a. The default hostname is `fullpageos`
        b. The default username is `pi`
        c. The default password is `raspberry`
    4. Edit the default webpage in `/boot/fullpageos.txt` to point at your TLT server.

  • 3
    Assemble the screen and Raspberry Pi
    1. Install the included standoffs on the screen
    2. Connect the ribbon cable to the screen
    3. Place the Raspberry Pi on the back of the screen being sure to align the pogo pins with the GPIO
    4. Mount the Pi using the included hardware
    5. Connect the DSI cable between the Pi and the screen

View all 8 instructions

Enjoy this project?

Share

Discussions

Similar Projects

Does this project spark your interest?

Become a member to follow this project and never miss any updates