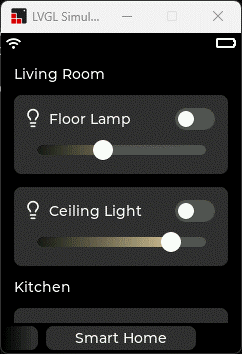
One of the reasons for starting this project was that I wanted to try out LVGL. LVGL is an open-source embedded graphics library that is well optimized to run on microcontrollers like the ESP32. You can create user interfaces using a set of building blocks like buttons and sliders and add styles and animations to them. With little effort these UIs end up looking beautiful and professional. There is even a drag and drop editor, Squareline Studio, that generates the necessary code for you. To be more flexible, I decided to start with the LVGL simulator for Visual Studio.
For my universal remote interface, I am using multiple pages, that can be scrolled through by swiping horizontally. Each device has its own page that contains the corresponding buttons. There is a larger settings page, that can also be scrolled vertically. These pages are set up as a “tabview” object so they behave like a smartphone home screen. Everything about the scrolling and animations is then handled by LVGL. I also added a little page index to the bottom that contains the pages title. These text boxes fade out to the sides using transparent bitmaps, as a reference to the iOS camera app.

After building and testing the interface on my PC, I copied the code over to Platformio for the ESP32. The touch buttons can then be mapped to sending infrared signals using event callback functions. Display output and touchscreen input is connected to LVGL using the TFT_eSPI and Adafruit FT6206 libraries.
The interface looks nice and sharp even on the 320 by 240 pixel display. UI elements like sliders were working fine immediately at around 30 fps. Only when scrolling the pages, I experienced drops in framerate (9-10 fps) and visible lag at first. Luckily LVGL and TFT_eSPI support DMA and double buffering, meaning that the ESP32 can draw one frame, while the other is sent to the display simultaneously. This takes up more RAM, but it increased the frame rate during scrolling to nearly 20 fps. SPI frequency has a huge impact as well. On paper, the ILI9341 display driver only support SPI frequencies of around 6MHz, but it usually works even at 80MHz. I have had displays that would only work at up to 40Mhz, which leads to a slightly lower performance.

For many of the additional hardware features, I am using Arduino libraries. “IRremoteESP8266” deals with the infrared sending and receiving. It supports basically any manufacturer’s standard. The LIS3DH accelerometer detects when the device is in motion. I am using Sparkfun’s library to read the acceleration values and to configure the interrupt for waking up the ESP32. Another wakeup source is the tactile button grid. This is handled by the Keypad library which I modified to invert its logic. This way I can use the ESP32’s EXT1 wakeup to detect if the accelerometer pin or any button pin goes high. Booting the ESP32 takes around half a second from the interrupt to the point where the display is turned on.
When the motion detection is used, the display usually turns on before I have a finger on a button.
To make use of the 2.4GHz antenna, I created another UI page for smart devices. This way, the remote can control lightbulbs by communicating with my MQTT server over Wi-Fi.

Right now, the IR codes and button mapping is hard coded for my personal use. A next step would be making the interface configurable. This could be done on the remote itself by expanding the existing touchscreen UI or on a computer using for example a HTML interface that is hosted by the ESP32.
 Max.K
Max.K
Discussions
Become a Hackaday.io Member
Create an account to leave a comment. Already have an account? Log In.